
Our new Digital Growth Platform makes it easy for growth teams and marketers to send notification-style messages to any channel — including IoT devices. In this post, Urban Airship’s senior mobile client engineer, David Crow, demonstrates how to build an Android Things device and send it a push notification using Urban Airship Engage. Read on and enjoy!
IoT devices are expected to exceed mobile phones as the largest category of connected devices as soon as 2018 But the sheer number of these devices is only part of what makes the internet of things so compelling.
IoT devices are unparalleled in their flexibility and potential to engage users with valuable personalized experiences. Android’s new operating system for IoT devices, Android Things (formerly called Brillo), makes supporting IoT devices simple by providing a high level of cross compatibility with existing Android projects.
This enables organizations to leverage Android Things to develop and support professional, mass market IoT devices using the same Android development tools their mobile developers already use.
As Android Things develops and grows, more and more brands will be able to use Android Things-powered IoT devices to create smart customer connections through notification-style messages.
Android Things also enables developers to easily integrate the Urban Airship SDK into their projects and enable push messages to their IoT devices.
In this tutorial, we outline how to build a simple IoT device running Android Things and integrate the Urban Airship SDK so it can receive and display push messages. We encourage your dev teams to try this out at their next hack week – and growth teams might set aside some time to think about how this could work for your brand.
Building An IoT Device
For this tutorial, we’ll be using a Raspberry Pi to display push messages on a 16×2 LCD. We’ll put the hardware components together first and then move onto driving the LCD and displaying pushes.
The IoT device will consist of the following components:
HD44780 16×2 LCD
10kΩ potentiometer
Breadboard
Pre-cut jumper wires
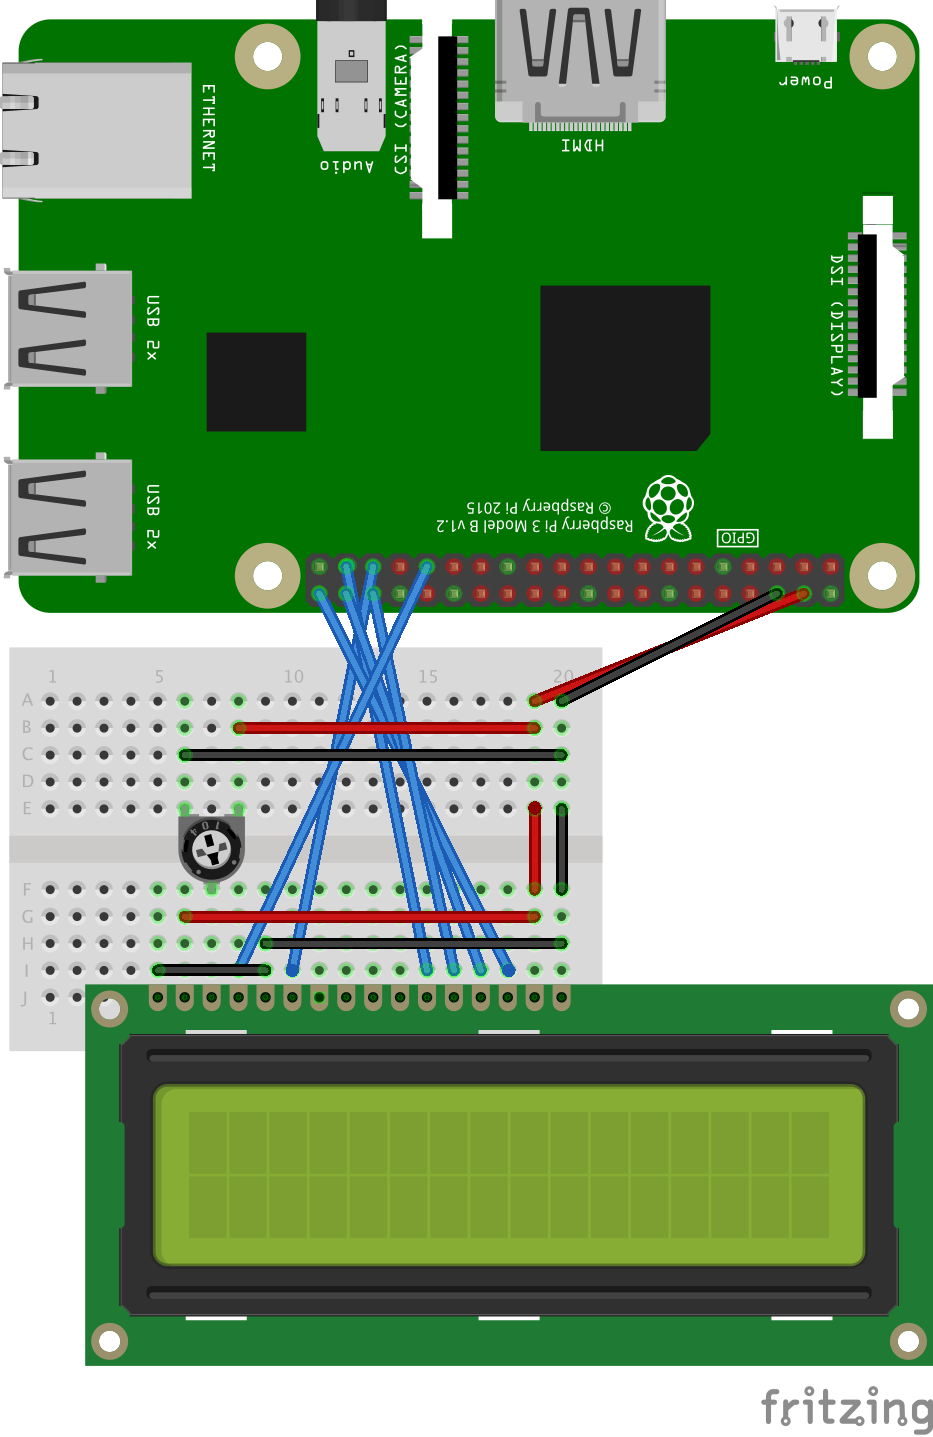
Connecting the LCD to the Raspberry Pi
We’ll begin by connecting the LCD to the Raspberry Pi.
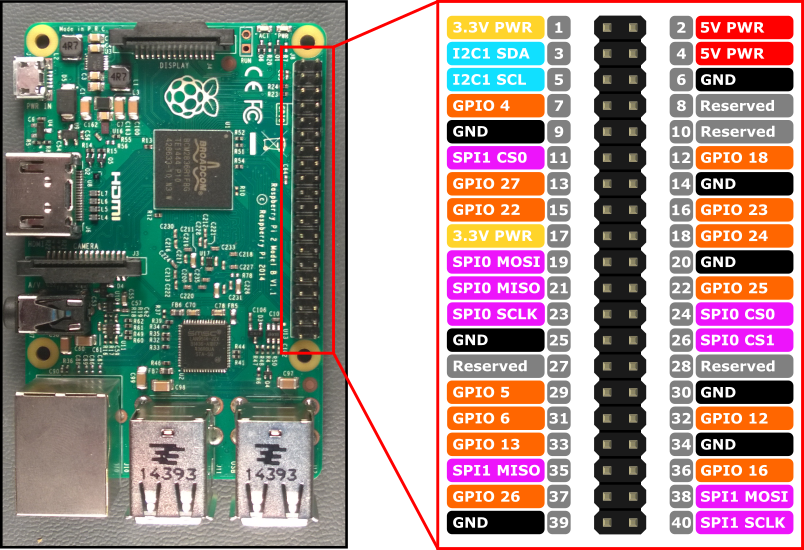
To start sending data from the Raspberry Pi to the LCD we need to connect the LCD’s register select, and enable at least four data bus pins to the Raspberry Pi’s GPIO pins.
To power the LCD we can use the Raspberry Pi’s 5v output.
Lastly, we need to provide a variable voltage level to the LCD’s contrast control pin. This can be accomplished by using a 10K potentiometer as a voltage divider connected across the Raspberry Pi’s 5V output and ground.
When building the circuit we’ll want to follow the schematic and ensure the following connections are in place:
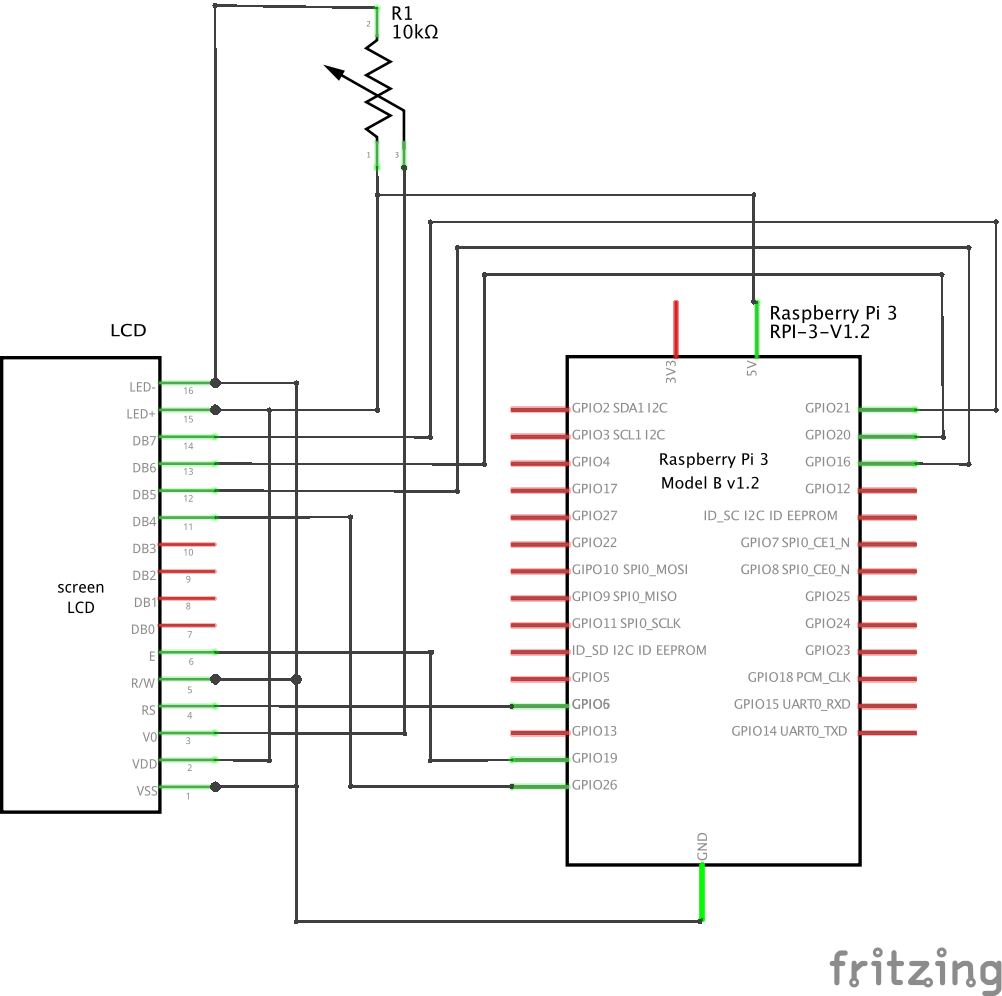
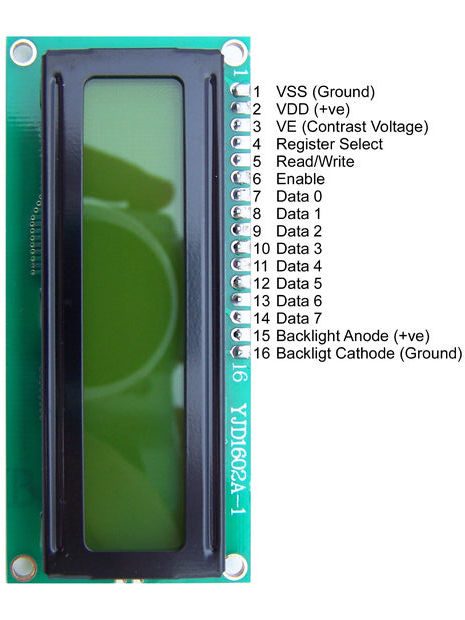
LCD pin 1 (VSS) – Raspberry Pi Gnd
LCD Pin 2 (VDD) – Raspberry Pi 5V
LCD Pin 3 (V0) – Middle potentiometer pin
LCD Pin 4 (RS) – Raspberry Pi GPIO6
LCD Pin 5 (RW) – Gnd
LCD Pin 6 (E) – Raspberry Pi GPIO19
LCD Pin 11 (DB4) – Raspberry Pi GPIO26
LCD Pin 12 (DB5) – Raspberry Pi GPIO16
LCD Pin 13 (DB6) – Raspberry Pi GPIO20
LCD Pin 14 (DB7) – Raspberry Pi GPIO21
LCD Pin 15 (LED+) – Raspberry Pi 5V pin
LCD Pin 16 (LED-) – Gnd.
Left potentiometer pin – Raspberry Pi 5V
Right potentiometer pin – Gnd
Raspberry Pi pinout:
LCD Pinout:
When you finish connecting your components, your circuit should look something like this:
Flashing and Connecting To Your Raspberry Pi
Now that your Raspberry Pi is connected to your LCD, we’ll want to flash the Raspberry Pi and connect to it using the adb tool. This is a necessary step because it allows us to build to the Raspberry Pi from Android Studio. This process is outlined in the Android Things hardware guide.
Making your Project Compatible With Android Things
Once you’ve flashed your Raspberry Pi and are able to connect to it with adb, the next step is to make your Android project compatible with Android Things by adding the requisite dependencies and intent filters.
To do this you’ll need to open up a project in Android Studio and add the Android Things developer preview dependency to your build.gradle file:
You’ll also want to include both CATEGORY_DEFAULT and IOT_LAUNCHER intents inside the MainActivity block of your AndroidManifest:
Driving the LCD Screen
After adding the Android Developer preview dependency and the IOT_LAUNCHER and CATEGORY_DEFAULT intents – you’re ready to start adding functionality to drive the LCD.
Driving the LCD screen requires us to write a driver class to interface output from the Raspberry Pi’s GPIO pins to the LCD. It’s a good practice to check the Android Things user-space drivers repo to see if drivers are available for the peripheral you’d like to use.
In this case, there aren’t any drivers available for this particular LCD component, so we’ve provided a simple LCD driver class that will need to be added to your project. The driver defines GPIO objects that are managed by a PeripheralManagerService to send instructions to the LCD.
A subset of these instructions are outlined nicely in the HD44780 instruction set and are defined as constants at the top of the LCD class. With these instructions we initialize and manage the LCD’s state and are able to send binary representations of characters over the data bus to be written to the LCD.
To start writing to the LCD, initialize a new LCD class instance in your MainActivity:
After initializing the shared LCD instance you can write strings to the LCD using the writeString function. This function requires that you specify a string and the row on which you’d like the string to appear. Strings longer than 16 characters (including spaces) will be truncated to fit the row. You can add the following write commands after the initialization block to ensure the LCD is working properly when your app starts:
Integrating Urban Airship
Now that we’ve finished integrating the LCD we’re ready to integrate Urban Airship and start sending and receiving push messages.
Integrating Urban Airship into your Android Things project requires a few easy steps. Once you’ve completed the integration process you’ll have an application on the Urban Airship dashboard. This application will allow you to send messages from a simple composer interface directly to your Android Things device. The integration steps are outlined in the Getting Started Guide.
Preparing Your Application for Push Alerts
Once the Urban Airship SDK is integrated, you’ll want to implement a class that extends the AirshipReceiver. The AirshipReceiver class is the base intent receiver that processes registration and push events from Urban Airship.
We are most interested in the onPushReceived event that gets called when a push notification is received by the application. In this callback, we’ll want to write the passed in alert parameter to the LCD shared instance using its writeString function:
For the AirshipReceiver to receive intents – we’ll also want to add the following intent receiver to the AndroidManifest:
Once the AirshipReceiver is in place, we’ll be ready to send a push to the device using the push composer. Since we only have 16 characters to use, we’ll want to keep the message short and sweet:

You should receive the push to your device almost immediately. If you don’t receive your push notification – be sure to check out this troubleshooting guide.

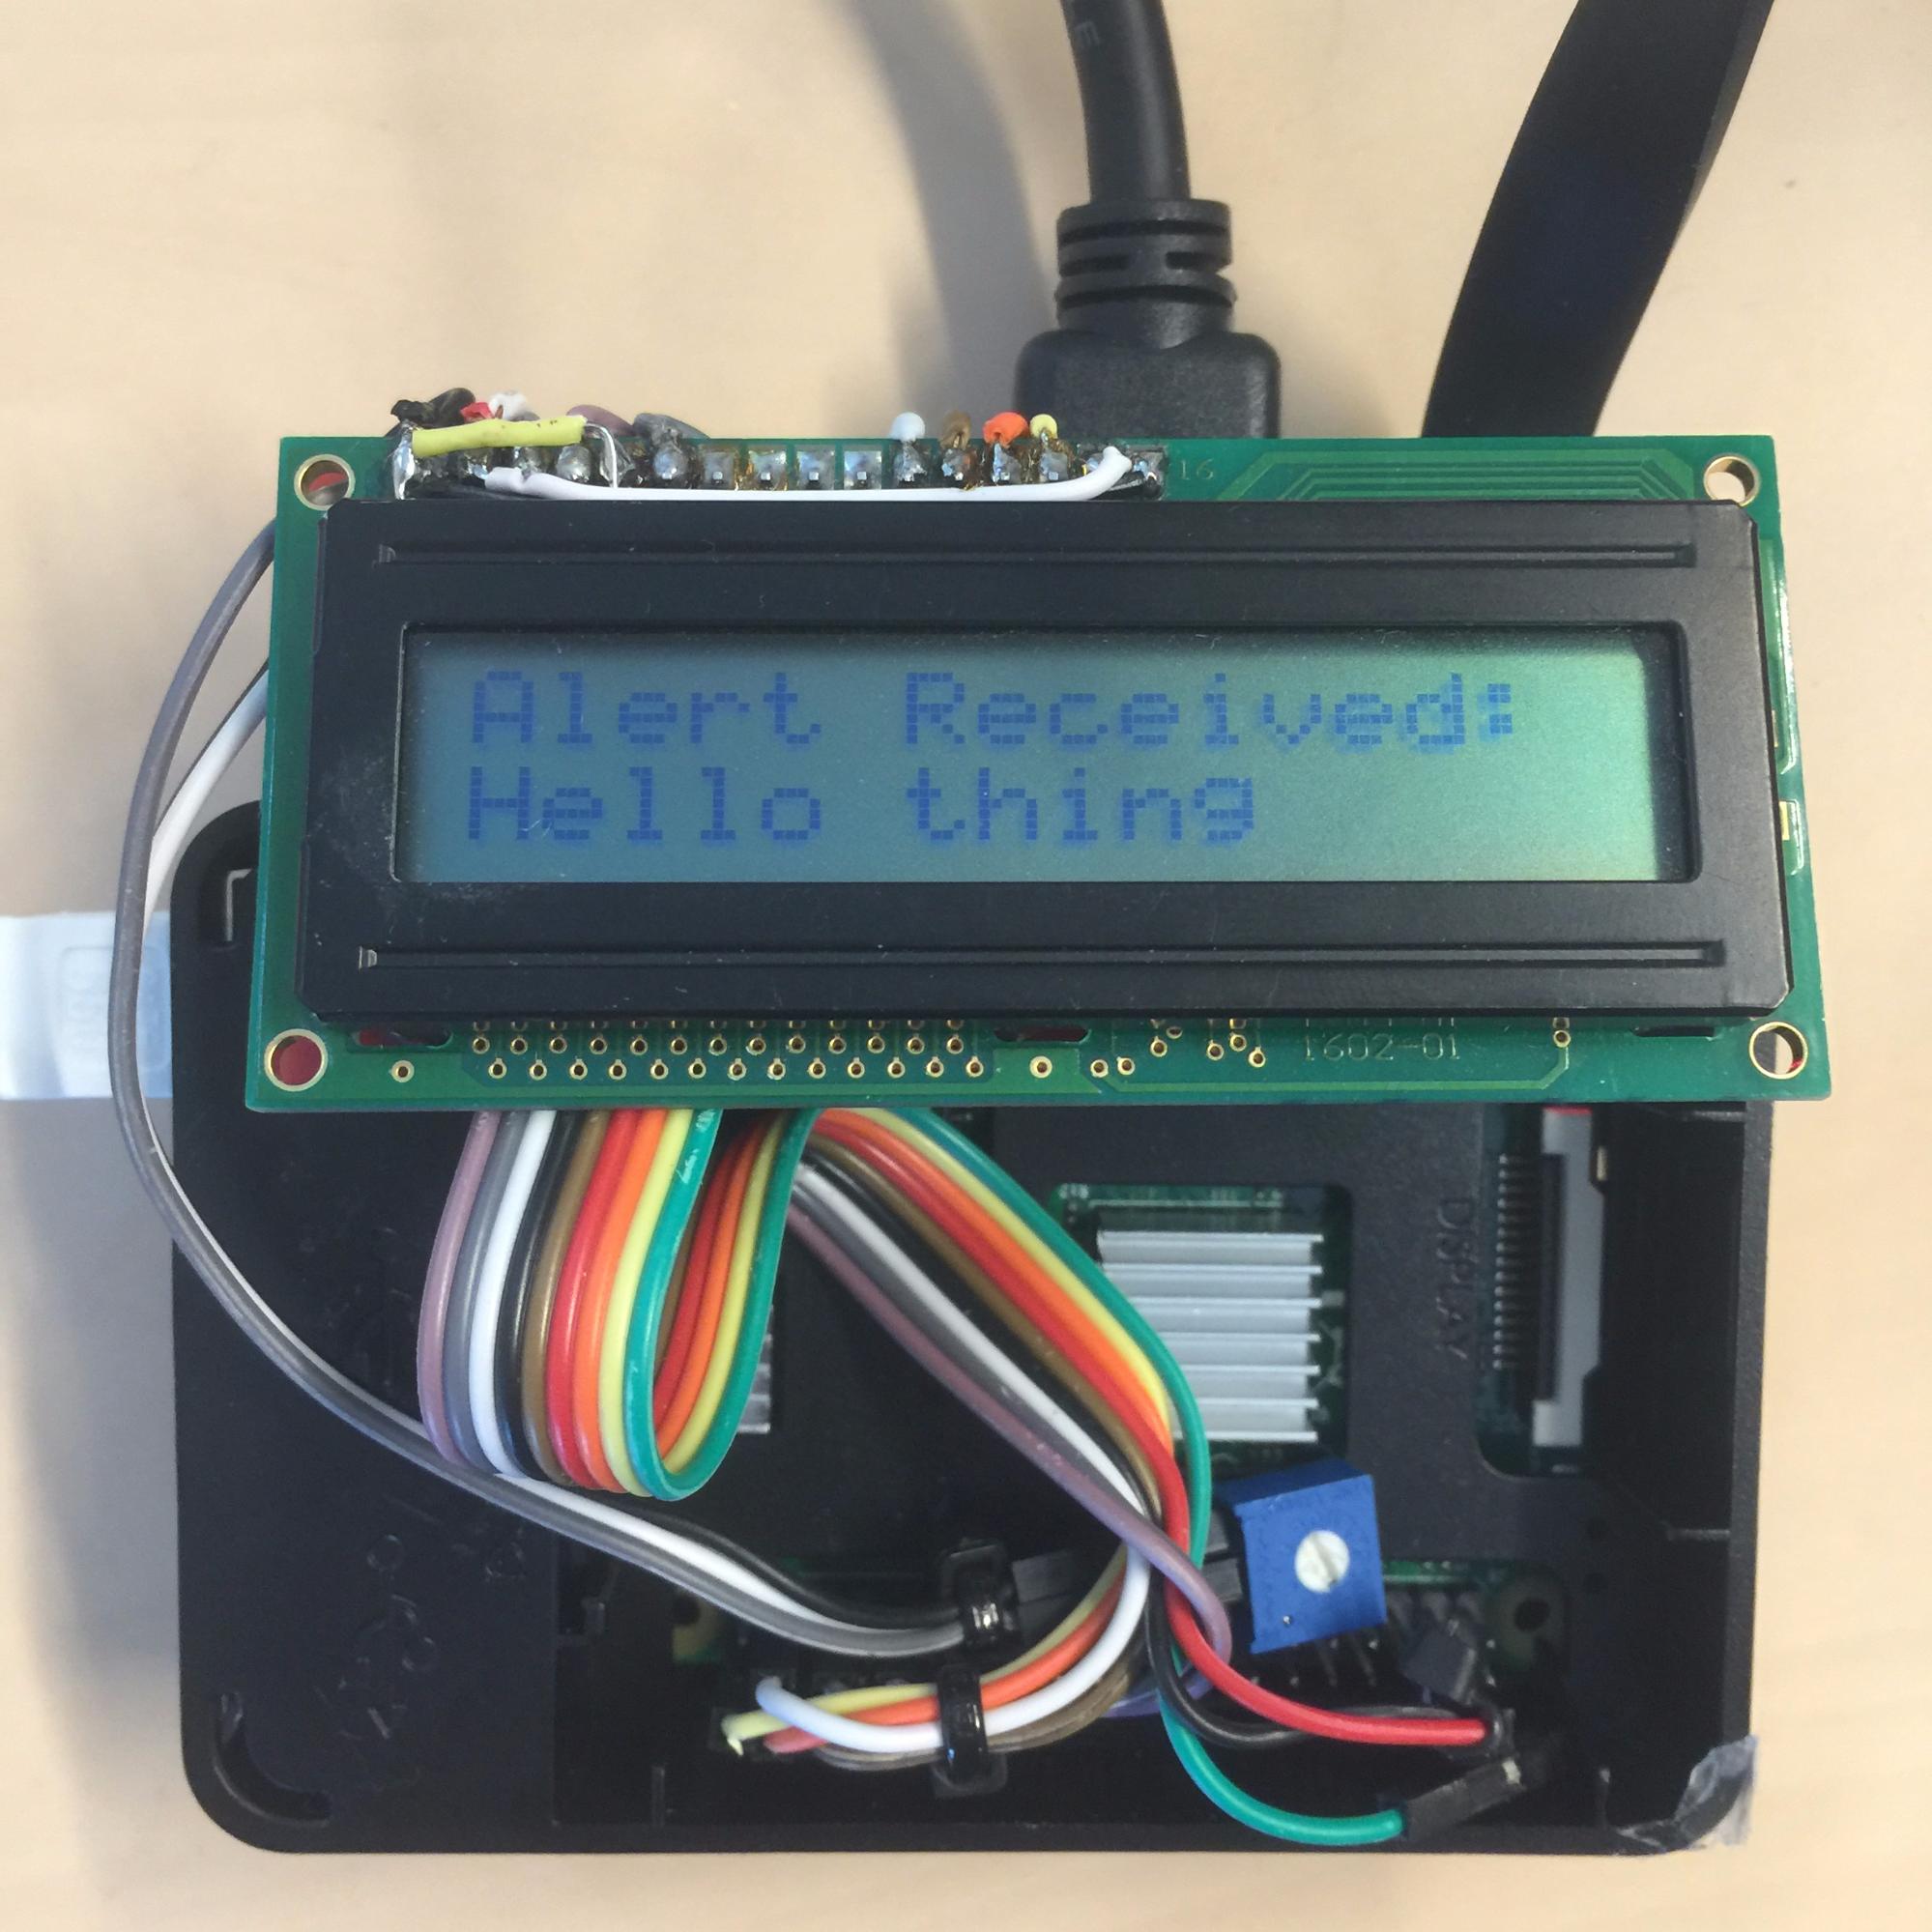
If you do receive your push — congratulations! You just sent your first push to an IoT device running Android Things!
Closing Thoughts
While this is only a tiny glimpse of what Android Things is capable of, we hope that this tutorial gets you as excited about Android Things as we are. For more information about Android Things be sure to check out the Android Things developer page and the source for this project on github.
Special Thanks
This tutorial was expanded from an Android Things guide by Nish Tahir over at Willow Tree. His guide can be found here.
Learn more about Urban Airship’s Digital Growth Platform, and get your brand ready to send notification-style messages to customers on any device or channel. Get in touch anytime for a demo.