
How to Create Android Notifications With Android O Notification Categories

Meghan Suslak Group Product Manager

Share to my network
In this article
Categories
Book a meeting
Connect with our team of experts to discuss your conversion and loyalty goals, and how we can help you achieve them faster.
Get a demoIn April we wrote a post sharing our excitement about the newest version of the Android operating system, Android O (8.0).
Last month, we were first to market with both SDK & API support of Android O, which includes support for both Notification Categories (known by developers as Notification Channels — more on that below) and Notification Dots.
Note: If you’re planning on updating your app at all for Android O, you must update your Urban Airship SDK to version 8.7. Failure to update your app will result in application crashes. Get all the details here.
Today we’re excited to bring you support for Notification Categories in our Message Composer as well. This means that teams of any size and technical ability can now use Urban Airship to send notifications to devices running Android O.
Given the changes in Android O, we wanted to walk you through the process for sending a notification to a Notification Category. (For more technical info, take a look at our docs for Notification Categories.)
What is a Notification Category in Android O?
As a quick recap, Notification Categories are a new way Android has created to categorize and manage the types of notifications a user can receive.
Brands can start out by defining Notification Categories any way they choose. For example, a news app might offer a channel for each of its news types — breaking news, sports news, weather, etc. A retail app might create channels for deals, store events and new product releases.
Notification Categories are meant to give users even more power to fine tune their push notification preferences, allowing them to personalize things like importance and sound for each Notification Category, and even turn off certain Categories of notifications that they aren’t interested in.
What’s the Difference Between Android O’s Notification Categories and Notification Channels?
The Android team at Google has released this new Android O feature with two names, Notification Categories and Notification Channels.
Notification Channels is a term used for and by Android developers, in a technical context. For Android developers, the first step in the process of using this feature is to implement Notification Channels in an app.
Once Notification Channels have been implemented, end users will experience them as Notification Categories in the app interface.
Android users will find Notification Categories in the app settings. From there, they can control how they want to experience push notifications, setting preferences like importance, sound, and badging within each Notification Categories.
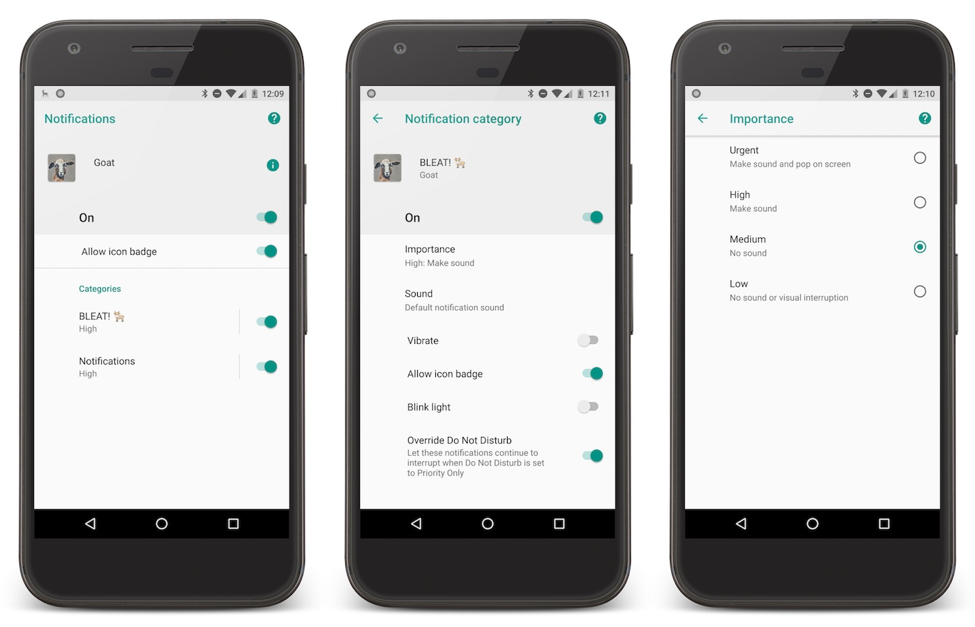
How Notification Categories look in Urban Airship’s test app, fondly named Goat.
Yes, Badging Has Come to Android
You read that right. Starting with O, Android now supports Badges (also known as Dots) on notifications. These badges are controlled at the Notification Category level. That is, you can set default badging behavior per notification category and end users can then customize this behavior even further.
Perhaps a user only wants to receive a dot on the app icon for breaking news, instead of all Categories. They can easily make this change.
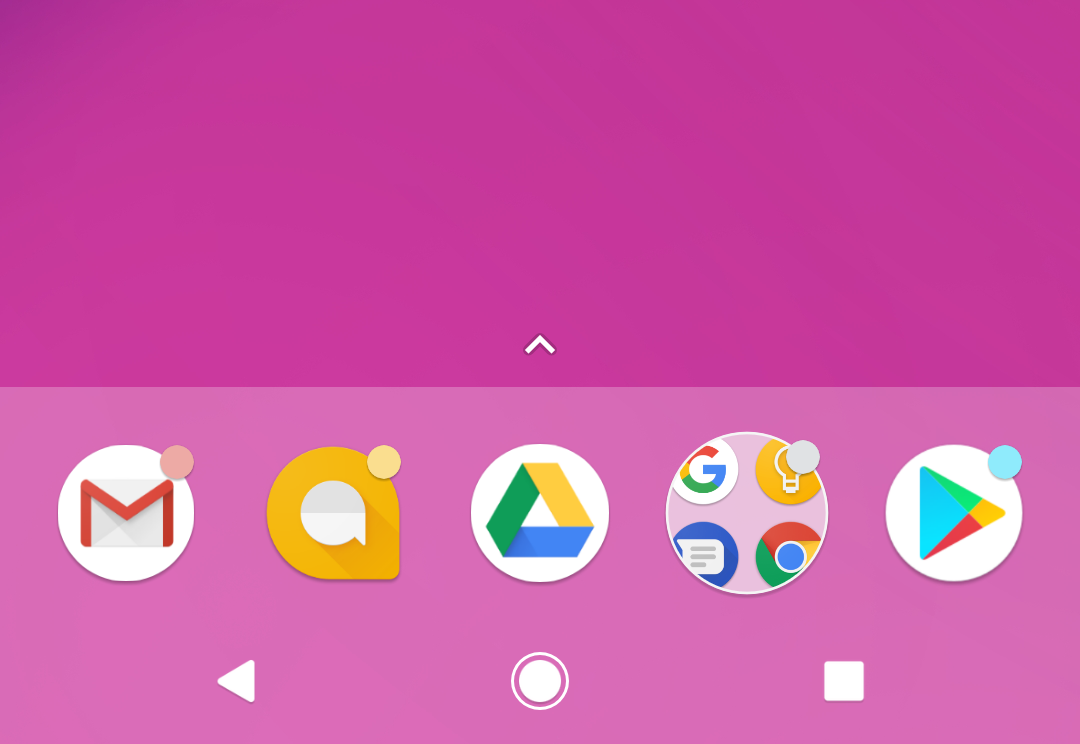
Here’s what badging, referred to as “Dots” on Android, looks like on an Android device. Image source.
Sending Push Notifications to Android Devices With Android O: Step By Step
For apps running Android O, all notifications must be sent to a Notification Category. This means that any app running Android O has to have at least one notification category provided by your development team.
To send a notification to your default Notification Category, you don’t have to do anything differently in our UI, you can just send your notification via our Message Composer as you normally would.
However, if you’ve set up multiple Notification Categories, in the steps below, we’ll show you how easy it is to configure your Categories in Urban Airship and then choose which Category to send your notification to. Let’s check it out…
Remember, to get started, you’ll need to have more than one Notification Category created in your app by your development team.
Step 1
Head over to your Urban Airship dashboard and navigate to the Configuration page. This is where you’lll add your Notification Categories to your Urban Airship project configuration.
Click “New Notification Category,” enter the name and Category ID, and save your Category.

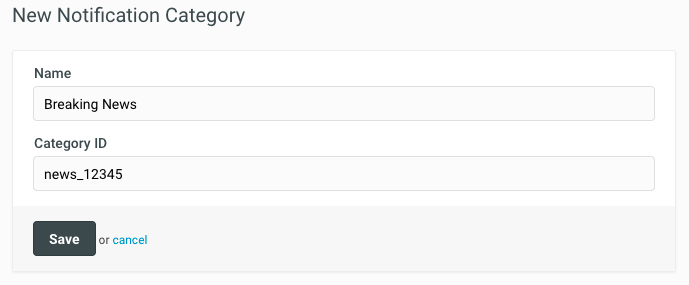
Step 2
Next, create a new message in the Urban Airship Message Composer. Define the audience for your notification, choose the platform(s) that will receive your push notification, and choose your message type.
Note: while you can send your notification to any of your configured platforms, Notification Categories are only available for users on Android O and above.
Step 3
Input the content for your push notification, and decide where users will go when they tap on it.
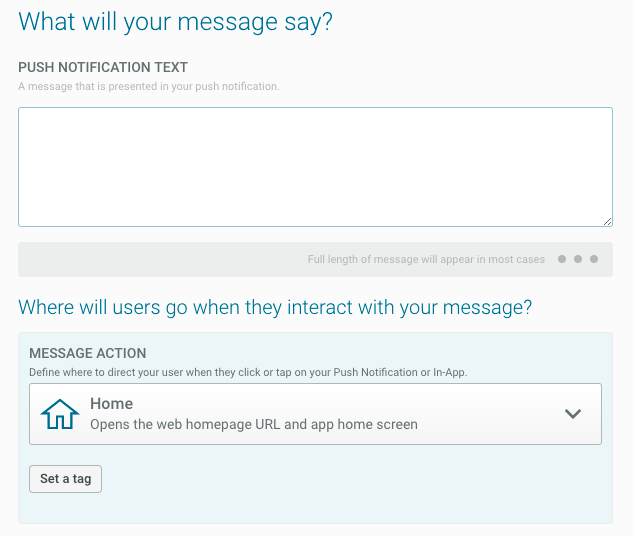
Step 4
Now it’s time to select the Notification Category for your message! Under Optional Features, navigate to the Android Options. Toggle on the switch for Notification Category, and select the Category you’d like to send your notification to


Remember, your brand can set Notification Categories however you choose. You can create Categories based on message type, topic of interest, or anything else your heart desires. (Want help thinking this through? Schedule a strategic consulting session with our team anytime.)
Step 5
Choose any remaining optional features you’d like to include with your message as well as the delivery date and time. You can send your notification right away, or schedule it to be sent later, on a specific day and time. Our Message Composer also allows you to customize send times for different timezones.
Step 6
Review and send! Take one last look at your notification to make sure you’re pleased with it, and hit the send button.
Use Android Notification Categories to Empower Your Users — And Avoid Opt-Outs
Now you know how to send a message using the new Notification Category feature for Android O. Remember that the goal of this update from Android is to put more control in the user’s hands, allowing the user to customize the notification experience as much as possible.
We believe this will be a positive change for Android users and could even decrease opt out rates (because users can now simply turn off notifications for Categories they're not interested in). For the first time, users are able to fine tune the Categories of push notifications they receive and how those notifications behave, giving them more control than ever. We’re excited to see how brands and users alike start to adopt Notification Categories.
Be sure to check out our docs about Notification Categories — or get in touch anytime with questions about how you can use Notification Categories to better engage with your customers, or to share what’s working for you! Leave a comment below or find us on Twitter.

