First, select a [Channel Coordination](https://www.airship.com/docs/reference/glossary/#channel_coordination) strategy:
Then, enable the channel types to include in your audience. For Mobile Apps, also select from the available platforms. For Priority Channel, also drag the channel types into priority order.
### Channel conditionsUse Channel conditions to filter which channels are included in the audience. A channel must meet the conditions to remain in the audience.
For example, if your audience includes users with app, email, and SMS channels, and you set a channel condition requiring membership in an email Subscription List:
To set channel conditions, use the same process as when building a [Segment](https://www.airship.com/docs/reference/glossary/#segment). You can use the following data in your conditions:
device [Tag Group](https://www.airship.com/docs/reference/glossary/#tag_group) — See Primary device tags.Selected Lifecycle, Subscription, and Uploaded Lists must contain Channel IDs or Named Users as the identifier, not a mix of the two.
### Localization Enable **Localization** if you want to provide different content to app and web users depending on their language and country. See [Localization](https://www.airship.com/docs/guides/messaging/messages/localization/). ## Content Configure the message content per enabled channel. See [Content by channel](https://www.airship.com/docs/guides/messaging/messages/content/) and [Localization](https://www.airship.com/docs/guides/messaging/messages/localization/). 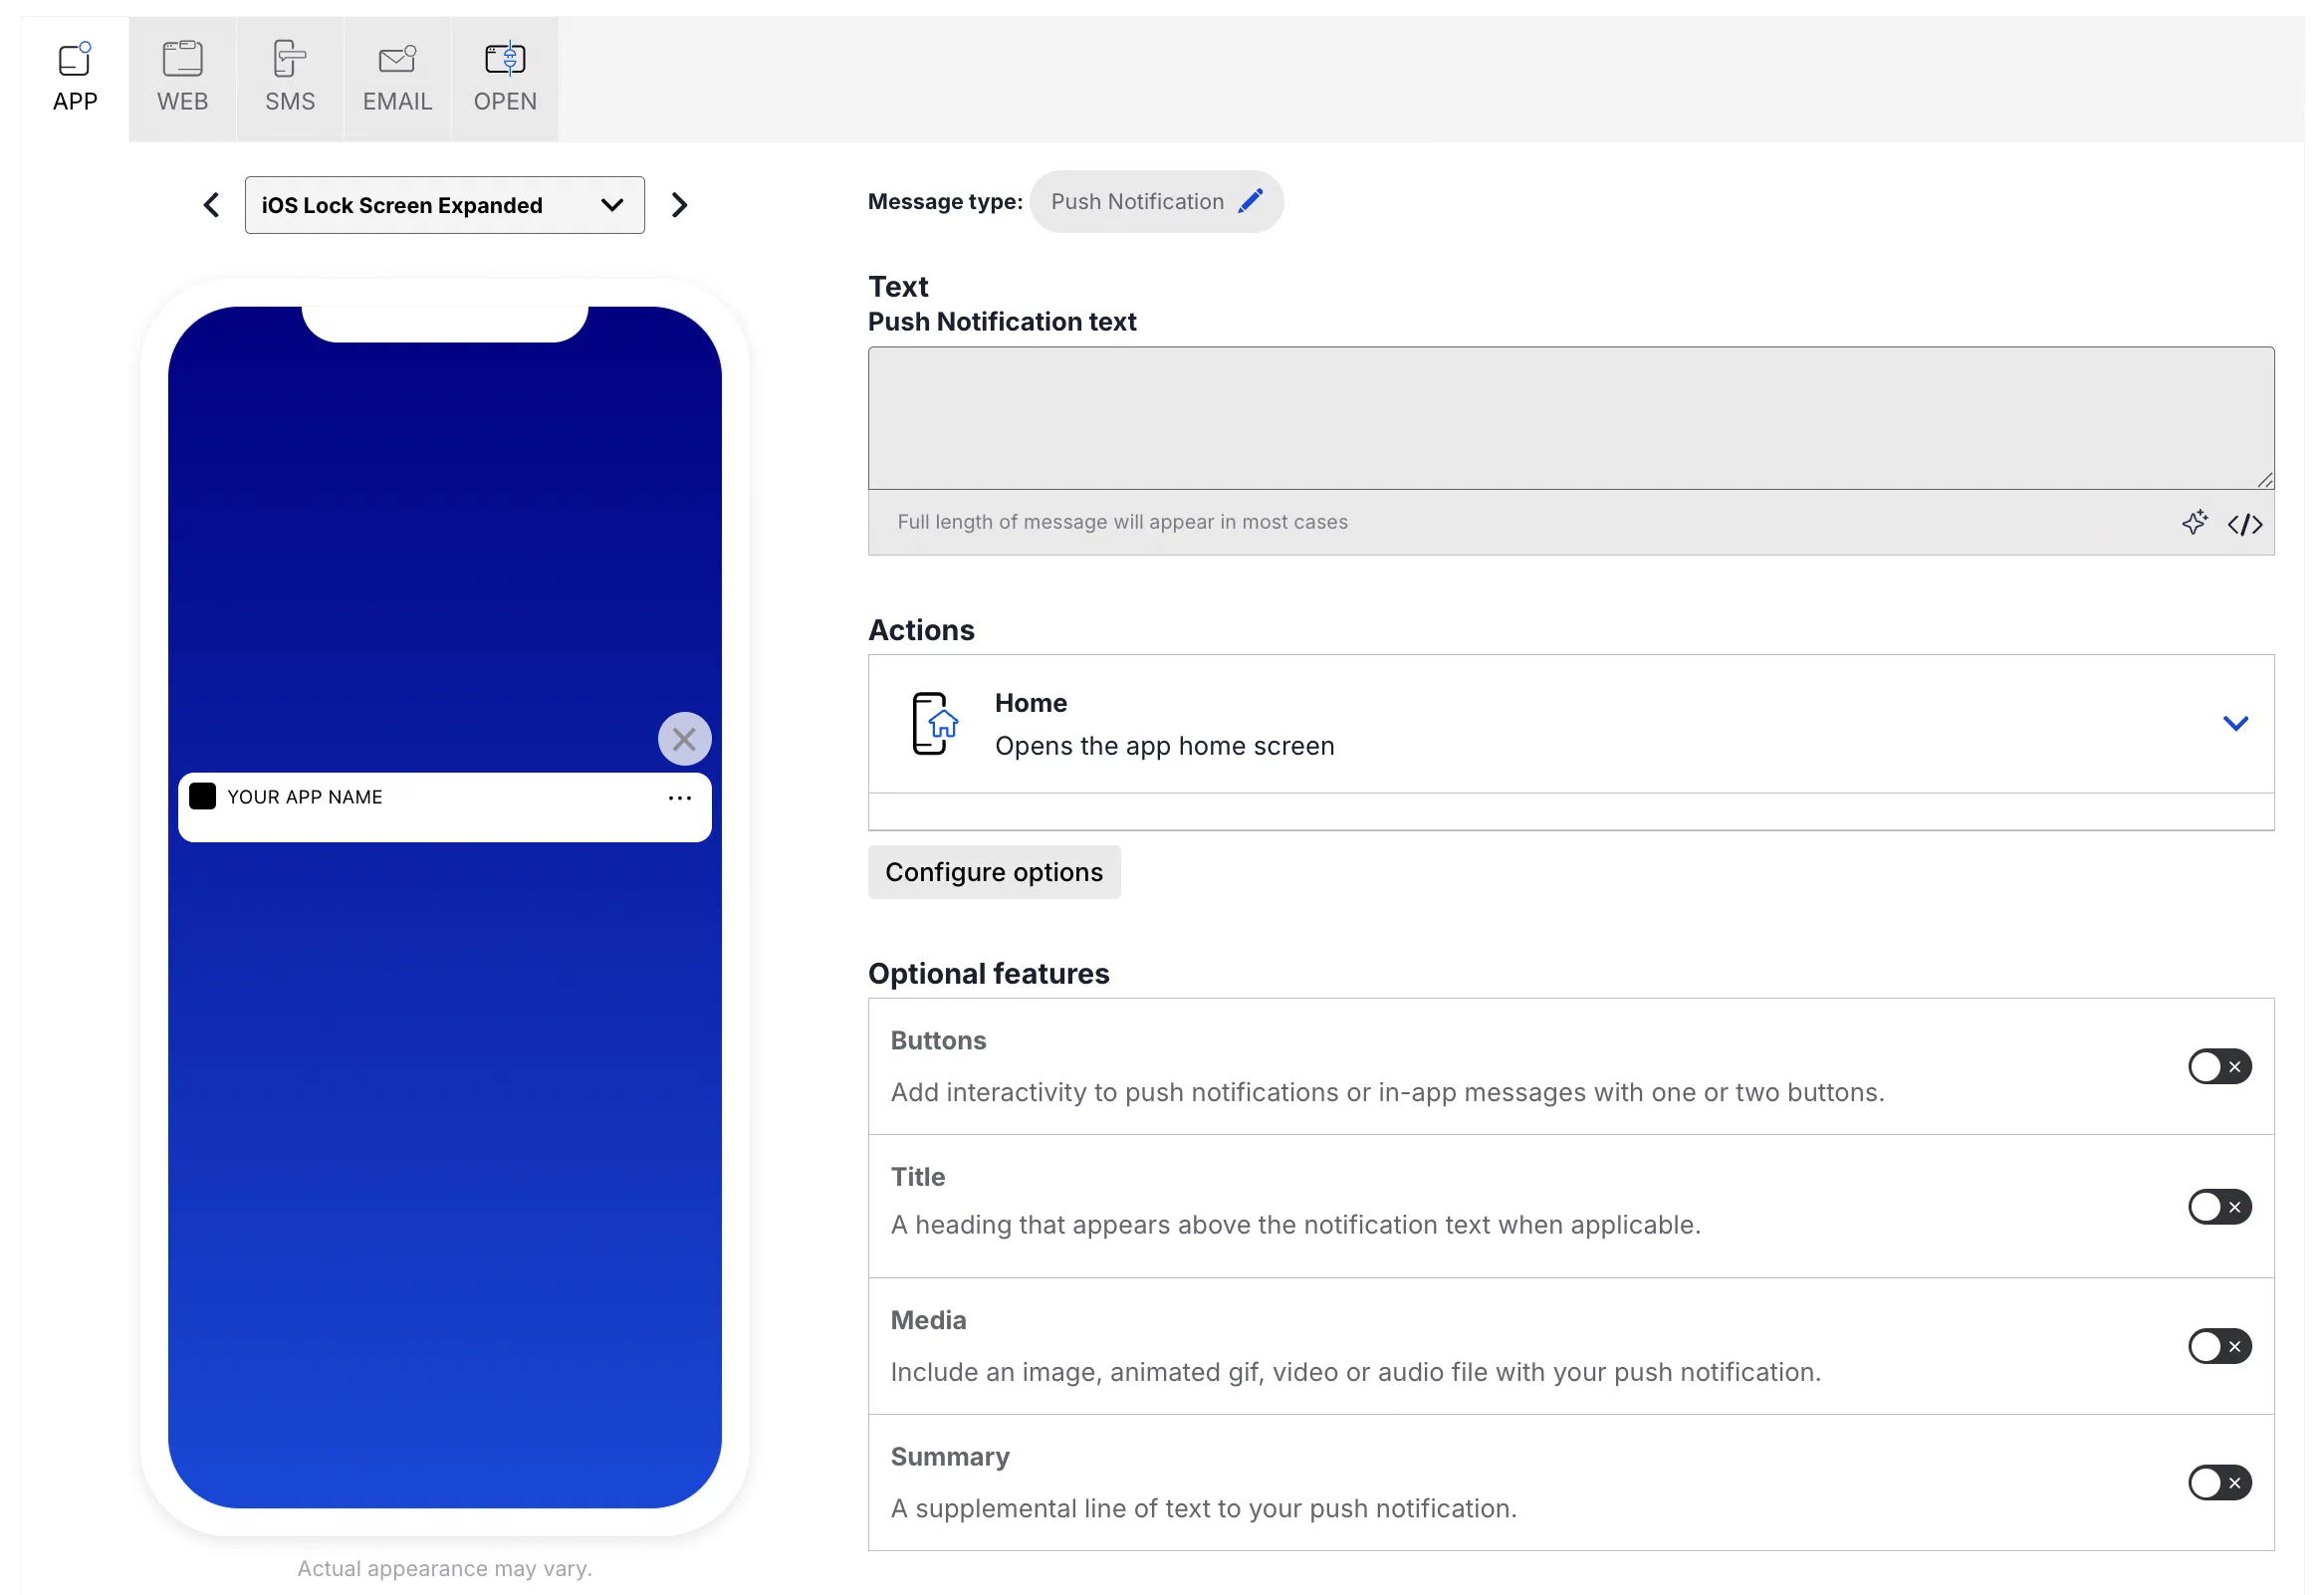 ## Delivery Configure [delivery](https://www.airship.com/docs/guides/messaging/messages/delivery/delivery/).  ## Review {#message-review} Review the device preview and message summary. Select the arrows to page through the various previews. The channel and display type dynamically update in the dropdown menu above. You can also select a preview directly from the dropdown menu. If you want to make changes, select the associated step in the header, make your changes, then return to Review. If you chose **Target by conditions** in the Audience step, select **Generate audience count** to see the following: * The total number of [Contacts](https://www.airship.com/docs/reference/glossary/#contact) and channels in the audience * The total number of channels and the number of opted-in channels for each [Channel (Engagement)](https://www.airship.com/docs/reference/glossary/#channel_engage) and mobile app platform You can also generate the audience count for the [**Target Specific Users** legacy option](#audience), but it does not include the Contacts count. If you chose **Upload a list** or **Upload Users** in the Audience step, select **Upload & Send** and select your file. Uploaded merge field names will be verified against the merge fields set in the Content step. For more information, see [Bulk sending](https://www.airship.com/docs/guides/audience/segmentation/bulk-sending/). To create an experiment with this message as a variant, select **Create Experiment**, then select **A/B Test** or **Intelligent Rollout**. You will leave the Message composer and go to the variants list in the new experiment. See [Message A/B tests](https://www.airship.com/docs/guides/experimentation/a-b-tests/messages/) and [Intelligent Rollouts](https://www.airship.com/docs/guides/experimentation/intelligent-rollouts/). Send a test message to verify its appearance and behavior on each configured channel. The message is sent to your selected recipients immediately, and it appears as a test in [Messages Overview](https://www.airship.com/docs/reference/glossary/#messages_overview). 1. Select **Send Test**.Under Test audience, enter at least one [Named User](https://www.airship.com/docs/reference/glossary/#named_user) or [Test Group](https://www.airship.com/docs/reference/glossary/#preview_test_groups) and select from the results. If your message includes email, you can also search for email addresses. If no matches appear for an address, you can select Create channel for <address>, and the channel will be registered for your project and opted in to transactional messaging.
Users in an active [Holdout Experiment](https://www.airship.com/docs/reference/glossary/#holdout_experiment) will not receive a test message. You can view a user’s current holdout group status and history when viewing their channel details in Contact Management.
(If your message contains [Handlebars](https://www.airship.com/docs/reference/glossary/#handlebars)) Under Personalization, select and configure a personalization data source:
| Data source | Description | Steps |
|---|---|---|
| Test message recipient | The message will be personalized using information associated with each test audience member. | n/a |
| Preview Data tool | The message will be personalized using the data currently entered in the Preview Data tool. The same values will apply to all test message recipients. You can also manually edit the JSON. | (Optional) Edit the JSON data. |
Select Send.
Adaptive Link opens a mobile wallet pass. Select an [Adaptive Link](https://www.airship.com/docs/reference/glossary/#adaptive_link) from the list.
Deep Link opens a screen in your app or website. Select a deep link from the list.
Our Deep Link functionality supports URL templates, which expose a friendly interface to your users in our UI, while constructing the correct URL behind the scenes on the fly. You can specify substitution parameters by enclosing them in brackets. For example, if you want to define a Deep Link for a product page screen in your app (or on your mobile website), you can make the product ID number a substitution parameter. Here are example template URLs: ```text https://yourcompany.com/products/{Product Id} yourapp://products/{Product Id} ```
When you enter this URL in the Airship interface, the form parses it and previews the form your users see in the composer. It automatically identifies “Product Id” as the parameter name, and provides a field to substitute in the actual identifier. So if you had previously entered a product ID of 1872983490 for the above Product ID, the generated URL would be: ```text http://yourcompany.com/products/1872983490 yourapp://products/1872983490 ```
The interface treats all values for each field as a string.
### Home *Home* opens your app's home screen. For web push notifications it opens your [Default Action URL](https://www.airship.com/docs/developer/sdk-integration/web/getting-started/#airship-setup). You can override the default URL by selecting the *Web Page* action and entering a different URL. ### Landing Page *Landing Page* opens a [Landing page](https://www.airship.com/docs/guides/features/messaging/landing-pages/). ### Message Center *Message Center* opens a Message Center message. See: [Message Center content](https://www.airship.com/docs/guides/features/messaging/message-center/). ### Preference CenterPreference Center opens an app preference center. Select a preference center from the list.
### ShareShare prompts the user to share your message with apps, social media accounts, and other services. Enter the text you want to accompany the share, including any promotional information, shortened links, hashtags, etc.
### Web PageWeb Page opens a web page or any valid device-level URL such as App Store or app protocol links. The web page opens in the device’s default browser. Enter a URL.
# Buttons > Add buttons to your push notifications, in-app messages, and web push notifications. ## About buttons  *A button pair in a push notification* Buttons in your message content can drive users to: * Take immediate, specific action * Make decisions or choices * Express preferences Messages support a single button or a pair, such as `Opt-in` or a `Yes`/`No` pair. Each button has an associated [Action](https://www.airship.com/docs/reference/glossary/#action) that occurs when the user selects it. When that interaction occurs, you can add or remove [Tags](https://www.airship.com/docs/reference/glossary/#tag) or opt a user in to or out of a [Subscription List](https://www.airship.com/docs/reference/glossary/#subscription_list). For push notifications, you can also emit a [Custom Event](https://www.airship.com/docs/reference/glossary/#custom_event). ### Predefined buttons Airship provides 30+ predefined buttons for common use cases. They have preset labels and actions. Some buttons support changing their associated actions. You can use these buttons in your messages at any time. They do not require SDK or project configuration. ### Built-in Interactive Notifications Our SDK also includes translations for these buttons in several languages. In addition to text-based interactive notification types, Airship also provides [Emoji buttons](https://www.airship.com/docs/reference/messages/built-in-interactive-notifications/#built-in-emoji). Use emojis to track user sentiment on a certain story or offer. Learn more in our [iOS](https://www.airship.com/docs/developer/sdk-integration/apple/push-notifications/interactive-notifications/) and [Android/Fire OS](https://www.airship.com/docs/developer/sdk-integration/android/push-notifications/advanced-customizations/#interactive-notifications) documentation. For the full list, see [Built-In Interactive Notification Types ](https://www.airship.com/docs/reference/messages/built-in-interactive-notifications/). ### Custom buttons Create custom buttons to reuse across multiple messages. * **Web buttons:** You can create web buttons for a single message without adding them to your project, or add them to your project to reuse across messages. Web buttons can be used immediately. * **App buttons:** Custom app buttons require a developer to register button categories in your app before you can use them in messages. You can also associate custom app buttons with custom actions instead of only Airship actions. Custom buttons you add in your project settings appear alongside predefined buttons when selecting buttons for a message. ## Enable buttons For the Buttons option to appear when configuring your message content, you must enable **Notification Buttons** in your project settings. By default, new projects have Notification Buttons enabled. For App buttons, you must also enable [Custom Keys](https://www.airship.com/docs/reference/glossary/#custom_keys), which send information about buttons between your app and the Airship SDK. In the dashboard: 1. Next to your project name, select the dropdown menu ( ), then **Settings**. 1. Under **Project settings**, select **Dashboard Settings**. 1. Enable **Notification Buttons**. 1. (Required for app buttons only) Enable **Custom Keys**. ## Create custom app buttons Buttons are associated with an action within your app, so a developer must first update your app, registering new Interactive Notification types in the Airship SDK. See the platform documentation for implementation details: * [Interactive Notifications for iOS](https://www.airship.com/docs/developer/sdk-integration/apple/push-notifications/interactive-notifications/) * [Interactive Notifications for Android](https://www.airship.com/docs/developer/sdk-integration/android/push-notifications/advanced-customizations/#interactive-notifications) After your developer registers the new types, you can add buttons to your project. You will need the ID for each button. In the dashboard: 1. Next to your project name, select the dropdown menu ( ), then **Settings**. 1. Under **App settings**, select **Mobile App Notification Buttons**. 1. Select **Create Notification Buttons**. 1. Enter a name and description for the button, so you can identify it in your project. 1. Enter the category name that should be passed to the mobile device to identify which notification buttons to display with a message. 1. (Optional) Clear the **Enabled** check box if you do not yet want these buttons to appear in the list of buttons when composing messages. 1. Specify the label and actions for each button. If you set up both a primary and secondary buttons, they will appear as a pair. * **Button Label:** Identifies the button label for display purposes in the dashboard. It should match the label defined in the app. This label does not change button labels in your app. * **ID:** Associates actions with the correct button label when passed by message. * **Foreground** or **Background:** Controls which actions are available in the dashboard. Must match button ID defined in the app. * **Destructive:** For iOS, indicates if button action causes the removal of data, features, etc., for display purposes in the dashboard. Must match capability defined in the app. Check the box to enable. 1. Select **Save**. ## Create custom web buttons To add custom web buttons to your project: 1. Next to your project name, select the dropdown menu ( ), then **Settings**. 1. Under **App settings**, select **Web Notification Buttons**. 1. Select **Create Web Buttons**. 1. Enter a name and description. The name helps you identify your buttons when setting up a message. 1. Enter a label for each button. These are the button labels users see in your web messages. For a single button, enter one label. For a button pair, enter two labels. 1. Select **Save**. ## Add buttons to message content Follow these steps to add buttons to your message content: 1. Enable **Buttons**. 1. Select buttons for your message: * If you are creating an app message, choose **Select buttons**, then select a button or pair to add it to your message. You can search for [predefined buttons](https://www.airship.com/docs/reference/messages/built-in-interactive-notifications/) by their type, or search for custom buttons by name. * If you are creating a web message, choose **Select or add buttons**, and then: * To add custom buttons for this message only, enter a button label, or two for a pair, then select **Add buttons**. * To add predefined or existing custom buttons, go to **Select buttons** and choose which buttons to add to your message. 1. Set an [Action](https://www.airship.com/docs/reference/glossary/#action) for each button. Predefined buttons already have set actions, but some support selecting a different action. You cannot use [Handlebars](https://www.airship.com/docs/reference/glossary/#handlebars) to personalize actions for Web buttons. 1. (Optional) Set and/or remove [Tags](https://www.airship.com/docs/reference/glossary/#tag) when the user taps a button: 1. Select **Configure options**. 1. Select **Add tag** or **Remove tag**, then search for tags that exist in the system, or create a new tag. 1. (Optional) [AXP](https://www.airship.com/docs/reference/feature-packages/) Opt a user in to or out of a [Subscription List](https://www.airship.com/docs/reference/glossary/#subscription_list) when the user taps a button: 1. Select **Configure options**. 1. Select **Opt in to** or **Opt out of**, then search for a subscription list by name. When you first click the search field, you can select from your five most recently modified subscription lists. For push notifications messages, you can also emit a custom event when the user taps a button. You can select an existing event or name a new one. (iOS SDK 20+) (Android SDK 20+)You can also assign an event value and specify string, number, or boolean property values that you can use later when filtering Custom Events. If you want to use properties, you must define the event and its properties in your project in advance. See Manage Events.
Airship’s localization feature provides a way to send a single message with multiple localizations. You can prepare localizations based on language information or [Locale](https://www.airship.com/docs/reference/glossary/#locale) for more specific, regional localizations. Airship delivers localized messages to your audience according to language and country information gathered by the Airship SDK.
For example, if you prepared a German localization, users with their language set to German will receive the German localization of your message. If you want to make your message more regionally specific, you could add German localizations for both Germany and Austria. Users with their language preferences set to German would receive different messages depending on whether their country/region settings are set to Germany or Austria.
--- You can create localized content using: * The **Message** and **In-App Automation** composers * [Message A/B tests](https://www.airship.com/docs/guides/experimentation/a-b-tests/messages/) * The `/push` or `/schedules` APIs, with a `localizations` array in your request All message types for the App channel are supported: push notifications, in-app messages, and Message Center messages. In the Message composer and A/B tests, you also have the option of selecting a [content template](https://www.airship.com/docs/guides/personalization/content/templates/). Localization for In-App Automation includes support for Custom HTML messages. **This document is for the Message composer, A/B tests, and APIs.** See also: [Localization for In-App Automation](https://www.airship.com/docs/guides/messaging/in-app-experiences/in-app-automation/localization/). > **Note:** Localized push notifications do not generate a message report at this time. Message details are available in [Performance Analytics](https://www.airship.com/docs/reference/glossary/#pa). ## Create localized content Follow these steps to create localized content for App and Web channels in the Message composer or an A/B test variant. The process is much like creating any other message, except that you will repeat the *Content* step for each localization that you add to your message. First you will create a *Default* message — the message that Airship sends to anybody in your audience who does not match the languages or locales that you specify in your localizations. The default message helps you reach your entire audience even if you aren't able to translate your message into all of your audience's possible languages. > **Note:** These steps cover enabling localization and adding content only. In the Audience step in the Message Composer, or in the Channels step in an A/B test variant, enable **Localization**:  In the Content step, select your message type, configure you default message, then add localized versions: 1. If prompted, choose a message type or [content template](https://www.airship.com/docs/guides/personalization/content/templates/), then click **Add Content**. The message type screen appears depending on your selections in the *Audience* step. 1. Configure your message content if you did not select a template. See *Creating content* for: * [Push notifications](https://www.airship.com/docs/guides/messaging/messages/content/app/push-notifications/#creating-content) * [In-app messages](https://www.airship.com/docs/guides/messaging/messages/content/app/in-app-messages/#creating-content) * [Message Center](https://www.airship.com/docs/guides/messaging/messages/content/app/message-center/) * [Web](https://www.airship.com/docs/guides/messaging/messages/content/web/#creating-content) 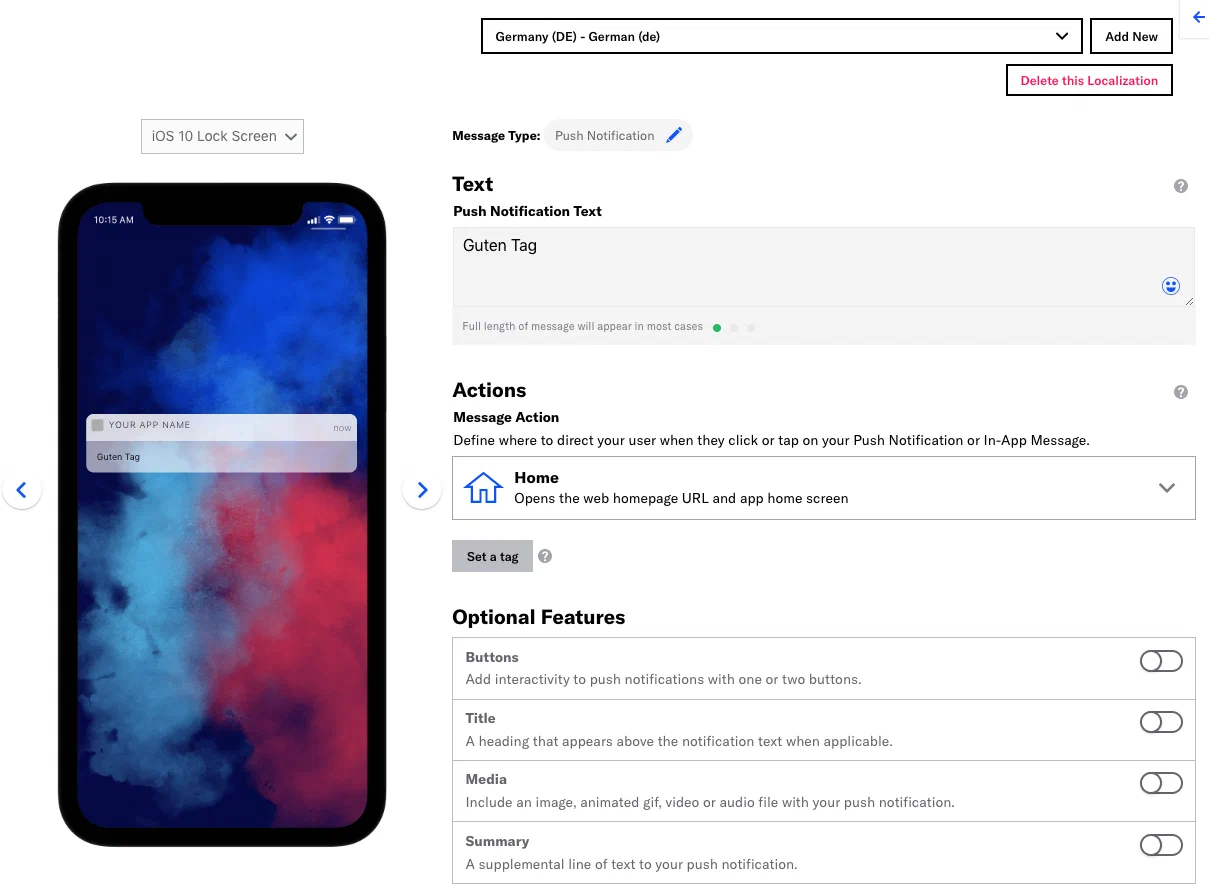 1. When you have completed configuring the content for this message, click **Add new**. 1. Select a language (required) and country (optional), click **Save**, and repeat the content configuration for the next localization. Select from the dropdown menu to view content for each localization and edit as necessary. When you have finished adding localizations, click *Delivery* in the header and complete the rest of the steps in the composer. > **Tip:** When sending a message with localizations to App or Web channels, you may want to use the [Optimize](https://www.airship.com/docs/reference/glossary/#optimal_send_time) or [Delivery By Time Zone](https://www.airship.com/docs/reference/glossary/#delivery_by_time_zone) options to make sure that users get their localized message at the time that best suits them. In the Review step, you can preview your localization content. See the [Review step](https://www.airship.com/docs/guides/messaging/messages/create/#message-review) in *Create a message*. --- You can edit or delete a localized message while it is in draft state or until Airship has sent it. 1. Go to **Messages**, then **Messages Overview**. 1. Find the message you want and select the pencil icon ( ) to edit or the trash can icon ( ) to delete. ## Send localized content using the API **Example:** Send a localized `/push` using the Airship API by adding an array of `localizations` in your request. ```http POST /api/push HTTP/1.1 Authorization: BasicFirst, select a [Channel Coordination](https://www.airship.com/docs/reference/glossary/#channel_coordination) strategy:
Then, enable the channel types to include in your audience. For Mobile Apps, also select from the available platforms. For Priority Channel, also drag the channel types into priority order.
> **Note:** For projects using the [channel-level segmentation system](https://www.airship.com/docs/guides/audience/segmentation/segmentation/#channel-level-segmentation), instead of channel coordination, enable the channels you want to send the message to. Available channels are based on your trigger. > > 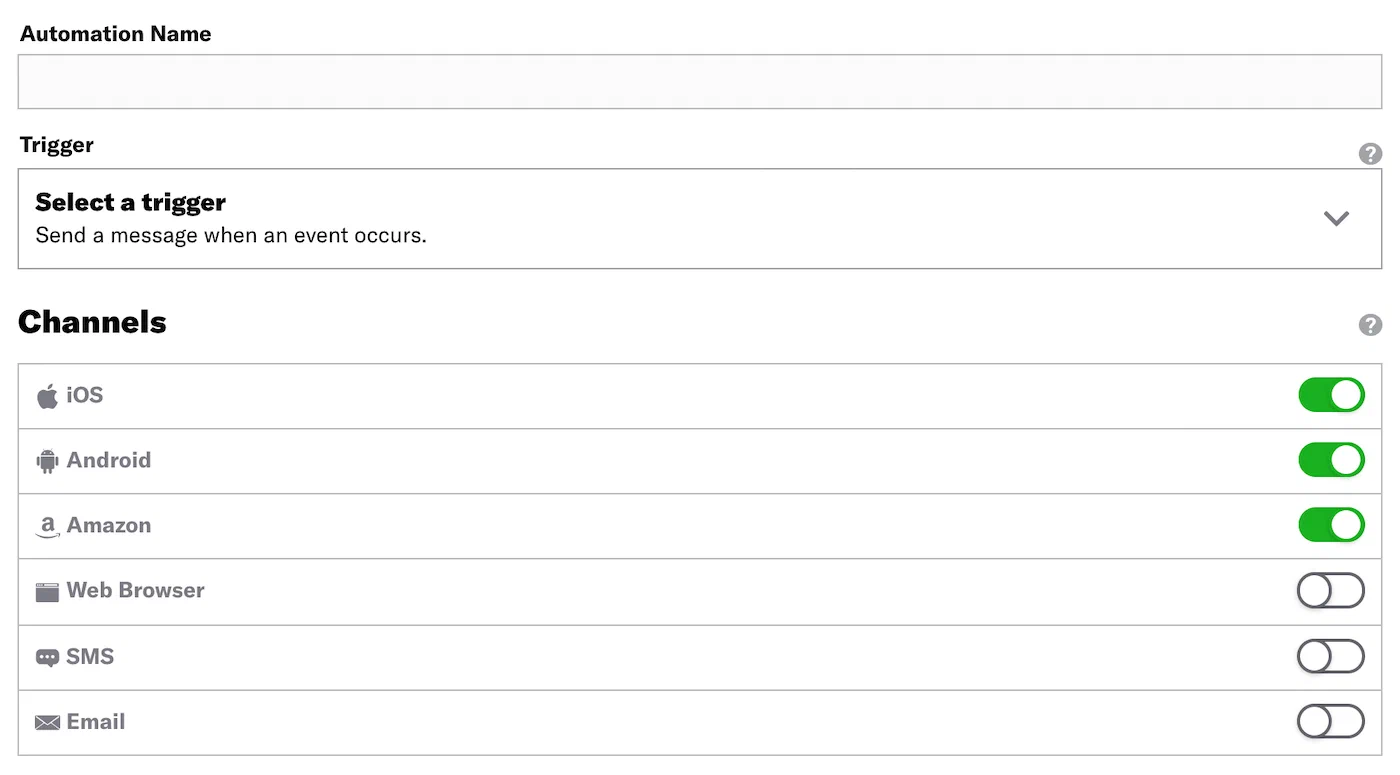 > > *Enabling channels for an Automation* ## Content Configure the message content per enabled channel. See [Content by channel](https://www.airship.com/docs/guides/messaging/messages/content/).  ## Delivery Configure [delivery](https://www.airship.com/docs/guides/messaging/messages/delivery/delivery/). Timing settings do not appear if you chose the Inactivity trigger. ## Review {#message-review} Review the device preview and message summary. Click the arrows to page through the various previews. The channel and display type dynamically update in the dropdown menu above. You can also select a preview directly from the dropdown menu. If you want to make changes, click the associated step in the header, make your changes, then return to *Review*. Send a test message to verify its appearance and behavior on each configured channel. The message is sent to your selected recipients immediately, and it appears as a test in [Messages Overview](https://www.airship.com/docs/reference/glossary/#messages_overview). 1. Select **Send Test**.Under Test audience, enter at least one [Named User](https://www.airship.com/docs/reference/glossary/#named_user) or [Test Group](https://www.airship.com/docs/reference/glossary/#preview_test_groups) and select from the results. If your message includes email, you can also search for email addresses. If no matches appear for an address, you can select Create channel for <address>, and the channel will be registered for your project and opted in to transactional messaging.
Users in an active [Holdout Experiment](https://www.airship.com/docs/reference/glossary/#holdout_experiment) will not receive a test message. You can view a user’s current holdout group status and history when viewing their channel details in Contact Management.
(If your message contains [Handlebars](https://www.airship.com/docs/reference/glossary/#handlebars)) Under Personalization, select and configure a personalization data source:
| Data source | Description | Steps |
|---|---|---|
| Test message recipient | The message will be personalized using information associated with each test audience member. | n/a |
| Preview Data tool | The message will be personalized using the data currently entered in the Preview Data tool. The same values will apply to all test message recipients. You can also manually edit the JSON. | (Optional) Edit the JSON data. |
Select Send.
For example, if you have a custom event named “Purchase”, with a purchase category fedoras and a value 125.0 representing the dollar amount of the purchase, you can add these criteria to the Purchase event so that your message is only seen by users spending at least $125 on fedoras.
You can use file upload to provide multiple values to match against a specified event property’s value. For string properties only.
For example, for a point-of-sale system that emits events when a sale occurs, an event might have the following data:
```js name: "sale-completed" properties: customer_id: 234234 store_id: 103843 region: "northwest-usa" ```To trigger only when sales occur in the regions of northwest-usa and southwest-usa but not midwest-usa or any other region, you would do the following to filter your custom events:
region..txt file containing values northwest-usa and southwest-usa.Provide your values in a line delimited .txt file. Each value must be on a separate line. 100 KB maximum file size.
For sequences configured with a continuation sequence outcome that does not include an exit event, the attribution period is the delay period set for the continuation sequence. For all other sequences, the attribution period is one day (24 hours). Sequences created prior to August 28, 2023, have a one-hour attribution period.
1. [Add a message to the sequence](https://www.airship.com/docs/guides/messaging/messages/sequences/create/add-messages/). 1. After editing a sequence, click **Test changes** to [create a sequence test](https://www.airship.com/docs/guides/messaging/messages/sequences/create/test/#test-a-sequence), or click **Publish changes** to apply the changes to a sequence that is already in progress. # Sequence Performance > The Performance report shows audience behavior compared to the sequence's goal. It displays performance data and a link to the message report for each message in the sequence. A sequence's Performance report is available after you [start the sequence](https://www.airship.com/docs/guides/messaging/manage/change-status/#start-pause-sequence). You will not see links to the reports until then. > **Note:** Engagement data is sent to Airship as soon as it becomes available. Data may be delayed due to connectivity issues with a user's carrier, Wi-Fi, power, etc. Wait at least 12 to 24 hours before acting on the data to allow for potential lags. You can access a performance report by selecting your sequence in [Messages Overview](https://www.airship.com/docs/reference/glossary/#messages_overview) and clicking or by selecting a sequence in the [Journey Map](https://www.airship.com/docs/reference/glossary/#journey_map) and clicking . ## Performance report layout The performance report has the same layout as the [Sequence Manager](https://www.airship.com/docs/reference/glossary/#sequence_manager), and the message previews show the content as it appeared when the sequence was first started. The following information and actions are available in the report. 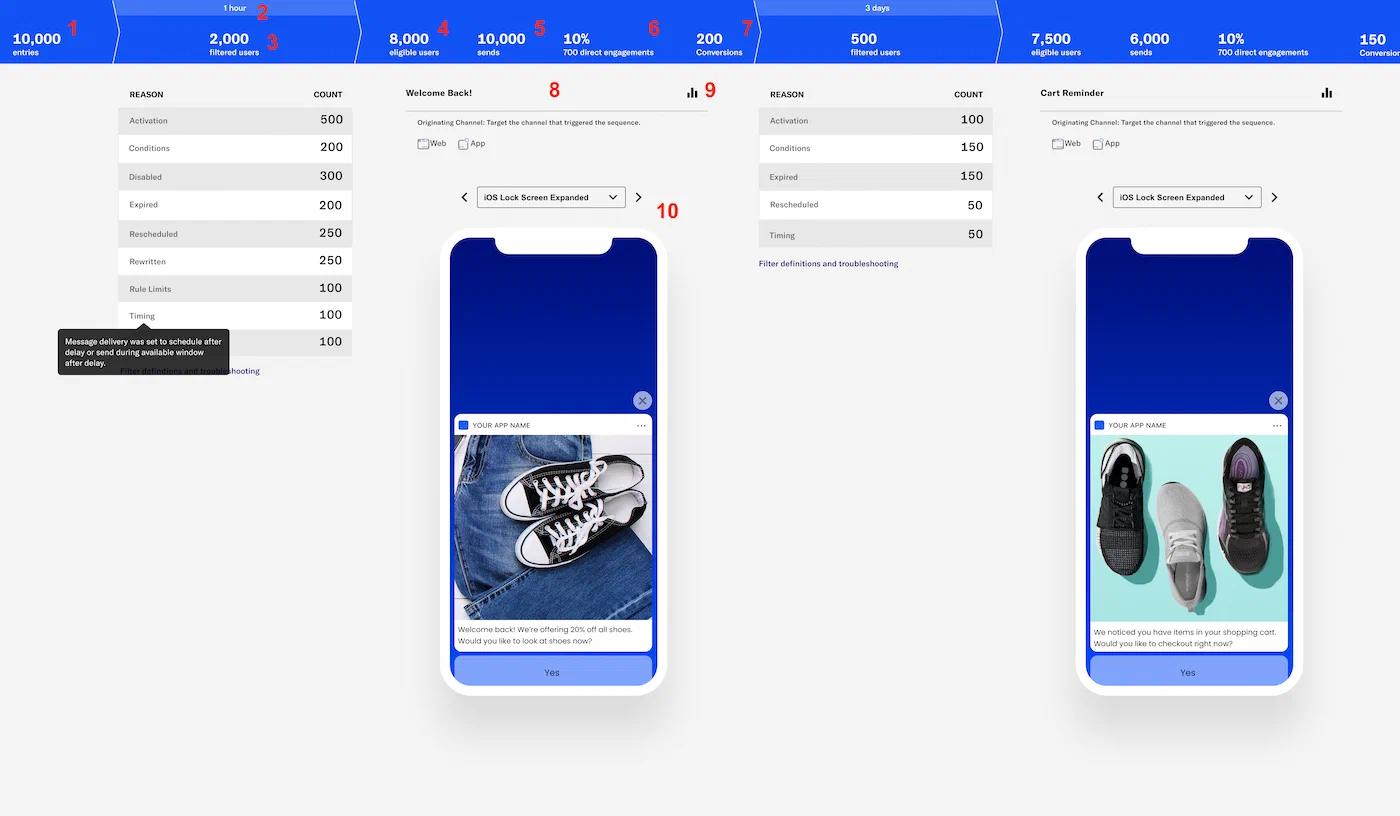 *A sequence performance report* 1. *Entries* — The total number of users who entered the sequence. 1. A time period. For each message in the sequence, this is the delay period set for the message. A time period also follows the last message in the sequence. This is the attribution period after the last message is sent, during which cancellation and conversion events are counted in reporting. After the attribution period elapses, no further events are recorded for the sequence.For sequences configured with a continuation sequence outcome that does not include an exit event, the attribution period is the delay period set for the continuation sequence. For all other sequences, the attribution period is one day (24 hours). Sequences created prior to August 28, 2023, have a one-hour attribution period.
1. *Filtered users* — The reasons why users exited the sequence, or *fell out of the funnel*, and counts for each. Hover over a reason row to see its definition. See also on this page: [Filter definitions and troubleshooting](#filter-definitions-and-troubleshooting). 1. *Eligible users* — The total number of users that have met the criteria to receive the message. A user could be either a [Channel](https://www.airship.com/docs/reference/glossary/#channel_engage) or a [Named User](https://www.airship.com/docs/reference/glossary/#named_user). 1. *Sends* — The total number of messages sent across all platforms. Sends may be higher or lower than your eligible users depending on your [Channel Coordination](https://www.airship.com/docs/reference/glossary/#channel_coordination) strategy. 1. *Direct engagements* — The total number of direct app opens and clicks on web notifications. The percentage of direct engagements is calculated as *Direct Engagements* / *Number of Sends* * 100. 1. *Conversions / Reactivations* — The number of users who exited the sequence by a *Conversion* event. This count is used to calculate conversion/cancellation rates. * If your sequence does not have a *Conversion* outcome, this count will not appear. * For sequences using the [Inactivity trigger](https://www.airship.com/docs/guides/messaging/messages/sequences/triggers/#inactivity), *Conversions* is instead labeled *Reactivations*. A reactivation occurs when an eligible user re-engages with the app or website. * Conversion events that occur before the first message of the sequence is sent are not included in the Conversions/Reactivations count, though converted users will still experience the conversion outcome as configured. 1. The message summary. The message name appears at the top. If your account is enabled for [Channel Coordination](https://www.airship.com/docs/reference/glossary/#channel_coordination), the message's Channel Coordination strategy and selected channels also appear here. 1. Click to open the [message report](https://www.airship.com/docs/guides/reports/message/). 1. The device preview. Select from the menu to see how the message will appear on different devices. --- The report shows data for *All Time* by default. You can select a different time frame, and the report will reload with data for that period. If you [set a control group](https://www.airship.com/docs/guides/experimentation/control-groups/) for the sequence, you can also select *Active audience* / *Control group* to change the viewable data. > **Tip:** You can access Performance reports from additional locations: > > * From the [Sequence Manager](https://www.airship.com/docs/reference/glossary/#sequence_manager), click *Performance*. > * From the [Journey Map](https://www.airship.com/docs/reference/glossary/#journey_map), select a sequence in the map, then click *Performance*. ## Filter definitions and troubleshooting The Performance screen displays counts for the following reasons users exit a sequence. Activation : The message delivery time was outside of the sequence's scheduled start/stop window. > --- > **Troubleshooting:** Make sure the sequence [start and end dates and times](https://www.airship.com/docs/guides/messaging/messages/sequences/create/create/#trigger) are set correctly. Cancelled : A [[Cancellation Event](https://www.airship.com/docs/reference/glossary/#cancellation_events_event_option)](https://www.airship.com/docs/guides/messaging/messages/sequences/create/outcomes/#exit-events) event was performed. Conditions : The message's [Conditions](https://www.airship.com/docs/reference/glossary/#conditions_event_option) were not met, e.g., message 2 was only delivered to users with tag `hotdog`. > --- > **Troubleshooting:** Verify message conditions are set correctly. See: [Edit delay and conditions for a message in a sequence](https://www.airship.com/docs/guides/messaging/messages/sequences/create/edit/#delay-conditions). Disabled : The sequence was paused during the time when users would have received the next message. > --- > **Troubleshooting:** Check the [Team activity log](https://www.airship.com/docs/guides/getting-started/admin/teams-messaging/#team-activity-log) to see when the sequence may have been paused: > 1. Go to the [Sequence Manager](https://www.airship.com/docs/reference/glossary/#sequence_manager) and copy the reference from the page URL. The reference is the string following `series`. For example, in the URL `https://go.airship.com/apps/Vl0wyEXAMPLEUW98Wj4xg/composer/series/fmYMAonmSIuaJEge3VIouw/messages/#/edit`, the reference is `fmYMAonmSIuaJEge3VIouw`. > 1. Select the account menu icon () in the dashboard header and select *Team Management*, then *Activity*. > 1. Select your project and the action *Journey paused*. > 1. Use Control+F or Command+F to find the reference on the page. You may need to change the number of items on the page or adjust the date time range. Error : Any reason not attributable to another filter. Expired : The message was not delivered to a device before its expiration date and time. > --- > **Troubleshooting:** Make sure [expiration](https://www.airship.com/docs/guides/messaging/messages/delivery/delivery-options/#expiration) is set up correctly for the message. > 1. Go to the [Sequence Manager](https://www.airship.com/docs/reference/glossary/#sequence_manager). > 1. Click for a message, then **Edit Message**. > 1. Go to the *Delivery* step and review the expiration settings. Rescheduled : Users awaiting the scheduled message in a sequence performed the trigger event again, resulting in cancelling and rescheduling the message delivery. This can also occur when channel-level fulfillment is rescheduled to a contact-level fulfillment. > --- > **Troubleshooting:** None. Even with [Rule Limits](https://www.airship.com/docs/reference/glossary/#rule_limits_sequence) set, a user could enter a sequence multiple times while awaiting delivery of the first message, resulting in rescheduling. Rewritten : The message trigger and/or timing were edited while the user was awaiting message delivery, invalidating delivery. > See: [Edit sequence settings](https://www.airship.com/docs/guides/messaging/messages/sequences/create/edit/#settings) and [Edit delay and conditions for a message in a sequence](https://www.airship.com/docs/guides/messaging/messages/sequences/create/edit/#delay-conditions). Rule limits : The [Rule Limits](https://www.airship.com/docs/reference/glossary/#rule_limits_sequence) or the project [Message Limits](https://www.airship.com/docs/reference/glossary/#message_limits) (set for *Sequences and Automation*) were met. > --- > **Troubleshooting:** View your sequence- and project-level rule limits and edit if they are too restrictive: > * *Sequence rule limits* — Go to the [Sequence Manager](https://www.airship.com/docs/reference/glossary/#sequence_manager), then click *Settings* and review *Rule Limits* on the *Trigger* tab. > * *Project rule limits* — Next to your project name, select the dropdown menu ( ), then **Settings**. Then, under **Project settings**, select **Message Limits** and review your settings for **Sequence and Automation Limits**. Timing : Message delivery was set to *schedule after delay* or *send during available window after delay* and either were true: > 1. A user did not have a known time zone. > 1. The option *Do not send* was selected for *If a trigger occurs outside the available window*, and the trigger did occur outside the window. > --- > **Troubleshooting:** If you did not intend to include a channel with unknown time zones, you can exclude them from your audience: > * **Non-AXP or -Orchestration customers:** Go to the [Sequence Manager](https://www.airship.com/docs/reference/glossary/#sequence_manager), then click *Settings* and change channel selections on the *Target* tab. > * **AXP and -Orchestration customers:** >> 1. Go to the [Sequence Manager](https://www.airship.com/docs/reference/glossary/#sequence_manager). >> 1. Click for a message, then select *Edit Message*. >> 1. Click and edit the enabled channels for the message. > --- > To disable the *Do not send* option: > 1. Go to the [Sequence Manager](https://www.airship.com/docs/reference/glossary/#sequence_manager). > 1. Click for a message, then select *Edit Message*. > 1. Go to the *Delivery* step and change the Timing setting to *Send at next available time*, or [configure a different delivery](https://www.airship.com/docs/guides/messaging/messages/delivery/delivery/). Untargetable Platform : Users did not have a [Channel](https://www.airship.com/docs/reference/glossary/#channel_dev) matching any of those selected for the message audience. ### Creating Sequences Learn how to configure Sequences. # Create a Sequence > Create a series of messages that are initiated by a trigger. Messages are delivered according to your timing settings, and you can also set conditions that determine the continuation of the series. > **Note:** Each message in a sequence counts toward your *Sequences and Automation* [Message Limit](https://www.airship.com/docs/reference/glossary/#message_limits). To get started, create a new Sequence: 1. In the sidebar, select the **Create** dropdown menu ( ), then select **Journey**. 1. Select **Sequence**, then **Start from scratch**. 1. Enter a name for your Sequence. 1. Select **Continue**. You will now configure each [component](https://www.airship.com/docs/guides/messaging/messages/sequences/about/#components) from the [Journey Map](https://www.airship.com/docs/reference/glossary/#journey_map). You can configure components in any order. 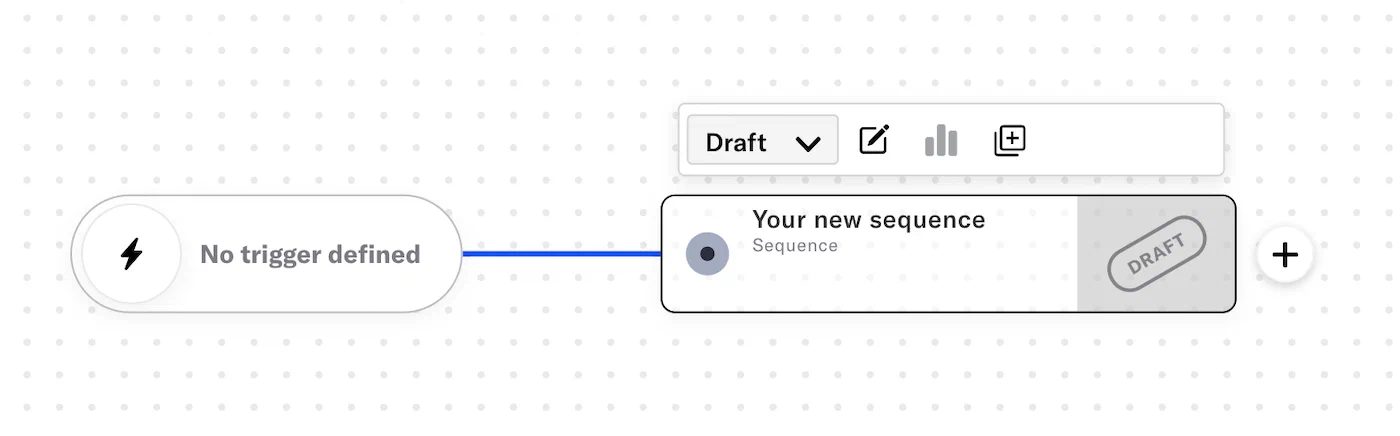 *A draft sequence* ## Trigger Configure a trigger that will initiate your sequence. You can configure up to 10 triggers unless you are using the [Inactivity trigger](https://www.airship.com/docs/guides/messaging/messages/sequences/triggers/#inactivity).  *Configure a Sequence trigger* 1. Select the trigger card and then the pencil icon ( ). If multiple triggers are configured, first select the trigger stack to expand it, and then select a trigger card. 1. Select and configure a [trigger](https://www.airship.com/docs/guides/messaging/messages/sequences/triggers/). 1. (Optional) Under **Settings**, define the times during which the trigger is active for the Sequence. Trigger start and end dates are evaluated before [Sequence start and end dates](#scheduling-and-frequency). 1. Enable **Start Date** and/or **End Date**. 1. Set the time, time zone, and date. 1. (Optional) Under **Conditions**, build a [Segment](https://www.airship.com/docs/reference/glossary/#segment) to filter the audience members entering the Sequence. Creating a segment here uses the same segmentation data and procedure as building [Segments](https://www.airship.com/docs/guides/audience/segmentation/segments/#adding-conditions). You cannot set Conditions for the Inactivity or Manual Entry trigger. 1. Select **Save**. To add another trigger, select the plus icon () below the configured triggers. Adding more triggers to an existing Sequence does not require publishing changes. To delete a trigger, select its card, and then select the trash can icon ( ). > **Tip:** You can route users to a Sequence when an [In-App Automation](https://www.airship.com/docs/reference/glossary/#iaa) or [Scene](https://www.airship.com/docs/reference/glossary/#scene) displays on a device or when they select a button in an In-App Automation. See [Link Journey components](https://www.airship.com/docs/guides/features/orchestration-experimentation/journeys/#link-journey-components) in the *Journeys* documentation. ## Scheduling and frequency Define when the sequence can deliver messages to your audience, and control the frequency of sending messages and of triggering the sequence. The settings are optional. 1. Select the sequence card, then the pencil icon ( ). 1. Select **Settings** in the header. 1. Under **Scheduling**, define the times during which the Sequence can deliver messages to your audience. When its end date occurs, its status automatically changes to Completed, and you cannot restart it. Enable **Start Date** and/or **End Date**, and then set the time, time zone, and date. > **Important:** [Trigger start and end dates](#trigger) are evaluated before Sequence start and end dates. Verify settings in both locations before starting a Sequence or publishing changes. 1. Under **Limits**, enable **Ignore Channel Message Limits** to override the project-level [Message Limits](https://www.airship.com/docs/reference/glossary/#message_limits), ensuring that your audience will receive your message even if they've reached the message limit. Overriding message limits does not override your **Rule limits** setting. 1. Under **Limits**, enable **Rule Limits** to cap the number of messages a user can receive from a Sequence within a time frame, preventing you from over-messaging your audience. Select **Add a daily limit** and/or **Add an all-time limit** and enter a number. 1. Select **Save & Continue**. You will return to the [Sequence Manager](https://www.airship.com/docs/reference/glossary/#sequence_manager). You can start adding messages. To return to the map, select **Journey view** or **Exit **, then **Save and exit**. ## Channels > **Note:** If your account includes [Channel Coordination](https://www.airship.com/docs/reference/glossary/#channel_coordination), skip this step — the section does not appear for you in the dashboard. You will instead configure channels when you [add each message](#messages) to the sequence. Enable the channels you want to send the message to. Available channels are based on your selected trigger. 1. Select the sequence card, then the compose icon ( ). 1. Select **Settings** in the header. 1. Select the **Target** tab. 1. Enable channels. 1. Select **Next**, then **Save & Continue**. You will return to the [Sequence Manager](https://www.airship.com/docs/reference/glossary/#sequence_manager). You can start adding messages, or select **Exit **, then **Save and exit** to return to the map. ## Messages Configure the message conditions and content. For details, see [Add messages to a sequence](https://www.airship.com/docs/guides/messaging/messages/sequences/create/add-messages/). If you just saved and exited Settings, you will already be on the Manage screen and can skip to step 2. 1. Select the sequence card, then the compose icon ( ). 1. Set the message conditions. 1. Set the delay period. 1. Add the message content and configure its delivery settings. 1. Select **Save & Continue** to complete adding the message to your sequence. You will return to the [Sequence Manager](https://www.airship.com/docs/reference/glossary/#sequence_manager) after adding a message. From there, select **Add message** and repeat these steps for each message you want to add to the sequence. Select **Exit **, then **Save and exit** to return to the map. ## Outcomes You can configure outcomes in the [Journey Map](https://www.airship.com/docs/reference/glossary/#journey_map). If using the [Inactivity trigger](https://www.airship.com/docs/guides/messaging/messages/sequences/triggers/#inactivity), the outcome is pre-configured and cannot be edited. For details about setting up each option, see [Sequence outcomes](https://www.airship.com/docs/guides/messaging/messages/sequences/create/outcomes/). ## Start sequence When all required components are configured, you can: * [Test the sequence](https://www.airship.com/docs/guides/messaging/messages/sequences/create/test/) before starting it or publishing changes. * [Create a control group](https://www.airship.com/docs/guides/experimentation/control-groups/) before starting the sequence. * **Start the sequence** to make it available to your audience: * From the map: Select the sequence card and select *Start* from the dropdown menu. * From the [Sequence Manager](https://www.airship.com/docs/reference/glossary/#sequence_manager): Select ** Start**. # Sequence templates > {{< glossary_definition "sequence_template" >}} This document describes each Sequence template, provides steps for accessing them, and lists considerations for editing. See [Create a Sequence](https://www.airship.com/docs/guides/messaging/messages/sequences/create/create/) for full documentation about creating a new Sequence and composing its messages. Each message in a Sequence counts toward your *Sequences and Automation* [Message Limit](https://www.airship.com/docs/reference/glossary/#message_limits). ## Types of Sequence templates Default channels, trigger, outcome, message content, and delivery timing are described for each template type. ### Welcome Series Send onboarding messages. Default settings: | Channels | Trigger | Outcome | Message 1 | Message 2 | Delivery timing | | --- | --- | --- | --- | --- | --- | | App | [First Seen](https://www.airship.com/docs/reference/glossary/#first_seen_event_trigger) | Default Sequence behavior: Users who trigger the Sequence will receive all messages in the Sequence. | **Delay:** 1 day**Message type and content:** Push notification, with title and body welcoming the user to the app. | **Delay:** 3 days after message 1
**Message type and content:** Push notification, encouraging the user to check out the brand's best features. | All messages are set to *Send immediately*: Airship sends your message after receiving the triggering event and after the delay period elapses. | ### Authentication Sequence Encourage users on anonymous channels to log in to your app, which associates them with a [Named User](https://www.airship.com/docs/reference/glossary/#named_user). This creates a known contact within Airship. Default settings: | Channels | Trigger | Outcome | Message 1 | Message 2 | Delivery timing | | --- | --- | --- | --- | --- | --- | | App | [First Seen](https://www.airship.com/docs/reference/glossary/#first_seen_event_trigger) | Conversion: Users who trigger the Sequence and then log in to the app will exit the Sequence. | **Delay:** 7 days
**Message type and content:** Push notification, with title and body encouraging user to log in to the app. | | All messages are set to *Send immediately*: Airship sends your message after receiving the triggering event and after the delay period elapses. | > **Note:** Named user association at login must be implemented for your app. See: [Associating Channels with Named Users](https://www.airship.com/docs/guides/audience/named-users/#associate). ### Re-engagement Sequence Win back inactive audience members. Default settings: | Channels | Trigger | Outcome | Message 1 | Message 2 | Delivery timing | | --- | --- | --- | --- | --- | --- | | App, Web | [Inactivity](https://www.airship.com/docs/reference/glossary/#inactivity_event_trigger), set to *15 days* | Conversion: Users who trigger the Sequence and then re-engage with the app or website will exit the Sequence. They are represented in the *Reactivations* count in the [Performance Report](https://www.airship.com/docs/reference/glossary/#sequence_performance) and Sequence tests. | **Delay:** None
**Message type and content:** Push notification or web push notification, with title and body telling the user that they are missed. | **Delay:** 7 days after message 1
**Message type and content:** Push notification or web push notification, with title and body telling the user that they are missing out. | All messages are set to *Send immediately*: Airship sends your message after receiving the triggering event and after the delay period elapses. | ## Using a Sequence template To get started, create a new Sequence: 1. In the sidebar, select the **Create** dropdown menu ( ), then select **Journey**. 1. Select **Sequence**, then select a template. The Sequence will open to the [Journey Map](https://www.airship.com/docs/reference/glossary/#journey_map). Details to keep in mind as you complete configuration: * **Trigger and Outcomes** — Make sure your Trigger and Outcomes are appropriately configured for the Sequence's goal. * For Sequences using the **Re-engagement Sequence** template, you cannot edit the Conversion selection in the *Outcomes* step. Users will exit the Sequence and be counted as a *Reactivation* in the [Performance Report](https://www.airship.com/docs/reference/glossary/#sequence_performance) and Sequence tests. * For Sequences using the **Authentication Sequence** template, *Contact association* is the preselected conversion event in the *Outcomes* step, but you have the option to edit and select a custom event. * **Messages** — Verify the settings for the default messages and any messages you add to the Sequence. * **Delay and conditions** — Adjust the delay and/or conditions, as necessary. * For Sequences using the **Re-engagement Sequence** template, there is no delay setting for the first message. * For Sequences using the **Authentication Sequence** template, *Anonymous channels* is preselected for the *Channel condition* for the first message, and cannot be edited. * **Content** — Make sure to edit the placeholder text in each message, adding brand-specific content. For a Welcome Series, highlight features that your users can get started with right away. For Re-engagement, highlight the features and/or deals that your users are missing out on. * **Delivery** — All messages are set to *Send immediately* by default. After setting up your new Sequence, you can: * [Test the Sequence](https://www.airship.com/docs/guides/messaging/messages/sequences/create/test/) before starting it. * [Start the Sequence](https://www.airship.com/docs/guides/messaging/messages/sequences/create/create/#start-sequence) to make it available to your audience. # Sequence outcomes > Configure alternatives to a sequence's default ending behavior. By default, all sequence messages are delivered to users who meet the conditions, but you can configure alternative outcomes. ## Possible outcomes You can configure the following outcomes for a sequence:
Continue to an in-app experience ([In-App Automation](https://www.airship.com/docs/reference/glossary/#iaa) or [Scene](https://www.airship.com/docs/reference/glossary/#scene)) or another sequence when Airship sends the last message in the current sequence.
Exit the sequence when a specific event occurs. When configuring the event, you designate it as a conversion or cancellation for reporting.
Exit the sequence when a specific event occurs, then continue to an in-app experience or another sequence.
You can use file upload to provide multiple values to match against a specified event property’s value. For string properties only.
>For example, for a point-of-sale system that emits events when a sale occurs, an event might have the following data:
> ```js > name: "sale-completed" > properties: > customer_id: 234234 > store_id: 103843 > region: "northwest-usa" > ``` > >To trigger only when sales occur in the regions of northwest-usa and southwest-usa but not midwest-usa or any other region, you would do the following to filter your custom events:
region..txt file containing values northwest-usa and southwest-usa.Provide your values in a line delimited .txt file. Each value must be on a separate line. 100 KB maximum file size.
Airship evaluates subscription status across all channels collectively. A Contact is subscribed to a list when they have at least one opted-in channel and unsubscribed when they have no opted-in channels. | Search for and select a list, then select whether they must be in to or out of the list. | {class="table-col-1-20 table-col-2-40"} 1. Select the arrow icon ( ) to close the configuration panel. ### Delay You can set a delay period for the message. This is the time Airship should wait after receiving the triggering event before sending your message. Set the value to zero (0) minutes to send immediately or adjust the default value (one hour) to the desired delay period. The maximum delay period is 90 days. * **For the first message in your sequence**: * The delay period starts when the triggering event is received by Airship. * For the First Seen trigger, a delay shorter than one hour may result in dropped sends. * For sequences with the goal of *Event*, a delay shorter than one hour may result in sends going to users who converted/cancelled. * For sequences using the Inactivity trigger, there is no delay setting for the first message. * **For subsequent messages**: * The delay period starts when the previous message was sent. * For sequences with the goal of *Event*, a delay shorter than one hour may result in sends going to users who converted/cancelled. To set a delay: 1. Under **Message Delay**, select the currently set time period. 1. Enter a value in minutes, hours, or days. 1. Select **Save**. ## Configure the message Select **Add message content**. You can add message content without setting conditions or a delay. After completing a step, select the next step in the header to move on. ### Setup > **Note:** Projects using the [channel-level segmentation system](https://www.airship.com/docs/guides/audience/segmentation/segmentation/#channel-level-segmentation) do not have a Setup step. However, if they are enabled for Channel Coordination, you must select and configure a strategy and save it before moving to the Content step. > > Also, for the channel-level segmentation system, each strategy targets a [Named User](https://www.airship.com/docs/reference/glossary/#named_user), not a [Contact](https://www.airship.com/docs/reference/glossary/#contact). First, select a [Channel Coordination](https://www.airship.com/docs/reference/glossary/#channel_coordination) strategy: * **Fan Out** targets a Contact on all the channels they are opted in to, maximizing the chances they receive your message. * **Last Active** targets a Contact on the opted-in channel they used most recently. * **Originating Channel** targets a Contact on the channel that triggered the Sequence. * **Priority Channel** targets a Contact on the first channel they are opted in to, in the priority order you set. Then, enable the channel types to include in your audience. For Mobile Apps, also select from the available platforms. For Priority Channel, also drag the channel types into priority order.
Use Channel conditions to filter which channels are included in the audience. A channel must meet the conditions to remain in the audience.
For example, if your audience includes users with app, email, and SMS channels, and you set a channel condition requiring membership in an email Subscription List:
To set channel conditions, use the same process as when building a [Segment](https://www.airship.com/docs/reference/glossary/#segment). You can use the following data in your conditions:
device [Tag Group](https://www.airship.com/docs/reference/glossary/#tag_group) — See Primary device tags.Selected Lifecycle, Subscription, and Uploaded Lists must contain Channel IDs or Named Users as the identifier, not a mix of the two.
### Content Configure the message content per enabled channel. See [Content by channel](https://www.airship.com/docs/guides/messaging/messages/content/).  ### Delivery Configure [delivery](https://www.airship.com/docs/guides/messaging/messages/delivery/delivery/). Timing settings do not appear if you chose the Inactivity trigger. ### Review Review the device preview and message summary. Click the arrows to page through the various previews. The channel and display type dynamically update in the dropdown menu above. You can also select a preview directly from the dropdown menu. If you want to make changes, click the associated step in the header, make your changes, then return to *Review*. Send a test message to verify its appearance and behavior on each configured channel. The message is sent to your selected recipients immediately, and it appears as a test in [Messages Overview](https://www.airship.com/docs/reference/glossary/#messages_overview). 1. Select **Send Test**.Under Test audience, enter at least one [Named User](https://www.airship.com/docs/reference/glossary/#named_user) or [Test Group](https://www.airship.com/docs/reference/glossary/#preview_test_groups) and select from the results. If your message includes email, you can also search for email addresses. If no matches appear for an address, you can select Create channel for <address>, and the channel will be registered for your project and opted in to transactional messaging.
Users in an active [Holdout Experiment](https://www.airship.com/docs/reference/glossary/#holdout_experiment) will not receive a test message. You can view a user’s current holdout group status and history when viewing their channel details in Contact Management.
(If your message contains [Handlebars](https://www.airship.com/docs/reference/glossary/#handlebars)) Under Personalization, select and configure a personalization data source:
| Data source | Description | Steps |
|---|---|---|
| Test message recipient | The message will be personalized using information associated with each test audience member. | n/a |
| Preview Data tool | The message will be personalized using the data currently entered in the Preview Data tool. The same values will apply to all test message recipients. You can also manually edit the JSON. | (Optional) Edit the JSON data. |
Select Send.
For example, if you have a custom event representing a purchase, you can send an automated message confirming the purchase and providing information about what the user bought.
Custom Event ```json { "occurred": "{{event_time}}", "user": { "named_user_id": "user" }, "body": { "name": "purchase", "subscribe": true, "properties": { "customer_name": "user", "total": 48, "cost_units": "USD", "purchase": [ { "qty": 4, "item": "MLB regulation baseball", "per": "$12", "total": "$48" } ] } } } ```
Message Content ```handlebars Hi {{$def customer_name "valued customer"}}! Thanks for your purchase of: {{#each purchase}} {{qty}}x {{per}} {{item}} = {{this.total}} {{/each}} total: ${{total}} Is being processed. We'll message you again when it ships! ```
## Localize your sequence messages Learn how to localize your messages in your sequence using [Handlebars](https://www.airship.com/docs/reference/glossary/#handlebars) with conditions targeting `ua_language` and/or `ua_country` tags. Localizing messages in this way ensures that your audience only sees the message intended for their language settings. > **Note:** The `else` statement acts as the default message for members of your audience who do not have a `ua_language` # Test a Sequence > Use sequence testing to verify the appearance and behavior of your messages, as well as channel configuration, tag conditions, and conversion or cancellation events. You can send a sequence to a test audience according to your specified timing, then view versions of the [Performance Report](https://www.airship.com/docs/reference/glossary/#sequence_performance) and message reports based on the test audience. You can also test individual messages in the sequence. ## Your test audience You can send a test to either a single [Named User](https://www.airship.com/docs/reference/glossary/#named_user) or to a [Test Group](https://www.airship.com/docs/reference/glossary/#preview_test_groups). * If you used tag conditions in your sequence, make sure you know which users in your test audience have which tags. * If you personalized messages using attributes, assign the relevant attributes to your test audience. * There may be a discrepancy between the number of intended recipients and the number of actual devices if members of the test audience have uninstalled. * Users in an active [Holdout Experiment](https://www.airship.com/docs/reference/glossary/#holdout_experiment) will not receive a test message. You can view a user's current holdout group status and history when [viewing their channel details in Contact Management](https://www.airship.com/docs/guides/audience/contact-management/#viewing-channel-details). ## Test a sequence Follow these steps to test a sequence that has never been started, or started but never edited. > **Note:** The option to test a sequence is not available until the sequence is configured with the minimum requirements to start it. If you just created the sequence, you will already be on the *Manage* screen. Otherwise, first go to **Messages**, then **Messages Overview**, and then select the pencil icon ( ) for a sequence. Then: 1. Click **Test Run** in the leftside drawer. 1. Click **Set up a test run**. 1. Enter at least one named user or test group and select from the results. 1. Specify the amount of time you want between delivery of each message in your test sequence. 1. Click **Create test**. 1. Click **Start test** on the *Test* screen. You can repeat this step to restart the test. Now you can [evaluate the test](#evaluate). ### Test your changes after editing a sequence Follow these steps to test your changes after editing a started or paused sequence. If you just edited the sequence, you will already be on the *Manage* screen. Otherwise, first go to **Messages**, then **Messages Overview**, and then select the pencil icon ( ) for a sequence. Then: 1. Click **Test changes** next to the notice *You have unpublished changes.* 1. If you have created a test for this sequence before, click **Yes, create new test** to confirm deleting previous test data. 1. Enter at least one named user or test group and select from the results. 1. Specify the amount of time you want between delivery of each message in your test sequence. 1. Click **Create test**. 1. Click **Start test run**. You can repeat this step to restart the test. Now you can [evaluate the test](#evaluate). ## Test a message in a sequence Send a test message, then verify its appearance and behavior on each channel the message is configured for. The message is sent to your selected recipients immediately, and it appears as a test in [Messages Overview](https://www.airship.com/docs/reference/glossary/#messages_overview). Send a test from the *Review* step when composing a message: 1. Select **Send Test**.Under Test audience, enter at least one [Named User](https://www.airship.com/docs/reference/glossary/#named_user) or [Test Group](https://www.airship.com/docs/reference/glossary/#preview_test_groups) and select from the results. If your message includes email, you can also search for email addresses. If no matches appear for an address, you can select Create channel for <address>, and the channel will be registered for your project and opted in to transactional messaging.
Users in an active [Holdout Experiment](https://www.airship.com/docs/reference/glossary/#holdout_experiment) will not receive a test message. You can view a user’s current holdout group status and history when viewing their channel details in Contact Management.
(If your message contains [Handlebars](https://www.airship.com/docs/reference/glossary/#handlebars)) Under Personalization, select and configure a personalization data source:
| Data source | Description | Steps |
|---|---|---|
| Test message recipient | The message will be personalized using information associated with each test audience member. | n/a |
| Preview Data tool | The message will be personalized using the data currently entered in the Preview Data tool. The same values will apply to all test message recipients. You can also manually edit the JSON. | (Optional) Edit the JSON data. |
Select Send.
When creating messages, you configure its appearance in the Content step. In the Delivery step, you can configure content-related features that do not affect the appearance of the message.
In the *Content* step, click **Web Notification**:  Now you can configure the body of the message: 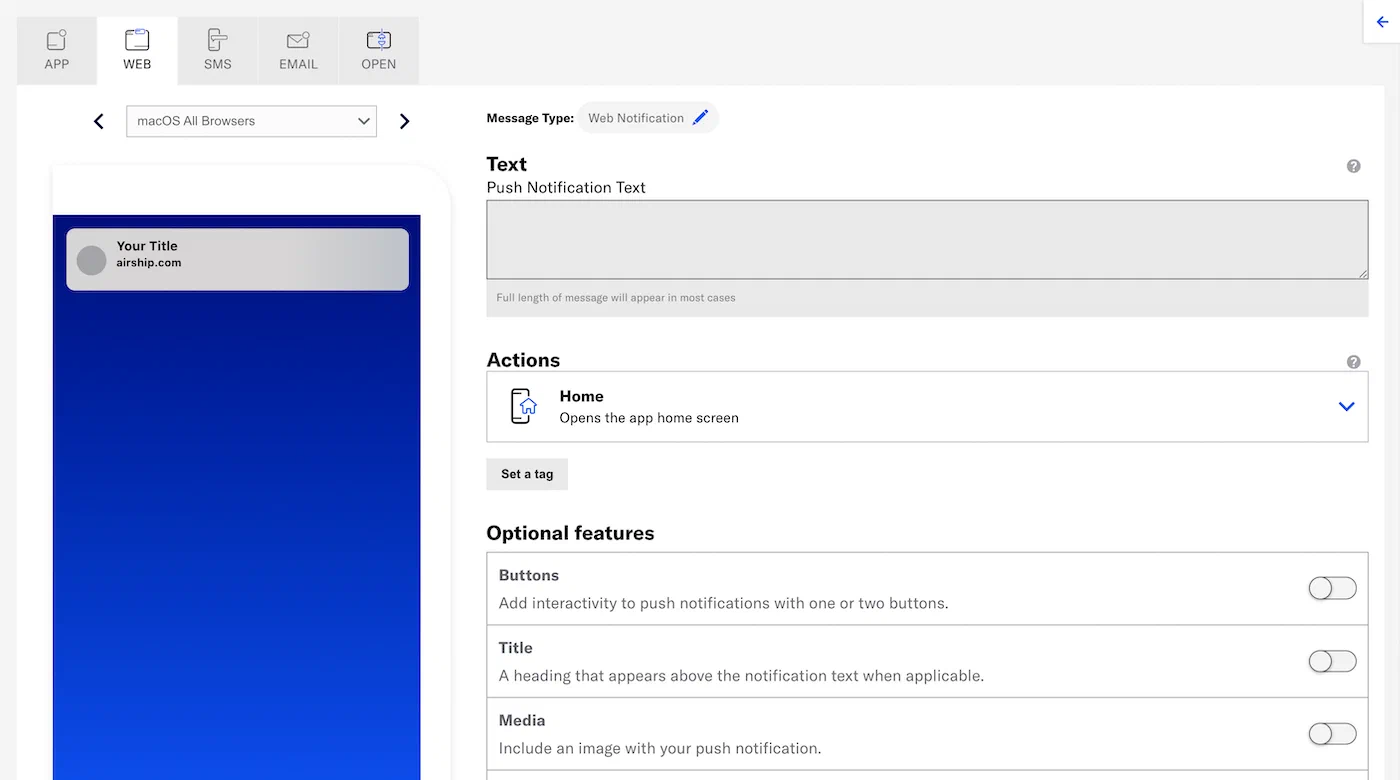 1.Enter the message text. If you are using [Handlebars](https://www.airship.com/docs/reference/glossary/#handlebars), you can test how the content will appear. See Previewing personalized content.
1. Select an [Action](https://www.airship.com/docs/reference/glossary/#action): * Home * Web Page * Adaptive Link 1. (Optional) Set and/or remove tags when the user interacts with your message.If your Airship plan includes CDN support, you can also upload media or select from previously uploaded media. See Insert media in message content in Media library.
### MediaEnter a URL to add media to your notifications. See also Media guidelines.
If using a personalized media URL for an App push notification, you must specify the media type after entering the URL:
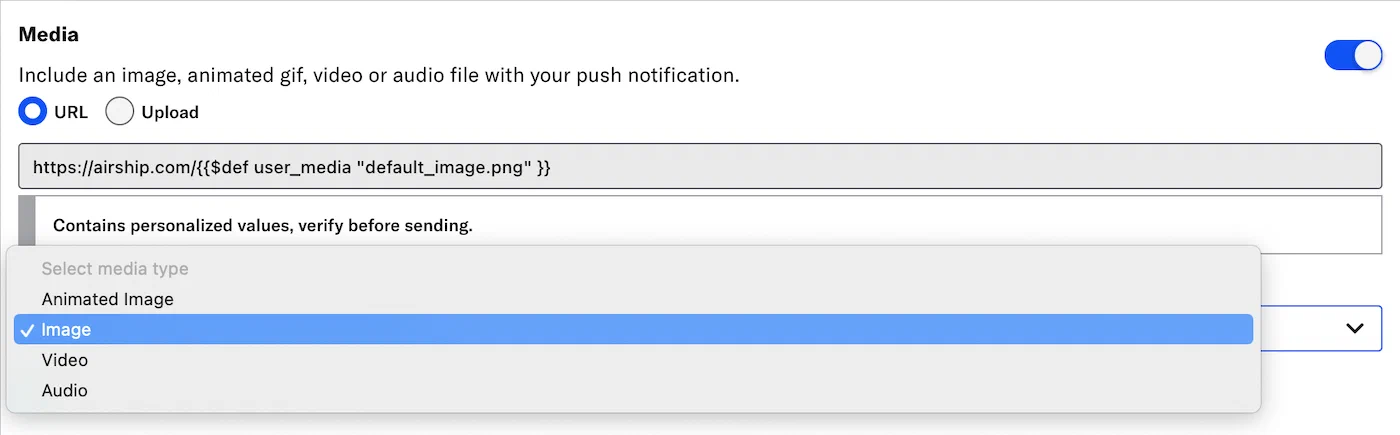 *Specifying the media type for a personalized media URL*If your Airship plan includes CDN support, you can also upload media or select from previously uploaded media. See Insert media in message content in Media library.
### Title Enter a title to create a heading that appears above the notification text. The title set here will override the [default title](https://www.airship.com/docs/developer/sdk-integration/web/getting-started/#airship-setup) configured for your web notifications. # SMS/MMS/RCS content > Send messages to your SMS channel. See also the [SMS/MMS/RCS](https://www.airship.com/docs/guides/features/messaging/sms/) in the feature guide. ## Create SMS content In the *Content* step, select **Text Message (SMS)**: 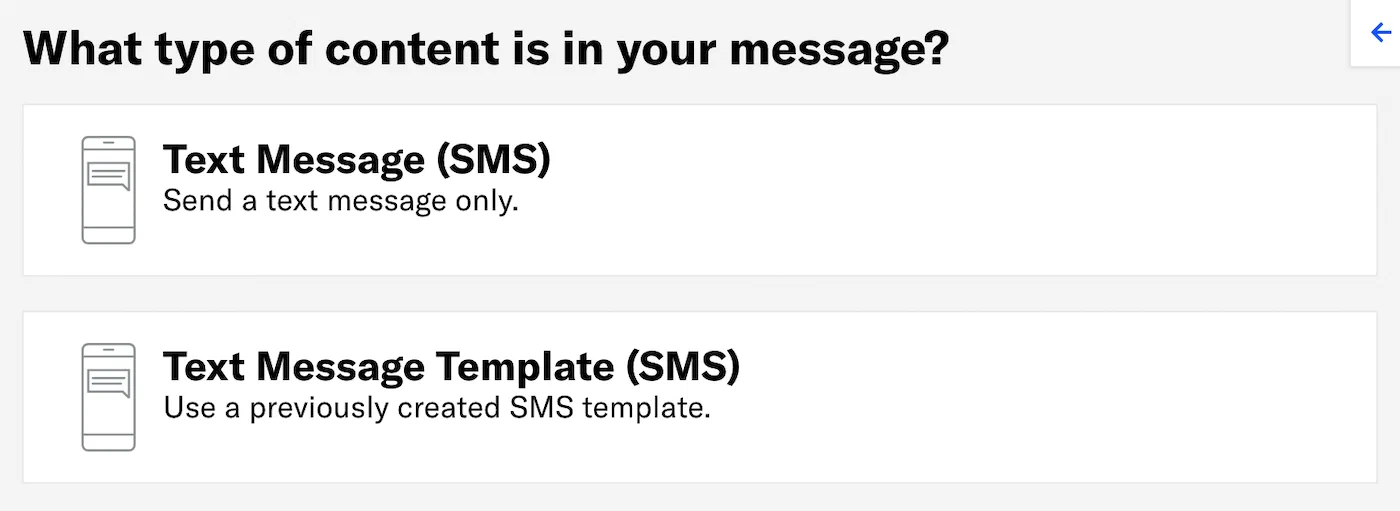 Now you can configure the body of the message: 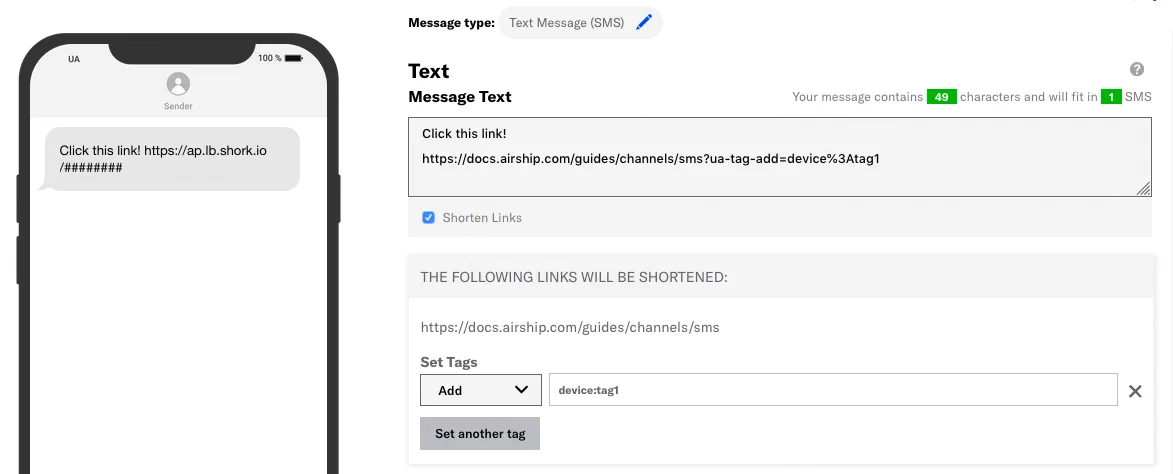 1.Enter the message text. If you are using [Handlebars](https://www.airship.com/docs/reference/glossary/#handlebars), you can test how the content will appear. See Previewing personalized content.
* The character count and the total number of SMS messages update as you type. * Include [Merge Fields](https://www.airship.com/docs/reference/glossary/#merge_field) or [Dynamic Content](https://www.airship.com/docs/reference/glossary/#dynamic_content) if you selected *Upload Users* in the *Audience* step. The character and notification counts do not account for the varying lengths of merge values, so they should only be used as an estimate when using merge fields. 1. (Optional) If your message includes links, you can enable/disable *Shorten Links*. When enabled, the message and character counts reflect your message with shortened link URLs. 1. (Optional) If your message includes links and *Shorten Links* is enabled, you can add or remove tags for members of your audience who engage with your link. 1. Select **Set tags**. 1. Select *Add* or *Remove*, then search for tags that exist in the system, or create a new tag. 1. (Optional) Select **Set another tag** and repeat the previous step. > **Note:** If you create a new tag when adding tag actions, it will belong to the `device` tag group for associated SMS channels. Now you are ready to complete the remaining steps in the composer. ## Create MMS content In the Content step, select **Multimedia Message (MMS)**: 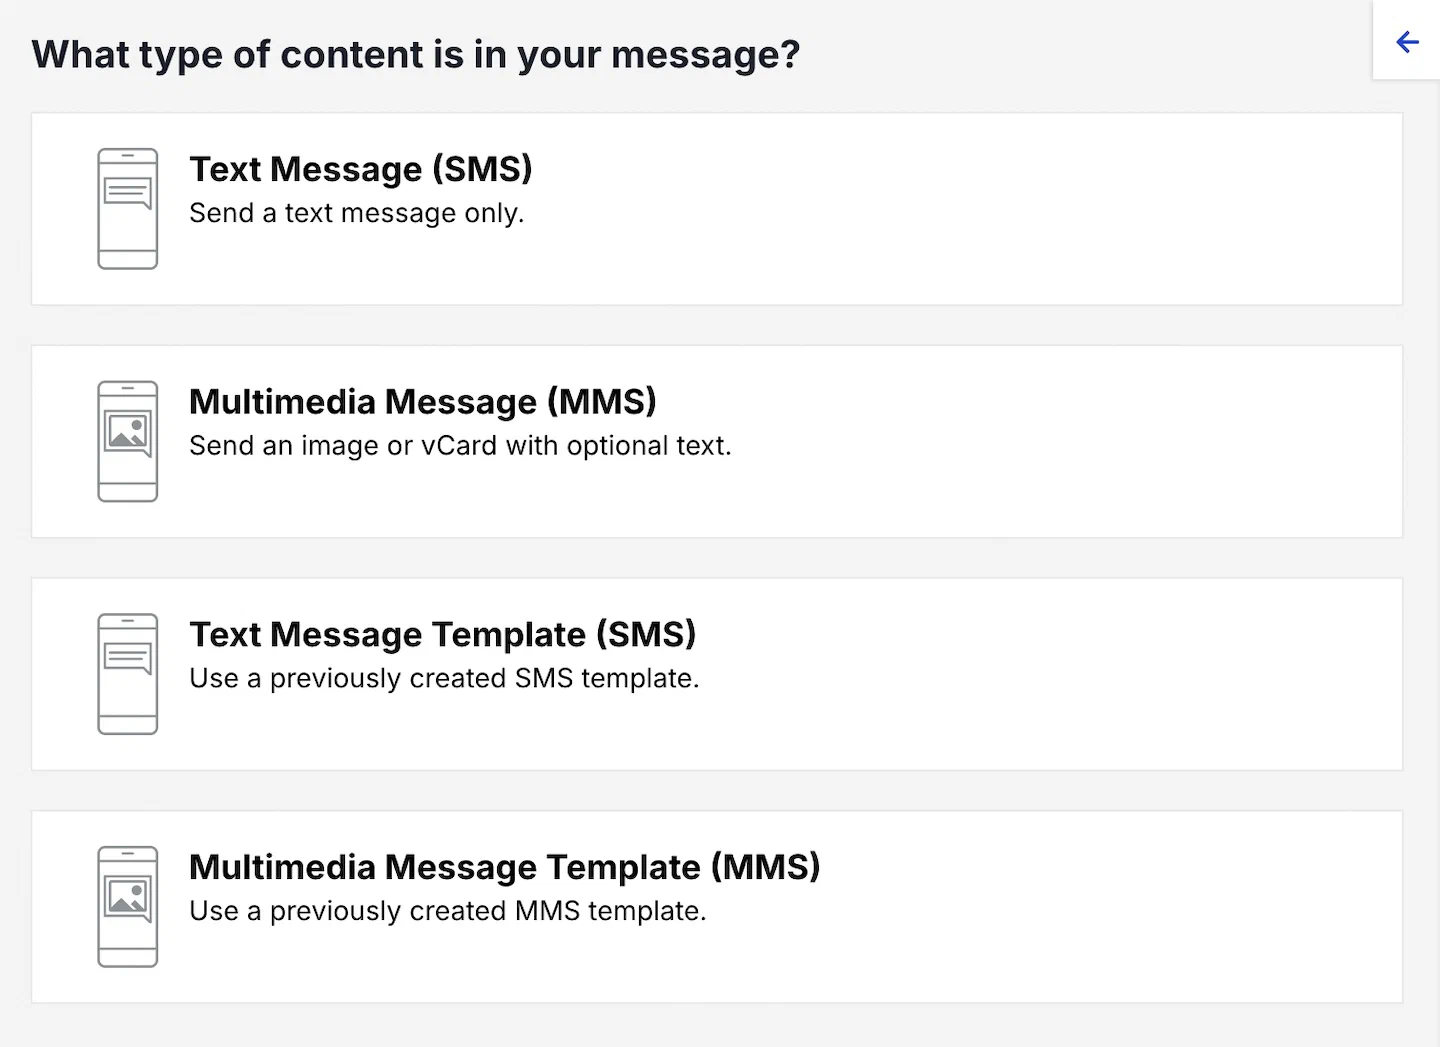 Now you can configure the body of the message:  1. Provide the media for your message. See [Media guidelines](https://www.airship.com/docs/reference/messages/media-guidelines/). * **URL** — Enter the address of your image or vCard, beginning with HTTP or HTTPS and ending with the image or vCard extension. * **Upload** — Select **Choose file** and select your image or vCard. 1. (Optional) Enter text for **Subject**, **Text Message**, and/or **SMS Fallback Text**. If you are using [Handlebars](https://www.airship.com/docs/reference/glossary/#handlebars), you can preview how your content will appear. See [Previewing personalized content](https://www.airship.com/docs/guides/personalization/previewing/). Include [Merge Fields](https://www.airship.com/docs/reference/glossary/#merge_field) or [Dynamic Content](https://www.airship.com/docs/reference/glossary/#dynamic_content) if you selected *Upload Users* in the *Audience* step. The fallback text character count does not account for the varying lengths of merge values, so it should only be used as an estimate when using merge fields. 1. (Optional) If *Text Message* or *SMS Fallback Text* includes links, you can enable/disable *Shorten Links*. When enabled, the fallback text character count reflects your message with shortened link URLs. 1. (Optional) If *Text Message* or *SMS Fallback Text* includes links and *Shorten Links* is enabled, you can add or remove tags for members of your audience who engage with your link. 1. Select **Set tags**. 1. Select *Add* or *Remove*, then search for tags that exist in the system, or create a new tag. 1. (Optional) Select **Set another tag** and repeat the previous step. > **Note:** If you create a new tag when adding tag actions, it will belong to the `device` tag group for associated SMS channels. Now you are ready to complete the remaining steps in the composer. ## Link Shortening When you enable link shortening, Airship replaces your URL with unique, shortened URLs for each member of your audience. Shortened URLs: * Reduce the total number of characters in your messages to exactly 25 characters. * Track engagement with SMS messages. * Support [tag actions](#tag-actions) — adding or removing tags from your audience when they tap a link. * Expire 60 days after they are sent. For Airship to recognize and shorten your links, your URLs must: * Begin with `http://` or `https://`. * Begin and end with a space. Your URL cannot contain beginning or trailing punctuation or space characters; spaces determine the beginning and end of the URL. For more information, see [Link Shortening](https://www.airship.com/docs/developer/api-integrations/sms/link-shortening/) in our SMS platform guide. In the dashboard, you enable link shortening in the *Content* step in a composer. You can also set your project to automatically shorten links in all messages created using the dashboard: 1. Next to your project name, select the dropdown menu ( ), then **Settings**. 1. Under **Project settings**, select **Dashboard Settings**. 1. Enable **SMS Link Shortening**. > **Note:** Your project's link shortening setting does not affect operations in the API. ## Tag Actions {#tag-actions} You can add or remove tags from users who engage with Airship-shortened links in your SMS messages. Shortened links with tag actions are the same length as URLs without. You can also use tag change events to kick off automation rules or sequences, making it easier to integrate SMS messaging campaigns into your larger messaging strategy. Tag actions add query parameters to your URL, but users will still see the shortened URL in your SMS messages. You can perform up to 100 total tag actions (add and remove) per SMS message. In the dashboard, a **Set tags** button appears when you add a URL in your SMS text (or SMS fallback text) and enable link shortening. # Open channel content > Send notifications to your open channel. See also the [Open channels](https://www.airship.com/docs/guides/features/messaging/open-channels/) feature guide. ## Creating contentWhen creating messages, you configure its appearance in the Content step. In the Delivery step, you can configure content-related features that do not affect the appearance of the message.
In the *Content* step, click **Custom Message**:  Now you can configure the body of the message: 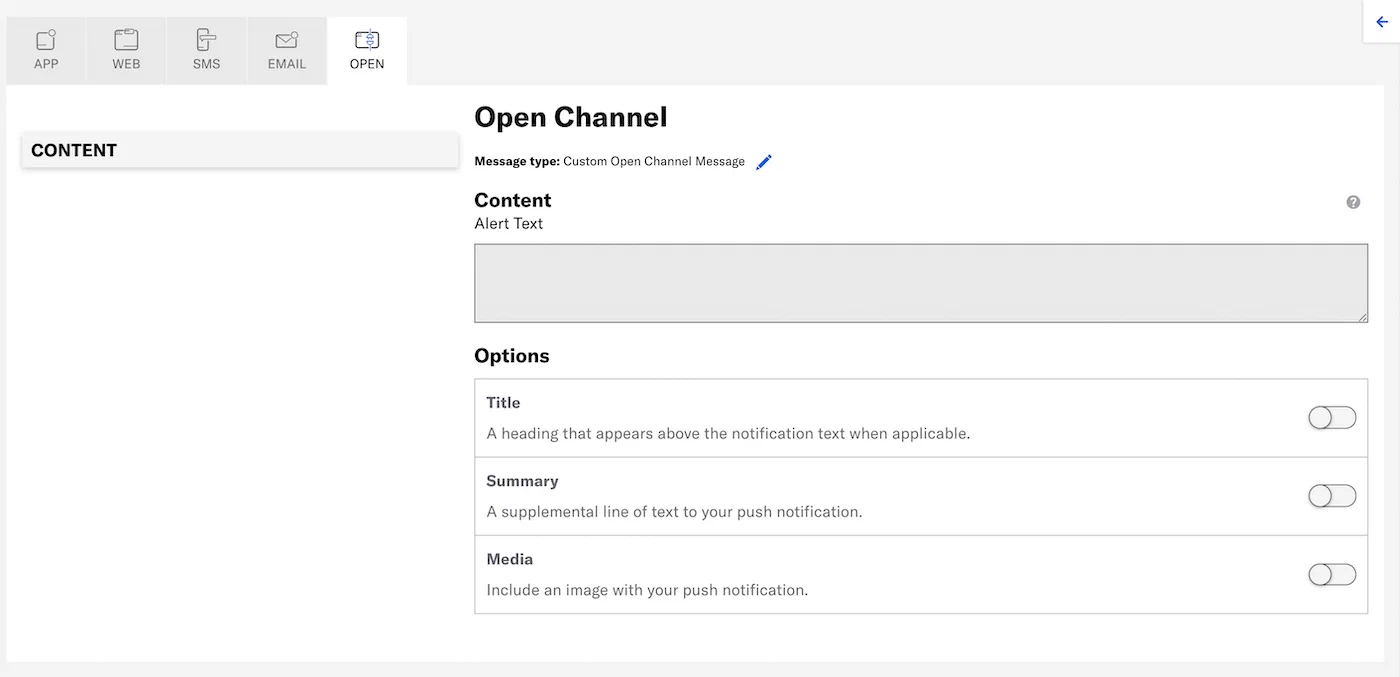 1.Enter the message text. If you are using [Handlebars](https://www.airship.com/docs/reference/glossary/#handlebars), you can test how the content will appear. See Previewing personalized content.
1. Configure optional features: * [Media](#media) * [Summary](#summary) * [Title](#title) Now you are ready to complete the remaining steps in the composer. ### MediaEnter a URL to add media to your notifications. See also Media guidelines.
If using a personalized media URL for an App push notification, you must specify the media type after entering the URL:
 *Specifying the media type for a personalized media URL*If your Airship plan includes CDN support, you can also upload media or select from previously uploaded media. See Insert media in message content in Media library.
### Summary Add a summary line as supplemental text displayed with the notification. ### Title Enter a title to create a heading that appears above the notification text. ### App channel content Learn about App channel message types and how to configure their content. # Push notification content > Send push notifications to your App channel. See also the [Push notifications](https://www.airship.com/docs/guides/features/messaging/push-notifications/) feature guide. ## Creating contentWhen creating messages, you configure its appearance in the Content step. In the Delivery step, you can configure content-related features that do not affect the appearance of the message.
**Silent push notifications** do not have visual content. In the *Content* step, click **Silent Push Notification**, then click *Delivery* in the header and complete the remaining steps in the composer. The remainder of this section applies to regular push notifications. --- In the *Content* step, click **Push Notification** then **Add content**: 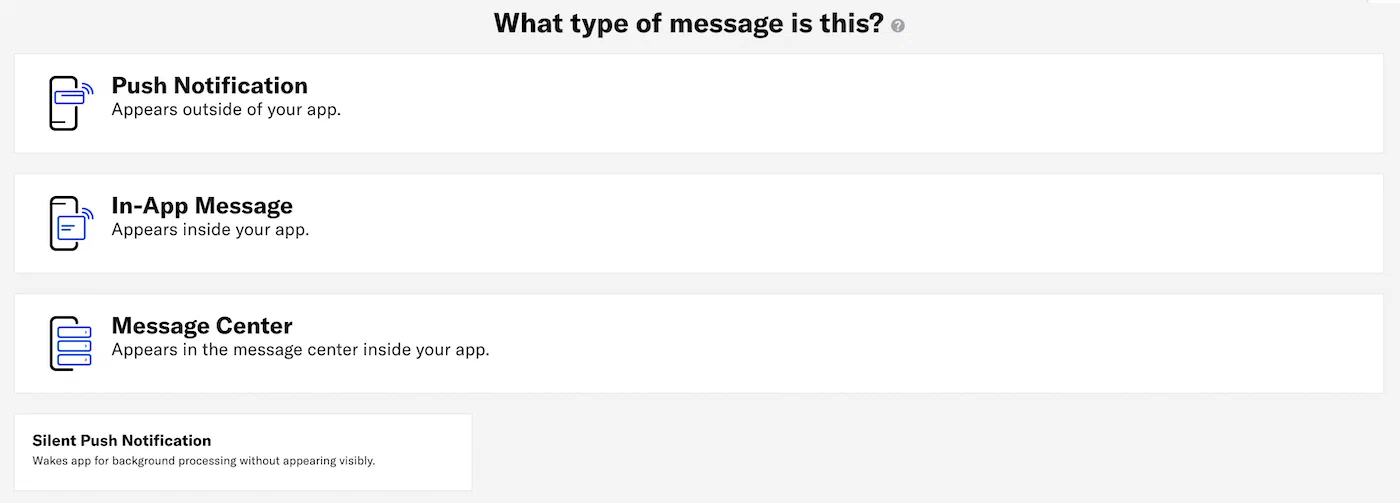 Now you can configure the body of the message:  1.Enter the message text. If you are using [Handlebars](https://www.airship.com/docs/reference/glossary/#handlebars), you can test how the content will appear. See Previewing personalized content.
1. Select an [Action](https://www.airship.com/docs/reference/glossary/#action): * Home * Message Center * Landing Page * Deep Link * Adaptive Link * Web Page * Share 1. (Optional) Set and/or remove tags when the user interacts with your message.You can also assign an event value and specify string, number, or boolean property values that you can use later when filtering Custom Events. If you want to use properties, you must define the event and its properties in your project in advance. See Manage Events.
Enter a URL to add media to your notifications. See also Media guidelines.
If using a personalized media URL for an App push notification, you must specify the media type after entering the URL:
 *Specifying the media type for a personalized media URL* > **Note:** When you enable both the iOS platform and one or more of Android and Fire OS, and you do not enter a static image in the initial URL field, a Static Image field is added to the media settings. Enter a URL, or use the Upload option.If your Airship plan includes CDN support, you can also upload media or select from previously uploaded media. See Insert media in message content in Media library.
### Summary Add a summary line as supplemental text displayed with the notification. * **iOS:** The summary appears below the push notification title. * **Android and Fire OS:** The summary appears below the main notification text in most cases. This is the only visible text other than the title when Android Picture is visible in expanded mode, as the main notification text is suppressed. ### Title Enter a title to create a heading that appears above the notification text in: * iOS Notification Center * Apple Watch Looks * Android and Fire OS Notification Area/Drawer ## Default notification character limits The following tables outline the maximum character counts for default notification display. ### iOS | Device | Display | Lock screen Portrait | Lock screen Landscape | Notification Center | Banner style | Alert view | | --- | --- | --- | --- | --- | --- | --- | | **iPhone 14 Pro Max** | 6.7 in (170 mm)When creating messages, you configure its appearance in the Content step. In the Delivery step, you can configure content-related features that do not affect the appearance of the message.
In the *Content* step, click **In-App Message** then **Add content**:  Now you can configure the body of the message: 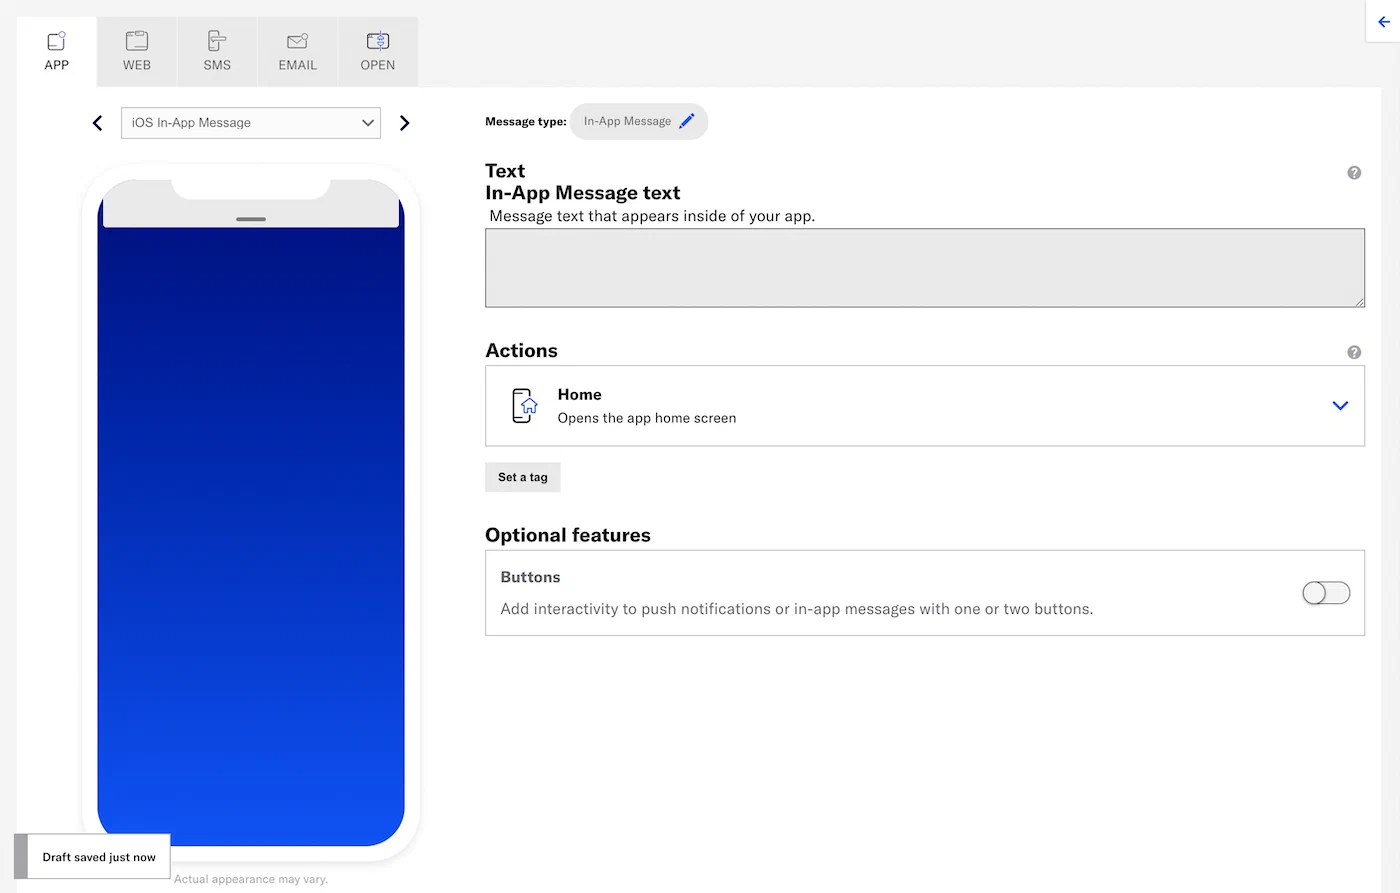 1.Enter the message text. If you are using [Handlebars](https://www.airship.com/docs/reference/glossary/#handlebars), you can test how the content will appear. See Previewing personalized content.
1. Select an [Action](https://www.airship.com/docs/reference/glossary/#action): * Home * Message Center * Landing Page * Deep Link * Adaptive Link * Web Page * Share 1. (Optional) Set and/or remove tags when the user interacts with your message.You can also assign an event value and specify string, number, or boolean property values that you can use later when filtering Custom Events. If you want to use properties, you must define the event and its properties in your project in advance. See Manage Events.
When creating messages, you configure its appearance in the Content step. In the Delivery step, you can configure content-related features that do not affect the appearance of the message.
In the *Content* step, click **Message Center** then **Add content**:  Then click **Interactive editor » Add content » Edit**. Now you can configure the message content: 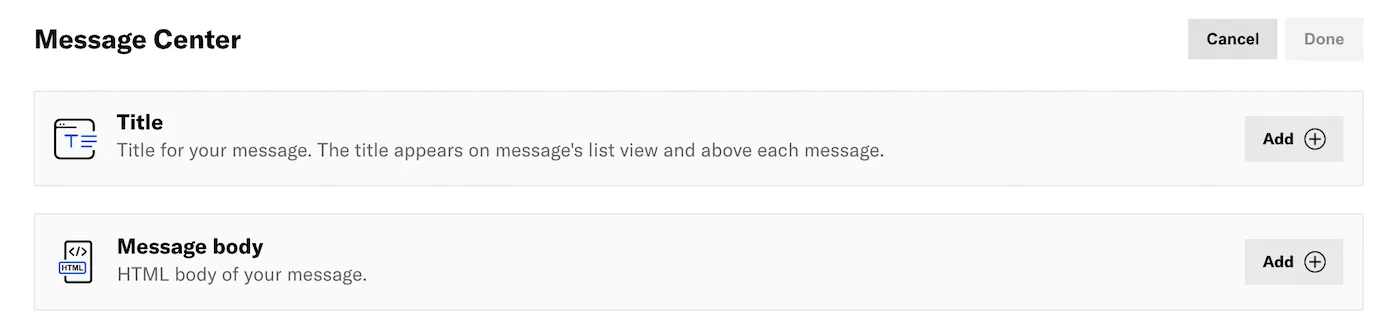 If your message includes [Handlebars](https://www.airship.com/docs/reference/glossary/#handlebars), you can preview how the content will appear. See [Previewing personalized content](https://www.airship.com/docs/guides/personalization/previewing/). 1. Add a *Title*. 1. Click **Add **. 1. Enter a title. 1. Click **Done**. 1. Add the *Message body*. 1. Click **Add **.Select Settings in the left sidebar.
Enter the HTTPS URL of an image. See Media guidelines.
If your Airship plan includes CDN support, you can also upload media or select from previously uploaded media. See Insert media in message content in Media library.
When creating messages, you configure its appearance in the Content step. In the Delivery step, you can configure content-related features that do not affect the appearance of the message.
Do the following to add only a Message Center message: 1. In the Content step, select **Message Center**, then **Add content**. 1. Select **Visual editor**. 1. Under **Rich Page**, select **Create**. Or you use the Visual editor in the Content step when configuring a push notification or in-app message: 1. Under **Actions**, select **Message Center**, then **Visual editor**. 1. Under **Rich Page**, select **Create**. Now you can configure the message content. Follow the steps in [The Visual editor](https://www.airship.com/docs/guides/messaging/editors/visual/). ## Android app reinstallationMessage Center inboxes are associated with channel IDs. On Android, reinstalling an app creates a new channel ID. Messages previously available in an Android user’s inbox will no longer be available after app reinstall.
## Hosting and page sizeContent is hosted in a CDN, ensuring responsive load times for your users globally. Hosted content — including embedded CSS, images and JavaScript — is limited to 1.5 MB, however the ideal page size is much smaller, given the potential for degraded download speeds on cellular networks. We recommend that you optimize your images and HTML to keep total page sizes under 100 KB.
If you have additional assets to load, you can host them in another location and link to them. Airship offers additional asset hosting options as a Professional Service. Contact Airship Sales for more information.
## Welcome Message You can create a default message that appears in every new user's Message Center inbox when they open your app for the first time: 1. Go to **Messages**, then **Welcome Message**. 1. Enter a message title. 1. Enter HTML for the message body. 1. Select **Save**. After saving, you have the option to delete the message. ## Remove a message from a Message Center You can remove messages from the Message Center inbox from the dashboard. > **Warning:** Removing a message from a Message Center is irreversible. 1. Go to **Messages**, then **Messages Overview**. 1. Click for the message you want to remove. 1. Click **Remove from inbox** and confirm. After removal, *Removed from inbox* and the removal date, time, and time zone appears in these locations: * [Messages Overview](https://www.airship.com/docs/reference/glossary/#messages_overview) — Message Details expanded view * [Message report](https://www.airship.com/docs/guides/reports/message/) — Header # Landing pages > Direct users to a landing page when they interact with your message. See also the [Landing pages](https://www.airship.com/docs/guides/features/messaging/landing-pages/) feature guide. ## Choosing an editor If your landing page content is hosted outside Airship, configure it using [Creating content: Custom URL](#creating-content-custom-url). You do not use the Interactive or Visual editors for that path. When Airship hosts your landing page, choose an editor for creating content: Interactive or Visual. For information about each, see [Content editors](https://www.airship.com/docs/guides/messaging/editors/about/). See the sections below for access steps and links to configuration details: [Creating content: Interactive editor](#interactive-editor) or [Creating content: Visual editor](#visual-editor). ## Creating content: Custom URL In the *Content* step for a push notification or in-app message, select *Landing Page* from the [Actions](https://www.airship.com/docs/reference/glossary/#action) menu, then click **Custom URL** and enter an HTTPS URL. ## Creating content: Interactive editor {#interactive-editor} In the *Content* step for a push notification or in-app message, select *Landing Page* from the [Actions](https://www.airship.com/docs/reference/glossary/#action) menu, then click **Interactive editor » Add content » Edit**. Now you can configure the landing page:  If your landing page includes [Handlebars](https://www.airship.com/docs/reference/glossary/#handlebars), you can preview how the content will appear. See [Previewing personalized content](https://www.airship.com/docs/guides/personalization/previewing/). 1. Click **Add **.Content is hosted in a CDN, ensuring responsive load times for your users globally. Hosted content — including embedded CSS, images and JavaScript — is limited to 1.5 MB, however the ideal page size is much smaller, given the potential for degraded download speeds on cellular networks. We recommend that you optimize your images and HTML to keep total page sizes under 100 KB.
If you have additional assets to load, you can host them in another location and link to them. Airship offers additional asset hosting options as a Professional Service. Contact Airship Sales for more information.
## iOS developer notes The default behavior in the iOS SDK is to *not display* the landing page when the corresponding push notification is received while the app is in the foreground state. The logic behind this behavior is that you may not wish to interrupt or distract a user who is currently occupied with the app, only to ask them to visit a different part of the app. If you need to display a landing page while the app is in the foreground state, replace the registry predicate associated with that action with one that allows foreground execution. In the Airship SDK, this relative state between *what the app is doing now* and *how the action was invoked* is known as a *situation*, or more properly, [ActionSituation](https://urbanairship.github.io/ios-library/v20/AirshipCore/documentation/airshipcore/actionsituation) . Other examples of situations besides foreground state include background push and app launched from push notification. See [ActionArguments](https://urbanairship.github.io/ios-library/v20/AirshipCore/documentation/airshipcore/actionarguments) for more detail on the methods involved with this display behavior. ### Email channel content Learn about Email channel messages and how to configure their content. # Email content > Send messages to your email channel. See also the [Email](https://www.airship.com/docs/guides/features/messaging/email/) feature guide. ## Creating contentWhen creating messages, you configure its appearance in the Content step. In the Delivery step, you can configure content-related features that do not affect the appearance of the message.
In the *Content* step, click **Add content**. Now you can configure the body of the message: * For each section, click **Edit ** or **Add **, make your changes, then click **Done**. Merge fields can be included in HTML and plain text content if you chose Upload Users in the Audience step. * If your message includes [Handlebars](https://www.airship.com/docs/reference/glossary/#handlebars), you can preview how the content will appear. See [Previewing personalized content](https://www.airship.com/docs/guides/personalization/previewing/). 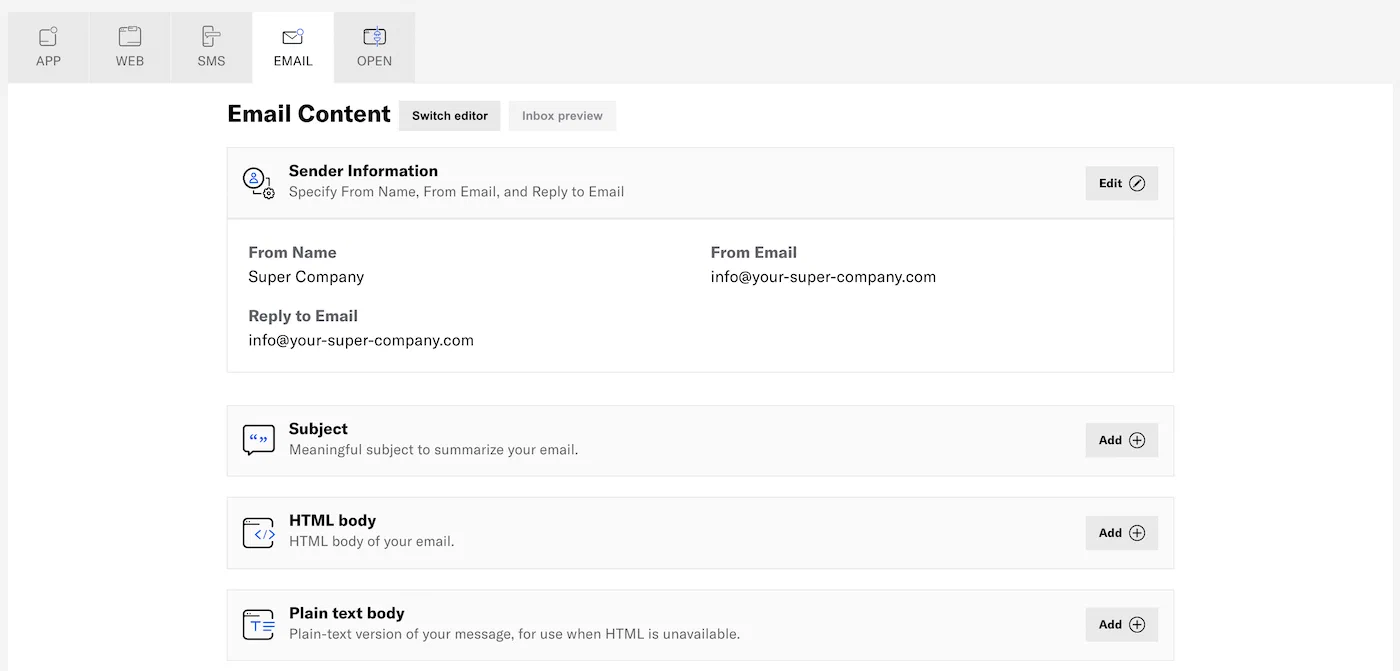 1. (Optional) Edit sender information: | Setting | Description | Steps | | --- | --- | --- | | **From Name, From Email, and Reply to Email** | The name and email addresses to use in the message header. They also appear in the user's email client.The **From Name** and the usernames in the **From Email** and **Reply to Email** addresses support personalization using [Handlebars](https://www.airship.com/docs/reference/glossary/#handlebars). The username is what appears before the @ symbol in the email address. See [About Personalization](https://www.airship.com/docs/guides/personalization/about/). | Edit the fields and select from available domains for the email addresses. For **Reply to Email**, leave field blank if replies should go to the address already entered in **From Email**. | | **Transactional** | If the message is triggered by a user's action such as a password reset request, opt-in, shopping receipt, etc., you can designate it as transactional, and optionally include an [unsubscribe link](https://www.airship.com/docs/guides/messaging/messages/content/email/email-unsubscribe-links/). See [Commercial vs. Transactional Email](https://www.airship.com/docs/developer/api-integrations/email/commercial-transactional/)
The Content step is considered incomplete until an unsubscribe link is provided in the message body or the message is designated as transactional in Sender Information. | Enable to designate the message as transactional. | | **Bypass Opt-in Status** | Sends the message to audience members even if they have opted out of transactional messages. This option appears if **Transactional** is enabled.
Use for business-critical emails only. See [Opt-in and Opt-out Requirements](https://www.airship.com/docs/developer/api-integrations/email/commercial-transactional/#opt-in-reqs) in *Commercial vs. Transactional Email*. | Enable to send the message to users who opted out of transactional messages. | | **Open and Click Tracking** | Records an event when the email is opened and/or links are clicked. Only HTTP and HTTPS links are tracked. Enabled by default.
When enabled, opens and clicks are tracked for all channels that have not been opted out. When disabled, opens and clicks are not tracked for any channels. See [Contact Management](https://www.airship.com/docs/guides/audience/contact-management/) to manage open and click tracking at the channel level. | Enable to track opens and clicks. | | **BCC Addresses** | For accounts with email addresses registered with Airship for BCC capabilities. Sends a blind copy of the message to selected email addresses.
It's important to keep email volume in mind when using BCC. When you send a message with BCC enabled, your BCC addresses receive one email for each recipient of that message. | Select email addresses. | {class="table-col-1-20 table-col-2-40"} 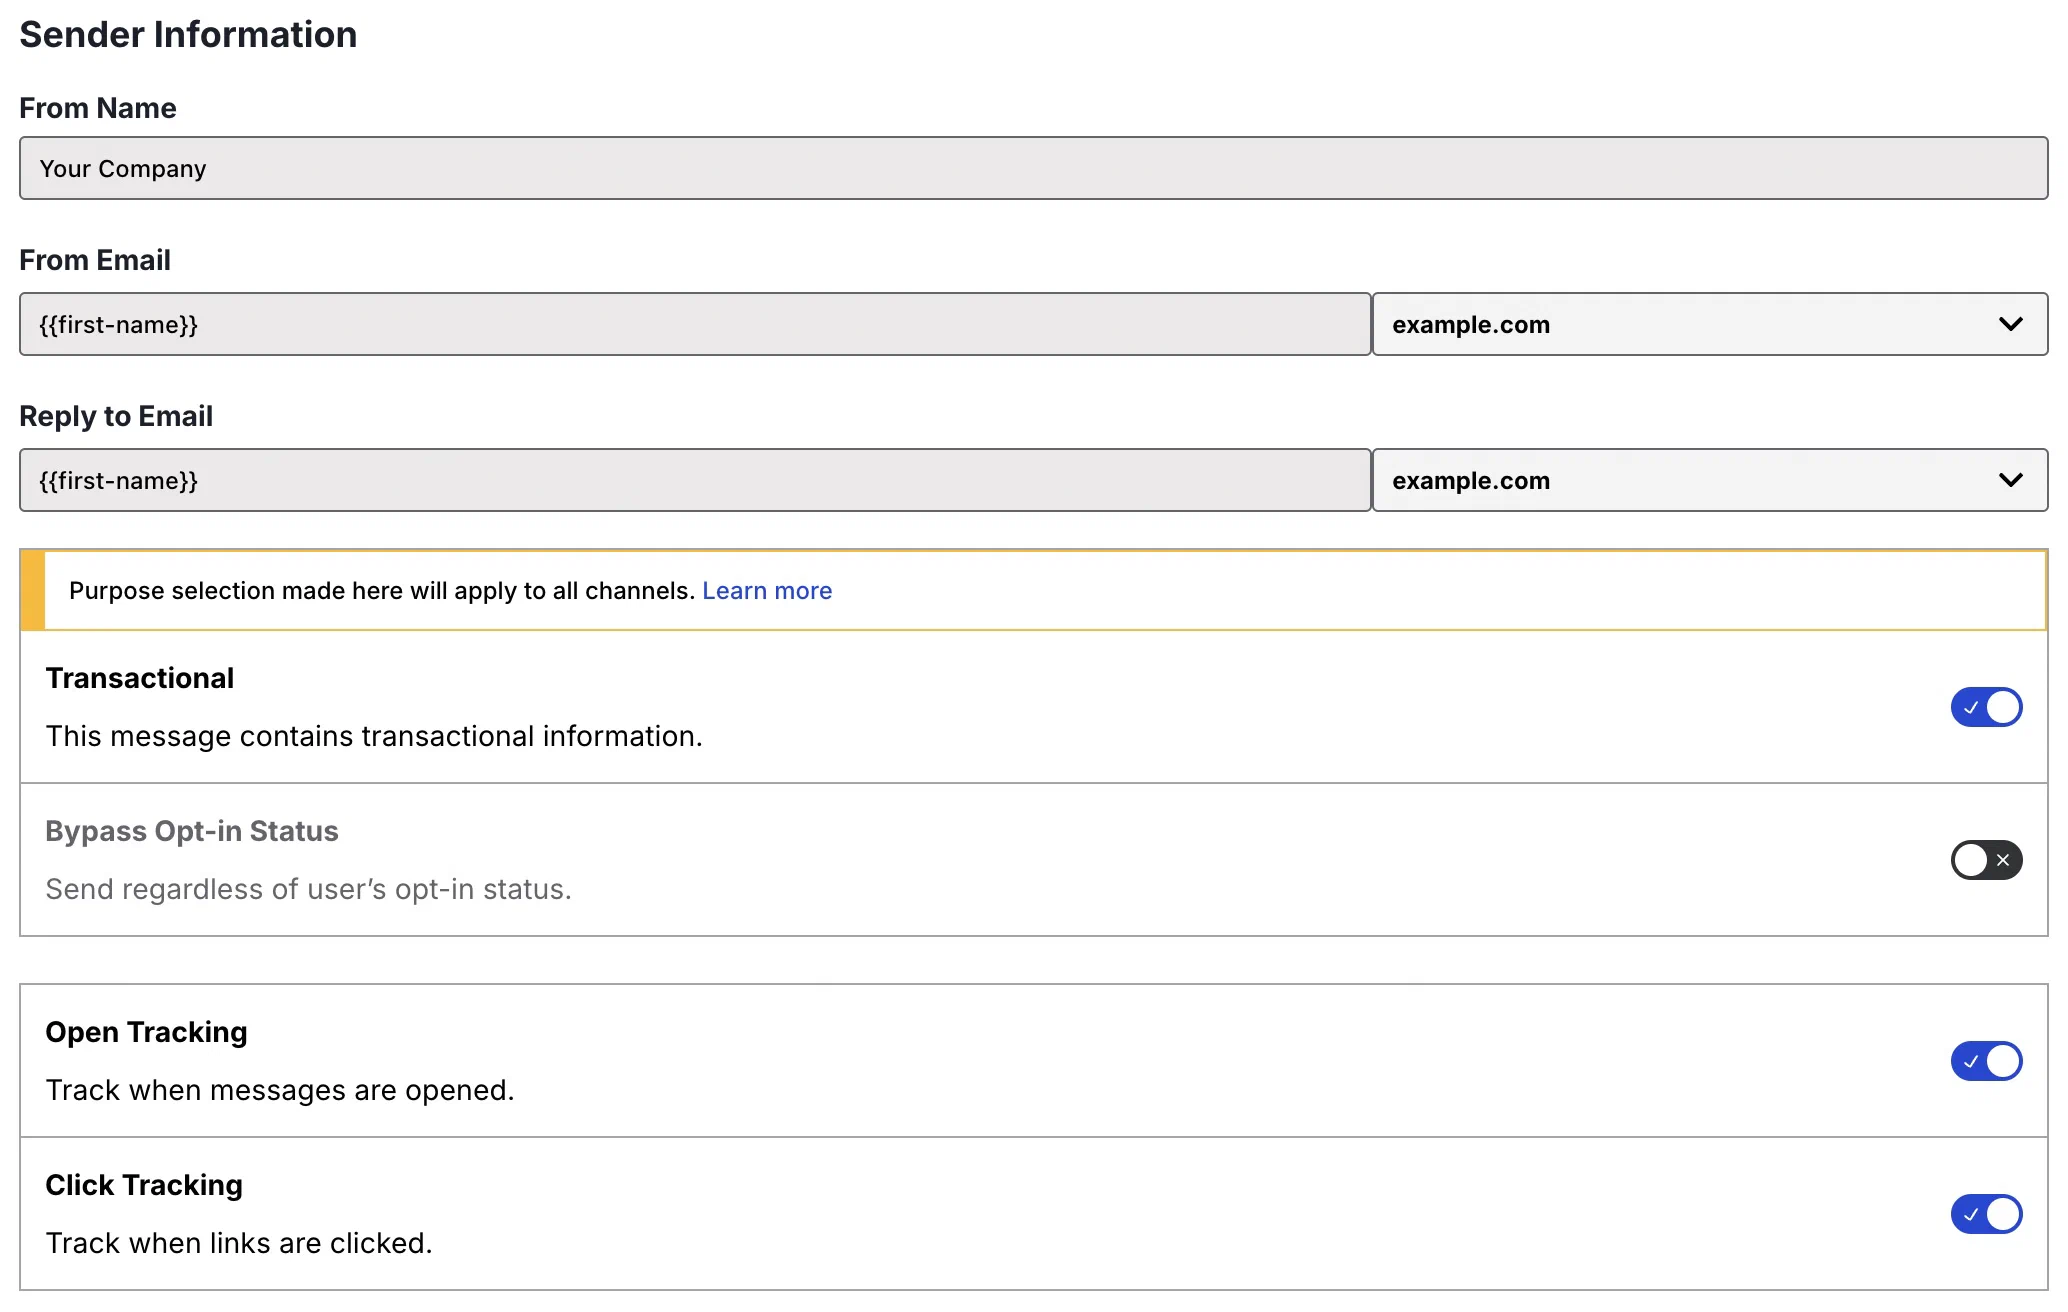 *Email sender information* 1. Add the *Subject*. 1. (Optional) Add the *HTML body*.
Airship recommends scheduling your message at least three days in advance due to the combination of time zones and optimal times. You can reduce the lead time if your audience is more localized, e.g., only in the United States or in a certain European region.
> **Note:** When your audience includes users without an optimal send time tag, those users will be dropped from delivery and will not receive the message. Since optimal send time is determined from user behavior over time, new users might not have an optimal send time determined for the first week or two after channel registration. ### Recurring In the Message composer and for A/B test variants, send the message periodically at specified intervals. You may want to send recurring messages for things like payment reminders. You can pause, resume, and cancel recurring messages in [Messages Overview](https://www.airship.com/docs/reference/glossary/#messages_overview). Segmentation data is evaluated at send time. For example, if your recurring message targets an audience list whose members change over time, each recurring message is sent to the current version of the list when the message is sent. > **Note:** Recurring messages that include multi-language [localized content](https://www.airship.com/docs/guides/messaging/messages/localization/) cannot be edited. 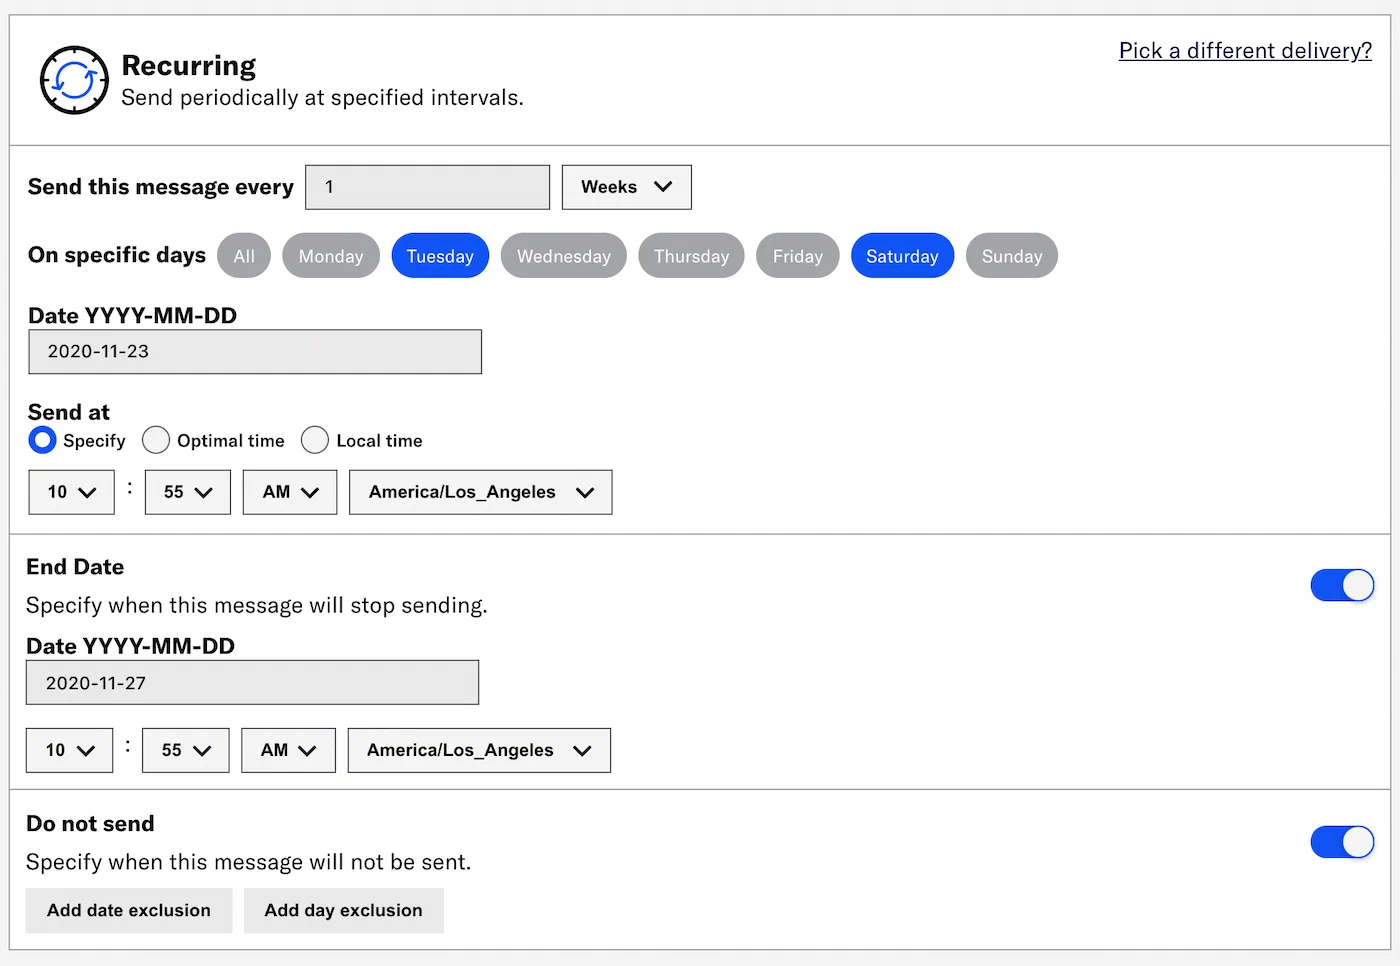 1. Specify the delivery interval by number of hours/days/weeks/months/years. For *weeks*, also specify which days of the week to send the message. 1. Set the initial date. This is the first day Airship will send your message. 1. Set the initial time. This is the time of day Airship will send each message. * **Specify:** Enter the time and time zone. * **Optimal time:** The message will send at each user's [Optimal Send Time](https://www.airship.com/docs/reference/glossary/#optimal_send_time). * **Local time:** Enter the time. 1. (Optional) Specify when to stop sending the message. 1. Enable *End date*. 1. Enter a date. 1. Set the time and time zone. 1. (Optional) Specify dates or days of the week when the message should not be sent. If you select the *hours* interval, you can also specify which hours of the day should be excluded. If you select the *weeks* interval, you can only specify which dates should be excluded. If the scheduled send falls during an excluded period, Airship waits to send the message until the next available valid send time. For example, if you scheduled delivery weekly on Thursdays but added the date for Thanksgiving Day as an exclusion, the next send would be the Thursday after Thanksgiving Day. 1. Enable *Do not send*. 1. Select **Add date exclusion**, enter a date, and repeat for additional dates. 1. Select **Add day exclusion** and select days. 1. Select **Add time exclusion** and set start and end times. ### Schedule In the Message composer and for A/B test variants, choose an exact time of day to send the message: 1. Enter a date in YYYY-MM-DD format and select the time and time zone. 1. (Optional) Select **Delivery By Time Zone** to deliver messages at the specified time in your audience's time zones. For example, a push notification scheduled for 9 a.m. will arrive for people on the east coast at 9 a.m. Eastern Time, in the midwest an hour later at 9 a.m. Central Time, then on the west coast two hours after that, at 9 a.m. Pacific Time. > **Note:** Messages are only delivered by time zone to channels that have a time zone set. > > **App and Web channels** have their time zone set automatically by the SDK. > > **Email, SMS, and Open channels** will only have a time zone if set through the channel registration API. To do so, enter a value for the `"timezone"` key in the request body. See: > * [Email: Register Users](https://www.airship.com/docs/developer/api-integrations/email/getting-started/#register-users) > * [SMS: Register SMS Users](https://www.airship.com/docs/developer/api-integrations/sms/getting-started/#register-sms-users) > * [Open Channels: Register a Channel to Your Open Platform](https://www.airship.com/docs/developer/api-integrations/open/getting-started/#register-a-channel-to-your-open-platform) > **Tip:** * A message delivered by time zone includes a Delivery by Time Zone section in its message report. See [View Message Detail](https://www.airship.com/docs/guides/reports/message/#message-detail) in *Message reports*. > * The API equivalent of Delivery By Time Zone is [Push to Local Time](https://www.airship.com/docs/developer/rest-api/ua/schemas/schedules/#schedulespec). ## Timing — Automations and Sequences Automations and Sequences support these timing settings: | Timing option | Description | | --- | --- | | **Send immediately** | Send the message after receiving the triggering event and after the delay period elapses. | | **[Schedule](#schedule)** | Send the message at a specific date and time after receiving the triggering event and after the delay period elapses. | | **[Send during available window](#send-during-available-window)** | Send the message within a specified time range after the trigger event. | Timing settings and application vary: * **Sequences**: Timing settings apply to the first message in a Sequence only. Subsequent messages in the Sequence are sent as additional conditions are met and according to their specified delay periods. * **Automations and Sequences**: Timing settings do not appear if using the Inactivity trigger. ### Schedule For Automations and messages in Sequences, Airship sends your message at the first appropriate scheduled time after receiving the triggering event and after the delay period elapses. All messages are delivered in the device's local time zone. Choose an exact time of day to send the message: 1. Select days of the week. 1. Select and drag the circle on the timeline to select delivery time. Hours are in 15-minute divisions. 1. (Optional) Select **Add Another** to create multiple schedules. ### Send during available window For Automations and Sequences, configure message delivery windows by specifying valid hours of the day and days of the week. Airship sends your message at the first appropriate time during the window after receiving the triggering event and after the delay period elapses. If no delay is configured and the triggering event falls within an available window, the message will send immediately. 1. Select days of the week. 1. Select and drag the circle on the timeline to constrain the delivery window. Hours are in 15 minute divisions. 1. (Optional) Select **Add Another** to create multiple windows. 1. Choose what happens if the triggering event occurs outside the available window. By default, if the triggering event (plus delay, if specified) falls outside of an available window, Airship sends the message during the next available window. Select **Do not send** if you want to discard the message instead of sending during the next available window. > **Tip:** Create multiple windows to support separate hours during weekdays versus weekends. ## Additional settings Additional settings may be available depending on your composer, project configuration, channel selection, and message configuration. ### Audience limit In the Message composer and for A/B test variants, and for App channels only, set a maximum number of audience members to send the message to. This setting can be useful for promotions with a limited number of coupons or other capped advertisements. For [Recurring delivery](#recurring), the limit applies to each message send. 1. Enable *Audience Limits*. 1. Set the audience size to between 100 and 1 million. > **Important:** Audience Limit is not supported for: > > * [Optimal Send Time](https://www.airship.com/docs/reference/glossary/#optimal_send_time) — This includes > * [Optimized](#optimize) delivery > * **Optimal time** for [Recurring](#recurring) delivery > * Delivery by time zone — This includes: > * **Delivery By Time Zone** for [Scheduled](#schedule) delivery > * **Local time** for [Recurring](#recurring) delivery > * [Audience Lists](https://www.airship.com/docs/reference/glossary/#audience_list) — This includes any [Segment](https://www.airship.com/docs/reference/glossary/#segment) that includes an Audience List > * [Message Center](https://www.airship.com/docs/reference/glossary/#message_center) messages — If Message Center is combined with a Push Notification and/or In-App Message, the limit is applied to the Push and In-App Message as long as other requirements are met. > * [Accounts that include Boost](https://www.airship.com/docs/reference/feature-packages/#account) ### Ban List If your project has a [Ban List](https://www.airship.com/docs/reference/glossary/#ban_list) enabled and its request URL includes send time variables, you can override their default values for this message only. Each one is listed under the heading **Default value for \Bypass your [Ban List](https://www.airship.com/docs/reference/glossary/#ban_list) when sending business-critical or otherwise required messages, such as privacy policy update notifications.
If you have a Ban List but do not see this option in the composer, enable it in your project settings. See Bypassing your Ban List in the Ban List documentation.
### Campaign categories*Campaign categories* are labels that group messages of a similar type or messaging strategy for aggregate reporting. Campaigns help you track the efficacy of both your individual messages and a messaging campaign as a whole. You can add a maximum of ten categories.
Enter a campaign category name, then select Add. Category names have a 64-character maximum.
For categories defined in message limits, its limit displays after the category. To override the limit, select the check box for Ignore limit for this message.
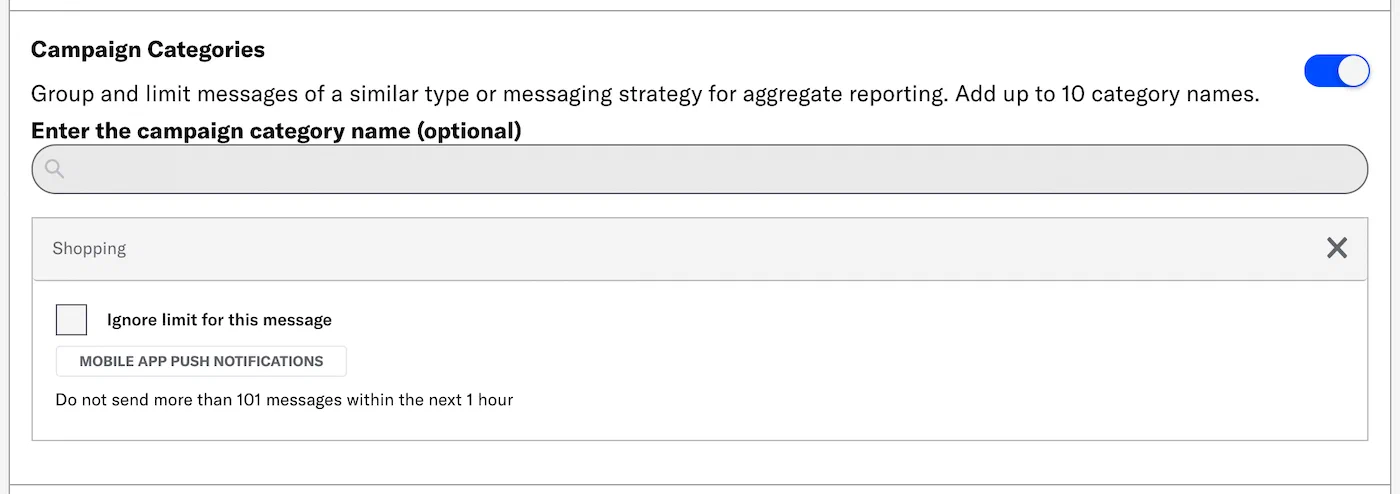 *Adding a campaign category that has a message limit* > **Tip:** Campaign categories are listed in the > [Message Detail](https://www.airship.com/docs/guides/reports/message/#message-detail) > section of Message Reports. ### Custom keys *Custom keys* are additional key-value pairs in your push notification payload for use by custom code in your app or website. You can use custom keys to pass additional campaign identifiers for analytics, pass user information to the device, control the look and feel of the app, provide image links, etc. By default, a custom key is sent to push notifications on all platforms, but you can choose platform-specific keys as well if your message is going out to more than one platform, e.g., one imageURL for iOS and another imageURL for Android. Select a platform, then enter the key and value. Click **Add Another** for additional keys. > **Note:** For Message Center messages or templates created using the [Interactive Editor](https://www.airship.com/docs/reference/glossary/#interactive_editor), a separate Custom Keys section is under **Message Center Options**. Configure those custom keys to set key-value pairs that apply specifically to your Message Center message. See [Custom Keys](#message-center-custom-keys) for Message Center. ### Expiration The *delivery expiration* option discards your message if it hasn't been delivered to a device within a specific period of time. Select and configure an option: * **Duration:** Enter the number of minutes, hours, or days past your defined send time to expire the delivery. * **Date & Time:** Enter the date and time when delivery attempts should cease. Expiration behavior per message type: | Message type | Expiration behavior | | --- | --- | | **Push notifications and Web push notifications** | If a device is online, the notification will be delivered immediately. If a device is offline, the push service for each platform preserves the notification and attempts to deliver it as soon as it comes online, up until the expiration date.The default expiration for push notifications without an expiration date is 30 days for APNs and 28 days for FCM.
For Web, if no expiration is set and a device is offline, the delivery service, e.g., Google or Mozilla, preserves the notification and attempts to deliver it as soon as it comes online, for a maximum of 28 days.
There is no way to remove a delivered push notification. | | **In-app messages** | Since in-app messages are delivered via a push payload, they will not be delivered past the expiration date if the user has been offline. In addition, Airship will not display an in-app message past the expiration date. | | **Message Center** | If you created the message using the Visual editor, its expiration is coupled with push notifications and in-app messages. | {class="table-col-1-30"} ### Ignore channel message limits Enable this option to override the project-level [Message Limits](https://www.airship.com/docs/reference/glossary/#message_limits), ensuring that your audience will receive your message even if they've reached the message limit. You may want to override message limits for important messages like breaking news, account alerts, or location proximity-based messages. Overriding message limits does not override [Sequence Rule Limits](https://www.airship.com/docs/reference/glossary/#rule_limits_sequence) or [Automation Rule Limits](https://www.airship.com/docs/reference/glossary/#rule_limits_event_option). ### Start and End Dates {#start-end} For Automations only, start and end dates define the times during which an automation can deliver messages to your audience. 1. Enable **Start Date** and/or **End Date**. 1. Set the time, time zone, and date. ### Throttle delivery In the Message composer and for A/B test variants, enable *Throttle Delivery* to set a delivery rate for the message. Enter the number of messages to be sent per second. The minimum rate is 100 messages per second. *Throttle Delivery* is only available for the following delivery options: *Send Now*, *Schedule*, and *Optimize*. **Not supported for Message Center.** You can change the rate after sending your message and also pause/resume or cancel delivery within 48 hours of send time. > **Important:** * Throttling must be enabled before sending the message. You cannot edit the message and enable it later. > *
If you combine Message Center with other App message types and pause or stop delivery within 48 hours of send time, delivery status change has no effect on Message Center delivery. Message Center messages will remain in the inbox until expiration, if set. You can also manually remove messages from the Message Center inbox.
> * If your use case requires a rate lower than 100 messages per second, [contact Support](https://support.airship.com) to request a different default rate for your project. 1. Go to **Messages**, then **Messages Overview**. 1. Change the message status: * Click * Pause* or * Resume*. * Click * Stop* to cancel delivery. You cannot resume a canceled message. 1. Change the throttle rate: 1. Click for the message. 1. Click next to *Throttle Delivery*. 1. Enter a new rate and click **Update**. ## Message Center These options are specific to Message Center messages and templates created with the [Interactive Editor](https://www.airship.com/docs/reference/glossary/#interactive_editor). ### Custom keys {#message-center-custom-keys} You can set [Custom Keys](https://www.airship.com/docs/reference/glossary/#custom_keys) that apply specifically to a Message Center message. Under **Message Center Options**, add a key and value. Select **Add Another** for additional keys. > **Tip:** If your Message Center is set up with [Named User](https://www.airship.com/docs/reference/glossary/#named_user) filtering, include a custom key with `named_user_id` as the key and the user's actual ID as the value. > > See information about filtering by Named User in the Message Center documentation for [SDK integrations](https://www.airship.com/docs/developer/sdk-integration/). > **Tip:** For messages created with the [Interactive Editor](https://www.airship.com/docs/reference/glossary/#interactive_editor), you can use custom keys to preview lines, which appear below the message title in the inbox. > > You must perform some development work before your app can display preview lines in the inbox. > > Use `com.urbanairship.listing.field1` and `com.urbanairship.listing.field2` as keys representing preview lines 1 and 2. In the **Value** field for each key, enter the text that you want to show on each line of the preview. > > 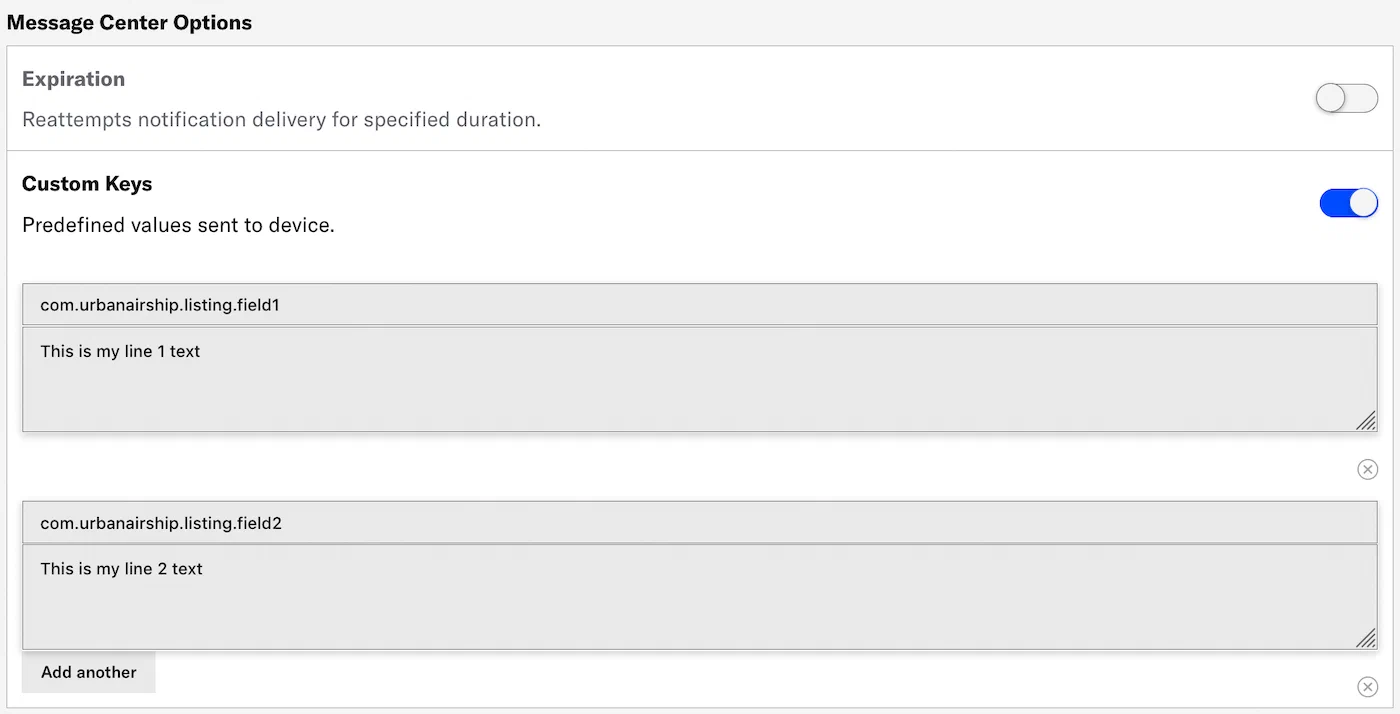 > > You can personalize preview lines using [Handlebars](https://www.airship.com/docs/reference/glossary/#handlebars) to reference [Attributes](https://www.airship.com/docs/reference/glossary/#attributes) or [Custom Event](https://www.airship.com/docs/reference/glossary/#custom_event) properties. ### Expiration {#message-center-expiration} The Expiration setting for Message Center removes the message from users' inboxes. This may be helpful if the message represents a coupon, sale, or specific event and needs to expire on a specific date and time, or after a period of time has elapsed (duration). Under **Message Center Options**, select one of: * **Duration:** Enter the number of minutes, hours, or days past your defined send time to remove the message. * **Date & Time:** Select the date, time, and time zone when the message should be removed. 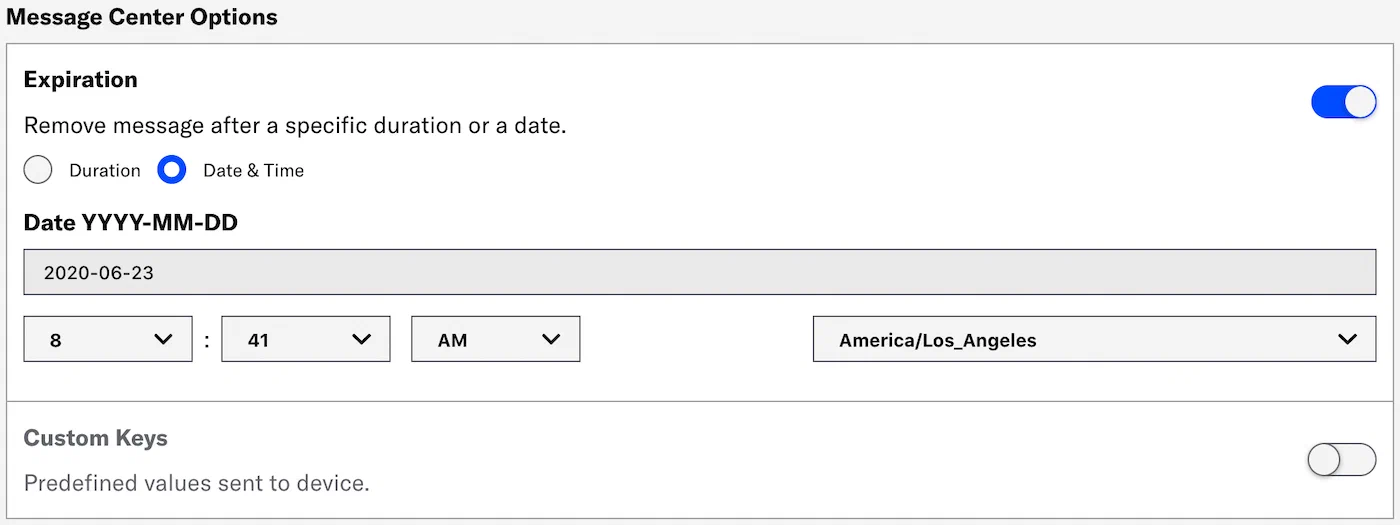 > **Note:** If you created your Message Center message using the Visual editor, instead of setting an expiration, go to the Options tab and set when to remove it from the Message Center. See [Configuration steps](https://www.airship.com/docs/guides/messaging/editors/visual/#configuration-steps) in *The Visual editor*. ## SMS These options are specific to SMS messages. ### Expiration (SMS) {#sms-expiration} The *delivery expiration* option discards your message if it hasn't been delivered to a device within a specific period of time. 72 hours is the default. Enter the number of hours, between 1 and 72. ## iOS These options are specific to iOS messages. ### Background processing The *background processing* option wakes the app and give it some running time to perform work, such as downloading content for future display. Data included in the push notification is available for background processing, e.g., to send URLs and then download that content. **iOS only.** ### Badge Update the recipient device's app *badge*. A *badge* is the numeric display on an app icon that typically indicates the number of unread messages. The badge count can be used as an engagement strategy, notifying users about new content and driving them to open your app. By default messages automatically increment the badge number, but you can specify an exact number, e.g., +3, +12, -3. Select *Increment by 1* or *Specify*. *Specify* requires a value in the text field. > **Note:** Badge functionality requires the device to be opted in to push notifications. ### Group A *delivery group* uses an identifier to group related notifications from your app into a single stack. Notifications bearing the same group identifier are stacked together. **iOS 12 and later only.** Enter an identifier in the text field. > **Note:** Remember to use the same identifier for subsequent messages you wish to group. ### Interruption level Determine the degree of interruption a user experiences from a push notification. Each level has a different impact on the user's experience, depending on their Focus settings. The default level is *Active*. Select *Passive*, *Time Sensitive*, or *Critical*. For *Critical*, also specify the alert volume level, at 10% increments. | Interruption level | Overrides scheduled delivery | Breaks through Focus | Supports sounds/vibration | Overrides ring/silent switch | iOS minimum | |---|---|---|---|---|---| | Active (default) | No | No | Yes | No | n/a | | Passive | No | No | No | No | 15 | | Time Sensitive | Yes | Yes | Yes | No | 15 | | Critical | Yes | Yes | Yes | Yes | 12 | > **Important:** * Critical alerts require: > 1. A special entitlement issued by Apple. > 1. Feature enablement by Airship. Contact your account manager or Support if you have the Apple entitlement and want to use critical alerts with Airship. > * Critical alerts must be allowed by a user on their device. ### Mutable content The *mutable content* option allows a notification’s content to be changed or downloaded before delivery. This feature is automatically enabled if media is defined in the message's *Optional Features » Media* settings. **iOS 10 and later only.** ### Relevance score The relevance score is one of multiple factors used by Apple to determine which push notifications are featured more prominently within the *Notification summary*. Use this setting to override the default value of 0. iOS 15 and later only. Set a value between 1 and 10. ### Sound Play a custom *sound* when your audience receives a message. The sound file that you specify must be bundled with your app by your app developer. Enter "default" to use your audience's default system notification sound or the name of the sound file that you want to play, for example "beep.caf". See [Configure Notification Options](https://www.airship.com/docs/developer/sdk-integration/apple/push-notifications/getting-started/#configure-notification-options) for more information. ## Android and Fire OS These options are specific to Android and Fire OS messages. ### Collapse key A *collapse key* is an optional delivery feature that acts as a grouping and replacement mechanism for messages with the same value. The Collapse Key comes into play when a device is offline (e.g. airplane mode) or in doze mode; if multiple messages are available with the same collapse key value when a device comes back online, it will display only the most recent message and discard previous that have the same value. Enter the key in the text field. ### Delivery priority The *delivery priority* option sends your notification using Firebase Cloud Messaging (FCM) high priority. When not enabled, messages default to normal priority. **Android only**. > **Note:** From [Set the priority of a message](https://firebase.google.com/docs/cloud-messaging/customize-messages/setting-message-priority) in Google's FCM documentation: > > **High priority.** FCM attempts to deliver high priority messages immediately even if the device is in Doze mode. High priority messages are for time-sensitive, user visible content. ### Notification category Send your message with a specific *notification category* instead of the default. A *notification category* is a grouping mechanism for messages in **Android versions 8.0 and later**, synonymous with [Android notification channels](/docs/developer/sdk-integration/mobile/push/advanced/android/#notification-channels). Users can set behaviors for each notification category within your Android app, determining the types of messages they are most interested in. Select a notification category. > **Note:** You must add your app's notification categories to your Airship project before you can select them for your messages. See: [Manage Android Notification Categories](https://www.airship.com/docs/guides/messaging/project/config/android-notification-categories/). ## Email These options are specific to email messages. ### URL parameters Override project-level email [URL Parameters](https://www.airship.com/docs/reference/glossary/#url_parameters) or add custom parameters for the current message only. Existing project-level parameters are listed onscreen for reference. 1. Under **URL parameters for this message**, enter a parameter name and value. * To override an existing parameter, enter its name and enter a new value. * To remove an existing parameter, enter its name and leave the value empty. * To add a parameter, enter a parameter name and value. 1. Select ** Add parameter** to add more. ## Web These options are specific to web push notifications. ### Require interaction > **Important:** Support for the Require Interaction option varies by browser and OS. Enable **Require interaction** to require your audience to interact with your web notification to dismiss it from the browser window. Users may interact with a web notification in these ways: * Click the notification, which opens the message-defined URL, or the [default Action URL](https://www.airship.com/docs/developer/sdk-integration/web/getting-started/#airship-setup). * Dismiss the notification. * Click the Settings icon or button on the notification. ## API equivalents for delivery options Set Campaign Categories using the Campaigns object. See [Campaigns Object](https://www.airship.com/docs/developer/rest-api/ua/schemas/push/#campaignsobject) in the API reference. Start and End dates are for Automation only. You can set them using the `activation_time` and `deactivation_time` properties in the Pipeline object. See [Pipeline Object](https://www.airship.com/docs/developer/rest-api/ua/schemas/pipeline-objects/#pipelineobject) in the API reference. These options can be set using [Platform Overrides](https://www.airship.com/docs/developer/rest-api/ua/schemas/platform-overrides/): | Composer option | API | | --- | --- | | Background processing1,2 | `content_available` | | Badge2 | `badge` | | Collapse key (Fire OS) | `consolidation_key` | | Collapse key (Android) | `collapse_key` | | Custom keys | `extra` | | Delivery priority3 | `delivery_priority` | | Expiration | `expiry` | | Group2 | `thread_id` | | Interruption level2 | `interruption_level` | | Mutable content1,2 | `mutable_content` | | Notification category3 | `notification_channel` | | Relevance score2 | `relevance_score` | | Require interaction4 | `require_interaction` | | Sound2 | `sound` | | URL parameters5 | `url_parameters` | 1. Automation only