When selecting a transparent background for modal [In-App Automation](https://www.airship.com/docs/reference/glossary/#iaa), you must also set your project's default background color to `#00000000` for HTML messages. See: [In-App Experience Defaults: Setting Transparent Background](https://www.airship.com/docs/guides/messaging/in-app-experiences/configuration/defaults/#setting-transparent-background). | | **Background image** | Enter the HTTP/HTTPS URL of an image, then set its options.
If your Airship plan includes CDN support, you can also upload media or select from previously uploaded media. See Insert media in message content in Media library.
| | **Content width** | Set the content width of your message. This is generally helpful for email, as it represents your mobile breakpoint as well. When a client width is less than the content width, columns will collapse and cells will stack unless you apply mobile settings preventing columns from collapsing. | | **Font family** | Set the font for your message. You cannot override this setting at the row or column level. | | **Links** | Configure the appearance of links in the message. | ## Blocks and content columns 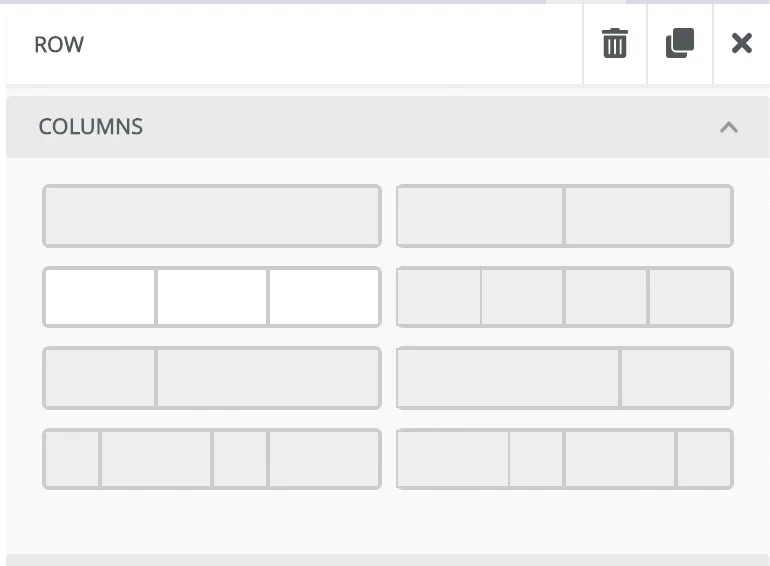 *Column options in the Interactive editor* The Blocks section and the Columns option in Content are the same thing: layout sections that organize your message into rows and columns. When you select a cell, you can style the entire row or individual columns. Most style options are the same for both. Add a single column or row of columns, then style each column and the row. To resize column widths, select and drag the dividers, and the width percentages display in the sidebar. See also [Saving blocks in the Interactive editor](https://www.airship.com/docs/guides/messaging/editors/interactive/saving-layouts/). ### Row properties Set properties for an entire row: | Setting | Description | | --- | --- | | **Background color** | Set the color for the entire row, extending to the entire width of the window, not just the width of the content body. | | **Content background color** | Set the background color for content body in the row. | | **Padding** | Set spacing inside the border for all columns in the row. Select **More Options** to change padding for individual sides of the row. | | **Background image** | Set an image as the background of the row. You can overlay the background image with other content elements. Enter the HTTP/HTTPS URL of an image, then set its options. See [Media guidelines](https://www.airship.com/docs/reference/messages/media-guidelines/#message-center-and-landing-page).If your Airship plan includes CDN support, you can also upload media or select from previously uploaded media. See Insert media in message content in Media library.
| ### Column properties Set properties for an individual cell in a row: | Setting | Description | | --- | --- | | **Background color** | Set the background color for the individual cell. | | **Padding** | Set spacing inside the border for the cell. | | **Border** | Add and style a border for the cell to provide visual separation between rows and columns. | Select the add icon () to add another column to a row or the delete icon ( ) to remove. ## Content elements Content elements consume the width of the column you place them in. Elements not contained in a block are rendered full-width. Drag a content element into your message, and then select the element to see its styling options. The following content elements are available: | Element | Description | | --- | --- | | **Columns** | See [Blocks and content columns](#blocks-and-content-columns). | | **Divider** | Add a dividing line. You can change the line color and style, and set padding around the divider. | | **Image** | Enter the HTTP/HTTPS URL of an image. You can set the image alignment, provide alternate text, set padding, and provide a link if you want the image to be clickable. See also [Actions](https://www.airship.com/docs/guides/messaging/editors/interactive/actions/) and [Media guidelines](https://www.airship.com/docs/reference/messages/media-guidelines/#message-center-and-landing-page).If your Airship plan includes CDN support, you can also upload media or select from previously uploaded media. See Insert media in message content in Media library.
| | **Button** | Link to another page, such as a subscribe or unsubscribe action or a product page. You can style button color, border, alignment, and padding in the sidebar. Select the button element to see styling options for the button label text. See also [Actions](https://www.airship.com/docs/guides/messaging/editors/interactive/actions/). | | **HTML**1 | Add your own custom HTML content element and set padding. You must select **Done** to see the preview. | | **Heading**1 | Add text. You can set the type (H1, H2, etc.), font information, color, alignment, line height, and padding in the sidebar. Select the heading element to style the text and add [links](https://www.airship.com/docs/guides/messaging/editors/interactive/actions/) and emojis. You must select **Done** to see the preview. | | **Text**1 | Add text. You can set the color, alignment, line height, and padding in the sidebar. Select the text element to style the text and add [links](https://www.airship.com/docs/guides/messaging/editors/interactive/actions/), emojis, and tables. You must select **Done** to see the preview. | | **Video** | Message Center only. Enter a YouTube URL to add video to a message. The video adapts to the width of the column that you place it in.Video does not play in the Interactive editor. You can play the video in the preview that appears after you select **Done** and leave the editor. | | **Menu** | Create a navigation menu. Add menu items and their actions, and then style the menu. | | **Social** | Add social media icons. Select icons and configure your social account links. You can set alignment, size, spacing, and padding, and select an icon type to set icon style and color scheme. | | **Preference Center** | You must include at least one Preference Center element when designing an email [Preference Center](https://www.airship.com/docs/reference/glossary/#preference_center) web page. Select a Preference Center, customize loading and saving status text and button labels, and then provide an Unsubscribe landing page URL. See default values following this table. For **Unsubscribe landing page URL**, enter a URL. | 1. You can insert [Snippets](https://www.airship.com/docs/reference/glossary/#snippet) into HTML, Heading, and Text content, but they will not render in the preview. These are the default values for Preference Center fields: | Field | Default value | | --- | --- | | **Loading text** | Loading... | | **Error loading text** | There was an error loading this preference center. Please try again. | | **Submit button text** | Save communication preferences | | **Success saving text** | Your preferences have been saved. | | **Error saving text** | There was an error saving your preferences. Please try again. | | **Unsubscribe button text** | Unsubscribe from all emails | 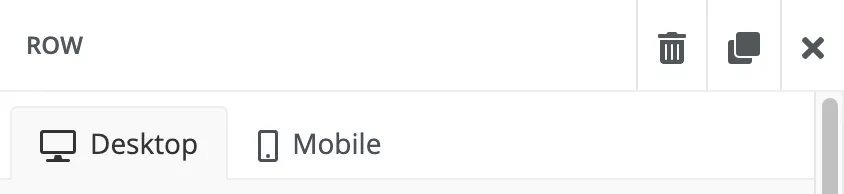 *Desktop and Mobile selections in the Interactive editor* Select **Desktop** or **Mobile** to access their different settings and options. Your message preview updates dynamically when you switch selections. ### Responsive design When configuring a content element, the following **Responsive Design** options are available: | Option | Description | | --- | --- | | **Hide on mobile/desktop** | This hides a content element from view. If you create different versions of the same content element for both desktop and mobile, use this option to make sure only the relevant version is viewable in the right context. For mobile, you may want to use this option to hide images and other elements that take up an inordinate amount of the screen in your message. | | **Do not stack on mobile** | This prevents columns in a row from stacking on a mobile device or when the screen width is less than the **Content Width** setting, which is essentially the mobile breakpoint. You can set the Content Width in the **Body** section of the editor. | ### Accessibility audit 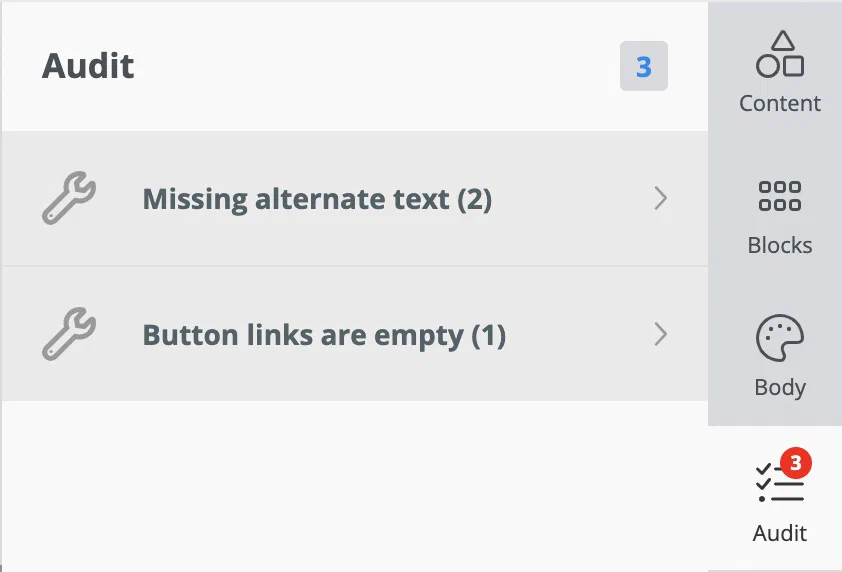 *Accessibility audit in the Interactive editor* The **Audit** section shows a count of accessibility issues in the current design: * Missing alternate text for images * Missing links in buttons and menus * Missing image URLs Select an issue type to go directly to where you can fix it. The audit is a warning only and does not prevent saving the design or sending the message. ## Thumbnail image for Message Center Message Center supports a message preview, which is how the message appears as listed in the inbox. To add the image:
Select Settings in the left sidebar.
Enter the HTTPS URL of an image. See Media guidelines.
If your Airship plan includes CDN support, you can also upload media or select from previously uploaded media. See Insert media in message content in Media library.
Adaptive Link opens a mobile wallet pass. Select an [Adaptive Link](https://www.airship.com/docs/reference/glossary/#adaptive_link) from the list.
App Rating prompts the user to rate the app in the app store. Optionally enter a custom message title and body.
> **Note:** **App Rating display behavior differs by operating system:** > > * The Title and Body dialog appear for Android only. > * iOS displays its system dialog for app rating. Additionally, > [Apple limits app rating dialogs to three times in a 365-day period](https://developer.apple.com/app-store/ratings-and-reviews/). > > App rating prompts will process as configured by your message settings, but the displayed dialog is controlled by Apple, not Airship. > **Important:** iOS requires that you provide your app's Apple ID, which is used as the iTunes App Store Identifier. (Android and Fire OS generate app store links automatically based on information already in your app, so no configuration is required.) > > You can do this by [adding the ID in your Airship project settings](https://www.airship.com/docs/guides/messaging/project/config/itunes-id/), or by editing your plist dictionary. > > In your plist dictionary, add the following, substituting `1111111111` with the app's actual ID: > ```text >Deep Link opens a screen in your app or website. Select a deep link from the list.
Our Deep Link functionality supports URL templates, which expose a friendly interface to your users in our UI, while constructing the correct URL behind the scenes on the fly. You can specify substitution parameters by enclosing them in brackets. For example, if you want to define a Deep Link for a product page screen in your app (or on your mobile website), you can make the product ID number a substitution parameter. Here are example template URLs: ```text https://yourcompany.com/products/{Product Id} yourapp://products/{Product Id} ```
When you enter this URL in the Airship interface, the form parses it and previews the form your users see in the composer. It automatically identifies “Product Id” as the parameter name, and provides a field to substitute in the actual identifier. So if you had previously entered a product ID of 1872983490 for the above Product ID, the generated URL would be: ```text http://yourcompany.com/products/1872983490 yourapp://products/1872983490 ```
The interface treats all values for each field as a string.
### Dismiss message *Dismiss Message* closes the message. ### Preference centerPreference Center opens an app preference center. Select a preference center from the list.
### Push opt-in *Push Opt-in* prompts users to enable push notifications. When a user taps the screen element configured with this action, the system behavior depends on the current permission status.Share prompts the user to share your message with apps, social media accounts, and other services. Enter the text you want to accompany the share, including any promotional information, shortened links, hashtags, etc.
### Web pageWeb Page opens a web page or any valid device-level URL such as App Store or app protocol links. The web page opens in the device’s default browser. Enter a URL.
## Email and link actions Supported actions for: * Email buttons, links, and images * App (landing page, Message Center, In-App Automation) links | Action | Email | App (Links only) | | --- | :---: | :---: | | Call phone number | ✓ | ✓ | | Confirm subscription | ✓ | | | Deep Link | ✓ | | | Open unsubscribe page | ✓ | | | Open website | ✓ | ✓ | | Send email | ✓ | ✓ | | Unsubscribe from all | ✓ | | | Unsubscribe from current list | ✓ | | ### Call phone number *Call phone number* initiates a call from the device. Enter a phone number. ### Confirm subscription *Confirm subscription* opts the user into email messaging when using [[Double Opt-In](https://www.airship.com/docs/reference/glossary/#double_opt_in)](https://www.airship.com/docs/developer/api-integrations/email/getting-started/#double-opt-in). See also [Email double opt-in links](https://www.airship.com/docs/guides/messaging/messages/content/email/email-double-opt-in-links/). 1. Enter the URL for your confirmation page or enter one of the following URLs for the default confirmation page. For the default page, use the URL that matches your data center location: * US: `https://asemailmgmtus.com/opt-in/success.html` * EU: `https://asemailmgmteu.com/opt-in/success.html` 1. (Optional) Enter a [link name](https://www.airship.com/docs/guides/messaging/messages/content/email/email/#link-names) for tracking purposes. 1. Determine if clicks should be tracked. You can use the message-level click tracking setting or disable tracking for this link. See [Disabling click tracking for specific links](https://www.airship.com/docs/guides/messaging/messages/content/email/email/#disabling-click-tracking-for-specific-links) in *Email content*. ### Deep Link {#deep-link-email} *Deep Link* opens a screen in your app. Your app must already be configured to handle the links. See [Deep Links in email](https://www.airship.com/docs/guides/messaging/messages/content/email/email/#deep-links-in-email) in *Email content* for steps and link formatting requirements. 1. Enter a Deep Link URL. 1. (Optional) Enter a [link name](https://www.airship.com/docs/guides/messaging/messages/content/email/email/#link-names) for tracking purposes. ### Open unsubscribe page *Open unsubscribe page* opens a link to your [custom unsubscribe page](https://www.airship.com/docs/developer/api-integrations/email/custom-unsubscribe-pages/), where users can opt out of messaging. When using a custom unsubscribe page, you do not need to include an unsubscribe link for opting out of all messaging. 1. Enter the URL for your custom unsubscribe page. 1. (Optional) Enter a [link name](https://www.airship.com/docs/guides/messaging/messages/content/email/email/#link-names) for tracking purposes. ### Open website *Open website* opens a web page or any valid device-level URL such as App Store or app protocol links. The web page opens in the device’s default browser. 1. Enter a URL. 1. (Optional) Enter a [link name](https://www.airship.com/docs/guides/messaging/messages/content/email/email/#link-names) for tracking purposes. 1. Select whether the link should open in the same (current) tab or a new tab. 1. Determine if clicks should be tracked. You can use the message-level click tracking setting or disable tracking for this link. See [Disabling click tracking for specific links](https://www.airship.com/docs/guides/messaging/messages/content/email/email/#disabling-click-tracking-for-specific-links) in *Email content*. ### Send email *Send email* creates a draft email in the device's default mail client, with preset data defined here. Enter: * *Mail To* — Email address the message should be sent to * *Subject* — Text * *Body* — Text ### Unsubscribe from all *Unsubscribe from all* opts the user out of: * All commercial emails if used in a commercial email * All commercial and transactional email if used in a transactional email **This action is not recommended for transactional email.** Enter the URL for your confirmation page or enter one of the following URLs for the default confirmation page. For the default page, use the URL that matches your data center location: * US: `https://asemailmgmtus.com/unsubscribe/success.html` * EU: `https://asemailmgmteu.com/unsubscribe/success.html` See also: [Email unsubscribe links](https://www.airship.com/docs/guides/messaging/messages/content/email/email-unsubscribe-links/). ### Unsubscribe from current list *Unsubscribe from current list* unsubscribes the user from the [Subscription List(s)](https://www.airship.com/docs/reference/glossary/#subscription_list) specified when defining the message audience. Enter the URL for your confirmation page or enter one of the following URLs for the default confirmation page. For the default page, use the URL that matches your data center location: * US: `https://asemailmgmtus.com/unsubscribe/success.html` * EU: `https://asemailmgmteu.com/unsubscribe/success.html` See also: [Email unsubscribe links](https://www.airship.com/docs/guides/messaging/messages/content/email/email-unsubscribe-links/). > **Important:** Whenever you include an unsubscribe link for a specific list, you must also include an unsubscribe link for opting out of all messaging. # Merge fields in the Interactive editor > Add merge fields, conditionals, and looping fields in the Interactive editor. You can add [Merge Fields](https://www.airship.com/docs/reference/glossary/#merge_field) when using the drag-and-drop option in the Interactive editor. When you create a merge field, you set its field logic, which determines both how you use the field and the options you have when you use the field in a message: * **None** applies to **Text content** elements. When you send a message, Airship replaces your merge field with the appropriate value. This is considered a standard merge field. * **Conditional** applies to **rows of content** in your message. When you send a message, Airship evaluates the condition and determines whether or not to insert a row of content, depending on if the **Key Path** is populated (true) or not (false). * **Loop** applies to **rows of content** in your message. When you send a message, Airship evaluates the condition and determines whether or not to repeat a row of content for *each* item in an array, or display the content, depending on whether or not an array is populated. Loop is not supported for [In-App Automation](https://www.airship.com/docs/reference/glossary/#iaa). Merge fields, conditionals, and looping fields make it easier to take advantage of [Dynamic Content](https://www.airship.com/docs/reference/glossary/#dynamic_content). Merge fields are not supported for [Email Preference Centers](https://www.airship.com/docs/reference/glossary/#preference_center). > **Tip:** You can also take advantage of looping (`#each`), conditional (`#if`), and other advanced [Handlebars](https://www.airship.com/docs/reference/glossary/#handlebars) within HTML content to show or repeat text. However, you cannot apply conditional or looping logic to block-level elements in your layout without adding merge fields to your layout. ## Creating and editing merge fields Create or edit merge fields when editing layouts: 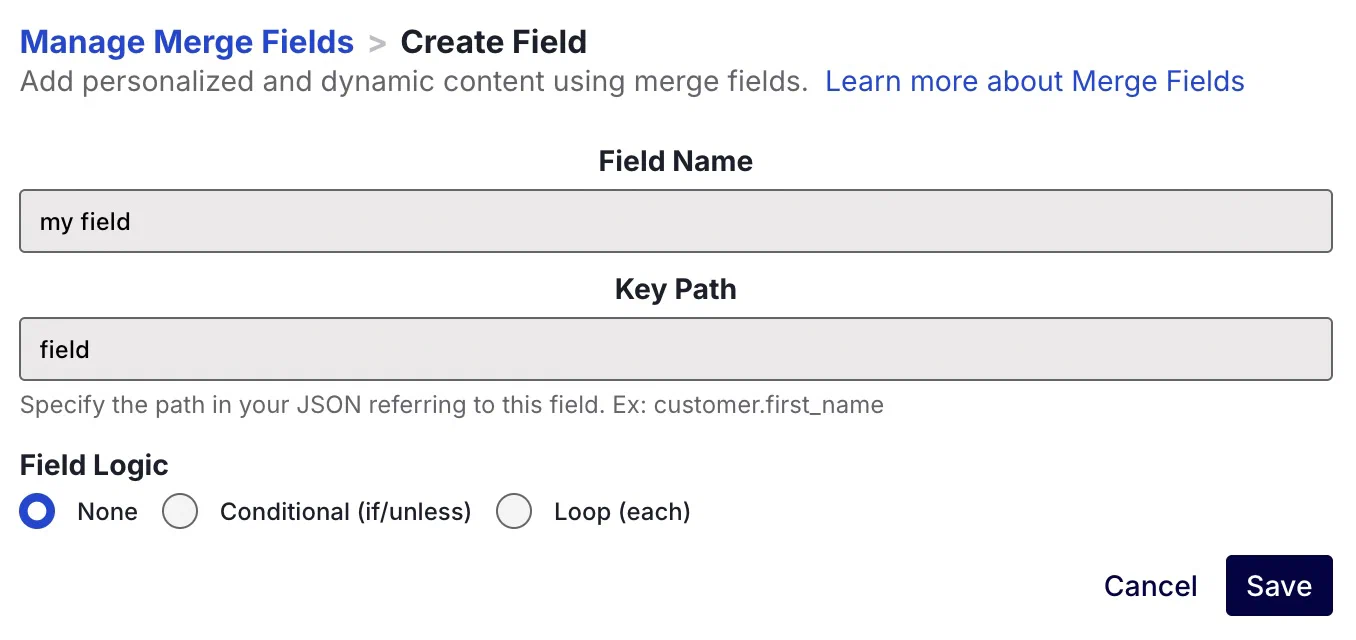 *Editing a merge field* 1. Select **Merge fields** in the header of the editor. 1. Select **Create field** to add a new field or the edit icon ( ) to edit an existing field. 1. Enter a **Field Name**. This is the name you'll see in the editor. 1. Enter the **Key Path**. This is the path to the variable that you want to use. * For [Attributes](https://www.airship.com/docs/reference/glossary/#attributes), use the attribute name. * For [Custom Event](https://www.airship.com/docs/reference/glossary/#custom_event) properties, use JSON notation for the property in the event's `properties` object that you want to use. For example, if you wanted to access `properties.name` from your custom event, you would enter `name`. * For a [Create and Send](https://www.airship.com/docs/reference/glossary/#create_and_send) CSV, use the column name for your variable. 1. Make a selection for **Field Logic** 1. Select **Save**. 1. Select **Done ** to return to the editor. ## Using merge fields The way you use a merge field depends on its logic: None, Conditional, or Loop. ### None 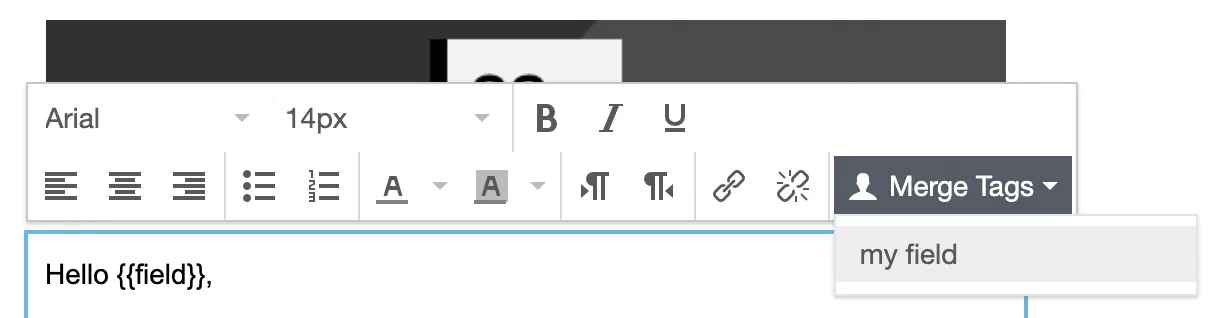 *Using a standard merge field* You can insert merge fields set to None into any Text content element, and Airship will add your merge field with the correct syntax in your text: 1. Select the Text content element that you want to add a merge field to, and a toolbar will appear. 1. Select **Merge Tags** from the toolbar, and select a merge field. ### Conditional and Loop Merge fields set to Conditional and Loop apply to a row. You use the merge field to determine whether you want to show, hide, or repeat the entire Text content element. While conditions apply at the row level, you can still use merge fields within your conditional block. If you want to use a field both as a block-level condition and as a value within a block, you should save two merge fields: one to represent the conditional usage of the field, and one with field logic set to None. When you apply a looping merge field to a content block, you can reference the current instance of the loop with the `this` context. For example, if looping through an array of products in your audience's shopping cart, you might reference the price for each product in the loop with `{{this.price}}`. To set conditional or looping logic: 1. Select the row you want to apply the logic to and select **Merge Tags **. 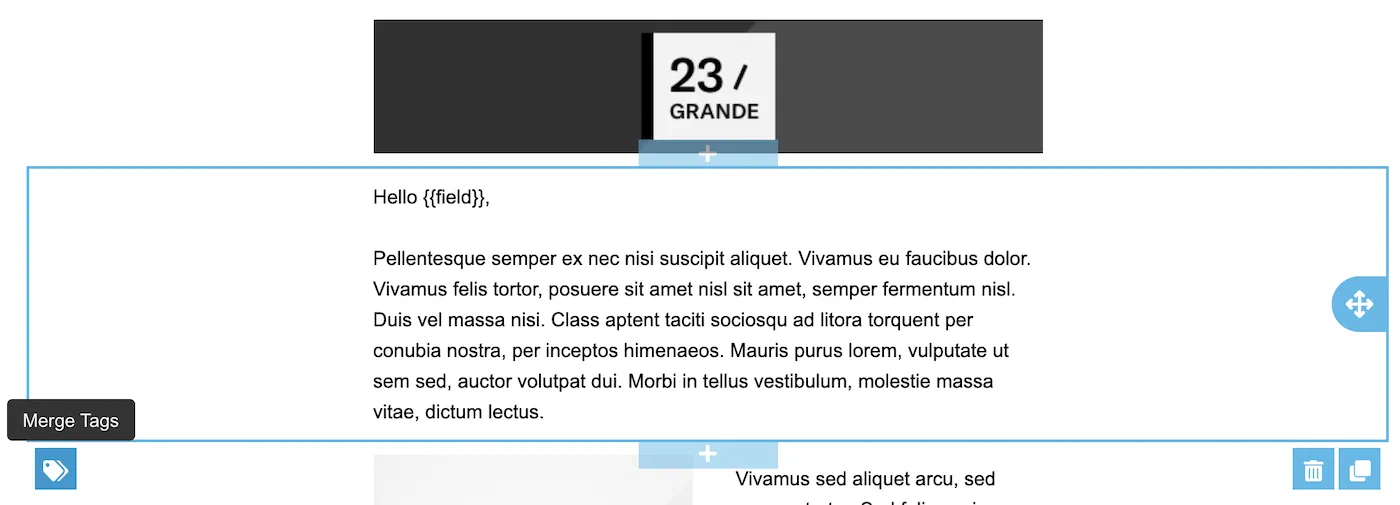 *Selecting the Merge Tags option in the Interactive editor* 1. Select a merge field and select from the available options: **Conditional** * **Show if condition is false** — Displays the block if the field does not exist, is empty, or is `null`. * **Show if condition is true** — Displays the block if the field exists and is not an empty string or `null` value. **Looping** * **Repeat for each** — Repeats the block for each item in an array. * **Show if there are none** — Displays the block if the key path is empty or does not exist. * **Show if there are any** — Displays the block if the key path exists and has at least one item in the array. 1. Choose **Select**. 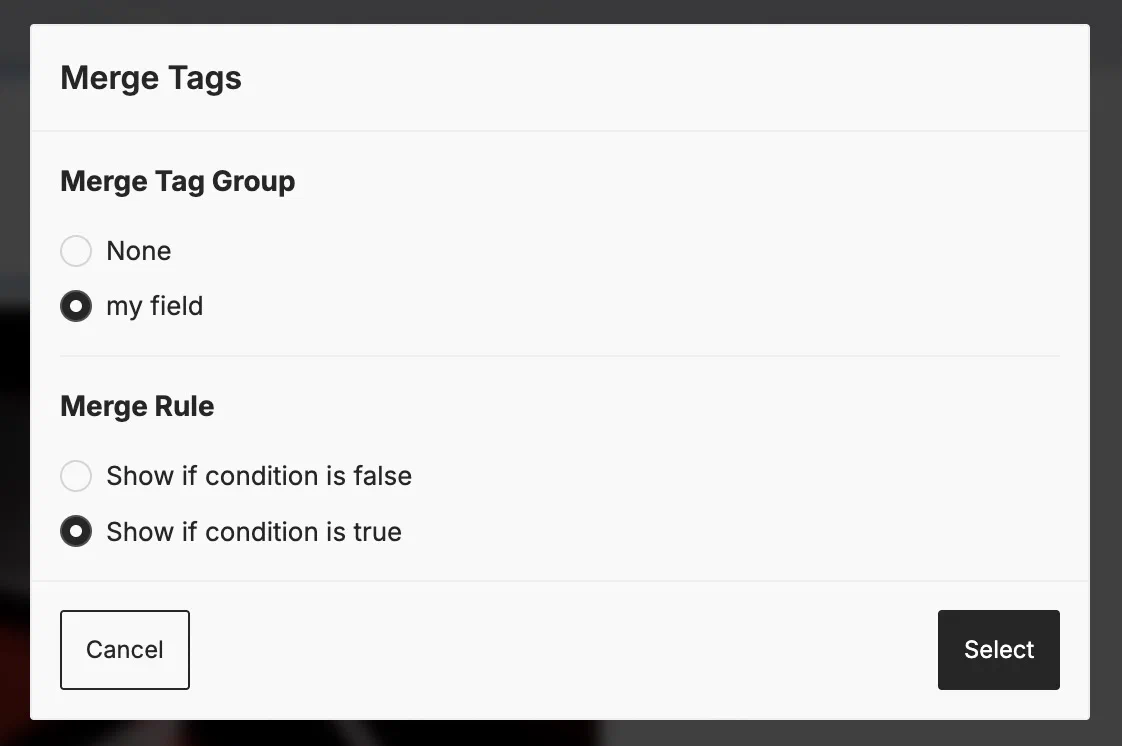 *Using a merge field with conditional logic* # Saving blocks and layouts in the Interactive editor > Save blocks and layouts for reuse in your messages, templates, and Preference Center web pages. This information applies to the drag-and-drop option in the Interactive editor. ## Save blocks Saved blocks are an easy way to create footer or nav bars for emails that you can reuse across templates. You can include a [Snippet](https://www.airship.com/docs/reference/glossary/#snippet) for information like the copyright date. Update the snippet once a year, and that change will be applied to anywhere the snippet is in use. You can save up to 50 blocks. Save blocks in the Interactive editor: 1. Open an existing or blank layout, then edit. 1. Select the row you want to save for reuse, then select the Save icon.  *Saving a content block in the Interactive editor* 1. Enter a category and tags you can use when searching blocks: * **Category** — Saved blocks are grouped by category name. You can use this field to assign a unique name to each block if you do not want to organize your blocks by category. * **Tags** — Optional. Separate multiple tags with commas. 1. Select **Save**. ### Insert saved blocks Insert saved blocks when editing layouts: 1. Open an existing or blank layout, then edit. 1. Select **Blocks** in the sidebar. * Your last saved block is listed first, followed by [blank rows](https://www.airship.com/docs/guides/messaging/editors/interactive/styling-formatting/#blocks-and-content-columns), then categories in alphanumeric order. * Search by category or tag. * To filter, select **All >** next to a category. 1. Drag a saved block into your layout. If you edit a block's content after adding it to your layout, the changes will apply to that layout only. ### Managing saved blocks You must edit or create a message, template, or Preference Center web page to access the Interactive editor, then you can manage your saved blocks: 1. Open an existing or blank layout, then edit. 1. Select **Blocks** in the sidebar. 1. Hover over a saved block and select the more menu icon ( ), then make your changes: * Edit categories and tags, and then select **Save**. * Select **Delete** to remove a block. You cannot edit the content of a saved block. Instead, drag the block into a layout, make changes, and save it as a new block. You can then delete the previous version, if needed. ## Save layouts You can save up to 20 of each layout type: email, [Rich Page](https://www.airship.com/docs/reference/glossary/#rich_page), [In-App Automation](https://www.airship.com/docs/reference/glossary/#iaa), email [Preference Center](https://www.airship.com/docs/reference/glossary/#preference_center). To save a layout: 1. Open an existing or blank layout, then edit. 1. Select **Save layout**. 1. Enter a name and optional thumbnail image that will appear on the card for the saved layout. You cannot change the name later. Enter an HTTPS URL for the image. See [Media guidelines](https://www.airship.com/docs/reference/messages/media-guidelines/#message-center-and-landing-page).If your Airship plan includes CDN support, you can also upload media or select from previously uploaded media. See Insert media in message content in Media library.
1. Select **Save**. 1. Select **Done** to close the Interactive editor. Now you can complete creating your message, template, or web page. The next time you return to the Interactive editor, your saved layout will be available to select. ### Managing saved layouts You must edit or create a message, template, or Preference Center web page to access the Interactive editor, then you can manage your saved layouts. To remove a layout, hover over it and select **Delete layout**. You cannot delete Airship default layouts. You cannot edit the content of a saved layout. Instead, select the layout, make changes, and save it as a new layout. You can then delete the previous version, if needed.