# Personalize Your Messages
Customize messages using user attributes, external data feeds, and other sources to provide the most relevant content for every customer.
# About Personalization
> Customize messages using user Attributes, external data feeds, and other sources to provide the most relevant content.
## Personalizing content
To personalize content in Airship, create a merge field representing a value you want to personalize, surrounded by double curly braces, e.g., `{{firstname}}`. Airship replaces the merge field (and braces) with the data specified by the merge field at send time — just like mail merge in a word processor or mail client.
Common uses of personalization:
* **Flight info** — *"Your departure gate for flight `{{flight_number}}` has changed to `{{gate_code}}`."*
* **Retail purchase updates** — *"`{{first_name}}`, we received your order `{{order_number}}` and will send tracking information when it has shipped."*
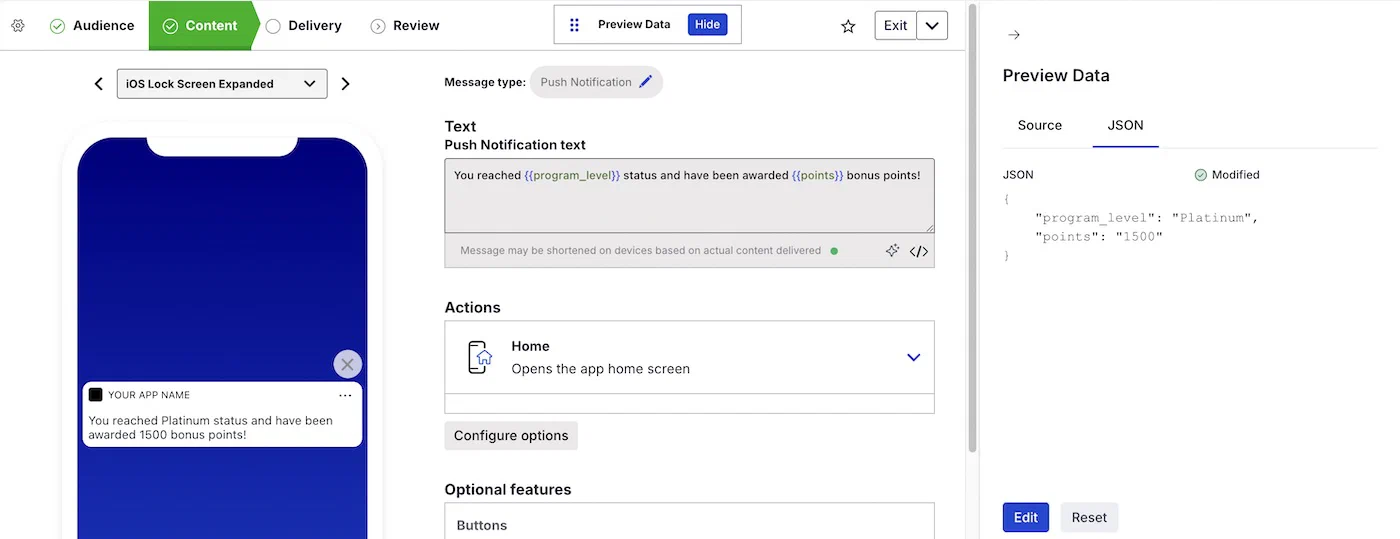
* **Membership rewards program updates** — *"You reached `{{program_level}}` status and have been awarded `{{points}}` bonus points!"*
In the image below you can see `{{program_level}}` and `{{points}}` appear as `Platinum` and `1500` in the message preview. See also [Previewing personalized content](https://www.airship.com/docs/guides/personalization/previewing/).
*Previewing personalized content in a message*
### Handlebars syntax
Airship's personalization features are implemented using the [Handlebars](https://handlebarsjs.com) templating language. We do not support all features described in handlebarsjs.com, only those described in our [Handlebars reference documentation](https://www.airship.com/docs/guides/personalization/handlebars/). It includes information about complex expressions that use logic operations such as AND, OR, NOT, greater than/less than, loops, math, and more.
## Data sources
The data you use to personalize a message may be personal in nature (first name, birth date, city) or based on user behavior (purchase history, pageviews, app opens). That data can come from these sources:
* [Attributes](https://www.airship.com/docs/reference/glossary/#attributes) — In addition to stored attributes you can use the `global_attributes` property in the [Push Object](https://www.airship.com/docs/developer/rest-api/ua/schemas/push/#pushobject) in the API for individual messages.
* [Custom Event](https://www.airship.com/docs/reference/glossary/#custom_event) properties
* [Create and Send](https://www.airship.com/docs/reference/glossary/#create_and_send) CSVs
* [External Data Feeds](https://www.airship.com/docs/reference/glossary/#external_feed)
* [Coupons](https://www.airship.com/docs/reference/glossary/#coupons)
* [Message namespace properties](https://www.airship.com/docs/guides/personalization/sources/message-namespace/)
* [Web URL triggers](https://www.airship.com/docs/guides/messaging/in-app-experiences/configuration/triggers/#web-url)
### Evaluation order
You can use multiple data sources to personalize a single piece of content, which means it is possible for you to have two merge fields with the same name in the same expression, e.g., an Attribute `{{points}}` and a Create and Send value for `{{points}}`.
If two fields share the same name, Airship attempts to use the value that is most relevant to your audience. This order isn't guaranteed, but, in general, Airship attempts to use the following order:
1. Custom event properties
1. Create and Send values
1. Attributes
1. External data feeds and Coupons feeds
You are advised to make sure your fields have unique names to prevent unintended personalization results.
## What you can personalize
When creating a message, you can personalize:
* Viewable message elements:
* *All message types* — Message text/body
* *Message Center* — Title and Preview lines
* *In-App Automation* — Header, body, and footer, and button labels
* *Email* — Title, subject, body, From name, and the usernames in the From and Reply to email addresses
* *SMS* — Summary
* *Open channels* — Title
* [Actions](https://www.airship.com/docs/reference/glossary/#action) — Take advantage of information specific to your audience to personalize your audience's experience when they interact with your message.
* Media URLs
You can also personalize reusable content:
* [Templates](https://www.airship.com/docs/reference/glossary/#template)
* [Snippets](https://www.airship.com/docs/reference/glossary/#snippet)
## Start personalizing
First learn personalization formatting:
* Learn [Handlebars syntax](https://www.airship.com/docs/guides/personalization/handlebars/).
* Learn how to personalize using each data source:
* [Attributes](https://www.airship.com/docs/guides/personalization/sources/attributes/)
* [Custom event properties](https://www.airship.com/docs/guides/personalization/sources/custom-events/)
* [Create and Send messages](https://www.airship.com/docs/guides/personalization/sources/create-and-send/)
* [External data feeds](https://www.airship.com/docs/guides/personalization/sources/external-data-feeds/)
* [Coupons](https://www.airship.com/docs/guides/personalization/sources/coupons/)
* [Message namespace properties](https://www.airship.com/docs/guides/personalization/sources/message-namespace/)
* Learn how to personalize [message actions and media URLs](https://www.airship.com/docs/guides/personalization/content/personalize-actions/).
Then you can start personalizing your messages, templates, and snippets.
# Dashboard tools for Handlebars
> Built-in tools that simplify entering Handlebars expressions.
Handlebars is Airship's templating language for personalization. Handlebars expressions use double curly braces wrapped around a content template, ranging from a simple variable, e.g., `{{first_name}}`, to complex evaluations of personalization data.
*Dashboard tools for entering Handlebars expressions*
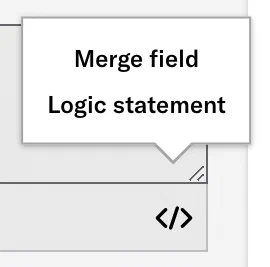
We provide tools in the dashboard that simplify adding and formatting **merge fields** and **logic statements** that conditionally render content.
When entering content in text fields, click **** to start creating merge fields or logic statements for the Text and Number [Attributes](https://www.airship.com/docs/reference/glossary/#attributes) in your project.
These options are available for most text fields, such as message body, button labels, URLs, [Custom Keys](https://www.airship.com/docs/reference/glossary/#custom_keys), and pasted or uploaded HTML in the Interactive editor.
See also: [Handlebars reference](https://www.airship.com/docs/guides/personalization/handlebars/).
## Merge fields tool
A merge field is a variable in your message or template that you want to populate with a personalized value for each member of the audience. Merge fields are the most basic Handlebars expression.
Using this tool, your expression is inserted in the text field in the format `{{attribute_id}}` or `{{$def attribute_id "default_value"}}`.

*Creating a merge field using the dashboard tool*
---
When entering content in text fields:
1. Click **** and select *Merge field*.
1. Search for an attribute and select from the list. You can search by attribute name or ID.
1. Do **one** of the following:
* Enter a default value that will be used if the merge field is empty.
* Leave the default value blank and check *Allow empty values*.
1. Click **Insert**.
---
After inserting, you can edit the `"default_value"` or delete the entire handlebars string to remove it.
## Logic statements tool
Logic statements include conditional requirements. The first statement you add is an `if`, which means your content is rendered in your message if the statement is true. You can then add `else if` and `else` statements. Each additional statement is a condition that builds on the preceding one, and all are formatted as a single expression.
* **Statement 1:** `if` — The specified text is displayed if the statement is true. *Only this initial statement is required.*
* **Statement 2:** `else if` — The specified text is displayed if statement 1 is false and statement 2 is true. *You can add multiple `else if` statements.*
* **Statement 3:** `else` — The specified text is displayed if all preceding statements are false. *You can add an `else` statement without adding any `else if` statements.*
See also: [Handlebars Reference: If/Else Statements](https://www.airship.com/docs/guides/personalization/handlebars/logic-helpers/#ifelse).
---
*Creating a logic statement using the dashboard tool*
When entering content in text fields:
1. Click **** and select *Logic statement*.
1. Search for an attribute and select from the list. You can search by attribute name or ID.
1. Select the operator you want to use, and enter a value. Available operators depend on the attribute type (Text or Number). As you add and edit statements, the code output that will be inserted in your message displays at the bottom of the window.
1. Click **Add content**, enter the content you want to display in the message when the statement is true, then click **Apply**.
1. (Optional) Click the add icon (+) to add `else` and/or `else if` conditions and complete previous steps.
1. Click **Insert**.
After inserting, you can edit the display text for each statement or delete the entire handlebars string to remove it.
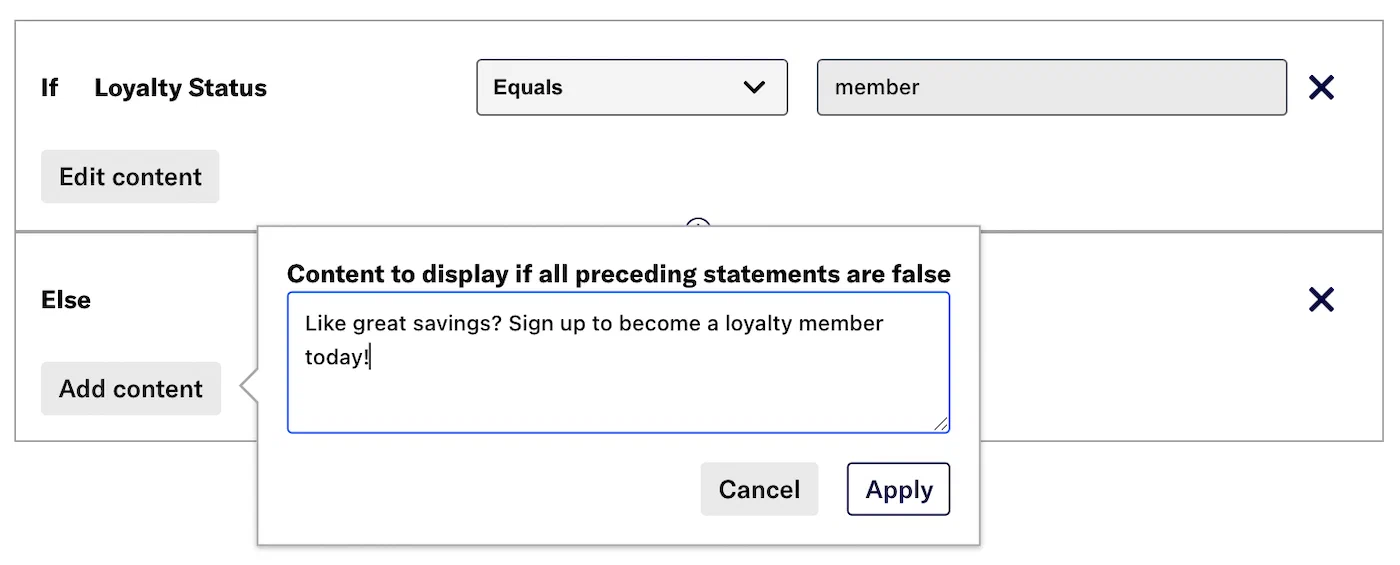
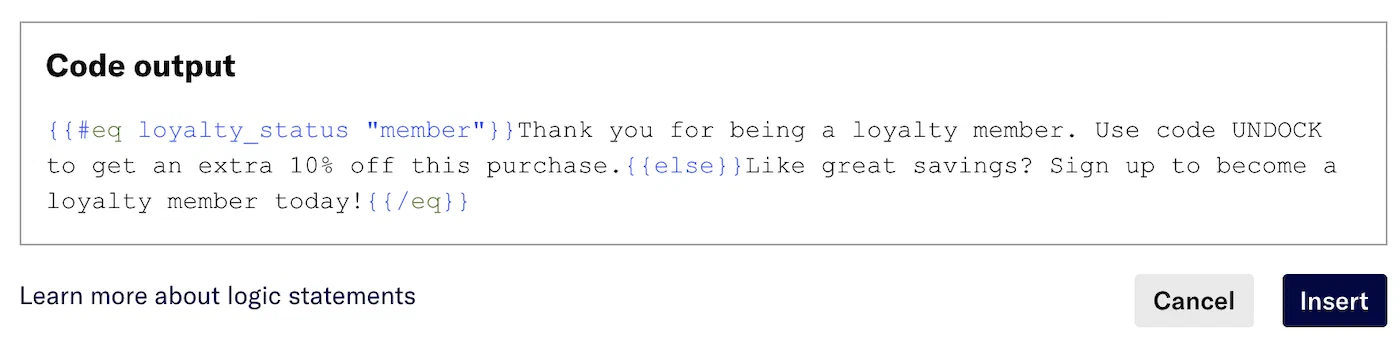
### Example logic statement
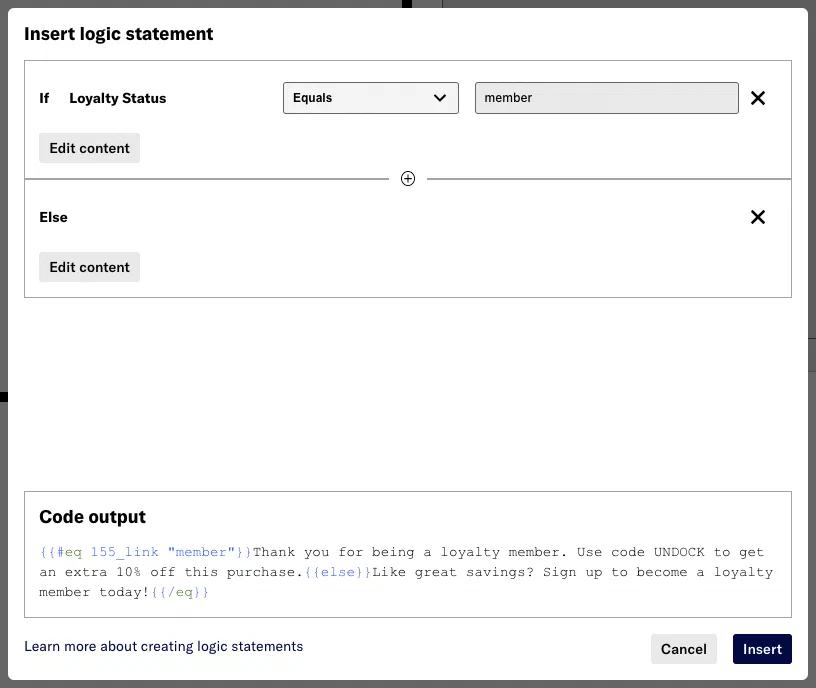
In this example, we want to show existing loyalty program members a discount code and non-members a signup message. We will build this expression based on attribute `loyalty_status`.

*Setting attribute operator and value*
First set the attribute to equal value `member`.
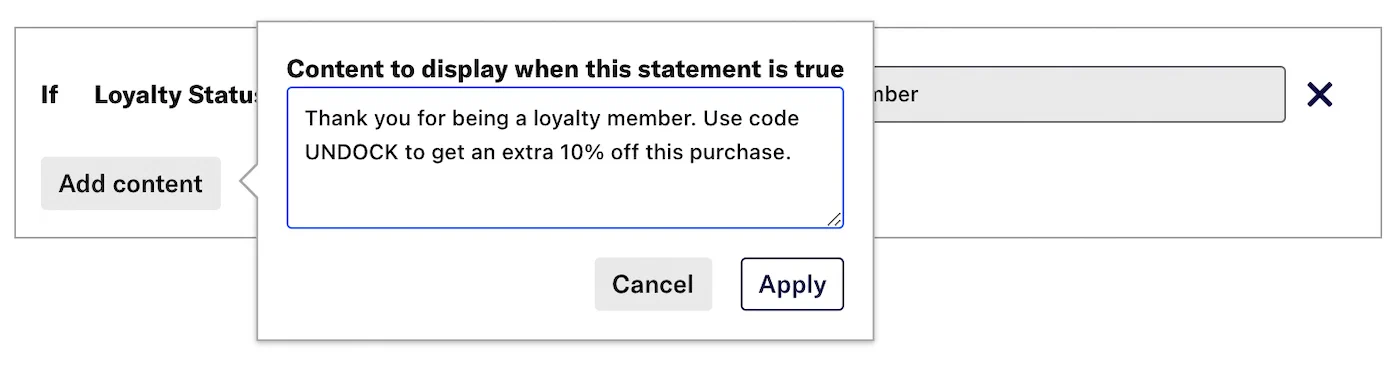
*if statement *
Then enter content `Thank you for being a loyalty member. Use code UNDOCK to get an extra 10% off this purchase.`.
*else statement*
Next add an `else` statement, for users for whom the first statement is false, and enter the content those users will see instead: `Like great savings? Sign up to become a loyalty member today!`.
*Your coded expression*
The code updates as you add and edit statements. Click **Insert** to add the expression to your message.
# Previewing personalized content
> See how your personalized content will look when populated with data.
When adding or editing content that contains [Handlebars](https://www.airship.com/docs/reference/glossary/#handlebars), preview the appearance with actual values from sample data. The sample data can come from a member of a [Preview Group](https://www.airship.com/docs/reference/glossary/#preview_test_groups) or from a random or specific [Contact](https://www.airship.com/docs/reference/glossary/#contact). You can also enter your own JSON sample data and override the data for any selected user. [Message namespace data](https://www.airship.com/docs/guides/personalization/sources/message-namespace/) is available in previews.

*Previewing personalized content in a message*
Where message, [Template](https://www.airship.com/docs/reference/glossary/#template), and [Snippet](https://www.airship.com/docs/reference/glossary/#snippet) previews appear, select **View** for **Preview Data** to open the configuration drawer. To close it, select **Hide** or select the arrow icon in the **Preview Data** drawer. Select and hold the drag handle icon (dots-six-vertical) to drag the Preview Data element to a new position on the screen.
* For [Scenes](https://www.airship.com/docs/reference/glossary/#scene), first enable the Interactive mode [preview tool](https://www.airship.com/docs/guides/messaging/editors/native/about/#preview-tools) to access the **Preview Data** option.
* For email, Message Center, and landing page content, previewing is available within the [Interactive Editor](https://www.airship.com/docs/reference/glossary/#interactive_editor) only. When using the Interactive editor, select **Preview** to access the **Preview Data** option.
* Previewing personalization is not available for [In-App Automation](https://www.airship.com/docs/reference/glossary/#iaa) messages or templates.
After configuring preview data, it persists in other screens within the same message, template, or Snippet. You do not have to reenter it. Within Sequences, preview data persists between the Manage and Performance screens and is independent of the preview data in individual messages.
## Configure a preview data source
After entering content that contains Handlebars, select **View** for **Preview Data**, and then configure a data source in the drawer:
| Source | Description | Steps |
| --- | --- | --- |
| **Preview Group** | Populate the personalized content using data associated with a member of a [Preview Group](https://www.airship.com/docs/reference/glossary/#preview_test_groups). Use this source to validate content rendering for known users instead of relying on actual audience data. | Under **Source**, select **Preview Group**, select a group, and then select a member. |
| **Random Contact** | Populate the personalized content using data associated with a random user from the configured message audience. Use this source to validate content rendering for a range of actual audience members.
You can select from a list of up to ten users labeled with their channel type, such as `email`, `SMS`, or `iOS`. If the message does not require configuring an audience, or if the audience is All Users, the list is generated from all users in the project. | Under **Source**, select **Random Contact**, and then select a user. Select **Refresh list** for different users. |
| **Specific Contact** | Populate the personalized content using data associated with a specific user in your project. Use this source to validate content rendering for known recipients.
You can search for a [Channel ID](https://www.airship.com/docs/reference/glossary/#channel_id), [Named User](https://www.airship.com/docs/reference/glossary/#named_user), email address, or [MSISDN](https://www.airship.com/docs/reference/glossary/#msisdn). Matches are labeled with their channel type, such as `email`, `SMS`, or `iOS`. | Under **Source**, select **Specific Contact**, search for an identifier, and select from the results. |
| **Custom JSON** | Modify the data for a selected source or provide your own. Use custom JSON to simulate various personalization scenarios. | Select **JSON**, then **Edit**, enter or modify the current data, then select **Apply JSON** to see the changes in the preview. Select **Reset** to restore the unedited data and refresh the preview. |
{class="table-col-1-20 table-col-2-40"}
## JSON sample data for Automations and Sequences
If your template or message is for an Automation or Sequence triggered by a [Custom Event](https://www.airship.com/docs/reference/glossary/#custom_event), you will want to use sample data based on that event.
Enter Custom Event properties representative of an audience member, mirroring the `properties` object in a [Custom Event object](https://www.airship.com/docs/developer/rest-api/ua/schemas/others/#customeventobject). See also [Personalize messages using Custom Events](https://www.airship.com/docs/guides/personalization/sources/custom-events/).
The following are a Custom Event and the JSON you would enter when configuring preview data for that event.
**Sample Custom Event**
```JSON
{
"occurred": "{{event_time}}",
"user": {
"named_user_id": "user"
},
"body": {
"name": "purchase",
"subscribe": true,
"properties": {
"customer_name": "user",
"total": 48,
"cost_units": "USD",
"purchase": [
{
"qty": 4,
"item": "MLB regulation baseball",
"per": "$12",
"total": "$48"
}
]
}
}
}
```
**Example JSON for previewing personalization**
```json
{
"total": 48,
"cost_units": "USD",
"purchase": [
{
"qty": 4,
"item": "MLB regulation baseball",
"per": "$12",
"total": "$48"
}
]
}
```
## Sources
The data you use to personalize a message may be personal in nature (first name, birth date, city) or based on user behavior (purchase history, pageviews, app opens).
# Personalizing messages using Attributes
> Attributes are metadata used for audience segmentation and personalization. You can use Attributes in a message body to personalize content for each user.
For example, if you were sending a birthday message to your audience, you could target the audience using an [Attribute](https://www.airship.com/docs/reference/glossary/#attributes) for a specific date and also use relevant Attributes within the body of the message to personalize based on an individual's specific age, location, etc. Use [Handlebars](https://www.airship.com/docs/reference/glossary/#handlebars) to reference Attributes in message content.
The image below shows a push notification with title `It's your birthday, {{name}}!` and text `We heard you're turning {{age}}! Here's a gift to help you celebrate.` Using [preview data](https://www.airship.com/docs/guides/personalization/previewing/), you can populate the message preview to see how it will appear to your users.
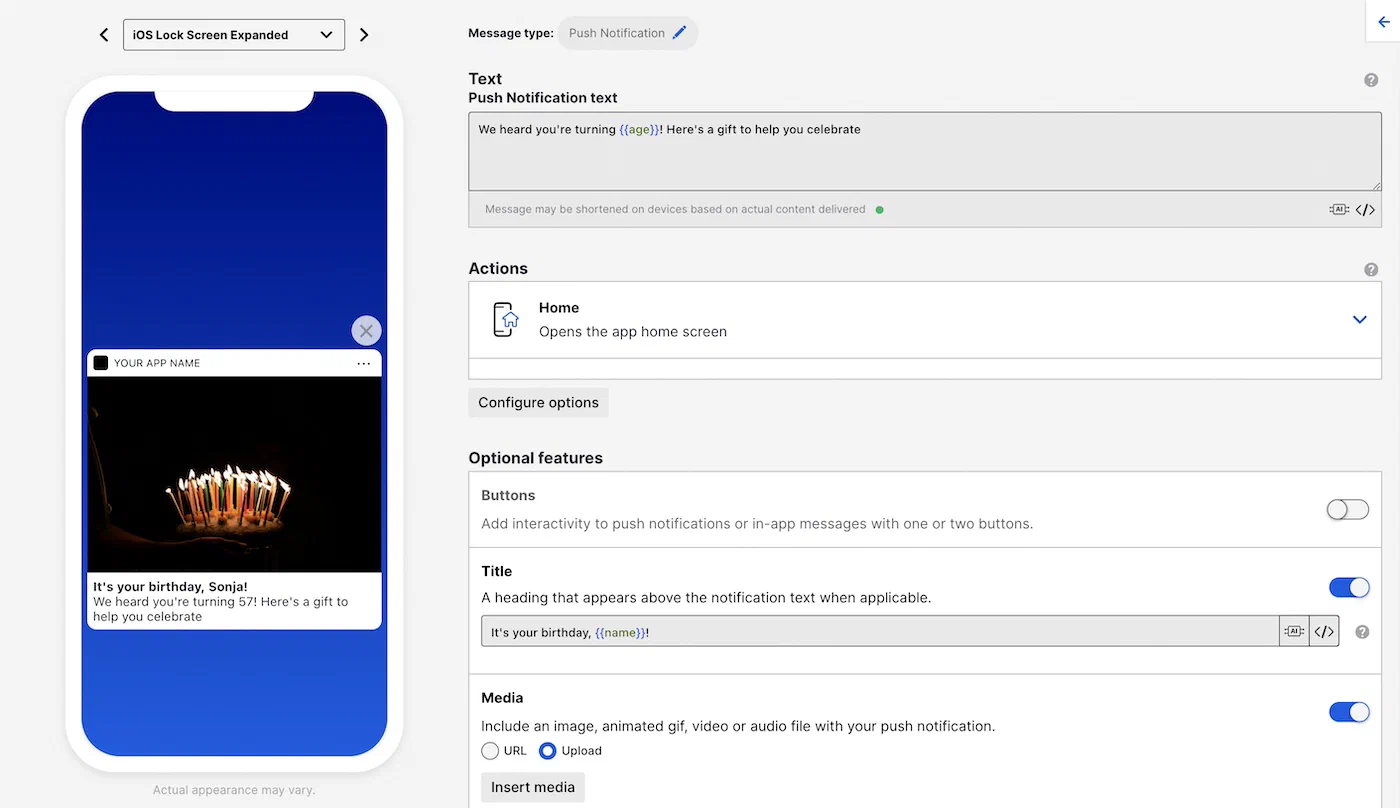
*Personalizing a message using age and name Attributes*
Since Attributes can represent different kinds of values, make sure you know the format of your Attributes before using them in a message or template. See [Attribute types](https://www.airship.com/docs/guides/audience/attributes/about/#attribute-types) in *About Attributes*.
### Personalizing content with JSON Attributes
JSON Attributes are provided as an object with keys corresponding to instance IDs each with a value of the associated instance. To use JSON Attributes in personalization, you can either reference a specific instance by ID or loop through the instances using the `#each` operator. See the [Looping through objects and arrays](https://www.airship.com/docs/guides/personalization/handlebars/loop/) guide.
> **Warning:** Do not include an instance ID in conditionals or other queries. Instance IDs are only for use with the APIs for [setting and removing JSON Attributes](https://www.airship.com/docs/guides/audience/attributes/setting/#setting-and-removing-json-attributes). Use the form `attribute_name.PropertyName` only. In the dashboard device preview, other forms, such as `attribute_name#instance_id.PropertyName`, may render correctly, but sends will fail.
>
> For example, for an Attribute `acme_ticketing_window_json` with a `Cities` property, use `acme_ticketing_window_json.Cities` inside conditionals:
>
> ```text
> {{#if ($contains acme_ticketing_window_json.Cities "Guadalajara")}}
> Guadalajara: February 25 at 11:00 (ET) / 17:00 (CET)
> {{else}}{{/if}}
> {{#if ($contains acme_ticketing_window_json.Cities "Philadelphia")}}
> Philadelphia: February 25 at 11:00 (ET) / 17:00 (CET)
> {{else}}{{/if}}
> ```
Let's look at an example. This is a JSON schema for an Attribute with ID `players`:
```text
{
name: string
cool_factor: number
is_cool: boolean
inventory: [
{
name: string
age: number
enchanted: boolean
custom_name: string
magic_properties: [
{
id: string
bonus: number
}
]
}
]
}
```
An example of a JSON Attribute using the above schema and having two saved instances might look like this:
```text
{
"player1": {
"name":"Ganthur",
"cool_factor":7,
"is_cool":true,
"inventory":[
{
"name":"Broadsword",
"age":177,
"enchanted":true,
"custom_name":"Matilda",
"magic_properties":[
{
"id":"flaming",
"bonus":20
}
]
}
]
},
"player2": {
"name":"Balfor",
"cool_factor":1,
"is_cool":false,
"inventory":[
{
"name":"Mighty axe",
"age":23,
"enchanted":false,
"custom_name":"Brunhild",
"magic_properties":[
{
"id":"indestructible",
"bonus":4
}
]
}
]
}
}
```
You can use the `this` expression to refer to the current item in the loop and `@index` for the zero-index number of the item. In this example we will create a numbered list of player names and increment the `@index` operator by one using the `add` helper so the list starts with `1`:
```text
{{#each players}}
{{add @index 1}} - {{this.name}}
{{/each}}
```
You can use the `as |name|` syntax to make your loop more readable. Let's add each player's list of inventory names to our example:
```text
{{#each players as |player|}}
{{add @index 1}} - {{player.name}}. Inventory:
{{#each player.inventory as |item|}}
{{item.name}}
{{/each}}
{{/each}}
```
Add an `if` conditional statement to display a message only for players with a sword in their inventory that has the `flaming` magic property and display its custom name:
```text
{{#each players as |player|}}
{{#each player.inventory as |item|}}
{{#if (eq item.name "sword")}}
{{#each item.magic_properties as |property|}}
{{#if (eq property.id "flaming")}}
Congrats on your flaming sword "{{item.custom_name}}"
{{/if}}
{{/each}}
{{/if}}
{{/each}}
{{/each}}
```
You can also refer to a specific instance of the JSON Attribute using its instance ID. For example, `{{players.player1}}`.
# Personalize your Create and Send messages
> Create and Send supports personalization using Handlebars.
When using [Create and Send](https://www.airship.com/docs/reference/glossary/#create_and_send), you can personalize values directly in the `create_and_send` array, or you can include in your CSV data additional properties that you want to use to personalize messages — any column name or property that is not prefaced with `ua_`. Use `{{column_name}}` or `{{property_name}}` in the body of the message. All values in CSV uploads, including numbers, are represented as strings and cannot be used with [math helpers](https://www.airship.com/docs/guides/personalization/handlebars/math-helpers/).
If you want to personalize your message using both Attributes and information from a CSV, make sure that the properties in the CSV are unique from your Attributes. If an Attribute has the same name as a property in the CSV, Airship will try to use the value in the CSV. See [Object and Array Notation for Create and Send](https://www.airship.com/docs/guides/personalization/handlebars/basics/#object-and-array-notation-for-create-and-send) for using complex arrays and objects.
## Enabling personalization
When using bulk audiences (`bulk_id`) with personalization, include `"personalization": true` in the `options` object of your request. Personalization is enabled automatically when using the direct `create_and_send` array approach.
**Create and Send request with personalization:**
```http
POST /api/create-and-send HTTP/1.1
Authorization: Basic
Accept: application/vnd.urbanairship+json; version=3
Content-Type: application/json
{
"audience": {
"create_and_send": [
{
"ua_msisdn": "15551234567",
"ua_sender": "12345",
"ua_opted_in": "2021-04-29T10:34:22",
"name": "New Customer, Esq.",
"from_city": "City",
"from_state": "OR"
}
]
},
"device_types": [
"SMS"
],
"message_type": "commercial",
"notification": {
"sms": {
"template" : {
"fields" : {
"alert": "Hi {{name}}! I hear you're from {{from_city}}, {{from_state}}!",
}
}
}
}
}
```
# Personalize messages using Custom Events
> Personalize message content with values from the Custom Events used to trigger Automations, Scenes, and Sequences.
Custom Events help you track user activities and conversions from your app, website, etc. When you trigger an [Automation](https://www.airship.com/docs/reference/glossary/#automation), [Scene](https://www.airship.com/docs/reference/glossary/#scene), or [Sequence](https://www.airship.com/docs/reference/glossary/#sequence) with a [Custom Event](https://www.airship.com/docs/reference/glossary/#custom_event), you can use properties from the event to personalize the resulting messages. For Sequences, you can reuse Custom Event properties in any message in the Sequence, which can help remind your audience about items they left in their shopping cart, or that an event that they're interested in is happening soon.
Automations and Sequences support server-side and client-side Custom Events for personalization. Scenes support client-side Custom Events only.
> **Tip:** You can also personalize messages using [Attributes](https://www.airship.com/docs/reference/glossary/#attributes), even when you don't use Custom Event triggers.
## Referencing properties in message content
Custom Events are associated with a channel or a [Named User](https://www.airship.com/docs/reference/glossary/#named_user) and carry properties that you can use to trigger and personalize your messages.
Start by creating an Automation, Scene, or Sequence using the Custom Event trigger, and select one or more Custom Events or event properties.
When writing the message, you can reference properties from the Custom Event trigger in your message or template. For example, you could iterate over the items a user purchased by referencing an `items_purchased` property.
```text
{{#each items_purchased}}
{{qty}} x {{item_name}} = {{item_total}}
{{/each}}
{{total}}
```
If you reference a property that is not in an event, is null, or empty, the reference will be empty in your message, and your message may not make sense. Use the [default handler](https://www.airship.com/docs/guides/personalization/handlebars/basics/#def) `$def` to set default values, so that your message still makes sense if variables are empty or absent. For example, `{{$def name "you"}}` would insert `you` in the message if the `name` property in your Custom Event is empty or missing.
## Custom Event personalization example
When personalizing messages or templates for a Custom Event-triggered Automation, Scene, or Sequence, you can use anything in the Custom Event's `properties` object.
The following is an example Custom Event. We will use that to send a personalized receipt in a Message Center message.
**Custom Event:**
```json
{
"occurred": "{{event_time}}",
"user": {
"named_user_id": "user"
},
"body": {
"name": "purchase",
"subscribe": true,
"properties": {
"customer_name": "Dave",
"total": 48,
"cost_units": "USD",
"purchase": [
{
"qty": 4,
"item": "MLB regulation baseball",
"per": "$12",
"total": "$48"
},
{
"qty": 2,
"item": "MLB official hat",
"per": "$15",
"total": "$30"
}
]
}
}
}
```
Because Custom Event properties can include arrays, objects, and arrays of objects, we can [loop through](https://www.airship.com/docs/guides/personalization/handlebars/loop/) complex Custom Event properties using `{{#each}}`.
Next we put it all together with the default handler to craft the message:
```handlebars
Hi, {{$def customer_name "valued customer"}}!
Thanks for your purchase of:
{{#each purchase}}
{{qty}} x {{per}} {{item}} = {{this.total}}
{{/each}}
Total: ${{total}} {{cost_units}}
Your order is being processed. We'll message you again when it ships!
```
The result will look like this:
```handlebars
Hi, Dave!
Thanks for your purchase of:
4 x $12 MLB regulation baseball = $48
2 x $15 MLB official hat = $30
Total: $78 USD
Your order is being processed. We'll message you again when it ships!
```
# External Data Feeds
> {{< glossary_definition "external_feed" >}}
## About External Data Feeds
Using External Data Feeds can help you tell your audience about things they might be interested in, without having to send custom events to Airship or assign [Attributes](https://www.airship.com/docs/reference/glossary/#attributes).
For example, if your audience requests weather updates, you can set up an External Data Feed to fetch weather data when you send your message and personalize messages with relevant weather updates for each member of your audience.
The following is the general workflow for using External Data Feeds in messages:
1. [Create an External Data Feed](#create-a-feed) in the dashboard.
1. [Reference a feed when entering content in a message or template](#using-a-feed-in-messages). You'll create a merge field representing a value you want to personalize, surrounded by double curly braces `{{ }}`, also known as [Handlebars](https://www.airship.com/docs/reference/glossary/#handlebars). Airship replaces the merge field (and braces) with the data specified by the merge field at send time, just like mail merge in a word processor or mail client.
Example feed variables in a message:
```text
{{#feed "feed_id"}}
Content referencing the feed, like {{first_name}} or {{mtn_weather}}.
{{/feed}}
```
1. [Set failure behavior and variable values when sending the message](#setting-feed-failure-behavior-and-variable-values).
### Throttling and caching
Personalization using External Data Feeds can mean a lot of API calls in a short period of time. With throttling, you can set a frequency rate for your requests. The minimum rate is 100 requests per second.
You can also cache responses from your feeds and use them for multiple recipients. You may want to cache a response if you don't expect your feed to return a different response when using the same feed URL and parameters.
You can enable throttling or caching for a feed but not both.
### Object locations
You can enter names and paths for objects in your feed so they are available in the code copying helper in the [Interactive Editor](https://www.airship.com/docs/reference/glossary/#interactive_editor). See [Code helper](#code-helper).
Use JSON dot notation to enter the paths to the variables you want to reference. For example, if you have a user object, you might want to access the first name of your user. You would enter `firstName` as the *Name* for the data and `user.firstName` as the *Object location*.
See also [Object and array notation](https://www.airship.com/docs/guides/personalization/handlebars/basics/#dot-notation).
### External API requirements
Your external API must operate in the following ways to work with External Data Feeds:
* Return the correct `Content-Type` header for the response. We support `application/json`.
* Return the correct `Content-Encoding` header if you are compressing your responses. We support gzip for compression.
* Return your content as a JSON object. We do not support top-level JSON arrays. Array content must be nested in an object.
## Create a feed
You can create up to 10 feeds per project. [Contact Support](https://support.airship.com/) to request increasing this limit.
1. Next to your project name, select the dropdown menu (▼), then **Settings**.
1. Under **Project settings**, select **External Data Feeds**.
1. Select **Create external data feed**.
1. Configure the feed settings, and then select **Next** to move on:
| Setting | Description |
| --- | --- |
| **Friendly name** | This is the feed name as it appears in the Airship dashboard. |
| **Feed ID** | This is how you will reference the feed. The ID must be unique, without spaces or special characters. Use a feed ID that is meaningful to use and relatively easy to type. **You cannot change the feed ID later.** |
| **Description** | This is a summary of the data returned by the feed. |
| **Request URL** and **Default values** | This is the URL to retrieve data from, also called the *feed URL*. The URL is your domain, protocol, path, and any variables you want to use to personalize your messages. For example, `https://api.example.com/products/`. The default value fields appear automatically based on the request URL. Enter a default value for each send time variable used in the request URL. See [Message-level and user-level variables](#message-level-and-user-level-variables). |
| **Confirm access rights for request URL** | Check the box to confirm. |
| **Headers** | Optional. Specify any HTTP request headers that may be required to successfully communicate with the external feed. For example, `authorization` headers.
Header values support Handlebars as well, so you can populate header values from attributes and other personalization sources. Header information is not a part of the request URL. Select **Add header**, then enter a *Key* and *Value*. Repeat for additional headers. |
1. (Optional) Configure [throttling or caching](#throttling-and-caching), and then select **Next** to move on:
| Setting | Description |
| --- | --- |
| **Throttle requests** | Enable to set a frequency rate for your requests. Enter the number of API requests per second. The minimum rate is 100 requests per second. |
| **Cache response** | Check box to enable. |
1. (Optional) Configure [object locations](#object-locations). Select **Add object location** and enter a name and object location.
1. Select **Save**.
### Message-level and user-level variables
The [request URL](#create-a-feed) supports two types of variables. You can use both in the same URL:
| Variable type | Syntax | Resolved from | Scope |
|---|---|---|---|
| **Message-level (send time)** | `[[var]]` | Default value set in the feed, overridden per message | Same value for all recipients |
| **User-level** | `{{var}}` (standard [Handlebars](https://www.airship.com/docs/reference/glossary/#handlebars)) | Audience data such as [Attributes](https://www.airship.com/docs/reference/glossary/#attributes) and custom event properties | Different value per recipient |
Use **message-level variables** to reuse a single feed for different purposes by changing the variable value at send time. You set a default value when creating the feed and can override it when [sending the message](#setting-feed-failure-behavior-and-variable-values).
Use **user-level variables** to personalize the feed request per recipient. Airship resolves each variable from the recipient's data, so the feed request URL can differ for each member of your audience.
This example uses two message-level variables (`[[program]]` and `[[contentID]]`) to fetch different content per campaign without creating separate feeds:
`https://api.example.com/[[program]]/[[contentID]]`
This example combines a message-level variable (`[[msg_purpose]]`) with user-level variables (`{{first_name}}` and `{{last_name}}`), so each recipient gets a personalized request for the same campaign:
`https://api.example.com/[[msg_purpose]]?user={{first_name}}%20{{last_name}}`
If your users have [Named User](https://www.airship.com/docs/reference/glossary/#named_user) IDs set, you can use the `ua_named_user_id` [default attribute](https://www.airship.com/docs/reference/data-collection/attributes/#default-attributes) to fetch feed data per user:
`https://api.example.com/[[msg_purpose]]?user={{ua_named_user_id}}`
## Using a feed in messages
You add your data feed to messages in two parts:
1. Formatting the message content
1. Entering default values for the variables you referenced in your message and determining how to handle the message if the feed fails
### Formatting content
Formatting your message content is identical in the dashboard and the API. In the dashboard you add content when configuring a template or in the Content step in a composer.
**Content format for External Data Feeds**
```text
{{#feed "feed_id"}}
Content referencing the feed, like {{first_name}} or {{mtn_weather}}.
{{/feed}}
```
If your feed URL includes send time variables, you can override their default values in the `#feed` block as `{{#feed "feed_id" var="value"}}`. Or you can [set a value in the *Delivery* step](#setting-feed-failure-behavior-and-variable-values) that applies to all of the channels selected for the message.
### Code helper
When using the [Interactive Editor](https://www.airship.com/docs/reference/glossary/#interactive_editor) to create content for a template, email, landing page, or Message Center message, we provide a helper for inserting feed code. Available code:
* Object locations — Paths defined in the feed settings.
* `#feed` blocks — Available for all feeds in your project. A preformatted block that includes the feed ID:
```text
{{#feed "feed_id"}}
{{/feed}}
```
When adding content:
1. Select *Data Feed* in the left sidebar.
1. Select ▼ for a feed.
1. Hover over a feed name or object location and select the duplicate icon (
) to copy the code.
1. Select a field in your message content and paste the copied data.
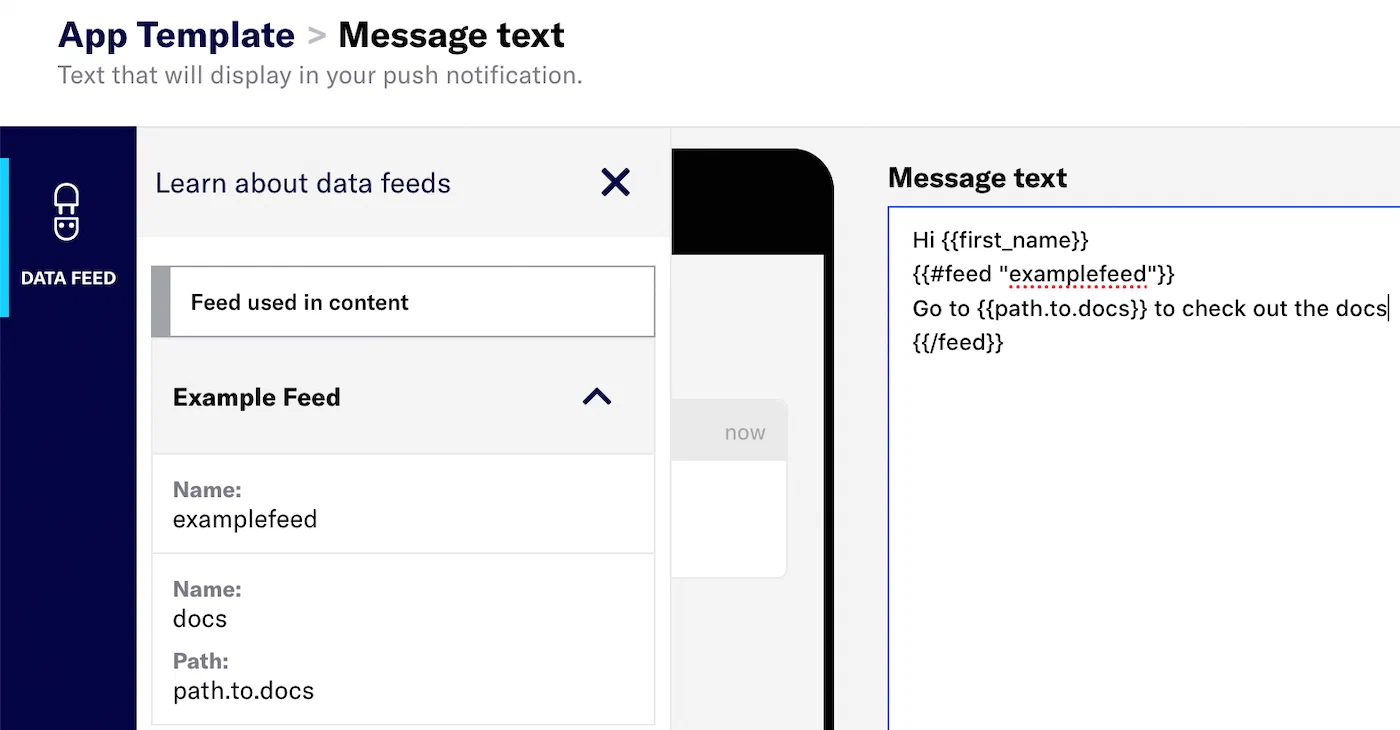
*Copied and pasted feed code in an App template*
#### Differentiating data sources
You can use reference variables (or [Merge Fields](https://www.airship.com/docs/reference/glossary/#merge_field)) that aren't a part of a feed and variables that are part of a feed in the same `#feed` block. For instance, if your content uses project attribute `first_name` and the feed also has a property `first_name`, if you don't namespace it, the feed data will take precedence over the project attribute.
To differentiate the data sources, set the feed namespace using `as |alias|`. This ensures that Airship uses the proper data for the variables in your messages.
In the example below, we can differentiate between attributes (`first_name` and `user_id`) and feed properties based on the parent namespace set within the `feed` and `each` blocks.
```text
{{#feed "featured_products" region="us" as |result|}}
Hi, {{first_name}}. Take a look at
{{#each (limit result.products 2) as |product|}}
{{product.name}}: {{product.price}}
https://example.com/us/{{user_id}}/featured/{{urlEncode product.slug}}/
{{else}}
Products that might interest you at https://example.com/us/products/featured
{{/each}}
{{else}}
Couldn't fetch featured products!
{{/feed}}
```
### Setting feed failure behavior and variable values
In the *Delivery* step of a composer, you must configure each feed listed in *External data feed options*.
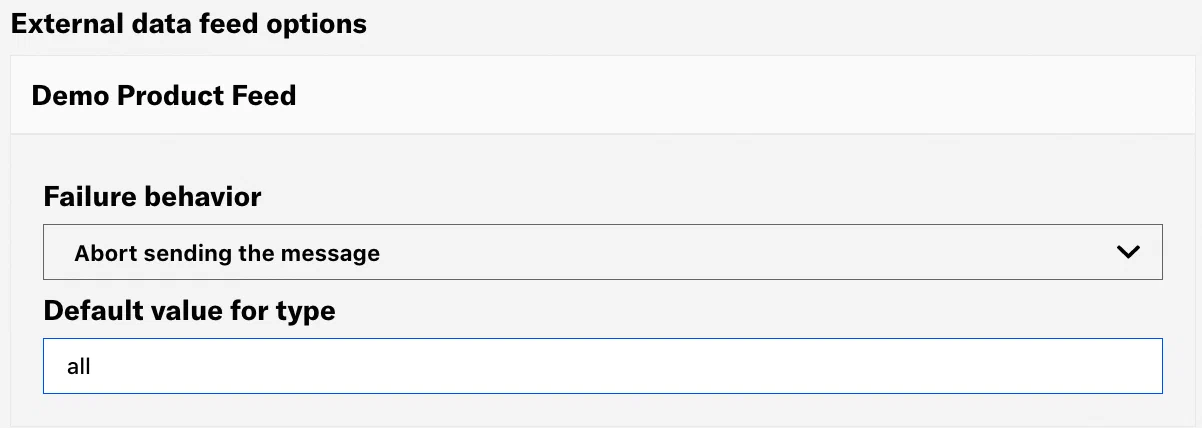
* **Failure behavior** — Determine how your message is handled if the feed fails. If your message still makes sense without a feed, you may want to send the message even if your data feed fails. Also consider how ongoing (automated and recurring) messages will be affected if you later [delete the feed](#managing-external-data-feeds).
Select *Abort sending the message* or *Send message without this data*.
See also: [Success, Retry, and Error Conditions](#success-retry-and-error-conditions).
* **Send time variables** — If your feed URL contains send time variables, each one will be listed as `Default value for [var]` with its default value. You can change the value here to override the default. Changes apply to the current message only.
*External data feed settings in a composer's Delivery step*
With the API, you set the failure (error) behavior in the [External Data Feed References Object](https://www.airship.com/docs/developer/rest-api/ua/schemas/external-data-feeds-references/). When using a data feed you must include a [`templates` object](https://www.airship.com/docs/developer/rest-api/ua/operations/personalization/) in the payload or set the `personalization` option to `true`.
* The value for `name` is the Feed ID you set when [creating your feed](#create-a-feed).
* The possible values for `on_error` are `cancel` and `continue`. These are equivalent to the dashboard options *Abort sending the message* and *Send message without this data*.
`continue` will result in sending the message despite an error. Otherwise, a feed failure will prevent Airship from sending your message.
**Example push request using an External Data Feed**
```json
{
"feed_references": {
"feeds": [
{
"name": "featured_products",
"params": {
"region": "us"
},
"on_error": "continue"
}
]
}
}
```
## Managing External Data Feeds
To see a list of all your feeds:
1. Next to your project name, select the dropdown menu (▼), then **Settings**.
1. Under **Project settings**, select **External Data Feeds**.
To edit all fields except the Feed ID, select the more menu icon (⋯) for a feed, select **Edit**, make your changes, and then select **Save**. If you make changes to the Request URL, you will need to reconfirm the request URL domain. You must confirm access rights for request URL every time you edit a feed.
To delete a feed, select the more menu icon (⋯) for a feed, and then select **Delete**.
> **Warning:** * If you delete an External Data Feed, any messages content referencing its data will be handled according to the message's [feed failure behavior settings](#setting-feed-failure-behavior-and-variable-values).
> * Your External Data Feed is deleted immediately. There is no confirmation and your External Data Feed cannot be restored once deleted.
## Success, Retry, and Error Conditions
Airship considers any 2xx response from a feed to be a success and will continue a message using the feed response. Airship considers any 3xx, 4xx, and 5xx codes (except 502/503) to be error conditions.
HTTP status
Result
Behavior
2xx
Success
Airship uses the feed response, even if empty.
3xx
Error
Error behavior determined by user.
4xx
Error
Error behavior determined by user.
5xx
Error
Error behavior determined by user.
timeout (60 sec)
Retry
Up to 4 retries, 60 sec between attempts.
502/503
Retry
Up to 4 retries, 60 sec between attempts.
## Send Aborted event
The [Real-Time Data Streaming](https://www.airship.com/docs/reference/glossary/#rtds) `SEND_ABORTED` event occurs when a push is dropped from our system before delivery is attempted. Device information for the device that did not receive the push is included with `SEND_ABORTED` events, and the `reason` property gives more information about the error.
For additional information and a sample event, see the [Send Aborted event](https://www.airship.com/docs/developer/rest-api/connect/schemas/events/#send-aborted) in the *Real-Time Data Streaming API* reference.
# Personalization using message namespace properties
> Message namespace properties are dynamic values that are automatically populated based on the details of a messaging campaign.
These properties are the message name, platforms, send date, [Push ID](https://www.airship.com/docs/reference/glossary/#push_id), and [Campaign Categories](https://www.airship.com/docs/reference/glossary/#campaign_categories). They serve a crucial role in personalizing messages and tailoring content by allowing you to dynamically adjust [URL Parameters](https://www.airship.com/docs/reference/glossary/#url_parameters) and implement conditional logic using [Handlebars](https://www.airship.com/docs/reference/glossary/#handlebars). Using these properties, you can create more relevant and targeted messaging experiences for your audience. You can also use [Text](https://www.airship.com/docs/guides/personalization/handlebars/text-helpers/) and [Date and time](https://www.airship.com/docs/guides/personalization/handlebars/date-time-helpers/) helpers to transform content in your Handlebars expressions.
The properties are available for personalization for all channels and message types except for [In-App Automations](https://www.airship.com/docs/reference/glossary/#iaa) and [Scenes](https://www.airship.com/docs/reference/glossary/#scene).
Message namespace properties:
| Namespace property | Description | Format | Example value |
| --- | --- | --- | --- |
| {{$message.push_id}} | The Airship [Push ID](https://www.airship.com/docs/reference/glossary/#push_id) assigned to the message | String | 50b521d9-4cd1-4c08-99c1-cabcf0bf5a2b |
| {{$message.platforms}} | The platforms enabled for this message: iOS, Android, Email, SMS, etc. | Comma separated text | ios,email |
| {{$message.date}} | The date the message was sent, in UTC | [ISO 8601](https://en.wikipedia.org/wiki/ISO_8601) | 1983-01-31T12:36:35 |
| {{$message.name}} | The message name set in a [Composer](https://www.airship.com/docs/reference/glossary/#composer) | String | Autumn promo |
| {{$message.campaign_categories}} | The [Campaign Categories](https://www.airship.com/docs/reference/glossary/#campaign_categories) defined in the message | String, 64-character maximum per category | spring_newsletter 2024 |
# Coupons
> Add promotional codes to your messages. {{< badge "axp" >}}
## About Coupons
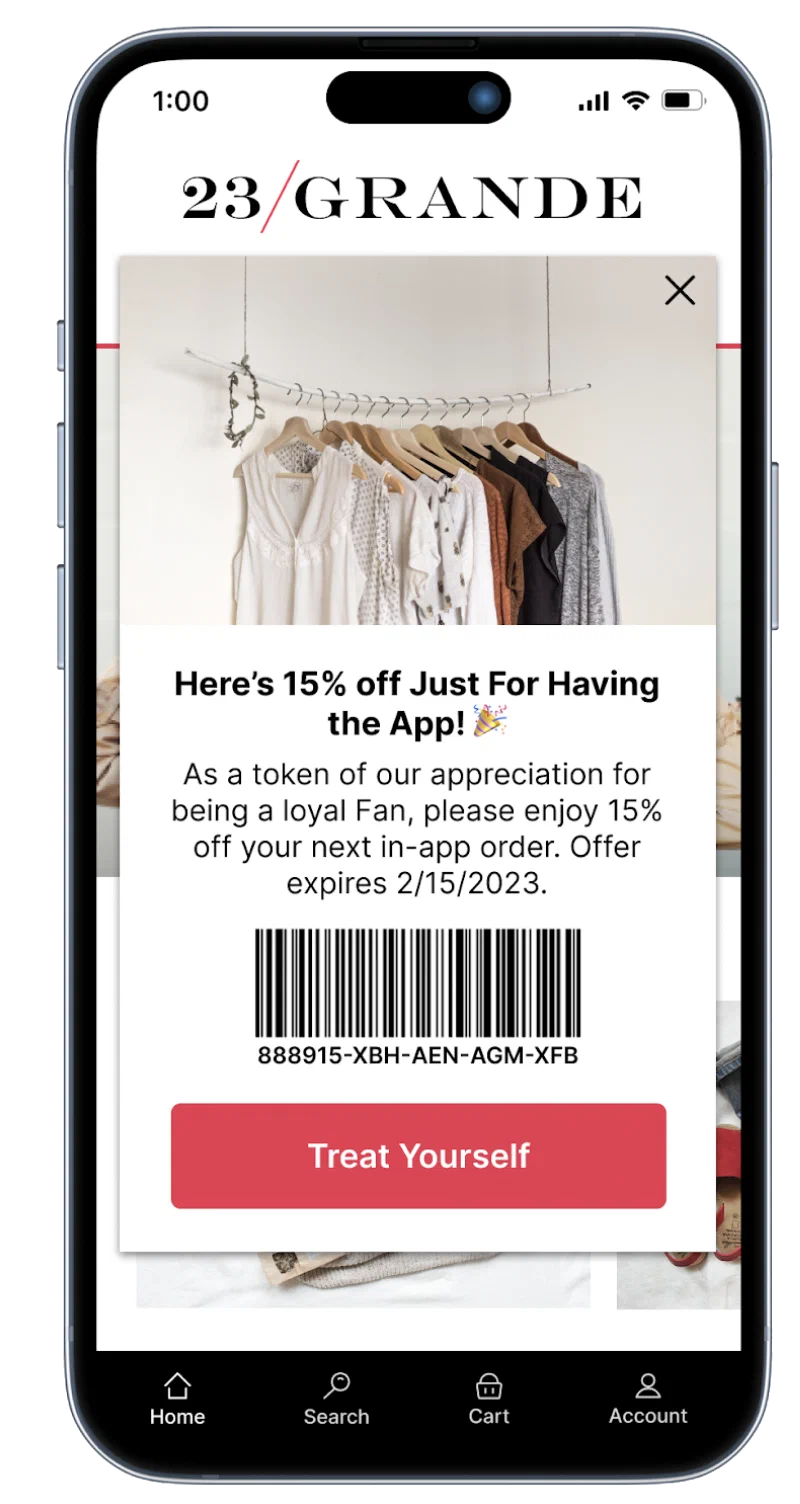
*A landing page with a promotional code — Barcode requires JavaScript*
Like other forms of personalization in Airship, with Coupons you create a merge field representing a value you want to personalize, surrounded by double curly braces `{{ }}`, also known as [Handlebars](https://www.airship.com/docs/reference/glossary/#handlebars). Airship replaces the merge field (and braces) with the data specified by the merge field at send time — just like mail merge in a word processor or mail client.
The source of this data (including your promotional codes) is a CSV file you upload to Airship and the campaign you define for the codes. We refer to this source as a *feed* for the campaign, and you'll see the term in the dashboard and in the required formatting for your message content.
Example uses:
* Provide exclusive discounts or rewards to retain or transition your customers and build loyalty
* Clear out excess or slow-moving inventory
* Re-engage existing customers with your business
Coupons are supported for messages in both the dashboard and API.
---
Promotional codes are rendered in plain text in your messages. You can use the JsBarcode library to [render the codes as barcodes instead](#rendering-as-a-barcode).
Codes are limited to 100 requests per second and are best used with automation. Consider this rate if you intend to distribute codes via broadcasts to large audiences.
### Supported message types
You can add codes to any message content you create using the Message, A/B Test, Automation, and Sequence composers:
* Push notification
* In-app message (standard format)
* Message Center (Not supported for A/B Tests)
* Landing page
* Web push notification
* Email
* SMS
* Open channel
You can also add codes to [Templates](https://www.airship.com/docs/reference/glossary/#template) for:
* Push notification
* Message Center (can also be used for landing pages)
* Web push notification
* Email
* SMS
* Open channel
The same message types and template content are supported in the API.
Coupons are not supported for In-App Automations or Scenes, as these are ephemeral and not a good place to show the promotional code. We suggest using a link in these formats to other messaging formats that are persistent.
### Remaining code notifications
When you upload your CSV file, a value equal to 10% of the number of codes is stored and checked when a code is used in a message. We'll notify you by email when 90% of codes have been used in messages and again at 100%.
You can specify up to five email addresses for notification. Add `coupons@partner-alerts.airship.com` as a contact in your email client to ensure these messages are not marked as spam.
We repeat the calculation when you [add more codes to a campaign](#managing-campaigns-and-adding-more-codes).
### Coupons workflow
The following is the general workflow for using promotional codes in messages. For illustration, we are using retail loyalty as an example.
1. [Create your CSV file.](#formatting-your-csv-file) The first row must contain headers `coupon_code` and `campaign`. Each additional row must contain a unique alphanumeric code and the same ID for the campaign. (You can add more information in your file, but we're keeping it simple for this example).
**Example CSV**
```text
coupon_code,campaign
RS8E3589,2023loyalty
RS8E3590,2023loyalty
RS8E3591,2023loyalty
```
1. [Create a campaign](#creating-a-campaign) in the dashboard. You will upload your CSV file and define the following:
* *Campaign name* — This is used for identification in the list of all campaigns in your project.
* *Campaign ID* — This must match what you put in your CSV. You will use the ID when creating your messages so Airship can use codes from the right campaign.
* *Validity period* — The effective and expiration dates and times for the campaign and its codes.
In our examples the campaign ID is `2023loyalty`.
1. [Create your content](#adding-codes-to-messages) using the following format. In all content, use the feed ID `couponing`.
```text
{{#feed "couponing"}}
Content referencing the feed, like a {{coupon_code}}.
{{/feed}}
```
Using our loyalty example, your message would look like this in the [Interactive Editor](https://www.airship.com/docs/reference/glossary/#interactive_editor):
1. [Specify the campaign ID and determine failure behavior](#specifying-the-campaign-id-and-feed-failure-behavior) when sending the message.
* In the dashboard, you'll do this in the Delivery step of a composer.
* With the API, you'll make these specifications in the External Data Feed References object.
> **Important:** As a best practice, verify the campaign ID, its validity period, and that it has available codes prior to sending the message. The feed will fail if the expiration date-time has passed or does not have remaining codes.
>
> You can view the number of available codes for each campaign:
>
> 1\. Next to your project name, select the dropdown menu (▼), then **Settings**.
> 2\. Under **Project settings**, select **Coupons**.
---
Boom! We just sent codes to our audience. Now what happens? This is what Airship does next:
* Populates your message content at send time, using one code from your CSV file per message
* Checks the number of remaining codes so we can process your [remaining code notifications](#remaining-code-notifications)
* Generates an event every time a code is used in a message (See next section)
> **Note:** Codes do not populate messages as ordered in your CSV file. For example, if your CSV file has rows with codes in order `1001, 1002, 1003`, they may be sent to users in order `1003, 1001, 1002`.
### Reporting
Codes are associated with the [Channel ID](https://www.airship.com/docs/reference/glossary/#channel_id) of the message recipient at send time. This association is recorded as a [Custom Event](https://www.airship.com/docs/reference/glossary/#custom_event) with name `coupon_assigned`. The event properties use keys `coupon_code` and `campaign`. `coupon_code_alt` will also appear if included in your CSV file. The property values are the actual code used in the message and the campaign ID.
The event is recorded the first time a code for a given campaign is assigned to a Channel ID. Additional events are not recorded if you send messages to the same Channel ID that references the same code.
**Example Coupons custom event**
```json
{
"name": "coupon_assigned",
"properties":
{
"coupon_code": "RS8E3589",
"campaign": "2023loyalty"
}
}
```
## Formatting your CSV file
When uploading in the dashboard, maximum file size 1.5 GB. There is no file size limit when using SFTP [to add more codes](#managing-campaigns-and-adding-more-codes) to a campaign. To ensure the support of special characters and accents, the file must be encoded to UTF-8 without BOM.
* `campaign` — Required. The campaign ID. Used to determine which campaign to use for populating message content. Ignored when uploaded in the dashboard. Must match an existing campaign when uploaded via SFTP.
* `coupon_code` — Required. A unique alphanumeric value to render in a message. Duplicate values are ignored and not added to the campaign as available codes.
* `coupon_code_alt` Optional. An alternative version of the coupon code (such as an online code) that can be rendered in a message. Must be a unique alphanumeric value.
* `starts_time` — Optional. The effective date-time for the campaign. Must be in ISO 8601 date-time format `YYYY-MM-DDThh:mm:ss`. Defaults to current date-time if not provided. **Ignored when file is uploaded in the dashboard.** Updates the campaign effective date-time in the dashboard when uploaded via SFTP.
* `ends_time` — Optional. The expiration date-time for the campaign. Must be in ISO 8601 date-time format `YYYY-MM-DDThh:mm:ss`. **Ignored when uploaded in the dashboard.** Updates or sets the campaign expiration date-time in the dashboard when uploaded via SFTP.
### Pre-assigning coupon codes
By default, coupon codes are randomly assigned to recipients at send time. You can pre-assign coupon codes to specific contacts by adding user IDs to your CSV file. Pre-assigned coupon codes are not added to the campaign as available codes or included in the [remaining code notifications](#remaining-code-notifications).
To pre-assign codes to [Channel IDs](https://www.airship.com/docs/reference/glossary/#channel_id), add these headers and values to your CSV:
* `identifier_type` — Set to `channel_id`.
* `identifier` — The Channel ID of the contact to pre-assign to the coupon code.
To pre-assign codes using [Named User](https://www.airship.com/docs/reference/glossary/#named_user) IDs, you must first contact your technical account manager or [Airship Support](https://support.airship.com/) to enable the feature. Once enabled, use the same headers as above, but with these values:
* `identifier_type` — Set to `named_user`.
* `identifier` — The Named User ID of the contact to pre-assign to the coupon code.
### Sample CSV for Coupons
Use the selector to see sample files containing all headers and only the required headers.
#### Only required headers
```text
coupon_code,campaign
myCouponCode0,myCampaign
myCouponCode1,myCampaign
```
#### All headers
```text
coupon_code,coupon_code_alt,campaign,starts_time,ends_time,identifier,identifier_type
myCouponCode0,myOnlineCode0,myCampaign,2023-11-20T21:43:44,2024-11-20T21:43:44
myCouponCode1,myOnlinceCode1,myCampaign,2023-11-20T21:43:44,2024-11-20T21:43:44,9c36e8c7-5a73-47c0-9716-99fd3d4197d5,channel_id
```
## Creating a campaign
1. Next to your project name, select the dropdown menu (▼), then **Settings**.
1. Under **Project settings**, select **Coupons**.
1. Click **Create coupon campaign**.
1. Configure fields:
* *Campaign name* — Used for identification in the list of all coupon campaigns in your project.
* *Campaign ID* — Used to determine which campaign to use for populating message content.
* Format supports alphanumeric characters, dashes, and underscores.
* The ID must be unique for a project, without spaces or special characters.
* The `campaign` value in your CSV file will be ignored.
* **You cannot change the campaign ID later.**
* *Effective/Expiration dates* — Optional. The beginning and end dates and times for the campaign and its codes.
* If the effective date and time are not specified, they default to the date-time of saving the campaign.
* **If you set a start date and time, you cannot edit them later**.
* *Remaining codes contact* — The email address used to contact you with [remaining code notifications](#remaining-code-notifications). You can enter up to five comma-separated addresses. Addresses entered here will replace those entered for every campaign in the project.
1. Upload your CSV file.
1. Click **Save campaign**.
You will return to the [list of all campaigns in the project](#managing-campaigns-and-adding-more-codes).
## Adding codes to messages
You add codes to messages in two parts:
1. Formatting the message content
1. Specifying the campaign to use as the data feed and determining how to handle the message if the feed fails
### Formatting content
Formatting your message content is identical in the dashboard and the API. In the dashboard you add content when configuring a template or in the Content step in a composer.
#### Feed without campaign
```text
{{#feed "couponing"}}
Content referencing the feed, like a {{coupon_code}}.
{{/feed}}
```
#### Feed with campaign
```text
{{#feed "couponing" campaign="FallSavings"}}
Content referencing the feed, like a {{coupon_code}}.
{{/feed}}
```
The feed ID is always `couponing`. To render coupon codes, the campaign ID, or effective and expiration dates, use `{{coupon_code}}`, `{{campaign}}`, `{{campaign_start_date}}`, and `{{campaign_end_date}}`.
Dates are rendered in ISO 8601 date-time format: `YYYY-MM-DDThh:mm:ss`. If you want dates to appear differently in your message, use [Date and time helpers](https://www.airship.com/docs/guides/personalization/handlebars/date-time-helpers/). Examples for a campaign with expiration date 2023-10-15:
* To render the date as `10/15/2023`, you would enter it like so in your message content: `{{dateFormat campaign_end_date locale="en-US" format="SHORT"}}`.
* To render the date as `Oct 15, 2023`, you would use: `{{dateFormat campaign_end_date locale="en-US" format="MEDIUM"}}`.
You can use reference variables (or [Merge Fields](https://www.airship.com/docs/reference/glossary/#merge_field)) that aren't a part of a feed and variables that are part of a feed in the same `#feed` block. See [Differentiating data sources](https://www.airship.com/docs/guides/personalization/sources/external-data-feeds/#differentiating-data-sources) in *External Data Feeds*.
> **Tip:** When using the [Interactive Editor](https://www.airship.com/docs/reference/glossary/#interactive_editor) to create content for a template, email, landing page, or Message Center message, we provide a helper for inserting the feed formatting.
>
> 1. Click *Data Feed* in the left sidebar.
> 1. Click ▼ next to *Coupon Service*. The feed ID `couponing` will be exposed.
> 1. Hover over the feed ID and select the duplicate icon (
> ).
> 1. Select a field in your message content and paste the copied data. You should see:
> ```text
> {{#feed "couponing"}}
> {{/feed}}
> ```
### Rendering as a barcode
Use the [JsBarcode library](https://github.com/lindell/JsBarcode) to render your alphanumeric codes as barcodes. Make sure that the location where you are using a barcode supports HTML and JavaScript. For example, you cannot use barcodes in push notifications since they only support plain text.
**Sample content for a barcode**
```html
```
### Displaying an alternative coupon code
If your use case requires two versions of a coupon code such as an in-store and an online version, you can include both versions in your CSV file and display them in your message.
**Content format for alternative code**
```text
{{#feed "couponing"}}
In-store code {{coupon_code}} or an online code {{coupon_code_alt}}
{{/feed}}
```
### Specifying the campaign ID and feed failure behavior
Specifying the campaign ID and determining feed failure handling differs between the dashboard and API.
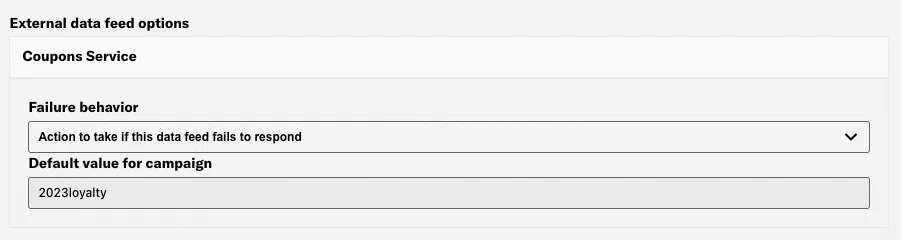
In the dashboard, you set both in the Delivery step of a composer in *External data feed options*:
* **Default value for campaign** — Enter the campaign ID (not the campaign name) for the campaign you want to use for the message. The default value is the first campaign created for the project.
* **Failure behavior** — Select *Abort sending the message* or *Send message without this data*.
For most Coupons scenarios, you likely want to use *Abort...* since the message won't make sense without a code and, potentially, its validity period.. Also consider how ongoing (automated and recurring) messages will be affected if you later [delete their campaigns](#deleting-a-campaign). See also: [Success, Retry, and Error Conditions](#success-retry-and-error-conditions).
*Configuring a Coupons feed in the composer*
---
With the API, you set the campaign ID and failure (error) behavior in the [External Data Feed References Object](https://www.airship.com/docs/developer/rest-api/ua/schemas/external-data-feeds-references/). When using a Coupons feed you must include a [`templates` object](https://www.airship.com/docs/developer/rest-api/ua/operations/personalization/) in the payload or set the `personalization` option to `true`.
* The value for `name` is `couponing` for all Coupons campaigns.
* The possible values for `on_error` are `cancel` and `continue`. These are equivalent to the dashboard options *Abort sending the message* and *Send message without this data*.
`continue` will result in sending the message despite an error. Otherwise, a feed failure will prevent Airship from sending your message.
* To specify the campaign ID, you must include a `defaults` object `couponing` with property `campaign` and the campaign ID as its value.
**Example push request using a Coupons feed**
```http
POST /api/push HTTP/1.1
Authorization: Basic
Accept: application/vnd.urbanairship+json; version=3
Content-Type: application/json
{
"device_types":[
"ios"
],
"audience":{
"tag": "earlyBirds"
},
"notification":{
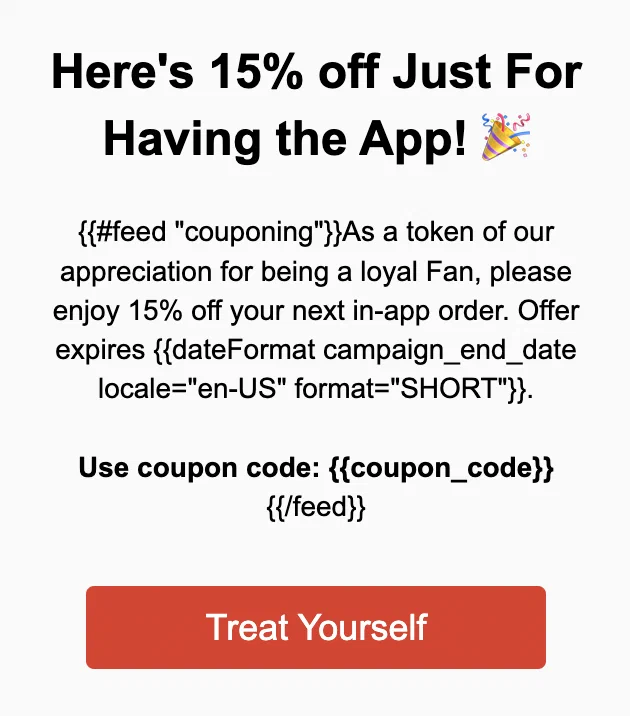
"alert":"{{#feed \"couponing\"}} As a token of our appreciation for being a loyal Fan, please enjoy 15% off your next in-app order. Offer expires {{dateFormat campaign_end_date locale="en-US" format="SHORT"}} Use coupon code: {{coupon_code}}{{/feed}}"
},
"options": {
"personalization": true
},
"feed_references": {
"feeds": [
{
"name": "couponing",
"params": {
},
"on_error": "cancel"
}
],
"defaults": {
"couponing": {
"campaign": "2023loyalty"
}
}
}
}
```
## Managing campaigns and adding more codes
To see a list of all your campaigns and their current number of available coupons.:
1. Next to your project name, select the dropdown menu (▼), then **Settings**.
1. Under **Project settings**, select **Coupons**.
Campaigns are sorted by effective date and time, latest first.
Select the edit icon (
) to edit the following for a campaign:
* Name
* Expiration date and time
* Remaining codes contact — Addresses entered here will replace those entered for every campaign in the project.
* [CSV file](#formatting-your-csv-file) — You can upload a new file only. You cannot download previously uploaded data.
Generally, you only need to upload a new CSV file when you want to **add more codes** to a campaign. You can either append rows to the original CSV file used to create the campaign and reupload it or create a new CSV file containing only rows with new codes. If creating a new file, the only required headers are `coupon_code` and `campaign`, even if a previously uploaded file contained additional headers.
You also have the option to provide a new CSV file via SFTP. Understand the differences in handling before deciding on a method:
* If you upload a new CSV file using the dashboard, only `coupon_code` values will be processed. All other columns will be ignored.
* If you upload a new CSV file via SFTP, all values (other than for `campaign`) will update the current campaign settings in the dashboard. For this reason, always verify that your CSV file has the correct `campaign` value for the campaign you intend to update.
To upload a new CSV file via SFTP, see: [SFTP upload for CSV files](https://www.airship.com/docs/guides/audience/segmentation/sftp-upload/).
> **Note:** Since message content is populated at send time, if you upload a new CSV file for a campaign, scheduled messages will use the most recent campaign data. They won't necessarily use the values available when the message was created. "Scheduled" includes recurring messages.
### Deleting a campaign
> **Warning:** If you delete a campaign, any messages content referencing its data will be handled according to the messages's [feed failure behavior setting](#specifying-the-campaign-id-and-feed-failure-behavior).
1. Next to your project name, select the dropdown menu (▼), then **Settings**.
1. Under **Project settings**, select **Coupons**.
1. Select the delete icon (trash) for a campaign.
## Success, Retry, and Error conditions
Airship considers any 2xx response from a feed to be a success and will continue a message using the feed response. Airship considers any 3xx, 4xx, and 5xx codes (except 502/503) to be error conditions.
HTTP status
Result
Behavior
2xx
Success
Airship uses the feed response, even if empty.
3xx
Error
Error behavior determined by user.
4xx
Error
Error behavior determined by user.
5xx
Error
Error behavior determined by user.
timeout (60 sec)
Retry
Up to 4 retries, 60 sec between attempts.
502/503
Retry
Up to 4 retries, 60 sec between attempts.
## Content
Wen creating a message, you can personalize viewable message elements, actions, media URLs, templates, and snippets.
# Content templates
> Use content templates to personalize messages with information specific to each member of your audience, like first name, flight number, or order status. You can even pass complicated variables to your template.
## About content templates
You can create content templates for all messaging channels:
* App — For [Push Notification](https://www.airship.com/docs/reference/glossary/#push_notification), [Message Center](https://www.airship.com/docs/reference/glossary/#message_center), and [In-App Automation](https://www.airship.com/docs/reference/glossary/#iaa), follow the steps on this page. Templates for In-App Automation can be used for [modal and fullscreen styles](https://www.airship.com/docs/guides/features/messaging/in-app-automation/#styles) only.
* Web
* SMS/MMS
* Email
* Open channel
After creating content templates, you can select them in the Content step in a composer or reference them with the `template` property in the API. In-App Automation is not supported for API use.
In the composers, for App, Web, SMS/MMS, and Open channels, the template content replaces your message content as is and cannot be edited. For Message Center, In-App Automation, and Email, you can edit your message content after selecting the template.
You can assign keywords to your templates so they are easily found in search.
> **Tip:** * Name your templates according to the sources they use for personalization, so it's clear when and where you can reuse your template.
> * For reusable message designs for [Scenes](https://www.airship.com/docs/reference/glossary/#scene), see [Custom content layouts](https://www.airship.com/docs/guides/messaging/editors/native/custom-layouts/).
### Content template format
A content template has a name, optional description, and fields that make up the viewable content in a message.
| Template | Fields |
| --- | --- |
| App (Push notification) | - **Message text** — The text that will display in your push notification. - **Title** — A heading that appears above the notification text when applicable. - **Summary** — Supplemental text displayed with the notification. **iOS:** The summary appears below the push notification title. **Android and Fire OS:** The summary appears below the main notification text in most cases. This is the only visible text other than the title when Android Picture is visible in expanded mode, as the main notification text is suppressed. |
| Message Center | - **Title** — A heading that appears above the message and in the Message Center inbox. - **Message body** — The HTML body of your message, created using the [Interactive Editor](https://www.airship.com/docs/reference/glossary/#interactive_editor). |
| In-App Automation | - **Message body** — The HTML body of your message, created using the [Interactive Editor](https://www.airship.com/docs/reference/glossary/#interactive_editor). |
| Web | - **Alert** — The text that will display in your web push notification. - **Title** — A heading that appears above the message. |
| SMS | - **Message text** — The text that will display in your SMS message. |
| MMS | - **Subject** — A meaningful subject to summarize your MMS message. - **Message text** — The text that will display in your MMS message. - **Fallback SMS text** — Fallback text version of your message, for use when MMS is unavailable. |
| Email | - **Subject** — A meaningful subject to summarize your email. - **HTML body** — The HTML body of your email, created using the [Interactive Editor](https://www.airship.com/docs/reference/glossary/#interactive_editor). - **Plain text body** — The plain-text version of your message, for use when HTML is unavailable. |
| Open channel | - **Alert** — The text that will display in your open channel message. - **Summary** — Supplemental text displayed with the notification. - **Title** — A heading that appears above the notification text when applicable. - **Media attachment URL** — The URL for media you want to include in your message. |
{class="table-col-1-20"}
#### Using the Interactive editor
When adding the email *HTML body*, or In-App Automation or Message Center *Message body*, you can use the [Interactive Editor](https://www.airship.com/docs/reference/glossary/#interactive_editor) to:
* Paste or upload your own HTML.
* Design using drag-and-drop. You can start from a blank layout or select an Airship default layout or a [layout you saved](https://www.airship.com/docs/guides/messaging/editors/interactive/saving-layouts/). The Interactive editor supports [[Merge Fields](https://www.airship.com/docs/reference/glossary/#merge_field)](https://www.airship.com/docs/guides/messaging/editors/interactive/merge-fields/), so you can personalize your message for your audience.
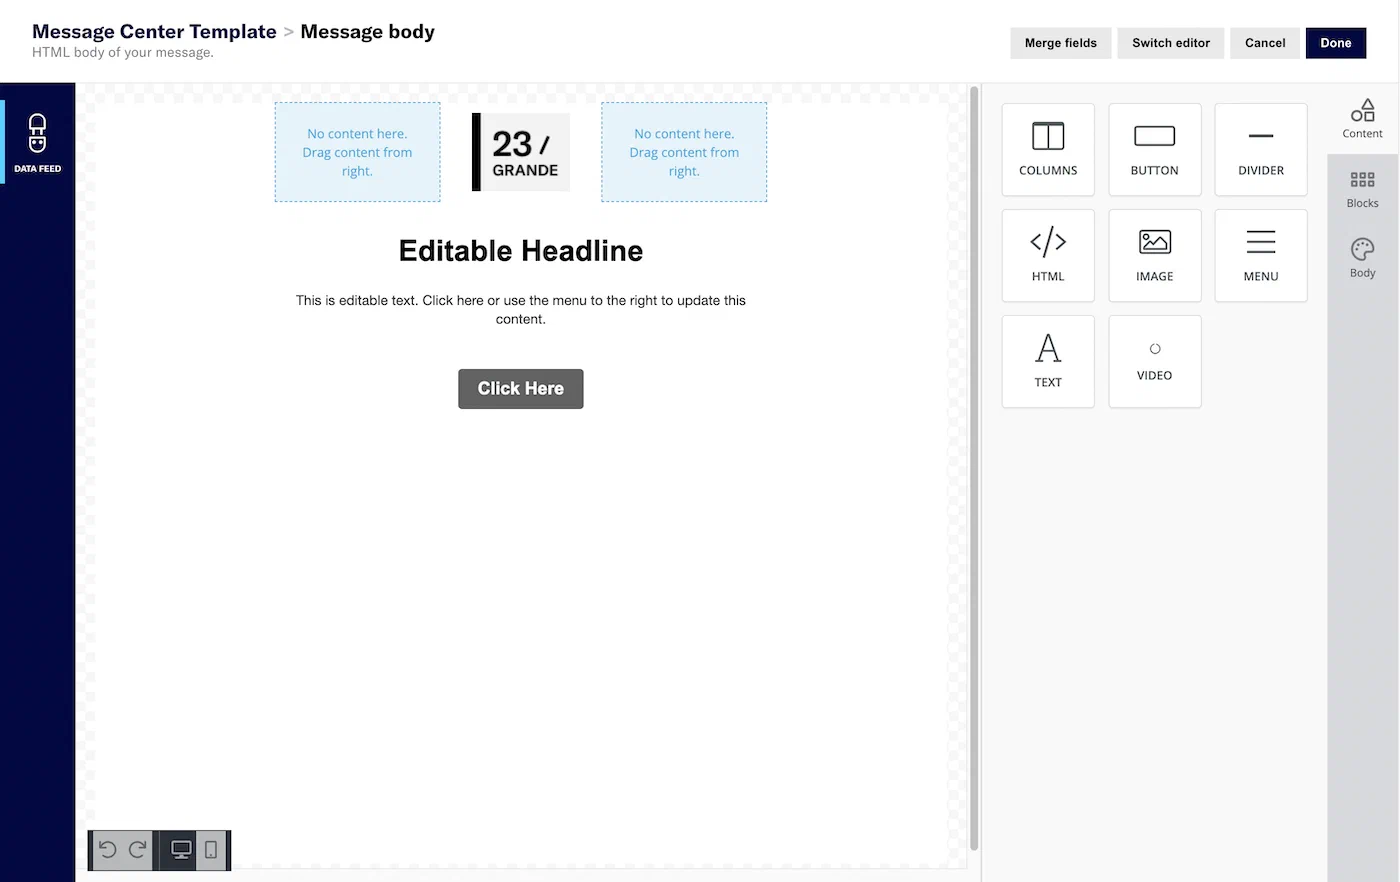
*Designing a Message Center template using the Interactive Editor*
### Personalizing content templates
You can use our built-in tool to insert merge fields and logic statements for the [Attributes](https://www.airship.com/docs/reference/glossary/#attributes) in your project. [Simplifying Handlebars expressions](https://www.airship.com/docs/guides/personalization/simplifying-handlebars/). You can also manually enter [Handlebars](https://www.airship.com/docs/reference/glossary/#handlebars). Both methods are available for all text fields in a template, including when you paste or upload HTML using the Interactive editor.
> **Important:** When using Handlebars to reference variables, you should define default values for your fields with `{{ $def field_name "default value" }}`. The template preview renders variables without default values as blank spaces, mimicking the behavior your audience will experience if they receive messages with unpopulated variables.
When personalizing messages in the Interactive editor, you must define merge fields before you can use them to personalize blocks of content unless you write your own custom HTML blocks. You can personalize custom HTML blocks using [Handlebars](https://www.airship.com/docs/reference/glossary/#handlebars) like you would any other message. See [Merge fields in the Interactive editor](https://www.airship.com/docs/guides/messaging/editors/interactive/merge-fields/).
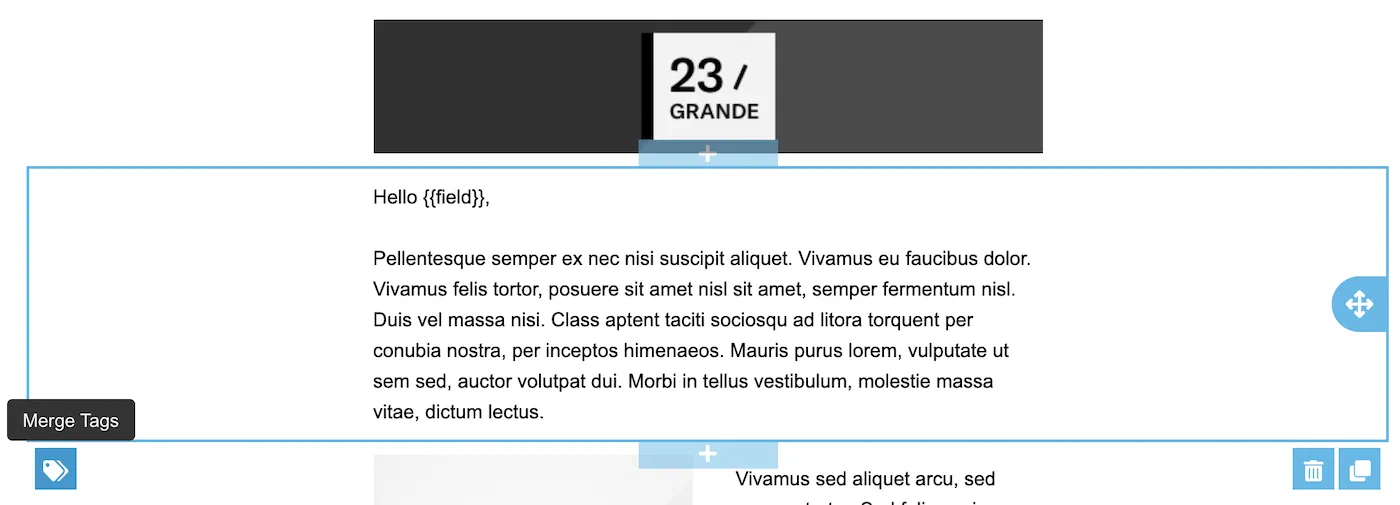
*Selecting the Merge Tags option for a content template*
> **Tip:** You can also take advantage of looping (`#each`), conditional if/else statements, and other advanced [Handlebars](https://www.airship.com/docs/reference/glossary/#handlebars) inside custom HTML blocks. However, you cannot apply conditional or looping logic to block-level elements in your template without defining merge fields in the layout first.
## Create a content template in the dashboard
Follow these steps to create a template in the dashboard:
1. Go to **Content**, then **Templates**
1. Select **Create template**.
1. Enter a name and a brief description to help you identify the template in lists (for example, "Holiday 2020"), and select the channel:
* App — For [Push Notification](https://www.airship.com/docs/reference/glossary/#push_notification) content only
* Message Center
* In-App Automation — For use with modal and fullscreen [styles](https://www.airship.com/docs/guides/features/messaging/in-app-automation/#styles) only
* Web
* SMS/MMS
* Email
* Open channel
1. (Optional) Add keywords to help organize your templates. Enter a term in the search field and select from results, or select **Add keyword: **. You can add up to 10 keywords.
1. Select **Save and continue**.
1. Enter your content. The preview updates as you type. Open channel templates do not have a preview.
Select **Add +** and add content for each field, then select **Done**.
For email *HTML body*, and Message Center and In-App Automation *Message body*, provide your HTML or design using drag-and-drop.
For HTML, select the paste or upload option and add your HTML.
For email, in the Interactive editor:
* To [reduce the HTML size](https://www.airship.com/docs/guides/messaging/messages/content/email/email/#size-limit-and-html-minification), select **Settings** in the sidebar, and then enable **Minify HTML**.
* After selecting **Done**, choose whether to save the HTML body only or [also generate the plain text body](https://www.airship.com/docs/guides/features/messaging/email/#plain-text-generation).
1. (Optional, for email only) [Preview your email](https://www.airship.com/docs/guides/messaging/messages/content/email/email/#inbox-previews) in different clients:
Click Inbox preview.
Select from the lists of browser, desktop, and mobile clients, then click Generate previews.
Click a thumbnail to see the full version. Click the close icon (×) to close and choose another preview.
(Optional) To add/remove clients, click Reselect and generate previews and start over.
When you are finished with inbox previews, select the close icon (×) to close the modal.
1. Select **Save template** when you are done adding content.
## Creating content templates using the API
You can use the [Content API](https://www.airship.com/docs/developer/rest-api/ua/operations/content/) to create, list, retrieve, update, and delete content templates. For supported template `type` values and fields, see the [Content template object](https://www.airship.com/docs/developer/rest-api/ua/schemas/content-objects/#contenttemplateobject) schema in the API reference.
OAuth client credentials can include the Content scope for these endpoints. See [Content](https://www.airship.com/docs/developer/rest-api/ua/api-auth-reference/#content) in the *Airship API authorization reference*.
When you create or update a template, Airship validates it using the same rules as the dashboard, including [Handlebars](https://www.airship.com/docs/reference/glossary/#handlebars) syntax and reference checks. Invalid templates are not saved.
You can set an optional `external_id` on a template. The ID is a customer-defined string that is unique within a project. You can use it to look up or update a template using dedicated endpoints and to reference the template in send and push payloads where supported, as an alternative to the template UUID.
## Using content templates
In the dashboard, you can select a template in a composer's Content step:
* For In-App Automation, you must select Modal or Fullscreen in the Style step, then you will see the option to use a template in the Content step.
* For Message Center, In-App Automation, and Email, you can edit the HTML or drag-and-drop design in the Interactive editor after selecting a template.
For email templates, you can create a new message directly from your templates list. Go to **Content** and select **Templates**, then select the more menu icon (⋯) for an email template and then **Use template**. This will open the [Message composer](https://www.airship.com/docs/guides/messaging/messages/create/) with the Email channel enabled and the template preselected.
In the API, include a `template` object to use a content template or to personalize your message with [Handlebars](https://www.airship.com/docs/reference/glossary/#handlebars). See [Platform Overrides with Templates](https://www.airship.com/docs/developer/rest-api/ua/schemas/platform-overrides-with-templates/).
Reference a content template by its ID, a UUID returned from Content API responses. You can also reference by external ID when your payload and endpoint support it. In the dashboard, you can get IDs from [your list of templates](#managing-content-templates). Exact property names and formats appear in the schema for your channel and operation.
For push, specify the template on the [Notification object](https://www.airship.com/docs/developer/rest-api/ua/schemas/push/#notificationobject).
[In-App Automation](https://www.airship.com/docs/reference/glossary/#iaa) is not supported for API use.
## Managing content templates
Go to **Content** and select **Templates** to view the list of templates in your project. The list displays templates created in the dashboard or with the [Content API](https://www.airship.com/docs/developer/rest-api/ua/operations/content/).
You can sort the list by name or date modified, filter by channel or keyword, and search by name, ID, or keyword. Templates without message content are labeled "Empty" and cannot be used until you add content.
Select a template name to open a drawer where you can do the following:
* For the ID, select the copy icon (clipboard) to copy it to your clipboard.
* Edit the name, description, and keywords. Select **Save** after making your changes.
* Select **Edit** or **Duplicate**, which are the same as the actions available from the more menu icon (⋯), as described in the table below.
* View the names of [Snippets](https://www.airship.com/docs/reference/glossary/#snippet) or [External Data Feeds](https://www.airship.com/docs/reference/glossary/#external_feed) used in the template.
* View the date and time when the template was created and last modified.
The following actions are available from the more menu icon (⋯) in the template list:
| Action | Description | Steps |
| --- | --- | --- |
| **Edit** | Open the template for editing. You can change the content, name, description, and keywords. | Select the more menu icon (⋯), then **Edit**, make your changes, and then select **Save template**. |
| **Duplicate** | Make a copy of the template in the current project or in a different project. You can only duplicate to projects that are configured for the template's channel. MMS templates are not supported.