If duplicating to a different project and the template has dependencies, they are listed along with whether Airship copies each dependency to the destination project. Airship does not copy Segments, Attributes, Custom Events, Deep Links, Subscription Lists, Preference Centers, brand guidelines, or Scene settings. Configure those resources independently in each project. | First, choose to copy to the current project or a different one, and update the name, description, and keywords. Then, select **Duplicate**. |
| **View information and access additional actions** | Open the same drawer as when you select a template name. For what you can do in the drawer, see the list above this table. | Select the more menu icon (⋯), then **View detail**. |
| **Delete** | Delete the template from your project. Deleting a template that is in use may impact messaging. | Select the more menu icon (⋯), then **Delete**. |
| **Copy ID to clipboard** | Copy the template ID to your clipboard. | Select the more menu icon (⋯), then **Copy ID to clipboard**. |
| **Create an email** | Create a new message in the [Message composer](https://www.airship.com/docs/guides/messaging/messages/create/) with the template preselected in the Content step. | Select the more menu icon (⋯) for an email template, then **Use template**. |
{class="table-col-1-20 table-col-2-40"}
# Snippets
> A snippet is a reusable piece of content that you can define in Airship for later use in your messages and templates.
A single snippet can be used in multiple channels. Snippets support text or HTML content and can be used for commonly used elements such as a copyright, header image, or custom CSS.
## About snippets
When you edit a snippet, the changes automatically update anywhere that snippet is in use. For scheduled and recurring messages, resave the message to update the message with the latest version of the snippet. Example uses:
* **Company branding** — Create an HTML snippet with your company's colors. When the colors need to be updated, edit the hex values in the snippet.
* **Header and footer blocks** — Create HTML snippets for the headers and footers you use for messages across different channels.
* **Streamline inserting** [External Data Feeds](https://www.airship.com/docs/reference/glossary/#external_feed) — Create a snippet that references an external data feed. Instead of using the longer format and process used to insert a feed, use the shorter snippet format: `{{>snippet_ID}}`.
You create snippets in the dashboard, and you can insert them into your messages and templates using both the dashboard and API. You can assign keywords to your snippets so they are easily found in search.
> **Tip:** Add plain text and HTML in the same snippet for email messages so the plain text version appears for clients that do not support HTML, or for content that will be used across multiple channels.
> **Note:** Snippets are not supported for Scenes or In-App Automations.
### Snippet format
A snippet has three parts:
* **Name** — Used for identification in the list of all snippets in your project.
* **ID** — Used to reference the snippet in your message. The snippet ID is generated automatically based on the snippet name, though you have the option to change it.
* **Content** — The text or HTML that is inserted in your message where the snippet is referenced.
### Personalizing snippets
You can use [Handlebars](https://www.airship.com/docs/reference/glossary/#handlebars) and [External Data Feeds](https://www.airship.com/docs/reference/glossary/#external_feed) to insert [Merge Fields](https://www.airship.com/docs/reference/glossary/#merge_field) and [Dynamic Content](https://www.airship.com/docs/reference/glossary/#dynamic_content) to personalize messages for each individual member of your audience. The dashboard supports previewing content that contains Handlebars. See [Previewing personalized content](https://www.airship.com/docs/guides/personalization/previewing/).
You can also pass template variables into a snippet to customize it for a specific message. For example, you might set up a "footer" snippet with a dynamic URL as its content like this:
```html
```
When including the snippet in your message, you can pass in one or more of the variables. You would add the snippet to your message text like this:
```text
{{>footer utm_source="email" utm_campaign="newsletter"}}
```
## Create a snippet
You can create a maximum of 1,000 snippets per project.
1. Go to **Content** and select **Snippets**.
1. Select **Create snippet**.
1. Enter a name and description for the snippet. The snippet ID is automatically generated based on the name.
* A snippet ID will not generate for a snippet name that contains only numbers and/or special characters.
* If the name starts with a number and/or special characters, the generated ID omits the leading numbers and/or special characters.
* Uppercase letters in the name are converted to lowercase in the ID.
* Special characters in the name are converted to underscores in the ID and only appear if followed by numbers or letters.
1. (Optional) Edit the snippet ID. Letters, numbers, and underscores only, and must start with a letter and end with a letter or number. **You cannot change the snippet ID later.**
1. (Optional) Add keywords to help organize your snippets. Enter a term in the search field and select from results, or select *Add keyword: [term]*. You can add up to 10 keywords.
1. Select **Continue**.
1. Add your plain text and/or HTML content.
1. Select **Add +**.
1. Enter your content. The preview updates as you type.
> **Important:** Do not insert a snippet into another snippet.
1. Select **Done**.
1. Select **Save snippet** when you are done adding content.
## Insert a snippet
You can insert a snippet anywhere that supports [Handlebars](https://www.airship.com/docs/reference/glossary/#handlebars) by entering its ID in the format `{{>snippet_ID}}`.
> **Note:** Make sure that the location where you are using a snippet supports the content defined in the snippet. For example, an image URL or HTML will not render in a push notification since push notifications only support plain text.
When using the [Interactive Editor](https://www.airship.com/docs/reference/glossary/#interactive_editor) and pasting or uploading HTML, a snippet is immediately rendered in the preview. If using layouts, you can insert snippets into text or HTML content, but they will not render in the editor. You must select **Done** to see the preview.
To include a snippet in an API request, reference the snippet by name in the `snippet_references` object, and invoke the snippet in your notification text. The example below loads a "signature" snippet and adds it to the end of the message.
```http
POST /attachments HTTP/1.1
Authorization: Bearer Snippets are evaluated at send time, so if you schedule a message that contains a snippet and then edit that snippet, the scheduled message automatically uses the updated snippet content. Scheduled includes recurring messages. | Select the more menu icon (⋯), then **Edit**, make your changes, and then select **Save snippet**. |
| **Duplicate** | Make a copy of the snippet in the current project or in a different project. If duplicating to a different project and the snippet has dependencies, they are listed along with whether Airship copies each dependency to the destination project. Airship does not copy Segments, Attributes, Custom Events, Deep Links, Subscription Lists, Preference Centers, brand guidelines, or Scene settings. Configure those resources independently in each project. | First, choose to copy to the current project or a different one, and update the name, ID, description, and keywords. Then, select **Duplicate**. |
| **View information and access additional actions** | Open the same drawer as when you select a snippet name. For what you can do in the drawer, see the list above this table. | Select the more menu icon (⋯), then **View detail**. |
| **Delete** | Delete the snippet from your project. Deleting a snippet that is in use may impact messaging. | Select the more menu icon (⋯), then **Delete**. |
| **Copy ID to clipboard** | Copy the snippet ID to your clipboard. | Select the more menu icon (⋯), then **Copy ID to clipboard**. |
{class="table-col-1-20 table-col-2-40"}
# Personalize actions and media URLs
> Use Airship Handlebars to show personalized media in messages and to send your audience to personalized URLs when they interact with your messages.
You can personalize [Actions](https://www.airship.com/docs/reference/glossary/#action) using [Handlebars](https://www.airship.com/docs/reference/glossary/#handlebars), taking advantage of information specific to your audience to personalize your audience's experience when they interact with your message.
Use properties from a custom event, attributes, or an uploaded list to personalize [adaptive links](https://www.airship.com/docs/reference/glossary/#adaptive_link), send your audience to their own, specific deep link, or send users to their accounts with web links.
You should set a default value when personalizing actions to ensure that personalized actions resolve correctly, even if the value you use to personalize the action does not exist.
## Deep links
A deep link sends a user to a specific location in your app. If you've configured deep link templates — deep links with merge fields that you can personalize for your audience – you can fill templated fields in the path of your deep link with personalizable properties.
For example, if your deep link template is:
```text
https://example.com/products/{{category}}/{{product_id}}
```
You would see the `category` and `product_id` fields when adding a deep link action. You could personalize the deep link with values from the event or data that you use to personalize your message.
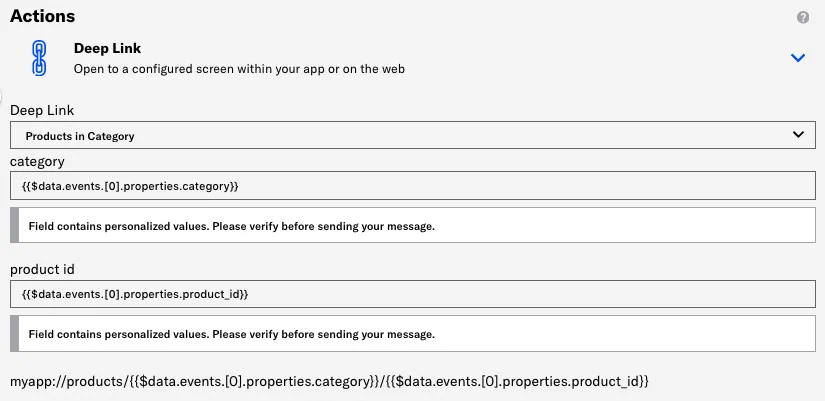
*Personalizing a deep link action with Handlebars*
## Adaptive links
[Adaptive links](https://www.airship.com/docs/reference/glossary/#adaptive_link) take query parameters that personalize information in the pass that each member of your audience installs. For example, if you want to add a user's name, captured in a custom event, to a pass, you might add `?name={{name}}` to the adaptive link URL.
When sending a message supporting personalization, you can reuse personalizable information in the adaptive link to personalize the passes that your audience receives.
In general, you'll need to know the field names in your Wallet templates, and then use Handlebars to produce the values that you want to add to the pass that your audience installs.
> **Note:** Personalization in adaptive links uses merge fields only and does not allow for personalization features such as logic, default values, or snippets.
Click *Add another field* to add additional parameters to your adaptive link.
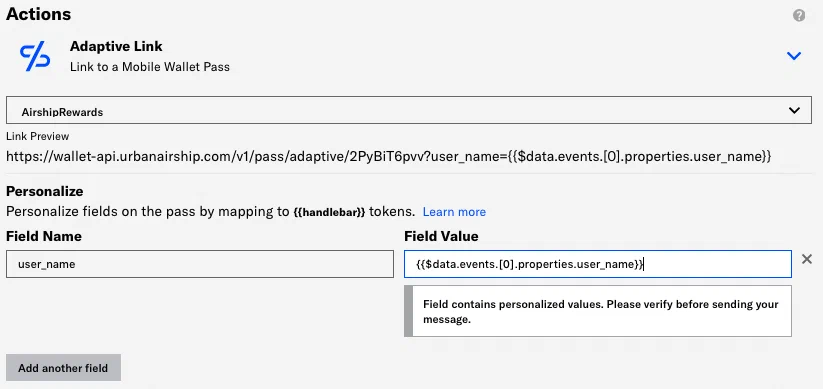
*Personalizing an adaptive link with merge fields*
## Web Page and Landing Page actions
The Web Page and [Landing Page](https://www.airship.com/docs/guides/features/messaging/landing-pages/) actions require entering a URL for the web page you want to open or the content to display in a landing page. You can personalize these URLs to send your audience to a relevant page or display specific content when they interact with your message.
Insert handlebars in your URL to personalize the URL for each individual recipient. You might want to personalize URLs to send a user to their account login or the page of a product they visited.
**Example URL**: `https://www.example.com/user?id={{name}}&cart={{cart_id}}`
> **Note:** Standard Handlebars syntax (using double curly braces) is URL encoded, so you can personalize individual parameters in a URL. Use triple braces to escape URL encoding and personalize a complete URL — `{{{url}}}`.
## Share action text
You can personalize the Share Text that users will see when they share your message on social networks. This can help you shape the way your audience talks about you, and make it easier for your audience to share their experiences with their groups of friends.
```text
I highly recommend {{product.name}} from Cool Company!
Go to {{product.url}} to get one!
```
## Message Center actions
Message Center actions support the same personalization sources as a message itself. For example, if you set up an automation based on a custom event trigger, such as an abandoned cart, to send a push notification with a Message Center action, you can personalize both the push notification and the Message Center message from the same information in your custom event.
When you select a Message Center action, you can select a template or create a new page in our Interactive Editor.
See [Content Templates](https://www.airship.com/docs/guides/personalization/content/templates/) to learn how to create Message Center templates.
When using the Interactive editor layouts for email, landing page, Message Center, and in-app automation content, you can assign an action that occurs when a user taps a button, link, or image in the message. You can use [Handlebars](https://www.airship.com/docs/reference/glossary/#handlebars) to personalize the actions. See [Actions in the Interactive editor](https://www.airship.com/docs/guides/messaging/editors/interactive/actions/).
## Media URLs
If you host your own media, you can use [Handlebars](https://www.airship.com/docs/reference/glossary/#handlebars) to personalize media URLs, helping you maximize the impact of your messages for each member of your audience.
You can personalize media URLs using custom event properties, [Attributes](https://www.airship.com/docs/reference/glossary/#attributes), and custom properties in [Create and Send](https://www.airship.com/docs/reference/glossary/#create_and_send) CSV files.
You should use the default handler (`$def`) when personalizing media URLs to make sure the URL resolves appropriately if variables in the URL are empty or don't exist.
**Example personalized media URL**
```text
https://example.com/{{$def user_profile_image "default.png"}}
```
See also: [Media guidelines](https://www.airship.com/docs/reference/messages/media-guidelines/).