# Creating Sequences
Learn how to configure Sequences.
# Create a Sequence
> Create a series of messages that are initiated by a trigger. Messages are delivered according to your timing settings, and you can also set conditions that determine the continuation of the series.
> **Note:** Each message in a sequence counts toward your *Sequences and Automation* [Message Limit](https://www.airship.com/docs/reference/glossary/#message_limits).
To get started, create a new Sequence:
1. In the sidebar, select the **Create** dropdown menu (
), then select **Journey**.
1. Select **Sequence**, then **Start from scratch**.
1. Enter a name for your Sequence.
1. Select **Continue**.
You will now configure each [component](https://www.airship.com/docs/guides/messaging/messages/sequences/about/#components) from the [Journey Map](https://www.airship.com/docs/reference/glossary/#journey_map). You can configure components in any order.
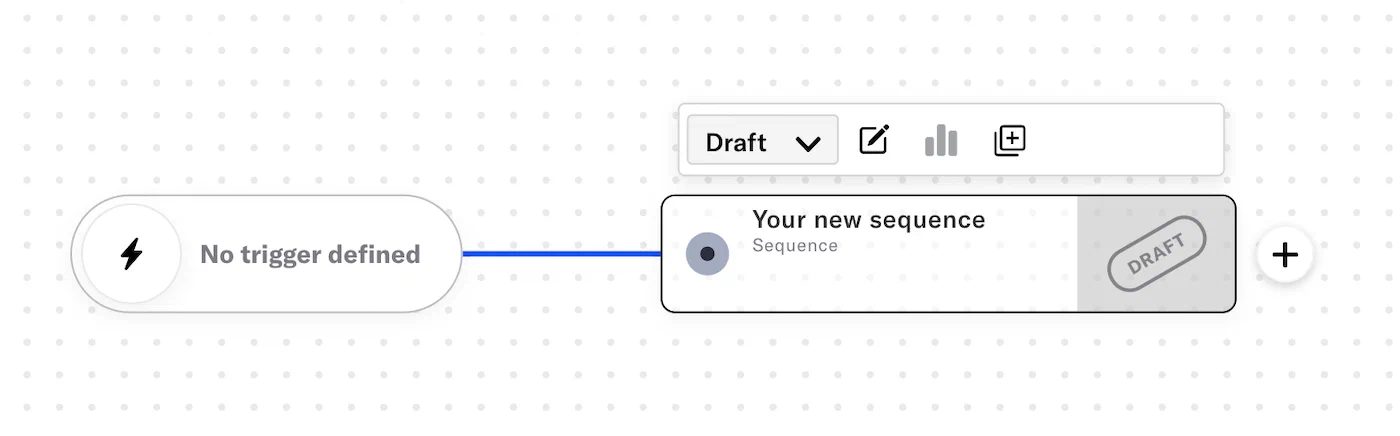
*A draft sequence*
## Trigger
Configure a trigger that will initiate your sequence. You can configure up to 10 triggers unless you are using the [Inactivity trigger](https://www.airship.com/docs/guides/messaging/messages/sequences/triggers/#inactivity).

*Configure a Sequence trigger*
1. Select the trigger card and then the pencil icon (
). If multiple triggers are configured, first select the trigger stack to expand it, and then select a trigger card.
1. Select and configure a [trigger](https://www.airship.com/docs/guides/messaging/messages/sequences/triggers/).
1. (Optional) Under **Settings**, define the times during which the trigger is active for the Sequence. Trigger start and end dates are evaluated before [Sequence start and end dates](#scheduling-and-frequency).
1. Enable **Start Date** and/or **End Date**.
1. Set the time, time zone, and date.
1. (Optional) Under **Conditions**, build a [Segment](https://www.airship.com/docs/reference/glossary/#segment) to filter the audience members entering the Sequence. Creating a segment here uses the same segmentation data and procedure as building [Segments](https://www.airship.com/docs/guides/audience/segmentation/segments/#adding-conditions). You cannot set Conditions for the Inactivity or Manual Entry trigger.
1. Select **Save**.
To add another trigger, select the plus icon () below the configured triggers. Adding more triggers to an existing Sequence does not require publishing changes. To delete a trigger, select its card, and then select the trash can icon (
).
> **Tip:** You can route users to a Sequence when an [In-App Automation](https://www.airship.com/docs/reference/glossary/#iaa) or [Scene](https://www.airship.com/docs/reference/glossary/#scene) displays on a device or when they select a button in an In-App Automation. See [Link Journey components](https://www.airship.com/docs/guides/features/orchestration-experimentation/journeys/#link-journey-components) in the *Journeys* documentation.
## Scheduling and frequency
Define when the sequence can deliver messages to your audience, and control the frequency of sending messages and of triggering the sequence. The settings are optional.
1. Select the sequence card, then the pencil icon (
).
1. Select **Settings** in the header.
1. Under **Scheduling**, define the times during which the Sequence can deliver messages to your audience. When its end date occurs, its status automatically changes to Completed, and you cannot restart it. Enable **Start Date** and/or **End Date**, and then set the time, time zone, and date.
> **Important:** [Trigger start and end dates](#trigger) are evaluated before Sequence start and end dates. Verify settings in both locations before starting a Sequence or publishing changes.
1. Under **Limits**, enable **Ignore Channel Message Limits** to override the project-level [Message Limits](https://www.airship.com/docs/reference/glossary/#message_limits), ensuring that your audience will receive your message even if they've reached the message limit. Overriding message limits does not override your **Rule limits** setting.
1. Under **Limits**, enable **Rule Limits** to cap the number of messages a user can receive from a Sequence within a time frame, preventing you from over-messaging your audience. Select **Add a daily limit** and/or **Add an all-time limit** and enter a number.
1. Select **Save & Continue**.
You will return to the [Sequence Manager](https://www.airship.com/docs/reference/glossary/#sequence_manager). You can start adding messages. To return to the map, select **Journey view** or **Exit
**, then **Save and exit**.
## Channels
> **Note:** If your account includes [Channel Coordination](https://www.airship.com/docs/reference/glossary/#channel_coordination), skip this step — the section does not appear for you in the dashboard. You will instead configure channels when you [add each message](#messages) to the sequence.
Enable the channels you want to send the message to. Available channels are based on your selected trigger.
1. Select the sequence card, then the compose icon (
).
1. Select **Settings** in the header.
1. Select the **Target** tab.
1. Enable channels.
1. Select **Next**, then **Save & Continue**.
You will return to the [Sequence Manager](https://www.airship.com/docs/reference/glossary/#sequence_manager). You can start adding messages, or select **Exit
**, then **Save and exit** to return to the map.
## Messages
Configure the message conditions and content. For details, see [Add messages to a sequence](https://www.airship.com/docs/guides/messaging/messages/sequences/create/add-messages/). If you just saved and exited Settings, you will already be on the Manage screen and can skip to step 2.
1. Select the sequence card, then the compose icon (
).
1. Set the message conditions.
1. Set the delay period.
1. Add the message content and configure its delivery settings.
1. Select **Save & Continue** to complete adding the message to your sequence.
You will return to the [Sequence Manager](https://www.airship.com/docs/reference/glossary/#sequence_manager) after adding a message. From there, select **Add message** and repeat these steps for each message you want to add to the sequence. Select **Exit
**, then **Save and exit** to return to the map.
## Outcomes
You can configure outcomes in the [Journey Map](https://www.airship.com/docs/reference/glossary/#journey_map). If using the [Inactivity trigger](https://www.airship.com/docs/guides/messaging/messages/sequences/triggers/#inactivity), the outcome is pre-configured and cannot be edited.
For details about setting up each option, see [Sequence outcomes](https://www.airship.com/docs/guides/messaging/messages/sequences/create/outcomes/).
## Start sequence
When all required components are configured, you can:
* [Test the sequence](https://www.airship.com/docs/guides/messaging/messages/sequences/create/test/) before starting it or publishing changes.
* [Create a control group](https://www.airship.com/docs/guides/experimentation/control-groups/) before starting the sequence.
* **Start the sequence** to make it available to your audience:
* From the map: Select the sequence card and select *Start* from the dropdown menu.
* From the [Sequence Manager](https://www.airship.com/docs/reference/glossary/#sequence_manager): Select **
Start**.
# Sequence templates
> {{< glossary_definition "sequence_template" >}}
This document describes each Sequence template, provides steps for accessing them, and lists considerations for editing. See [Create a Sequence](https://www.airship.com/docs/guides/messaging/messages/sequences/create/create/) for full documentation about creating a new Sequence and composing its messages.
Each message in a Sequence counts toward your *Sequences and Automation* [Message Limit](https://www.airship.com/docs/reference/glossary/#message_limits).
## Types of Sequence templates
Default channels, trigger, outcome, message content, and delivery timing are described for each template type.
### Welcome Series
Send onboarding messages. Default settings:
| Channels | Trigger | Outcome | Message 1 | Message 2 | Delivery timing |
| --- | --- | --- | --- | --- | --- |
| App | [First Seen](https://www.airship.com/docs/reference/glossary/#first_seen_event_trigger) | Default Sequence behavior: Users who trigger the Sequence will receive all messages in the Sequence. | **Delay:** 1 day **Message type and content:** Push notification, with title and body welcoming the user to the app. | **Delay:** 3 days after message 1
**Message type and content:** Push notification, encouraging the user to check out the brand's best features. | All messages are set to *Send immediately*: Airship sends your message after receiving the triggering event and after the delay period elapses. |
### Authentication Sequence
Encourage users on anonymous channels to log in to your app, which associates them with a [Named User](https://www.airship.com/docs/reference/glossary/#named_user). This creates a known contact within Airship. Default settings:
| Channels | Trigger | Outcome | Message 1 | Message 2 | Delivery timing |
| --- | --- | --- | --- | --- | --- |
| App | [First Seen](https://www.airship.com/docs/reference/glossary/#first_seen_event_trigger) | Conversion: Users who trigger the Sequence and then log in to the app will exit the Sequence. | **Delay:** 7 days
**Message type and content:** Push notification, with title and body encouraging user to log in to the app. | | All messages are set to *Send immediately*: Airship sends your message after receiving the triggering event and after the delay period elapses. |
> **Note:** Named user association at login must be implemented for your app. See: [Associating Channels with Named Users](https://www.airship.com/docs/guides/audience/named-users/#associate).
### Re-engagement Sequence
Win back inactive audience members. Default settings:
| Channels | Trigger | Outcome | Message 1 | Message 2 | Delivery timing |
| --- | --- | --- | --- | --- | --- |
| App, Web | [Inactivity](https://www.airship.com/docs/reference/glossary/#inactivity_event_trigger), set to *15 days* | Conversion: Users who trigger the Sequence and then re-engage with the app or website will exit the Sequence. They are represented in the *Reactivations* count in the [Performance Report](https://www.airship.com/docs/reference/glossary/#sequence_performance) and Sequence tests. | **Delay:** None
**Message type and content:** Push notification or web push notification, with title and body telling the user that they are missed. | **Delay:** 7 days after message 1
**Message type and content:** Push notification or web push notification, with title and body telling the user that they are missing out. | All messages are set to *Send immediately*: Airship sends your message after receiving the triggering event and after the delay period elapses. |
## Using a Sequence template
To get started, create a new Sequence:
1. In the sidebar, select the **Create** dropdown menu (
), then select **Journey**.
1. Select **Sequence**, then select a template.
The Sequence will open to the [Journey Map](https://www.airship.com/docs/reference/glossary/#journey_map). Details to keep in mind as you complete configuration:
* **Trigger and Outcomes** — Make sure your Trigger and Outcomes are appropriately configured for the Sequence's goal.
* For Sequences using the **Re-engagement Sequence** template, you cannot edit the Conversion selection in the *Outcomes* step. Users will exit the Sequence and be counted as a *Reactivation* in the [Performance Report](https://www.airship.com/docs/reference/glossary/#sequence_performance) and Sequence tests.
* For Sequences using the **Authentication Sequence** template, *Contact association* is the preselected conversion event in the *Outcomes* step, but you have the option to edit and select a custom event.
* **Messages** — Verify the settings for the default messages and any messages you add to the Sequence.
* **Delay and conditions** — Adjust the delay and/or conditions, as necessary.
* For Sequences using the **Re-engagement Sequence** template, there is no delay setting for the first message.
* For Sequences using the **Authentication Sequence** template, *Anonymous channels* is preselected for the *Channel condition* for the first message, and cannot be edited.
* **Content** — Make sure to edit the placeholder text in each message, adding brand-specific content. For a Welcome Series, highlight features that your users can get started with right away. For Re-engagement, highlight the features and/or deals that your users are missing out on.
* **Delivery** — All messages are set to *Send immediately* by default.
After setting up your new Sequence, you can:
* [Test the Sequence](https://www.airship.com/docs/guides/messaging/messages/sequences/create/test/) before starting it.
* [Start the Sequence](https://www.airship.com/docs/guides/messaging/messages/sequences/create/create/#start-sequence) to make it available to your audience.
# Sequence outcomes
> Configure alternatives to a sequence's default ending behavior.
By default, all sequence messages are delivered to users who meet the conditions, but you can configure alternative outcomes.
## Possible outcomes
You can configure the following outcomes for a sequence:
-
Continue to an in-app experience ([In-App Automation](https://www.airship.com/docs/reference/glossary/#iaa) or [Scene](https://www.airship.com/docs/reference/glossary/#scene)) or another sequence when Airship sends the last message in the current sequence.
-
Exit the sequence when a specific event occurs. When configuring the event, you designate it as a conversion or cancellation for reporting.
-
Exit the sequence when a specific event occurs, then continue to an in-app experience or another sequence.
> **Note:** An active in-app automation or scene that is connected downstream of a sequence might display independently of the upstream sequence until the in-app experience updates on a user's device.
>
> This is because in-app experiences are cached on users' devices then displayed when certain conditions are met. Edits made to individual messages, including connecting an in-app experience downstream of a sequence, are applied upon the next app open or via [background push](https://www.airship.com/docs/guides/messaging/project/enable-features/#setting-behavioral-defaults), if enabled.
## Exit events
You can configure a sequence to exit users based on these events:
* **App open** — This event occurs when a user opens your Android or iOS app or starts a web session. It applies only to sequences that include those platforms. It is not supported for sequences using the [Inactivity trigger](https://www.airship.com/docs/guides/messaging/messages/sequences/triggers/#inactivity).
* **Contact association** — This event occurs when an anonymous channel is associated with a [Named User](https://www.airship.com/docs/reference/glossary/#named_user).
* **Commercial opt-in** — This event occurs when a user opts in to [commercial email messaging](https://www.airship.com/docs/developer/api-integrations/email/commercial-transactional/) for the first time.
* **Tag change** — This event occurs when a tag is added to, or removed from, a device.
* **Custom event** — This event occurs when a user performs a custom event you select that represents a key value exchange with your customers.
* **Subscription event** — This event occurs when a user opts in to or out of a [Subscription List](https://www.airship.com/docs/reference/glossary/#subscription_list). This exit event can only be configured in the [Journey Map](https://www.airship.com/docs/reference/glossary/#journey_map), not the sequence settings.
Exit events are designated as either *Conversion* or *Cancellation*. Both have the same effect on a sequence, but the classifications are used for reporting and mapping. Their occurrence is evaluated during the delay period configured when [adding each message](https://www.airship.com/docs/guides/messaging/messages/sequences/create/add-messages/).
> **Note:** Sequences triggered by [[Inactivity](https://www.airship.com/docs/reference/glossary/#inactivity_event_trigger)](https://www.airship.com/docs/guides/messaging/messages/sequences/triggers/#inactivity) are automatically configured such that:
> 1. A user becoming active is a conversion event labeled *Reactivation*.
> 1. You cannot configure additional conversion events.
## Continuation
Configuring a sequence to continue to an in-app experience or another sequence creates a [Journey](https://www.airship.com/docs/reference/glossary/#journey). You can configure the downstream component in two ways:
* **Create new** — After entering a name, it is saved as a draft.
* **Insert existing** — Search for and select a sequence or in-app experience in your project. Archived items are excluded from search results.
For downstream sequences, [channel selection](https://www.airship.com/docs/guides/messaging/messages/sequences/create/create/#channels) is eliminated since your audience is predetermined by the upstream sequence.
### Delay period
You can set a delay period — the time Airship should wait before evaluating triggers and conditions for the downstream sequence or in-app experience. The delay period starts after the last message in the upstream sequence is sent or when an [exit event](#exit-events) occurs. The maximum delay period is 90 days.
### In-app experience expiration period
If the downstream in-app automation or scene does not display on a user's device within the default period of 31 days, they will exit the journey. This period starts after any configured [delay period](#delay-period) elapses.
As an alternative to exiting, you can route to a fallback sequence. You can also set a shorter expiration period.
## Configuring continuation
Route users to a sequence or in-app experience when Airship sends the last message in the current sequence or an exit event occurs.
1. Go to **Journeys** and select a sequence.
1. Click to the right of the sequence or a [previously configured exit event](#configuring-exit-events-and-optional-continuation). A configuration drawer will open.
1. Select *Continuation*. This step is eliminated if configuration is for an exit event.
1. Select *Create new* or *Insert existing*.
1. Set the delay period — the time Airship should wait before evaluating triggers and conditions for the downstream sequence or in-app experience. Enter a value in minutes, hours, or days. The maximum delay period is 90 days.
1. Select *Sequence*, *Scene*, or *In-App Automation*, then enter a name for the draft or search for an existing message.
1. (For in-app experiences only, optional) Edit the expiration period and/or set a fallback sequence.
If the downstream in-app automation or scene does not display on a user's device within the default period of 31 days, they will exit the [Journey](https://www.airship.com/docs/reference/glossary/#journey). This period starts after any configured delay period elapses. As an alternative to exiting, you can route to a fallback sequence. You can also set a shorter expiration period.
* **Expiration** — Enter a number of days.
* **Fallback sequence** — Search for an existing sequence or enter a name for a draft and click **Create new sequence: [draft name]**.
1. Click **Save**.
The map will now show the downstream sequence or in-app experience with a connection to the upstream sequence or exit event.
## Configuring exit events and optional continuation
Exit users from the sequence when an event occurs. You can set up multiple events. After configuring an event, you have the option to then route users to a sequence or in-app experience. See also: [Exit events](https://www.airship.com/docs/guides/messaging/messages/sequences/create/outcomes/#exit-events).
1. Go to **Journeys** and select a sequence.
1. Click to the right of the sequence. A configuration drawer will open.
1. Select the exit type: *Cancellation Event* or *Conversion Event*.
1. Select the exit event and configure.
* **App open:** No configuration needed.
* **Contact association:** No configuration needed.
* **Commercial opt-in:** No configuration needed.
* **Subscription event:**
1. Search for and select a subscription list.
1. Choose whether to exit when the user opts in to or out of the subscription.
* **Tag change:**
1. Search for a tag. If the tag you search for does not appear, click **Create [search term]** to create a new tag. You can select a tag group filter before or after searching.
1. (Optional) Click **Add Another** to add more tags. Airship handles multiple tags as a Boolean OR.
1. Choose to perform the event when a tag is *Added*, or *Removed*.
* **Custom event:**
1. Search for a custom event, then select an event from the listed results. Results are limited to events that occurred in the last 30 days. If your event name does not appear in the search results, click **Use [search term]** to use the event name as typed.
1. (Optional) Click **Add Another** to add more events. Airship handles multiple events as a Boolean OR.
1. (Optional) Filter custom events by value or key/value properties. Filtering events this way can help you more precisely target your audience.
- Select Add event properties for the custom event.
- Select Add property, then Search for properties and search for a property, or select Add event value.
- If applicable, select the operator you want to use to evaluate the value or property.
- Enter or select the event or property value you want to filter for.
- (Optional) Select the plus icon (
) to add an alternative for a filter.
- (Optional) Select Add property or Add event value to add more filters.
- Select All or ANY to determine how to evaluate multiple filters and alternatives within each filter.
- ALL = all criteria must be met (boolean AND)
- ANY = any criteria must be met (boolean OR)
- Select Save.
> **Note:** The filter **does not** show events and event properties for custom events associated with [Named Users](https://www.airship.com/docs/reference/glossary/#named_user). You can still use events associated with named users as triggers, but you must enter their information manually.
> **Tip:** You can use file upload to provide multiple values to match against a specified event property’s value. For string properties only.
> For example, for a point-of-sale system that emits events when a sale occurs, an event might have the following data:
> ```js
> name: "sale-completed"
> properties:
> customer_id: 234234
> store_id: 103843
> region: "northwest-usa"
> ```
>
> To trigger only when sales occur in the regions of northwest-usa and southwest-usa but not midwest-usa or any other region, you would do the following to filter your custom events:
>
> - Search for or enter the property name
region.
> - Select operator File upload (is one of).
> - Upload a
.txt file containing values northwest-usa and southwest-usa.
>
>
> Provide your values in a line delimited .txt file. Each value must be on a separate line. 100 KB maximum file size.
1. (Optional) Set the maximum age for the events. If an event is received after it is older than a certain age, the automation or sequence will not start.
1. Enable *Event Expiration*.
1. Enter a value in minutes, hours, days, months, or years.
1. (Optional) Enable *Add continuation* and complete the steps above for [Configuring continuation](#configuring-continuation), starting at step 4.
1. Click **Save**.
The map will now show a connection from the sequence to the exit event.
# Add messages to a sequence
> Follow these steps to add messages to a new or existing sequence.
You add messages to a sequence from the [Sequence Manager](https://www.airship.com/docs/reference/glossary/#sequence_manager). You can access this screen from these locations:
* [Journey Map](https://www.airship.com/docs/reference/glossary/#journey_map): Select a sequence, click its card in the map, then click
.
* [Messages Overview](https://www.airship.com/docs/reference/glossary/#messages_overview): Click
for a sequence.
For sequences that don't yet contain messages, you can start the following steps immediately after opening the Manage screen. For sequences with at least one message, first click **Add message** from the Manage screen, then complete these steps.
## Configure optional settings
In addition to configuring the message itself, you can set audience requirements and a delay period.
### Conditions
Conditions are requirements your audience must meet in order to receive a message from a sequence. If a member of the audience doesn't meet the conditions, they will not receive this message or any subsequent messages in the sequence; they will exit the sequence. If you add multiple conditions, they are handled as a boolean OR. If any condition is met, the message will be sent.
To set conditions:
1. Select **Add conditions
**, and then select a condition and configure:
| Condition | Description | Steps |
| --- | --- | --- |
| **Contact** | This condition specifies that [Contacts](https://www.airship.com/docs/reference/glossary/#contact) must be anonymous or associated with a [Named User](https://www.airship.com/docs/reference/glossary/#named_user). It is available for the first message in a Sequence only. | Select **Anonymous contacts** or **Authenticated contacts**. |
| **Segmentation** | This condition specifies that Contacts must be a member of a [Segment](https://www.airship.com/docs/reference/glossary/#segment) that you build. | Define your audience using the same segmentation data and process as when building a [Segment](https://www.airship.com/docs/reference/glossary/#segment). |
| **Subscription** | This condition specifies that Contacts must be opted in to or out of a [Subscription List](https://www.airship.com/docs/reference/glossary/#subscription_list). You can select multiple lists.Airship evaluates subscription status across all channels collectively. A Contact is subscribed to a list when they have at least one opted-in channel and unsubscribed when they have no opted-in channels. | Search for and select a list, then select whether they must be in to or out of the list. |
{class="table-col-1-20 table-col-2-40"}
1. Select the arrow icon (
) to close the configuration panel.
### Delay
You can set a delay period for the message. This is the time Airship should wait after receiving the triggering event before sending your message. Set the value to zero (0) minutes to send immediately or adjust the default value (one hour) to the desired delay period. The maximum delay period is 90 days.
* **For the first message in your sequence**:
* The delay period starts when the triggering event is received by Airship.
* For the First Seen trigger, a delay shorter than one hour may result in dropped sends.
* For sequences with the goal of *Event*, a delay shorter than one hour may result in sends going to users who converted/cancelled.
* For sequences using the Inactivity trigger, there is no delay setting for the first message.
* **For subsequent messages**:
* The delay period starts when the previous message was sent.
* For sequences with the goal of *Event*, a delay shorter than one hour may result in sends going to users who converted/cancelled.
To set a delay:
1. Under **Message Delay**, select the currently set time period.
1. Enter a value in minutes, hours, or days.
1. Select **Save**.
## Configure the message
Select **Add message content**. You can add message content without setting conditions or a delay. After completing a step, select the next step in the header to move on.
### Setup
> **Note:** Projects using the [channel-level segmentation system](https://www.airship.com/docs/guides/audience/segmentation/segmentation/#channel-level-segmentation) do not have a Setup step. However, if they are enabled for Channel Coordination, you must select and configure a strategy and save it before moving to the Content step.
>
> Also, for the channel-level segmentation system, each strategy targets a [Named User](https://www.airship.com/docs/reference/glossary/#named_user), not a [Contact](https://www.airship.com/docs/reference/glossary/#contact).
First, select a [Channel Coordination](https://www.airship.com/docs/reference/glossary/#channel_coordination) strategy:
* **Fan Out** targets a Contact on all the channels they are opted in to, maximizing the chances they receive your message.
* **Last Active** targets a Contact on the opted-in channel they used most recently.
* **Originating Channel** targets a Contact on the channel that triggered the Sequence.
* **Priority Channel** targets a Contact on the first channel they are opted in to, in the priority order you set.
Then, enable the channel types to include in your audience. For Mobile Apps, also select from the available platforms. For Priority Channel, also drag the channel types into priority order.
Use Channel conditions to filter which channels are included in the audience. A channel must meet the conditions to remain in the audience.
For example, if your audience includes users with app, email, and SMS channels, and you set a channel condition requiring membership in an email Subscription List:
- Only email channels that meet that condition would remain in the audience.
- All app and SMS channels would be excluded.
To set channel conditions, use the same process as when building a [Segment](https://www.airship.com/docs/reference/glossary/#segment). You can use the following data in your conditions:
- [Autogroup](https://www.airship.com/docs/reference/glossary/#autogroup)
- [Channel ID](https://www.airship.com/docs/reference/glossary/#channel_id)
- [Device Properties](https://www.airship.com/docs/reference/glossary/#device_properties)
- [Events](https://www.airship.com/docs/reference/glossary/#events)
- [Lifecycle List](https://www.airship.com/docs/reference/glossary/#lifecycle_list)
- [Predicted to Churn status](https://www.airship.com/docs/reference/glossary/#predicted_to_churn)
- [Subscription List](https://www.airship.com/docs/reference/glossary/#subscription_list)
- [Tag](https://www.airship.com/docs/reference/glossary/#tag) in the
device [Tag Group](https://www.airship.com/docs/reference/glossary/#tag_group) — See Primary device tags.
- [Uploaded (Static) List](https://www.airship.com/docs/reference/glossary/#uploaded_list)
Selected Lifecycle, Subscription, and Uploaded Lists must contain Channel IDs or Named Users as the identifier, not a mix of the two.
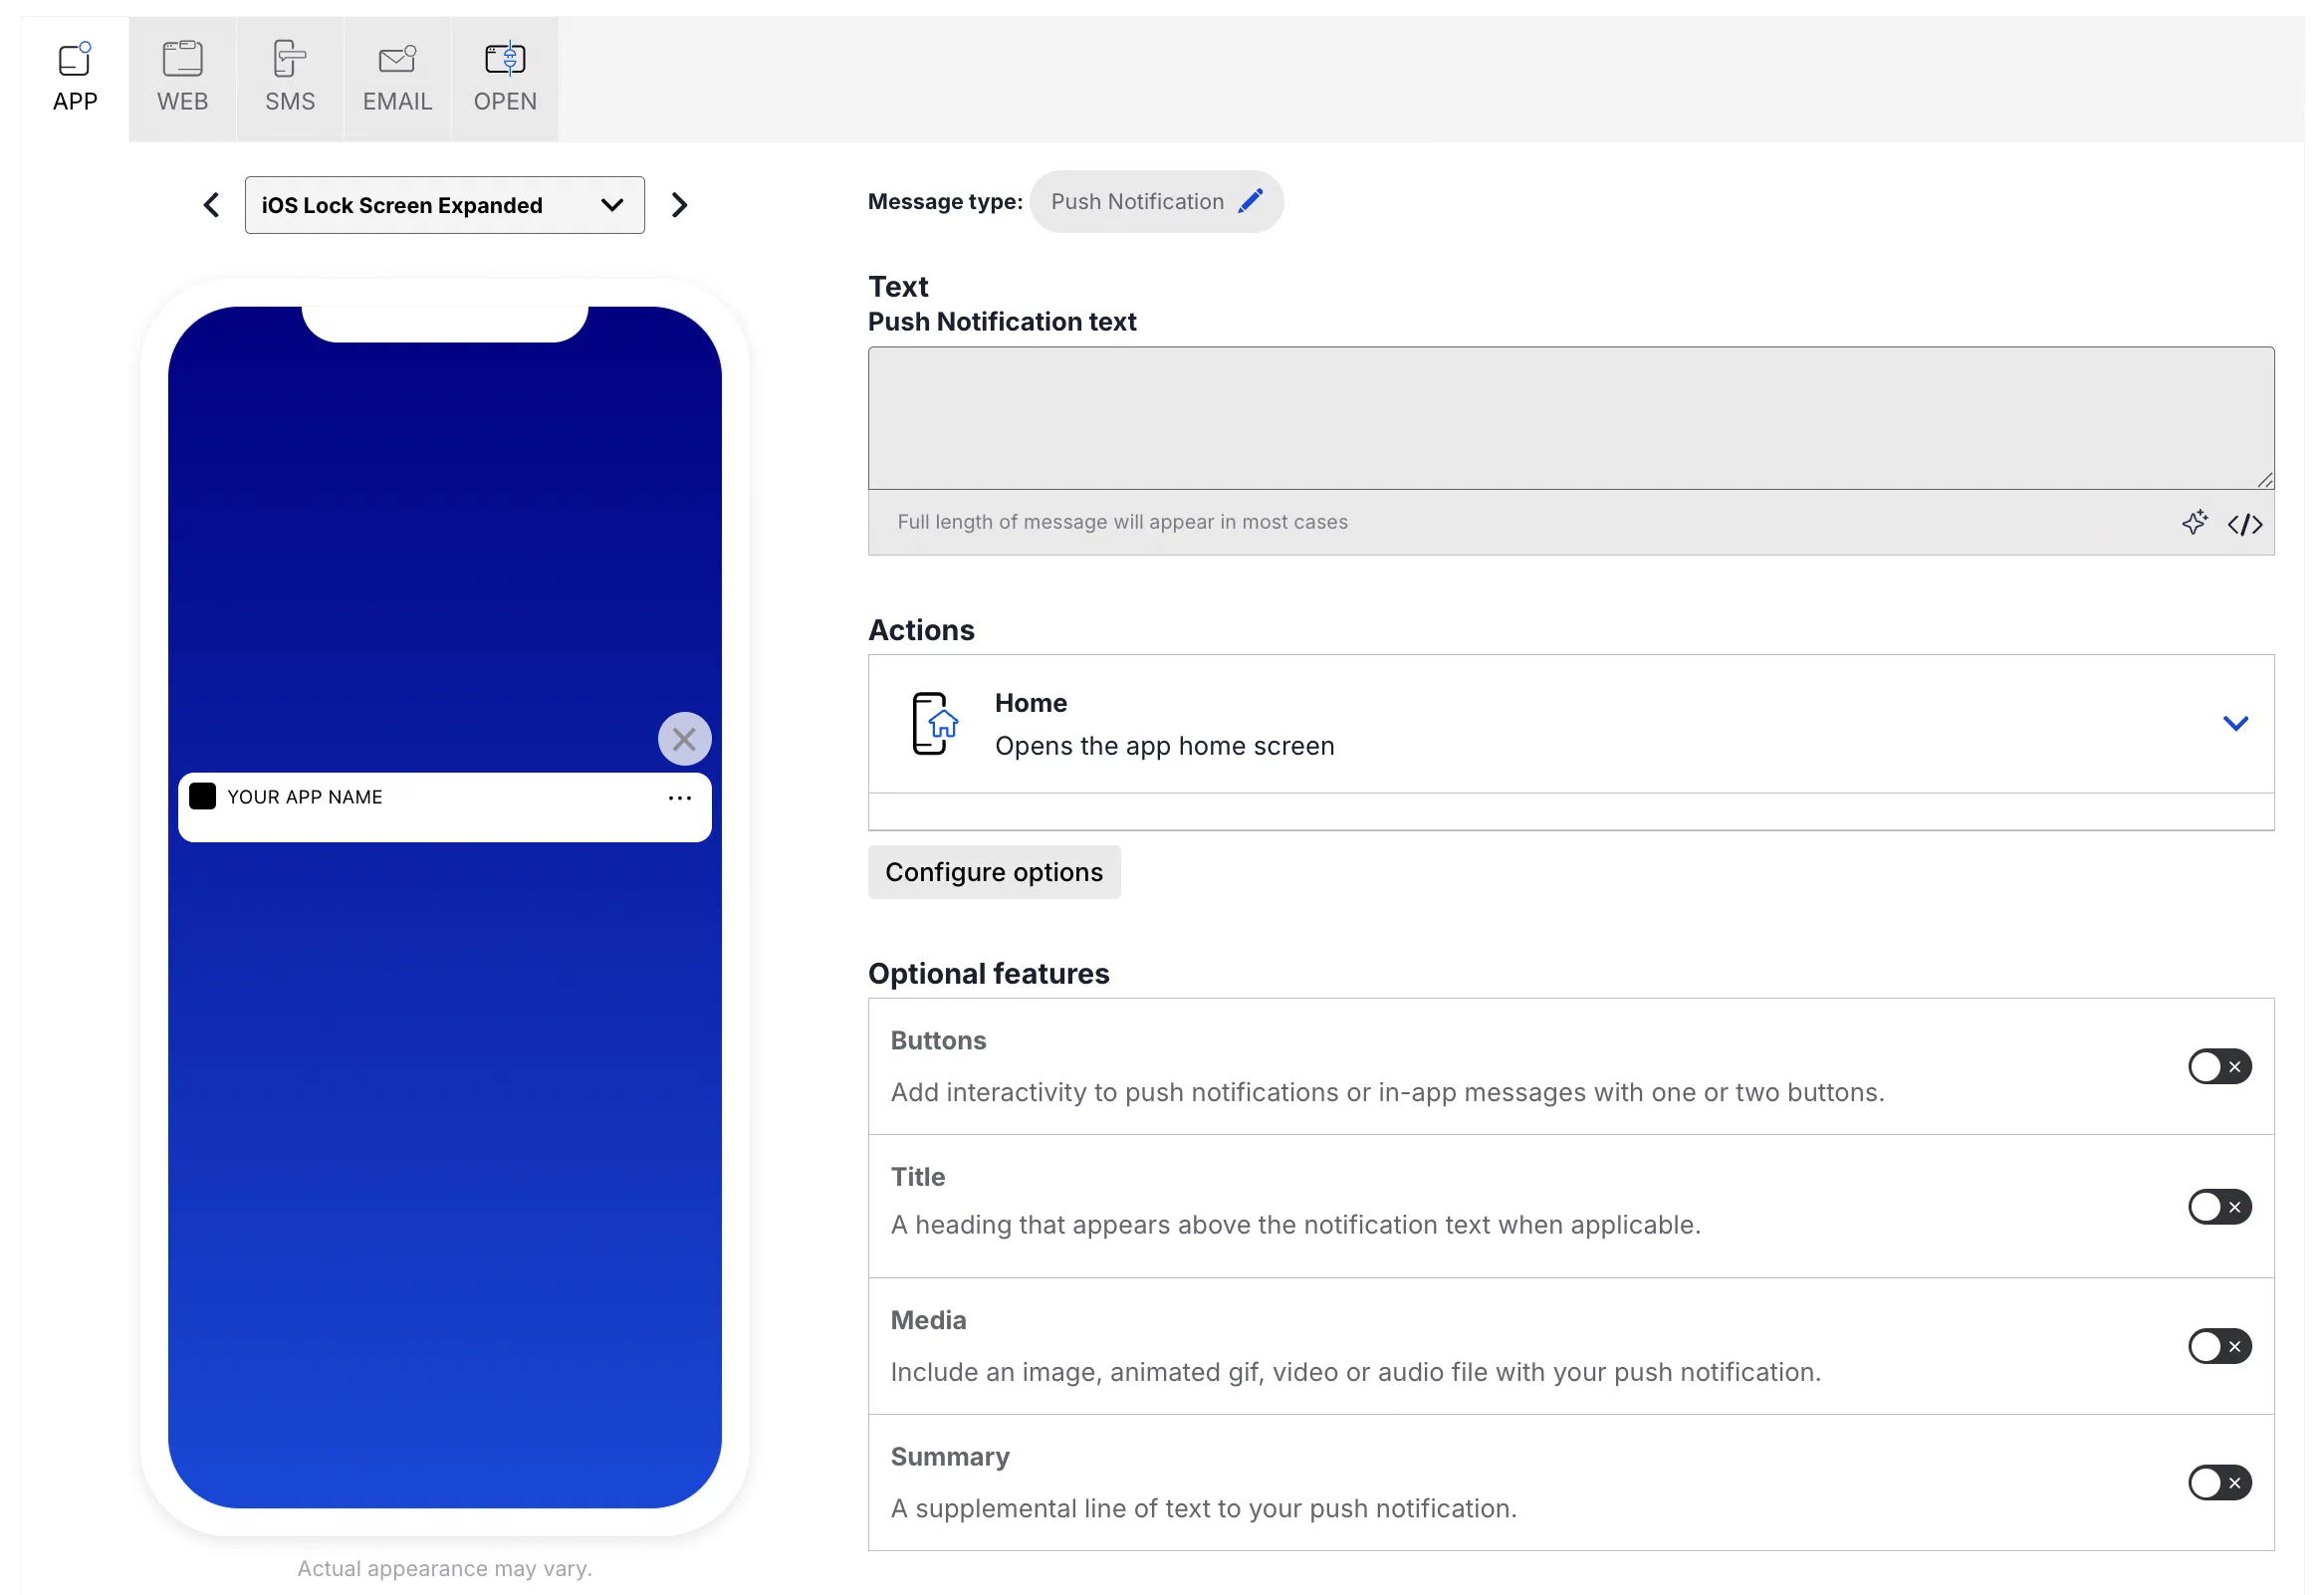
### Content
Configure the message content per enabled channel. See [Content by channel](https://www.airship.com/docs/guides/messaging/messages/content/).
### Delivery
Configure [delivery](https://www.airship.com/docs/guides/messaging/messages/delivery/delivery/). Timing settings do not appear if you chose the Inactivity trigger.
### Review
Review the device preview and message summary. Click the arrows to page through the various previews. The channel and display type dynamically update in the dropdown menu above. You can also select a preview directly from the dropdown menu. If you want to make changes, click the associated step in the header, make your changes, then return to *Review*.
Send a test message to verify its appearance and behavior on each configured channel. The message is sent to your selected recipients immediately, and it appears as a test in [Messages Overview](https://www.airship.com/docs/reference/glossary/#messages_overview).
1. Select **Send Test**.
-
Under Test audience, enter at least one [Named User](https://www.airship.com/docs/reference/glossary/#named_user) or [Test Group](https://www.airship.com/docs/reference/glossary/#preview_test_groups) and select from the results. If your message includes email, you can also search for email addresses. If no matches appear for an address, you can select Create channel for <address>, and the channel will be registered for your project and opted in to transactional messaging.
Users in an active [Holdout Experiment](https://www.airship.com/docs/reference/glossary/#holdout_experiment) will not receive a test message. You can view a user’s current holdout group status and history when viewing their channel details in Contact Management.
-
(If your message contains [Handlebars](https://www.airship.com/docs/reference/glossary/#handlebars)) Under Personalization, select and configure a personalization data source:
| Data source |
Description |
Steps |
| Test message recipient |
The message will be personalized using information associated with each test audience member. |
n/a |
| Preview Data tool |
The message will be personalized using the data currently entered in the Preview Data tool. The same values will apply to all test message recipients. You can also manually edit the JSON. |
(Optional) Edit the JSON data. |
-
Select Send.
Select **Save & Continue** to complete adding the message to your sequence.
---
From the [Sequence Manager](https://www.airship.com/docs/reference/glossary/#sequence_manager), now you can:
* Add another message to extend the sequence.
* [Test the sequence](https://www.airship.com/docs/guides/messaging/messages/sequences/create/test/) before starting it or publishing changes.
* [Create a control group](https://www.airship.com/docs/guides/experimentation/control-groups/) before starting the sequence.
* Click **
Start** to make the sequence available to your audience.
* Click **Publish changes** to apply your changes to a sequence that is already in progress. Audience members who have already triggered the sequence will only see the added or edited message content if they have not yet passed this point in the sequence.
## Personalizing messages
For Sequences using the *Custom Event* trigger, you can personalize messages using [Attributes](https://www.airship.com/docs/reference/glossary/#attributes) or [Custom Event](https://www.airship.com/docs/reference/glossary/#custom_event) properties. In both cases, you reference variables using [Handlebars](https://www.airship.com/docs/reference/glossary/#handlebars) to personalize the message for each member of your audience. If you set up templates, you can reference your templates when setting up messages in the Sequence.
For example, if your events have a property called `name`, you would add it to your message or template using `{{name}}`.
> **Note:** Custom event properties used to be referenced in the `$data.events.[0].properties` namespace. If you have templates referencing properties in this namespace, they'll still work, but you'll have to continue using this namespace until you [contact Airship Support](https://support.airship.com/) and move over to the simplified namespace for custom event properties.
You can personalize a message using both attributes and custom event properties. If both an attribute and a custom event property have the same name, Airship will attempt to use the custom event property — the most recent property — to personalize the message.
For example, if you have a custom event representing a purchase, you can send an automated message confirming the purchase and providing information about what the user bought.
Custom Event
```json
{
"occurred": "{{event_time}}",
"user": {
"named_user_id": "user"
},
"body": {
"name": "purchase",
"subscribe": true,
"properties": {
"customer_name": "user",
"total": 48,
"cost_units": "USD",
"purchase": [
{
"qty": 4,
"item": "MLB regulation baseball",
"per": "$12",
"total": "$48"
}
]
}
}
}
```
Message Content
```handlebars
Hi {{$def customer_name "valued customer"}}!
Thanks for your purchase of:
{{#each purchase}}
{{qty}}x {{per}} {{item}} = {{this.total}}
{{/each}}
total: ${{total}}
Is being processed. We'll message you again when it ships!
```
## Localize your sequence messages
Learn how to localize your messages in your sequence using [Handlebars](https://www.airship.com/docs/reference/glossary/#handlebars) with conditions targeting `ua_language` and/or `ua_country` tags. Localizing messages in this way ensures that your audience only sees the message intended for their language settings.
> **Note:** The `else` statement acts as the default message for members of your audience who do not have a `ua_language`
# Test a Sequence
> Use sequence testing to verify the appearance and behavior of your messages, as well as channel configuration, tag conditions, and conversion or cancellation events.
You can send a sequence to a test audience according to your specified timing, then view versions of the [Performance Report](https://www.airship.com/docs/reference/glossary/#sequence_performance) and message reports based on the test audience. You can also test individual messages in the sequence.
## Your test audience
You can send a test to either a single [Named User](https://www.airship.com/docs/reference/glossary/#named_user) or to a [Test Group](https://www.airship.com/docs/reference/glossary/#preview_test_groups).
* If you used tag conditions in your sequence, make sure you know which users in your test audience have which tags.
* If you personalized messages using attributes, assign the relevant attributes to your test audience.
* There may be a discrepancy between the number of intended recipients and the number of actual devices if members of the test audience have uninstalled.
* Users in an active [Holdout Experiment](https://www.airship.com/docs/reference/glossary/#holdout_experiment) will not receive a test message. You can view a user's current holdout group status and history when [viewing their channel details in Contact Management](https://www.airship.com/docs/guides/audience/contact-management/#viewing-channel-details).
## Test a sequence
Follow these steps to test a sequence that has never been started, or started but never edited.
> **Note:** The option to test a sequence is not available until the sequence is configured with the minimum requirements to start it.
If you just created the sequence, you will already be on the *Manage* screen. Otherwise, first go to **Messages**, then **Messages Overview**, and then select the pencil icon (
) for a sequence. Then:
1. Click **Test Run** in the leftside drawer.
1. Click **Set up a test run**.
1. Enter at least one named user or test group and select from the results.
1. Specify the amount of time you want between delivery of each message in your test sequence.
1. Click **Create test**.
1. Click **Start test** on the *Test* screen. You can repeat this step to restart the test.
Now you can [evaluate the test](#evaluate).
### Test your changes after editing a sequence
Follow these steps to test your changes after editing a started or paused sequence.
If you just edited the sequence, you will already be on the *Manage* screen. Otherwise, first go to **Messages**, then **Messages Overview**, and then select the pencil icon (
) for a sequence. Then:
1. Click **Test changes** next to the notice *You have unpublished changes.*
1. If you have created a test for this sequence before, click **Yes, create new test** to confirm deleting previous test data.
1. Enter at least one named user or test group and select from the results.
1. Specify the amount of time you want between delivery of each message in your test sequence.
1. Click **Create test**.
1. Click **Start test run**. You can repeat this step to restart the test.
Now you can [evaluate the test](#evaluate).
## Test a message in a sequence
Send a test message, then verify its appearance and behavior on each channel the message is configured for. The message is sent to your selected recipients immediately, and it appears as a test in [Messages Overview](https://www.airship.com/docs/reference/glossary/#messages_overview).
Send a test from the *Review* step when composing a message:
1. Select **Send Test**.
-
Under Test audience, enter at least one [Named User](https://www.airship.com/docs/reference/glossary/#named_user) or [Test Group](https://www.airship.com/docs/reference/glossary/#preview_test_groups) and select from the results. If your message includes email, you can also search for email addresses. If no matches appear for an address, you can select Create channel for <address>, and the channel will be registered for your project and opted in to transactional messaging.
Users in an active [Holdout Experiment](https://www.airship.com/docs/reference/glossary/#holdout_experiment) will not receive a test message. You can view a user’s current holdout group status and history when viewing their channel details in Contact Management.
-
(If your message contains [Handlebars](https://www.airship.com/docs/reference/glossary/#handlebars)) Under Personalization, select and configure a personalization data source:
| Data source |
Description |
Steps |
| Test message recipient |
The message will be personalized using information associated with each test audience member. |
n/a |
| Preview Data tool |
The message will be personalized using the data currently entered in the Preview Data tool. The same values will apply to all test message recipients. You can also manually edit the JSON. |
(Optional) Edit the JSON data. |
-
Select Send.
Send a test from the [Sequence Manager](https://www.airship.com/docs/reference/glossary/#sequence_manager):
1. Go to **Messages**, then **Messages Overview**.
1. Select the pencil icon (
) for a sequence.
1. Click
for the message you want to test, and select *Send Test Message*.
1. Enter at least one named user or test group and select from the results.
1. Click **Send**.
## Evaluate a sequence test {#evaluate}
Sequence tests are manually triggered, so the first message in the sequence is sent to every member of the test audience, then the audience is filtered by channel availability and tag conditions.
After you start a sequence test, verify:
* **Channels and tag conditions:** Were your messages received on intended channels and according to tag conditions you set?
* **Conversion or cancellation events:** Were users funneled out of the sequence as expected?
* **Message content:** Do your messages appear and behave as intended on each channel the message was configured for?
* **Personalization:** Do messages personalized using [Handlebars](https://www.airship.com/docs/reference/glossary/#handlebars) make sense?
* You cannot simulate a custom event in your test. Messages personalized using custom event properties will display their default values in your test messages. Any variable without a default value will instead appear empty.
* **Performance:** Do the [Test report](#test-report) metrics represent your expected test results?
### View a sequence Test report {#test-report}
A sequence's Test report is available after you [create and start a test](#test-a-sequence). It is identical to the [Performance Report](https://www.airship.com/docs/reference/glossary/#sequence_performance), but the data is based on your test audience.
1. Go to **Messages**, then **Messages Overview**.
1. Select the pencil icon (
) for a sequence.
1. Click **Test Run**, then **View test report**.
1. Click **
Report** to open an individual [message report](https://www.airship.com/docs/guides/reports/message/).
Previous Test report data is cleared when you create a new test.
# Edit or duplicate a Sequence
> Follow these steps to duplicate or edit a sequence.
> **Tip:** * **Do not pause** a sequence before you edit it. Edit the sequence, then click **Publish changes**. You can also [test the sequence](https://www.airship.com/docs/guides/messaging/messages/sequences/create/test/#test-a-sequence) before publishing changes. For active sequences, changes to [outcomes](https://www.airship.com/docs/guides/messaging/messages/sequences/create/outcomes/) are published automatically after saving.
> * You should only pause a sequence when you want to stop it and use it at a later date. Paused sequences remain in your project and can be edited and started again at any time.
## Edit sequence settings {#settings}
Sequence settings include the sequence name, trigger options, and target (channels).
For active sequences, editing the [audience channel selection](https://www.airship.com/docs/guides/messaging/messages/sequences/create/create/#channels) may impact delivery, depending on whether a user is opted into newly selected channels and which [Channel Coordination](https://www.airship.com/docs/reference/glossary/#channel_coordination) strategy is chosen.
> **Important:** Do not edit a Sequence that has a control group. See [Sequence Control Groups](https://www.airship.com/docs/guides/experimentation/control-groups/).
1. Go to **Messages**, then **Messages Overview**.
1. Select the pencil icon (
) for a sequence.
1. Click *Settings* in the header, and make your changes.
* For the sequence name, click the name in the header, enter a new sequence name, then click **Continue** or **Next**.
* Edit the [Trigger and options](https://www.airship.com/docs/guides/messaging/messages/sequences/triggers/) or [Target](https://www.airship.com/docs/guides/messaging/messages/sequences/create/create/#channels) as you would for a new sequence.
> **Note:** When configuring a continuation (downstream) sequence, the *Trigger* step lists the upstream sequence that will initiate the downstream sequence, and the *Target* step is eliminated since your audience is predetermined by the upstream sequence.
1. Click **Save and continue**.
1. Click **Publish changes** to apply the changes to a sequence that is already in progress.
## Edit or remove sequence outcomes in the journey map
For active sequences, changes to [outcomes](https://www.airship.com/docs/guides/messaging/messages/sequences/create/outcomes/) are published automatically after saving. Editing [[Cancellation Events](https://www.airship.com/docs/reference/glossary/#cancellation_events_event_option)](https://www.airship.com/docs/guides/messaging/messages/sequences/create/outcomes/#exit-events) will cause users to exit the sequence if they then perform a newly added event.
**Edit an exit event:**
1. Go to *Journeys* and select a sequence.
1. Click an exit event card, then click the pencil icon (
).
1. Make changes to the currently selected exit event, or click **Cancel** and [select a different exit event and complete its configuration](https://www.airship.com/docs/guides/messaging/messages/sequences/create/outcomes/#configuring-exit-events-and-optional-continuation).
1. Click **Save**.
**Remove an exit event:**
1. Go to *Journeys* and select a sequence.
1. Click an exit event card, then click
.
**Remove a component from a journey:**
1. Go to *Journeys* and select a component.
1. Click
then **Unlink**.
The map will refresh to focus on the component you unlinked.
## Edit message content in a sequence
Editing the content of messages in a started sequence has no impact on message delivery. For example, if you edit the content of message 3 and a user has not yet received message 3, the user will receive the updated version of message 3.
> **Important:** Do not edit a Sequence that has a control group. See [Sequence Control Groups](https://www.airship.com/docs/guides/experimentation/control-groups/).
1. Go to **Messages**, then **Messages Overview**.
1. Select the pencil icon (
) for a sequence.
1. Click
for the message you want to edit, and select *Edit Message*.
1. Go to the *Content* step and make your changes.
1. Go to the *Review* step select **Save & Continue**. You will return to the Manage screen.
1. Click **Publish changes** to apply the changes to a sequence that is already in progress.
## Edit the name of a message in a sequence
Each message in a sequence is automatically named for the sequence name and its position in the sequence, e.g., *Welcome Sequence 4*. You can edit the name of any message in a sequence.
1. Go to **Messages**, then **Messages Overview**.
1. Select the pencil icon (
) for a sequence.
1. Click
for the message you want to edit, and select *Edit Message*.
1. Click in the header.
1. Enter a new message name.
1. Click **Save & Continue**.
1. Go to the *Review* step and click **Save & Continue**. You will return to the Manage screen.
1. Click **Publish changes** to apply the changes to a sequence that is already in progress.
## Edit delay and conditions for a message in a sequence {#delay-conditions}
> **Important:** Do not edit a Sequence that has a control group. See [Sequence Control Groups](https://www.airship.com/docs/guides/experimentation/control-groups/).
You can edit the *delay* period that must elapse before the message is sent and the *conditions* that your audience must meet to receive the message.
* For sequences using the Inactivity trigger, there is no delay setting for the first message.
* For active sequences:
* Editing the timing delay between messages in a started sequence may cause users to exit the sequence. For example, if you edit the delay between message 2 and message 3, users who have already received message 2 will not receive message 3.
* Editing the conditions for a message will cause users to exit the sequence if they don't match the new conditions.
1. Go to **Messages**, then **Messages Overview**.
1. Select the pencil icon (
) for a sequence.
1. Click
for Conditions or Message Delay, and configure as you would for composing a new message:
* [Conditions](https://www.airship.com/docs/guides/messaging/messages/sequences/create/add-messages/#conditions)
* [Message delay](https://www.airship.com/docs/guides/messaging/messages/sequences/create/add-messages/#delay)
1. Click **Publish changes** to apply the changes to a sequence that is already in progress.
## Duplicate a sequence {#duplicate}
* The new sequence name is the original sequence name, with " - Copy" appended.
* If the original sequence was *Started* at the time of duplication, the new sequence status is *Paused* until you start it.
1. Go to **Messages**, then **Messages Overview**.
1. Click
for a sequence.
The next screen will be the [Sequence Manager](https://www.airship.com/docs/reference/glossary/#sequence_manager) for the new sequence.