Airship recommends scheduling your message at least three days in advance due to the combination of time zones and optimal times. You can reduce the lead time if your audience is more localized, e.g., only in the United States or in a certain European region.
> **Note:** When your audience includes users without an optimal send time tag, those users will be dropped from delivery and will not receive the message. Since optimal send time is determined from user behavior over time, new users might not have an optimal send time determined for the first week or two after channel registration. ### Recurring In the Message composer and for A/B test variants, send the message periodically at specified intervals. You may want to send recurring messages for things like payment reminders. You can pause, resume, and cancel recurring messages in [Messages Overview](https://www.airship.com/docs/reference/glossary/#messages_overview). Segmentation data is evaluated at send time. For example, if your recurring message targets an audience list whose members change over time, each recurring message is sent to the current version of the list when the message is sent. > **Note:** Recurring messages that include multi-language [localized content](https://www.airship.com/docs/guides/messaging/messages/localization/) cannot be edited. 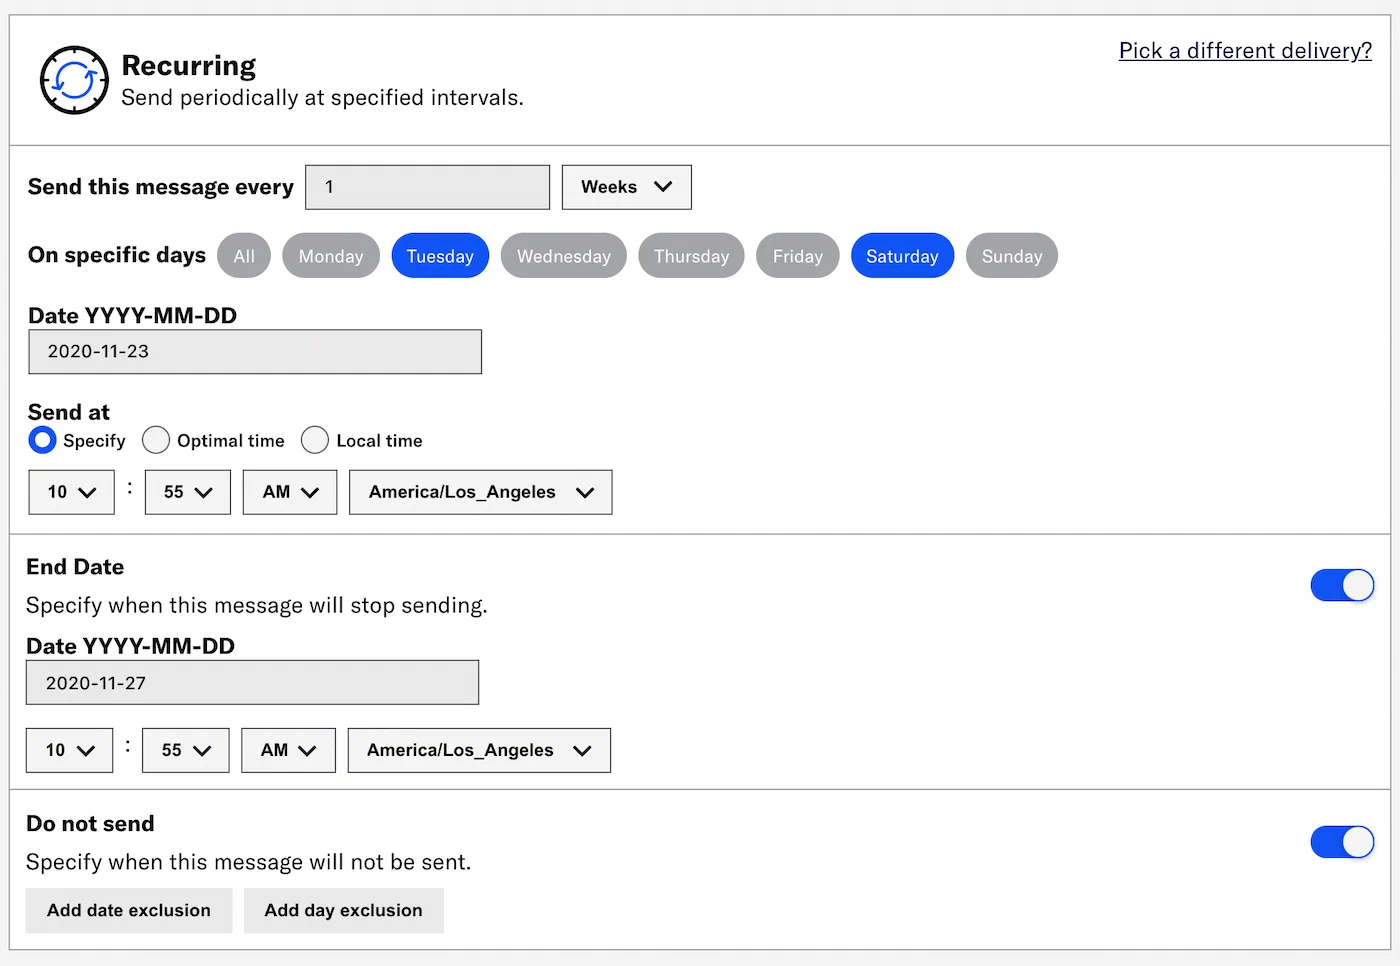 *Configuring delivery for a recurring message* 1. Specify the delivery interval by number of hours/days/weeks/months/years. For *weeks*, also specify which days of the week to send the message. 1. Set the initial date. This is the first day Airship will send your message. 1. Set the initial time. This is the time of day Airship will send each message. * **Specify:** Enter the time and time zone. * **Optimal time:** The message will send at each user's [Optimal Send Time](https://www.airship.com/docs/reference/glossary/#optimal_send_time). * **Local time:** Enter the time. 1. (Optional) Specify when to stop sending the message. 1. Enable *End date*. 1. Enter a date. 1. Set the time and time zone. 1. (Optional) Specify dates or days of the week when the message should not be sent. If you select the *hours* interval, you can also specify which hours of the day should be excluded. If you select the *weeks* interval, you can only specify which dates should be excluded. If the scheduled send falls during an excluded period, Airship waits to send the message until the next available valid send time. For example, if you scheduled delivery weekly on Thursdays but added the date for Thanksgiving Day as an exclusion, the next send would be the Thursday after Thanksgiving Day. 1. Enable *Do not send*. 1. Select **Add date exclusion**, enter a date, and repeat for additional dates. 1. Select **Add day exclusion** and select days. 1. Select **Add time exclusion** and set start and end times. ### Schedule In the Message composer and for A/B test variants, choose an exact time of day to send the message: 1. Enter a date in YYYY-MM-DD format and select the time and time zone. 1. (Optional) Select **Delivery By Time Zone** to deliver messages at the specified time in your audience's time zones. For example, a push notification scheduled for 9 a.m. will arrive for people on the east coast at 9 a.m. Eastern Time, in the midwest an hour later at 9 a.m. Central Time, then on the west coast two hours after that, at 9 a.m. Pacific Time. > **Note:** Messages are only delivered by time zone to channels that have a time zone set. > > **App and Web channels** have their time zone set automatically by the SDK. > > **Email, SMS, and Open channels** will only have a time zone if set through the channel registration API. To do so, enter a value for the `"timezone"` key in the request body. See: > * [Email: Register Users](https://www.airship.com/docs/developer/api-integrations/email/getting-started/#register-users) > * [SMS: Register SMS Users](https://www.airship.com/docs/developer/api-integrations/sms/getting-started/#register-sms-users) > * [Open Channels: Register a Channel to Your Open Platform](https://www.airship.com/docs/developer/api-integrations/open/getting-started/#register-a-channel-to-your-open-platform) > **Tip:** * A message delivered by time zone includes a Delivery by Time Zone section in its message report. See [View Message Detail](https://www.airship.com/docs/guides/reports/message/#message-detail) in *Message reports*. > * The API equivalent of Delivery By Time Zone is [Push to Local Time](https://www.airship.com/docs/developer/rest-api/ua/schemas/schedules/#schedulespec). ## Timing — Automations and Sequences Automations and Sequences support these timing settings: | Timing option | Description | | --- | --- | | **Send immediately** | Send the message after receiving the triggering event and after the delay period elapses. | | **[Schedule](#schedule)** | Send the message at a specific date and time after receiving the triggering event and after the delay period elapses. | | **[Send during available window](#send-during-available-window)** | Send the message within a specified time range after the trigger event. | Timing settings and application vary: * **Sequences**: Timing settings apply to the first message in a Sequence only. Subsequent messages in the Sequence are sent as additional conditions are met and according to their specified delay periods. * **Automations and Sequences**: Timing settings do not appear if using the Inactivity trigger. ### Schedule For Automations and messages in Sequences, Airship sends your message at the first appropriate scheduled time after receiving the triggering event and after the delay period elapses. All messages are delivered in the device's local time zone. Choose an exact time of day to send the message: 1. Select days of the week. 1. Select and drag the circle on the timeline to select delivery time. Hours are in 15-minute divisions. 1. (Optional) Select **Add Another** to create multiple schedules. ### Send during available window For Automations and Sequences, configure message delivery windows by specifying valid hours of the day and days of the week. Airship sends your message at the first appropriate time during the window after receiving the triggering event and after the delay period elapses. If no delay is configured and the triggering event falls within an available window, the message will send immediately. 1. Select days of the week. 1. Select and drag the circle on the timeline to constrain the delivery window. Hours are in 15 minute divisions. 1. (Optional) Select **Add Another** to create multiple windows. 1. Choose what happens if the triggering event occurs outside the available window. By default, if the triggering event (plus delay, if specified) falls outside of an available window, Airship sends the message during the next available window. Select **Do not send** if you want to discard the message instead of sending during the next available window. > **Tip:** Create multiple windows to support separate hours during weekdays versus weekends. ## Additional settings Additional settings may be available depending on your composer, project configuration, channel selection, and message configuration. ### Audience limit In the Message composer and for A/B test variants, and for App channels only, set a maximum number of audience members to send the message to. This setting can be useful for promotions with a limited number of coupons or other capped advertisements. For [Recurring delivery](#recurring), the limit applies to each message send. 1. Enable *Audience Limits*. 1. Set the audience size to between 100 and 1 million. > **Important:** Audience Limit is not supported for: > > * [Optimal Send Time](https://www.airship.com/docs/reference/glossary/#optimal_send_time) — This includes > * [Optimized](#optimize) delivery > * **Optimal time** for [Recurring](#recurring) delivery > * Delivery by time zone — This includes: > * **Delivery By Time Zone** for [Scheduled](#schedule) delivery > * **Local time** for [Recurring](#recurring) delivery > * [Audience Lists](https://www.airship.com/docs/reference/glossary/#audience_list) — This includes any [Segment](https://www.airship.com/docs/reference/glossary/#segment) that includes an Audience List > * [Message Center](https://www.airship.com/docs/reference/glossary/#message_center) messages — If Message Center is combined with a Push Notification and/or In-App Message, the limit is applied to the Push and In-App Message as long as other requirements are met. > * [Accounts that include Boost](https://www.airship.com/docs/reference/feature-packages/#account) ### Ban List If your project has a [Ban List](https://www.airship.com/docs/reference/glossary/#ban_list) enabled and its request URL includes send time variables, you can override their default values for this message only. Each one is listed under the heading **Default value for \Bypass your [Ban List](https://www.airship.com/docs/reference/glossary/#ban_list) when sending business-critical or otherwise required messages, such as privacy policy update notifications.
If you have a Ban List but do not see this option in the composer, enable it in your project settings. See Bypassing your Ban List in the Ban List documentation.
### Campaign categories*Campaign categories* are labels that group messages of a similar type or messaging strategy for aggregate reporting. Campaigns help you track the efficacy of both your individual messages and a messaging campaign as a whole. You can add a maximum of ten categories.
Enter a campaign category name, then select Add. Category names have a 64-character maximum.
For categories defined in message limits, its limit displays after the category. To override the limit, select the check box for Ignore limit for this message.
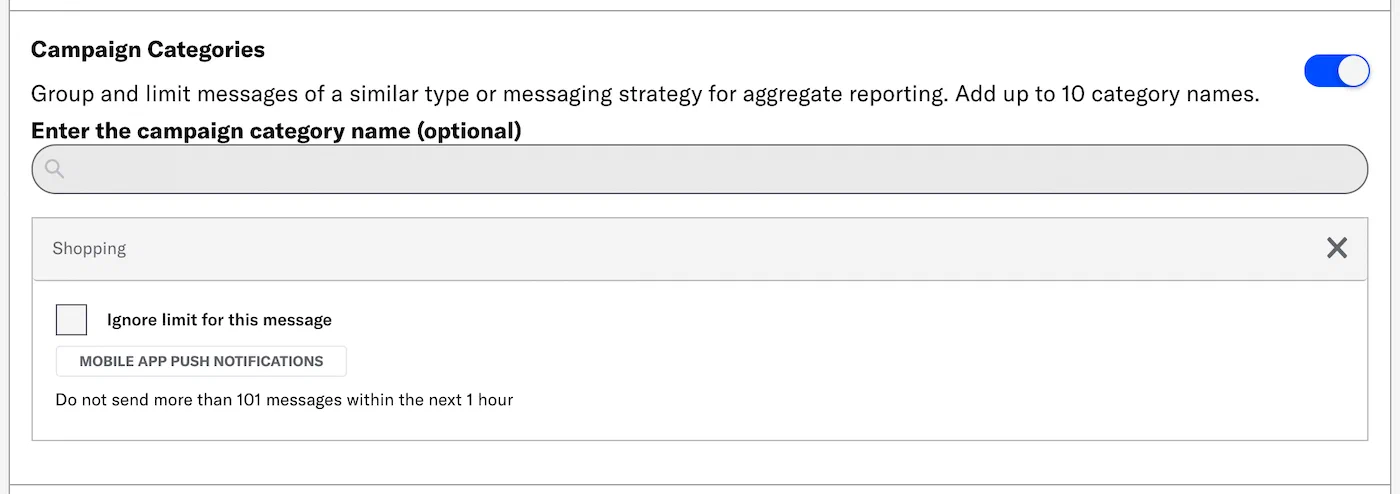 *Adding a campaign category that has a message limit* > **Tip:** Campaign categories are listed in the > [Message Detail](https://www.airship.com/docs/guides/reports/message/#message-detail) > section of Message Reports. ### Custom keys *Custom keys* are additional key-value pairs in your push notification payload for use by custom code in your app or website. You can use custom keys to pass additional campaign identifiers for analytics, pass user information to the device, control the look and feel of the app, provide image links, etc. By default, a custom key is sent to push notifications on all platforms, but you can choose platform-specific keys as well if your message is going out to more than one platform, e.g., one imageURL for iOS and another imageURL for Android. Select a platform, then enter the key and value. Click **Add Another** for additional keys. > **Note:** For Message Center messages or templates created using the [Interactive Editor](https://www.airship.com/docs/reference/glossary/#interactive_editor), a separate Custom Keys section is under **Message Center Options**. Configure those custom keys to set key-value pairs that apply specifically to your Message Center message. See [Custom Keys](#message-center-custom-keys) for Message Center. ### Expiration The *delivery expiration* option discards your message if it hasn't been delivered to a device within a specific period of time. Select and configure an option: * **Duration:** Enter the number of minutes, hours, or days past your defined send time to expire the delivery. * **Date & Time:** Enter the date and time when delivery attempts should cease. Expiration behavior per message type: | Message type | Expiration behavior | | --- | --- | | **Push notifications and Web push notifications** | If a device is online, the notification will be delivered immediately. If a device is offline, the push service for each platform preserves the notification and attempts to deliver it as soon as it comes online, up until the expiration date.The default expiration for push notifications without an expiration date is 30 days for APNs and 28 days for FCM.
For Web, if no expiration is set and a device is offline, the delivery service, e.g., Google or Mozilla, preserves the notification and attempts to deliver it as soon as it comes online, for a maximum of 28 days.
There is no way to remove a delivered push notification. | | **In-app messages** | Since in-app messages are delivered via a push payload, they will not be delivered past the expiration date if the user has been offline. In addition, Airship will not display an in-app message past the expiration date. | | **Message Center** | If you created the message using the Visual editor, its expiration is coupled with push notifications and in-app messages. | {class="table-col-1-30"} ### Ignore channel message limits Enable this option to override the project-level [Message Limits](https://www.airship.com/docs/reference/glossary/#message_limits), ensuring that your audience will receive your message even if they've reached the message limit. You may want to override message limits for important messages like breaking news, account alerts, or location proximity-based messages. Overriding message limits does not override [Sequence Rule Limits](https://www.airship.com/docs/reference/glossary/#rule_limits_sequence) or [Automation Rule Limits](https://www.airship.com/docs/reference/glossary/#rule_limits_event_option). ### Start and End Dates {#start-end} For Automations only, start and end dates define the times during which an automation can deliver messages to your audience. 1. Enable **Start Date** and/or **End Date**. 1. Set the time, time zone, and date. ### Throttle delivery In the Message composer and for A/B test variants, enable *Throttle Delivery* to set a delivery rate for the message. Enter the number of messages to be sent per second. The minimum rate is 100 messages per second. *Throttle Delivery* is only available for the following delivery options: *Send Now*, *Schedule*, and *Optimize*. **Not supported for Message Center.** You can change the rate after sending your message and also pause/resume or cancel delivery within 48 hours of send time. > **Important:** * Throttling must be enabled before sending the message. You cannot edit the message and enable it later. > *
If you combine Message Center with other App message types and pause or stop delivery within 48 hours of send time, delivery status change has no effect on Message Center delivery. Message Center messages will remain in the inbox until expiration, if set. You can also manually remove messages from the Message Center inbox.
> * If your use case requires a rate lower than 100 messages per second, [contact Support](https://support.airship.com) to request a different default rate for your project. 1. Go to **Messages**, then **Messages Overview**. 1. Change the message status: * Click **⏸ Pause** or **play Resume**. * Click ** Stop** to cancel delivery. You cannot resume a canceled message. 1. Change the throttle rate: 1. Click the expand icon ( ) for the message. 1. Click the edit icon ( ) next to **Throttle Delivery**. 1. Enter a new rate and click **Update**. ## Message Center These options are specific to Message Center messages and templates created with the [Interactive Editor](https://www.airship.com/docs/reference/glossary/#interactive_editor). ### Custom keys {#message-center-custom-keys} You can set [Custom Keys](https://www.airship.com/docs/reference/glossary/#custom_keys) that apply specifically to a Message Center message. Under **Message Center Options**, add a key and value. Select **Add Another** for additional keys. > **Tip:** If your Message Center is set up with [Named User](https://www.airship.com/docs/reference/glossary/#named_user) filtering, include a custom key with `named_user_id` as the key and the user's actual ID as the value. > > See information about filtering by Named User in the Message Center documentation for [SDK integrations](https://www.airship.com/docs/developer/sdk-integration/). > **Tip:** For messages created with the [Interactive Editor](https://www.airship.com/docs/reference/glossary/#interactive_editor), you can use custom keys to preview lines, which appear below the message title in the inbox. > > You must perform some development work before your app can display preview lines in the inbox. > > Use `com.urbanairship.listing.field1` and `com.urbanairship.listing.field2` as keys representing preview lines 1 and 2. In the **Value** field for each key, enter the text that you want to show on each line of the preview. > > 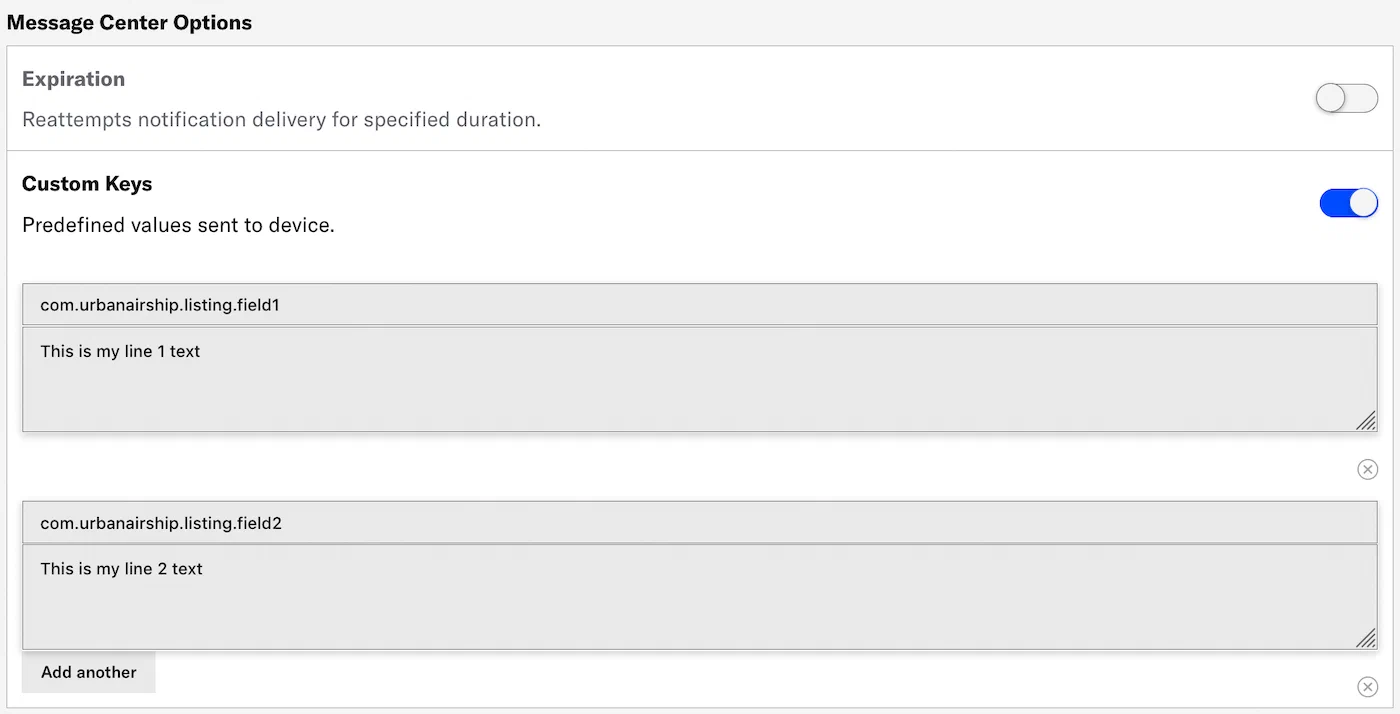 > > *Adding custom keys for Message Center preview lines* > > You can personalize preview lines using [Handlebars](https://www.airship.com/docs/reference/glossary/#handlebars) to reference [Attributes](https://www.airship.com/docs/reference/glossary/#attributes) or [Custom Event](https://www.airship.com/docs/reference/glossary/#custom_event) properties. ### Expiration {#message-center-expiration} The Expiration setting for Message Center removes the message from users' inboxes. This may be helpful if the message represents a coupon, sale, or specific event and needs to expire on a specific date and time, or after a period of time has elapsed (duration). Under **Message Center Options**, select one of: * **Duration:** Enter the number of minutes, hours, or days past your defined send time to remove the message. * **Date & Time:** Select the date, time, and time zone when the message should be removed. 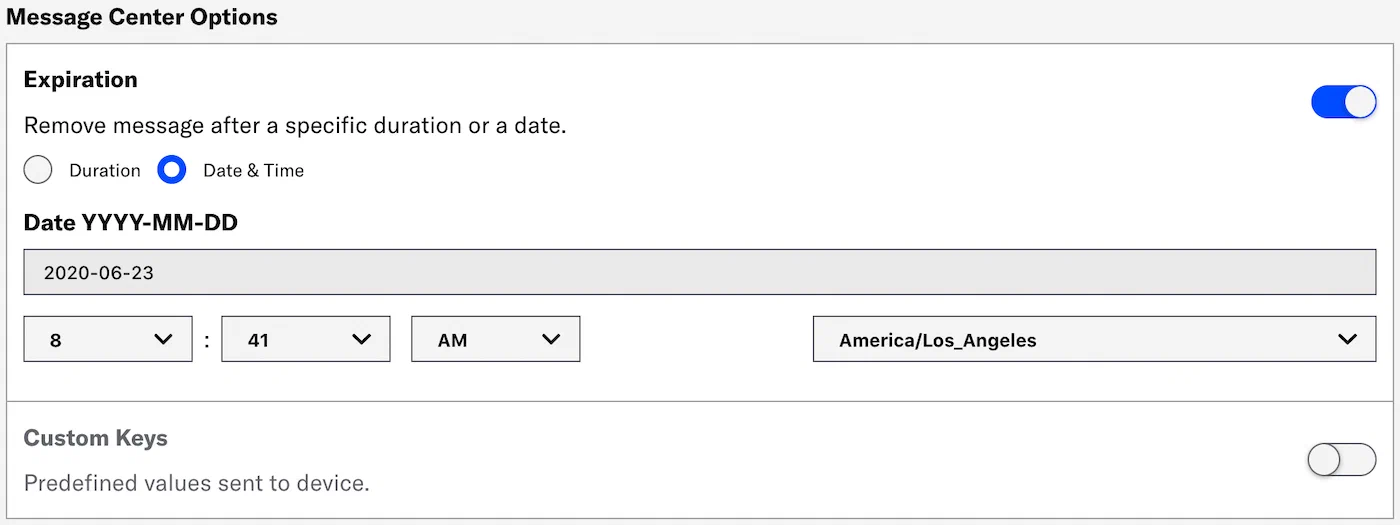 *Setting Message Center expiration in delivery options* > **Note:** If you created your Message Center message using the Visual editor, instead of setting an expiration, go to the Options tab and set when to remove it from the Message Center. See [Configuration steps](https://www.airship.com/docs/guides/messaging/editors/visual/#configuration-steps) in *The Visual editor*. ## SMS These options are specific to SMS messages. ### Expiration (SMS) {#sms-expiration} The *delivery expiration* option discards your message if it hasn't been delivered to a device within a specific period of time. 72 hours is the default. Enter the number of hours, between 1 and 72. ## iOS These options are specific to iOS messages. ### Background processing The *background processing* option wakes the app and give it some running time to perform work, such as downloading content for future display. Data included in the push notification is available for background processing, e.g., to send URLs and then download that content. **iOS only.** ### Badge Update the recipient device's app *badge*. A *badge* is the numeric display on an app icon that typically indicates the number of unread messages. The badge count can be used as an engagement strategy, notifying users about new content and driving them to open your app. By default messages automatically increment the badge number, but you can specify an exact number, e.g., +3, +12, -3. Select *Increment by 1* or *Specify*. *Specify* requires a value in the text field. > **Note:** Badge functionality requires the device to be opted in to push notifications. ### Group A *delivery group* uses an identifier to group related notifications from your app into a single stack. Notifications bearing the same group identifier are stacked together. **iOS 12 and later only.** Enter an identifier in the text field. > **Note:** Remember to use the same identifier for subsequent messages you wish to group. ### Interruption level Determine the degree of interruption a user experiences from a push notification. Each level has a different impact on the user's experience, depending on their Focus settings. The default level is *Active*. Select *Passive*, *Time Sensitive*, or *Critical*. For *Critical*, also specify the alert volume level, at 10% increments. | Interruption level | Overrides scheduled delivery | Breaks through Focus | Supports sounds/vibration | Overrides ring/silent switch | iOS minimum | |---|---|---|---|---|---| | Active (default) | No | No | Yes | No | n/a | | Passive | No | No | No | No | 15 | | Time Sensitive | Yes | Yes | Yes | No | 15 | | Critical | Yes | Yes | Yes | Yes | 12 | > **Important:** * Critical alerts require: > 1. A special entitlement issued by Apple. > 1. Feature enablement by Airship. Contact your account manager or Support if you have the Apple entitlement and want to use critical alerts with Airship. > * Critical alerts must be allowed by a user on their device. ### Mutable content The *mutable content* option allows a notification’s content to be changed or downloaded before delivery. This feature is automatically enabled if media is defined in the message's *Optional Features » Media* settings. **iOS 10 and later only.** ### Relevance score The relevance score is one of multiple factors used by Apple to determine which push notifications are featured more prominently within the *Notification summary*. Use this setting to override the default value of 0. iOS 15 and later only. Set a value between 1 and 10. ### Sound Play a custom *sound* when your audience receives a message. The sound file that you specify must be bundled with your app by your app developer. Enter "default" to use your audience's default system notification sound or the name of the sound file that you want to play, for example "beep.caf". See [Configure Notification Options](https://www.airship.com/docs/developer/sdk-integration/apple/push-notifications/getting-started/#configure-notification-options) for more information. ## Android and Fire OS These options are specific to Android and Fire OS messages. ### Collapse key A *collapse key* is an optional delivery feature that acts as a grouping and replacement mechanism for messages with the same value. The Collapse Key comes into play when a device is offline (e.g. airplane mode) or in doze mode; if multiple messages are available with the same collapse key value when a device comes back online, it will display only the most recent message and discard previous that have the same value. Enter the key in the text field. ### Delivery priority The *delivery priority* option sends your notification using Firebase Cloud Messaging (FCM) high priority. When not enabled, messages default to normal priority. **Android only**. > **Note:** From [Set the priority of a message](https://firebase.google.com/docs/cloud-messaging/customize-messages/setting-message-priority) in Google's FCM documentation: > > **High priority.** FCM attempts to deliver high priority messages immediately even if the device is in Doze mode. High priority messages are for time-sensitive, user visible content. ### Notification category Send your message with a specific *notification category* instead of the default. A *notification category* is a grouping mechanism for messages in **Android versions 8.0 and later**, synonymous with [Android notification channels](/docs/developer/sdk-integration/mobile/push/advanced/android/#notification-channels). Users can set behaviors for each notification category within your Android app, determining the types of messages they are most interested in. Select a notification category. > **Note:** You must add your app's notification categories to your Airship project before you can select them for your messages. See: [Manage Android Notification Categories](https://www.airship.com/docs/guides/messaging/project/config/android-notification-categories/). ## Email These options are specific to email messages. ### URL parameters Override project-level email [URL Parameters](https://www.airship.com/docs/reference/glossary/#url_parameters) or add custom parameters for the current message only. Existing project-level parameters are listed onscreen for reference. 1. Under **URL parameters for this message**, enter a parameter name and value. * To override an existing parameter, enter its name and enter a new value. * To remove an existing parameter, enter its name and leave the value empty. * To add a parameter, enter a parameter name and value. 1. Select **+ Add parameter** to add more. ## Web These options are specific to web push notifications. ### Require interaction > **Important:** Support for the Require Interaction option varies by browser and OS. Enable **Require interaction** to require your audience to interact with your web notification to dismiss it from the browser window. Users may interact with a web notification in these ways: * Click the notification, which opens the message-defined URL, or the [default Action URL](https://www.airship.com/docs/developer/sdk-integration/web/getting-started/#airship-setup). * Dismiss the notification. * Click the Settings icon or button on the notification. ## API equivalents for delivery options Set Campaign Categories using the Campaigns object. See [Campaigns Object](https://www.airship.com/docs/developer/rest-api/ua/schemas/push/#campaignsobject) in the API reference. Start and End dates are for Automation only. You can set them using the `activation_time` and `deactivation_time` properties in the Pipeline object. See [Pipeline Object](https://www.airship.com/docs/developer/rest-api/ua/schemas/pipeline-objects/#pipelineobject) in the API reference. These options can be set using [Platform Overrides](https://www.airship.com/docs/developer/rest-api/ua/schemas/platform-overrides/): | Composer option | API | | --- | --- | | Background processing1,2 | `content_available` | | Badge2 | `badge` | | Collapse key (Fire OS) | `consolidation_key` | | Collapse key (Android) | `collapse_key` | | Custom keys | `extra` | | Delivery priority3 | `delivery_priority` | | Expiration | `expiry` | | Group2 | `thread_id` | | Interruption level2 | `interruption_level` | | Mutable content1,2 | `mutable_content` | | Notification category3 | `notification_channel` | | Relevance score2 | `relevance_score` | | Require interaction4 | `require_interaction` | | Sound2 | `sound` | | URL parameters5 | `url_parameters` | 1. Automation only