# Create a message

Use the Message composer to send a single message to any channel.

To get started, select the **Create** dropdown menu (
), then select **Message**. Next, enter a message name and save it. Select the gear icon () to [flag it as a test](https://www.airship.com/docs/guides/messaging/manage/flag-as-test/).

After completing a step, select the next one in the header to move on.

## Audience

In this step, define who you want to send your message to, and then set [Channel Coordination](https://www.airship.com/docs/reference/glossary/#channel_coordination) and which channel types to include. You can also filter channels in your audience based on user data.

> **Note:** For projects using the [channel-level segmentation system](https://www.airship.com/docs/guides/audience/segmentation/segmentation/#channel-level-segmentation), configure the Audience step using the following options, as well as [Localization](#localization). Channel coordination and channel conditions do not appear in those projects.
> 
> Enable the channels you want to send the message to, then choose a group of users. 
> 
> | Option | Description | Steps |
> | --- | --- | --- |
> | **All Users** | Your entire audience for the selected channels | n/a |
> | **Target Specific Users** | Audience members in a group you define | Use the same process as when building a [Segment](https://www.airship.com/docs/reference/glossary/#segment). |
> | **Test Users** | Members of a [Test Group](https://www.airship.com/docs/reference/glossary/#preview_test_groups) | Select a Test Group. |
> | **Upload Users** | Upload a list of users just before sending the message. | See [Bulk Sending](https://www.airship.com/docs/guides/audience/segmentation/bulk-sending/). |
> 
> ![Create a message](https://www.airship.com/docs/images/audience-open-channel_hu_21b4c95eb24528e8.webp)
> ![Create a message](https://www.airship.com/docs/images/user-selection_hu_40b8f411ae80120f.webp)
> 
> To make this audience eligible for [retargeting](https://www.airship.com/docs/guides/audience/segmentation/send-retargeting-message/), enable **Generate retargeting segments**. This option is only available when your only selected channels are app platforms, Web, and Email.
>    ![Create a message](https://www.airship.com/docs/images/generate-retargeting-segments_hu_7f8f93812585e302.webp)


### Audience selection

Choose a group of users:

| User group | Description | Steps |
| --- | --- | --- |
| **Target by conditions** | Include only users who meet conditions you define based on user data. | Use the same process as when building a [Segment](https://www.airship.com/docs/reference/glossary/#segment). |
| **Test group** | Include the members of a [Test Group](https://www.airship.com/docs/reference/glossary/#preview_test_groups). | Select a Test Group. |
| **Upload a list** | Upload a list of users just before sending the message. This option is only available when you have one of Email, SMS, or an Open Channel enabled in **Channel coordination**. | See [Bulk Sending](/docs/guides/audience/segmentation/bulk-sending). |
| **All users** | Include all users in your project for the selected channels. | n/a |

### Channel coordination

<p>First, select a [Channel Coordination](https://www.airship.com/docs/reference/glossary/#channel_coordination) strategy:</p>
<ul>
<li><strong>Fan Out</strong> targets a Named User on all the channels they are opted in to, maximizing the chances they receive your message.</li>
<li><strong>Last Active</strong> targets a Named User on the opted-in channel they used most recently.</li>
<li><strong>Priority Channel</strong> targets a Named User on the first channel they are opted in to, in the priority order you set.</li>
</ul>
<p>Then, enable the channel types to include in your audience. For Mobile Apps, also select from the available platforms. For Priority Channel, also drag the channel types into priority order.</p>

### Channel conditions

<p>Use <strong>Channel conditions</strong> to filter which channels are included in the audience. A channel must meet the conditions to remain in the audience.</p>
<p>For example, if your audience includes users with app, email, and SMS channels, and you set a channel condition requiring membership in an email Subscription List:</p>
<ul>
<li>Only email channels that meet that condition would remain in the audience.</li>
<li>All app and SMS channels would be excluded.</li>
</ul>
<p>To set channel conditions, use the same process as when building a [Segment](https://www.airship.com/docs/reference/glossary/#segment). You can use the following data in your conditions:</p>
<ul>
<li>[Autogroup](https://www.airship.com/docs/reference/glossary/#autogroup)</li>
<li>[Channel ID](https://www.airship.com/docs/reference/glossary/#channel_id)</li>
<li>[Device Properties](https://www.airship.com/docs/reference/glossary/#device_properties)</li>
<li>[Events](https://www.airship.com/docs/reference/glossary/#events)</li>
<li>[Lifecycle List](https://www.airship.com/docs/reference/glossary/#lifecycle_list)</li>
<li>[Predicted to Churn status](https://www.airship.com/docs/reference/glossary/#predicted_to_churn)</li>
<li>[Subscription List](https://www.airship.com/docs/reference/glossary/#subscription_list)</li>
<li>[Tag](https://www.airship.com/docs/reference/glossary/#tag) in the <code>device</code> [Tag Group](https://www.airship.com/docs/reference/glossary/#tag_group) — See <a href="https://www.airship.com/docs/guides/audience/tags/#device-tags">Primary device tags</a>.</li>
<li>[Uploaded (Static) List](https://www.airship.com/docs/reference/glossary/#uploaded_list)</li>
</ul>
<p>Selected Lifecycle, Subscription, and Uploaded Lists must contain Channel IDs or Named Users as the identifier, not a mix of the two.</p>

### Localization

Enable **Localization** if you want to provide different content to app and web users depending on their language and country. See [Localization](https://www.airship.com/docs/guides/messaging/messages/localization/).

## Content

Configure the message content per enabled channel. See [Content by channel](https://www.airship.com/docs/guides/messaging/messages/content/) and [Localization](https://www.airship.com/docs/guides/messaging/messages/localization/).

![Create a message](https://www.airship.com/docs/images/composer-content-app_hu_28a88387be2dfd33.webp)

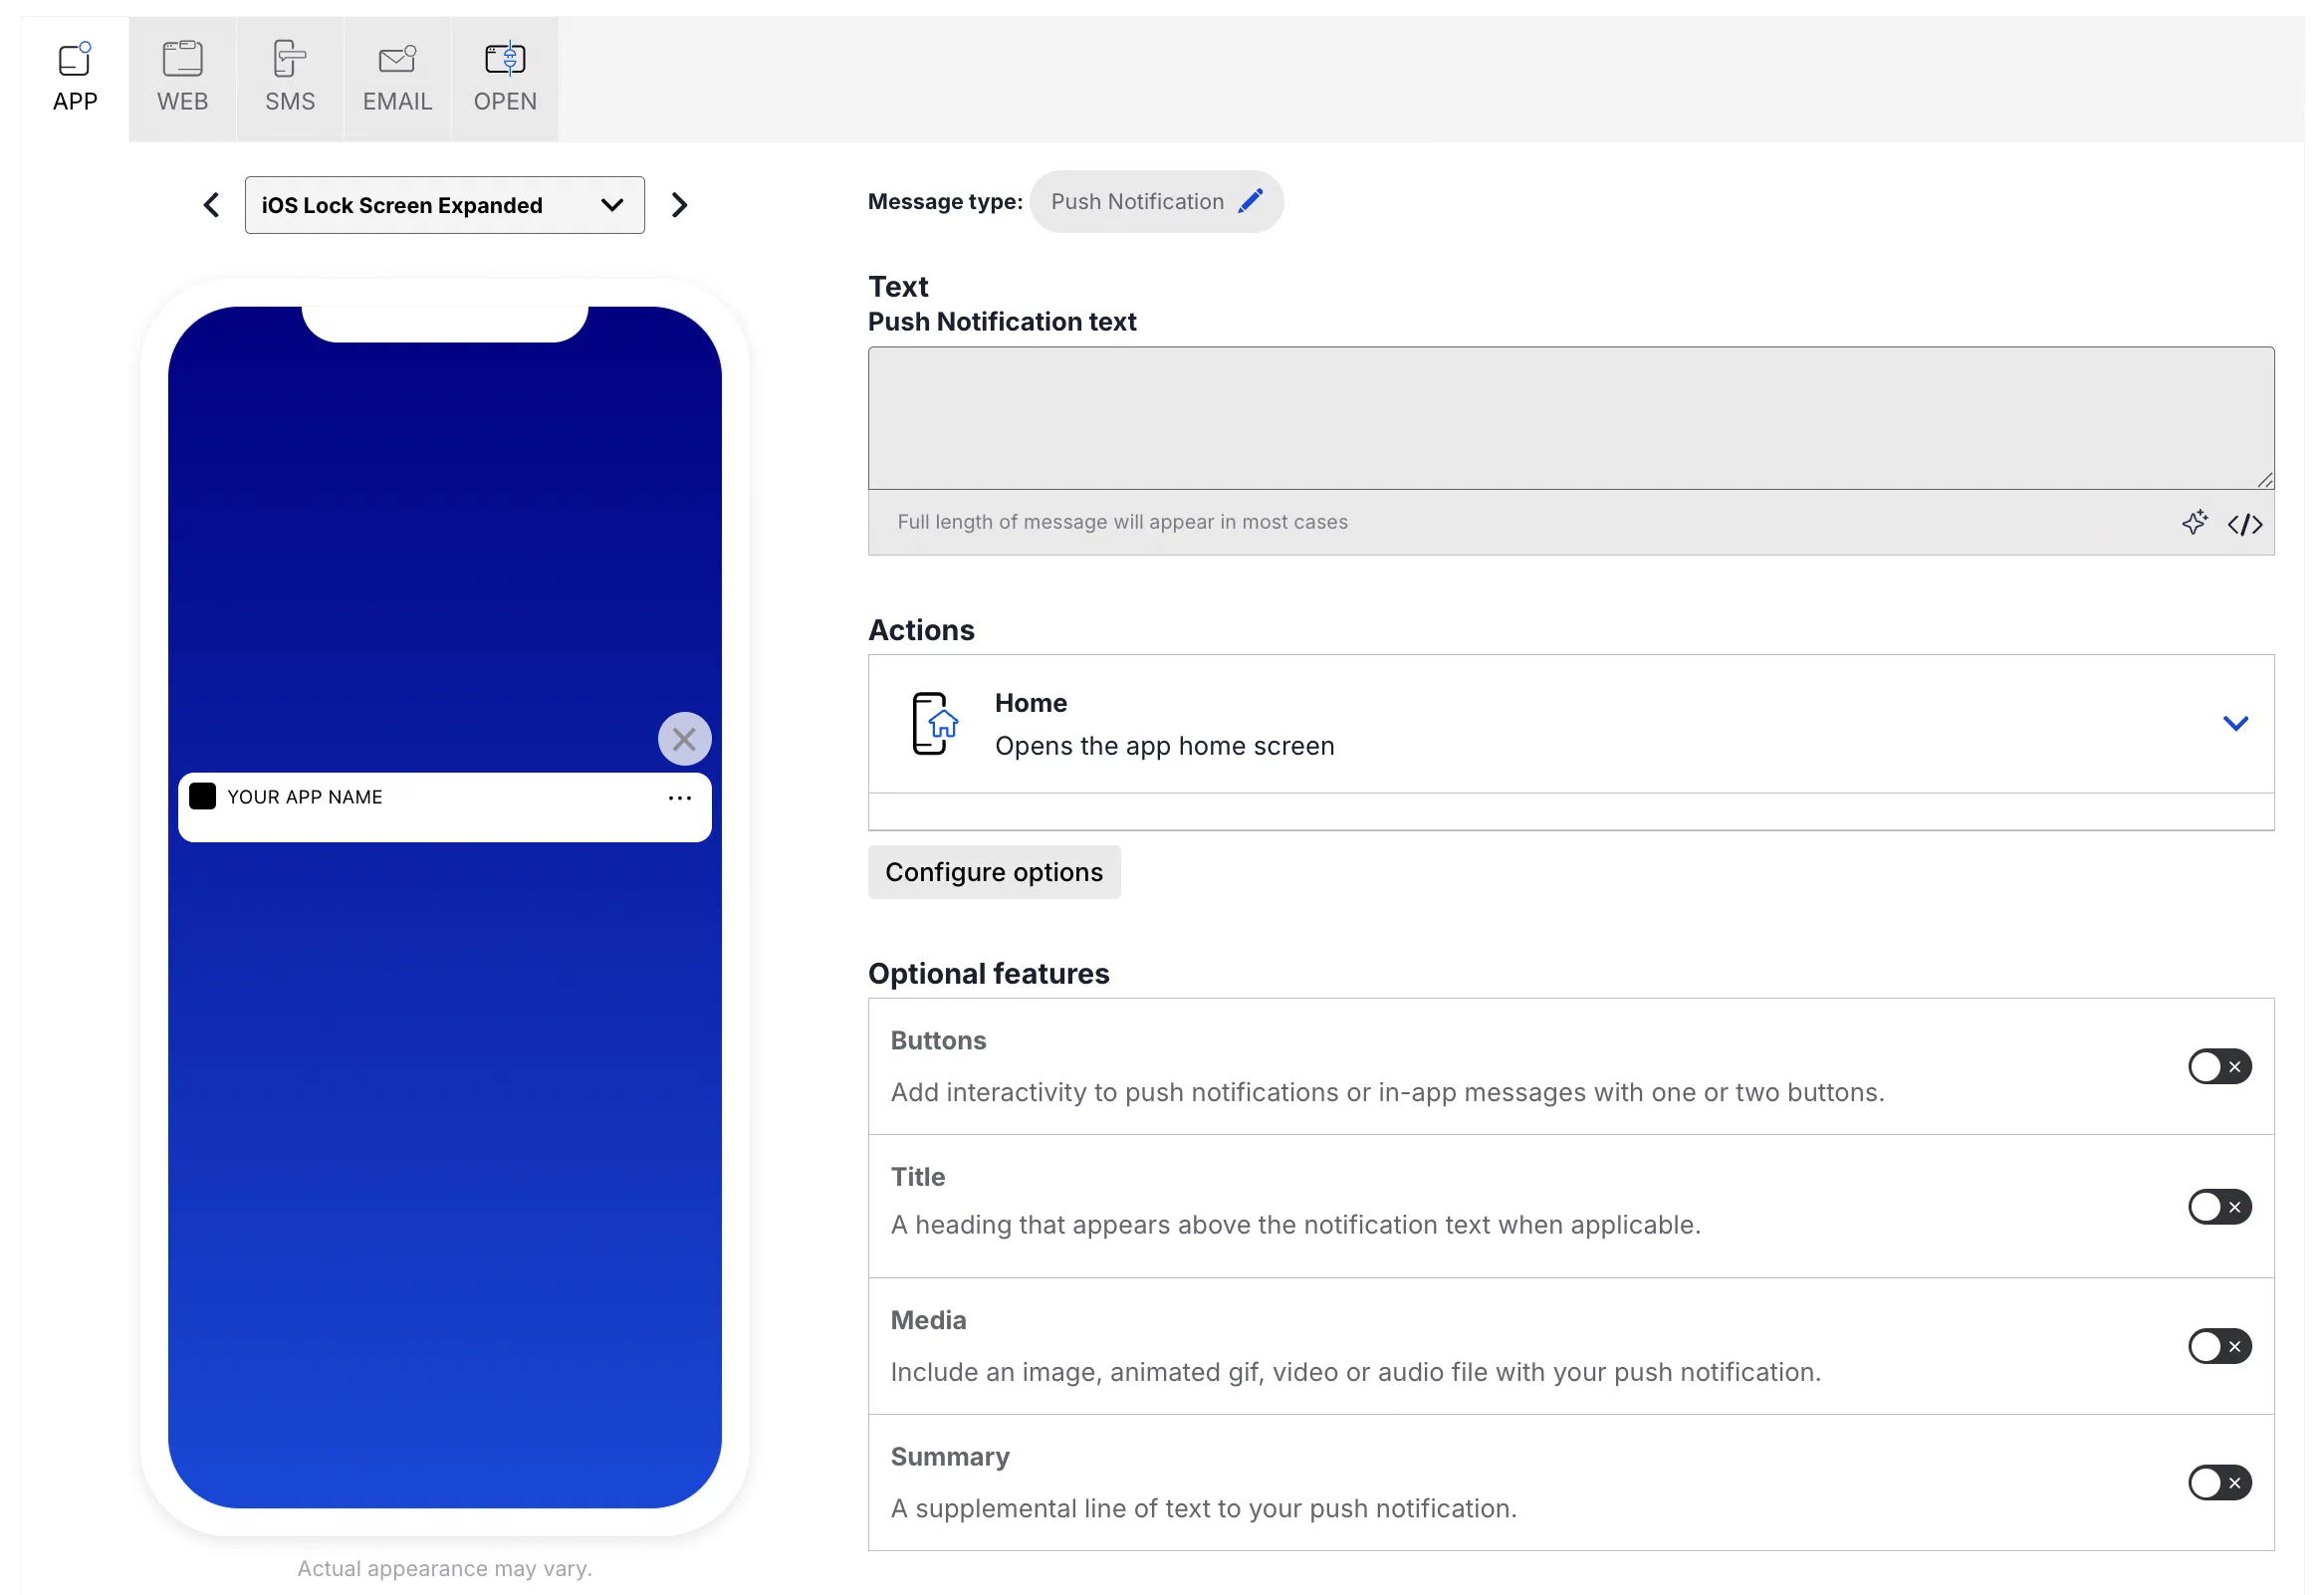
## Delivery

Configure [delivery](https://www.airship.com/docs/guides/messaging/messages/delivery/delivery/).

![Create a message](https://www.airship.com/docs/images/message-delivery_hu_eb18bad8a57fe15b.webp)

## Review {#message-review}

Review the device preview and message summary. Select the arrows to page through the various previews. The channel and display type dynamically update in the dropdown menu above. You can also select a preview directly from the dropdown menu. If you want to make changes, select the associated step in the header, make your changes, then return to Review.

If you chose **Target by conditions** in the Audience step, select **Generate audience count** to see the following:
   * The total number of [Contacts](https://www.airship.com/docs/reference/glossary/#contact) and channels in the audience
   * The total number of channels and the number of opted-in channels for each [Channel (Engagement)](https://www.airship.com/docs/reference/glossary/#channel_engage) and mobile app platform

   You can also generate the audience count for the [**Target Specific Users** legacy option](#audience), but it does not include the Contacts count.

If you chose **Upload a list** or **Upload Users** in the Audience step, select **Upload & Send** and select your file. Uploaded merge field names will be verified against the merge fields set in the Content step. For more information, see [Bulk sending](https://www.airship.com/docs/guides/audience/segmentation/bulk-sending/).

Send a test message to verify its appearance and behavior on each configured channel. The message is sent to your selected recipients immediately, and it appears as a test in [Messages Overview](https://www.airship.com/docs/reference/glossary/#messages_overview).

1. Select **Send Test**.<ol>
<li>
<p>Under <strong>Test audience</strong>, enter at least one [Named User](https://www.airship.com/docs/reference/glossary/#named_user) or [Test Group](https://www.airship.com/docs/reference/glossary/#preview_test_groups) and select from the results. If your message includes email, you can also search for email addresses. If no matches appear for an address, you can select <strong>Create channel for &lt;address&gt;</strong>, and the channel will be registered for your project and opted in to transactional messaging.</p>
<p>Users in an active [Holdout Experiment](https://www.airship.com/docs/reference/glossary/#holdout_experiment) will not receive a test message. You can view a user&rsquo;s current holdout group status and history when <a href="https://www.airship.com/docs/guides/audience/contact-management/#viewing-channel-details">viewing their channel details in Contact Management</a>.</p>
</li>
<li>
<p>(If your message contains [Handlebars](https://www.airship.com/docs/reference/glossary/#handlebars)) Under <strong>Personalization</strong>, select and configure a personalization data source:</p>
<table>
  <thead>
      <tr>
          <th>Data source</th>
          <th>Description</th>
          <th>Steps</th>
      </tr>
  </thead>
  <tbody>
      <tr>
          <td><strong>Test message recipient</strong></td>
          <td>The message will be personalized using information associated with each test audience member.</td>
          <td>n/a</td>
      </tr>
      <tr>
          <td><strong>Preview Data tool</strong></td>
          <td>The message will be personalized using the data currently entered in the <a href="https://www.airship.com/docs/guides/personalization/previewing/">Preview Data tool</a>. The same values will apply to all test message recipients. You can also manually edit the JSON.</td>
          <td>(Optional) Edit the JSON data.</td>
      </tr>
  </tbody>
</table>
</li>
<li>
<p>Select <strong>Send</strong>.</p>
</li>
</ol>

Select **Send Message** or **Schedule Message**.