# Email channel content
Learn about Email channel messages and how to configure their content.
# Email content
> Send messages to your email channel.
See also the [Email](https://www.airship.com/docs/guides/features/messaging/email/) feature guide.
## Creating content
When creating messages, you configure its appearance in the Content step. In the Delivery step, you can configure content-related features that do not affect the appearance of the message.
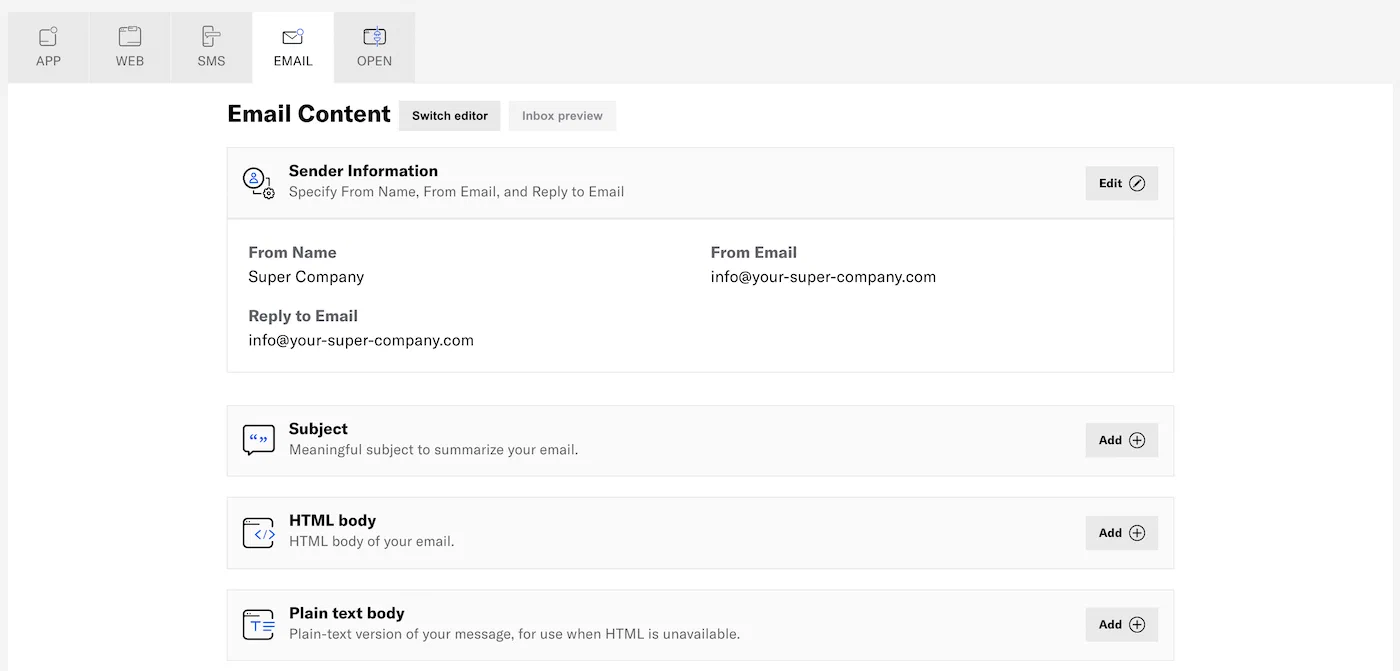
In the *Content* step, click **Add content**. Now you can configure the body of the message:
* For each section, click **Edit
** or **Add +**, make your changes, then click **Done**.
Merge fields can be included in HTML and plain text content if you chose Upload Users in the Audience step.
* If your message includes [Handlebars](https://www.airship.com/docs/reference/glossary/#handlebars), you can preview how the content will appear. See [Previewing personalized content](https://www.airship.com/docs/guides/personalization/previewing/).
*Configuring email content*
1. (Optional) Edit sender information:
| Setting | Description | Steps |
| --- | --- | --- |
| **From Name, From Email, and Reply to Email** | The name and email addresses to use in the message header. They also appear in the user's email client.The **From Name** and the usernames in the **From Email** and **Reply to Email** addresses support personalization using [Handlebars](https://www.airship.com/docs/reference/glossary/#handlebars). The username is what appears before the @ symbol in the email address. See [About Personalization](https://www.airship.com/docs/guides/personalization/about/). | Edit the fields and select from available domains for the email addresses. For **Reply to Email**, leave field blank if replies should go to the address already entered in **From Email**. |
| **Transactional** | If the message is triggered by a user's action such as a password reset request, opt-in, shopping receipt, etc., you can designate it as transactional, and optionally include an [unsubscribe link](https://www.airship.com/docs/guides/messaging/messages/content/email/email-unsubscribe-links/). See [Commercial vs. Transactional Email](https://www.airship.com/docs/developer/api-integrations/email/commercial-transactional/)
The Content step is considered incomplete until an unsubscribe link is provided in the message body or the message is designated as transactional in Sender Information. | Enable to designate the message as transactional. |
| **Bypass Opt-in Status** | Sends the message to audience members even if they have opted out of transactional messages. This option appears if **Transactional** is enabled.
Use for business-critical emails only. See [Opt-in and Opt-out Requirements](https://www.airship.com/docs/developer/api-integrations/email/commercial-transactional/#opt-in-reqs) in *Commercial vs. Transactional Email*. | Enable to send the message to users who opted out of transactional messages. |
| **Open and Click Tracking** | Records an event when the email is opened and/or links are clicked. Only HTTP and HTTPS links are tracked. Enabled by default.
When enabled, opens and clicks are tracked for all channels that have not been opted out. When disabled, opens and clicks are not tracked for any channels. See [Contact Management](https://www.airship.com/docs/guides/audience/contact-management/) to manage open and click tracking at the channel level. | Enable to track opens and clicks. |
| **BCC Addresses** | For accounts with email addresses registered with Airship for BCC capabilities. Sends a blind copy of the message to selected email addresses.
It's important to keep email volume in mind when using BCC. When you send a message with BCC enabled, your BCC addresses receive one email for each recipient of that message. | Select email addresses. |
{class="table-col-1-20 table-col-2-40"}
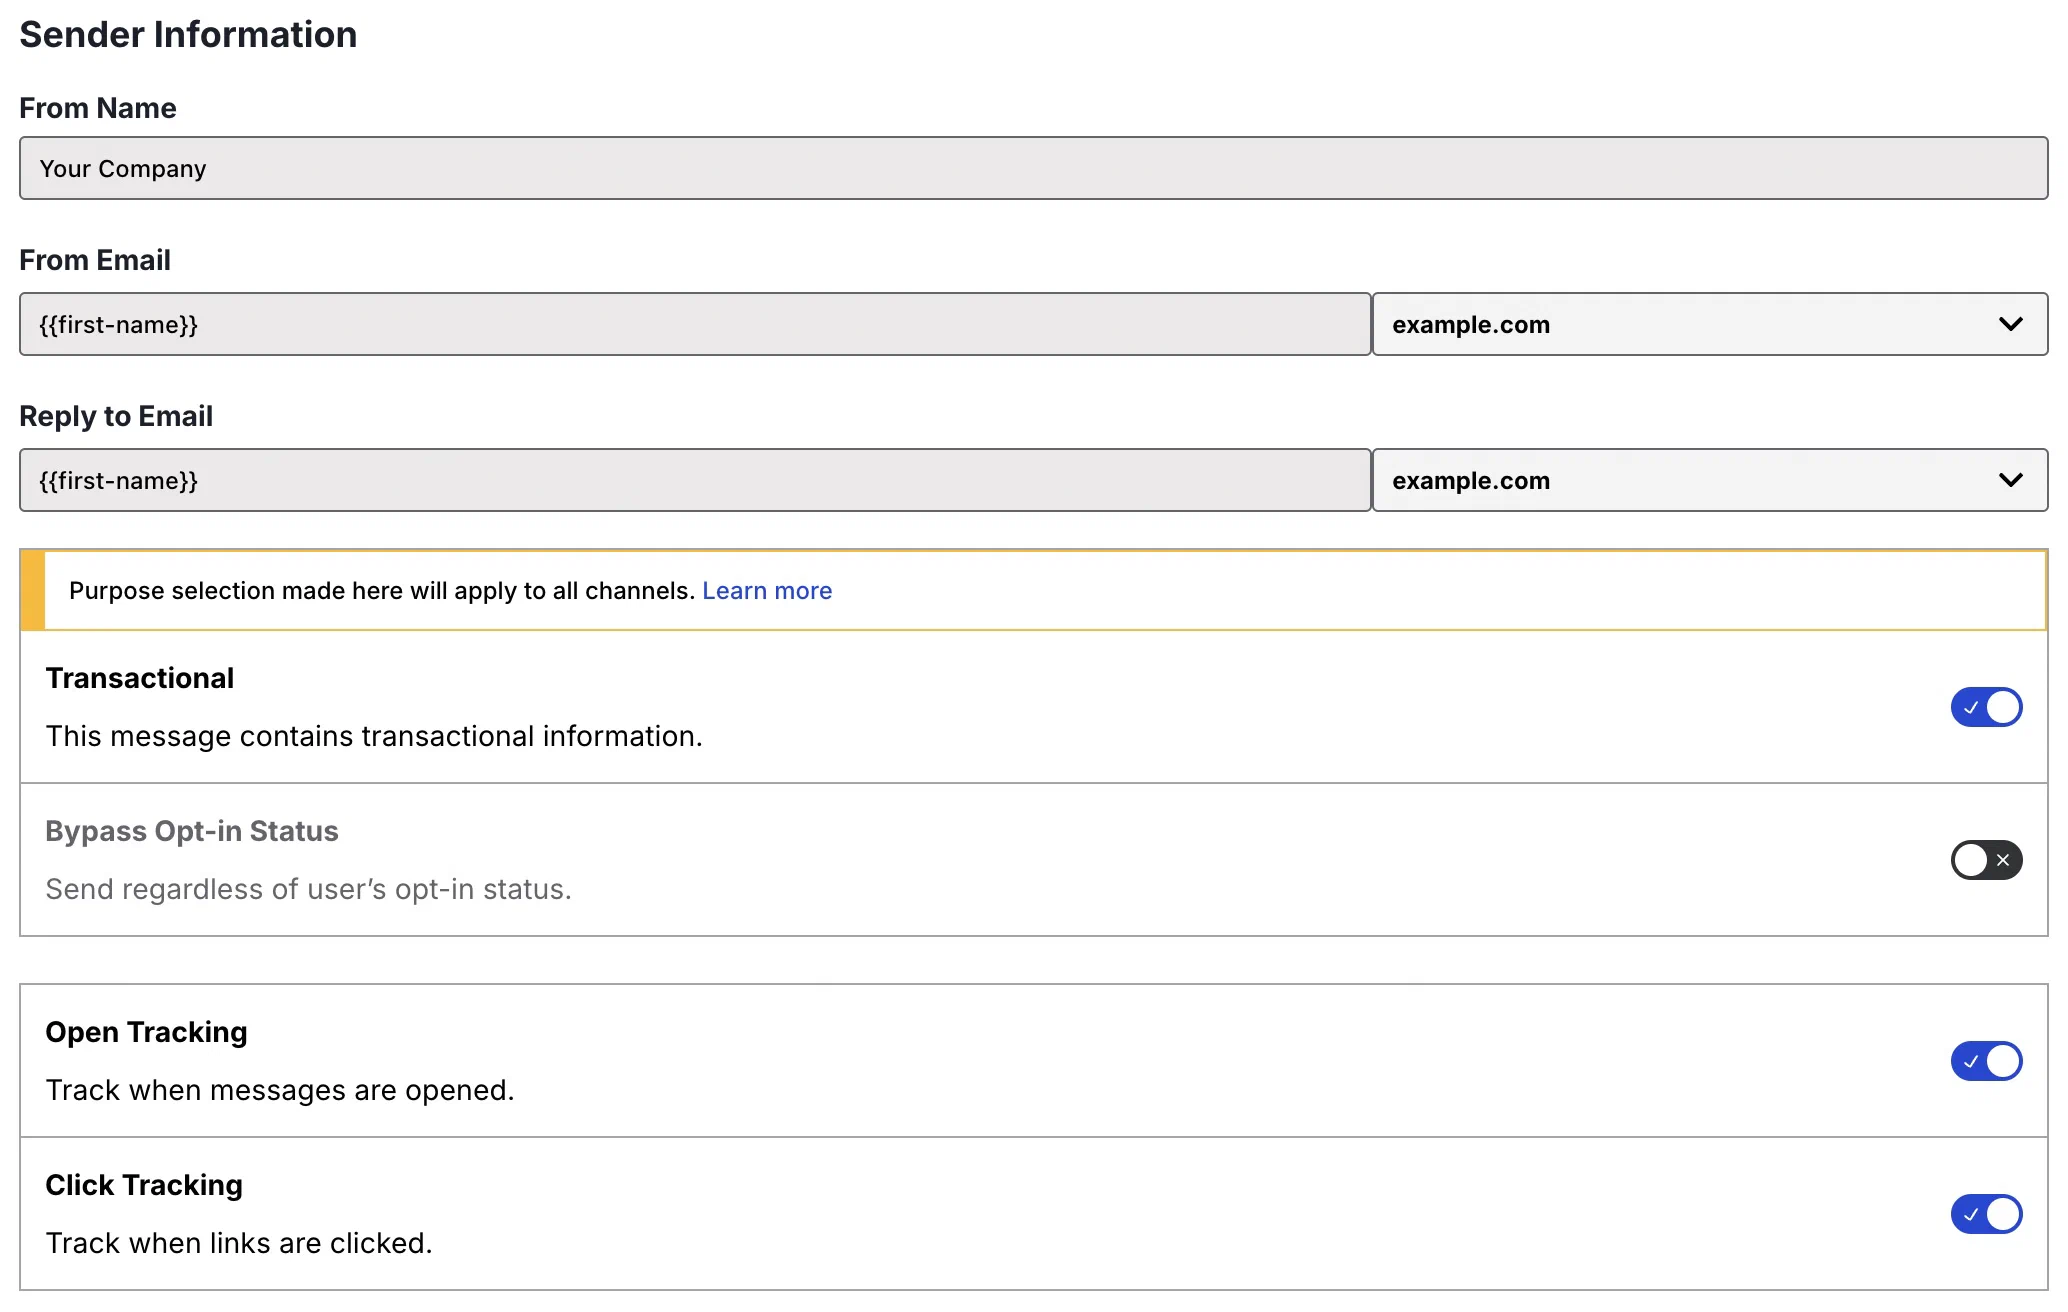
*Email sender information*
1. Add the *Subject*.
1. (Optional) Add the *HTML body*.
In the Interactive editor:
* To [reduce the HTML size](https://www.airship.com/docs/guides/messaging/messages/content/email/email/#size-limit-and-html-minification), select **Settings** in the sidebar, and then enable **Minify HTML**.
* After selecting **Done**, choose whether to save the HTML body only or [also generate the plain text body](https://www.airship.com/docs/guides/features/messaging/email/#plain-text-generation).
1. Add the *Plain text body* or edit if populated in the previous step.
1. (Optional) [Preview your email](#inbox-previews) in different clients:
- Click Inbox preview.
- Select from the lists of browser, desktop, and mobile clients, then click Generate previews.
- Click a thumbnail to see the full version. Click the close icon (×) to close and choose another preview.
- (Optional) To add/remove clients, click Reselect and generate previews and start over.
- When you are finished with inbox previews, select the close icon (×) to close the modal.
Now you are ready to complete the remaining steps in the composer. If your message requires overriding project-level [URL parameters](#url-parameters), set overrides in the Delivery step.
## Size limit and HTML minification
Message size should not exceed 100 KB, as email clients typically truncate content larger than 103 KB. If you need to provide content exceeding this limit, link from the email to web-hosted content.
When using the drag-and-drop option in Interactive editor for an email HTML body, you can [reduce the overall size of your content by up to 25%](https://www.airship.com/docs/guides/features/messaging/email/#html-minification).
First, [Contact Support](https://support.airship.com) to request enabling HTML minification for your project, and include your project [App Key](https://www.airship.com/docs/reference/glossary/#app_key). To access it, next to your project name, select the dropdown menu (▼), then **Project Details**.
After it's enabled, you can use it in the editor for your email messages and templates: Select **Settings** in the sidebar, and then enable **Minify HTML**.
When applying the setting to an existing message, you do not need to change anything else in the message before saving.
## Inbox previews
> **Note:** Inbox previews must be enabled for your account. Contact your Airship account manager if they do not appear for your projects.
Before sending your message, you can preview what it will look like in various email clients. After adding the HTML body in a message or template, you can select **Inbox preview** and choose from a list of browser, desktop, and mobile clients.
* Each individual browser, desktop, or mobile selection counts as 1 preview. **If you edit a message and then regenerate previews, the new previews are counted separately from the original previews.**
* Each Airship project includes a limited number of free previews per month. Additional previews are billed at the end of the month.
* Your preview count for the current month is displayed at the bottom of the inbox preview modal. The number of previews to generate appears after you select clients.
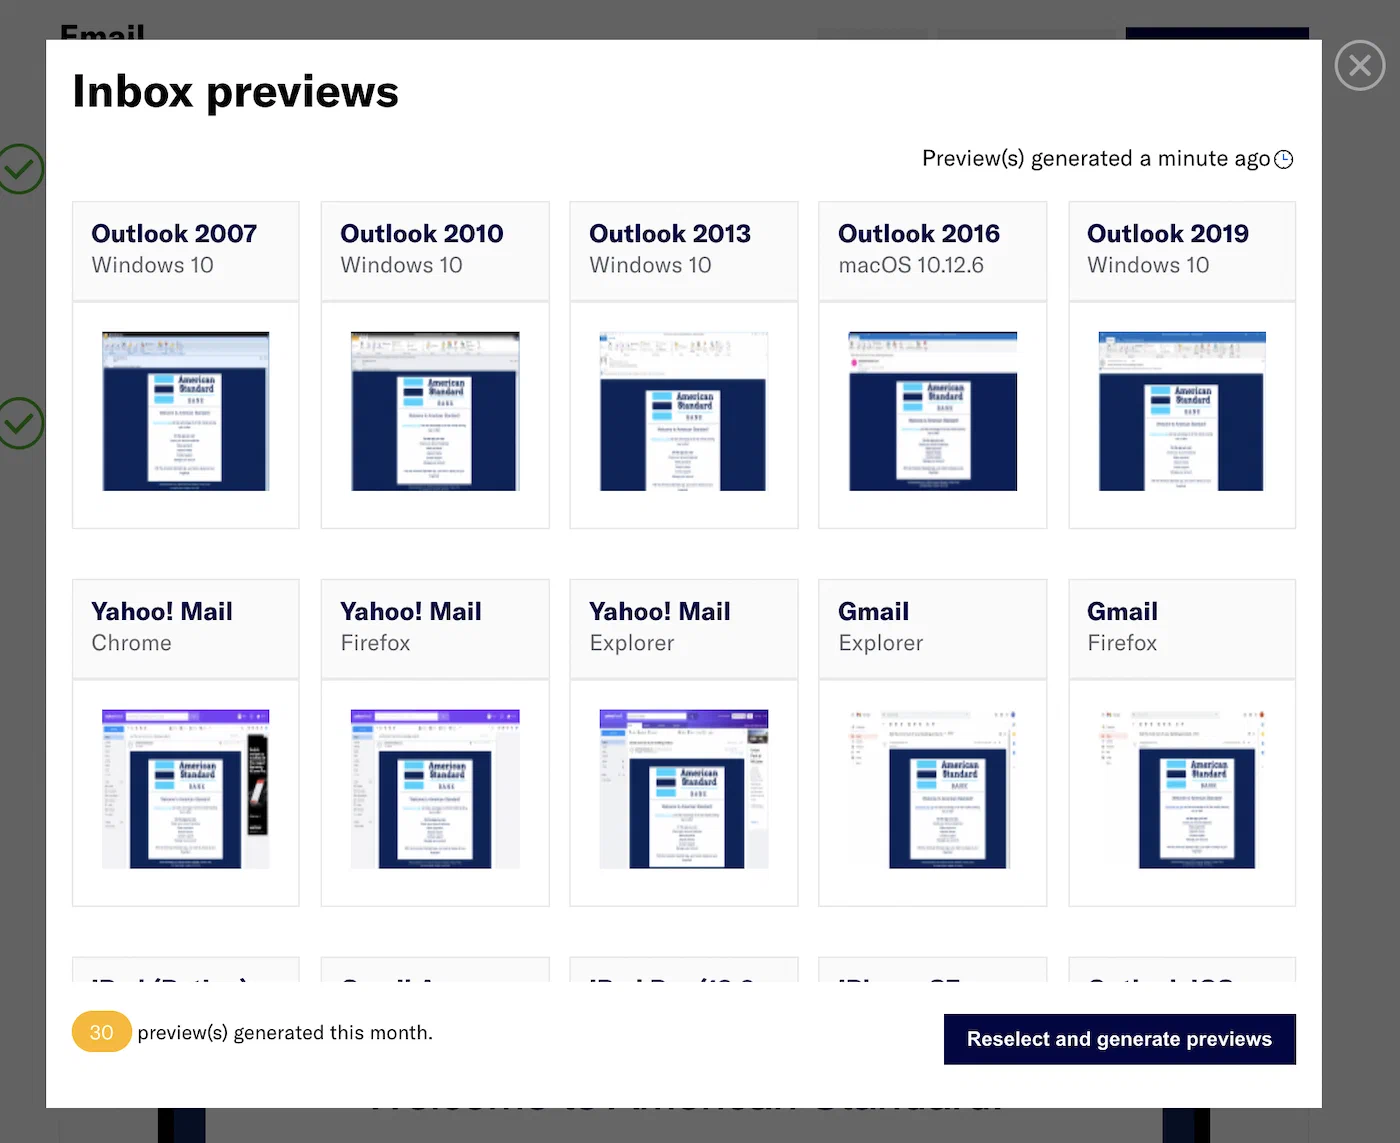
*Selecting email clients for inbox previews*
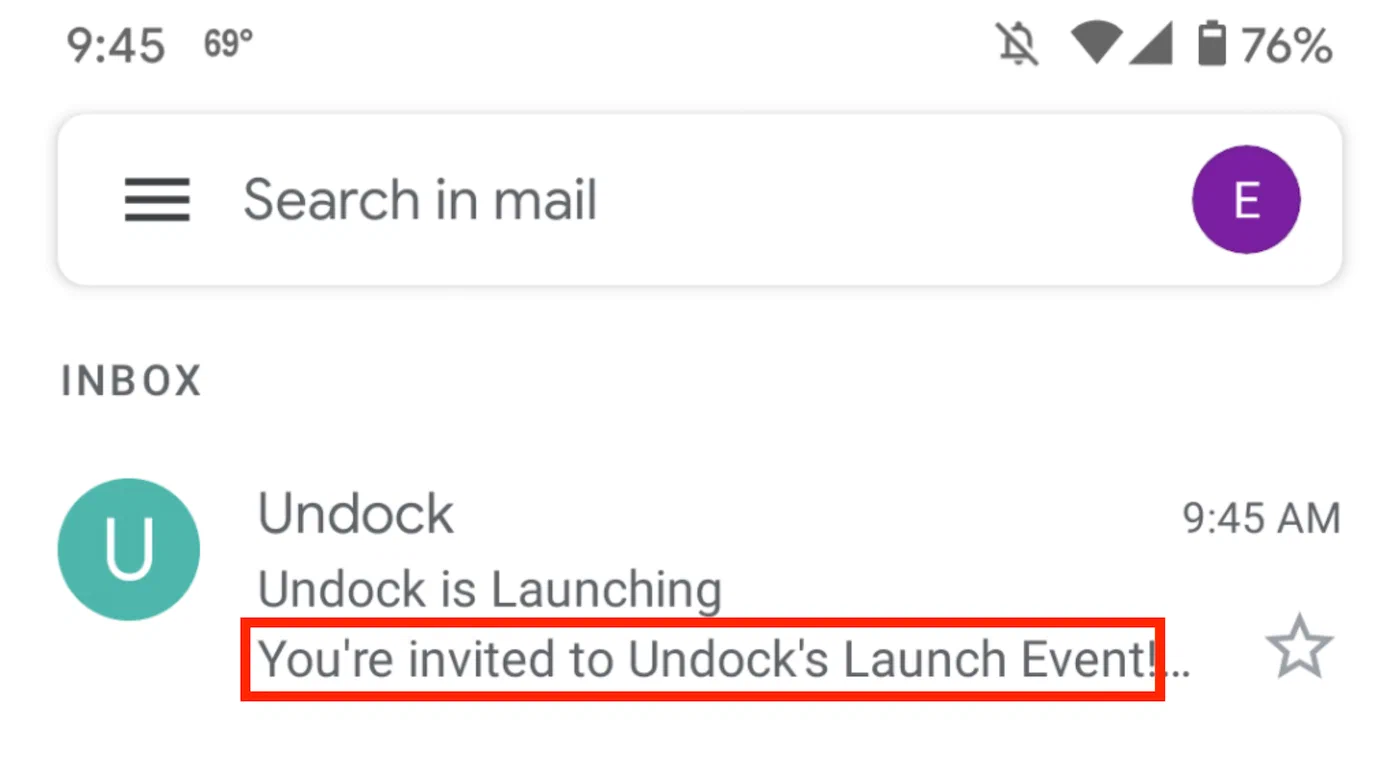
## Preheader text
*Preheader text* is a short line of text that displays after or below an email subject line in an inbox. You can also have the text appear in the message body. Preheader text is an easy way to expand on your subject line and improve email open rates. Not all email clients support preheader text. These examples show preheader text following the subject "Undock is Launching":

*Preheader text in a browser inbox*
*Preheader text in a mobile inbox*
While some clients will display more than 100 characters, we recommended 40-100 characters, to make sure your message is fully displayed in most email clients and browser windows. However, if most of your recipients are opening their messages on mobile devices, consider keeping your character count on the lower end, since many devices display an average of 35-50 characters.
* The Interactive editor supports preheader text in the inbox, or in both the inbox and the body of the message. See [Preheader text for email](https://www.airship.com/docs/guides/messaging/editors/interactive/styling-formatting/#preheader-text-for-email) in *Styling and formatting in the Interactive editor*.
* If providing your own HTML, you can add preheader text that appears in the **inbox only**. Add this snippet of code to the top of your HTML body, and edit "Preheader text goes here." with the message you'd like to use:
```html
Preheader text goes here.
```
## Link names
Name your email links to better understand their performance. You can add them manually using the HTML attribute `data-ua-linkname` on anchor tags or enter them when configuring actions in the [Interactive editor](https://www.airship.com/docs/guides/messaging/editors/interactive/about/).
When users follow links in an email, the URLs and related metrics appear in the Performance section of a message report. See [Email Performance](https://www.airship.com/docs/guides/reports/message/#email-performance) in *Message Reports*.
Link names also appear in [Real-Time Data Streaming](https://www.airship.com/docs/reference/glossary/#rtds) as the value for the `link_name` property in the `email_click` event body. See [Email click event](https://www.airship.com/docs/developer/rest-api/connect/schemas/custom-email-events/#emailclickevent) in the *Real-Time Data Streaming API* reference. In the [Performance Analytics](https://www.airship.com/docs/reference/glossary/#pa) Engagement Explore, you can use the Link Name [Dimension](https://www.airship.com/docs/reference/glossary/#pa_dimension). See [General data](https://www.airship.com/docs/guides/reports/analytics/email/#general-data) in the *Email in Performance Analytics* guide.
### Entering link names in messages
In layouts in the Interactive editor, you can provide a link name when configuring the actions Open website, Open unsubscribe page, and Confirm subscription. See [Email and link actions](https://www.airship.com/docs/guides/messaging/editors/interactive/actions/#email-and-link-actions) in *Actions in the Interactive editor*.
If you entered the link name "jawn" for URL `https://www.example.com`, it would appear in the message HTML like so:
```html
here
```
Use the above format to manually add link names to email HTML bodies.
### Creating link name Segments
When creating a [Segment](https://www.airship.com/docs/reference/glossary/#segment), use the `email_click` event, add the `link_name` property, and enter a link name as the property value.
## URL parameters
URL parameters are variables you can automatically append to all link URLs in emails. They function as tags for tracking campaign performance, both on the web and in an app. You can use platforms like Google Analytics to track user behavior after they've followed a link.
Add your own custom parameters and/or supply values for these [UTM parameters](https://en.wikipedia.org/wiki/UTM_parameters):
| UTM parameter | Description | Usage example |
| --- | --- | --- |
| utm_campaign | Identifies the purpose of the campaign or promotion | utm_campaign=winter_clearance |
| utm_content | Identifies what the user interacted with in the email, such as a button or a text link, and differentiates links that may direct to the same URL, as is commonly used in A/B testing | utm_content=sign-up-button |
| utm_medium | Identifies where a user found your URL | utm_medium=email |
| utm_source | Identifies the traffic source, which you can use to identify the type of email campaign | utm_source=newsletter |
| utm_term | Typically identifies search terms, but instead can be used to differentiate things like subject lines | utm_term=you-forgot-your-cart |
A full link could look like this: `https://example.com/utm_medium=email&utm_source=newsletter&utm_campaign=winter_clearance&utm_content=sign-up-button`.
URL parameters can be set at the project level and for individual messages. You can override project-level parameters per message as well. URL parameters already defined or hardcoded into your email links will not be overridden.
URL parameters are supported for the API and for messages created using the Message, A/B Test, Automation, and Sequence composers.
---
Names of custom parameters should be formatted according to your analytics platform requirements. Values for both UTM and custom parameters accept all characters and support [Handlebars](https://www.airship.com/docs/reference/glossary/#handlebars).
* Handlebars values are automatically [URL-encoded](https://www.airship.com/docs/guides/personalization/handlebars/basics/#url-encoding).
* You can use [message namespace properties](https://www.airship.com/docs/guides/personalization/sources/message-namespace/), event properties, and the `global_attributes` property in the [Push Object](https://www.airship.com/docs/developer/rest-api/ua/schemas/push/#pushobject) with Handlebars personalization.
* Handlebars support does not include stored [Attribute](https://www.airship.com/docs/reference/glossary/#attributes) values on channels and [Named Users](https://www.airship.com/docs/reference/glossary/#named_user).
Dynamic values can be appended or prepended to static text or used standalone. For example, you can set a custom value for `utm_content` as `newsletter-{{dateFormat $message.date pattern="yyyy-MM-dd"}}`, which will append `utm_content=newsletter-11-25-24` to the URL.
### Setting URL parameters
To set URL parameters for all link URLs contained in emails:
1. Next to your project name, select the dropdown menu (▼), then **Settings**.
1. Under **Project settings**, select **URL Parameters**.
1. Under **UTM Parameters**, enter values for each parameter. Parameters left empty will not be included in email URLs.
1. Under **Custom Parameters**, select **+ Add custom parameter**, then enter a parameter name and value.
1. Select **Save**.
> **Note:** Changes made to project-level email URL parameters will apply to all active Automations and Journeys. Changes will not apply to messages that are currently being delivered.
You can set parameters for an individual message in the Delivery step in the Message, A/B Test, Automation, and Sequence composers. See [URL parameters](https://www.airship.com/docs/guides/messaging/messages/delivery/delivery-options/#url-parameters) in *Message delivery options*.
For API use, see the `url_parameters` object in [Email Override](https://www.airship.com/docs/developer/rest-api/ua/schemas/platform-overrides/#emailoverrideobject) and [Email Notification with Template](https://www.airship.com/docs/developer/rest-api/ua/schemas/platform-overrides-with-templates/#emailoverridewithtemplate).
## Disabling click tracking for specific links
You set click tracking for a message when configuring its [Sender Information](#creating-content). When tracking is enabled for a message, you can override the setting and disable tracking for message specific links and actions.
In layouts in the Interactive editor, you can disable click tracking for text hyperlinks and for the actions Open Website and Confirm Subscription. See [Email and link actions](https://www.airship.com/docs/guides/messaging/editors/interactive/actions/#email-and-link-actions) in *Actions in the Interactive editor*.
In HTML or plaintext content, in either the dashboard or using the API, you can disable click tracking by including these parameters:
* In HTML, use the `data-ua-clicktrack="0"` attribute on an anchor tag to remove click tracking for a link.
**Tracked and untracked HTML links**
```html
My Tracked Link
My Untracked Link
```
* In plaintext, use the format `[[ua-clicktrack-disabled="1" href=""]]` to disable click tracking.
**Tracked and untracked plaintext links**
```plaintext
[My Tracked Link]
https://airship.com
[My Untracked Link]
[[ua-clicktrack-disabled="1" href="https://airship.com"]]
```
## Preference Centers
To link to an Email [Preference Center](https://www.airship.com/docs/reference/glossary/#preference_center) in a message, first get its web page URL:
1. Go to **Content**, then **Web Pages**.
1. Select the more menu icon (⋯) for a Preference Center web page, then **Copy link to clipboard**.
Now you can include the saved URL in a link in your message.
## Deep Links in email
You can use a Deep Link to direct users from an email to a specific location within your app. For Deep Links to work properly with Airship Email, you must have the following:
* A branded click tracking domain configured in Airship
* An `apple-app-site-association` and `assetlinks.json` files hosted using HTTPS at the root of your domain
* Code in your Android and iOS apps that resolves the click-tracking links and routes to the proper page in your app
Follow the steps below to set up your website and app, and then add Deep Links to your messages.
Links to additional documentation for Airship's email providers SendGrid and SparkPost are provided. If you do not know which provider your account uses, [contact Airship Support](https://support.airship.com/).
### Configure your website to handle Deep Links
Android and iOS devices handle Deep Link resolution using files hosted alongside your website. Customize the following files to match your iOS `appID` and Android `sha256_cert_fingerprints` and place them at the root of your domain. They must be hosted using HTTPS.
For iOS, add the following to your `apple-app-site-association` file:
```json
{
"applinks": {
"apps": [],
"details": [
{
"appID": "",
"paths": [
"/uni/*",
"/f/open-in-app/*"
]
}
]
}
}
```
For Android, add the following to your `assetlinks.json` file:
```json
[{
"relation": ["delegate_permission/common.handle_all_urls"],
"target": {
"namespace": "android_app",
"package_name": "com.example.testlinks",
"sha256_cert_fingerprints":
[""]
}
}]
```
For additional information, see [Support Universal Links](https://developer.apple.com/library/archive/documentation/General/Conceptual/AppSearch/UniversalLinks.html) in the Apple Developer *App Search Programming Guide* and [Getting Started](https://developers.google.com/digital-asset-links/v1/getting-started) in the Google *Digital Asset Links* guide.
### Configure your apps to handle Deep Links
Add the following code to your Android and iOS apps to resolve the click-tracking links and route to the proper page in your app. These code samples are provided for reference and may need to be adjusted to work in your application.
#### iOS Swift
```swift
func application(_ application: UIApplication, continue userActivity: NSUserActivity, restorationHandler: @escaping ([Any]?) -> Void) -> Bool {
if userActivity.activityType == NSUserActivityTypeBrowsingWeb {
guard let encodedURL = userActivity.webpageURL else {
// No URL to resolve
return false
}
let task = URLSession.shared.dataTask(with: encodedURL, completionHandler: { (data, response, error) in
guard let resolvedURL = response?.url else {
// URL failed to resolve
return
}
// Now you have the resolved URL that you can
// use to navigate somewhere in the app.
print(resolvedURL)
})
task.resume()
}
return true
}
```
#### Android Java
```java
protected void onNewIntent(Intent intent) {
String action = intent.getAction();
final String encodedURL = intent.getDataString();
if (Intent.ACTION_VIEW.equals(action) && encodedURL != null) {
new Thread(new Runnable() {
public void run() {
try {
URL originalURL = new URL(encodedURL);
HttpURLConnection ucon = (HttpURLConnection) originalURL.openConnection();
ucon.setInstanceFollowRedirects(false);
URL resolvedURL = new URL(ucon.getHeaderField("Location"));
// Redirect to the correct page in your app
}
catch (MalformedURLException ex) {
//
}
catch (IOException ex) {
//
}
}
}).start();
}
}
```
For additional information, see [Universal Links](https://www.twilio.com/docs/sendgrid/ui/sending-email/universal-links) in the Twilio SendGrid *Sending Email* documentation and [Using Mobile Universal and App Links with SparkPost](https://support.sparkpost.com/docs/tech-resources/deep-links-self-serve) in the SparkPost *Tech Resources* documentation.
### Add Deep Links in messages
In layouts in the Interactive editor, select the Deep Link action for text, buttons, or images in your messages, and then enter your Deep Link URL. You can also provide a [link name](#link-names) for tracking purposes. For all available actions, see [Email and link actions](https://www.airship.com/docs/guides/messaging/editors/interactive/actions/#email-and-link-actions) in *Actions in the Interactive editor*.
---
To use Deep Links with click tracking, SendGrid provides specific instructions for "Universal Links". SparkPost refers to these as "Deep Links". These instructions can be found in their documentation, but we've summarized them here.
The editor will automatically add the necessary `universal="true"` or `data-msys-sublink="open-in-app"` attribute to the link, ensuring it functions correctly with our Email subprocessors.
---
In HTML or plaintext content, in either the dashboard or using the API, you can add Deep Link handling to URLs by including these parameters:
* In HTML, add the `data-ua-universal="true` attribute to your Deep Link URLs:
```html
Your Deep Link Text
```
* In plaintext, add `ua-universal="true"` to your Deep Link URLs:
```plaintext
[Your Deep Link Text]
[[ua-universal="true" href="your-deep-link-url"]]
```
> **Note:** SendGrid does not support click tracking in plaintext links, so you may need to adjust your links in your plaintext copy.
# Email unsubscribe links
> Create links for unsubscribing to individual subscription lists or opting out of all email messaging.
## About unsubscribe links
By default, email is for [commercial use](https://www.airship.com/docs/developer/api-integrations/email/commercial-transactional/) and requires an unsubscribe link in both the HTML and plain text message bodies. When the user follows the link, Airship unsubscribes the user (i.e., opts them out of email messaging) and redirects to a **confirmation web page** that tells them they are unsubscribed. The user is opted out of all commercial messages if the message was marked as commercial or opted out of all email messaging if marked as transactional.
You can use the Airship-hosted default confirmation web page that displays the message "You have been successfully unsubscribed." or link to your own confirmation web page.
Airship also supports double opt-out flows via [custom unsubscribe pages](https://www.airship.com/docs/developer/api-integrations/email/custom-unsubscribe-pages/). When users click on the unsubscribe link, they will not be opted out of messages and will instead be directed to your unsubscribe page.
When sending an email to a [Subscription List](https://www.airship.com/docs/reference/glossary/#subscription_list), in addition to the required unsubscribe link (for opting out of all messaging), you can also include an unsubscribe link for that list only.
### Unsubscribing by confirmation click
Many email security tools, including Microsoft SafeLinks and Barracuda, automatically "pre-click" links to scan for malicious content. When traditional unsubscribe links trigger an immediate opt-out, these scans can accidentally unsubscribe engaged users before they ever open the email.
To handle accidental unsubscribes, you can enable requiring an intentional user action to perform an unsubscribe. When a user clicks an unsubscribe link in an email body, it will open a confirmation web page where they must click a button to confirm unsubscribing. This helps prevent accidental churn, keeps unsubscribe metrics clean, and maintains full compliance.
Additional details about handling:
* Unsubscribe by confirmation click applies only to the `data-ua-unsubscribe` and `data-ua-list-unsubscribe` link formats.
* If you use your own [custom unsubscribe page](https://www.airship.com/docs/developer/api-integrations/email/custom-unsubscribe-pages/) for `data-ua-unsubscribe-page` links, there is no change in behavior.
* The required one-click `List-Unsubscribe` header for Google and Yahoo remains unchanged and fully automated.
To enable the confirmation-click unsubscribe behavior for your project, contact your account manager or [Airship Support](https://support.airship.com/). If you're seeing unexplained unsubscribe spikes, pre-click scanning by security tools may be the cause, and enabling confirmation-click unsubscribe is the recommended solution.
## Unsubscribe link formatting
To use the **default confirmation page**, include the following in your message:
* *HTML body* — Paste this HTML:
```html
Unsubscribe
```
* *Plain text body* — Paste this content: `[[ua-unsubscribe]]`
---
To use **your own confirmation page**, include the following in your message:
* *HTML body* — Paste this HTML, replacing the `href` URL with your own:
```html
Unsubscribe
```
* *Plain text body* — Paste this content, replacing the `href` URL with your own: `[[ua-unsubscribe href="https://www.example.com/unsubscribe"]]`
---
For an unsubscribe link for a specific [Subscription List](https://www.airship.com/docs/reference/glossary/#subscription_list), insert `list-` into the link; all other formatting as described above is the same:
* For HTML, use `data-ua-list-unsubscribe` instead of `data-ua-unsubscribe`.
* For plain text, use `ua-list-unsubscribe` instead of `ua-unsubscribe`.
> **Important:** Whenever you include an unsubscribe link for a specific list, you must also include an unsubscribe link for opting out of all messaging.
---
If [custom unsubscribe pages](https://www.airship.com/docs/developer/api-integrations/email/custom-unsubscribe-pages/) are enabled for your project, include the following in your message:
* *HTML body* — Paste this HTML, replacing the `href` URL with the URL of your custom unsubscribe page:
```html
Unsubscribe
```
* *Plain text body* — Paste this content, replacing the `href` URL with the URL of your custom unsubscribe page: `[[ua-unsubscribe-page href="https://www.example.com/unsubscribe"]]`
When using a custom unsubscribe page, you do not need to include an unsubscribe link for opting out of all messaging.
## Unsubscribe links in the Interactive editor
When using the [Interactive editor](https://www.airship.com/docs/guides/messaging/editors/interactive/) to create email content, you can add unsubscribe links in the [HTML, Heading, and Text content elements](https://www.airship.com/docs/guides/messaging/editors/interactive/styling-formatting/#content-elements).
In the HTML content element, use the code specified for *HTML body* in [Unsubscribe link formatting](#unsubscribe-link-formatting) above.
In Heading and Text content elements:
1. Select text in your message and click the Link link option.
1. Select an action: *Unsubscribe from all*, *Unsubscribe from current list*, or *Open unsubscribe page*.
1. Enter the URL according to your selection:
* *Open unsubscribe page* — Enter the URL for your custom unsubscribe page.
* *Unsubscribe from all* or *Unsubscribe from current list* — Enter the URL for your confirmation page or enter one of the following URLs for the default confirmation page. For the default page, use the URL that matches your data center location:
* US: `https://asemailmgmtus.com/unsubscribe/success.html`
* EU: `https://asemailmgmteu.com/unsubscribe/success.html`
1. Click **Save**.
See also [Actions in the Interactive editor](https://www.airship.com/docs/guides/messaging/editors/interactive/actions/).
# Email double opt-in links
> Create links for completing the email double opt-in process.
## About double opt-in links
When using [[Double Opt-In](https://www.airship.com/docs/reference/glossary/#double_opt_in)](https://www.airship.com/docs/developer/api-integrations/email/getting-started/#double-opt-in), you must include an **opt-in link** in both the HTML and plain text message bodies. When the user follows the opt-in link, Airship updates their channel as opted in to email messaging and redirects to the confirmation web page that tells them they are opted in.
The Airship-hosted **default confirmation web page** displays the message "You have been successfully opted in." You can also link to **your own confirmation web page** instead.
## Double opt-in link formatting
To use the **default confirmation page**, include the following in your message:
* *HTML body* — Paste this HTML:
```html
Link Title
```
* *Plain text body* — Paste this content: `[[ua-opt-in]]`
To use **your own confirmation page**, include the following in your message:
* **HTML body** — Paste this HTML (it includes a `data-ua-opt-in="1"` attribute), replacing the `href` URL with your own:
```html
Link Title
```
* **Plain text body** — Paste this content, replacing the `href` URL with your own:
`[[ua-opt-in href="https://www.example.com/confirmed"]]`
## Double opt-in links in the Interactive editor
When using the [Interactive editor](https://www.airship.com/docs/guides/messaging/editors/interactive/) to create email content, you can add opt-in links in the [HTML, Heading, and Text content elements](https://www.airship.com/docs/guides/messaging/editors/interactive/styling-formatting/#content-elements).
In the HTML content element, use the code specified for *HTML body* in [Double opt-in link formatting](#double-opt-in-link-formatting) above.
In Heading and Text content elements:
1. Select text in your message and click the Link link option.
1. Select the *Confirm subscription* action.
1. Enter the URL for your confirmation page or enter one of the following URLs for the default confirmation page. For the default page, use the URL that matches your data center location:
* US: `https://asemailmgmtus.com/opt-in/success.html`
* EU: `https://asemailmgmteu.com/opt-in/success.html`
1. Click **Save**.
See also [Actions in the Interactive editor](https://www.airship.com/docs/guides/messaging/editors/interactive/actions/).
# Email best practices
> Learn about what influences email deliverability and how to improve yours.
Mailbox providers, such as Gmail, Yahoo, and Outlook, are responsible for processing incoming email and determining whether it should be delivered to the inbox, filtered into spam, or blocked entirely. This directly affects the emails you send to your customers. They make these decisions in part by maintaining a *sender reputation score* for each business, which helps determine whether emails from that sender should reach its recipients.
In this guide, we provide insights into how sender reputation works, specifically in the context of volume and sending regularity, and offer recommendations for sending newsletters and other email content effectively.
## Sender reputation
Sender reputation influences whether your emails land in a user's inbox or their spam folder. It is determined by several key factors:
* **Sending IP and domain reputations**: The overall sending history of your sending IP address and domain. Reputation is assigned to both, but IP reputation is weighted more heavily than domain reputation. High bounce and unsubscribe rates, a high number of spam complaints, and low user engagement negatively affect sender reputation scores.
* **Sending patterns**: The consistency in email sending volume and frequency. Sudden spikes in volume or erratic schedules can trigger spam filters and harm your reputation.
* **Engagement metrics**: User interaction with your emails. High open rates, click-through rates, and low unsubscribe rates positively influence your reputation. Engaging content leads to better reputation scores.
## Best practices for sending email
To maintain a good sender reputation and improve your email deliverability when messaging a large email audience, consider the following best practices:
* **Maintain good audience hygiene** — It's essential to keep your email audience well-maintained. Regularly reviewing and cleaning helps identify inactive or invalid email addresses. Failing to do so can result in high bounce rates and may also lead to sending emails to spam trap addresses. This can seriously damage your sender reputation and increase the risk of being added to blocklists by major email providers. To avoid these pitfalls, implement a routine for audience hygiene, such as periodically assessing subscriber engagement and using tools to verify email addresses.
* **Establish a frequent, consistent sending schedule** — Consistent sending helps email providers recognize your patterns. We recommend emailing your audience at least every two weeks. If you only send monthly, split your audience into four segments and send to each segment 24 hours apart
* **Avoid large, sudden spikes in volume** — For any message, do not send to more than twice your past week's average daily send volume. For example, if your past week's daily average was one million, don't send more than two million messages within 24 hours. Exceeding this limit significantly raises the risk of a message being rejected or flagged as spam. Split large audiences into smaller segments and send to each segment 24 hours apart. See [Email](https://www.airship.com/docs/guides/reports/engagement/#email) in *Engagement reports*.
* **Segment your audience** — Tailor your content for different segments of your audience based on engagement levels. Send to your most engaged subscribers first to improve open rates and engagement. See [Segmenting your audience](https://www.airship.com/docs/guides/audience/segmentation/segmentation/).
* **Monitor engagement metrics** — Regularly review your open, click, and bounce rates. If you notice a decline, consider adjusting your content or targeting. See [Email](https://www.airship.com/docs/guides/reports/engagement/#email) in *Engagement reports*.
* **Create engaging content** — Focus on creating relevant and valuable content for your audience. Engaging content leads to higher open and click rates, improving your overall reputation.
* **Test and optimize** — Conduct A/B testing to see which subject lines and content types resonate best with your audience. Use the insights to refine your strategy. See [About A/B testing](https://www.airship.com/docs/guides/experimentation/a-b-tests/about/).