See [Create AI-generated Journeys](https://www.airship.com/docs/guides/features/orchestration-experimentation/journeys/#create-ai-generated-journeys). | | **Colors and fonts** | Each color is defined as a [Color Set](https://www.airship.com/docs/reference/glossary/#color_set). Custom fonts are rendered in [In-App Automations](https://www.airship.com/docs/reference/glossary/#iaa) and [Scenes](https://www.airship.com/docs/reference/glossary/#scene) according to a font stack, which is a list of the names of individual fonts available in your app. | Select color sets and font stacks when configuring the default appearance of In-App Automations and Scenes and when creating individual messages.
See [In-app experience defaults](https://www.airship.com/docs/guides/messaging/in-app-experiences/configuration/defaults/), [Create a Scene](https://www.airship.com/docs/guides/messaging/in-app-experiences/scenes/create/), and [Create an In-App Automation](https://www.airship.com/docs/guides/messaging/in-app-experiences/in-app-automation/create/). | | **Text, button, and input field styles** | Styles are collections of settings that determine the appearance of [Scene](https://www.airship.com/docs/reference/glossary/#scene) content. Selecting a style applies all its settings at once. | Select styles when configuring the default appearance of Scenes and when creating individual messages.
See [In-app experience defaults](https://www.airship.com/docs/guides/messaging/in-app-experiences/configuration/defaults/) and [Create a Scene](https://www.airship.com/docs/guides/messaging/in-app-experiences/scenes/create/). | {class="table-col-1-30"} ## Methods and Generative AI You can set all brand guidelines manually. You also have the option to provide source material and let Airship derive and set your guidelines using Generative AI: * For your profile and design elements, upload PDFs outlining the language, colors, fonts, and other design elements to use in your messages, and select which guidelines to apply them to. These are documents that represent your brand, such as your company's "Style Guide" or "Brand Guidelines." You can upload multiple sources for different guidelines or to overwrite previous values. See [Set brand guidelines from uploaded sources](#set-brand-guidelines-from-uploaded-sources). * For your personalities, directly enter writing samples or upload PDFs of samples. You can add multiple writing samples for each personality. See [Set personalities](#set-personalities). > **Note:** **Opting In to AI Functions** > > If you opted out of AI usage, you must sign an updated contract to enable this feature. Contact your account manager for assistance. > > **Compliance Considerations in Using AI Functions** > > The Service incorporates AI functions, including Generative AI and Agentic AI. > > Generative AI generates content such as Notification copy, images, and Journeys based on your prompts. > > Agentic AI autonomously optimizes, personalizes, or executes cross-channel customer engagement actions, or analyzes audience and performance data, subject to the parameters and controls you set in the Service. These systems operate under human-defined parameters and do not initiate customer-facing actions without human interaction or pre-configured parameters. You are responsible for reviewing Generated Outputs for accuracy, appropriateness, and to ensure they do not violate third-party intellectual property or other rights. Airship does not publish Generated Outputs to end users without approval from the Customer. > > In addition to the applicable terms of your agreement with Airship (e.g., Use of Service, Customer Responsibilities sections), you must comply with the [Airship Acceptable Use Policy](https://www.airship.com/legal/acceptable-use/), which provides additional details about appropriate conduct when using the Service. > > The Service includes safety features to block harmful content, such as content that violates our Acceptable Use Policy. You may not attempt to bypass these protective measures or use content that violates your agreement with Airship. > > About the AI models: > > Airship utilizes Google Gemini and Imagen to generate copy and images for AI Scene screens. The content is created solely with Google's out-of-the-box models, and no customization or fine-tuning with Customer Data is applied. See [Responsible AI](https://cloud.google.com/responsible-ai?hl=en) in Google's *Google Cloud* documentation. ## Set brand guidelines manually For personalities, see [Set personalities](#set-personalities) below. For all other guidelines, use the following steps. ### Profile Your profile defines fundamental aspects of your brand identity and the core values that guide your brand. When creating an AI-generated [Journey](https://www.airship.com/docs/reference/glossary/#journey), its content is created based on the current version of your brand profile and a specified personality. To manually manage your brand profile: 1. Next to your project name, select the dropdown menu (▼), then **Brand Guidelines**. 1. Under **Brand**, select **Profile**. 1. Select **Edit** and enter text for each field: | Field | Description | | --- | --- | | **Vision** | Your brand's vision for the future | | **Mission** | Your brand's mission and purpose | | **Positioning** | How you want your brand to be perceived | 1. Select **Add value** and enter a name for the value and how it manifests in your brand. Repeat for additional values. 1. Select **Save**. ### Colors Colors are defined as color sets. A *Color Set* is a named pair of hexadecimal color values supporting device Light and Dark modes. Color sets can be selected for any color field in a Scene and when configuring the default appearance of Scenes and In-App Automations. Dark mode is supported for Scenes only. When you edit a color set, the changes automatically update anywhere the set is in use. You may want to update your color sets seasonally or when refreshing your branding. New projects have 10 preset color sets. > **Note:** Color sets used in [In-App Automation defaults](#setting-in-app-automation-defaults) appear as their Light Mode hexadecimal color values, not the color set name, in In-App Automation composer color fields. They appear as their color set name in [Scene defaults](https://www.airship.com/docs/guides/messaging/in-app-experiences/configuration/defaults/#scene-defaults) and in the Scene composer. To manually add color sets: 1. Next to your project name, select the dropdown menu (▼), then **Brand Guidelines**. 1. Under **Elements**, select **Colors**. 1. Select **Add color set** and enter a name for the color set, Light and Dark Mode hexadecimal color values, and opacity percentages. Repeat for additional sets. 1. Select **Save**. Options for existing color sets: | Option | Description | Steps | | --- | --- | --- | | **Edit** | You can change any part of the configuration. | Select the more menu icon (⋯) for a color set, then **Edit colors**, edit the settings, then select **Save**. | | **Duplicate** | Make a copy of the color set. | Select the more menu icon (⋯) for a color set, then **Duplicate**. | | **Delete** | Remove the color set from your project. | Select the more menu icon (⋯) for a color set, then **Edit colors**, then **Delete**. | > **Important:** If editing or deleting a color set that is in use, make sure to update the values for the affected fields in your in-app experiences and your [In-App Automation defaults](https://www.airship.com/docs/guides/messaging/in-app-experiences/configuration/defaults/#setting-in-app-automation-defaults) and [Scene defaults](https://www.airship.com/docs/guides/messaging/in-app-experiences/configuration/defaults/#scene-defaults). ### Fonts When configuring the content of your in-app experiences, or when setting their defaults, you must set a font size and font family for text. For font size, see [Fonts](https://www.airship.com/docs/guides/messaging/in-app-experiences/configuration/defaults/#fonts) in *In-app experience default settings*. The remainder of this section is about font families. All Airship projects contain a serif and sans-serif font. You can also add custom fonts in your brand guidelines so your in-app experiences use the same fonts as the rest of your app. Custom fonts are rendered in your messages according to a font stack, which is a list of the names of individual fonts available in your app. **Guidelines for font stacks:** * Create separate stacks for serif and sans-serif fonts. * Each font name should match the fonts that are in your app. * Your Primary Font should be the font you want to appear in your messages by default. You can also provide a web font URL for the Primary Font so it can be rendered in device previews when creating and editing Scenes. * Add Fallback Fonts to be used by your app if the Primary Font doesn't load. They will be loaded in the order they are listed in the stack. * If your project supports both iOS and Android, your Primary Font and first Fallback Font should collectively serve as the default fonts for both platforms. For instance, if iOS uses `MyFont` and Android uses `myfont`, assign one as the Primary Font and the other as the first Fallback Font. After creating a custom font stack, you can select it as a font family when configuring appearance defaults and text and button fields in In-App Automations and Scenes. Since font name format varies between iOS and Android, custom font stacks also allow font names to be unified into a single selection. > **Important:** Confirm your app's font names with your developer before creating custom font stacks. > > 1. Adding custom fonts in your project settings does not add the font to your app. A developer must add the font to your app. See our platform documentation for customizing in-app experiences: > * [iOS: Fonts](https://www.airship.com/docs/developer/sdk-integration/apple/in-app-experiences/in-app-automation/#fonts) > * [Android: Fonts](https://www.airship.com/docs/developer/sdk-integration/android/in-app-experiences/in-app-automation/#fonts) > > 1. The font names you enter when creating a font stack must match the names as configured in your app, keeping in mind that font name format varies by app platform: > | Option | Steps | > | --- | --- | > | **Android** | Use the name that is in your app's fonts.xml. See the [Fonts In XML guide](https://developer.android.com/guide/topics/ui/look-and-feel/fonts-in-xml.html). For example, if you define a font in res/fonts/my_cool_font.xml, the font name is my_cool_font. | > | **iOS** | Use the font family name, including spaces. For example, `Roboto Condensed`. This is not necessarily the filename of the font. One way to verify the family name is to check the Identifiers section for the font in the Font Book application on macOS. | To manually add a font stack: 1. Next to your project name, select the dropdown menu (▼), then **Brand Guidelines**. 1. Under **Elements**, select **Fonts**. 1. Select **Add font stack**. 1. Enter a name for the stack and select whether it is for serif or sans-serif fonts. 1. For **Primary Font**, enter the name for the primary font and an optional publicly accessible web font URL.
The font URL is used for rendering the font in previews when creating and editing Scenes. It must be for either a file or a web font service such as Google Fonts. Supported file types: WOFF, WOFF2, TTF, EOT. Example web font service CSS URL: `https://fonts.googleapis.com/css2?family=Crimson+Pro:wght@200`.
1. Under **Fallback Fonts**, select **Add fallback** and enter a font name. Repeat for additional fonts. 1. Select **Save**. Options for existing font stacks: | Option | Description | Steps | | --- | --- | --- | | **Edit** | You can change any part of the configuration. | Select the more menu icon (⋯) for a font stack, then **Edit**, edit the settings, then select **Save**. | | **Delete** | Remove the font stack from your project. | Select the more menu icon (⋯) for a stack, then **Edit**, then **Delete**. | ### Text, button, and input stylesThe styles for text, button, and input fields can be selected when configuring other default settings and when creating Scene content. Input styles control the appearance of the user input fields for the Email, SMS, Text Input, and Open Question content elements.
Each project supports up to 25 of each style. There are preset styles you can edit or remove. To manually add a text, button, or input style: 1. Next to your project name, select the dropdown menu (▼), then **Brand Guidelines**. 1. Under **Elements**, select **Text**, **Buttons**, or **Inputs**. 1. Select **Add text/button/input style** and configure each field. A preview of the style updates as you make changes: Text fields: | Field | Description | Steps | | --- | --- | --- | | **Name** | A descriptive name for the style. The name appears in the list of all text styles when configuring button styles and [configuring Scene content](https://www.airship.com/docs/guides/messaging/editors/native/about/). | Enter text. | | **Font** | The font of the text: serif, sans-serif, or a [custom font stack](https://www.airship.com/docs/guides/messaging/in-app-experiences/configuration/defaults/#custom-fonts). | Select a font or font stack. | | **Font size** | The size of the font in points. | Enter a numeric value. | | **Font weight** | The thickness of the font, from 100 to 900. Common values are 300 for light, 400 for normal, and 700 for bold. Available weights depend on the selected font family. For SDK versions older than the required minimums, weights 100–600 fall back to 400 (normal), and weights 700–900 fall back to 700 (bold). [iOS SDK 20.1+](/docs/docs/developer/sdk-integration/apple/ios-changelog/#20.1.0) [Android SDK 20.1+](/docs/docs/developer/sdk-integration/android/changelog/#20.1.0) | Enter a numeric value. | | **Line height** | The vertical spacing between lines of text, as a multiplier. For example, 1.2 is 120% of the font size. [iOS SDK 20.1+](/docs/docs/developer/sdk-integration/apple/ios-changelog/#20.1.0) [Android SDK 20.1+](/docs/docs/developer/sdk-integration/android/changelog/#20.1.0) | Enter a numeric value. | | **Letter spacing** | The horizontal spacing between characters, in points. [iOS SDK 20.1+](/docs/docs/developer/sdk-integration/apple/ios-changelog/#20.1.0) [Android SDK 20.1+](/docs/docs/developer/sdk-integration/android/changelog/#20.1.0) | Enter a numeric value. | | **Alignment** | The horizontal position of the text: left, middle, or right. | Select an alignment. | | **Emphasis** | The format of the text: bold, italic, or underline. | Select an emphasis. | | **Color** | The color of the text. | Select a [color set](#colors). | | **Accessibility heading level** | Optional, applies to [Text](https://www.airship.com/docs/guides/messaging/editors/native/elements/#text) elements in Scenes only. The heading level of the text, for navigation using assistive technology such as screen readers. [iOS SDK 18.13+](/docs/docs/developer/sdk-integration/apple/ios-changelog/#18.13.0) [Android SDK 18.5+](/docs/docs/developer/sdk-integration/android/changelog/#18.5.0) | Select from H1 to H6. | Button fields: | Field | Description | Steps | | --- | --- | --- | | **Name** | A descriptive name for the style. The name appears in the list of all button styles when [configuring Scene content](https://www.airship.com/docs/guides/messaging/editors/native/about/). | Enter text. | | **Text style** | The format of the text, defined by a text style. | Select a text style. | | **Background color** | The color of the button background. | Select a [color set](#colors). | | **Border color** | The color of the button border. | Select a [color set](#colors). | | **Border width** | The size of the button border in pixels. | Enter a numeric value. | | **Border radius** | Governs rounding the button corners. | Enter an integer from 0 to 100. | Input fields: | Field | Description | Steps | | --- | --- | --- | | **Name** | A descriptive name for the style. The name appears in the list of all input styles when configuring the [Email](https://www.airship.com/docs/guides/messaging/editors/native/elements/#email), [SMS](https://www.airship.com/docs/guides/messaging/editors/native/elements/#sms), [Text Input](https://www.airship.com/docs/guides/messaging/editors/native/elements/#text-input), and [Open Question](https://www.airship.com/docs/guides/messaging/editors/native/elements/#question) elements in a Scene. | Enter text. | | **Text style** | The format of the text typed in the field by the user, defined by a text style. | Select a text style. | | **Background color** | The color of the input field background. | Select a [color set](#colors). | | **Placeholder color** | The color of the input field placeholder text. | Select a [color set](#colors). | | **Border color** | The color of the input field border. | Select a [color set](#colors). | | **Border width** | The size of the input field border in pixels. | Enter a numeric value. | | **Border radius** | Governs rounding the input field corners. | Enter an integer from 0 to 100. | 1. Select **Save**. Options for existing styles: | Option | Description | Steps | | --- | --- | --- | | **Edit** | Change any part of the configuration. | Select the more menu icon (⋯) for a style, then **Edit style**, edit the settings, then select **Save**. | | **Duplicate** | Make a copy of the style. | Select the more menu icon (⋯) for a style, then **Duplicate**. | | **Delete** | Remove the style from your project. | Select the more menu icon (⋯) for a color set, then **Edit style**, then **Delete**. | ## Set brand guidelines from uploaded sources [AXP](https://www.airship.com/docs/reference/feature-packages/) [Generative AI](https://www.airship.com/docs/guides/features/intelligence-ai/ai/) For all guidelines except personalities, you will first upload at least one PDF and specify which guidelines its content should apply to. Airship will analyze the content, apply values, and flag changed guidelines for review. You can then review each flagged item and apply or reject the changes. Upload your source material: 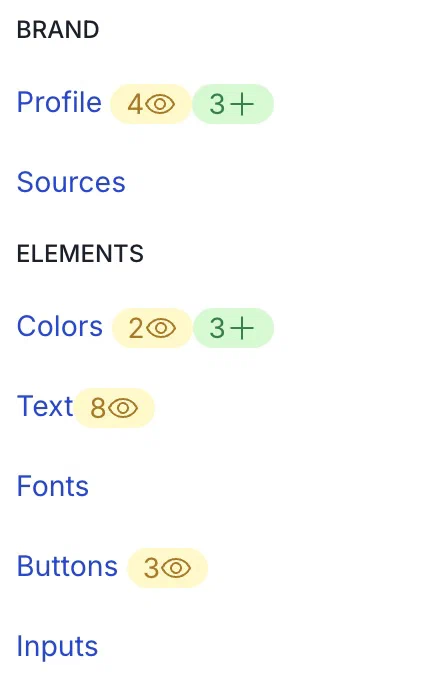 *Brand guidelines flagged for review* 1. Next to your project name, select the dropdown menu (▼), then **Brand Guidelines**. 1. Under **Brand**, select **Sources**. 1. Select **+ Add source**, then **Choose files**, and choose at least one PDF. 1. Select one or more guidelines to apply the source material to. 1. Select **Upload attachments**. After processing the upload, a review icon (eye) appears in the sidebar for any changed guideline. The number of items to review appears next to the icon. If items were also added, the number of added items appears next to an add icon (+). Review your changes and additions: 1. Select a guideline for review. 1. For changes, select **eye Review updates** and review the initial and changed values, then select **Reject all changes** to discard or **Accept all changes** to apply the new values. 1. For additions, select **Reject** or **Accept**. If you edit and save a color before accepting or rejecting, the options will be replaced with **eye Review updates**. To view a record of uploads, under **Brand**, select **Sources**. Each file is listed by name and which guidelines were selected for application. To delete a source, select the more menu icon (⋯), then **Delete**. Deleting removes the file from the list only. It does not affect your current guidelines. ## Set personalities [AXP](https://www.airship.com/docs/reference/feature-packages/) [Generative AI](https://www.airship.com/docs/guides/features/intelligence-ai/ai/) For personalities, add your own tonal attributes or let Airship create them based on the writing samples you provide. Explicit content is excluded by Airship, and you can also specify your own list of banned words and phrases. When creating an AI-generated [Journey](https://www.airship.com/docs/reference/glossary/#journey), its content is created based on the current version of your brand profile and a specified personality. Add a personality: 1. Next to your project name, select the dropdown menu (▼), then **Brand Guidelines**. 1. Select the plus sign icon (+) for **Personalities**. 1. Enter a name for the personality. 1. (To manually add attributes) Under **Tonal Attribute**, select **Add attribute** and enter an adjective and description. Repeat for additional attributes. 1. (To add attributes based on writing sample) Under **Writing Samples**, enter sample text and/or select **Choose files** and choose at least one PDF. 1. Under **Forbidden Words/Phrases**, enter any words or phrases to exclude from generated content. 1. Select **Save changes**. After adding tonal attributes, you can manually edit them or use AI to generate new ones. Whenever you add a writing sample, Airship generates new attributes that replace the current ones. We recommend verifying that generated content matches your personality settings and excludes forbidden words or phrases you've set. Options for existing personalities: | Option | Description | Steps | | --- | --- | --- | | **Edit personality name** | Change the name as it appears in Brand Guidelines and when creating an AI-generated Journey. | Select **Edit**, enter a new name, then select **Save changes**. | | **Manually edit or delete tonal attributes** | Change the information available for creating content in AI-generated Journeys. | Select **Edit**, change the adjective and/or description for an attribute, select the delete icon (×) to delete an attribute, then select **Save changes**. | | **Add writing samples** | Airship will generate new tonal attributes based on all writing samples for the personality, replacing the current attributes. | Select **Edit**, enter sample text and/or select **Choose files** and choose at least one PDF, then select **Save changes**. | | **Delete writing samples** | The sample will be removed from the list, but Airship will not generate new tonal attributes unless you apply the change. | Under **Writing Samples** select the more menu icon (⋯) for a sample, then **Delete**. To also generate new tonal attributes, select **Edit**, then **Save Changes**. | | **Delete a personality** | Remove the personality from your brand guidelines. Its writing samples will also be deleted, and the personality will no longer be an option when creating AI-generated Journeys. | Select **Edit**, then **Delete**. | # Campaigns > Keep your project organized by grouping related messages into Campaigns. ## About Campaigns Campaigns present your selected messages in list and calendar views, giving you: * **Focused hubs** — Keep all messaging for a product launch, seasonal promotion, or event in one place. * **Cross-channel visibility** — Get a complete picture of your coordinated marketing effort. * **Scheduling and monitoring tools** — Use the calendar to spot scheduling gaps, avoid overlap, and optimize timing. You can sort and filter in both the list and calendar views to track status. Open messages for editing, access reports, and create new messages directly from the Campaign. You can also [use AI to create and refine Campaigns](#create-and-refine-campaigns-using-ai), generating a structured overview and drafting messages through a conversational chat interface. > **Note:** Though named similarly, [Campaign Categories](https://www.airship.com/docs/reference/glossary/#campaign_categories) are a separate feature and have no connection to Campaigns. ## Create a Campaign To create a Campaign using an AI chat interface, see [Create and refine Campaigns using AI](#create-and-refine-campaigns-using-ai). To create a Campaign manually: 1. Select the **Create** dropdown menu (▼), then **Campaign**. Or go to **Campaigns**, and then select **Add Campaign**. 1. Select the default Campaign name and change it to something descriptive, and then select the submit icon (✓) to save it. Now you can add [existing messages](#add-existing-messages) or [new messages](#add-new-messages). You can also [add messages from a composer](#add-messages-from-a-composer). ### Add existing messages After opening a Campaign, select **Add ▼**, then select **Add existing**. You can search for messages by name and use the following filters: * **Status** — Select from Active, Draft, Paused, or Scheduled status. * **Message Type** — Select a composer: * Message — *Includes variants created in an [A/B test](https://www.airship.com/docs/guides/experimentation/a-b-tests/messages/)* * Scene * Sequence * Automation * In-App Automation * A/B Test — *[Legacy](https://www.airship.com/docs/guides/experimentation/a-b-tests/messages-legacy/)* Select at least one message by checking the box in its row, and then select **Add to Campaign**. You will return to the Campaign messages list. ### Add new messages After opening a Campaign, select **Add ▼**, and then select a composer: * Message * Automation * In-App Automation * Scene * A/B Test — *[Legacy](https://www.airship.com/docs/guides/experimentation/a-b-tests/messages-legacy/)* You can also select **Journey** to configure a Sequence, In-App Automation, or Scene in the [Journey Map](https://www.airship.com/docs/reference/glossary/#journey_map). For **Journey**, you can complete configuration in the map. For all other options, after completing configuration, you will return to the Campaign messages list. ### Add messages from a composer To add a message to a Campaign while composing: 1. Select **Campaign** above the message name. If the message is already assigned to a Campaign, the Campaign name will appear there instead. 1. Search for and select a Campaign, or select **Create** to create a new one.  *In composers, the Campaign name appears above the message name* ## Create and refine Campaigns using AI [AXP](https://www.airship.com/docs/reference/feature-packages/) [Agentic & Generative AI](https://www.airship.com/docs/guides/features/intelligence-ai/ai/) Use the Campaigns AI Agent to create or refine a Campaign through a conversational chat interface. Generate the [Campaign overview](#managing-campaigns) and draft or update messages from a prompt or by uploading a file. You can chat with the agent at any time to make additional updates to your Campaigns. The agent supports the following capabilities: * **Conversational editing and refinement** — Use natural language to iterate on your Campaign. Request changes like "Update the audience to loyalty members" or "Add a push notification for the launch date." * **Campaign planning** — Provide an objective, target audience, goals, and dates, and the agent will create a [structured overview](#managing-campaigns) that serves as the foundation for message creation. * **Message creation** — The agent uses the information in the overview as the foundation for drafting messages, ensuring content aligns with your goals and audience. It can create individual [messages](https://www.airship.com/docs/guides/messaging/messages/create/), [Scenes](https://www.airship.com/docs/reference/glossary/#scene), and [Sequences](https://www.airship.com/docs/reference/glossary/#sequence). However, it cannot create Open Channel messages or link components to create a [Journey](https://www.airship.com/docs/reference/glossary/#journey). Using the agent provides significant advantages: * **Faster planning** — Turn a brief or idea into a complete campaign strategy and drafted messages with less manual setup. * **Documented strategy** — Your strategy is captured in the overview before message creation begins, giving your team a shared reference as the campaign grows. * **Complete campaigns from incomplete briefs** — The agent identifies gaps in your prompt or file and asks targeted follow-up questions, so you can build a complete campaign even when you don't have all the details upfront. * **Consistent messaging** — Because all drafted messages are grounded in the same overview, the agent produces content that's consistent in tone, audience, and goals across the campaign. You can use the agent from the Campaigns list or after opening a Campaign: 1. Select **✨ Campaigns AI Agent**. 1. Enter a prompt describing your Campaign and/or upload a file. * Supported file formats: TXT and PDF. * The styles and personalities in your [brand guidelines](https://www.airship.com/docs/guides/messaging/features/brand-guidelines/) will be applied to the message design and content. * Explicit content is excluded. 1. Select the submit icon (↑) after each prompt or upload. After each generation completes, you can repeat these steps to continue editing. The agent will request additional information if needed to complete the overview. Once the minimum requirements have been met, it will prompt you to specify the messages you'd like to add and ask any questions needed to draft them. You can skip any item by saying "skip for now" or "I don't have that information yet" when asked. When you are finished using the agent, select the close icon (×). Your chat history persists in the current editing session, so you can close and reopen the agent without losing your chat. Select the remove icon (trash) to clear your chat history at any time. All messages are added as drafts. You must still review message content, configure any per-message audience targeting, and schedule or send manually. For Scenes, you can also use the [Native Experience AI Agent](https://www.airship.com/docs/guides/messaging/editors/native/ai-content/) for more fine-grained editing. > **Note:** **Opting In to AI Functions** > > If you opted out of AI usage, you must sign an updated contract to enable this feature. Contact your account manager for assistance. > > **Compliance Considerations in Using AI Functions** > > The Service incorporates AI functions, including Generative AI and Agentic AI. > > Generative AI generates content such as Notification copy, images, and Journeys based on your prompts. > > Agentic AI autonomously optimizes, personalizes, or executes cross-channel customer engagement actions, or analyzes audience and performance data, subject to the parameters and controls you set in the Service. These systems operate under human-defined parameters and do not initiate customer-facing actions without human interaction or pre-configured parameters. You are responsible for reviewing Generated Outputs for accuracy, appropriateness, and to ensure they do not violate third-party intellectual property or other rights. Airship does not publish Generated Outputs to end users without approval from the Customer. > > In addition to the applicable terms of your agreement with Airship (e.g., Use of Service, Customer Responsibilities sections), you must comply with the [Airship Acceptable Use Policy](https://www.airship.com/legal/acceptable-use/), which provides additional details about appropriate conduct when using the Service. > > The Service includes safety features to block harmful content, such as content that violates our Acceptable Use Policy. You may not attempt to bypass these protective measures or use content that violates your agreement with Airship. > > About the AI models: > > Airship utilizes Google Gemini and Imagen to generate copy and images for AI Scene screens. The content is created solely with Google's out-of-the-box models, and no customization or fine-tuning with Customer Data is applied. See [Responsible AI](https://cloud.google.com/responsible-ai?hl=en) in Google's *Google Cloud* documentation. ## Managing Campaigns Go to **Campaigns** to view all Campaigns in your project. Each Campaign is listed by name and date last modified, with the most recently modified Campaign listed first. You can search for Campaigns by name. To view or edit a Campaign, select its name from the list. To delete a Campaign, select the more menu icon (⋯), then select **Delete**. Once you open a Campaign, you can work in three views: * **Overview** — The Campaign objective, goals, audience, dates, and channel strategies are automatically populated when you [create and refine Campaigns using AI](#create-and-refine-campaigns-using-ai). **Channel Strategies** outlines each channel's name, specifies its role as either Primary for the main message or Secondary for supporting communication, and details the particular strategy employed for that channel within the campaign. * **Messages** — Each message is listed by name with its status, channels, and last modified date. Select the name or date column headers to sort. You can manage messages using these options: | Option | Description | Steps | | --- | --- | --- | | **Add message** | Add an existing message to the Campaign or create a new one. | See the steps for adding messages in [Create a Campaign](#create-a-campaign). | | **Edit message or open report** | Open the message in its origin composer or open its [message report](https://www.airship.com/docs/guides/reports/message/), [Scene report](https://www.airship.com/docs/guides/messaging/in-app-experiences/scenes/create/scene-reports/), or Sequence [Performance report](https://www.airship.com/docs/reference/glossary/#sequence_performance). Action availability depends on the status, and neither action is available for scheduled messages. | Select the message name. | | **Move message** | Move a message to a different Campaign. This action can be performed in bulk. | Select the check box for one or more messages, then select **Actions**, and then **Move to Campaign**. Then, search for and select a Campaign, or select **Create** to create a new one. | | **Remove message** | Remove a message from the Campaign. This action can be performed in bulk. | Select the check box for one or more messages, then select **Actions**, and then **Remove from Campaign** and confirm. | * **Calendar** — This functions the same as the [project-level calendar](https://www.airship.com/docs/guides/getting-started/ui/manage-views/#calendar) but includes only the messages in the Campaign. The Status and Message Type filters in the list and calendar views are the same as in the project-level calendar. However, the messages list includes an additional legacy A/B test filter option, as these messages are only displayed in the list view, not in the calendar. See the filter descriptions in [Visual indicators](https://www.airship.com/docs/guides/getting-started/ui/manage-views/#visual-indicators) in *Messages Overview and Calendar*. # Preference Centers > {{< glossary_definition "preference_center" >}} > **Important:** Airship Preference Centers are widgets that can be embedded in a page in an app or website. Please verify with your legal team that your full Preference Center page, including any web page for email Preference Centers, is compliant with local privacy regulations. ## Overview 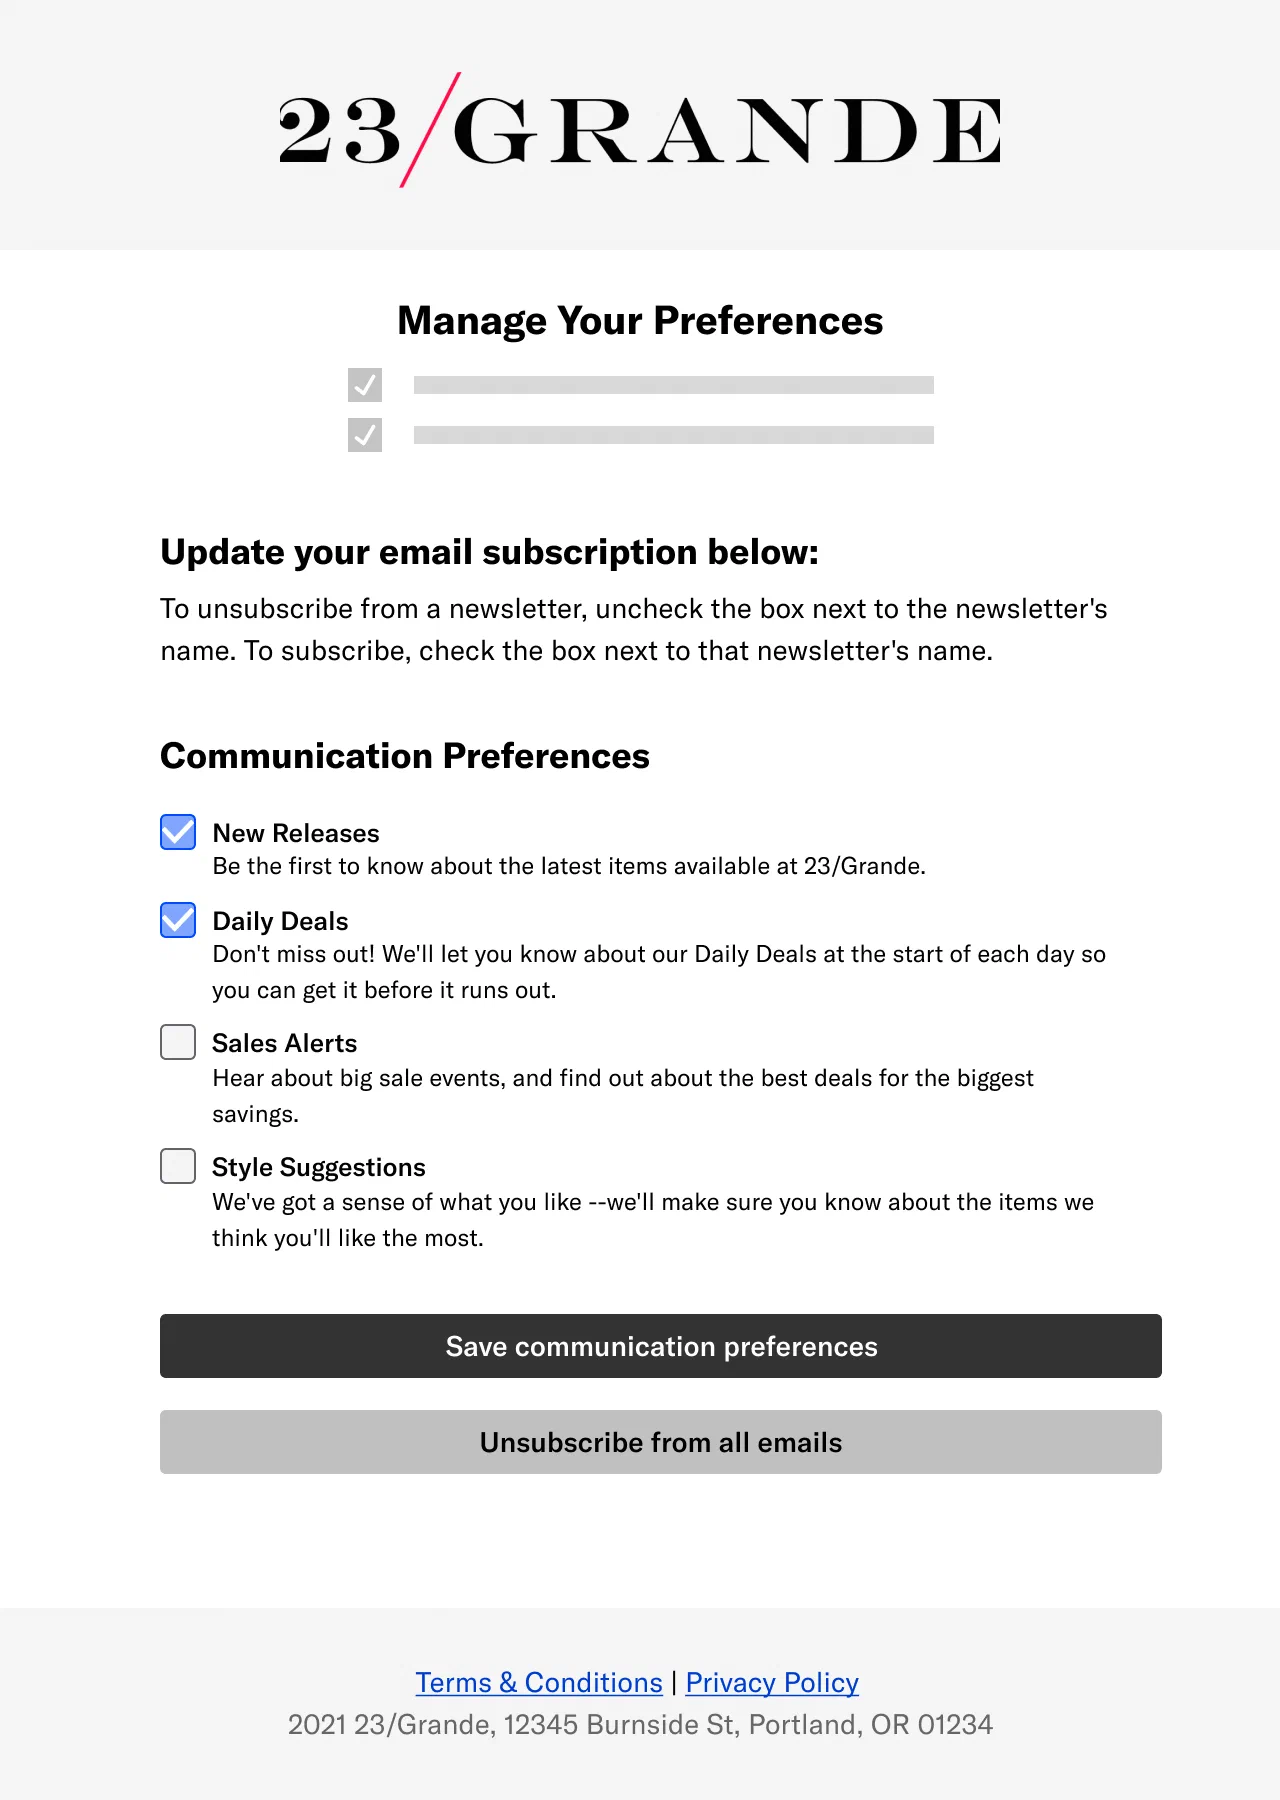 *Email Preference Center web page* Preference Centers contain one or more page sections, each with an optional title and description. Add the text and sections you want in the page and select at least one [Subscription List](https://www.airship.com/docs/reference/glossary/#subscription_list) per section. You can also customize Subscription List names and descriptions to override those from your project settings. You can change a Preference Center in the Airship dashboard at any time. Your saved edits are published in real time. --- **Email** Preference Centers are Airship-hosted web pages. After creating the Preference Center in the dashboard, design a web page using our [Interactive editor](https://www.airship.com/docs/guides/messaging/editors/interactive/about/) and select a Preference Center to appear on the page. You can customize loading and saving status text and button labels and provide an Unsubscribe landing page URL. **No development work is required.** Then, include the web page link in emails you send to a Subscription List. You can also test the page's appearance in your web browser before making it available to your users. 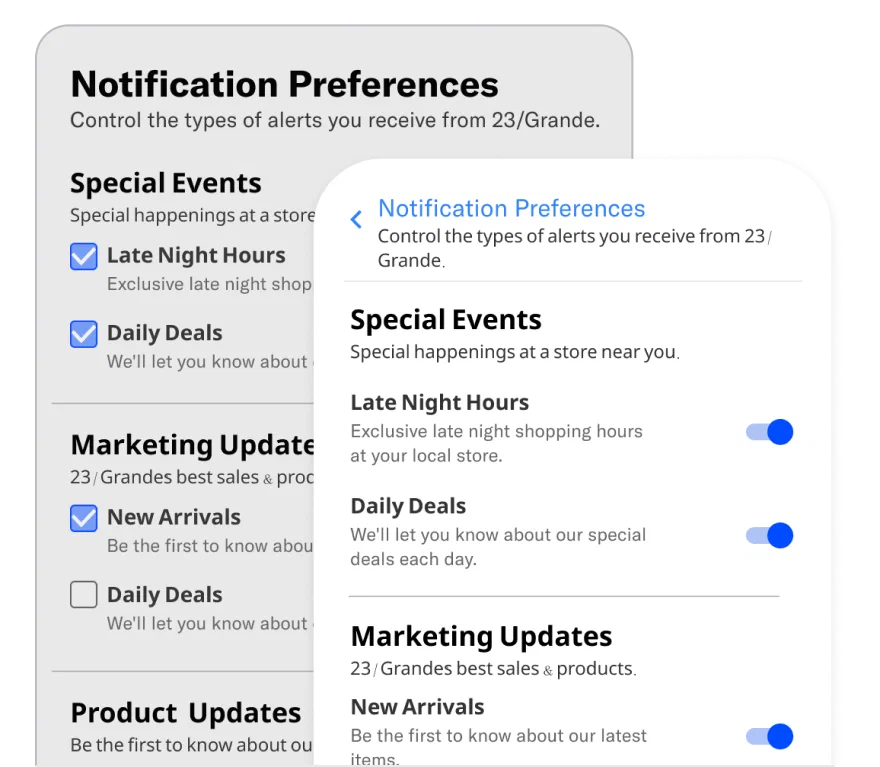 *Web and App single-channel Preference Centers* --- **App** and **Web** Preference Centers can be displayed as individual pages in your app or website or embedded in a page. After creating the Preference Center in the dashboard, give your developer the Preference Center ID so they can add it to your website or app. You can direct users to an App or Web Preference Center in multiple ways: * App and website navigation * Link or deep link * The Preference Center [Action](https://www.airship.com/docs/reference/glossary/#action) in a push notifications or in-app message * The Preference Center [Interactive button action](https://www.airship.com/docs/guides/messaging/editors/interactive/actions/) in a [Rich Page](https://www.airship.com/docs/reference/glossary/#rich_page) or [In-App Automation](https://www.airship.com/docs/reference/glossary/#iaa) ### Single- or multi-channel Preference centers can support either a single channel or multiple channels. Multi-channel Preference Centers can be configured for a single channel. Channel support, opt-in/out handling, and Airship plan requirements for each Preference Center type: | Type | Channel support | Opt-in/out handling1 | Plan requirement | | --- | --- | --- | --- | | **Single-channel** | App, web, email | Preferences are updated per channel. | Non-AXP | | **Multi-channel** | App, web, email, SMS | Preferences are updated at the [Named User](https://www.airship.com/docs/reference/glossary/#named_user) level per channel type. For example, if a user has two app channels and they update a preference for an app Subscription List, Airship updates both app channels for their named user, not just the one for the device they are on. | [AXP](https://www.airship.com/docs/reference/feature-packages/) | 1. See additional information in Subscription List opt-in/out handling per channel. In both Preference Center types, you can manually group Subscription Lists under headings you create. For multi-channel only, you also have the option to organize Subscription Lists automatically by channel: 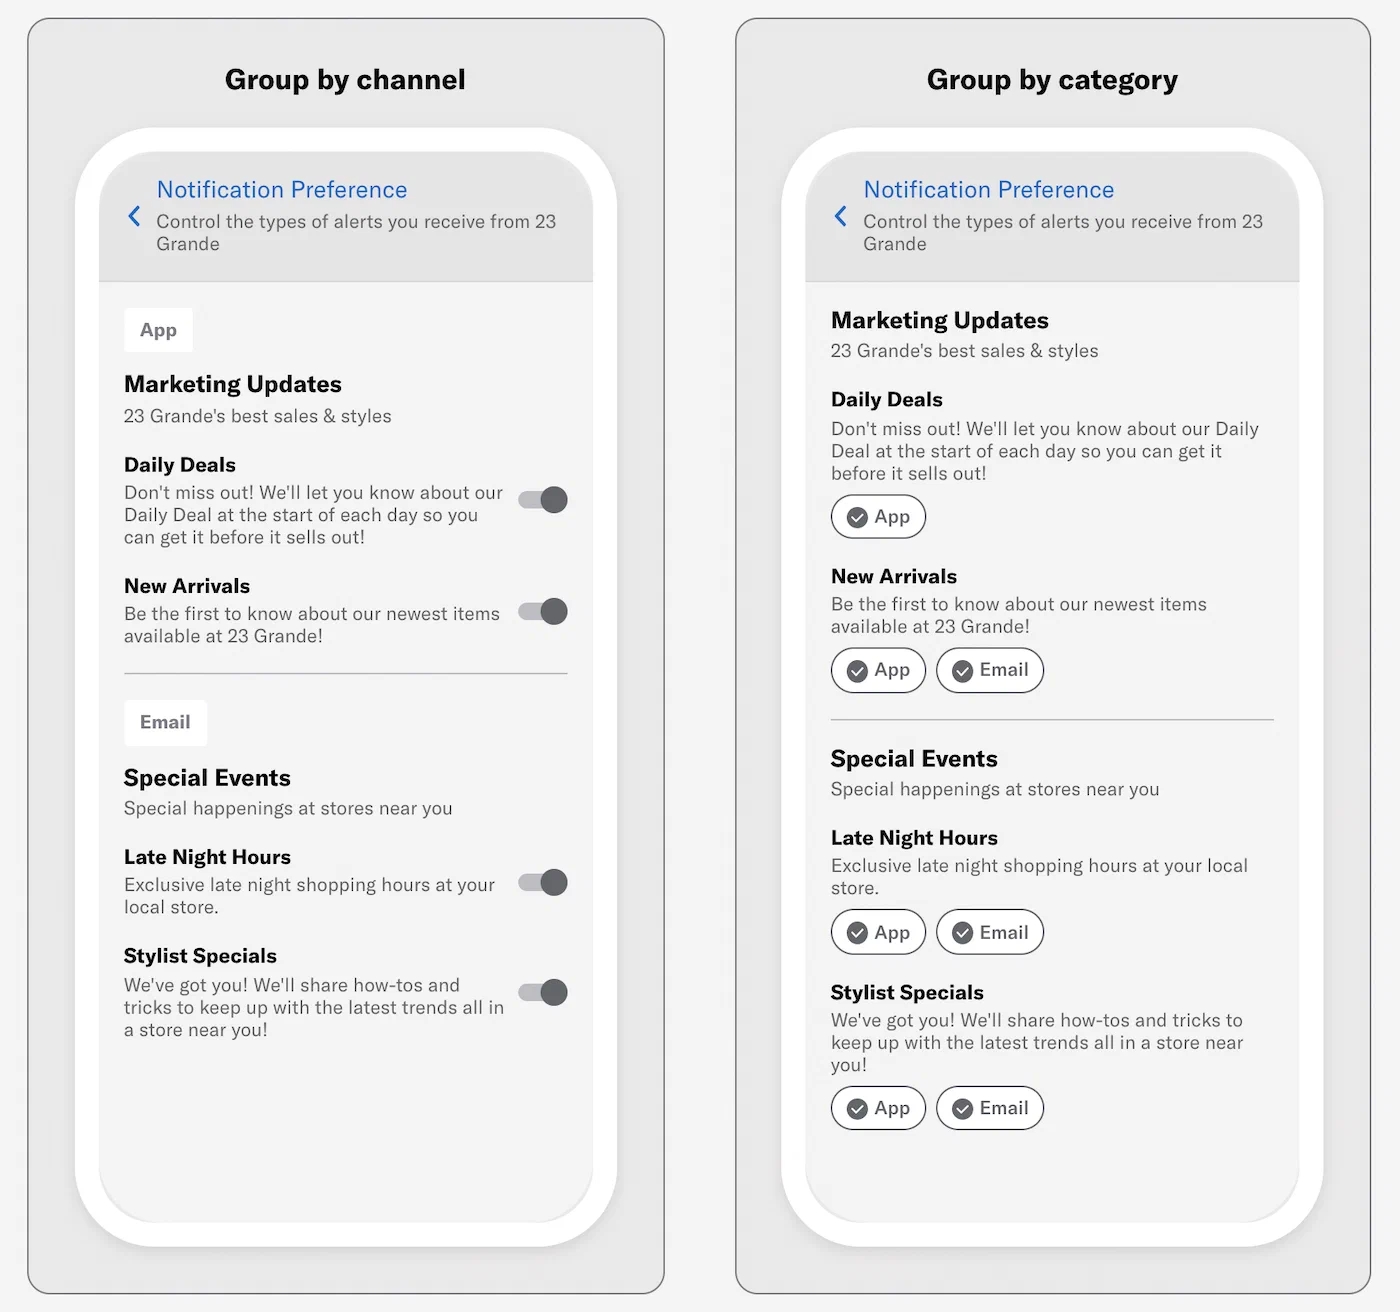 *Layout options for a multi-channel (App and Email) Preference Center* ### Subscription List opt-in/out handling per channel Subscription List opt-in status change handling for Preference Centers: | App and Web | Email | | --- | --- | | When a user changes their opt-in status for a Subscription List in a single-channel app or web Preference Center, their status is updated for the respective device or browser. For multi-channel, preferences are updated at the [Named User](https://www.airship.com/docs/reference/glossary/#named_user) level per channel type. | When a user follows the link from your email, the URL automatically inserts their [Channel ID](https://www.airship.com/docs/reference/glossary/#channel_id) and loads the web page, showing their email opt-in status for each email Subscription List in your project.For a single-channel Preference Center, when a user changes their opt-in status and submits the form, the status is updated in Airship for the email address the message was sent to. For multi-channel, preferences are updated at the [Named User](https://www.airship.com/docs/reference/glossary/#named_user) level per channel type. | > **Important:** Changes users make in Preference Centers apply to the opt-in statuses for Subscription Lists only. **They do not control the opt-in status for receiving messages.** For example, if a user opts in to an SMS Subscription List in a Preference Center, they will not receive messages sent to that list unless they are already opted in to SMS notifications. See opt-in information per channel: > > * App > * [Android](https://www.airship.com/docs/developer/sdk-integration/android/push-notifications/getting-started/#enable-user-notifications) > * [iOS](https://www.airship.com/docs/developer/sdk-integration/apple/push-notifications/getting-started/#enable-user-notifications) > * [Web](https://www.airship.com/docs/developer/sdk-integration/web/push-notifications/) > * [Email](https://www.airship.com/docs/developer/api-integrations/email/getting-started/#register-users) > * [SMS](https://www.airship.com/docs/developer/api-integrations/sms/opt-in-out-handling/) ### Notification opt-in prompts and contact information 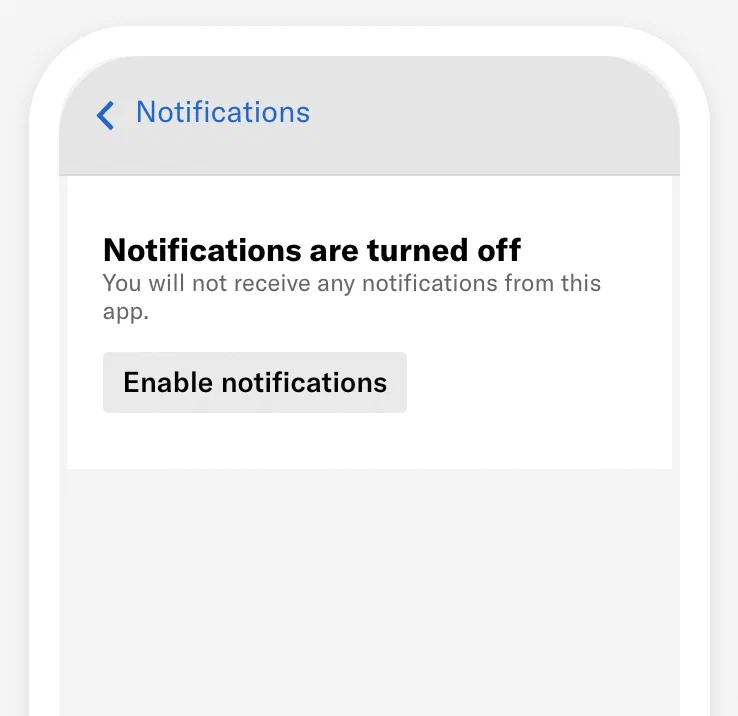 *An App opt-in prompt in an App Preference Center* In an App Preference Center, you can add notification opt-in prompts for App, Web, Email, and SMS. They appear as embedded banners. For Email and SMS, users must add at least one email address or phone number, and users can manage addresses and numbers already opted in. All labels and fields within the prompts and modals are fully customizable. --- For **App and Web**, the prompt banner appears in the Preference Center on devices that have notifications disabled. You configure a single prompt for both App and Web that contains a button for opting in. Selecting the button opens the native notification settings for your app or a browser message asking the user to allow web notifications. For a web Preference Center, your web developer must code an action for the button. --- 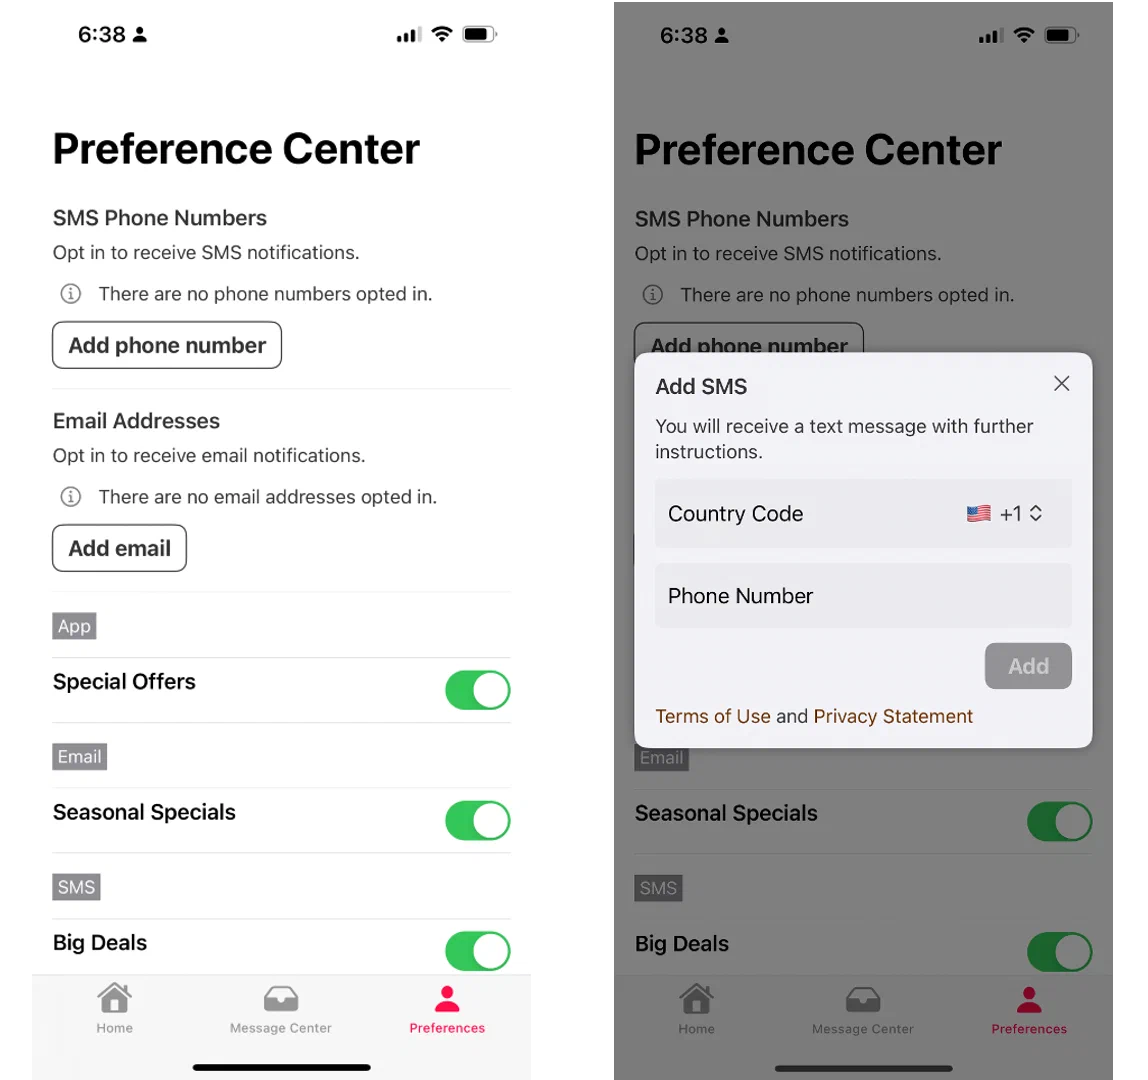 *Opting in to SMS in an App Preference Center* For **Email and/or SMS**, the prompt banner appears whether or not a user has added an email address or phone number. Opted-in addresses and phone numbers associated with a [Named User](https://www.airship.com/docs/reference/glossary/#named_user) are listed within the prompt banner. Users can add email addresses or phone numbers in order to opt in, add other addresses or numbers, or remove their contact information in order to opt out. Addresses or numbers added by the user are automatically associated with their Named User ID, allowing for cross-channel messaging. Users must complete the [Double Opt-In](https://www.airship.com/docs/reference/glossary/#double_opt_in) process in order to start receiving messages. Learn more about how double opt-in works for [Email](https://www.airship.com/docs/developer/api-integrations/email/getting-started/#double-opt-in) and [SMS](https://www.airship.com/docs/developer/api-integrations/sms/opt-in-out-handling/#double-opt-in). Your double opt-in workflow must be in place before saving an Email or SMS opt-in prompt in a Preference Center. When removing an email address, users are opted out of [Commercial Email](https://www.airship.com/docs/reference/glossary/#commercial_email) only. Required for Email and SMS opt-in prompts: [iOS SDK 18.6+](/docs/docs/developer/sdk-integration/apple/ios-changelog/#18.6.0) [Android SDK 18.1.2+](/docs/docs/developer/sdk-integration/android/changelog/#18.1.2) ### Reporting Changes to subscription status are recorded as [Real-Time Data Streaming](https://www.airship.com/docs/reference/glossary/#rtds) events. For single-channel Preference Centers, the events are per channel. For multi-channel, they include the [Named User](https://www.airship.com/docs/reference/glossary/#named_user). See [Subscription Event](https://www.airship.com/docs/developer/rest-api/connect/schemas/events/#subscription) and [Subscription List Event](https://www.airship.com/docs/developer/rest-api/connect/schemas/events/#subscription-list) in the *Real-Time Data Streaming API* reference. Even if you do not use Airship for all your channels, you can still use multi-channel Preference Centers for your other channels and keep your external providers in sync via Named User subscription status. ## Setup First, create the Preference Center in the dashboard, and then see the Implementation sections for App and Web or Email. > **Tip:** You can save an empty/undesigned Preference Center as a placeholder if your developer needs the ID immediately. ### Creating a Preference Center The [Company account Owner](https://www.airship.com/docs/guides/getting-started/admin/company-plan/) or a team member with [Administrator permission](https://www.airship.com/docs/guides/getting-started/admin/teams-messaging/#access-levels) can create and manage Preference Centers. You can create a maximum of 50 Preference Centers per project. 1. Next to your project name, select the dropdown menu (▼), then **Settings**. 1. Under **Project settings**, select **Preference Centers**. 1. Select **Create Preference Center**. 1. Define the Preference Center: | Field | Description | | --- | --- | | **Name and Description** | These appear in the Airship dashboard only. The Preference Center ID is automatically generated based on the name. An ID will not generate for a name that contains only numbers and/or special characters. | | **Type** | For single-channel Preference Centers only. Options: Mobile App, Web, Email. | | **ID** | You can enter your own ID instead of using the auto-generated one, using letters, numbers, and underscores. The ID must start with a letter and end with a letter or number. **You cannot change the ID later.** | {class="table-col-1-30"} 1. Select **Save and continue**. 1. (Multi-channel only) Select a layout. You can group Subscription Lists automatically by channel or manually under headings you create. If grouping by channel, select a channel to set up first. If a multi-channel Preference Center is organized by channel, Email automatically appears first. --- Now you can design the appearance of the Preference Center. 1. Set the title and description. For multi-channel Preference Centers, they apply to all selected channels. The Title is intended to appear as a page heading, with the Description appearing below. Their values apply to all channels, but appearance and control options vary: * For **apps**, they appear in the navigation bar at the top of your Preference Center. If you do not enter a title, the default title "Notifications" appears. * For **web**, your developer can control how they appear (or do not appear) in the Preference Center on your website. * For **email**, the title is a level-one HTML heading (`
`). They inherit whatever styles apply more generally from the surrounding page. 1. (Optional for App Preference Centers) Add [notification opt-in prompts and contact information](#notification-opt-in-prompts-and-contact-information). Follow the steps in the [next section](#configuring-opt-in-prompts-and-contact-information). --- Next, configure page sections. Select **+ Add another section** for more page sections. Fields in each section: | Field | Description | Steps | | --- | --- | --- | | **Header** and **Description** | Optional. Text that appears above the Subscription Lists you add to the section. You may want to group related lists under a single header for better organization of your Preference Center.
For Web, your developer can control how these appear (or do not appear) in the Preference Center on your website. For Email, the header is a level-two HTML heading (`
`). | Enter text. | | **Subscription Lists** | Determines which Subscription Lists will appear in the section. You can customize the list name and description for the current Preference Center. For multiple lists, you can set their order. | Search for and select at least one list. Select the more menu icon (⋮) for options to edit a list name and description, move it up in the order of lists, or remove it from the section. | {class="table-col-1-20 table-col-2-40"} For multi-channel Preference Centers grouped by channel: * To add channels, select **+ Add**, and select a channel. To remove a channel, select its tab, and then select **Remove channel**. Make sure to configure the page sections for each channel. * To customize channel names, select **Settings ▼**, then **Channel names**, enter the names as you want them to appear in the Preference Center, then select **Save**. If you want to change the name and description of a Subscription List, you must edit the list itself. See [Managing Subscription Lists](https://www.airship.com/docs/guides/audience/segmentation/audience-lists/subscription/#managing-subscription-lists). --- When you have completed configuration, select **Save and publish**. ### Configuring opt-in prompts and contact information When [creating an App Preference Center](#creating-a-preference-center), you can add a section that [prompts the user to opt-in to messaging and where they can manage their email addresses and phone numbers](#notification-opt-in-prompts-and-contact-information). > **Important:** Make sure your [Double Opt-In](https://www.airship.com/docs/reference/glossary/#double_opt_in) workflow is in place before saving an Email or SMS opt-in prompt in a Preference Center. 1. Under **Opt-in prompts**, select **Add +** next to **App/Web**, **Email**, or **SMS**. 1. (For App/Web) Configure fields for the title, body, button label, and button accessibility description. The accessibility description is optional text to be announced by assistive technology, such as screen readers. This overrides the announcement of the button label text. Selecting the button opens the native notification settings for your app or a browser message asking the user to allow web notifications. 1. (Optional for App/Web) Add an icon image. No icon is present by default. Enter an HTTPS URL for an icon image. The icon image may not render in preview. Open your app to review its appearance. See also [Personalizing media URLs](https://www.airship.com/docs/guides/personalization/content/personalize-actions/#media-urls).
If your Airship plan includes CDN support, you can also upload media or select from previous uploads in your project’s media library. See Insert media in message content in Media library.
1. (For Email and SMS)[iOS SDK 18.6+](/docs/docs/developer/sdk-integration/apple/ios-changelog/#18.6.0) [Android SDK 18.1.2+](/docs/docs/developer/sdk-integration/android/changelog/#18.1.2) Configure fields for each step: | Step | Format | Purpose and actions | Fields | | --- | --- | --- | --- | | **Prompt** | Embedded banner | The body should inform the users about the communications they are opting/opted into. Before entering an email address or phone number, customizable text appears next to an info icon (ⓘ). Afterward, the text is replaced with obfuscated contact information and a link for resending the verification email or text message also appears. Selecting the button opens the contact information form. | **Title**, **Body**, **Info** (If no contact information is present), **Button label: Add email address or phone number**, **Link label: Resend verification email or text message** | | **Contact information form** | Modal | This appears to the user after selecting a button for adding an email address or phone number. The body should inform the user that they will receive a verification email or text message they must respond to in order to complete opting in.For SMS country code, you must select at least one [Sender ID](https://www.airship.com/docs/reference/glossary/#sender_id) to populate the country code menu that will appear in the Preference Center. You can select a single sender ID per country.
The Footer can be used for details and disclaimers, and you can add links using Markdown in the format `[Terms & Conditions](https:/www.example.com/terms)`. | **Title**, **Body**, **Email field** (Email only), **Email placeholder** (Email only), **Country code heading** (SMS only), **Country code menu** (SMS only), **Phone number field** (SMS only), **Button label: Cancel**, **Button label: Submit**, Footer | | **Confirmation: Contact information submitted** | Modal | This appears after the user submits the contact information form. The body should inform the user they successfully submitted their contact information and to check for the verification email or text message. Selecting the button closes the modal. | **Title**, **Body**, **Button label: Close** | | **Confirmation: Verification message resent** | Modal | This appears when the user selects the link for resending the verification email or text message. The body should inform the user that the verification message resent. Selecting the button closes the modal. | **Title**, **Body**, **Button label: Close** | | **Confirmation: Opt-out** | Modal | This appears when a user selects the remove icon (trash) to remove an email address or phone number. The body should inform the user they will be opted out of messaging for that address or number. For email, users are opted out of [Commercial Email](https://www.airship.com/docs/reference/glossary/#commercial_email) only. Selecting either button closes the modal. | **Title**, **Body**, **Button label: Cancel**, **Button label: Submit** | {class="table-col-1-20 table-col-2-20"} 1. Select **Save**. 1. Complete the remaining steps for [creating the Preference Center](#creating-a-preference-center). ### Implementation: App and Web Your app or web developer must place your Preference Center widget in the desired area of your app or website. If you included a [notification opt-in prompt](#configuring-opt-in-prompts-and-contact-information) for Web, your web developer must also code an action for the button. 1. Go to **Content**, then **Web Pages**. 1. Copy the ID for a Preference Center. 1. Give the ID and the following platform docs links to your developer. See: * Preference Center documentation for [SDK integrations](https://www.airship.com/docs/developer/sdk-integration/) * [Preference Center](https://www.airship.com/docs/developer/sdk-integration/web/advanced/preference-center/) for Web ### Implementation: Email Next, create the Airship-hosted web page where you will embed your Preference Center: 1. Go to **Content**, then **Web Pages**. 1. Select **Create web page**. 1. Enter a name and description for your Preference Center web page, and select **Continue**. These fields are for use within the Airship dashboard only and do not appear in your form. Description is optional. 1. Select **Add +** for HTML and select a default or [saved layout](https://www.airship.com/docs/guides/messaging/editors/interactive/saving-layouts/), or select **Blank Layout** to design your own. You can edit any layout after selecting. Then design the page. See [Interactive editor](https://www.airship.com/docs/guides/messaging/editors/interactive/about/) for details. * Your layout must include at least one Preference Center element. * Personalization is not supported. * A placeholder is shown within the Interactive editor, not your Preference Center design. * Select **Preview** to see how the web page will appear on desktop and mobile devices. 1. Select **Done** when you are finished designing the page. 1. Select **Save web page** to return to the list of all web pages in your project. #### Testing an Email Preference Center web page After [Creating an Email Preference Center web page](#creating-an-email-preference-center-web-page), you can see how it will appear to your users by sending its link in an email to a [Test Group](https://www.airship.com/docs/reference/glossary/#preview_test_groups) or by manually editing the web page URL. > **Note:** If you intend to send the message to your users immediately, use the [*Send Test* option in the *Review* step](https://www.airship.com/docs/guides/messaging/messages/create/#message-review) instead. To send a test email: 1. If you do not already have a Test Group, create or edit one now, adding yourself as a member using your email address. See [Preview and test groups](https://www.airship.com/docs/guides/audience/preview-test-groups/). 1. Go to **Content**, then **Web Pages**. 1. Select the more menu icon (⋯) for a web page, then **Copy link to clipboard**. 1. In the sidebar, select the **Create** dropdown menu (▼), then select **Message**, and complete the steps for the [Message composer](https://www.airship.com/docs/guides/messaging/messages/create/). * In the Audience step, enable the Email channel, then select Test Users, enter your test group name, and select from the results. * In the Content step, include the Preference Center link in the body of the email. * In the Delivery step, select **Send Now**. 1. After sending, check your email for your test message, and follow the Preference Center link. --- To test the web page without sending a message, add a [Channel ID](https://www.airship.com/docs/reference/glossary/#channel_id) to the Preference Center's URL: > **Warning:** Interacting with the web page will apply changes to the channel ID you use for testing. 1. Go to **Content**, then **Web Pages**. 1. Select the more menu icon (⋯) for a web page, then **Copy link to clipboard**. 1. Paste the URL in your browser's address bar, replace `{{$channel.id}}` with an actual channel ID, and hit Enter on your keyboard. You should now see your rendered Email Preference Center web page. ## Directing users to a Preference Center In addition to adding a Preference Center to your app or website or providing a link or deep link, you use can Airship's built-in actions to open a Preference Center when a user interacts with a message or taps a button: * For push notifications and in-app messages, select the Preference Center [Action](https://www.airship.com/docs/reference/glossary/#action) in the Content step in a Message, Automation, A/B Test, or Sequence. * For [Rich Pages](https://www.airship.com/docs/reference/glossary/#rich_page) and [In-App Automation](https://www.airship.com/docs/reference/glossary/#iaa), select the Preference Center button action when configuring content using the Interactive editor. See [Actions in the Interactive editor](https://www.airship.com/docs/guides/messaging/editors/interactive/actions/). --- For Email Preference Centers, add the URL as a link in an [email message](https://www.airship.com/docs/guides/messaging/messages/content/email/email/) or [Template](https://www.airship.com/docs/reference/glossary/#template). To get the web page URL: 1. Go to **Content**, then **Web Pages**. 1. Select the more menu icon (⋯) for a web page, then **Copy link to clipboard**. You must send your email using Airship. The Preference Center will not load for a user if sent from a system other than Airship. Only link to an email Preference Center from an email. ## Managing Preference Centers The [Company account Owner](https://www.airship.com/docs/guides/getting-started/admin/company-plan/) or a team member with [Administrator permission](https://www.airship.com/docs/guides/getting-started/admin/teams-messaging/#access-levels) can create and manage Preference Centers and web pages. Select the dropdown icon (▼) next to your project name, then **Settings**. Under **Project settings**, select **Preference Centers**. The most recently modified Preference Center appears first. Select a column header to sort by name, ID, date created, or date modified. Select the **Archived** filter to see all archived Preference Centers. | Option | Description | Steps | | --- | --- | --- | | **Edit name and description (Single-channel)** | The name and description appear in the dashboard only. | Select the edit icon ( ), then the ( ) next to the name. Update the name or description, then select **Continue**, then **Save and publish**. | | **Edit name and description (Multi-channel)** | The name and description appear in the dashboard only. | Select the edit icon ( ), then **Settings ▼**, and then **Preference Center details**. Edit the name or description, then select **Save**, then **Save and publish**. | | **Change layout (Multi-channel only)** | You can switch between grouping by category or channel. | Select the edit icon ( ), then **Settings ▼**, then **Preference center details**, then **Select a different layout**. Make a selection, and the Preference Center will reload with the new layout. | | **Customize channel names (Multi-channel only)** | You set the channel names as they appear in the Preference Center. Channel names only appear when the Preference Center is grouped by channel and when more than one channel is added to the Preference Center. | Select the edit icon ( ), then **Settings ▼**, and then **Channel names**. Update the channel names, then select **Save**, then **Save and publish**. | | **Edit content** | You can edit the Preference Center at any time. Changes are published immediately. | Select the edit icon ( ), update the design, then select **Save and publish**. | | **Duplicate** | Makes a copy of the Preference Center with " copy" appended to the original name. | Select the duplicate icon ( ), edit the name, ID, and description, and select a type (required for single-channel Preference Centers only). Then select **Save and continue** and follow the steps in [Creating a Preference Center](#creating-a-preference-center). | | **Archive** | Available when **Published** filter is enabled. Removes the Preference Center from your list of published Preference Centers. This action does not affect its use in an app, website, or Airship-hosted web page. Archived Preference Centers count toward the maximum of 50. **Deleting a web page invalidates its URL.** | Select the archive icon ( ). For multi-channel Preference Centers, you can also archive by going selecting the edit icon ( ), then **Settings ▼**, then **Preference Center details**, then **Archive Preference Center**. | | **Unarchive** | Available when **Archived** filter is enabled. Restores the Preference Center to your list of published Preference Centers. | Select the archive icon ( ). | > **Note:** As of May 24, 2022, [AXP customers](https://www.airship.com/docs/reference/feature-packages/) can create multi-channel Preference Centers only. Previously created single-channel Preference Centers: > * Cannot be duplicated > * Can be edited — *Name and description only* > * Can be archived > > See [Migrating to a user-level Preference Center](#migrating-to-a-user-level-preference-center). ## Managing web pages Go to **Content** and select **Web Pages** to view the list of email Preference Center web pages in your project. Your last modified web page is listed first. You can sort the list by name or date modified, and search by name or keyword. Select a web page name to open a drawer where you can do the following: * For the web page link, select the copy icon (clipboard) to copy it to your clipboard. * Edit the name, description, and keywords. Select **Save** after making your changes. * Select **Edit** or **Duplicate**, which are the same as the actions available from the more menu icon (⋯), as described in the table below. * View the date and time when the web page was created and last modified. The following actions are available from the more menu icon (⋯) in the web pages list: | Action | Description | Steps | | --- | --- | --- | | **Edit** | Open the web page for editing. You can change the content, name, and description. | Select the more menu icon (⋯), then **Edit**, make your changes, and then select **Save web page**. | | **Duplicate** | Make a copy of the web page in the current project or in a different project.
Airship does not copy Segments, Attributes, Custom Events, Deep Links, Subscription Lists, Preference Centers, brand guidelines, or Scene settings. Configure those resources independently in each project. | First, choose to copy to the current project or a different one, and update the name, description, and keywords. Then, select **Duplicate**. | | **View information and access additional actions** | Open the same drawer as when you select a web page name. For what you can do in the drawer, see the list above this table. | Select the more menu icon (⋯), then **View detail**. | | **Delete** | Delete the web page from your project.
**Deleting a web page invalidates its URL.** Consider editing the web page if you want to keep the link active in emails you have already sent. | Select the more menu icon (⋯), then **Delete**. |
| **Copy link to clipboard** | Copy the web page link to your clipboard. | Select the more menu icon (⋯), then **Copy link to clipboard**. |
{class="table-col-1-20 table-col-2-40"}
## Migrating to a user-level Preference Center
Single-channel Preference Centers created before October 10, 2022, update at the channel level. After migrating to a user-level Preference Center, preferences are updated at the [Named User](https://www.airship.com/docs/reference/glossary/#named_user) level per channel type. For instance, if a user has two app channels and they update a preference for an app Subscription List, then Airship updates both app channels for their named user, not just the one for the device they are on.
**Do not migrate until your SDK has been updated.**
* [Android migration guides](https://github.com/urbanairship/android-library/tree/main/documentation/migration)
* [iOS migration guides](https://github.com/urbanairship/ios-library/tree/main/Documentation/Migration)
> **Warning:** Migration is permanent. You cannot migrate a user-level Preference Center to channel-level.
1. Next to your project name, select the dropdown menu (▼), then **Settings**.
1. Under **Project settings**, select **Preference Centers**.
1. Select the edit icon (
) for a Preference Center.
1. Select **Start migration process**. This option only appears if the Preference Center is currently channel-level.
1. Check the terms box and select **Migrate Preference Center**. Migration takes seconds to complete.
1. Select **Save and publish** to apply the changes.
# Android Live Updates
> Add and manage Android Live Updates using the push API. {{< badge "axp" >}}
For SDK methods, see the [Live Updates](https://www.airship.com/docs/sdk-topics/live-updates/) developer documentation. See also the [Android Live Updates](https://www.airship.com/docs/guides/features/messaging/live-activities-updates/) feature guide.
## About implementation
Live Updates can be started, updated, and ended using API push notifications or the SDK. The notification, widget, or custom app view refreshes with the information contained in the latest Live Update received by the device.
First you must implement a handler and define its type. This determines what occurs in the app when it receives a Live Update. Then register the handler with the Airship SDK so the handler can be notified upon receiving a `live_update` payload. Then start the Live Update by sending a push or implementing custom code. When you start the Live Update, you define its name in the `live_update` object. You can update and end by sending additional pushes or using the `LiveUpdateManager`.
* Types must be unique for each `LiveUpdateHandler` defined by an app.
* A handler can handle multiple uniquely named Live Updates.
* A name can be unique for a [Channel ID](https://www.airship.com/docs/reference/glossary/#channel_id) (e.g., `order-12345`) or shared across multiple channel IDs (e.g., `sports-game-123`).
* A name can be reused after its Live Update has ended.
For example, to provide updates for tracking a sports game, start a Live Update with name `sports-game-123`. The app will track and display changes through the Airship SDK using that name.
## Creating a handler
The Airship SDK supports two types of Live Update handlers:
* `NotificationLiveUpdateHandler` — Displays a notification with a custom layout, with content updated by the Live Update.
* `CustomLiveUpdateHandler` — Receives Live Update events and provides flexibility to display content using a custom implementation. This can be used to power home screen widgets, views embedded in the app, and more.
Each handler type has two different interfaces that may be implemented, to support suspending or callback-based code:
* `SuspendLiveUpdateNotificationHandler`
* `CallbackLiveUpdateNotificationHandler`
* `SuspendLiveUpdateCustomHandler`
* `CallbackLiveUpdateCustomHandler`
The following `SampleLiveUpdateHandler` reads content from the Live Update payload and displays scores for a sports game in a custom notification layout, using `RemoteViews`:
```kotlin
class SampleLiveUpdateHandler : SuspendLiveUpdateNotificationHandler() {
override suspend fun onUpdate(
context: Context,
event: LiveUpdateEvent,
update: LiveUpdate
): LiveUpdateResult