When selecting a transparent background for modal [In-App Automation](https://www.airship.com/docs/reference/glossary/#iaa), you must also set your project's default background color to `#00000000` for HTML messages. See: [In-App Experience Defaults: Setting Transparent Background](https://www.airship.com/docs/guides/messaging/in-app-experiences/configuration/defaults/#setting-transparent-background). | | **Background image** | Enter the HTTP/HTTPS URL of an image, then set its options.
If your Airship plan includes CDN support, you can also upload media or select from previously uploaded media. See Insert media in message content in Media library.
| | **Content width** | Set the content width of your message. This is generally helpful for email, as it represents your mobile breakpoint as well. When a client width is less than the content width, columns will collapse and cells will stack unless you apply mobile settings preventing columns from collapsing. | | **Font family** | Set the font for your message. You cannot override this setting at the row or column level. | | **Links** | Configure the appearance of links in the message. | ## Blocks and content columns 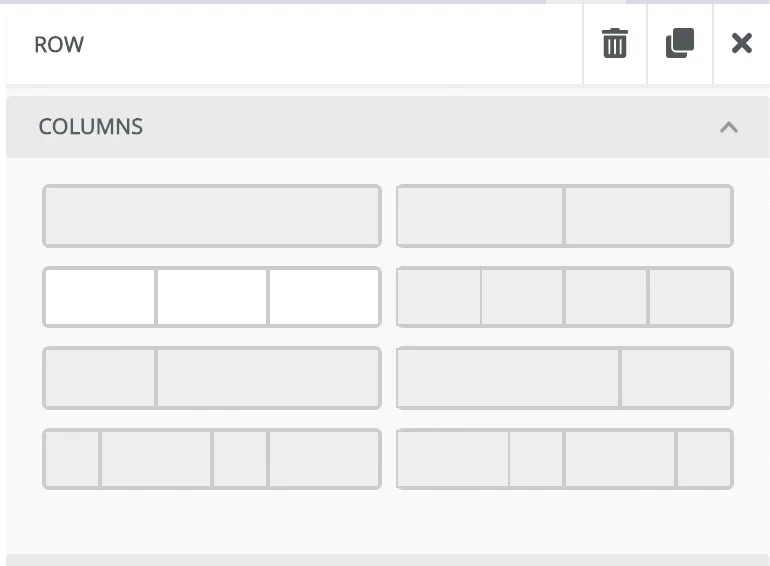 *Column options in the Interactive editor* The Blocks section and the Columns option in Content are the same thing: layout sections that organize your message into rows and columns. When you select a cell, you can style the entire row or individual columns. Most style options are the same for both. Add a single column or row of columns, then style each column and the row. To resize column widths, select and drag the dividers, and the width percentages display in the sidebar. See also [Saving blocks in the Interactive editor](https://www.airship.com/docs/guides/messaging/editors/interactive/saving-layouts/). ### Row properties Set properties for an entire row: | Setting | Description | | --- | --- | | **Background color** | Set the color for the entire row, extending to the entire width of the window, not just the width of the content body. | | **Content background color** | Set the background color for content body in the row. | | **Padding** | Set spacing inside the border for all columns in the row. Select **More Options** to change padding for individual sides of the row. | | **Background image** | Set an image as the background of the row. You can overlay the background image with other content elements. Enter the HTTP/HTTPS URL of an image, then set its options. See [Media guidelines](https://www.airship.com/docs/reference/messages/media-guidelines/#message-center-and-landing-page).If your Airship plan includes CDN support, you can also upload media or select from previously uploaded media. See Insert media in message content in Media library.
| ### Column properties Set properties for an individual cell in a row: | Setting | Description | | --- | --- | | **Background color** | Set the background color for the individual cell. | | **Padding** | Set spacing inside the border for the cell. | | **Border** | Add and style a border for the cell to provide visual separation between rows and columns. | Select the add icon () to add another column to a row or the delete icon ( ) to remove. ## Content elements Content elements consume the width of the column you place them in. Elements not contained in a block are rendered full-width. Drag a content element into your message, and then select the element to see its styling options. The following content elements are available: | Element | Description | | --- | --- | | **Columns** | See [Blocks and content columns](#blocks-and-content-columns). | | **Divider** | Add a dividing line. You can change the line color and style, and set padding around the divider. | | **Image** | Enter the HTTP/HTTPS URL of an image. You can set the image alignment, provide alternate text, set padding, and provide a link if you want the image to be clickable. See also [Actions](https://www.airship.com/docs/guides/messaging/editors/interactive/actions/) and [Media guidelines](https://www.airship.com/docs/reference/messages/media-guidelines/#message-center-and-landing-page).If your Airship plan includes CDN support, you can also upload media or select from previously uploaded media. See Insert media in message content in Media library.
| | **Button** | Link to another page, such as a subscribe or unsubscribe action or a product page. You can style button color, border, alignment, and padding in the sidebar. Select the button element to see styling options for the button label text. See also [Actions](https://www.airship.com/docs/guides/messaging/editors/interactive/actions/). | | **HTML**1 | Add your own custom HTML content element and set padding. You must select **Done** to see the preview. | | **Heading**1 | Add text. You can set the type (H1, H2, etc.), font information, color, alignment, line height, and padding in the sidebar. Select the heading element to style the text and add [links](https://www.airship.com/docs/guides/messaging/editors/interactive/actions/) and emojis. You must select **Done** to see the preview. | | **Text**1 | Add text. You can set the color, alignment, line height, and padding in the sidebar. Select the text element to style the text and add [links](https://www.airship.com/docs/guides/messaging/editors/interactive/actions/), emojis, and tables. You must select **Done** to see the preview. | | **Video** | Message Center only. Enter a YouTube URL to add video to a message. The video adapts to the width of the column that you place it in.Video does not play in the Interactive editor. You can play the video in the preview that appears after you select **Done** and leave the editor. | | **Menu** | Create a navigation menu. Add menu items and their actions, and then style the menu. | | **Social** | Add social media icons. Select icons and configure your social account links. You can set alignment, size, spacing, and padding, and select an icon type to set icon style and color scheme. | | **Preference Center** | You must include at least one Preference Center element when designing an email [Preference Center](https://www.airship.com/docs/reference/glossary/#preference_center) web page. Select a Preference Center, customize loading and saving status text and button labels, and then provide an Unsubscribe landing page URL. See default values following this table. For **Unsubscribe landing page URL**, enter a URL. | 1. You can insert [Snippets](https://www.airship.com/docs/reference/glossary/#snippet) into HTML, Heading, and Text content, but they will not render in the preview. These are the default values for Preference Center fields: | Field | Default value | | --- | --- | | **Loading text** | Loading... | | **Error loading text** | There was an error loading this preference center. Please try again. | | **Submit button text** | Save communication preferences | | **Success saving text** | Your preferences have been saved. | | **Error saving text** | There was an error saving your preferences. Please try again. | | **Unsubscribe button text** | Unsubscribe from all emails | 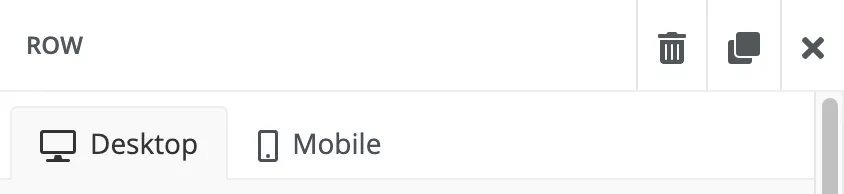 *Desktop and Mobile selections in the Interactive editor* Select **Desktop** or **Mobile** to access their different settings and options. Your message preview updates dynamically when you switch selections. ### Responsive design When configuring a content element, the following **Responsive Design** options are available: | Option | Description | | --- | --- | | **Hide on mobile/desktop** | This hides a content element from view. If you create different versions of the same content element for both desktop and mobile, use this option to make sure only the relevant version is viewable in the right context. For mobile, you may want to use this option to hide images and other elements that take up an inordinate amount of the screen in your message. | | **Do not stack on mobile** | This prevents columns in a row from stacking on a mobile device or when the screen width is less than the **Content Width** setting, which is essentially the mobile breakpoint. You can set the Content Width in the **Body** section of the editor. | ### Accessibility audit 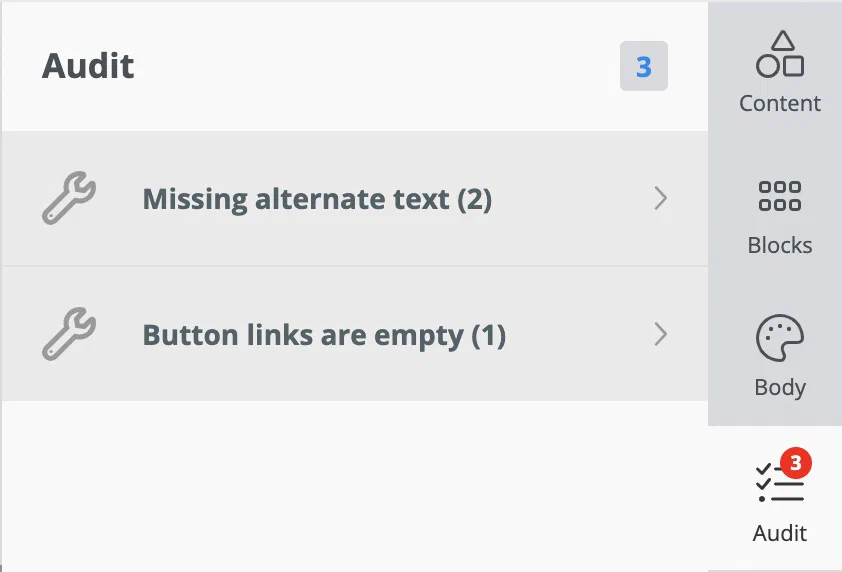 *Accessibility audit in the Interactive editor* The **Audit** section shows a count of accessibility issues in the current design: * Missing alternate text for images * Missing links in buttons and menus * Missing image URLs Select an issue type to go directly to where you can fix it. The audit is a warning only and does not prevent saving the design or sending the message. ## Thumbnail image for Message Center Message Center supports a message preview, which is how the message appears as listed in the inbox. To add the image:
Select Settings in the left sidebar.
Enter the HTTPS URL of an image. See Media guidelines.
If your Airship plan includes CDN support, you can also upload media or select from previously uploaded media. See Insert media in message content in Media library.