`, and you can manage your assets by your own IDs throughout your integration.
## Reporting
Track how your passes perform over time. Template reports show the number of passes created, installed, and removed, in the dashboard or through the Wallet API. See [Template activity](https://www.airship.com/docs/guides/wallet/user-guide/reporting/template-reports/).
To act on pass events as they happen, register a callback server that receives install and uninstall notifications. See [Wallet callbacks](https://www.airship.com/docs/guides/wallet/user-guide/reporting/wallet-callbacks/).
# Set up your wallet project
> Create an Airship account, get access to wallet, and create your first project and template.
After wallet is enabled for your account, you can create wallet projects and templates at any time. You'll need to set up certificates and publishing access before you can create pass links.
## Set up your account
New accounts start on our free plan, and you can [upgrade to a more feature-rich paid plan at any time](https://www.airship.com/docs/guides/getting-started/account/company-and-plan/#changing-your-airship-plan). Mobile Wallet does not have self-service signup, so only messaging will be available at first.
Follow these steps to create your Airship account:
- Create an Airship account on go.airship.com or go.airship.eu . Make sure your Region selection matches the location where you want your data to be hosted.
- Check your inbox for a verification email from Airship and click Activate account to open the account setup page.
- Set up a password.
Next, [contact Airship](https://www.airship.com/contact-us/) to request enabling Mobile Wallet for your account. Once enabled, you can create your first project.
## Add team members
Adding team members is a two-step process: invite users to your Company account, then grant them access to individual wallet projects. Only Company account Owners and team members with Administrator permission can manage invitations and project access. For procedures, see [Manage wallet teams and access](https://www.airship.com/docs/guides/getting-started/wallet/teams-and-access/).
## Set up vendor certificates and publishing access
Apple Wallet and Google Wallet each require credentials that prove you can issue passes for your brand. Google Wallet also requires publishing access approved by Google. These steps are typically completed by a developer. See [Set up Apple Wallet certificates](https://www.airship.com/docs/guides/getting-started/developers/wallet-apple-certificates/) and [Set up Google Wallet certificates and publishing access](https://www.airship.com/docs/guides/getting-started/developers/wallet-google-certificates/).
## Create a wallet project and template
Create your first project and template:
1. From the Airship dashboard, select **Create project** and select **Mobile Wallet Project**.
1. Enter a project name, select pass and barcode types, and then select **Save and Continue**.
1. Select a template type, enter the template name and description. The template name is essentially a title for the pass. It appears at the top of the pass when opened on a device, and it is also the source of the pass's file name as it appears for installation:
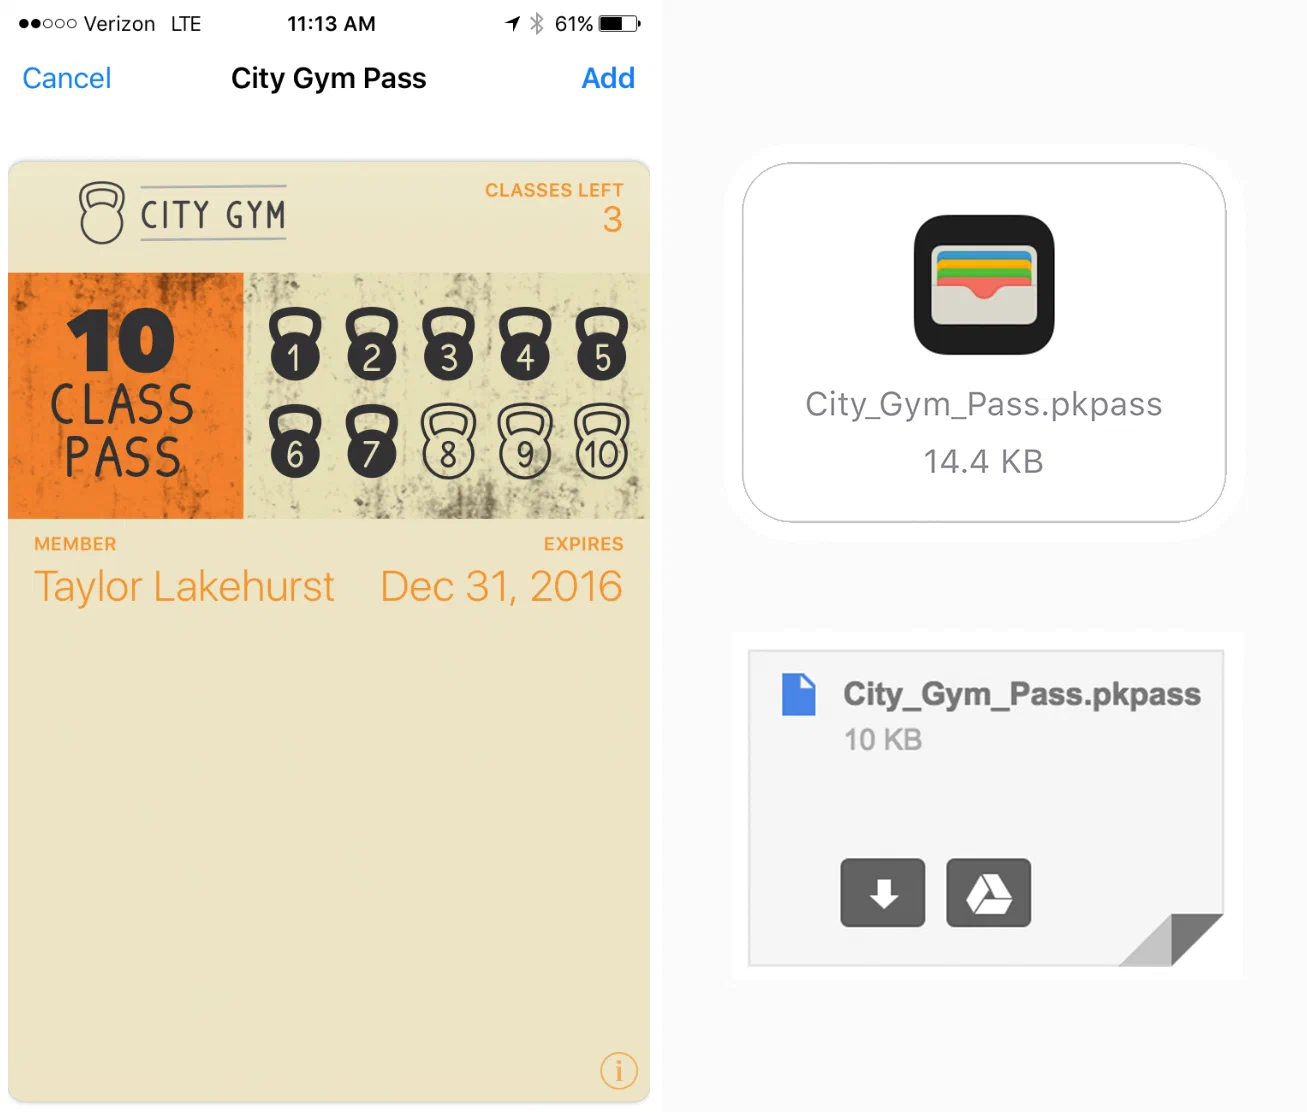
*A template with name 'City Gym Pass' as it appears on the installed pass*
1. Select **Start Building** to save the template.
### Managing projects
After creating a wallet project, go to **Settings**, then **Project Details** to view project details, edit the name, description, or custom project ID, or delete the project. Entering a custom project ID overrides the project's auto-generated default project ID.
To edit project details, select **Edit Details** or **Update**, make your changes, and select **Save**.
To delete your project, select **Delete Project** and confirm.
> **Important:** Before you can delete a project, you must expire or delete all passes associated with the project.
## Next steps
Continue to [Create your first pass](https://www.airship.com/docs/guides/getting-started/wallet/create-your-first-pass/) to design your template, generate a pass link, and install it on your device.
# Create your first pass
> Design your template, create a pass link, and install your first Airship Mobile Wallet pass on a test device.
After [setting up your wallet project and template](https://www.airship.com/docs/guides/getting-started/wallet/set-up-project/), you're ready to design your template, generate a pass link, and install a pass on a test device.
## Design your template
The template controls the look and content of your pass. Follow the steps in [Design a template](https://www.airship.com/docs/guides/wallet/user-guide/design-template/template-design/) to define colors, add your brand logo, configure fields, and set default values.
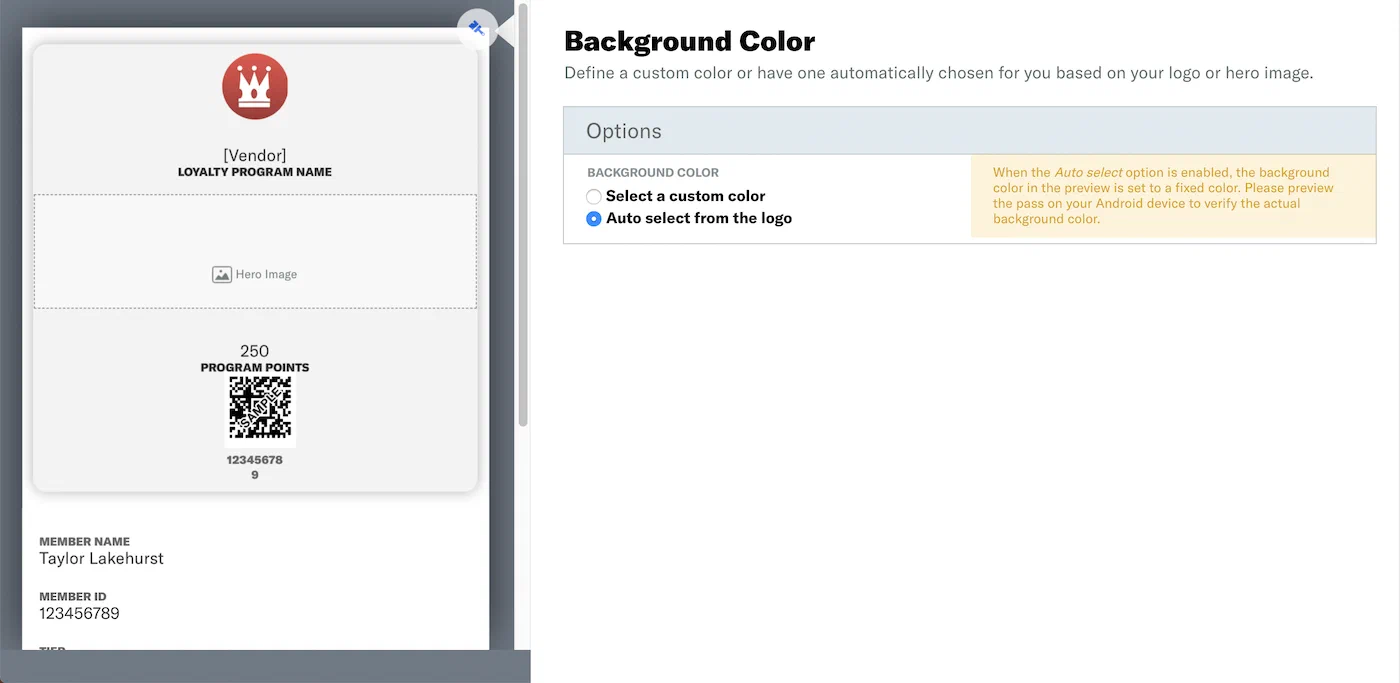
*Setting the background color for a wallet template*
## Create a pass link
An Adaptive Link is a vendor-agnostic, shortened mobile wallet pass link that supports templates for both Google Wallet and Apple Wallet. When a user taps the link, Airship determines the user's platform and generates the right pass for that platform. Adaptive Links are the recommended way to distribute a pass.
Create an Adaptive Link for your pass:
1. Go to **Templates**.
1. Select anywhere in your template's row to expand it, then select **Create an Adaptive Link**.
1. Enter a name for the link. The name appears in the list of all the template's Adaptive Links. It does not appear to recipients of the link.
1. Select **Save**.
1. Copy the **Adaptive Link URL**.
For information about all the available settings, see [Create Adaptive Links using the dashboard](https://www.airship.com/docs/guides/wallet/user-guide/create-links/dashboard/). For additional link creation methods, see [Creating and distributing pass links](https://www.airship.com/docs/guides/wallet/user-guide/create-links/).
## Install your pass on a test device
Now that you have a link, send it to yourself so you can see your pass on your own mobile device. You can share through any channel that preserves URLs, such as email, SMS, or AirDrop. If you have an Airship messaging project, you can also distribute pass links when a user interacts with a message. See [Distributing pass links](https://www.airship.com/docs/guides/wallet/user-guide/create-links/distribute/).
Open the link on your device:
* On iOS, open the link in Safari. Tap the pass to install it in Apple Wallet.
* On Android, open the link in Chrome. Tap **Save to Google Wallet** to install.
# The Airship dashboard
> {{< glossary_definition "dashboard" >}}
The dashboard is where you create and access projects, containers for the settings, certificates, reports, and other details related to your messages and mobile wallet passes.
The dashboard has two levels:
- A list of all your messaging and mobile wallet projects.
- An individual project after opening it from the list of all projects.
Almost everything you do with Airship happens inside a project, including creating messages and wallet pass templates.
Viewing and finding your projects
At the top level of the dashboard, tiles display each messaging and mobile wallet project. Messaging projects list their name, environment, and channels. Mobile wallet projects list their name and pass type.
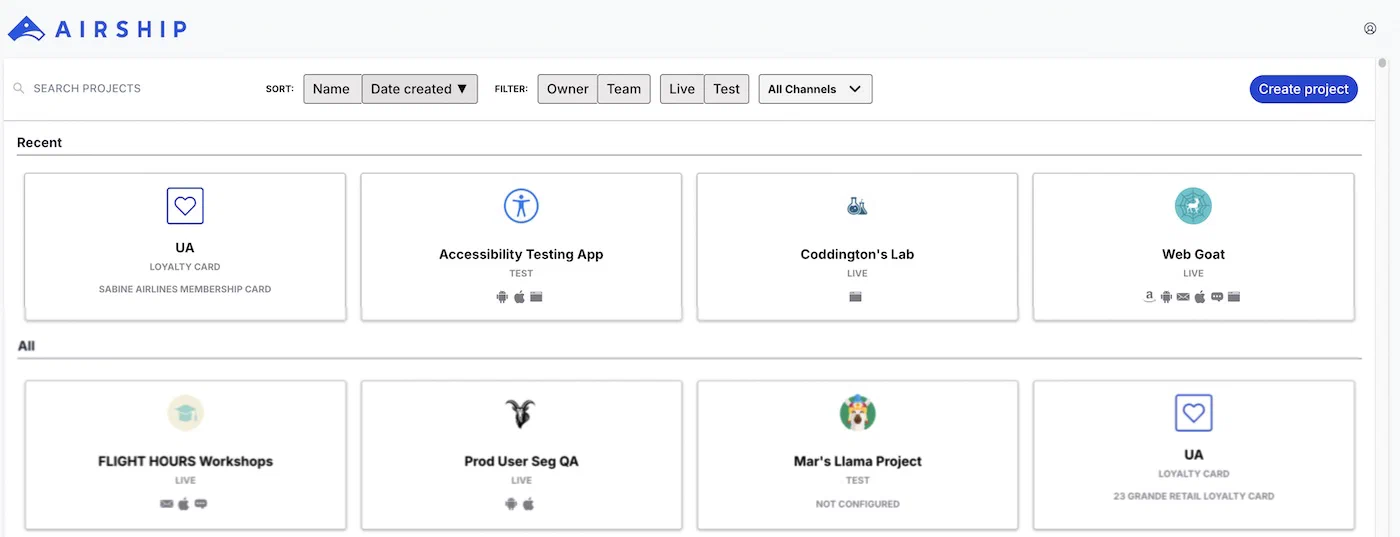
*The top-level dashboard in Airship*
If you have more than eight projects, up to four of your most recently accessed projects appear under Recent. Recent projects are not shown when sort, filter, or search are applied.
The default view is sorted by creation date, newest projects first. Select Name or Date Created to sort. Select again to toggle ascending/descending order. You can search for projects by complete or partial name.
Use filters to toggle views:
| Filter |
Description |
| Owner/Team |
Toggle between projects you own and projects you have non-owner access to. See Manage project access in Manage Messaging teams and access. All mobile wallet projects appear for Owner. |
| Live/Test |
Toggle between projects by environment type. All mobile wallet projects appear for Live. |
| Channel |
Select a channel configured for your account: Mobile apps, Web, SMS, Email, and Mobile wallet. After selecting Mobile apps you can filter again by platform. After selecting Mobile wallet you can further filter by pass type and company. |
## Navigating individual projects
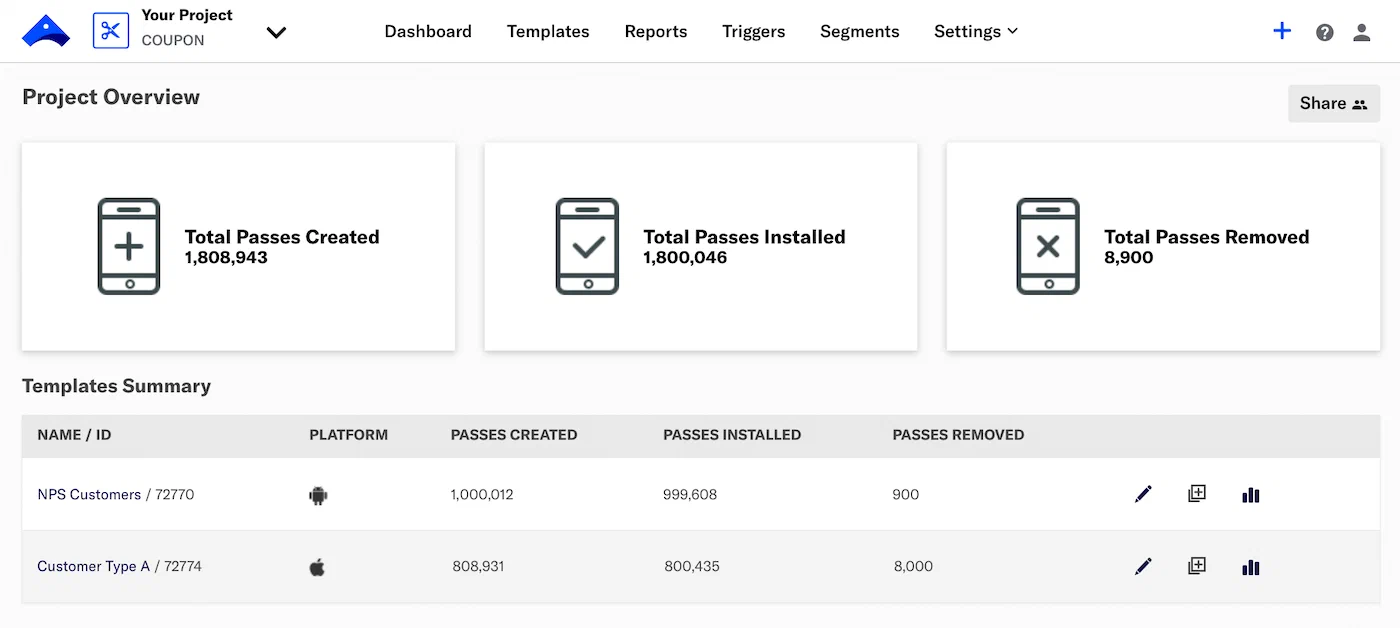
From the top-level dashboard, select a tile to open a project. The header shows the project name and the pass type name and icon.
To switch between your six most recent projects, select the down arrow (▼) next to the project name, then select from the list. Select **View all projects** in the list to return to the top-level dashboard. You can also select the Airship logo in the header to return to the top-level dashboard.
*A mobile wallet project dashboard*
### Header icons
The header contains the following icons:
* Project creation icon (+) — Create a new template.
* Help icon (?) — Access resources.
* Account menu icon (user) — View account information.
### Header menus
The header groups the main areas of a project:
| Menu | Description |
| --- | --- |
| **Templates** | Create and edit pass templates |
| **Reports** | Analysis of each template |
| **Triggers** | Set lock-screen alerts that appear on a user's device based on location, date, or beacon proximity |
| **Segments** | Build reusable audience groups from tags to target template updates |
| **Settings** | Manage the project's details, barcode, certificates, and Associated App IDs, and access its API key and secret |
### Project Overview
Under **Project Overview**, counts are provided for the following:
| Count | Description |
| --- | --- |
| **Passes Created** | The pass has been created but has not yet been added or deleted. Apple Wallet passes only. |
| **Passes Installed** | The pass has been installed by the end user and has not been removed or deleted. |
| **Passes Removed** | The pass has been removed by the end user and not deleted. Deleted passes are removed from the mobile wallet platform but remain on the end user's device. Only end users can remove the pass. If a pass has been deleted, you will not have the ability to send any updates to the pass. |
Pass counts reflect the current count of passes rather than net pass activity. For example, if a user adds a pass, then removes the same pass, then adds the pass again, the Passes Installed count increases by one, while the Passes Removed count stays constant.
> **Note:** The Passes Installed count may exceed the Passes Created count when passes are copied across devices, such as during iCloud backup, family sharing, or phone upgrades. Each copy counts as a separate installation, and Airship keeps each copy in the Installed state until the user removes it.
Select **Notification history** to view a log of notifications sent from the dashboard. See [Send Notifications from the Dashboard](https://www.airship.com/docs/guides/wallet/user-guide/notifications/push-notifications/#send-notifications-from-the-dashboard) in *Wallet Push Notifications*.
Select **Share
** to grant project access to current team members. See [Manage project access](https://www.airship.com/docs/guides/getting-started/wallet/teams-and-access/#manage-project-access) in *Manage wallet teams and access*.
### Templates Summary
Under **Templates Summary**, each template is listed with its ID, platform, and pass counts. Each row offers these actions:
* Select the edit icon (
) to [edit the template design](https://www.airship.com/docs/guides/wallet/user-guide/design-template/template-design/#editing-template-designs).
* Select the duplicate icon (
) to [duplicate the template](https://www.airship.com/docs/guides/wallet/user-guide/design-template/manage/#duplicate-a-wallet-template).
* Select a template name or the report icon (
) to open its [Template Report](https://www.airship.com/docs/guides/wallet/user-guide/reporting/template-reports/).
# Manage wallet teams and access
> Invite team members to your wallet projects, manage administrator permissions, and control project access.
First, invite users to join your [Company account](https://www.airship.com/docs/guides/getting-started/account/company-and-plan/). After they accept the invitation, you can grant them access to individual wallet projects. Only Company account Owners and team members with [Administrator permission](#administrator-permission) can invite or remove other team members and control project access.
## Invite team members
Verify addresses for existing Airship users before sending an invitation. If you enter an email address that does not match an existing Airship user account, they receive an email with a request to activate a new account.
New team members are automatically assigned [Administrator permission](#administrator-permission).
Send an invitation:
1. Select the account menu icon (user) in the dashboard header, then select **Team Management**.
1. Select **Invite member**.
1. Enter an email address and select **Invite**.
After sending an invitation, the Team Management page lists the invited user under **Outstanding Invitations**.
## Remove team members
For outstanding invitations, removing a team member deactivates the invitation link sent to the user and removes the invitation from Team Management. For accepted invitations, removing a team member revokes their access to all projects in your [Company account](https://www.airship.com/docs/guides/getting-started/account/company-and-plan/). If you need to revoke access to a single project, see [Manage project access](#manage-project-access).
Remove a team member:
1. Select the account menu icon (user) in the dashboard header, then select **Team Management**.
1. Select the remove icon (trash-simple) for a team member.
## Manage project access
You can grant project access to current team members. People with outstanding invitations do not appear in search results. You can also remove team members from individual projects. If you need to remove a user from your team entirely, see [Remove team members](#remove-team-members).
Grant or revoke project access:
1. Select **Templates** in the project header.
1. Select **Share
**.
1. (To grant access) Enter the username or email address of your team member and select from results.
1. (To revoke access) Under **Current Team**, select the remove icon (×) for the team member you want to remove. Team members that cannot be removed are greyed out.
1. Select **Share**.
Access changes take effect for team members the next time they refresh the dashboard or log in to Airship.
## Administrator permission
Wallet administrators have these additional permissions:
* Create new projects
* Send team invitations
* Add or remove Administrator permissions for other team members
* View API credentials and create OAuth tokens
You can enable Administrator permission for any team member. Administrators only have access to projects that have been shared with them.
Set Administrator permission for a team member:
1. Select the account menu icon (user) in the dashboard header, then select **Team Management**.
1. Under **Accepted Invitations**, toggle the **Admin** setting for a user.
## Accept team invitations
If you are invited to a wallet team, Airship may send you two emails: one to activate your account and one to accept the team invitation. After you join a team, an Administrator can grant you access to wallet projects.
Activate your Airship account before accepting the team invitation. If you try to accept the invitation first, you may need help from Airship Support to complete it.
If you do not accept the team invitation, you can still follow the link to join the team at any time. Your invitation is valid until an Administrator deletes it.