# Get started with messaging
Set up your Airship messaging project, configure the channels you need, and send your first message.
Use for marketer-led onboarding to Airship messaging — concepts, project setup, the developer hand-off, and sending the first message. Defer SDK install and REST API implementation steps to /developer/.
# Messaging basics
> Learn how messaging works, what kinds of messages Airship supports, and the tools you use to create them.
## How messaging works
In order to send messages, you need the following:
- An **app or website** integrated with the Airship software developer kit (SDK) — The SDK enables communication with mobile devices and web browsers. If you are only sending SMS or email notifications, SDK integration is not required. Notifications sent to [Open Channels](#message-types) also do not require SDK integration, but your webhook server must be able to process and interpret a JSON payload.
- An **audience** of your app's or website's opted-in users — An exception to this is [Apple News](https://www.airship.com/docs/reference/glossary/#apple_news) notifications, which are sent to Apple News subscribers. Apple News audience management is not handled via Airship.
- A **container** for your messages — In Airship, this container is a *project*. You create a project in the [Dashboard](https://www.airship.com/docs/reference/glossary/#dashboard) for each app or website you want to communicate with. Almost everything you do with Airship, including creating messages, happens inside a project. A project does the following:
* Serves as a record for your app, website, and any other channels you use to communicate with your audience
* Stores your message history, message templates, audience and analytic data, channel configuration, default message configuration settings, and more
* Contains the keys required to talk to various notification services
With the above in place:
1. **You create a message** in the dashboard or using the API.
1. **Your app or website interprets the message** via the Airship SDK, displaying or delivering it to users. SMS, email, and Apple News notifications are instead interpreted by a native client.
1. **Users see your message.** When and where they see the message depends on message type, delivery settings, and automation.
## Channels
When you read "channel," it could mean one of three things:
* **Engagement** channel — A communication medium supported by the Airship Service. Supported channels include app, web, email, SMS, and Open Channels.
* **Development** channel — An instance representing an entity addressable via the Airship Service, such as an iOS device, email address, SMS number, or web browser.
* **Channel ID** — An Airship-specific unique identifier for a development channel instance, such as a mobile device, web browser, or email address.
We specify *Channel ID* as such in our documentation. *Engagement* and *development* are generally implied by context. For more information, see [Intro to Channels](https://www.airship.com/docs/guides/getting-started/developers/channels-intro/).
## Message types
Message type availability varies per engagement channel:
| Message type | Description | Channels | Send from |
| --- | --- | --- | --- |
| **Push notification** | A push notification is a message that can appear on any screen on a mobile device. Push notifications appear as banners. [Learn more](https://www.airship.com/docs/guides/messaging/messages/content/app/push-notifications/) | App | Dashboard, API |
| **Web push notification** | A web push notification is a message that appears in the top or bottom right corner of a web browser or in a notification center. On mobile devices, web push notifications appear similar to push notifications. [Learn more](https://www.airship.com/docs/guides/features/messaging/push-notifications/) | Web | Dashboard, API |
| **Message Center** | Message Center is both a place in your app where you can display persistent rich messages, including HTML, video, etc., and a message type. Similar to email, Message Center represents both the medium (the in-app inbox) and the message type (the messages you send to the inbox). [Learn more](https://www.airship.com/docs/guides/features/messaging/message-center/) | App | Dashboard, API |
| **In-app message** | An in-app message is a message that appears inside of your app. You can send in-app messages to your entire app audience, not just users who have opted-in to push notifications. The standard format, as opposed to In-App Automation, is a banner that slides downward or upward from the top or bottom of a device screen. [Learn more](https://www.airship.com/docs/guides/messaging/messages/content/app/in-app-messages/) | App | Dashboard, API |
| **In-App Automation** | In-App Automation refers to messages cached on users' devices and displayed when users meet certain conditions within your app, such as viewing a particular screen or opening the app a certain number of times. [Learn more](https://www.airship.com/docs/guides/features/messaging/in-app-automation/) | App | Dashboard |
| **Scene** | A Scene is a mobile app or web experience of one or more screens displayed with fully native UI components in real time, providing immediate, contextual responses to user behaviors. Scenes can be presented in full-screen, modal, or embedded format using the default swipe/click mode or as a Story. They can also contain survey questions. [Learn more](https://www.airship.com/docs/guides/features/messaging/scenes/about/) | App, Web | Dashboard |
| **Email** | Email is an HTML or plain-text message that you send to registered users. [Learn more](https://www.airship.com/docs/guides/features/messaging/email/) | Email | Dashboard, API |
| **SMS** | An SMS is a message that you can send to an MSISDN (phone number) over the SMMP protocol to devices that have opted in for a specific sender ID (long or short code). SMS messages appear in recipients' native SMS clients. Generally speaking, SMS is inclusive of MMS and RCS. [Learn more](https://www.airship.com/docs/guides/messaging/messages/content/sms/) | SMS | Dashboard, API |
| **Open channel** | An Open channel message can be sent to any medium that can accept a JSON payload. [Learn more](https://www.airship.com/docs/guides/features/messaging/open-channels/) | Open channel | Dashboard, API |
## Creating and sending messages
You can create and send messages in three ways: with a Composer, in the Journey map, or through the Airship API.
### Composers
A Composer is a dashboard tool for creating a message in a linear, step-by-step flow.
Use a Composer for single messages:
| Composer | Description | Supported channels | Multi-channel support | Documentation |
| --- | --- | --- | --- | --- |
| **Message** | Send a single message immediately, scheduled, or recurring. | App1, web, email, SMS, open | Yes | [Create a Message](https://www.airship.com/docs/guides/messaging/messages/create/) |
| **Automation** | Automatically send a message to users when users meet certain conditions. | App1, web, email, SMS, open | Yes | [Create an Automation](https://www.airship.com/docs/guides/messaging/messages/sequences/create-automation/) |
| **Scene** | Display a [Scene](https://www.airship.com/docs/reference/glossary/#scene) when users meet certain conditions. | App, web | Yes | [Create a Scene](https://www.airship.com/docs/guides/messaging/in-app-experiences/scenes/create/) |
| **In-App Automation** | Display an [In-App Automation](https://www.airship.com/docs/reference/glossary/#iaa) when users meet certain conditions. | App | No | [Create an In-App Automation](https://www.airship.com/docs/guides/messaging/in-app-experiences/in-app-automation/create/) |
| **Apple News** | Send a push notification that links to an Apple News story. | App | No | [Apple News](https://www.airship.com/docs/guides/messaging/messages/apple-news/) |
1. For the app channel, the Message and Automation Composers support push notifications, in-app messages, and Message Center.
### Journey map
A Journey is a continuous user experience of connected Sequences, Scenes and/or In-App Automations. The Journey map is a dashboard tool for building those messages, either individually or connected to create a Journey.
Sequences support the same channels and message types as the [Message and Automation Composers](#composers). See [Create a Sequence](https://www.airship.com/docs/guides/messaging/messages/sequences/create/create/) and [Journeys](https://www.airship.com/docs/guides/features/orchestration-experimentation/journeys/).
### API
To send messages using the API, see the [Airship API reference](https://www.airship.com/docs/developer/rest-api/ua/). The API does not support Sequences, Scenes, In-App Automations, or Apple News. See [Message types](#message-types) for API support per message type.
## Reporting
After you send, measure performance and engagement. See [About reports](https://www.airship.com/docs/guides/reports/about/).
You can also set up [integrations with Airship partners](https://www.airship.com/docs/integrations/) and use [Real-Time Data Streaming](https://www.airship.com/docs/reference/glossary/#rtds) to send your Airship events to an outside system.
# Set up your messaging project
> Create an Airship account and project so you can start sending messages.
This page walks you from a brand-new Airship account through creating a messaging project. Configuring channels is largely a developer step. Once your project has at least one configured channel, you'll be ready to send your first message.
## Set up your account
New accounts start on our free plan, and you can [upgrade to a more feature-rich paid plan at any time](https://www.airship.com/docs/guides/getting-started/account/company-and-plan/#changing-your-airship-plan).
Follow these steps to create your Airship account:
- Create an Airship account on go.airship.com or go.airship.eu . Make sure your Region selection matches the location where you want your data to be hosted.
- Check your inbox for a verification email from Airship and click Activate account to open the account setup page.
- Set up a password.
Now you can enter an email address to request a magic link to install our [1st Flight app](https://www.airship.com/docs/guides/getting-started/try-airship/) or skip. After either choice, your next screen is your [Dashboard](https://www.airship.com/docs/reference/glossary/#dashboard), where you can create a messaging project.
> **Tip:** After creating an Airship account, you can access [Flight School](https://www.airship.com/blog/fast-track-your-airship-expertise-and-value-creation-with-flight-school/) to take training courses and complete our Certification Track.
>
> Select the help icon (?) in the dashboard header, then **Flight School**. Or you can go directly to [https://flightschool.airship.com/](https://flightschool.airship.com/).
## Add team members
Invite team members directly to a messaging project and assign an [access level](https://www.airship.com/docs/guides/getting-started/messaging/teams-and-access/#access-levels) for that project. Only Company account Owners and team members with Administrator permission can send invitations and change access. For procedures, see [Manage messaging teams and access](https://www.airship.com/docs/guides/getting-started/messaging/teams-and-access/).
Some actions, such as creating or deleting projects, viewing billing, and modifying login security settings, require Owner permission. By default, each company account has a single Owner. To add additional Owners or transfer ownership, see [Adding or changing a Company account Owner](https://www.airship.com/docs/guides/getting-started/account/company-and-plan/#adding-or-changing-a-company-account-owner).
## Create a messaging project
Create a new project from the top-level dashboard:
1. Select **Create project**, then **Messaging project**.
1. Enter details about your project:
* **Project Name** — You can edit this at any time. If your organization runs multiple projects, adopt a descriptive naming convention so teammates can find it. Examples: "Anytown News iOS — Development" or "McDowell's Chicago Android — Production".
* **Icon (Optional)** — Upload your icon. This does not have to be the same
icon you submit to app marketplaces, but that is the typical practice.
* **Type** — Specify whether this project is live or for testing. If
this is your first time configuring a project for Airship, you
should choose **Test**. **This setting cannot be changed later.**
Eventually you'll want both a Test build for sending test messages and a Live build for messaging customers. Apple treats production and development servers separately, so a device token from a testing sandbox won't work in production. See [iOS Channel Configuration](https://www.airship.com/docs/guides/getting-started/developers/configure-channels/#ios-channel-configuration).
* **Industry** — Select an industry type and sub-industry. These are used for reporting.
* **Website URL (Optional)** — Enter your homepage URL to provide context for [Audience Pulse](https://www.airship.com/docs/guides/audience/segmentation/audience-pulse/) AI recommendations.
1. Select **Create project**.
### Managing projects
After creating a messaging project, you can access its details, and edit or delete the project.
Next to your project name, select the dropdown menu (▼), then **Project details**. From there you can view the following information:
* Project name
* Industry
* App key
* Secret — Requires access level [Owner, Administrator, or Full access](https://www.airship.com/docs/guides/getting-started/messaging/teams-and-access/#access-levels)
* Master Secret — Requires access level [Owner or Administrator](https://www.airship.com/docs/guides/getting-started/messaging/teams-and-access/#access-levels)
To edit the name, icon, or industry, select **Edit project details**, make your changes, and select **Save project details**.
To delete your project, select **Delete project**.
> **Warning:** When you delete a project:
>
> * All messages are deleted, including any scheduled or ongoing messages.
> * All analytics are deleted.
> * All channels are uninstalled.
> * After 90 days, data related to the deleted project is purged.
>
> This action is irreversible.
## Configure channels
Configuring a channel connects Airship to a delivery platform. Airship provisions email and SMS for you. See [Provision Account](https://www.airship.com/docs/developer/api-integrations/email/getting-started/#provision-account) and [Configure your project](https://www.airship.com/docs/developer/api-integrations/sms/getting-started/#configure-your-project) in the email and SMS *Getting Started* documentation.
A developer sets up the remaining channels. App and web channels require integrating the Airship SDK. Set up each channel you plan to use:
| Channel | What's required | Resources |
| --- | --- | --- |
| **Apple**
(iOS / iPadOS / visionOS / tvOS) | Add an APNs token or certificate to Airship, then integrate the SDK. | [Configuring Mobile Channels](https://www.airship.com/docs/guides/getting-started/developers/configure-channels/) and [Install and Set Up the Apple SDK](https://www.airship.com/docs/developer/sdk-integration/apple/installation/getting-started/) |
| **Android**
(FCM / HMS) | Add Firebase (FCM) service account credentials and/or Huawei (HMS) client ID and secret to Airship, then integrate the SDK. | [Configuring Mobile Channels](https://www.airship.com/docs/guides/getting-started/developers/configure-channels/) and [Install and Set Up the Android SDK](https://www.airship.com/docs/developer/sdk-integration/android/installation/getting-started/) |
| **Fire OS**
(ADM) | Add Amazon Device Messaging credentials to Airship, then integrate the SDK. | [Configuring Mobile Channels](https://www.airship.com/docs/guides/getting-started/developers/configure-channels/) and [Install and Set Up the Android SDK](https://www.airship.com/docs/developer/sdk-integration/android/installation/getting-started/) |
| **Web** | Set web push defaults, then install the SDK on your site. | [Web Getting Started](https://www.airship.com/docs/developer/sdk-integration/web/getting-started/) |
| **Open Channels** | Stand up a webhook server, then configure the Open Channel in the dashboard. | [Open Channels Getting Started](https://www.airship.com/docs/developer/api-integrations/open/getting-started/) |
For cross-platform frameworks, such as React Native, Flutter, and Cordova, see [Install and integrate Airship Mobile & Web SDKs](https://www.airship.com/docs/developer/sdk-integration/).
## Next steps
After at least one channel is configured, go to [Send your first message](https://www.airship.com/docs/guides/getting-started/messaging/send-first-message/). You will send to a [Test Group](https://www.airship.com/docs/reference/glossary/#preview_test_groups), so you only need your own test recipients, not your full audience.
You add each test recipient by an ID. For app and web, that ID is a [Channel ID](https://www.airship.com/docs/reference/glossary/#channel_id), which is ready once the SDK is integrated. For email, you can add any address. For SMS and Open Channels, the recipient must already be registered in your project. See the following:
- [Register SMS Users](https://www.airship.com/docs/developer/api-integrations/sms/getting-started/#register-sms-users) in SMS *Getting Started*
- [Register a Channel to Your Open Platform](https://www.airship.com/docs/developer/api-integrations/open/getting-started/#register-a-channel-to-your-open-platform) in Open Channels *Getting Started*
If you are migrating an existing Twilio SMS or SendGrid email program to Airship, see [Twilio and SendGrid activation](https://www.airship.com/docs/guides/getting-started/messaging/twilio-sendgrid/).
# Send your first message
> Create a Test Group, then send your first message from the Airship dashboard.
After you have [set up your messaging project](https://www.airship.com/docs/guides/getting-started/messaging/set-up-project/) and configured at least one channel, you're ready to send your first message.
## Create a Test Group
You'll send to a [Test Group](https://www.airship.com/docs/reference/glossary/#preview_test_groups) so you can check the experience yourself before sending to your audience.
When adding users to a group, you must enter one of these IDs: an app or web [Channel ID](https://www.airship.com/docs/reference/glossary/#channel_id), an email address, or an [MSISDN](https://www.airship.com/docs/reference/glossary/#msisdn). MSISDNs must already be registered SMS channels. See [Preview and Test Groups](https://www.airship.com/docs/guides/audience/preview-test-groups/) for ID requirements and caveats.
For app and web, your Channel ID is available once the SDK is integrated. Ask your developer for it, or [find it yourself](https://www.airship.com/docs/guides/getting-started/developers/identifiers/#find-a-channel-id).
Once you have an ID to add, create a Test Group in your project:
1. Select **Audience**, then **Preview and Test Groups**.
1. Select **Create group**.
1. Enter a name and enable **Test group**.
1. Select **Save and continue**.
1. Select **Add user**, enter your name and your ID, then select **Done**.
## Send the message
Follow these steps to send a message to your Test Group:
1. In the sidebar, select the **Create** dropdown menu (▼), then **Message**.
1. Enter a message name and save it.
1. Under **Audience selection**, select **Test group** and the group you just created.
1. Under **Channel coordination**, select [Fan Out](https://www.airship.com/docs/guides/features/orchestration-experimentation/channel-coordination/#fan-out) and enable the channels included in your Test Group.
1. 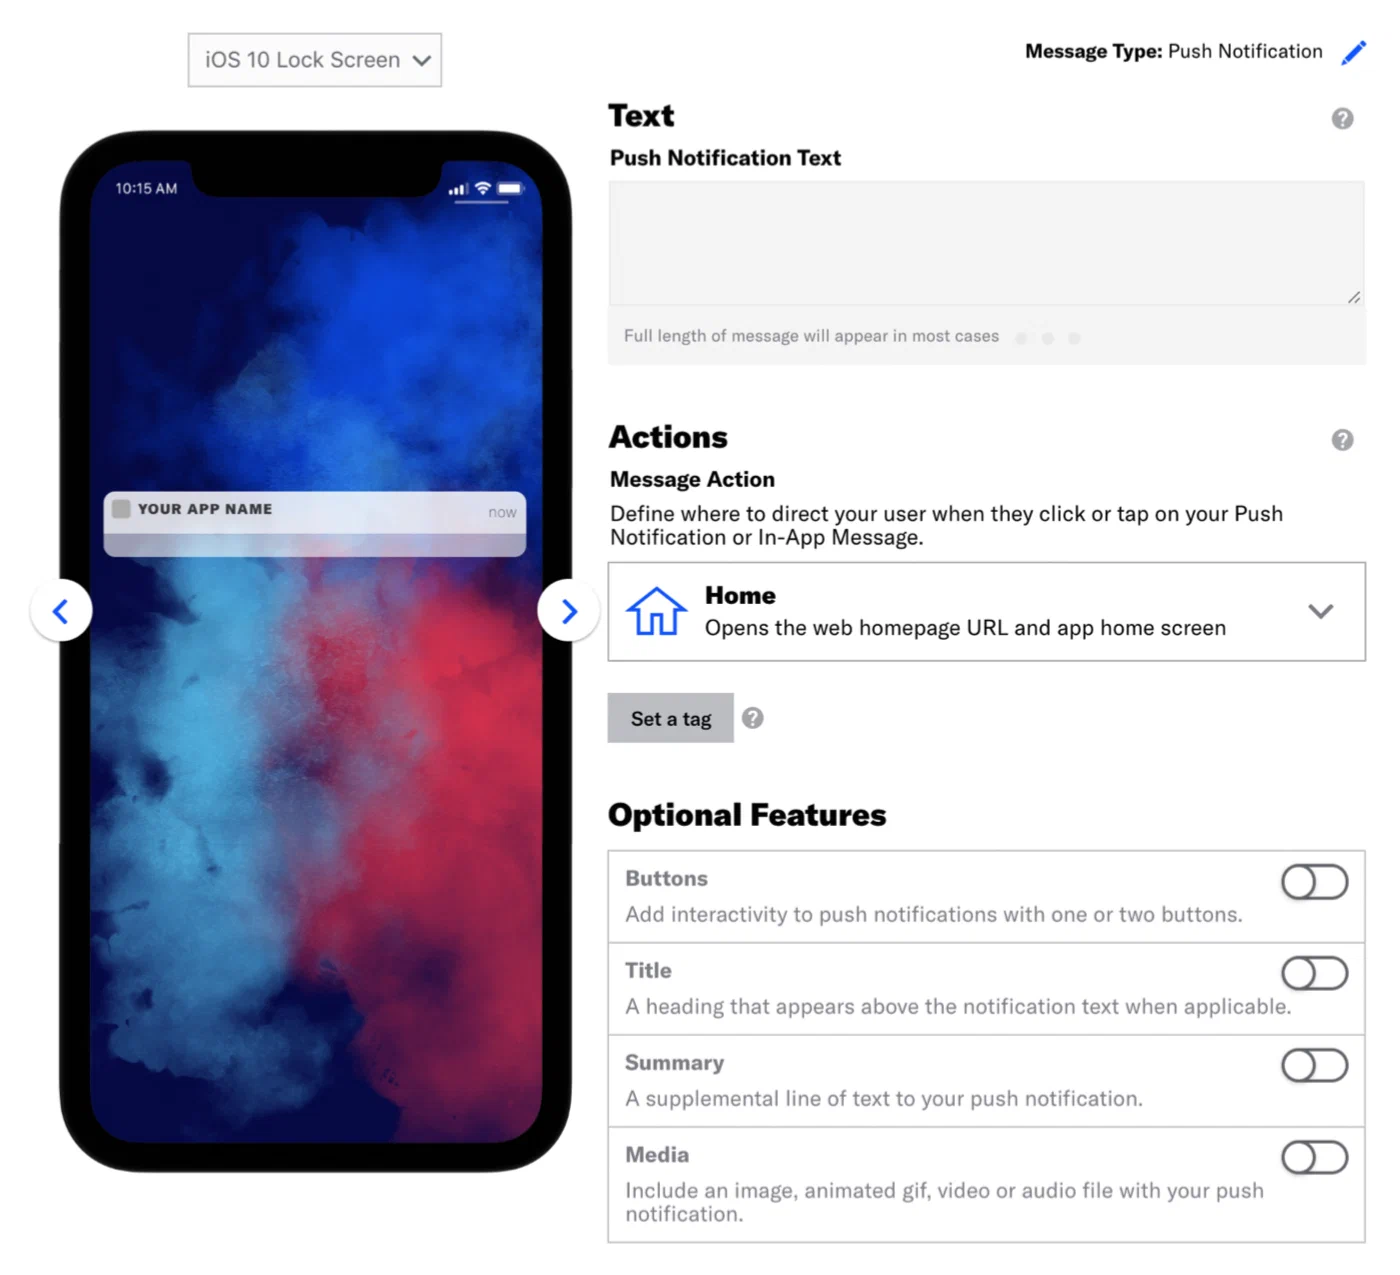
*Entering push notification text*
Select **Content** in the header, then configure your message. See [Content by channel](https://www.airship.com/docs/guides/messaging/messages/content/) for details. A device preview updates as you type and make selections.
1. Select **Delivery** in the header, then **Send Now**.
1. Select **Review & Send** in the header, then review the device preview and message summary. Use the arrows to page through the various previews. You can also select a preview directly from the menu.
1. Select **Send Message**.
If everything is configured correctly, your message is on its way to your Test Group members.
# The Airship dashboard
> {{< glossary_definition "dashboard" >}}
The dashboard is where you create and access projects, containers for the settings, certificates, reports, and other details related to your messages and mobile wallet passes.
The dashboard has two levels:
- A list of all your messaging and mobile wallet projects.
- An individual project after opening it from the list of all projects.
Almost everything you do with Airship happens inside a project, including creating messages and wallet pass templates.
Viewing and finding your projects
At the top level of the dashboard, tiles display each messaging and mobile wallet project. Messaging projects list their name, environment, and channels. Mobile wallet projects list their name and pass type.
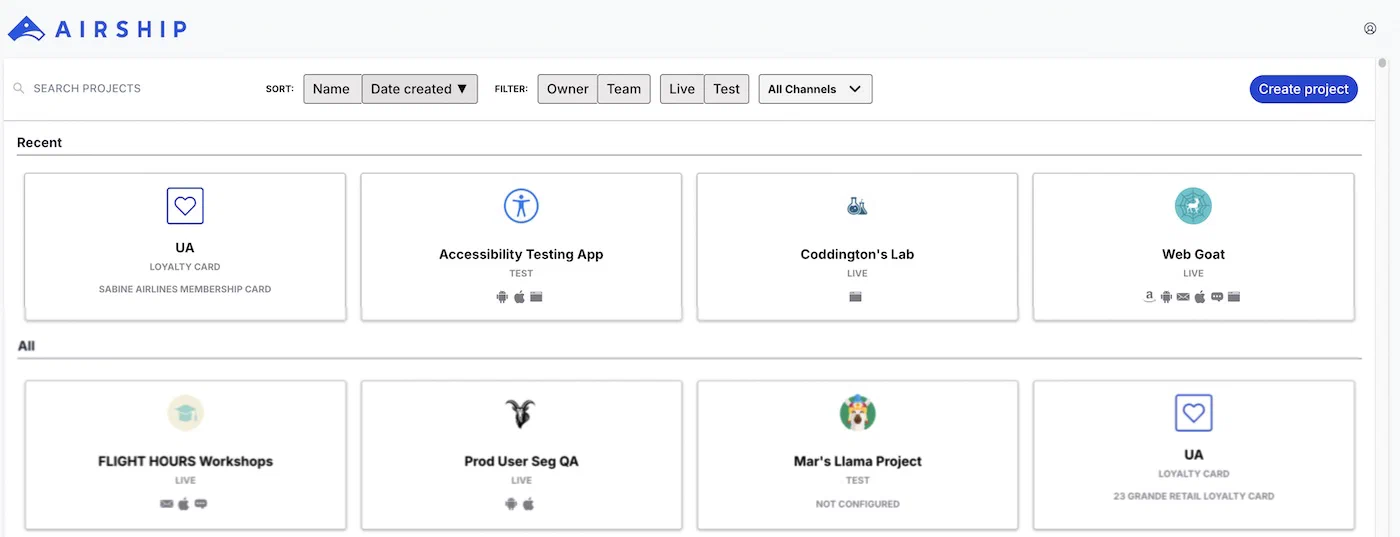
*The top-level dashboard in Airship*
If you have more than eight projects, up to four of your most recently accessed projects appear under Recent. Recent projects are not shown when sort, filter, or search are applied.
The default view is sorted by creation date, newest projects first. Select Name or Date Created to sort. Select again to toggle ascending/descending order. You can search for projects by complete or partial name.
Use filters to toggle views:
| Filter |
Description |
| Owner/Team |
Toggle between projects you own and projects you have non-owner access to. See Manage project access in Manage Messaging teams and access. All mobile wallet projects appear for Owner. |
| Live/Test |
Toggle between projects by environment type. All mobile wallet projects appear for Live. |
| Channel |
Select a channel configured for your account: Mobile apps, Web, SMS, Email, and Mobile wallet. After selecting Mobile apps you can filter again by platform. After selecting Mobile wallet you can further filter by pass type and company. |
## Navigating individual projects
From the top-level dashboard, select a tile to open a project, then navigate using the header and sidebar.
### Header icons
The header contains the following icons:
* Sidebar icon (◧) — Toggle the sidebar.
* Pilot icon (⚛) — Enable or disable [Pilot program](https://www.airship.com/docs/guides/features/pilot/) features, or leave feedback.
* Help icon (?) — Access resources.
* Account menu icon (user) — View account information.
* Favorite icon (★) — Add or manage your [bookmarked pages](#search-and-favorites).
### Sidebar menus
The sidebar groups the main areas of a project:
| Menu | Description |
| --- | --- |
| **Favorites** | Your [bookmarked dashboard pages](#search-and-favorites) |
| **Messages** | [Messages Overview](https://www.airship.com/docs/reference/glossary/#messages_overview), calendar, logs, tools, and more |
| **Content** | Web pages for [Preference Centers](https://www.airship.com/docs/reference/glossary/#preference_center), plus reusable content: [Templates](https://www.airship.com/docs/reference/glossary/#template), [Scene Layouts](https://www.airship.com/docs/guides/messaging/editors/native/custom-layouts/), [Snippets](https://www.airship.com/docs/reference/glossary/#snippet), and the [Media library](https://www.airship.com/docs/guides/messaging/features/media/) |
| **Journeys** | The [Journey map](https://www.airship.com/docs/reference/glossary/#journey_map) |
| **Audience** | Tools to target and segment your users |
| **Experiments** | [Holdout Experiments](https://www.airship.com/docs/reference/glossary/#holdout_experiment), [Feature Flags](https://www.airship.com/docs/reference/glossary/#feature_flag), and the Experimentation Hub |
| **Reports** | Analysis of your project's messaging use |
### Project settings and details
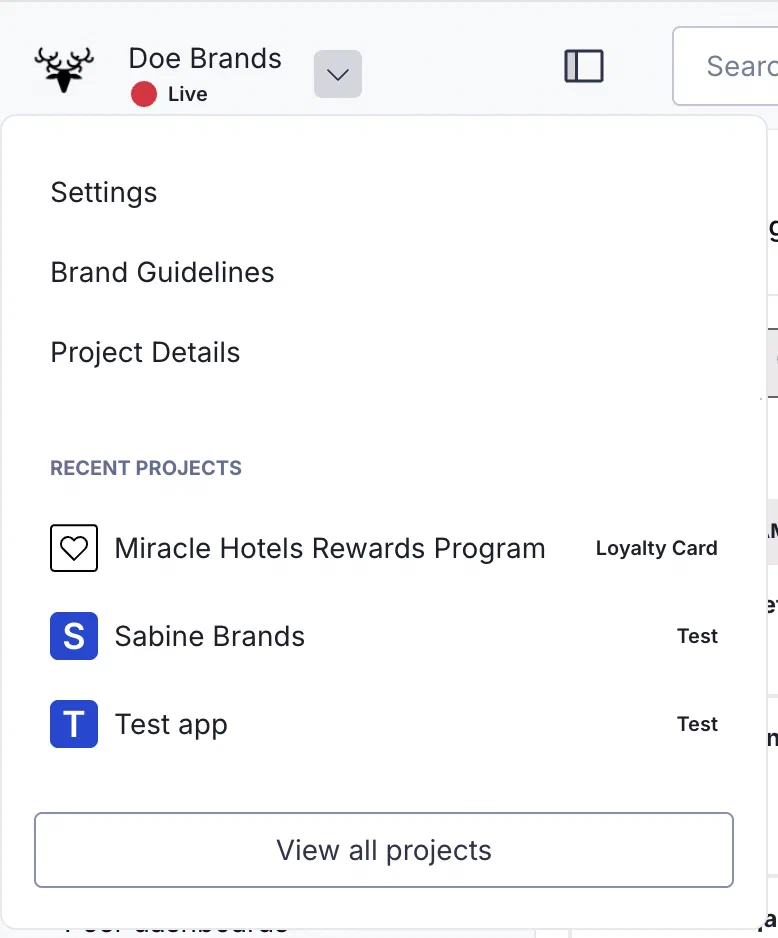
*The messaging project menu*
Select the project dropdown menu (▼) to access channel, app, and project settings. You can also go to your [Brand guidelines](https://www.airship.com/docs/guides/messaging/features/brand-guidelines/) and [project details](https://www.airship.com/docs/guides/getting-started/messaging/set-up-project/#managing-projects).
To switch to a recently accessed project, select a name from the list. A link to return to the top-level dashboard is at the bottom of the list.
### Search and Favorites
Use the search box to find individual pages within the dashboard. To bookmark dashboard pages for quick access:
1. Go to the page you want to bookmark.
1. Select the favorite icon (★) in the header.
1. Enter a page name as you want it to appear in the quick access menu.
1. Select **Save**.
Your saved pages are available in the **Favorites** sidebar menu. To change a page name or remove it from Favorites, select the favorite icon (★) again.
### Message creation

*Sidebar options in a messaging project*
Select the **Create** dropdown menu (▼) to choose **Message**, **Journey**, **Apple News**, **Scene**, or **A/B Test**. Select **Create** to access all message creation options and [Composer Favorites](https://www.airship.com/docs/reference/glossary/#composer_favorites).
When the sidebar is collapsed, select the edit icon (✏) in the header to access the Create dropdown menu options.
# Manage messaging teams and access
> Invite team members to your messaging projects, manage access levels, and view the activity log.
## Manage project access
[Company account Owners](https://www.airship.com/docs/guides/getting-started/account/company-and-plan/) and team members with [Administrator permission](#access-levels) can manage project access.
Handle invitations and access levels in the Team Access section of a project's settings. There are two ways to get there:
1. Next to your project name, select the dropdown menu (▼), then **Settings**.
1. Under **Project settings**, select **Team Access**.
**OR**
1. Select the account menu icon (user) in the dashboard header, then select **Team Management**.
1. Under **Share project**, select the share icon (+) next to a project name.
### Invite team members
Add team members by sending an invitation to join a messaging project.
Verify addresses for existing Airship users before sending an invitation. If you enter an email address that does not match an existing Airship user account, they will receive an email with a request to activate a new account.
> **Important:** For [Company accounts](https://www.airship.com/docs/guides/getting-started/account/company-and-plan/) using single sign-on (SSO), email addresses must meet certain conditions. See the information in [Single sign-on (SSO)](https://www.airship.com/docs/guides/getting-started/account/security/account-security/#single-sign-on-sso).
First, [open Team Access](#manage-project-access), then create an invitation:
1. Enter an email address.
1. Select an [access level](#access-levels).
1. Select **Share project**.
After sending an invitation, the Team Access page lists the invited user as pending. If they decline the invitation, the user is removed from the project's member list. Invitations expire 24 hours after they are sent.
### Change or revoke access
From [Team Access](#manage-project-access), change a team member's [access level](#access-levels):
1. Select **Edit** next to a team member's current access level.
1. Select a new access level. To revoke access or delete a pending invitation, select **Remove Access**.
1. Select **Save**.
To remove yourself from a project team:
1. Select the account menu icon (user) in the dashboard header, then select **Team Management**.
1. In the **Accepted invitations** list, select **Revoke access** for a project.
## Accept or decline team invitations
If you are invited to a messaging project team but do not yet have an Airship account, you will receive an email asking you to activate a new account. After activating the account and setting up your password and [Multi-Factor Authentication (MFA)](https://www.airship.com/docs/guides/getting-started/account/security/mfa/):
1. Select the account menu icon (user) in the dashboard header, then select **Team Management**.
1. Select **Accept** in the **Project invitations** list.
If you already have an Airship account, you will receive an email asking you to accept access in Team Management in your account. You can either follow the link in the email to go directly to Team Management or follow the above steps.
You have 24 hours to accept an invitation after it is sent. If you select **Decline** for an invitation, the invitation is deleted.
## Team activity log
View and download the log of team member activity across all projects over the last 90 days. All users can view their own activity. The account Owner or a team member with [Administrator permission](#access-levels) can see the activity of all users.
1. Select the account menu icon (user) in the dashboard header, then select **Team Management**.
1. Select **Activity**.
The log provides this information:
| Column | Description |
| --- | --- |
| **Team Member** | The username of the user who performed the action. |
| **IP Address** | The IP address of the user who performed the action, if available. |
| **Timestamp** | The date, time, and time zone when the action occurred. |
| **Action** | The action a user performed. |
| **Reference ID** | A unique identifier per logged action. For any reference ID in blue, select it to see its associated [Push ID](https://www.airship.com/docs/reference/glossary/#push-id) and message content. If the Push ID is also blue, select it to open its [message report](https://www.airship.com/docs/guides/reports/message/). |
| **Project** | The name of the project where the action occurred. Login-related actions display "Not Applicable" since logins are not associated with a project. |
| **Company** | The name of the company where the action occurred. |
| **Notes** | Additional information about the logged action. Not present for all activities. |
The default view is sorted by activity date and time, most recent first. Select a column header to sort.
You can filter the log by date and time range, project, and activity. To export the log, select **Download CSV**. The file will include the currently displayed record set, up to 3,000 records.
## Access levels
Refer to this information when [sending invitations](#invite-team-members) or [changing access levels](#change-or-revoke-access). For more about Owner, see [Manage your company account and plan](https://www.airship.com/docs/guides/getting-started/account/company-and-plan/).
Permissions per access level:
| Permission | Owner | Admin | Full Access | Reports,
Composers,
Segments | Reports &
Composers | Composers
Only | Content
Author | Reports
Only |
| --- | --- | --- | --- | --- | --- | --- | --- | --- |
| [Create a project](https://www.airship.com/docs/guides/getting-started/messaging/set-up-project/#create-a-messaging-project) | ✓ | | | | | | | |
| [Delete a project](https://www.airship.com/docs/guides/getting-started/messaging/set-up-project/#managing-projects) | ✓ | | | | | | | |
| View all user activity in the [Team activity log](#team-activity-log) | ✓ | | | | | | | |
| Modify [login security settings](https://www.airship.com/docs/guides/getting-started/account/security/account-security/) | ✓ | | | | | | | |
| Create and modify an [IP Allowlist](https://www.airship.com/docs/guides/getting-started/account/security/allowlist/) | ✓ | | | | | | | |
| View and update [billing](https://www.airship.com/docs/guides/getting-started/account/usage-and-billing/#update-payment-information) | ✓ | | | | | | | |
| View [usage data](https://www.airship.com/docs/guides/getting-started/account/usage-and-billing/) | ✓ | | | | | | | |
| [Send Team Access invitations](#invite-team-members) | ✓ | ✓ | | | | | | |
| [Change team member project access level](#change-or-revoke-access) | ✓ | ✓ | | | | | | |
| View changes to team member access level in the [Team activity log](#team-activity-log) | ✓ | ✓ | | | | | | |
| Create [Preference Centers](https://www.airship.com/docs/reference/glossary/#preference_center) | ✓ | ✓ | | | | | | |
| Create and manage [Bearer Tokens or OAuth credentials](https://www.airship.com/docs/guides/getting-started/developers/api-security/) | ✓ | ✓ | | | | | | |
| Configure and enable/disable [Ban List](https://www.airship.com/docs/reference/glossary/#ban_list) and Bypass Ban List | ✓ | ✓ | | | | | | |
| View [Master Secret](https://www.airship.com/docs/guides/getting-started/developers/app-keys-secrets/) | ✓ | ✓ | | | | | | |
| View [Secret](https://www.airship.com/docs/guides/getting-started/developers/app-keys-secrets/) | ✓ | ✓ | ✓ | | | | | |
| Set [Brand guidelines and personalities](https://www.airship.com/docs/guides/messaging/features/brand-guidelines/) | ✓ | ✓ | ✓ | | | | | |
| Enable/disable [dashboard features](https://www.airship.com/docs/guides/messaging/project/enable-features/) | ✓ | ✓ | ✓ | | | | | |
| View and modify [Contacts](https://www.airship.com/docs/guides/audience/contact-management/) | ✓ | ✓ | ✓ | | | | | |
| [Edit a project](https://www.airship.com/docs/guides/getting-started/messaging/set-up-project/#managing-projects) | ✓ | ✓ | ✓ | | | | | |
| Configure and update messaging channels: [App](https://www.airship.com/docs/guides/getting-started/developers/configure-channels/), [Web](https://www.airship.com/docs/developer/sdk-integration/web/getting-started/), [SMS](https://www.airship.com/docs/developer/api-integrations/sms/getting-started/), [Open](https://www.airship.com/docs/developer/api-integrations/open/getting-started/) | ✓ | ✓ | ✓ | | | | | |
| View, create, and edit [Holdout Experiments](https://www.airship.com/docs/reference/glossary/#holdout_experiment) | ✓ | ✓ | ✓ | | | | | |
| Select random or specific contacts for [previewing personalization](https://www.airship.com/docs/guides/personalization/previewing/) | ✓ | ✓ | ✓ | | | | ✓ | |
| View, create, edit, and export [Segments](https://www.airship.com/docs/reference/glossary/#segment) | ✓ | ✓ | ✓ | ✓ | | | | |
| View, create, and edit [Feature Flags](https://www.airship.com/docs/reference/glossary/#feature_flag) | ✓ | ✓ | ✓ | ✓ | | | | |
| View, create, and edit [Campaigns](https://www.airship.com/docs/reference/glossary/#campaign) | ✓ | ✓ | ✓ | ✓ | ✓ | ✓ | | |
| Manage [Preview and Test Groups](https://www.airship.com/docs/reference/glossary/#preview_test_groups) | ✓ | ✓ | ✓ | ✓ | ✓ | ✓ | | |
| [Compose messages](https://www.airship.com/docs/guides/getting-started/messaging/basics/#creating-and-sending-messages) | ✓ | ✓ | ✓ | ✓ | ✓ | ✓ | ✓ | |
| [Send messages](https://www.airship.com/docs/guides/getting-started/messaging/basics/#creating-and-sending-messages) | ✓ | ✓ | ✓ | ✓ | ✓ | ✓ | | |
| Create [Templates](https://www.airship.com/docs/reference/glossary/#template) and [Snippets](https://www.airship.com/docs/reference/glossary/#snippet) | ✓ | ✓ | ✓ | ✓ | ✓ | ✓ | | |
| Create [Composer Favorites](https://www.airship.com/docs/reference/glossary/#composer_favorites) | ✓ | ✓ | ✓ | ✓ | ✓ | ✓ | ✓ | |
| [Bypass a Ban List](https://www.airship.com/docs/guides/audience/segmentation/ban-lists/#bypassing-your-ban-list) in composers | ✓ | ✓ | ✓ | ✓ | ✓ | ✓ | | |
| View [Holdout Experiments](https://www.airship.com/docs/reference/glossary/#holdout_experiment) | ✓ | ✓ | ✓ | ✓ | ✓ | | ✓ | ✓ |
| View, print, and export [Reports](https://www.airship.com/docs/guides/reports/engagement/) | ✓ | ✓ | ✓ | ✓ | ✓ | | ✓ | ✓ |
{class="access-table"}
# Twilio and SendGrid activation
> Enable your Twilio SMS and SendGrid email programs for Airship.
If you already send SMS through Twilio or email through SendGrid, you can keep those providers and run the programs through Airship messaging instead of rebuilding them. Follow this guide to confirm the prerequisites, request the integration, and migrate your audience, templates, and campaigns.
## Prerequisites
Your Airship contract must include Email and/or SMS. Depending on purchase date, your contract may require an amendment. Contact your account manager for details.
To enable Twilio for your Airship SMS channel, you must have a Twilio account or Subaccount. While not required, we recommend using a separate Subaccount within your Twilio account to isolate Airship messaging campaigns and sender configurations from any existing campaigns.
You must also have the following prerequisites in place:
| Prerequisite | Detail | Resource |
| --- | --- | --- |
| **Account SID** | This is a unique key that is used to identify a specific Twilio Parent Account or Subaccount and is a credential that acts as a username. | [What is a Twilio Account SID and where can I find it?](https://help.twilio.com/articles/14726256820123) |
| **Auth Token** | This acts as the password for API authorization requests. The Auth Token must be a Primary or Secondary token, though we recommended using a Secondary token to avoid interference with existing API integrations. | [REST API: Secondary Auth Token](https://www.twilio.com/docs/iam/api/secondary_authtoken) |
| **A registered SMS Sender** | The SMS sender must be one of Short code, Long code, or Alphanumeric code. | [SMS Senders](https://www.airship.com/docs/developer/api-integrations/sms/senders/) |
To enable SendGrid for your Airship Email channel, you must have a SendGrid account or subuser. While not required, we recommend using a separate subuser within your SendGrid account to isolate Airship messaging campaigns and sender configurations from any existing campaigns.
You must also have the following prerequisites in place:
| Prerequisite | Detail | Resource |
| --- | --- | --- |
| **API key** | The key must have Full Access permission. | [API Keys](https://www.twilio.com/docs/sendgrid/ui/account-and-settings/api-keys) |
| **Sending domain** | Domain authentication must already be completed for the sending domain with proper DNS configuration. | [How to Set Up Domain Authentication](https://www.twilio.com/docs/sendgrid/ui/account-and-settings/how-to-set-up-domain-authentication) |
| **Marketing and transactional IP pools** | IP pools may be either shared or dedicated. We recommended provisioning separate pools for commercial marketing messaging and transactional messaging. | [IP Pools: All You Need to Know](https://sendgrid.com/en-us/blog/ip-pools-all-you-need-to-know) |
| **Webhook verification key** | Configure your SendGrid webhook using the Post URL `https://go.urbanairship.com/api/email/twilio/events/`, with all Engagement and Delivery Actions enabled, and with Signature Verification enabled. | [Add an Event Webhook](https://www.twilio.com/docs/sendgrid/for-developers/tracking-events/getting-started-event-webhook#add-an-event-webhook) |
## Request Airship integration
Once your prerequisites are met, contact your Airship account manager or [Support](https://support.airship.com/) and request integrating your Airship account with Twilio.
Then Airship will:
1. Prepare your account for the integration
1. Request that you provide details about your [prerequisites](#prerequisites)
1. Assign a dedicated technical consultant, who will complete the necessary project configuration
1. (For Twilio SMS) Provide a unique Mobile Originated Callback URL to add to your Sender or Messaging Service configuration in Twilio
## Importing your audience
There are several methods available to import your existing audience into Airship, and your Airship technical consultant will recommend the best method for your specific needs. A common method is [SFTP upload](https://www.airship.com/docs/guides/audience/segmentation/sftp-upload/). You can upload to Airship using this method after exporting from Segment Engage or another CRM/CDP. See [Download your audience as a CSV file](https://www.twilio.com/docs/segment/engage/audiences#download-your-audience-as-a-csv-file) in Segment's Engage documentation.
You can also enable email and SMS audience syncing via Segment integration, which is our recommended method. Synchronization automatically associates audience members to [Named Users](https://www.airship.com/docs/reference/glossary/#named_user) based on your existing track events in Segment.
Our technical consulting team will work with you to import your mobile device IDs using our import API endpoint. See [Register and associate](https://www.airship.com/docs/integrations/segment/#register-and-associate) in our Segment integration documentation.
## Importing templates from Segment Engage
Email and SMS templates built in Engage use a scripting language called Liquid for personalization and dynamic content. Your Airship onboarding team will help with converting your templates to use [Handlebars](https://www.airship.com/docs/reference/glossary/#handlebars) instead of Liquid.
First, export your templates from Segment Engage. Your Airship onboarding team will ask you to copy and paste your template content from Engage to a shared document. Airship will use a script to convert your templates and add them to your Airship projects for you to test and validate.
From there, you can use Airship's [Interactive editor](https://www.airship.com/docs/guides/messaging/editors/interactive/about/) to create new templates or upload your own HTML templates personalized using Handlebars.
## Migrating your Segment email campaigns
The method of migrating your email campaigns from Segment Engage to Airship will depend on the types of campaigns you have configured.
For triggered messaging, recreate the messages as Airship [Journeys](https://www.airship.com/docs/reference/glossary/#journey). You can use many of your existing events and properties already tracked in Segment via our pre-built integration. See [Segment](https://www.airship.com/docs/integrations/segment/#destination-integration) in our integration docs.
For ad hoc or recurring campaigns like newsletters, recreate the messages using the Message [Composer](https://www.airship.com/docs/reference/glossary/#composer) and configure delivery according to your preferred channels and schedule. See [Create a message](https://www.airship.com/docs/guides/messaging/messages/create/).
## Optional: Syncing opt-outs or unsubscribes from Twilio
If you are handling opt-out state outside of Airship, for instance, by using Twilio's Advanced Opt-Out for Messaging Services, you'll need to make sure that Airship remains in sync to avoid messaging users who have unsubscribed. This includes STOP messages and any other unsubscribe signals you receive from users.
For SMS, send these events to the [Opt-out of SMS messages API endpoint](https://www.airship.com/docs/developer/rest-api/ua/operations/sms/#optoutsmschannel). For email, send these events to the [Update an email channel API endpoint](https://www.airship.com/docs/developer/rest-api/ua/operations/email/#updateemailchannel), updating the `commercial_opted_out` channel property. This ensures that Airship has the latest opt-out state for each MSISDN or email address and can suppress messages accordingly.
If you are unable to automate this process through the API for email, you can manage opt-outs by manually uploading a CSV file through the Airship dashboard. This CSV should contain the email addresses of users who have opted out, based on your internal records. See [Setting and removing Text, Number, and Date Attributes](https://www.airship.com/docs/guides/audience/attributes/setting/#setting-and-removing-text-number-and-date-attributes) and follow the steps for the CSV method to provide a date for [Attribute](https://www.airship.com/docs/reference/glossary/#attributes) `ua_commercial_opted_out`.
For individual channels, you can change opt-in status manually in the dashboard. See [Viewing channel details](https://www.airship.com/docs/guides/audience/contact-management/#viewing-channel-details) in *Contact Management*.
Whether using automated or manual sync, it's important to keep Airship's records updated. Airship does not assume responsibility for enforcing opt-outs that have not been communicated through one of these methods.
## Bringing your own RCS branded sender
If you manage your own Twilio Subaccount, you can configure an [RCS](https://www.airship.com/docs/reference/glossary/#rcs) branded sender to use with Airship.
After adding RCS to your Airship plan, we will provide detailed instructions and validate your configuration. At a high level, you will:
* Assign both senders to a Twilio Messaging Service and configure incoming messages to post to Airship
* Share your Messaging Service SID and chosen SMS sender with your Airship representative so we can complete the connection on our side
For more information, see [RCS branded sender](https://www.airship.com/docs/developer/api-integrations/sms/rcs/).