When running a message experiment and a [Holdout Experiment](https://www.airship.com/docs/reference/glossary/#holdout_experiment) simultaneously, Airship prevents holdout group users from being included in the message experiment. This eliminates potentially skewed data in cases where there are overlapping experimentation audiences. It also ensures that the most critical experiments maintain integrity.
### Supported channels and measuring engagement These channels and message types are supported for Intelligent Rollouts: * App — Push notifications, in-app messages, and Message Center * Web * Email * SMS * Open channel Airship uses the following engagement signals to determine the top-performing variant: * **Push** — Direct clicks on the push message * **Email** — Clicks on any link in the email, excluding unsubscribe links * **SMS** — Clicks on the link in the message — Links are required for optimization. * **Message Center** — Message reads ### Workflow Set up an Intelligent Rollout in three steps: 1. **Create two or more message variants** — Just like in the [Message composer](https://www.airship.com/docs/guides/messaging/messages/create/), for each variant, select channels, configure content for each channel, and set up delivery. 1. **Allocate an audience** — You can designate all users as eligible for the experiment or target specific users. To limit your audience, set the percentage that can participate. 1. **Schedule timing** — Set a send window between 6 and 24 hours, then choose whether to start immediately or at a specific date and time. The window gives Airship time to optimize delivery while the campaign is active. After setup, you can start the experiment and review its results. ## Create an Intelligent Rollout First, select the **Create** dropdown menu (▼), then **Intelligent Rollout**. Or you can start from your list of all message experiments by going to **Experiments**, then **Message Experiments**, selecting **Add experiment**, and then selecting the same option. Next, select the experiment name and change it to something descriptive, then select the check mark to save it. To finish setup, add message variants, determine the audience, and configure the schedule. You can configure them in any order. ### Add message variants You can add up to 26 variants: 1. Select **Add variant**. After completing a step, select the next step in the header to move on. 1. For **Channels**:First, select a [Channel Coordination](https://www.airship.com/docs/reference/glossary/#channel_coordination) strategy:
Then, enable the channel types to include in your audience. For Mobile Apps, also select from the available platforms. For Priority Channel, also drag the channel types into priority order.
> **Note:** For projects using the [channel-level segmentation system](https://www.airship.com/docs/guides/audience/segmentation/segmentation/#channel-level-segmentation), instead of Channel Coordination, enable the channels you want to send the message to.Use Channel conditions to filter which channels are included in the audience. A channel must meet the conditions to remain in the audience.
For example, if your audience includes users with app, email, and SMS channels, and you set a channel condition requiring membership in an email Subscription List:
To set channel conditions, use the same process as when building a [Segment](https://www.airship.com/docs/reference/glossary/#segment). You can use the following data in your conditions:
device [Tag Group](https://www.airship.com/docs/reference/glossary/#tag_group) — See Primary device tags.Selected Lifecycle, Subscription, and Uploaded Lists must contain Channel IDs or Named Users as the identifier, not a mix of the two.
> **Note:** Setting channel conditions is not supported for projects using the [channel-level segmentation system](https://www.airship.com/docs/guides/audience/segmentation/segmentation/#channel-level-segmentation). Under **Localization**, enable the option if you want to provide different content to app and web users depending on their language and country. 1. For **Content**, configure the message content per enabled channel. See the [Content documentation](https://www.airship.com/docs/guides/messaging/messages/content/) per message type, [Content options](https://www.airship.com/docs/guides/messaging/in-app-experiences/configuration/optional-features/), and [Localization](https://www.airship.com/docs/guides/messaging/messages/localization/). 1. For **Delivery**, configure the options. See [Message delivery](https://www.airship.com/docs/guides/messaging/messages/delivery/delivery/). 1. In the **Review** step, review the device preview and message summary: * Use the arrows to page through the various previews. The channel and display type dynamically update in the dropdown menu above. You can also select a preview directly from the menu. * If you want to make changes, select the associated step in the header, make your changes, then return to Review. * Select **Send Test** to send a test message to verify its appearance and behavior on each configured channel. The message is sent to your selected recipients immediately, and it appears as a test in [Messages Overview](https://www.airship.com/docs/reference/glossary/#messages_overview). Follow the same steps as in the [Review step for the Message composer](https://www.airship.com/docs/guides/messaging/messages/create/#message-review). When your review is complete, select **Save Variant**. To add another variant from scratch, select **Add variant**. To duplicate an existing variant, select the more menu icon (⋯) at the end of a row and select **Copy to variant**. ### Set the audience After creating an experiment, select **Audience** and then set it up: 1. Choose and configure users: | Option | Description | Steps | | --- | --- | --- | | **All Users** | This option makes the experiment available to a percentage of your total audience. | n/a | | **Target Specific Users** | This option makes the experiment available to a percentage of users who meet specified conditions. | Select and configure one or more conditions. Use the same process as when building a [Segment](https://www.airship.com/docs/reference/glossary/#segment). | 1. (Optional) Under **Total audience allocation**, limit the selected audience to your specified percentage. 1. Select **Save**. ### Set the schedule Select **Schedule** to configure the send window and timing: 1. Set a send window between 6 and 24 hours. Longer windows give Airship more time to learn and optimize delivery. Choose a shorter window when your message is time-sensitive. 1. Choose whether to start immediately or at a specific date and time. 1. Select **Save**. ### Start the experiment Once you've completed the setup, select **Start** and confirm. Airship then distributes variants automatically during the send window according to live engagement. ## View results After starting the experiment, see how it performed. Use experiment- and message-level reports to evaluate engagement, variant distribution during the experiment window, and strategies for improving future campaigns. To access results, go to **Experiments**, then **Message Experiments**, select the more menu icon (⋯) for an experiment in the list, then **View results**. You can also select its name from the list and then go to **Results**. * A summary describes what happened during the experiment. * A **Performance** section for each channel contains statistical data for each variant per channel, including variant distribution during the experiment window, conversions, and Probability to Be Best (PTBB), which indicates Airship's confidence in the current top-performing variant. Select a variant name to open its [message report](https://www.airship.com/docs/guides/reports/message/).To export data:
Go to Experiments, then Message Experiments to view and manage your message A/B tests. You can filter the list by experiment type and archive status. Each experiment is listed by name with its status and the date it was last modified. Your last modified experiment is listed first, and you can search by experiment name.
You can perform the following actions from the list: | Option | Description | Steps | | --- | --- | --- | | **View** | Open the experiment to access its message variants, audience configuration, schedule, and results. | Select its name. | | **Duplicate** | Make a draft copy with its message variants, audience configuration, and schedule. | Select its more menu icon (⋯) and then **Duplicate**. | | **View results** | Open the performance reports. | Select its more menu icon (⋯) and then **View results**. See [View results](#view-results). | ### Editing message variants, audience, and schedule You can edit variants, audience settings, and schedule settings for any experiment that has not yet been started. After opening it from the Message Experiments list, select the more menu icon (⋯) for a variant and select an option: | Option | Description | | --- | --- | | **Edit** | Modify the variant's channels, content, or delivery settings. | | **Duplicate** | Create a copy of the variant as a starting point for a new variant. | | **Delete** | Remove the variant from the experiment. | To modify the audience, select **Audience** and adjust targeting or allocation settings. See [Set the audience](#set-the-audience) for configuration details. To modify the schedule, select **Schedule** and adjust the send window or timing. # Feature Flags > {{< glossary_definition "feature_flag" >}} {{< badge "addon" >}} ## About Feature Flags The format of a Feature Flag is a conditional *if* statement you add to your app or website code. It contains your flag name and any properties and wraps around the code you want the flag to control. Airship provides the flag as a code snippet for your developer to add to your app or website. Set up Feature Flag experiments in two steps: 1. **Define the flag** — Set the flag's name, description, and properties that can be used by your app or website code within the flag. 1. **Create one or more Configurations for the flag** — Determine the audience, schedule, and property values for each Configuration. Configuration types: * [**A/B tests**](#ab-tests) — Compare audience behaviors when a feature is hidden or present, or experiment with distinct feature experiences, such as new home screen designs, by setting different property values for each variant. Reports provide detailed data for evaluating engagement and the overall success of a feature based on your [Goals](https://www.airship.com/docs/reference/glossary/#goals). * [**Rollouts**](#rollouts) — Release a feature to a targeted audience and/or a percentage of an audience, then monitor interaction event counts or other concerns, such as support capacity. In addition to experimentation, you can use rollouts to present different content versions to separate audiences. For example, for a loyalty program, individual rollouts can control which content your Gold and Silver users see. Configurations can be open-ended or time-bound, starting immediately, ending manually, and starting or ending at a scheduled time and date. Arrange Configurations in order of priority to determine which one should be available to a user if they are included in multiple Configuration audiences. Each flag can have up to 10 active Configurations. Manage a Configuration's audience, schedule, and properties from the Airship dashboard. If something unexpected happens with the feature, or if you have reason to end access before its scheduled end time, you can easily disable it for all users. For apps, this means eliminating the need to release an app update and waiting for users to install the new version. You can also [use Feature Flags to determine a messaging audience or trigger automation](#using-feature-flags-with-messaging). > **Tip:** You can also create rollouts using [Sequence Control Groups](https://www.airship.com/docs/guides/experimentation/control-groups/) and [Scenes](https://www.airship.com/docs/guides/features/messaging/scenes/rollouts/). ### Audience When creating a flag Configuration, set your audience to members of a [Test Group](https://www.airship.com/docs/reference/glossary/#preview_test_groups). When you are ready to go live, select **All Users** for your entire audience or select **Target Specific Users** and set conditions, then set a percentage of your set audience that will be able to view the feature determined by the flag. For A/B tests, the percentage is divided evenly between variants by default, or you can set your own values. Set your audience according to the purpose of your A/B test or rollout. Audience members are randomly selected. Any user included in the set percentage is considered *eligible*, meaning they have access to the feature. For A/B tests, you have the option to hide the feature from the control variant. Setting a percentage helps you limit the audience so you can effectively manage feedback or limit exposure to potential bugs. For a rollout, gradually increase the percentage to expand your audience. For example, you could set a condition where only users who have freshly installed your app will be able to access the flagged feature. If you set a percentage of 10%, only 10% of users who meet the condition will be able to access the feature. For flags with multiple Configurations, if a user falls into more than one Configuration's audience, only the one with the highest priority will be active for that user. By default, each new Configuration is set to the lowest priority. See [Set priority order](#manage-configurations) in *Manage Configurations* below. For more about audience and eligibility, see [Rollout example implementation](#rollout-example-implementation) below. #### Conditions For the Target Specific Users audience option, see [Targeting Specific Users](https://www.airship.com/docs/guides/audience/segmentation/target-specific-users/) for the list of conditions you can set. Additionally, you can use the Feature Flag access condition to include or exclude users who are part of one or more specified flag audiences. Using this condition enables coordinated experiences across multiple features during phased rollouts or A/B tests. Run layered or mutually exclusive experiments, chain flags together, or gate sub-features behind primary ones. For exclusive experiments, use the Feature Flag access condition to make sure users in one experiment are not also in an experiment running for a different flag. To roll out sub-features that add to another flagged feature, use the Feature Flag access condition to make sure the sub-features are only made available to users who are part of the initial feature's audience. For a retail app, sub-features for a new checkout flow could be an in-store pickup option or AI-powered product recommendations. Feature Flag access condition requirements, behavior, and restrictions: * **Evaluation** — The condition evaluates users who are members of all Configurations for a specified flag. You cannot select an individual Configuration. * **Configurations** — All users who are members of the Active, Scheduled, and Ended Configuration audiences for a specified flag are included in (or excluded from, according to the condition settings) the condition audience. * The specified flag must have at least one currently Active, Scheduled, or Ended Configuration. * When you archive an Ended Configuration, its audience is no longer included in (or excluded from, according to the condition settings) the condition audience. * **Ineligible flags** — Flags that contain a Configuration that uses the Segments condition cannot be selected for the Feature Flag Access condition. * **Scenes targeting a Configuration audience** — When [configuring a Scene's audience](https://www.airship.com/docs/guides/messaging/in-app-experiences/scenes/create/#audience), you cannot select a Configuration that uses the Feature Flag access condition. Supported channels and SDK minimums for each condition: | Condition | Supported Channels | | --- | --- | | **App version** | App | | **Device tags** | App, Web | | **Feature Flag access** | App [iOS SDK 19.4+](/docs/docs/developer/sdk-integration/apple/ios-changelog/#19.4.0) [Android SDK 19.7+](/docs/docs/developer/sdk-integration/android/changelog/#19.7.0), Web [Web SDK 2.7+](/docs/docs/developer/sdk-integration/web/changelog/#v2.7.0) | | **Locale** | App, Web | | **Location opt-in status** | App, Web | | **New users** | App, Web | | **Platforms** | App, Web | | **Push opt-in status** | App, Web | | **Segments** | App | ### Properties You can add properties that can be used by your app's or website's code within a Feature Flag, bypassing the need for traditional code changes and release processes. The flag code you pass on to your development team includes references to the properties. Once implemented, edit the flag Configuration's properties in the dashboard to make immediate changes to your app or website, like variables that can be updated remotely. As a general example, you could create properties for a promotion's title, description, and button URL, then change their values when the promotion ends and a new one launches. You can override flag properties per Configuration. For A/B tests, you can set property overrides for each variant. When creating or editing a flag, set a name, type, and default value for each property. Properties can be a string, number, boolean, or JSON. You can create up to 50 properties per flag. Properties use cases: * **Coffee mobile ordering app** — Create a flag with properties for controlling the promotions and rewards for loyalty membership. Using just the Airship dashboard, you can transition from pumpkin spice promotions to holiday themes in sync with seasonal campaigns. Celebrate special limited time milestones, such as the app's 10th anniversary, by offering "10x rewards" points. * **Music streaming app** — Create a flag with properties to introduce a new premium subscription tier. Launch the feature to 25% of the audience, with flag properties "Price Point" and "Trial Period Duration" and quickly gauge engagement data and user feedback as users respond to the new tier. Update the properties to fine tune the subscription offer, and roll out the feature to 100% of users once you land on the right details. You can also use a "Promotional Messaging" property to periodically update the copy promoting the new subscription. ### Interaction events Track interaction with the flagged feature by generating an event from the SDK. It must be explicitly called by the developer. See [Implement the code](#implement-the-code) below. While it is called an "interaction" event, what you track is up to you and depends on the feature. Some examples of how to implement different use cases: * **Tracking when a user encounters a change** — For a flag that changes a button's color from blue to green or adds a new button to a screen, track when a user visits the screen containing the button, since it is a visible change. * **Tracking when a user interacts with a change** — For a flag that changes a button's destination, track when the user selects the button, since it is a non-visible change. The events have a flag ID and flag name, which identify which flagged feature a user interacted with. They also have a boolean `eligible` field, which indicates whether or not the user was in the Feature Flag audience and had access to the feature. The `variant_id` is the UUID of the A/B test variant. This ID is listed for each variant in [A/B test reports](#ab-test-reports-and-technical-overview). See also [Feature Flag Interaction Event](https://www.airship.com/docs/developer/rest-api/connect/schemas/events/#feature-flag-interaction) in the [Real-Time Data Streaming](https://www.airship.com/docs/reference/glossary/#rtds) API reference. Deciding what you are tracking is especially important when [using the flag to trigger a message](#using-feature-flags-with-messaging), since you can trigger based on whether or not the user is part of the Feature Flag audience. ### Draft Configurations You can add flag code to your app or website even while a Configuration is in Draft state, and then make it active later. For apps, make it active after delivering your new code to devices in an app update. ### Workflow The following is the general workflow for using Feature Flags: 1. [Create a flag in the dashboard](#create-feature-flags) and copy the code snippets and Mobile docs link. Code is provided for Web, Android (Kotlin and Java), iOS, Cordova, Flutter, and React Native. You can also access the code after saving. 1. Give the code snippets and docs links to your developer so they can [add the flag to your app or website](#implement-the-code). 1. [Create at least one Configuration](#create-configurations), setting the audience to members of a [Test Group](https://www.airship.com/docs/reference/glossary/#preview_test_groups). For A/B tests, all variants are distributed randomly to Test Group users by default, or you can specify which variant to make available to the them. After you update your website with the feature and flag code, the feature or A/B test will be available to the configured audience the next time they visit the website, according to the Configuration's schedule. For apps, the same is true after users install the version of your app that contains the updated code. 1. After verifying the feature or A/B test works as intended with your Test Group, change the Configuration audience to All Users or Target Specific Users and set the percentage and conditions. [Manage the Configuration](#manage-configurations) from the Airship dashboard. Repeat this step for each Configuration. 1. [View reports](#view-reports) and evaluate performance. For A/B tests, then roll out the winning variant to all test audience members. 1. After the flag has served its purpose, [archive it](#manage-feature-flags) and remove the flag code from your app or website. ## Rollouts Use rollouts for experimentation and for controlling content versions for different audiences. Common use cases: * **Resource management** — Release features to segments of your audience over time to prevent a strain on resources. Increase the audience according to database query volume, support ticket volume, or limited initial product supply. * **Content testing** — Test features with a small segment of your audience before releasing the feature to a broader audience. * **Time-limited promotions** — Turn on and off time-restricted features, either manually or according to an automated schedule, such as displaying a promotional banner only during a sale weekend. * **Premium features** — Provide premium feature access to paid users only, based on membership tiers. * **Holiday promotions** — Create a flag for promotional banners in your app. Launch the banners to 100% of your U.S. audience after Thanksgiving and to 100% of the E.U. audience in early November. This method ensures that each region receives the promotion at the optimal time, maximizing engagement and driving campaign success. * **Retail app loyalty program** — Create a flag to launch a new loyalty program in your retail app. Release the program to your most loyal and lowest-tier users at different rates based on observed differences in user behavior for those audiences. You can then create individual Configurations of the Feature Flag for each audience segment and roll out the experience to 50% of your most loyal users and 10% of lowest-tier users under the same flag using different Configurations. You can also use properties to customize the promotional text for each audience and display differing content for each segment. ### Rollout example implementation The following example is for introducing a redesigned Settings screen in a mobile app. To let all new users experience the new Settings screen: 1. Create a Feature Flag with any relevant properties and default values. 1. Create a rollout Configuration with these Audience settings: 1. Select **Target Specific Users**. 1. Set the Configuration audience percentage to `100`. 1. Add the condition **New users**. 1. In your app code, set the Feature Flag interaction event to occur when users view the Settings screen. 100% of users who have freshly installed your app will be able to see the redesigned Settings screen. They are *eligible* users. For each [interaction event](#interaction-events): * When `eligible` has a value of `true`, that means the screen was viewed by a user that **is** in the Configuration audiences for the Feature Flag. The user experienced the redesigned Settings screen. * When `eligible` has a value of `false`, the screen was viewed by a user that **is not** in the Configuration audiences for the Feature Flag. The user saw the old version of the Settings screen. However, if you're concerned about the potential for bugs in the redesigned screen, you would want to limit how many new users could see it. Keep all the settings the same except the percentage, which you would set to `10`. 10% of users who have freshly installed your app will be able to see the redesigned Settings screen. Once you determine the feature is ready for a wider audience, increase the audience percentage. Keep adjusting till you reach 100% or the acceptable threshold determined by your planning. ## A/B tests (iOS SDK 19+) (Android SDK 19+) Use A/B tests to compare audience behaviors when a feature is hidden or present. You can also experiment by presenting different experiences by setting specific [property values](#properties) for each variant. The [audience percentage](#audience) is divided evenly between variants by default, or you can set your own values. A/B tests contain a control variant and support up to 25 additional variants. A/B test use cases: * **Evaluating engagement of new designs** — Create an experiment to test the effectiveness of your new home screen design with new users. Display the new design to 50% of new users and the current home screen to the other 50%, set a goal such as a purchase, and track which version of the home screen leads to more conversions. If the old design still outperforms, you can stop the experiment, and if the new one wins, you can create a new rollout from the winning variant. * **Optimizing loyalty programs** — Create an experiment to test different reward structures for your new loyalty program. Create an experiment with two variations of the program: one offering discounts on future orders and another offering free delivery credits, and set a goal to track repeat orders. Reporting data reveals a 20% increase in repeat orders for the delivery credit variant, providing the team with concrete evidence to present to leadership on which program structure performs best.To prepare for your tests, see About A/B testing.
### Goals and reports [Goals](https://www.airship.com/docs/reference/glossary/#goals) are the events you want to measure in your A/B tests and are required to declare a winner and generate reports. You can select from project-level Goals or create new ones. If you create Goals while setting up the A/B test, you can reuse them for other A/B test Configurations for the same flag. Maximum 10 goals per test. You can create Goals based on [Custom or Predefined Events](https://www.airship.com/docs/guides/audience/events/events/#event-types) or for a number of Default Events. For the list of Default Events, see [Goals](https://www.airship.com/docs/guides/reports/goals/). Reporting does not include events attributed to [Named Users](https://www.airship.com/docs/reference/glossary/#named_user) that are not associated with a platform and [Channel ID](https://www.airship.com/docs/reference/glossary/#channel_id). View reports to see how each variant performs. You can select each Goal to update the reports with data for that Goal only. After enough data is available and time has elapsed, Airship declares a winning variant, which you can then roll out to your entire A/B test audience. If there is no significant difference between variant performance, you may want to consider your test variables and audience. Even with significant differences, this data can help you understand what your audience responds to. For more information, see [A/B test reports and technical overview](#ab-test-reports-and-technical-overview). ## Create Feature Flags 1. Go to **Experiments**, then **Feature Flags**. 1. Select **Create Feature Flag**. 1. Configure for the flag: | Field or section | Description | Steps | | --- | --- | --- | | **Display name** | The dashboard label for the flag | Enter text. | | **Flag name** | The name used for reference by the SDK. Must be unique. Automatically generated based on the display name, but you can change it. The name can contain letters, numbers, and underscores only, and it must start with a letter and end with a letter or number. You cannot change the flag name after making the flag active. | Enter text. | | **Description** | Describes what the flag controls | Enter text. | | **Properties** | Optional. String, number, boolean, or JSON properties that can be used by your app or website code within the Feature Flag. 50 properties maximum. | Select **Add property**, and then enter a name, select a type, and configure a value. Select **Add property** for additional properties. | | **Reference image** | Optional. An image to help identify what the flag controls. The image is displayed when [viewing the list of all flags](#manage-feature-flags) and when [viewing its Configurations](#manage-configurations). Supported file types: JPG, PNG, GIF. Maximum file size: 5 MB. | Select **Choose File**, and then select a file to upload. | 1. Select **Save and continue**. 1. Copy the code snippets and docs link for your developer. The code snippet is the same in all Configurations for a flag, so you only need to provide it to your developer once. 1. Select **Close**. Your flag is now saved, and you can [create a Configuration](#create-configurations) at any time. ## Add events and creating Goals for A/B testsYou must add Custom and Predefined Events to your project before you can select them for Goals. You do not need to add Default Events to your project before selecting them for Goals.
If you want to use project-level Goals in an A/B test Configuration, you must first create them in your project settings. See [Goals](https://www.airship.com/docs/guides/reports/goals/). Otherwise, you can create Goals as you create an A/B test. ## Create Configurations Set up applications for a Feature Flag. If you just [created a flag](#create-feature-flags), start on step 3. If you just [duplicated a Configuration](#manage-configurations), start on step 4. A/B test requirements: (iOS SDK 19+) (Android SDK 19+) 1. Go to **Experiments**, then **Feature Flags**, and then select **View** to access a flag's Configurations. 1. Select **Create Configuration** and then select **Feature rollout** or **Feature A/B test**. 1. Select **Definition** to continue, and then enter for the Configuration: | Field | Description | Steps | | --- | --- | --- | | **Rollout or A/B test name** | The dashboard label for the Configuration | Enter text. | | **Description** | Describes the purpose of the Configuration | Enter text. | 1. (For [A/B tests](#ab-tests) only) Select **Goals** to continue, and then search for and select Goals or create them. The winner and detailed reports do not generate without at least one Goal.To create a Goal, enter a Goal name in the search field, then select Create Goal and configure fields:
| Field | Description | Steps |
|---|---|---|
| Goal name | Used for identification within the experiment | Enter text. |
| Description | Additional information about the Goal | Enter text. |
| Event | The event you want to measure in the experiment | Search for and select an event. If the event does not have a category assigned, select from the list or select Custom category and enter a category name. |
For the **Feature Flag access** condition, search for a flag and then specify whether or not users must be in the selected flag's audience. You can select multiple flags.
For all other conditions, follow the steps in [Targeting Specific Users](https://www.airship.com/docs/guides/audience/segmentation/target-specific-users/). |
| **Test Users** | Makes the feature or A/B test available to users in a [Test Group](https://www.airship.com/docs/guides/audience/preview-test-groups/). | Select a Test Group. |
{class="table-col-1-20 table-col-2-40"}
1. (Optional, for A/B tests only) Override the default variant distribution:
* **All Users** and **Target Specific Users** — The audience percentage is divided evenly between variants. To change it, enable **Allow uneven allocations**. Then, under **Variant allocation**, edit the percentage for each variant.
* **Test Group** — All variants are distributed randomly to Test Group users. To change it, select **Specific variant only** and select the control or other variant.
1. Select **Schedule** to continue and then schedule the period when the Configuration will be active. For specific times and dates, also specify the time zone. The UTC conversion displays below the settings and updates as you make changes.
1. Select **Review** to continue and then review your Configuration's settings.
1. Select **Launch** to make the Configuration active or **Exit** to save it as a draft. See the status information in [Manage Configurations](#manage-configurations).
## Implement the code
This section describes implementation for the mobile SDKs. For web implementation, see [Web Feature Flags](https://www.airship.com/docs/developer/sdk-integration/web/feature-flags/) and also [contact Support](https://support.airship.com/).
You can return to the dashboard to get the code snippets at any time:
1. Go to **Experiments**, then **Feature Flags**.
1. Select **View** to access a flag's Configurations.
1. Select ** Code snippet**.
1. Copy the code snippet for each platform.
1. Select **Close**.
### Access flags
The Airship SDK will refresh Feature Flags when the app is brought to the foreground. If a Feature Flag is accessed before the foreground refresh completes, or after the foreground refresh has failed, Feature Flags will be refreshed during flag access. Feature Flags will only be updated once per session and will persist for the duration of each session.
Once [defined in the dashboard](#create-feature-flags), a Feature Flag can be accessed by its name in the SDK after `takeOff`.
#### Android Kotlin
The SDK provides asynchronous access to Feature Flags using Kotlin suspend functions, which is intended to be called from a coroutine. For more info, see [Coroutines Overview guide](https://kotlinlang.org/docs/coroutines-overview.html).
```kotlin
// Get the FeatureFlag result
val result: Result You can cancel a single Active message or all Active messages. Canceling a message is effectively the same as [setting an end date](https://www.airship.com/docs/guides/messaging/in-app-experiences/configuration/optional-features/#specify-start-and-end-dates) for the current date and time. See also [Restart an In-App Automation or Scene](https://www.airship.com/docs/guides/messaging/manage/change-status/#restart) in *Change message status*. | Select the link icon (link) to view the list. To cancel, select **⏹ Stop** for a single message or **Stop all**. To check for scheduling conflicts, select a message name, then see the **Schedule** section to compare the start and end settings. |
{class="table-col-1-20 table-col-2-40"}
### Editing Flag properties
If a Feature Flag does not have an active or scheduled Configuration, you can edit the flag's property names, types, and values at any time.
When editing a flag that has active or scheduled Configurations, note the following:
* If a flag has an active or scheduled rollout or A/B test Configuration, you cannot edit the flag's property names or types.
* If a flag has an active or scheduled rollout Configuration, you can edit the flag's property values at any time. The Configurations will inherit the new property value.
* If a flag has an active or scheduled A/B test Configuration, you cannot edit the flag's property values unless all variants have an override value set for that property.
Whenever you change property names or types at the flag level, you must update the code snippet in your app or website for changes to take effect. You do not need to update the code snippet when changing a flag's default property values only.
## Manage Configurations
To manage Configurations, go to **Experiments**, then **Feature Flags**, then select **View** to access a flag's Configurations. If a [reference image](#create-feature-flags) is present, you can hover over it for a preview or select it to view a larger version in a modal window.
Active and Scheduled Configurations are listed in priority order, with the following information:
* Priority number
* Configuration type — Rollout or A/B test
* Configuration name
* Status — Active or Scheduled
* Description
* Goal name (for A/B test Configurations only)
* Audience — "Test group" or percentage
* Start and end dates and times in UTC
For Ended and Draft Configurations, use the **Current/Archived** filter to update the list. The default sort order is by last modified, and each row displays:
* Configuration name
* Configuration type — Rollout or A/B test
* Description
* Date modified
* Schedule
* Status — Draft or Ended
Manage Configurations by selecting an icon or link in a row, and select the more menu icon (⋮) to see additional options:
| Option | Description | Steps |
| --- | --- | --- |
| **Set priority order** | For flags with multiple Configurations, if a user falls into more than one Configuration's audience, only the one with the highest priority will be active for that user. By default, each new Configuration is set to the lowest priority. | Select the drag handle icon (dots-six-vertical), then drag and drop to a new position. |
| **View reports** | Opens reports for Active and Ended Configurations. | Select the report icon (
). See [View reports](#view-reports) for more information. |
| **Edit Configuration** | Opens Active and Draft Configurations for editing. | Select the edit icon (✏), make your changes, then select **Update** or **Launch** in the Review step. |
| **End A/B test** | Opens options for rolling out a variant or ending the test without a rollout. | Select the stop icon (⏹). See [End an A/B test](#end-an-ab-test). |
| **Edit audience allocation** | Opens the audience allocation setting for an Active Configuration. You also have the option to end the Configuration. See the description for **End/Cancel Configuration** in this table. | Select the filter icon, set a new percentage, then select **Save**. To end the Configuration, select the settings icon, then select **End Configuration**. |
| **Duplicate Configuration** | Creates a copy of the Configuration and opens it for editing. The Configuration name is appended with " copy". | Select the duplicate icon (copy), and then complete the steps for [creating a new Configuration](#create-configurations). |
| **End/Cancel Configuration** | Immediately ends an Active Configuration or cancels a Scheduled Configuration. To make it Active or Scheduled again later, you can edit the Configuration and set a new end date. | Select the edit icon (✏), and then **Stop**. |
| **Archive Configuration** | Moves a Configuration from the Current list to the Archived list. You cannot archive an Active or Scheduled Configuration. | Select the archive icon (
). |
| **Restore/Unarchive Configuration** | Moves an Archived Configuration to the list of Current Ended and Draft Configurations. | Select the **Archived** filter, then select the archive icon (
) for a Configuration. |
| **View and cancel related messages** | Opens a list of [In-App Automations and Scenes targeting the Configuration's audience](#using-feature-flags-with-messaging). Messages are listed by name, type, and status. Selecting a name opens the message to its Review step, where you can check for conflicts between the Configuration and message schedules. You can cancel a single Active message or all Active messages. Canceling a message is effectively the same as [setting an end date](https://www.airship.com/docs/guides/messaging/in-app-experiences/configuration/optional-features/#specify-start-and-end-dates) for the current date and time. See also [Restart an In-App Automation or Scene](https://www.airship.com/docs/guides/messaging/manage/change-status/#restart) in *Change message status*. | Select the link icon (link) to view the list. To cancel, select **
Stop** for a single message or **Stop all**. To check for scheduling conflicts, select a message name, then see the **Schedule** section to compare the start and end settings. |
{class="table-col-1-20 table-col-2-40"}
## View reports
To access reports showing performance and interaction data:
1. Go to **Experiments**, then **Feature Flags**.
1. Select **View** to access a flag's Configurations.
1. Select the report icon (
) for a Configuration. See [Rollout reports](#rollout-reports) and [A/B test reports and technical overview](#ab-test-reports-and-technical-overview) for details.
You can also view reports and export data in [Performance Analytics](https://www.airship.com/docs/reference/glossary/#pa). For usage data, see [View Feature Flag and Scene Rollout usage](https://www.airship.com/docs/guides/getting-started/admin/usage-payment/#view-feature-flag-and-scene-rollout-usage).
### Rollout reports
The following are available for when [viewing reports](#view-reports) for rollouts:
| Report | Description |
| --- | --- |
| **Feature Flag interactions** | Counts of users in the Configuration audience with at least one [interaction event](#interaction-events) and interaction events per date. The default view is the last 30 days. Use the date selector to define a different time period. |
| **Users in Configuration audience with interaction events** | A count of users in the Configuration audience with at least one [interaction event](#interaction-events). Users are counted as [Channel IDs](https://www.airship.com/docs/reference/glossary/#channel_id). |
To download the data, select the down arrow icon (arrow-down), select CSV or TEXT format, and then select **Download**. For **Feature Flag interactions**, the download lists user and event counts per date. For **Users in Configuration audience with interaction events**, the download lists the platform and [Named User](https://www.airship.com/docs/reference/glossary/#named_user) for each Channel ID.
### A/B test reports and technical overview
When [viewing reports](#view-reports) for A/B tests, limited data appears if a [Goal](https://www.airship.com/docs/reference/glossary/#goals) was not set for the test. A summary displays the status of the experiment. Reports load with data for the test's primary Goal. If multiple Goals were set, select a different one, and the reports will reload with the data for that Goal. Select the info icon (ⓘ) for more information in each section.
Data represented in A/B test reports:
| Data | Description |
| --- | --- |
| **ID** | This is a variant's UUID. It appears in [interaction events](#interaction-events). |
| **Probability to Be Best** | This metric represents the likelihood that a particular variant is the top performer based on your test results. The closer the probability is to 100%, the more confidence that this variant is the best choice. A value of 95% or above suggests the variant is very likely to outperform the others. Hover over a variant for additional information. |
| **Loss** | Expected loss quantifies the risk of making a suboptimal decision. It accounts for both the uncertainty in the A/B test results and the potential missed opportunities if another variant performs better. A higher loss value suggests a greater risk of missing out on potential conversions, while a lower loss value indicates that even if the variant isn't the absolute best, the downside of choosing it is minimal. For example, if the variant you select to roll out turns out to not be the best one, you might lose 3% of the conversions by having selected it. So if you have a P2BB of 70% but a small loss, it might be worth it to use that variant even though P2BB might not be 95%+. |
| **Conversion count** | This is the total number of users who completed the Goal event within this variant group during the A/B test. |
| **Conversion rate (vs Top)** | This shows the percentage of users who completed the Goal event, calculated as (conversion count / sample size) x 100. The comparison to the top-performing variant indicates how much lower the conversion rate is for this variant relative to the best option, where the top variant shows a difference of 0%. |
| **Sample size** | This represents the total number of users who triggered the interaction event in the A/B test for each variant. A larger sample size increases confidence in the results. |
| **Posterior Probability** | This graph visualizes the probability distribution of conversion rates for each variant based on the test data, highlighting the range of likely performance outcomes. **X-Axis (Conversion Rate)**: Represents the posterior distribution of possible conversion rates for each variant based on the test data. It shows the range of values a variant's true conversion rate is likely to fall within, rather than just observed conversion rates. **0% uplift line**: Represents that there is no difference between variants. You must add Custom and Predefined Events to your project before you can select them for Goals. You do not need to add Default Events to your project before selecting them for Goals. To create a Goal, enter a Goal name in the search field, then select Create Goal and configure fields: You cannot select **Specific campaigns** if allowances for **Campaign Categories** and/or **Transactional messages** are selected. | Select **All messages** or **Specific campaigns**. For **Specific campaigns**, enter a Campaign Category and then select its name below the entry field. Repeat for additional categories. |
| **Allowances: Campaign Categories** | Allows sending messages with specific Campaign Categories to members of the holdout group. Cannot be selected if **Withhold by Campaign Category** is selected. | Enter a category and then select its name below the entry field. Repeat for additional categories. |
| **Allowances: Transactional messages** | Allows sending transactional messages to members of the holdout group. Cannot be selected if **Withhold by Campaign Category** is selected. For more information, see [Commercial vs. Transactional Email](https://www.airship.com/docs/developer/api-integrations/email/commercial-transactional/). The information also applies to other message types. | No configuration is required. |
{class="table-col-1-20 table-col-2-40"}
> **Important:** If your experiment does not allow sending transactional messages to the holdout group, you can use the [`bypass_holdout_groups` boolean](https://www.airship.com/docs/developer/rest-api/ua/schemas/push/#pushoptions) to send them anyway.
>
> When set to `true`, the message, whether commercial or transactional, will be sent to holdout group members who are part of the message audience. This option is available for messages sent using the API only.
1. Set the duration. For specific times and dates, also specify the time zone. The UTC conversion displays below the settings and updates as you make changes.
1. Select **Save**.
## Viewing reports
Go to **Experiments**, then **Holdout Experiments**. Information about the most recent experiment appears next to the report for the first Goal added when setting up the experiment. Ended experiments are listed under **Past Holdout Experiments** with their start and end dates and times. Select a date a column header to sort. You can search for experiments by name.
Select the report icon (
) for an experiment.
*Holdout Experiment reporting*
### Performance
The **Performance** section contains the following reports per Goal:
Create variants of message content by duplicating the initial variant or by starting from scratch. Each variant returns analytic data to help you determine the most effective way to engage your audience. Message A/B tests can include a control group, and you can adjust audience allocation across the message variants and control group. **Maximum variants:** 26 Create a variant for any message in a [Sequence](https://www.airship.com/docs/reference/glossary/#sequence). The variant is a duplicate of the original message that you can then edit, changing its content, delivery settings, or [Channel Coordination](https://www.airship.com/docs/reference/glossary/#channel_coordination) settings. Audience allocation is set to 50% for each variant by default, but you can change the percentages. After starting the test, you will wait till the Confidence level meets or exceeds 95% and then select the winning message. The Sequence is then republished with the winning message. Audience members who receive the variant message are randomly selected on entry to the Sequence. Related events and conversions are recorded for both audiences, providing data you can use to evaluate Sequence performance based on your selected metric. You can run Sequence A/B tests and [control groups](https://www.airship.com/docs/guides/experimentation/control-groups/) concurrently. **Maximum variants:** 2 Create variations of [Scene](https://www.airship.com/docs/reference/glossary/#scene) content by duplicating an existing Scene or creating screens from scratch. You can make a single change, such as changing a button label in a screen, or provide entirely different content. Audience members are randomly selected and split equally to receive your control Scene (Variant A) and your variant Scene (Variant B) for the targeted audience. Related events and conversions are recorded for both audiences, providing data you can use to evaluate Scene performance based on your selected metric. **Maximum variants:** 2 Reports provide detailed data for evaluating engagement and the overall success of a feature based on your Goals. **Maximum variants:** 26 Create variants of message content by duplicating the initial variant or by starting from scratch. Each variant returns analytic data to help you determine the most effective way to engage your audience. Message A/B tests can include a control group, and you can adjust audience allocation across the message variants and control group. When running a message experiment and a [Holdout Experiment](https://www.airship.com/docs/reference/glossary/#holdout_experiment) simultaneously, Airship prevents holdout group users from being included in the message experiment. This eliminates potentially skewed data in cases where there are overlapping experimentation audiences. It also ensures that the most critical experiments maintain integrity. To prepare for your tests, see About A/B testing. First, select a [Channel Coordination](https://www.airship.com/docs/reference/glossary/#channel_coordination) strategy: Then, enable the channel types to include in your audience. For Mobile Apps, also select from the available platforms. For Priority Channel, also drag the channel types into priority order. Use Channel conditions to filter which channels are included in the audience. A channel must meet the conditions to remain in the audience. For example, if your audience includes users with app, email, and SMS channels, and you set a channel condition requiring membership in an email Subscription List: To set channel conditions, use the same process as when building a [Segment](https://www.airship.com/docs/reference/glossary/#segment). You can use the following data in your conditions: Selected Lifecycle, Subscription, and Uploaded Lists must contain Channel IDs or Named Users as the identifier, not a mix of the two. To export data: Go to Experiments, then Message Experiments to view and manage your message A/B tests. You can filter the list by experiment type and archive status. Each experiment is listed by name with its status and the date it was last modified. Your last modified experiment is listed first, and you can search by experiment name. When running a message experiment and a [Holdout Experiment](https://www.airship.com/docs/reference/glossary/#holdout_experiment) simultaneously, Airship prevents holdout group users from being included in the message experiment. This eliminates potentially skewed data in cases where there are overlapping experimentation audiences. It also ensures that the most critical experiments maintain integrity. To prepare for your tests, see About A/B testing. Airship recommends scheduling your message at least three days in advance due to the combination
of time zones and optimal times. You can reduce the lead time if your audience is more localized, e.g.,
only in the United States or in a certain European region. Under Test audience, enter at least one [Named User](https://www.airship.com/docs/reference/glossary/#named_user) or [Test Group](https://www.airship.com/docs/reference/glossary/#preview_test_groups) and select from the results. If your message includes email, you can also search for email addresses. If no matches appear for an address, you can select Create channel for <address>, and the channel will be registered for your project and opted in to transactional messaging. Users in an active [Holdout Experiment](https://www.airship.com/docs/reference/glossary/#holdout_experiment) will not receive a test message. You can view a user’s current holdout group status and history when viewing their channel details in Contact Management. (If your message contains [Handlebars](https://www.airship.com/docs/reference/glossary/#handlebars)) Under Personalization, select and configure a personalization data source: Select Send. Create variations of [Scene](https://www.airship.com/docs/reference/glossary/#scene) content by duplicating an existing Scene or creating screens from scratch. You can make a single change, such as changing a button label in a screen, or provide entirely different content. Audience members are randomly selected and split equally to receive your control Scene (Variant A) and your variant Scene (Variant B) for the targeted audience. Related events and conversions are recorded for both audiences, providing data you can use to evaluate Scene performance based on your selected metric. When running a message experiment and a [Holdout Experiment](https://www.airship.com/docs/reference/glossary/#holdout_experiment) simultaneously, Airship prevents holdout group users from being included in the message experiment. This eliminates potentially skewed data in cases where there are overlapping experimentation audiences. It also ensures that the most critical experiments maintain integrity. To prepare for your tests, see About A/B testing. You may want to end an A/B test early if you see a significant drop in conversions or engagement. If the drop is not significant or if it is observed early on in the test period, you may want to let the test continue, as the rate may correct itself. Another reason to end a test early is if you notice an error in your content. To end a test early, select a winner. This effectively cancels the test. Create a variant for any message in a [Sequence](https://www.airship.com/docs/reference/glossary/#sequence). The variant is a duplicate of the original message that you can then edit, changing its content, delivery settings, or [Channel Coordination](https://www.airship.com/docs/reference/glossary/#channel_coordination) settings. Audience allocation is set to 50% for each variant by default, but you can change the percentages. After starting the test, you will wait till the Confidence level meets or exceeds 95% and then select the winning message. The Sequence is then republished with the winning message. Audience members who receive the variant message are randomly selected on entry to the Sequence. Related events and conversions are recorded for both audiences, providing data you can use to evaluate Sequence performance based on your selected metric. When running a message experiment and a [Holdout Experiment](https://www.airship.com/docs/reference/glossary/#holdout_experiment) simultaneously, Airship prevents holdout group users from being included in the message experiment. This eliminates potentially skewed data in cases where there are overlapping experimentation audiences. It also ensures that the most critical experiments maintain integrity. To prepare for your tests, see About A/B testing. You may want to end an A/B test early if you see a significant drop in conversions or engagement. If the drop is not significant or if it is observed early on in the test period, you may want to let the test continue, as the rate may correct itself. Another reason to end a test early is if you notice an error in your content. To end a test early, select a winner. This effectively cancels the test.
**Y-Axis (Probability Density)**: Represents the likelihood of different conversion rates occurring, given the test data. Higher peaks indicate conversion rates that are more probable, while broader distributions suggest greater uncertainty in the estimate.
**Overlap of Distributions**: If two posterior distributions overlap significantly, this indicates uncertainty about which variant is better. Minimal overlap suggests a clearer winner. |
| **Relative Uplift** | This graph shows how each variant's performance compares to the others, highlighting the percentage increase or decrease in conversions relative to the top performing variant. It provides insight into whether a variant is making a meaningful improvement or if the difference is small.
**Distribution Spread**: A wide distribution suggests uncertainty in the uplift estimate. A narrow distribution indicates more confidence.
**Position of Bulk Mass**: If most of the distribution lies above zero for a variant, then it is likely to outperform others. |
{class="table-col-1-30"}
As you review the report data, you may want to disable an underperforming variant. In the table, select **Stop** for the variant, and it will no longer be available to its configured audience.
To download table data as a CSV file, select the download icon (download-simple).
#### Statistical methods
Airship analyzes Feature Flag A/B test results using [Bayesian statistics](https://en.wikipedia.org/wiki/Bayesian_statistics), measuring confidence in each variant's success while accounting for uncertainty in the data. Rather than relying on a fixed confidence threshold, Bayesian methods allow for continuously updating the understanding of variant performance as data comes in.
Airship estimates probability distributions for each variant's performance. These distributions help calculate how likely each variant is to be the best. A [Beta(1,1) prior](https://en.wikipedia.org/wiki/Beta_distribution) is used to create the distributions, starting with a neutral assumption and letting the data drive the results.
Instead of only comparing variants to a single control, Airship evaluates each variant against all other variants. This gives a more complete picture of which variant performs best in the test.
Benefits of using Bayesian methods:
* **Transparent decision-making** — You can see whether a variant is performing better than others and the confidence in that result.
* **More than just statistical significance** — Instead of a pass/fail outcome, Bayesian methods give you probability-based confidence in the results.
* **Flexibility** — You can decide how much certainty you need before rolling out a winning variant.
#### Calculating the winning variant
After a minimum runtime of one week and for a minimum sample size of 1,000 users, Airship declares the winning variant in the dashboard when Probability to Be Best exceeds 95% and Loss remains less than 5%.
* A one week minimum is required to ensure that results are not overly influenced by short-term anomalies such as holidays, weekend effects, or day-of-week traffic fluctuations. It provides a more stable and representative sample of user behavior.
* A sample size of at least 1,000 users per variant is required to ensure enough data is collected to provide statistically meaningful insights. This threshold helps avoid results that are skewed by randomness or small sample bias, leading to more reliable conclusions.
* A Probability to Be Best of at least 95% provides strong statistical evidence that the winning variant outperforms all other variants.
* An expected loss of less than 5% is required to ensure the winning variant is unlikely to perform significantly worse than others, minimizing risk and providing confidence in its effectiveness.
## End an A/B test
You can end an active A/B test at any time.
From the [A/B test report](#view-reports):
1. Select **End A/B test**.
1. Select an option to determine what will happen with the variants after ending the test:
| Option | Description |
| --- | --- |
| **<Any variant>** | Create a rollout Configuration for the variant that will be allocated to 100% of the A/B test audience. All other variants will no longer be available to their configured audiences. |
| **Stop all variants** | No variants will be available to their configured audiences. |
1. Confirm your selection.
You can also end the experiment by selecting **Stop** in the list of Configurations or by selecting **Roll out** for a variant listed in the table:

*Stop or roll out variants in a Feature Flag A/B test*
Once a winner has been determined, you will see an option to create a rollout for it in the report summary and table. Select **Roll out winner** and confirm your choice. The rollout will be allocated to 100% of the A/B test audience, and all other variants will no longer be available to their configured audiences.
To download the displayed test results in a CSV file, select **Download data**. Change your Goal selection to download results for that Goal. The following data is listed per [Channel ID](https://www.airship.com/docs/reference/glossary/#channel_id):
* Variant ID
* Variant name
* First interaction event time
* First Goal event time
* Goal event count
* [Named User](https://www.airship.com/docs/reference/glossary/#named_user)
* Platform
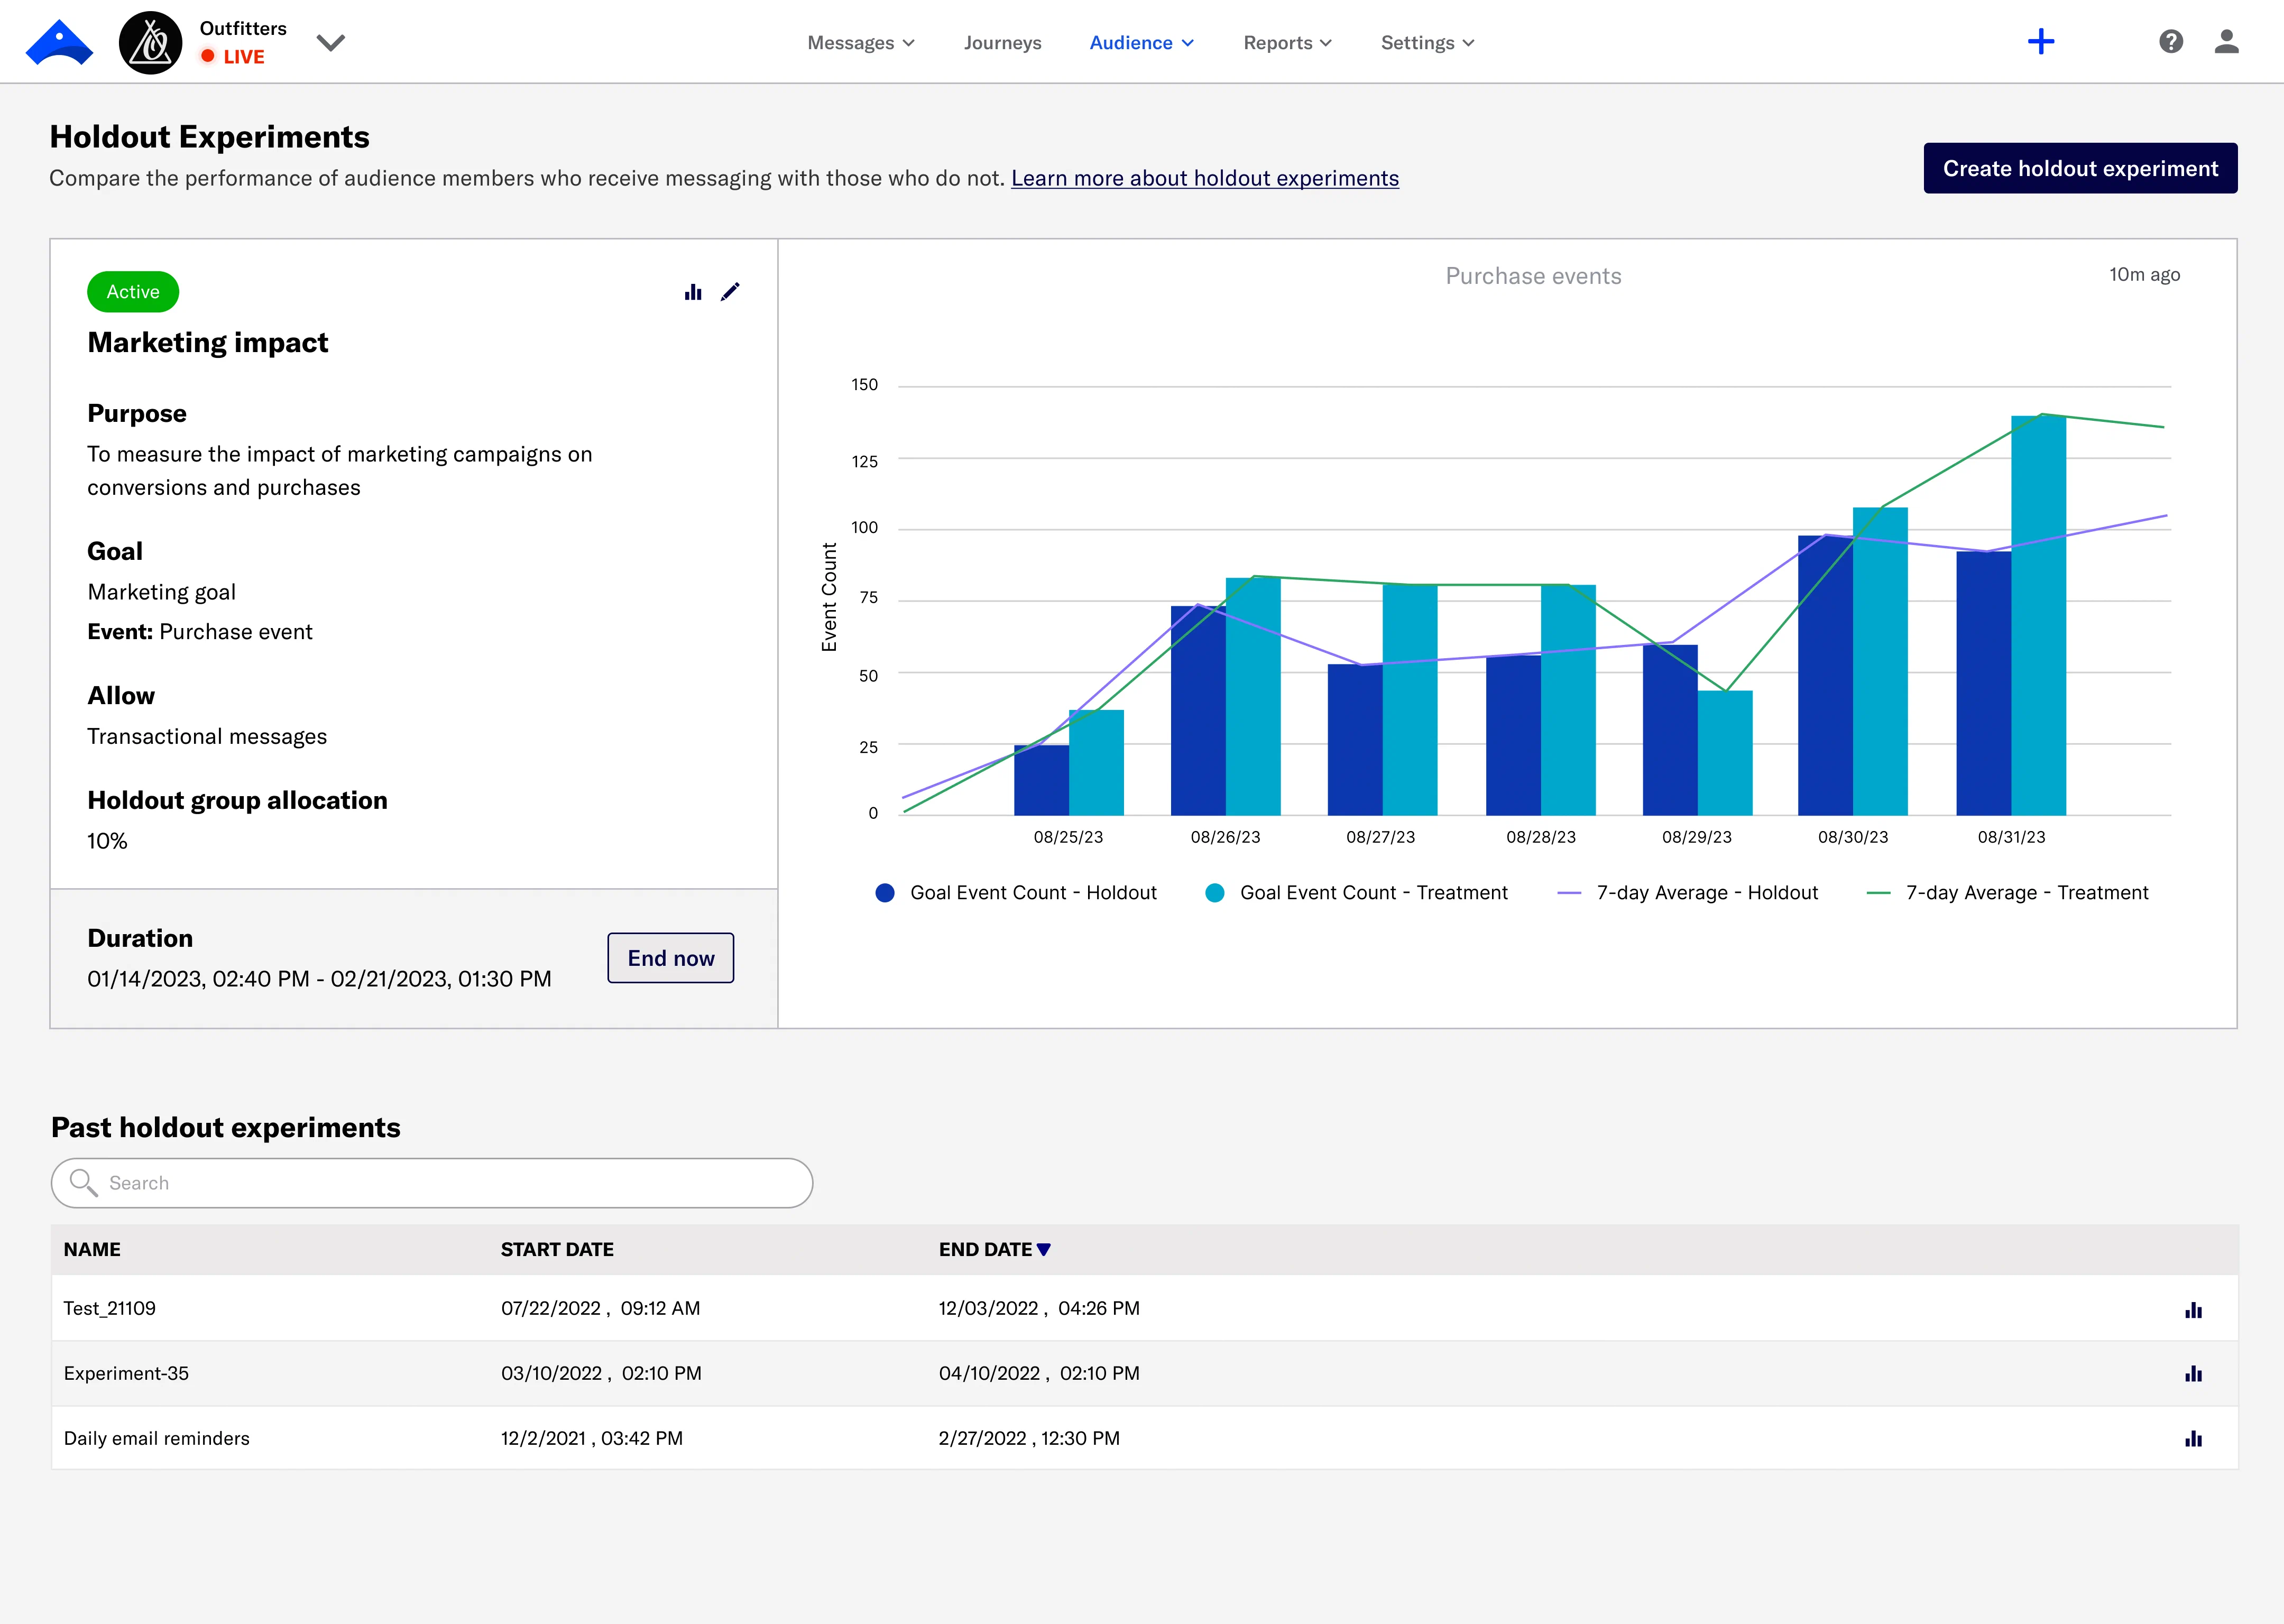
# Holdout Experiments
> {{< glossary_definition "holdout_experiment" >}}
## About Holdout Experiments
When creating a Holdout Experiment, you first define its purpose, hypothesis, and a definition of success. This step serves as a guideline for designing an effective experiment, since your answers can influence what messages you choose include or exclude, what to measure, and the duration. The information also serves as a reference when evaluating reports.
Holdout Experiments can be open-ended or time-bound, starting immediately or at a scheduled time and date. Only one experiment can be active at any time, and you cannot create or schedule an experiment while another is active.
When you create your first experiment, [Message Purpose](https://www.airship.com/docs/reference/glossary/#message_purpose) is automatically enabled for your project, and you must then select a purpose when creating any message in the dashboard.
### Holdout group
An experiment's holdout group is the percentage of your total audience that is excluded from messaging. The remaining audience is the treatment group.
* **Selection** — Audience members in a holdout group are randomly selected.
* **Application** — Holdout groups are applied at the user level. No messages will send from your project to a [Channel](https://www.airship.com/docs/reference/glossary/#channel_dev) associated with a [Named User](https://www.airship.com/docs/reference/glossary/#named_user) in an active holdout group until your experiment ends. Depending on when your experiment starts, Holdout Experiments might be applied partially to scheduled messages.
Airship prevents users in holdout groups from being included in [A/B tests](https://www.airship.com/docs/guides/experimentation/a-b-tests/) or [Sequence control groups](https://www.airship.com/docs/guides/experimentation/control-groups/). This eliminates potentially skewed data in cases where there are overlapping experimentation audiences. It also ensures that the most critical experiments maintain integrity, even when other experiments run simultaneously.
You can view a user's current holdout group status and history when [viewing their channel details in Contact Management](https://www.airship.com/docs/guides/audience/contact-management/#viewing-channel-details).
### Message exclusion and allowances
You can exclude all messages from holdout group members or only messages with specific [Campaign Categories](https://www.airship.com/docs/reference/glossary/#campaign_categories). For example, retailers could exclude `purchase_journey` campaigns to learn how their onboarding, abandoned cart, product rating requests, and other purchase-related messages impact conversion rates.
If your experiment excludes sending all messages, you can set exceptions that allow sending:
* **Transactional messages** — When sending messages from the API, you can bypass this allowance. See IMPORTANT note in step 5 in [Creating Holdout Experiments](#creating-holdout-experiments).
* **Messages with specific Campaign Categories** — This flexibility helps ensure your business-critical or other required messages still reach your intended audience.
### Goals and reports
Goals are the events you want to measure in your experiment. You can select from project-level [Goals](https://www.airship.com/docs/reference/glossary/#goals) or create new ones for that experiment only. Maximum 10 goals per experiment.
You can create Goals based on [Custom or Predefined Events](https://www.airship.com/docs/guides/audience/events/events/#event-types) or for a number of Default Events. For the list of Default Events, see [Goals](https://www.airship.com/docs/guides/reports/goals/).
As an experiment runs, reports for each Goal show the performance of the holdout and treatment groups. Holdout Experiments generate the same reports as project-level Goals.
After the experiment ends, or after a period of time relevant to the purpose of the experiment ends, evaluate the reports to determine the impact your messaging has on driving conversion goals or KPIs.
If there is no significant difference between holdout and treatment group performance, you may want to consider your campaigns and experiments for areas of improvement. Even with significant differences, this data can help you make informed decisions on how to best evolve your marketing strategy.
### Data normalization
Data in Holdout Experiment reports is normalized to make it easier to compare the effect of your campaigns on your Goals without having to compare vastly different audience group sizes.
For example, instead of comparing the actual numbers of 10% control and 90% treatment groups, we down-sample the larger group to compare an equal, random amount of users in each group. If there were 1,000 total users in an audience, 100 being in the control and 900 in the treatment, we would compare the 100 in the control with a random 100 users in the treatment group. We would then look at the users in those groups with at least one Goal event and show those in the report.
### Workflow
The following is the general workflow for Holdout Experiments.
1. [Handle Goals prerequisites](#adding-events-and-creating-goals) — If the events or project-level Goals you want to use for your experiment don't already exist in your project, you'll need to add them.
1. [Create the experiment](#creating-holdout-experiments) — Define the experiment and set the holdout group percentage and options, Goals, and duration.
1. [View reports and evaluate](#viewing-reports)
## Adding events and creating Goals
After configuring fields, select **Create Goal**.
1. Set up the holdout group and message options:
| Setting | Description | Steps |
| --- | --- | --- |
| **Holdout group allocation** | The percentage of your audience to exclude from messaging. | Set a percentage. |
| **Messages to withhold** | Determines which messages to withhold from members of the holdout group. **All messages** withholds all messages sent from your project. **Specific campaigns** withholds messages with specific Campaign Categories.
Field
Description
Steps
Goal name
Used for identification within the experiment
Enter text.
Description
Additional information about the Goal
Enter text.
Event
The event you want to measure in the experiment
Search for and select an event. If the event does not have a category assigned, select from the list or select Custom category and enter a category name.
The default view is the last 30 days of data. You can select a new time frame, and the reports will reload with the data for that period. For reports for multiple platforms, you can filter by one or more platforms.
To export data, hover over a report, then select the gear icon (⚙) and select **Download**. You can select from various output and other formatting options.
### Experiment detail
The **Experiment Detail** section of an experiment report contains a summary of the experiment's settings and displays the number of users in the holdout and treatment groups. Select a count to access a list of the users' [Channel IDs](https://www.airship.com/docs/reference/glossary/#channel_id) and [Named User IDs](https://www.airship.com/docs/reference/glossary/#named_user), and then select **Download** to export the list.
## Managing Holdout Experiments
You can manage your most recent experiment. Go to **Experiments**, then **Holdout Experiments**. Information about the most recent experiment appears next to the report for the first Goal added when setting up the experiment.
Experiment management options:
| Option | Description | Steps |
| --- | --- | --- |
| **Edit** | You can change the settings of an Active or Scheduled experiment. For Active experiments, you cannot change the holdout group allocation or transactional message status. | |
| **Delete a Scheduled experiment** | Removes the experiment from your project. Deleted experiments cannot be recovered. | Select the delete icon (trash). |
| **Start a Scheduled experiment** | Changes the start date and time of the experiment to the current date and time. | Select **Start now**. |
| **End an Active experiment** | Changes the end date and time of the experiment to the current date and time. You cannot restart an ended experiment. | Select **End now**. |
## Setting Campaign Categories
You can set [Campaign Categories](#message-exclusion-and-allowances) per message. For the API, see the [Campaigns Object](https://www.airship.com/docs/developer/rest-api/ua/schemas/push/#campaignsobject) documentation. In the dashboard, these are the locations per composer:
| Composer | Composer step | Documentation |
| --- | --- | --- |
| **Message, A/B Test, Automation, Sequence** | Delivery | [Campaign Categories](https://www.airship.com/docs/guides/messaging/messages/delivery/delivery-options/#campaign-categories) in _Message delivery options_ |
| **In-App Automation, Scene** | Settings | [Campaign Categories](https://www.airship.com/docs/guides/messaging/in-app-experiences/configuration/optional-features/#campaign-categories) in _Set optional message features_ |
# Sequence Control Groups
> Control groups are tools for measuring campaign efficacy and managing controlled rollouts for Sequences.
A control group is a percentage of an audience that is excluded from receiving messages. Audience members in the control group are randomly selected on entry to the Sequence, and they continue the [Sequence](https://www.airship.com/docs/reference/glossary/#sequence) just like active audience members, only without receiving any of its messages. Related events and conversions are recorded for both audiences, providing data you can use to evaluate Sequence performance. Using control groups in this way can help you:
* Determine the attribution of conversions to, as well as the potentially negative impacts of, various marketing efforts.
* Evaluate the impact your messaging has on driving conversion goals, KPIs, or uninstalls/opt-outs, to make informed decisions on how to best evolve your marketing strategy.
* Preview and set the pace for a controlled rollout.
When running a Sequence control group and a [Holdout Experiment](https://www.airship.com/docs/reference/glossary/#holdout_experiment) simultaneously, Airship prevents holdout group users from being included in the Sequence control group. This eliminates potentially skewed data in cases where there are overlapping experimentation audiences. It also ensures that the most critical experiments maintain integrity.
> **Tip:** * You can run control groups and [A/B tests](https://www.airship.com/docs/guides/experimentation/a-b-tests/sequences/) for a Sequence concurrently.
> * You can also create rollouts using [Feature Flags](https://www.airship.com/docs/guides/experimentation/feature-flags/) and [Scenes](https://www.airship.com/docs/guides/features/messaging/scenes/rollouts/).
## Creating a control group
As a best practice, you should create a control group before starting a Sequence, but you can create a control group at any time. From the Sequence [Manage](https://www.airship.com/docs/reference/glossary/#sequence_manager) or [Performance](https://www.airship.com/docs/reference/glossary/#sequence_performance) screen:
1. Select **Experiments** in the leftside drawer.
1. Select **Create a control group** and enter the percentage of users to exclude from messaging.
1. Select **Save**.
After saving, the Experiments drawer will update depending on Sequence configuration and status:
* For Sequences **without a conversion event**, you will see **Control group allocation** and options to remove the control group and adjust the allocation.
* For Sequences **with a conversion event**, you will see only **Control group allocation** until after you start the Sequence. After starting, you will instead see **Control group performance** options to remove the control group, adjust the allocation, and set a baseline. You will also see this data:
| Data | Description |
| --- | --- |
| **Allocation** | The current control group percentage. |
| **Sample size** | The number of users in the control group. Updated upon hard refresh and when allocation is changed. |
| **Conversions** | The number of users who exited the Sequence by a conversion event. Updated upon hard refresh. |
| **Conversion rate** | The number of conversions divided by the sample size. Updated upon hard refresh. |
## Comparing Performance reporting
The Performance report shows audience behavior compared to the Sequence’s goal. While a control group is enabled, review the performance of the active group compared to the control group and determine if messaging is having the expected impact on the Sequence's conversion events.
The report has the same layout as the [Sequence Manager](https://www.airship.com/docs/reference/glossary/#sequence_manager) and is available after you start the Sequence. For full documentation, see [Sequence Performance](https://www.airship.com/docs/guides/messaging/messages/sequences/performance/).
1. Go to **Messages**, then **Messages Overview**.
1. Select the report icon (
) for a Sequence. **Performance data** contains statistical data for the Sequence and each message.
* Select a time frame to update the viewable data.
* Select **
Report** to open an individual [message report](https://www.airship.com/docs/guides/reports/message/).
* Select *Active audience* / *Control group* to change the viewable data.
## Managing a controlled rollout
Use a controlled rollout to increase the availability of a Sequence over time. This can be helpful for Sequences that are considered high-risk, such as promoting a new feature launch or product line. If you want to preview the performance before deployment, set the initial control group allocation to 100%, and [compare performance data](#comparing-performance-reporting) before reducing the group size.
1. [Create a Sequence](https://www.airship.com/docs/guides/messaging/messages/sequences/create/create/), but **do not start it**.
1. Go to the [Manage](https://www.airship.com/docs/reference/glossary/#sequence_manager) or [Performance](https://www.airship.com/docs/reference/glossary/#sequence_performance) screen.
1. Select **Experiments** in the leftside drawer.
1. Select **Create a control group**, and enter the percentage of users to exclude from messaging.
1. Select **Save**.
1. Select **play Start**.
When you are ready to increase the availability of the Sequence:
1. Go to the [Manage](https://www.airship.com/docs/reference/glossary/#sequence_manager) or [Performance](https://www.airship.com/docs/reference/glossary/#sequence_performance) screen.
1. Select **Experiments** in the leftside drawer.
1. Select **Adjust allocation** and enter a lower percentage.
1. Select **Save**.
Continue to reduce the control group size over time, and select **Remove control group** when you want to make the Sequence available to your entire audience.
## Measuring campaign lift
*Lift* attempts to determine the efficacy of a Sequence by comparing the conversion rate of an active audience with that of a control group who received no messages. This can give you an idea of how your audience performs with and without your marketing efforts.
Key terms:
> Baseline
> : The *baseline* is the benchmark conversion rate of a Sequence's control group. It represents the conversion rate you would expect to see without messaging, and it is used to calculate the lift rate.
> Lift rate
> : The *lift rate* is the percent increase or decrease in the active audience conversion rate against the baseline.
> Conversion trend
> : The *conversion trend* is the difference between the baseline and current conversion rates for a selected time frame.
For example, a hotel chain may want to measure the impact of sending their audience a discount code for $150 off reservations for any stay of 2+ nights, using a Sequence conversion goal of hotel bookings. After creating the control group, they set a baseline when their desired sample size has been met. At the end of the 90-day campaign they find that the campaign lift rate is +86%:
* *Baseline: 7%* — The booking rate they would expect to see without messaging.
* *Conversion rate: 13%* — The conversion rate of the active audience.
* *Conversion trend: +6%* — The difference between the baseline conversion rate and the campaign-end conversion rate.
* *Lift rate: +86%* — For users who received the discount code, hotel bookings increased 86% over the baseline.
As your campaign runs and at its end, determine the impact of your messaging by looking at the lift rate, conversion trend, and other factors specific to the campaign. Keep in mind that:
1. The baseline is intended to represent the behavior of users without marketing influence (the messages in your Sequence), however, they may be exposed to your marketing through other channels.
1. The lift rate is neutral data — even though a lift rate may be high, if the campaign cost to achieve your Sequence goal is also high, you may find the ROI is too low to continue the campaign.
> **Note:** Airship does not provide historical reporting data for control groups. If you intend to compare the performance of a Sequence based on multiple control groups and baselines, you will need to record the data yourself.
To get started, set up a Sequence and its control group:
1. [Create a Sequence](https://www.airship.com/docs/guides/messaging/messages/sequences/create/create/) that has a conversion event, but **do not start it**.
1. Go to the [Manage](https://www.airship.com/docs/reference/glossary/#sequence_manager) or [Performance](https://www.airship.com/docs/reference/glossary/#sequence_performance) screen.
1. Select **Experiments** in the leftside drawer.
1. Select **Create a control group** and enter the percentage of users to exclude from messaging.
1. Select **Save**.
1. Select **play Start**.
Next you will establish a baseline for reporting. You decide when to set the baseline, by sample size or time — either wait till the number of users in the control group is representative of your Sequence's goal, or at least seven days or three times the Sequence length. When you set the baseline, the control group allocation is set to 0%, making the Sequence available to your entire audience, and Airship starts generating reporting data using the baseline.
1. Select **Experiments** in the leftside drawer.
1. Select **Set baseline** and confirm.
After setting a baseline, **Sequence lift** is added to the Experiments drawer, which displays the lift rate, the baseline rate, and the date the baseline was set. You can view the lift rate and conversion trend in the [Journey Map](https://www.airship.com/docs/reference/glossary/#journey_map):
1. Go to **Journeys**.
1. Select the Sequence from the sidebar or in the map.
The card in the map view displays the conversion trend next to the conversion rate. It appears in green for a positive trend and red for a negative trend. Select the trend to see the lift rate, baseline, and the date the baseline was set.
Now you can let the campaign run to completion. As a best practice, do not edit a Sequence while it has a control group enabled.
## Creating a new control group
When you need to change a Sequence's content and settings, you will likely also want to cancel your current control group and create a new one. For instance, you might update a Sequence for seasonality, such as changing from winter to spring campaigns.
Creating a new control group follows the [same procedure as creating the first control group](#creating-a-control-group). However, the lift rate is always based on the latest set baseline. Even if you create a new control group, the baseline is not affected until you set a new baseline.
## A/B tests
Learn how to create and run A/B tests and optimize your campaigns.
# About A/B testing
> {{< glossary_definition "ab_test" >}}
Digital marketing is constantly evolving, and staying competitive requires continuous improvement. One of the most effective methods for improving digital marketing strategies is through well-designed A/B tests. They can uncover valuable insights, which can help you optimize your campaigns and drive better results.
## Preparing for an A/B test
A solid understanding of the key components of an A/B test go a long way to ensuring that your experiments are valid, reliable and useful for improving your digital marketing strategies. The success of an experiment hinges on careful planning and execution. The following explains the key components that contribute to a successful experimentation process.
### Clear objective
Every successful experiment begins with a clear and well-defined objective. This is the guiding star that directs all your efforts throughout the experimentation process. In digital marketing, objectives can vary widely. For instance, you may aim to increase the click-through rate (CTR) of an email campaign by 10%, reduce the bounce rate on a landing page by 15%, or improve the conversion rate of a paid ad by 20%. The objective should be specific, measurable, and aligned with your broader business goals. It's not just about identifying what you want to achieve, but also about making sure that the objective is realistic and attainable within the scope of your resources and timeline.
### Well-formulated hypothesis
After defining the objective, the next step is to formulate a hypothesis. Your hypothesis is essentially an educated guess or prediction about the outcome of your experiment. It should be directly related to your objective and grounded in data or previous experience. This hypothesis should be clear and specific, measurable, testable and focused on a particular aspect of your digital marketing campaign. For example, instead of saying, "We want to improve our email click-through rates," you should say, "We hypothesize that changing the subject line of our email will improve our click-through rates by 10%."
### Key metrics
Key metrics are the quantitative measures you will use to evaluate the success of your experiment. These metrics should be directly tied to your objective and hypothesis. For instance, if your objective is to increase the CTR of an email campaign, the primary key metric would be the CTR itself. However, you might also track secondary metrics such as open rates, unsubscribe rates, and conversion rates to gain a fuller picture of the experiment's impact. Choosing the right metrics is crucial because they will guide your analysis and determine whether your hypothesis was correct. It's important to establish these metrics before you start the experiment so that you have clear criteria for success.
The four types of A/B tests in Airship support different metrics. See [A/B test types](https://www.airship.com/docs/guides/experimentation/a-b-tests/types/).
### Experiment design
Designing your experiment is a crucial step that involves planning how you will test your hypothesis. This includes several important components: choosing the A/B test type, determining the sample size, and establishing a control group, if available for your chosen A/B test type. Each of these components plays a vital role in the reliability and validity of your experiment.
A/B testing compares two or more versions of a marketing asset, such as an email, landing page, or ad, to see which one performs better. For example, you might test two different subject lines in an email campaign to see which one generates a higher open rate. Multivariate testing allows you to test multiple elements simultaneously. For instance, you might test different combinations of headlines, images, and CTAs on a landing page to determine which combination leads to the highest conversion rate, or compare [personalized](https://www.airship.com/docs/guides/personalization/about/) content to non-personalized. The design of your experiment should align with your goals and the complexity of the variables you are testing.
* **Sample size** is a critical factor in experimental design, representing the number of participants or observations. It's closely tied to your business's tolerance for error and decision-making agility. Selecting a sample size that's large enough to yield reliable results, but not so large that it slows down the process, is key. A small sample may produce unreliable findings, while a larger one increases the chance of detecting a true effect. You can use statistical calculators to determine the ideal sample size, taking into account the relevant statistical factors like the expected effect size, desired confidence level, and statistical power.
* A **control group** is essential for isolating the effect of the changes you are testing. In an experiment, the control group is the group that does not receive the experimental treatment or change. Instead, they are exposed to the original version of the marketing asset or the 'business as usual' condition. For example, if you are testing a new landing page design, the control group would see the original landing page, while the test group would see the new design. The purpose of the control group is to provide a baseline against which you can compare the results of the test group. By comparing the outcomes between the test and control groups, you can determine whether the changes made in the test group had a significant impact.
A holdout group from a project-wide [Holdout Experiment](https://www.airship.com/docs/reference/glossary/#holdout_experiment) can serve as a readily available control group that can be used to establish your initial baseline.
## Implementing A/B tests, outcomes, and compliance
Once your experiment design is in place, it's time to implement. The key steps for implementation are sample randomization, data collection, and continuous monitoring. Proper implementation is critical to ensuring that your experiment runs smoothly and yields accurate results.
* **Randomization** is a critical factor in a good experiment. The test and control groups should be selected randomly to ensure that any differences observed are due to the treatment and not other factors helping to eliminate bias and increase the reliability of your results. For example, if you're testing a new email campaign, you want to randomly select a portion of your email list to receive the new campaign while the remaining portion receives the old campaign.
* Accurate **data collection** is vital for meaningful analysis and informed decision-making. During the experiment, you'll need to track a variety of metrics that are relevant to your objective and hypothesis.
Continuous monitoring is the process of tracking the progress of your experiment in real time and making adjustments as needed. Continuous monitoring is important because it allows you to identify and respond to any issues that arise during the experiment. For instance, if you notice a significant drop in engagement during an ad campaign, you might need to investigate and address the issue before the experiment concludes. Additionally, continuous monitoring allows you to gather initial insights and make data-driven decisions during the experiment. This can be especially useful in longer experiments, where ongoing monitoring can help you optimize the experiment's performance and ensure that it stays on track.
Airship takes care of these for you, generating randomized experiment groups and collecting data for your chosen metrics. You can monitor the data continuously from the start of your experiment. While you're not responsible for setting up the experiment infrastructure, understanding these concepts will better equip you to design and run successful experiments.
### Rigorous analysis
As results come in, it's essential to evaluate whether the data provides clear insights before making decisions. Raw data can provide useful insights, and it's important to assess whether the observed differences are meaningful or simply due to chance. If statistical significance is provided with your experiment results, use it to understand whether the differences are likely due to the changes you tested rather than random variation. If not, consider a few key factors:
* Is the difference between test groups large enough to be meaningful?
* Was the sample size big enough to ensure reliable results?
* Have the results remained consistent over time, or are they fluctuating unpredictably?
If you're unsure, online calculators can help assess statistical significance by comparing sample sizes and conversion rates. Taking the time to review results thoughtfully ensures you make informed, data-driven decisions that lead to real improvements.
### Applying experiment findings
Once you've reviewed your results, the next step is deciding how to act on them. If your experiment produced a clear winner, you may choose to roll out that experience to a broader audience. If results were inconclusive, consider whether you need more data, a longer test duration, or a refined hypothesis. Sometimes, experiments reveal unexpected insights that lead to new questions. Use these learnings to shape future tests and continuously refine your approach. Experimentation isn't just about finding immediate wins.It's about building a culture of learning and iteration that drives long-term success.
### Documentation and learning
Documentation and learning are crucial steps in the experimentation process, as they ensure that the insights gained from your experiment are captured and shared across your organization. After analyzing the results, it's important to document your process and findings in a detailed report. This report should include your objective, hypothesis, experiment design, key metrics, results, and any conclusions or recommendations. For instance, if your experiment showed that personalized email subject lines consistently improve open rates, you should document this finding and share it with your team so that it can inform future email campaigns. Additionally, documenting any challenges or unexpected results can help you learn from the experience and improve future experiments. The ultimate goal of documentation is to create a knowledge base that helps your organization continuously improve its marketing strategies and decision-making processes.
### Ethical and legal compliance
It's essential to ensure that your experiments comply with ethical standards and legal regulations. In digital marketing, this might involve adhering to data privacy laws like the [General Data Protection Regulation (GDPR)](https://gdpr-info.eu/) and the [California Consumer Privacy Act (CCPA)](https://leginfo.legislature.ca.gov/faces/billTextClient.xhtml?bill_id=201720180AB375), ensuring that you have the necessary consent to use customer data and being transparent about how data will be used. For example, if you're conducting an experiment that involves collecting personal data from users, you need to ensure that you have obtained their consent and that you are storing and using the data in accordance with legal requirements. Ethical considerations might also include ensuring that your experiments do not mislead or harm participants. For instance, if you're testing different pricing strategies, it's important to be transparent about pricing changes and to avoid practices that could be considered deceptive or unfair.
By prioritizing ethical and legal compliance, you can protect your organization's reputation and build trust with your customers.
# A/B test types
> Airship provides multiple A/B testing options for various metrics and channels.
Compare A/B test types available in Airship:
| A/B test type | Metric | Channels | Description |
| --- | --- | --- | --- |
| **Message** | Engagement | **App** (push notification, in-app message, Message Center), **Web**, **Email**, **SMS**, **Open channel** |
Report name
Description
Goal
The number of times the event occurred per day and the 7-day average.
Channels per goal
The number of [Channels](https://www.airship.com/docs/reference/glossary/#channel_engage) that performed the event at least one time. You can filter by “greater than or equal to” and “is between” and enter values.
Goal frequency per channel
The frequency of event occurrence per [Channel](https://www.airship.com/docs/reference/glossary/#channel_engage). Data points displayed: 50th (median), 75th, and 99th percentiles.
Goals per platform
The percentage of events that occurred per platform. Only appears if multiple platforms are configured for the project.
**Resource:** [Message A/B tests](https://www.airship.com/docs/guides/experimentation/a-b-tests/messages/) |
| **Sequence** | Conversion or engagement | **App** (push notification, in-app message, Message Center), **Web**, **Email**, **SMS**, **Open channel** |
**Resource:** [Sequence A/B tests](https://www.airship.com/docs/guides/experimentation/a-b-tests/sequences/) |
| **Scene** | Various user actions | **App** (Scene) |
**Resource:** [Scene A/B tests](https://www.airship.com/docs/guides/experimentation/a-b-tests/scenes/) |
| **Feature Flag** | [Goals](https://www.airship.com/docs/reference/glossary/#goals) | **App** or **Web** content | Compare audience behaviors when a feature is hidden or present, or experiment with distinct feature experiences, such as new home screen designs, by setting different property values for each variant.
**Resource:** [Feature Flags](https://www.airship.com/docs/guides/experimentation/feature-flags/) |
{class="table-col-1-20 table-col-4-50"}
# Message A/B tests
> Experiment with up to 26 message variations to determine audience engagement.
## About A/B tests for messages
device [Tag Group](https://www.airship.com/docs/reference/glossary/#tag_group) — See Primary device tags.
> **Note:** Engagement data is sent to Airship as soon as it becomes available. Data may be delayed due to connectivity issues with a user's carrier, Wi-Fi, power, etc. Wait at least 12 to 24 hours before acting on the data to allow for potential lags.
## RTDS events
Messages used as variants in an A/B test include experiment information in [Real-Time Data Streaming](https://www.airship.com/docs/reference/glossary/#rtds) events.
The [Send event](https://www.airship.com/docs/developer/rest-api/connect/schemas/events/#send) includes an `experiments` object with the test details, including `experiment_id`, `type`, and `variant_id`. The `experiment_id` also appears in the `body` object.
The [Control event](https://www.airship.com/docs/developer/rest-api/connect/schemas/events/#control) includes an `experiment_id` at the top level and also in the `body` object.
## Managing A/B tests
"timezone" key in the request body. See user registration information for Email, SMS, and Open channels. The API equivalent of Delivery By Time Zone is Push to Local Time.
2. When your audience includes users without an optimal send time tag, those users will be dropped from delivery and will not receive the message. Since optimal send time is determined from user behavior over time, new users might not have an optimal send time determined for the first week or two after channel registration.
After selecting timing, configure:
| Section | Description | Steps |
| --- | --- | --- |
| **Purpose**1 | Set or verify the [Message Purpose](https://www.airship.com/docs/reference/glossary/#message_purpose). This option only appears if Message Purpose is enabled for the project. | Select **Commercial** or **Transactional**. |
| **Options** | Various options are available depending on the message types, channels, and platforms selected for your test. | See [Message delivery options](https://www.airship.com/docs/guides/messaging/messages/delivery/delivery-options/). |
| **External data feed options** | If your message includes [External Data Feeds](https://www.airship.com/docs/reference/glossary/#external_feed), you must determine how the message is handled if the feed fails. Additionally, the default value is displayed for each send time variable in the feed URL. You can enter new values to override the default value for this message only. | For **Failure behavior**, select **Abort sending the message** or **Send message without this data**. For any **Default value for <var>**, enter a new value. |
| **Ban List** | If your project has a [Ban List](https://www.airship.com/docs/reference/glossary/#ban_list) enabled and its request URL includes send time variables, you can override their default values for this message only. This setting does not appear if [Bypass Ban List](https://www.airship.com/docs/guides/messaging/messages/delivery/delivery-options/#bypass-ban-list) is also enabled. | For any **Default value for \\<variable>**, enter a new value. |
1. When Message Purpose is enabled and email and at least one other channel are selected for a message, Purpose is disabled in the Delivery step. Instead, set the purpose in the email's [Sender Information](https://www.airship.com/docs/guides/messaging/messages/content/email/email/#creating-content): In Content step, select the Email tab, select Edit
for Sender Information, and enable Transactional or leave it disabled if the message contains commercial content only. The commercial/transactional designation set in the email Sender Information will apply to all channels selected for the message.
1. Select the **Review** step, then review the device preview and message summary. You can select a variant in the Content section or above the preview. Select the arrows to page through the various previews. The channel and display type dynamically update in the dropdown menu above. You can also select a preview directly from the menu. If you want to make changes, select the associated step in the header, make your changes, then return to Review.
You can send a test message for each variant to verify its appearance and behavior on each configured channel. The message is sent to your selected recipients immediately, and it appears as a test in [Messages Overview](https://www.airship.com/docs/reference/glossary/#messages_overview). First, select **Send Test** and a variant. Then, complete the following:
When your review is complete, select **Send Message** or **Schedule Message**.
## View test reports
After sending an A/B test, discover which variant performed best. Use the test- and message-level reports to determine the quality of each variant and strategies for increasing engagement. See also [Implementing A/B tests, outcomes, and compliance](https://www.airship.com/docs/guides/experimentation/a-b-tests/about/#implementing-ab-tests-outcomes-and-compliance) in *About A/B testing*.
Go to **Messages**, then **Messages Overview**, and then select the report icon (
) for an A/B test. Report sections:
| Section | Description |
| --- | --- |
| **Header** | Displays the test name and its send date, time, and time zone |
| **Performance** | Contains statistical data for each variant per channel and the control group, if any, and a link to a [message report](https://www.airship.com/docs/guides/reports/message/) for each variant |
| **Message Detail** | Contains the same information and preview options shown in [the Review step when creating the A/B test](#create-a-message-ab-test) and in the [Message Detail section of a message report](https://www.airship.com/docs/guides/reports/message/#message-detail) |
To export test data, select **Download CSV**, then **Performance Data**. If your test included [Custom Events](https://www.airship.com/docs/reference/glossary/#custom_event), you will also have the option to download **Variant Event Data**, which is a report of event conversions and associated values, broken
out by variant or control group.
> **Note:** Engagement data is sent to Airship as soon as it becomes available. Data may be delayed due to connectivity issues with a user's carrier, Wi-Fi, power, etc. Wait at least 12 to 24 hours before acting on the data to allow for potential lags.
# Scene A/B tests
> Use an A/B test to determine which version of a Scene has the best impact based on your selected metric.
## About A/B tests for Scenes
Data source
Description
Steps
Test message recipient
The message will be personalized using information associated with each test audience member.
n/a
Preview Data tool
The message will be personalized using the data currently entered in the Preview Data tool. The same values will apply to all test message recipients. You can also manually edit the JSON.
(Optional) Edit the JSON data.