# Attributes
{{< glossary_definition "attribute" >}}
# About attributes
> {{< glossary_definition "attribute" >}}
## Tags versus attributes
Consider the example below — you want to target fans of the actor Chris Pine. To accomplish this, you specify an audience of users with the [tag](https://www.airship.com/docs/reference/glossary/#tag) `chris_pine`. Either a user has this tag, or not. **Note:** These API examples can also be used in the dashboard.
**Tag audience**
```json
{
"audience": {
"tag": "chris_pine"
}
}
```
But let's say you wanted to target fans of **All The Chrises**: Chris Pine, Chris Evans, Chris Pratt, and Chris Hemsworth. With attributes, you can set your audience to target users whose `favorite_actor` attribute `contains` the value `chris`, and you will reach all the Chris fans.
**Attributes audience**
```json
{
"audience": {
"attribute": "favorite_actor",
"operator": "contains",
"value": "chris"
}
}
```
It's a silly example, but hopefully you can begin to see the power of comparison operators for attributes.
## Attribute types
User information can be stored in an attribute as text or as a number, date, or JSON object. Each attribute type is named for the schema that defines what values it accepts. Text, Number, and Date schemas are determined by Airship. You provide your own schema for JSON attributes.
Values accepted for each attribute type:
| Attribute type | Value format | Comments |
| --- | --- | --- |
| **Text** | String | Text strings can be a maximum of 255 characters. |
| **Number** | Number or float value | When setting Number attributes, you can provide your value as an integer, float, or string. |
| **Date** | ISO 8601 date-time formatted string: `YYYY-MM-DDTHH:MM:SS` | You can set an offset by appending the date-time with `+HH:MM`. For example, `2020-07-20T12:35:42+08:00`. Date attributes are converted to and stored as UTC. |
| **JSON** | An object containing one or more string, number, date, or boolean key-value pairs, individually or within objects or arrays | JSON attributes are not available in [Performance Analytics](https://www.airship.com/docs/reference/glossary/#pa). See following page section for additional information. |
### JSON attributes
JSON attributes are data objects containing one or more string, number, date, or boolean key-value pairs. The pairs can be added individually or within objects or arrays.
You can think of them as collections of information you can assign to a user. Example use cases:
* **Retailer** — Store user preferences and send sale or discount messages about items you know a user will be interested in and with personalized content for their preferred brands, colors, etc.
* **Airline** — Store a user's booking information and send confirmation and update messages leading up to, during, and after their trip. Messages would contain their confirmation code, flight numbers, origin and destination airport codes, and departure and arrival times.
For each JSON attribute, you create a template for the structure and what data to store. The template is the *schema* and the data is defined as *properties*. Using the above airline use case, you could have an attribute with ID `reservation` and create a schema for the confirmation code and lists of like data types (departures and arrivals) with properties for flight numbers, airport codes, and times.
In addition to the properties defined in your provided schema, each JSON attribute has a property `exp` for its expiration date, represented as the number of seconds since the epoch (January 1st, 1970). After expiration, Airship ignores the attribute where used in segmentation and personalization. When setting a JSON attribute on a user, if a value for `exp` is not provided, Airship automatically sets a value of 90 days from the current date and time. The maximum expiry delay for a JSON attribute is 731 days.
Each instance of setting a JSON attribute on a user is defined by an *instance ID*, which is used as a reference for the property values set for that user.
The following describes associating the data with users and targeting and personalization options:
| Topic | How it works | Airline use case example |
| --- | --- | --- |
| **Setting the attribute on your audience** | Use the SDKs or API to set JSON attributes on a user, specifying an instance ID and values for properties. | When a user books a round-trip flight, you could assign the `reservation` attribute with instance ID `a001`. The JSON data assigned for instance `reservation#a001` would contain a list of each flight leg going to the destination and each returning flight leg. |
| **Targeting the attribute** | You target a JSON attribute's properties, not the object as a whole. All instances of the attribute are evaluated for matches. Any user that matches the target is included in the message audience. | For a flight update message, you could target any user with the attribute `reservation` where the initial leg of their trip departs from airport `PDX`. Any user with that attribute and value `PDX` for the airport code property would be included in the message audience. |
| **Personalizing content** | In message content, you can reference JSON attributes by instance ID or evaluate all instances of the attribute. In both cases, the message content populates with the property values set for a user. | In a flight update message, you could reference `reservation` properties, and the message would contain user-specific details about how the change affects their trip. |
## Categories, data sources, and setup
Attributes can come from the Airship SDKs, users, and you.
Data sources, descriptions, and setup per attribute category:
| Category | Data source | Description | Setup |
| --- | --- | --- | --- |
| **Default** | Airship SDKs | Airship automatically sets Default attributes on your audience. See [Device properties](https://www.airship.com/docs/guides/audience/device-properties/). | None. |
| **Named user ID** | Airship | If a channel has a [named user](https://www.airship.com/docs/reference/glossary/#named_user), Airship automatically generates this attribute, with the named user ID as its value. See [Named user ID attribute](https://www.airship.com/docs/reference/data-collection/attributes/#named-user-id-attribute) in the _Attributes Reference_. | None. |
| **NPS survey** | User answers to Net Promoter Score (NPS) surveys in [Scenes](https://www.airship.com/docs/reference/glossary/#scene) | Airship automatically generates attributes based on the NPS score or category. See [NPS Segmentation](https://www.airship.com/docs/guides/features/messaging/scenes/surveys-stories/#nps-segmentation) in _Surveys and Stories_ and [NPS survey attributes](https://www.airship.com/docs/reference/data-collection/attributes/#nps-survey-attributes) in the _Attributes Reference_. | None. |
| **Predefined** | Customer | Preformatted Text and Number attributes you can use to ensure consistency across reports and [Performance Analytics](https://www.airship.com/docs/reference/glossary/#pa). For example, ID `first_name` for first name, and ID `last_name` for last name. See [Predefined attributes](https://www.airship.com/docs/reference/data-collection/attributes/#predefined-attributes) in the _Attributes Reference_. | Add attributes in your project settings then set them on your audience. |
| **Custom** | Customer | You can add any attribute type to your project. | Add attributes in your project settings then set them on your audience. |
| **Zero-copy data integration** | Data partner | Directly access user data from external systems. The data remains in its original location instead of being copied or imported into Airship. | See [Zero-copy data integration](https://www.airship.com/docs/guides/features/data-integration/zero-copy-data-integration/). |
> **Warning:** To target users based on a unique user ID or other external identifier, do not use Custom attributes. Instead, target [named user](https://www.airship.com/docs/reference/glossary/#named_user).
> **Tip:** You can store responses to single choice questions in [Scenes](https://www.airship.com/docs/reference/glossary/#scene) as attributes.
>
> See the [Question content element](https://www.airship.com/docs/guides/messaging/editors/scenes/elements/#question) in *Configuring Scene content*.
## Personalization
You can use attributes in a message body to personalize content for each user. See [Personalizing messages using attributes](https://www.airship.com/docs/guides/personalization/sources/attributes/).
# Adding attributes to your project
> Before you can target attributes, you must add some types to your project.
You must add Predefined and Custom attributes to your project before you can set them on your audience for targeting. You can add up to 250 attributes per project.
After adding attributes, allow at least 10 minutes before setting their values. This delay ensures proper processing of the attributes within Airship.
No setup is required for Default and NPS survey attributes. You can go straight to [Targeting your audience using attributes](https://www.airship.com/docs/guides/audience/attributes/targeting/). Similarly, attributes from [Zero-copy data integration](https://www.airship.com/docs/guides/features/data-integration/zero-copy-data-integration/) are available for targeting once Airship completes your project configuration.
## Add Text, Number, and Date attributes
Follow these steps to add text, number, or date attributes to your project:
1. Go to **Audience**, then **Attributes**, then **Attribute List**.
1. Select **Create attribute**.
1. Search for the attribute you want to add. If it matches a [Predefined attribute](https://www.airship.com/docs/reference/data-collection/attributes/#predefined-attributes), select from the results. Results do not include Predefined attributes that have been [archived](https://www.airship.com/docs/guides/audience/attributes/managing/) or already added.
1. Complete the fields:
| Field | Description | Steps |
| --- | --- | --- |
| **Attribute ID** | The key that Airship uses to reference the attribute in the SDKs and API. Letters, numbers, and underscores only, 64 characters maximum. The `ua_` prefix is reserved by Airship, so you cannot include it in the ID. Cannot be edited for Predefined attributes. | Enter text. |
| **Name** | A human-friendly name to help you organize and identify your attributes in the dashboard. Accepts all characters, 64 characters maximum. | Enter text. |
| **Type** | Determines the format of the attribute value: Text, Number, or Date. Cannot be edited for Predefined attributes. | Select a type. |
> **Important:** * Names and IDs must be unique.
> * Attribute IDs are case sensitive. If your attributes exist in an external system, make sure they are always the same case in both systems.
> * We recommend using lowercase characters with underscores for attribute IDs. For example, `my_text_attribute`.
> * You cannot edit a Custom attribute's ID or type after saving.
1. Select **Add**.
## Add JSON attributes
When adding a JSON attribute, you must define the object's data structure in a schema. An object is a collection of properties defined as key-value pairs. The values can be strings, numbers, dates, booleans, objects, or arrays. An array is an ordered collection of values. A JSON object allows for nested objects and arrays, so it can contain an array of properties, and those properties can themselves be objects containing more properties and arrays of properties.
You can manually enter a schema or automatically generate a schema by uploading a sample .json file. For upload:
* The value data determines the value types and will be removed.
* Array value type is determined based on the first element in an array, so when using an array with more than one type, the array is converted to a single type based on the first element. For example, the array `["hi", true, 3]` will create an array of strings.
* Empty arrays, objects without keys, and keys with empty arrays or objects will be ignored.
You can assign any property a more readable name, like "Flight number" or "Reservation code", as an alias. When creating a [segment](https://www.airship.com/docs/reference/glossary/#segment) targeting a JSON attribute, you can select the alias from a menu instead of having to locate the property within the JSON schema. Aliases are supported in the dashboard only.
1. Go to **Audience**, then **Attributes**, then **Attribute List**.
1. Select **Create attribute**.
1. Complete the fields:
| Field | Description | Steps |
| --- | --- | --- |
| **Attribute ID** | A portion of the key that Airship uses to reference the attribute in the SDKs and API. Letters, numbers, and underscores only, 64 characters maximum. The `ua_` prefix is reserved by Airship, so you cannot include it in the ID. | Enter text. |
| **Name** | A portion of the key that Airship uses to reference the attribute in the SDKs and API. The name is also used to help you organize and identify your attributes in the dashboard. Letters, numbers, and underscores only, 64 characters maximum. | Enter text. |
| **Type** | Determines the format of the attribute value. | Select JSON. |
> **Important:** * Names and IDs must be unique.
> * Attribute IDs are case sensitive. If your attributes exist in an external system, make sure they are always the same case in both systems.
> * We recommend using lowercase characters with underscores for attribute IDs. For example, `my_text_attribute`.
> * You cannot edit a Custom attribute's ID or type after saving.
> **Tip:** You can select **Add** now to save the attribute, then edit and set up the schema later.
1. (To automatically generate a schema) Select **Upload**, then upload your sample .json file.
1. (To manually create a schema) Select **Create schema**.
1. Edit the schema:
| Option | Steps |
| --- | --- |
| **Add a property** | Select the add icon (+), enter a name, select a value type, then select the check mark. You must also select a value type for each array. |
| **Remove a property or object** | Hover over the item, then select the remove icon (trash). |
1. (Optional) Create aliases:
1. Under **Aliases**, select the add icon (+).
1. Enter a name for the alias.
1. Select a property in the schema. Its path will appear next to the alias.
1. (Optional for arrays in the path) Select **First** or **Last** to specify the first or last item in the array. Defaults to **Any**.
1. Select the check mark to save.
1. Repeat for additional aliases.
1. Select **Save JSON Schema**.
1. Select **Add**.
# Setting and removing attributes
> Setting and removing attributes varies per attribute type. Setting attributes on named users is recommended.
For Predefined and Custom attributes, you must set them on your audience after adding them to your project.
> **Important:** You must add Custom and Predefined attributes to your project before setting them on users. Otherwise, setting those attributes will result in an error. See [Adding attributes to your project](https://www.airship.com/docs/guides/audience/attributes/adding/).
>
> JSON attributes cannot be set through CSV upload. Use the Airship SDKs or the [Channels](https://www.airship.com/docs/developer/rest-api/ua/operations/channels/#modifychannelattributes) or [Named Users](https://www.airship.com/docs/developer/rest-api/ua/operations/named-users/#modifynameduserattributes) API.
No setup is required for Default and NPS survey attributes. You can go straight to [Targeting your audience using attributes](https://www.airship.com/docs/guides/audience/attributes/targeting/). Similarly, attributes from [Zero-copy data integration](https://www.airship.com/docs/guides/features/data-integration/zero-copy-data-integration/) are available for targeting once Airship completes your project configuration.
## Channels versus named users
You can set attributes on channels and named users, however their inheritance of attributes varies:
-
Channels inherit from named users — All the channels associated with a named user will also bear the named users’s attributes. When you remove a channel from a named user, Airship removes attributes set on the named user from that channel.
Using the example favorite_actor attribute contains the value chris, if you store the favorite_actor attribute at the named user level, you can target all contacts who are fans of Chrises over any of their channels. You can keep your audience up to date on Chris-related news, no matter which channels they use to communicate with you.
**Attributes at the named user level can be used to target any channel associated with a named user:**
```mermaid
graph LR
A[Named user
with attributes]
B[Attribute Selector]
subgraph Audience
C[App Message]
D[SMS]
E[Web Notification]
end
A --> B
B -.-> C
B -.-> D
B -.-> E
```
-
Named users do not inherit from channels — Any attribute set for a channel will not also be set for an associated named user.
If you store the favorite_actor attribute at the channel level, you can only target fans of Chrises on the specific channels bearing the favorite_actor attribute, limiting the scope of Chris-related communications.
**Attributes at the channel level are limited to that channel:**
```mermaid
graph LR
A[App Channel
with Attributes]
B[Attribute Selector]
subgraph Audience
C[App Message]
D[SMS]
E[Web Push]
end
A --> B -.-> C
```
In general, we recommend that you store attributes at the named user level so you can take advantage of your attributes across any of your users’ channels. This helps you build and maintain a cohesive relationship with your audience. Setting attributes at the channel level limits the scope of the attribute to that channel and can also limit your flexibility when targeting audiences.
Named users also inherit a few Default attributes from the last channel that was associated with them, helping keep your named users up to date with scheduling and locale information.
These attributes appear in the user_attributes object:
| Default attribute |
Description |
Example |
| ua_local_tz |
The user’s time zone |
America/Los_Angeles |
| ua_country |
The user’s ISO 3166 two-character country code |
US |
| ua_language |
The user’s ISO 639-1 two-character language code |
en |
## Required delay before setting attribute values
After adding attributes, allow at least 10 minutes before setting their values. This delay ensures proper processing of the attributes within Airship.
## Attributes list retention and deletion
An attributes list has the same retention behavior whether uploaded in the Airship dashboard, using SFTP, or using the [Attribute Lists API](https://www.airship.com/docs/developer/rest-api/ua/operations/attribute-lists/).
Airship automatically deletes a list and all its versions after 90 days of inactivity. Timestamps used to calculate the 90-day period:
- Creation date
- New version uploaded
The creation date is the initial day one of the 90-day period. Each instance of uploading a new version resets the timestamp to day one.
After deletion, the list is removed from the upload history and is no longer visible in the Airship dashboard or through API calls. Deletion does not affect the project state. For example, if you use an attribute list that adds Attribute A to a channel, Attribute A will still exist on the channel after list deletion.
## Setting and removing Text, Number, and Date attributes
You can set and remove Text, Number, and Date attributes using dashboard upload, SFTP, the SDKs, or APIs.
Use these formats when setting each attribute type:
| Type | Format |
| --- | --- |
| **Text** | String. When setting Text attributes using a CSV, you do not need to wrap the value in quotes. |
| **Number** | Number, float value, or string |
| **Date** | ISO 8601 date-time formatted string: `YYYY-MM-DDTHH:MM:SS`. Set an offset by appending the date-time with `+HH:MM`. For example, `2020-07-20T12:35:42+08:00`. |
### CSV file in the dashboard or using SFTP {#csv-file}
Whether you want to upload directly from the dashboard or transfer using SFTP, you must first create a list of users and their attributes in a CSV file. Prepare your file using the guidelines in [Attributes CSV Format](https://www.airship.com/docs/reference/messages/csv-formatting/#attributes) in the *CSV Formatting Reference*.
When using email or SMS identifiers in your CSV file, Airship registers new channels for addresses or MSISDN/sender combinations that are new to your project. Additional fields indicate opt-in statuses, so that you can send messages to new channels generated from your CSV upload. All values in CSV uploads, including numbers, are represented as strings and cannot be used with [math helpers](https://www.airship.com/docs/guides/personalization/handlebars/math-helpers/).
Next, transfer the file using SFTP or upload it in the dashboard. Follow the steps in [SFTP upload for CSV files](https://www.airship.com/docs/guides/audience/segmentation/sftp-upload/), or follow these steps for dashboard upload:
1. Go to **Audience**, then **Attributes**, then **Upload Attribute Data**.
1. For **Upload Type**, select which file type you prepared, **Attributes CSV** or **Attributes Snapshot CSV**.
1. Select **Choose file** and select your file.
1. Select **Upload**.
To see your upload and SFTP transfer status, select **Upload History**. See [Viewing upload history](https://www.airship.com/docs/guides/audience/attributes/managing/#viewing-upload-history) in *Managing attributes*.
### SDK
To set or remove attributes on a channel or a contact, use the channel or contact classes in our SDKs:
* **iOS** — [Contact](https://urbanairship.github.io/ios-library/v20/AirshipCore/documentation/airshipcore/airshipcontact)
, [Channel](https://urbanairship.github.io/ios-library/v20/AirshipCore/documentation/airshipcore/airshipchannel)
* **Android** — [Channel](https://www.airship.com/docs/reference/libraries/android-kotlin/latest/urbanairship-core/com.urbanairship.channel/-airship-channel/index.html), [Contact](https://www.airship.com/docs/reference/libraries/android-kotlin/latest/urbanairship-core/com.urbanairship.contacts/-contact/index.html)
* **Web** — [Channel](https://www.airship.com/docs/reference/libraries/web-notify-sdk/v2-latest/UaSDK.Channel.html#editAttributes), [Contact](https://www.airship.com/docs/reference/libraries/web-notify-sdk/v2-latest/UaSDK.Contact.html#editAttributes)
The code examples below show how to set attributes using the provided methods. See the
[SDK docs](https://www.airship.com/docs/sdk-topics/attributes/) for more details.
#### Android Java
```java
Airship.getChannel().editAttributes()
.setAttribute("average_rating", 4.99)
.setAttribute("last_product_purchased", "A1234567")
.removeAttribute("purchase_pending")
.apply();
```
#### iOS Swift
```swift
Airship.channel.editAttributes { editor in
editor.set(string: "cauldron", attribute: "last_product_purchased")
editor.set(number: 4.99, attribute: "average_rating")
editor.remove("purchase_pending")
}
```
#### iOS Objective-C
```obj-c
[UAirship.channel editAttributes:^(UAAttributesEditor * editor) {
[editor setString:@"cauldron" attribute:@"last_product_purchased"];
[editor setNumber:@(4.99) attribute:@"average_rating"];
[editor removeAttribute:@"purchase_pending"];
}];
```
**Setting attributes for Web**
```js
const editor = channel.editAttributes()
await editor
.set("my_attribute", "some_value")
.remove("other_attribute")
.apply()
```
### API
You can set attribute values from external sources, such as a CRM or data warehouse:
* To set attributes on a single channel or named user, use [Set or remove attributes on channels](https://www.airship.com/docs/developer/rest-api/ua/operations/channels/#modifychannelattributes) or [Set or remove attributes on named users](https://www.airship.com/docs/developer/rest-api/ua/operations/named-users/#modifynameduserattributes). Use `set` or `remove` for the `action` value, and use the attribute ID as the `key` value.
* To set attributes on many channels or named users at once, use the [Attribute Lists API](https://www.airship.com/docs/developer/rest-api/ua/operations/attribute-lists/) to upload a CSV.
**Setting two attributes on a channel and removing another**
```http
POST /api/channels/attributes HTTP/1.1
Authorization: Basic
Accept: application/vnd.urbanairship+json; version=3
Content-Type: application/json
{
"audience": {
"ios_channel": "b8f9b663-0a3b-cf45-587a-be880946e881"
},
"attributes": [
{
"action": "set",
"key": "favorite_actor",
"value": "chris_evans",
"timestamp": "2019-09-19 12:00:00"
},
{
"action": "remove",
"key": "favorite_color",
"timestamp": "2019-09-19 12:00:00"
},
{
"action": "set",
"key": "first_name",
"value": "Roger",
"timestamp": "2019-09-19 12:00:00"
}
]
}
```
**Setting two attributes on a named user and removing another**
```http
POST /api/named_users/my_named_user/attributes HTTP/1.1
Authorization: Basic
Accept: application/vnd.urbanairship+json; version=3
Content-Type: application/json
{
"attributes": [
{
"action": "set",
"key": "firstName",
"value": "Gyuri",
"timestamp": "2020-09-19 12:00:00"
},
{
"action": "remove",
"key": "birthDate",
"timestamp": "2020-09-19 12:00:00"
},
{
"action": "set",
"key": "lastName",
"value": "Pataki",
"timestamp": "2020-09-19 12:00:00"
}
]
}
```
## Setting and removing JSON attributes
You can set and remove JSON attributes on a channel or a contact using the App and Web SDKs or APIs.
### SDK
[iOS SDK 19.3+](/docs/docs/developer/sdk-integration/apple/ios-changelog/#19.3.0) [Android SDK 19.6+](/docs/docs/developer/sdk-integration/android/changelog/#19.6.0)
The code examples below show how to set JSON attributes using the provided methods.
#### Android Kotlin
```kotlin
Airship.contact.editAttributes {
setAttribute(
attribute = "attribute_name",
instanceId = "instance_id",
expiration = Date(),
json = jsonMapOf(
"key" to "value",
"another_key" to "another_value"
)
)
}
```
#### iOS Swift
```swift
Airship.contact.editAttributes { editor in
try! editor.set(
json: [
"key": .string("value"),
"another_key": .string("another_value")
],
attribute: "attribute_name",
instanceID: "instance_id",
expiration: Date.now
)
}
```
**Setting JSON attributes for Web**
```js
const contact = await sdk.contact
const editor = await contact.editAttributes()
const nowInSeconds = Math.floor(Date.now() / 1000)
await editor
.set("attribute_name#instance_id", {
key: "value",
another_key: "another_value",
exp: nowInSeconds
}
)
.apply()
```
### API
Set or remove JSON attributes using the Channels and Named Users APIs:
* [Set or remove attributes on channels](https://www.airship.com/docs/developer/rest-api/ua/operations/channels/#modifychannelattributes)
* [Set or remove attributes on named users](https://www.airship.com/docs/developer/rest-api/ua/operations/named-users/#modifynameduserattributes)
Use `set` or `remove` for the `action` value. Set the key value as `#`. Instance IDs:
* Can contain letters, numbers, and underscores only
* Must begin with a letter
* Must end with a letter or number
* Are limited to 31 characters maximum
* Are case-sensitive
For more information, see [JSON attributes](https://www.airship.com/docs/guides/audience/attributes/about/#json-attributes) in *About attributes*.
In the examples below we are using the attribute ID `reservations` and instance ID `a001`.
**Setting a JSON attribute on a channel**
```http
POST /api/channels/attributes HTTP/1.1
Authorization: Basic
Accept: application/vnd.urbanairship+json; version=3
Content-Type: application/json
{
"audience": {
"ios_channel": "b31cf3ab-f33e-46ae-b874-782facda2bab"
},
"attributes": [
{
"action": "set",
"key": "reservations#a001",
"value": {
"flights": [
{
"departs": {
"port": "PDX",
"time": "2023-12-01T05:09:00"
},
"arrives": {
"port": "LAX",
"time": "2023-12-01T07:09:00"
}
},
{
"departs": {
"port": "LAX",
"time": "2023-12-08T12:30:00"
},
"arrives": {
"port": "PDX",
"time": "2023-12-08T14:45:00"
}
}
]
}
}
]
}
```
**Setting the four different types of attributes on a named user**
```http
POST /api/named_users/my_named_user/attributes HTTP/1.1
Authorization: Basic
Accept: application/vnd.urbanairship+json; version=3
Content-Type: application/json
{
"attributes": [
{
"action": "set",
"key": "favorite_food",
"value": "cake"
},
{
"action": "set",
"key": "age",
"value": 35
},
{
"action": "set",
"key": "birthdate",
"value": "1985-07-14T00:00:00"
},
{
"action": "set",
"key": "flights#id123",
"value": {
"recordID": 123,
"flightsInfo": [
{
"departureTime": "2024-07-14T12:35:42+08:00",
"flightId": "LY205",
"destinationAirportCode": "PDX",
"originAirportCode": "LAX"
},
{
"departureTime": "2024-14-14T12:00:00+08:00",
"flightId": "LY315",
"destinationAirportCode": "LAX",
"originAirportCode": "PDX"
}
]
}
}
]
}
```
# Targeting your audience using attributes
> Target attributes using the dashboard or API.
Text, Number, and Date attributes are targeted directly. You specify the attribute, an operator, and a value to evaluate against. For JSON attributes, you target specific properties within the JSON schema, not the object as a whole.
> **Warning:** To target users based on a unique user ID or other external identifier, do not use Custom attributes. Instead, target [named user](https://www.airship.com/docs/reference/glossary/#named_user).
## Targeting in the dashboard
You can include attributes when using the **Target by conditions** and **Target specific users** audience options for messages and experiments. You can also create [segments](https://www.airship.com/docs/reference/glossary/#segment) instead of having to recreate your audience selections. Both use the same process.
Attributes can be combined with other segmentation data, such as events and tags. For full instructions and usage locations, see [Segments](https://www.airship.com/docs/guides/audience/segmentation/segments/). For details about configuring each attribute type, see the next sections.
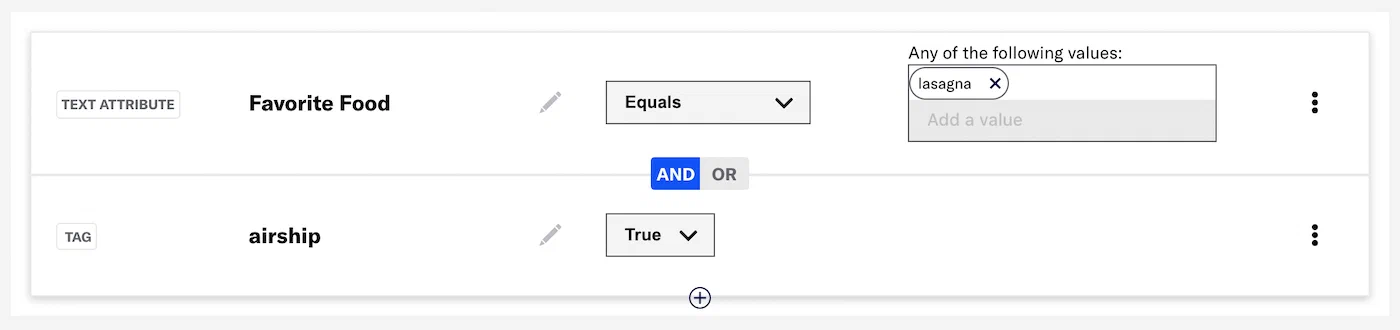
When defining your audience, add each attribute as a condition. In the image below, the segment includes a Text attribute targeting users whose favorite food is lasagna. The attribute name is "Favorite Food", the operator is `Equals`, and the value is `lasagna`.
*Creating a segment in the dashboard*
### Configure Text, Number, and Date attributes
To configure Text and Number attributes, select an operator, select **Add a value** and enter a value. Select outside the field or hit Enter on your keyboard to save the value. Repeat for multiple values. Multiple values are evaluated as a Boolean OR.
To configure Date attributes, select an operator, and then configure a date or range. Availability and requirements depend on the operator. For the *Between* operator, the end date is not inclusive. For example, `Between July 5 - July 17` includes dates July 5 to July 16.
Use these configuration steps for Specific, Relative, and Today:
| Option | Steps |
| --- | --- |
| **Specific** | Select a Year/Month/Day. With the _Equals_ and _Does not equal_ operators you can also use the formats Day, Month, Month/Day, and Year/Month. |
| **Relative** | Specify the number of years/months/days/hours/minutes from today's date. With the _Equals_ and _Does not equal_ operators, also select Month/Day or Year/Month/Day. |
| **Today** | With the _Equals_ operator, select Month/Day or Year/Month/Day. With the _After_ and _Before_ operators, Year/Month/Day is the only option and is preselected. |
### Configure JSON attributes
For JSON attributes, you target one or more properties in its schema for evaluation. For multiple properties, set Boolean logic to determine whether any or all evaluations must be true for the whole condition to be true.
> **Note:** When using the "is not equal to" (!=) operator, the system treats missing information differently based on the attribute type. For JSON attributes, if a user doesn't have a value for a specific property, that user is skipped from evaluation. For Text, Number, or Date attributes, if a user is missing a value for the attribute, that absence is considered "null", which is evaluated as whether it is not equal to the specified value, which is typically true.
>
> For example, consider a project with 100 users:
>
> * Targeting a segment using a JSON attribute `flight.destination` != `"London"`: Suppose 10 users have values for the property, and one of those users has the value `"London"`. The system will only evaluate the 10 users who explicitly have the property. Of the 10, one is "London", so the condition is true for nine users. The 90 users who do not have the `flight.destination` property are skipped from this evaluation. Result: nine users are included.
>
> * Targeting a segment using a Text attribute `singleFlightDestination` != `"London"`: All 100 users are included in the evaluation, even if their `singleFlightDestination` value is missing, because the missing value is treated as `"null"`. If one user has `singleFlightDestination` as `"London"`, then 99 users will satisfy the condition: `"null"` != `"London"` is true, and any other value not equal to `"London"` is also true. Result: 99 users are included.
After selecting a JSON attribute:
1. Select **Configure**.
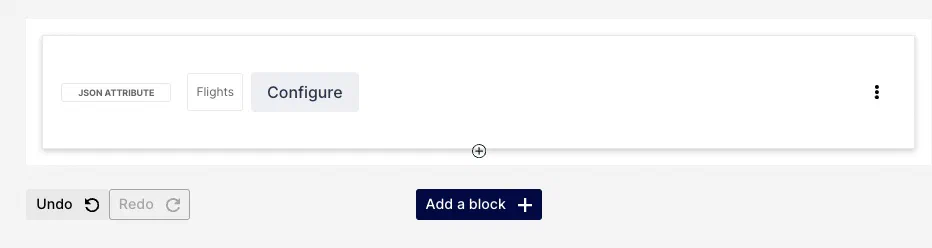
*Configuring a JSON attribute in a segment*
1. Under **Evaluations**, choose from the **Select a source** menu:
| Option | Description |
| --- | --- |
| **\** | [An alternate name defined for a property.](https://www.airship.com/docs/guides/audience/attributes/adding/#add-json-attributes) The attribute's schema will appear with the aliased property's line selected. |
| **Select from schema** | The attribute's schema will appear. Select a property's line, then its path will appear to the right of the menu. |
1. (For string and number properties) Select an operator and enter a value.
1. (For Boolean properties) Select **Is true** or **Is false**.
1. (For date properties) Select an operator and configure a date or range. Availability and requirements depend on the operator. For the *Between* operator, the end date is not inclusive. For example, `Between July 5 - July 17` includes dates July 5 to July 16.
Use these configuration steps for Specific, Relative, and Today:
| Option | Steps |
| --- | --- |
| **Specific** | Select a Year/Month/Day. With the _Equals_ and _Does not equal_ operators you can also use the format Year/Month. |
| **Relative** | Specify the number of years/months/days/hours/minutes from today's date. With the _Equals_ and _Does not equal_ operators, also select Month/Day or Year/Month/Day. |
| **Today** | With the _Equals_ operator, select Month/Day or Year/Month/Day. With the _After_ and _Before_ operators, Year/Month/Day is the only option and is preselected. |
1. (Optional for arrays in the path) Select **First** or **Last** to specify the first or last item in the array. Defaults to **Any**.
1. Select the check mark to add the property.
1. Select **Add another** for more properties.
1. (For multiple properties) Select **AND** or **OR** to determine how to evaluate multiple properties within the condition:
* AND = all criteria must be met
* OR = any criteria must be met
1. Select **Done**.
## Targeting using the API
Use the [Attributes audience object](https://www.airship.com/docs/developer/rest-api/ua/schemas/attributes/) to target any attribute type.
For Text, Number, and Date attributes, use the attribute ID as the value for `attribute` and specify a comparison `operator` and attribute `value`. `precision` is also required for some operators for Date attributes. For more information, see:
* [Text attribute selector](https://www.airship.com/docs/developer/rest-api/ua/schemas/attributes/#textattribute)
* [Number attribute selector](https://www.airship.com/docs/developer/rest-api/ua/schemas/attributes/#numberattribute)
* [Date attribute selector](https://www.airship.com/docs/developer/rest-api/ua/schemas/attributes/#dateattribute)
**Example push targeting a Text attribute**
```http
POST /api/push HTTP/1.1
Authorization: Basic
Accept: application/vnd.urbanairship+json; version=3
Content-Type: application/json
{
"audience": {
"attribute": "item_purchased",
"operator": "contains",
"value": "jeans"
},
"device_types": [
"ios",
"android",
"web"
],
"notification": {
"alert": "Hello from Airship"
}
}
```
**Example push targeting a Date attribute**
```http
POST /api/push HTTP/1.1
Authorization: Basic
Accept: application/vnd.urbanairship+json; version=3
Content-Type: application/json
{
"audience": {
"attribute": "account_creation",
"operator": "equals",
"value": "2023-05-24",
"precision": "year_month_day"
},
"device_types": [
"web"
],
"notification": {
"alert": "Hello from Airship"
}
}
```
Use Boolean `NOT` or `AND` operators to create compound audience expressions. In the following example, the `NOT` operator gives you the same result as if you had used the "Does not contain" operator building a segment in the dashboard. For more about Boolean audience operators, see [Audience Selection: Compound Selector](https://www.airship.com/docs/developer/rest-api/ua/schemas/audience-selection/#compoundselector) in the Data Formats section of our API reference.
**NOT operator**
```json
{
"NOT": {
"attribute": "item_purchased",
"operator": "contains",
"value": "jeans"
}
}
```
**AND operator**
```json
{
"AND": [
{
"attribute": "size",
"operator": "greater",
"value": 12
},
{
"attribute": "size",
"operator": "less",
"value": 15
}
]
}
```
For JSON attributes, the [Attributes audience object](https://www.airship.com/docs/developer/rest-api/ua/schemas/attributes/) must contain the attribute ID as the value for `attribute` and a `where` object. The `where` object defines a `property` as a JsonPath expression, the property `value`, a comparison `operator`, and the property type as a `compare_as` value. See [JSON attribute selector](https://www.airship.com/docs/developer/rest-api/ua/schemas/attributes/#jsonattribute) for more information.
**Audience object for a JSON attribute**
```json
{
"audience":{
"attribute": "books_on_books",
"where":{
"property": "$.x.store.book[*].title",
"operator": "equals",
"value": "Dracula",
"compare_as": "text"
}
}
}
```
For details and more example requests, see [Attributes](https://www.airship.com/docs/developer/rest-api/ua/schemas/attributes/) in the Data Formats section of our API reference.
---
As in the dashboard, you can create reusable segments instead of having to recreate your audience selections. See [Segments](https://www.airship.com/docs/developer/rest-api/ua/operations/segments/) in our API reference.
## Operators
Operators per attribute type:
| Attribute type | Operators | API reference |
| --- | --- | --- |
| **Text** | equals, contains, less, greater, is_empty | [Text attribute selector](https://www.airship.com/docs/developer/rest-api/ua/schemas/attributes/#textattribute) |
| **Number** | equals, contains, less, greater, is_empty | [Number attribute selector](https://www.airship.com/docs/developer/rest-api/ua/schemas/attributes/#numberattribute) |
| **Date** | equals, before, after, is_empty, range | [Date attribute selector](https://www.airship.com/docs/developer/rest-api/ua/schemas/attributes/#dateattribute) |
| **JSON** | equals, contains, not_contains, less, greater, is_empty, not_empty1 | [JSON attribute selector](https://www.airship.com/docs/developer/rest-api/ua/schemas/attributes/#jsonattribute) |
1. If the JsonPath expression maps to an array, the only available operators are is_empty, not_empty, contains, or not_contains.
The same operators are available when creating a segment in the dashboard, but some have slightly different labels, such as "Does not contain" instead of `not_contains`.
# Managing attributes
> Edit and archive attributes and view your upload history.
To view a list of your attributes, go to **Audience**, then **Attributes**. The page opens to **Attribute List**. The default sort order is by last created, and each row displays:
* Name — Attributes from [Zero-copy data integration](https://www.airship.com/docs/guides/features/data-integration/zero-copy-data-integration/) are labeled **External**.
* Type
* ID
* Created and modified dates in UTC
All attributes are displayed by default. Your total number of [Custom and Predefined attributes](https://www.airship.com/docs/guides/audience/attributes/about/#categories-data-sources-and-setup) is displayed next to **Create attribute**.
You can search for specific attributes by name or ID. You can also filter for Default and Custom attributes. The Custom filter includes Predefined attributes. Toggle between **Active** and **Archived** to update the list.
Attribute management options:
| Option | Description | Steps |
| --- | --- | --- |
| **Edit** | You can change any active attributes's name and an active JSON attribute's schema and aliases. You cannot edit archived attributes — you must first unarchive it to change its status back to Active. | Select the edit icon (
), make your changes, then select **Save**. |
| **Archive/Unarchive** | Custom and Predefined attributes only. Archiving reduces the total count of attributes and stops data collection for an attribute. Data collected prior to archiving is made available again after unarchiving. Archived Predefined attributes do not appear in search when [adding attributes to your project](https://www.airship.com/docs/guides/audience/attributes/adding/). | Select the archive icon (
). |
> **Note:** * [Contact Airship Support](https://support.airship.com/) to delete Custom attributes.
> * You cannot edit or archive attributes from [Zero-copy data integration](https://www.airship.com/docs/guides/features/data-integration/zero-copy-data-integration/) in the dashboard. To make updates, contact your Airship account manager or Support.
## Viewing upload history
To view the history of [attributes set using a CSV file](https://www.airship.com/docs/guides/audience/attributes/setting/#csv-file), go to **Audience**, then **Attributes**, then **Upload History**. The list also includes [named user association uploads](https://www.airship.com/docs/guides/audience/named-users/#csv-file). The latest upload is listed first, with columns for:
- File name
- User name — The user who performed the upload in the dashboard
- Source — Dashboard or SFTP
- Upload date
- Status — Processed, Processed with errors, Processing, or Failed
For status “Processed with errors”, select the download icon (
) to download a CSV file of the identifiers that failed processing and their error reasons.