AIRSHIP-MAINTAINED INTEGRATION
Contact Airship Support for help.Salesforce Marketing Cloud
Leverage Airship from within Salesforce Marketing Cloud.
Companies engage with their users to deliver positive brand experiences, support their business goals, and build long-term relationships. You can coordinate all your engagement campaigns within the Salesforce Marketing Cloud (SFMC) Journey Builder. And you can consume Airship’s events in SFMC, adding Airship-gathered engagement data to your CRM system.
Available integrations
Send your SFMC journey data to Airship to trigger messages, record custom events, or set tags on a named user. See Send Airship messages from SFMC journeys.
You can also send Airship events to SFMC to track engagement in your CRM and trigger SFMC journeys. See Send Airship events to SFMC.
The legacy integration for sending Airship events to SFMC stops working on January 29, 2027, when Salesforce retires SOAP username and password authentication. If you use it, switch to the new integration before that date. See Migrating from the legacy integration.
Send Airship messages from SFMC journeys
When you integrate Airship into SFMC’s Journey Builder, you can send Airship app, SMS, and web messages from an SFMC journey. You can also send wallet push notifications, both to external IDs and pass IDs.
Create a compelling campaign in minutes — Initiate campaigns with easy-to-use tools that don’t require a development team. With Airship, you can add mobile, SMS, and web messaging to any customer journey that will deliver in-the-moment value to your app audience.
Create automated SFMC journeys triggered by cross-channel events — Send targeted campaigns to onboard, activate, retain and re-engage your customers. Easily zero in on the insights necessary to drive targeted actions in other systems.
Use multiple Airship projects in SFMC — Most companies have different Airship projects for different purposes. You can add all your projects to SFMC and use them in individual campaigns.
Add actions and extras to message payloads — Do more with your messages by adding Actions (Deep Links, Landing Pages, Tagging, etc.) and Extras (key/value pairs available to the app upon direct open).
Re-engage users — Use cross-channel marketing to re-engage users when they uninstall your app or convert on their mobile device or web browser.
For additional uses, see Use Airship activities in SFMC journeys below.
Requirements
This integration is fairly flexible in terms of audience mapping. In the context of an individual Airship Activity, you can target an audience using either:
- A value from the Journey’s Entry Source — This can be either a named userA contact identified with an ID you provide, such as a customer ID from your CRM. Associating channels with that ID maps multiple devices and channels to one individual. Each named user has a unique named user ID. ID or channelA device or address registered with Airship to receive messages, such as a mobile app, web browser, email address, or SMS number. It stores opt-in status, device-specific information, and metadata used for targeting. Each channel has a unique channel ID. ID.
- The named user associated with the subscriber from the project configuration
Named users map IDs from your CRM or another backend system (like SFMC) to device IDs. The named user IDs you set must map to a data extension in SFMC. Airship cannot target devices if you do not set named users appropriately. See Associating channels with named users in the Named users guide to set the named user ID for a device via the iOS SDK, Android SDK, or the server-side API.
Configure Airship in SFMC
The steps for configuring Airship in SFMC are provided in the Airship dashboard:
- In the sidebar, select the settings icon ().
- Under Project settings, select Partner Integrations.
- Select Salesforce Marketing Cloud.
- Select Configure for the inbound integration and follow the onscreen instructions to complete the following:
- Create tag groupAn array of tags that you can associate with both channels and named users.
sfmc-integrationand an authentication token. All tags set from Salesforce appear in this tag group, and it used to reference Salesforce tags in the API. SFMC uses the token to communicate with your project in Airship. - Configure the Airship integration in SFMC.
- Create tag groupAn array of tags that you can associate with both channels and named users.
Add Airship projects to SFMC
After configuring Airship in SFMC, add your Airship projects to SFMC. You can select the project that you want to send messages from when configuring activities in SFMC journeys.
In SFMC:
- Hover over AppExchange and select Airship.
- Select New Project or select the edit icon () to edit the settings for an existing Airship project.
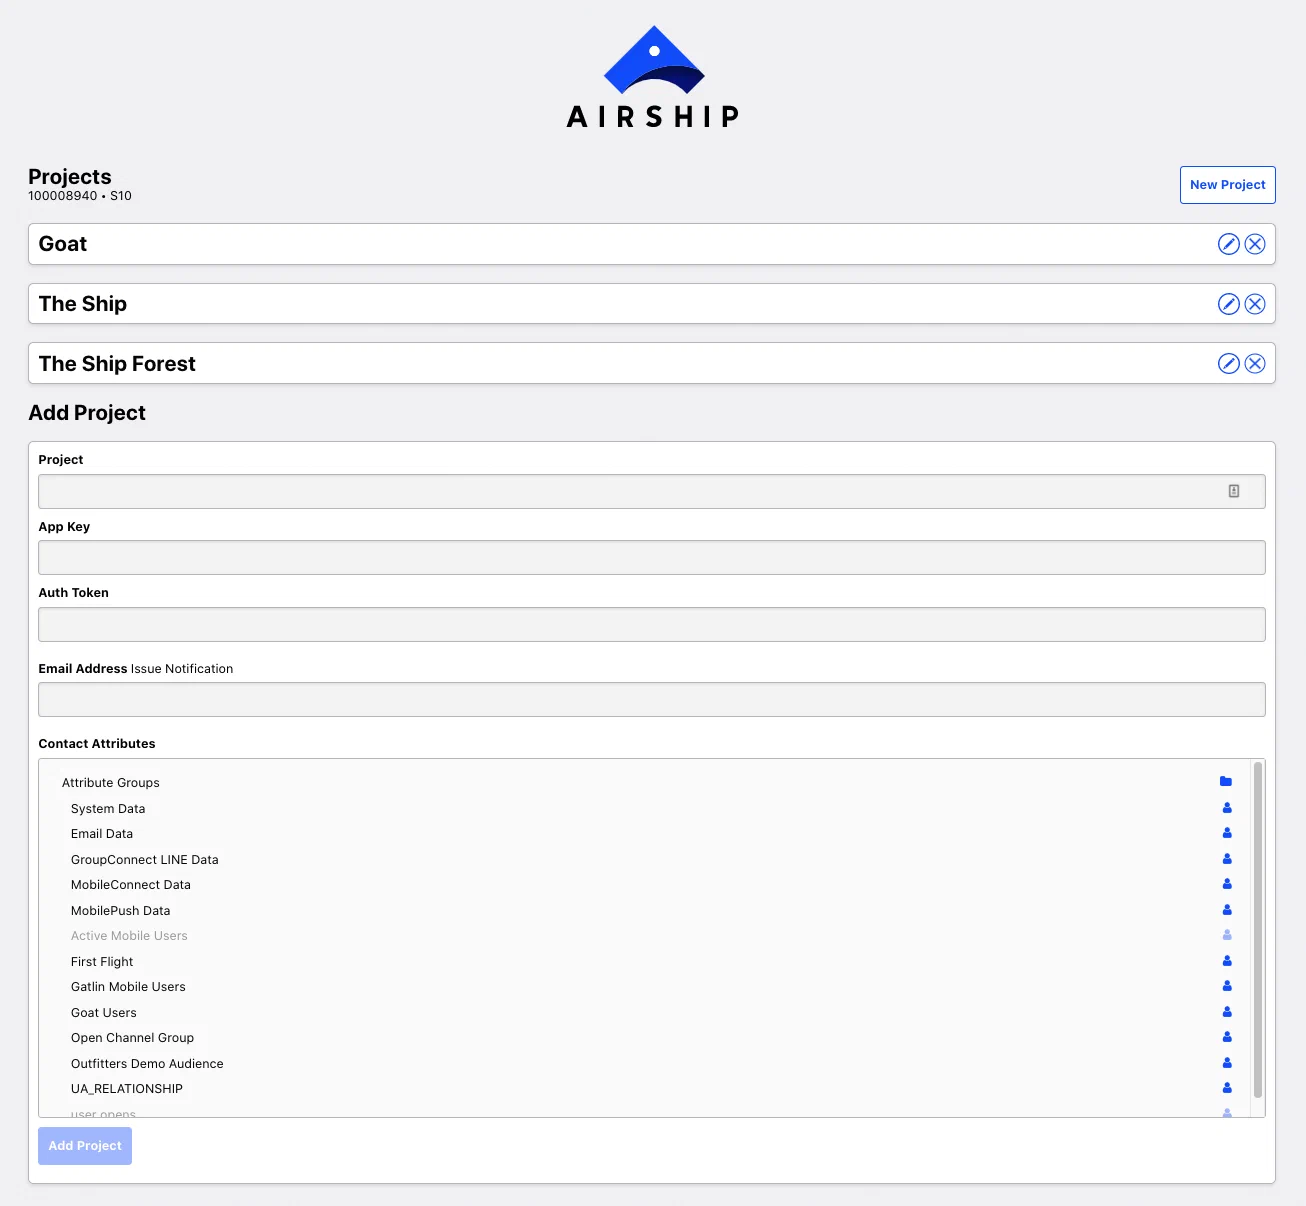
Adding an Airship project to SFMC - Configure for the project:
Field Description Steps Project The name of your Airship project Enter the project name. App Key Your Airship project app keyUniquely identifies an Airship project. Paired with an app secret or master secret, it authenticates API requests for the project.. You can find this in your Airship project: Select the settings icon () in the sidebar, then copy the value from Project Details. Enter the app key. Auth Token The auth token you created when configuring Airship in SFMC Enter the auth token. Email Address The address where SFMC should send notifications about send issues Enter an email address. Contact Attributes The field in your Data Extension External Key that you want to map to your Airship named users Navigate to the data extension containing the field you want to map. In Named User, select the field. Data extensions are displayed as they are represented in your SFMC Attribute Groups. If you need assistance locating the field, contact your SFMC administrator.
Wallet Config (Optional) Enables including Airship wallet push notifications in an SFMC journey See Enable sending Airship wallet push notifications. - Select Add Project.
Enable sending Airship SMS messages
To support including Airship SMS messages in an SFMC journey, you must add your Airship sender IDsAn originating phone number or string identifier used to indicate who an SMS message comes from. Members of your audience subscribe (opt in) to each sender ID they want to receive messages from. to SFMC. You add a sender ID to SFMC by entering a name and its Airship long code or short code. Do this after you add your Airship project to SFMC.
If you do not know your long or short codes, you can find them in the Airship dashboard:
- Select the Messages menu, then SMS Keywords.
- Select Create new keyword.
- Select Settings, then the SMS Sender menu. You will see all the long codes and short codes for your project. Each sender in the list is formatted as a 2-character country code followed by the actual long or short code.
- Note the long and short codes, then leave the page without saving a new keyword.
If you do not have access to the Airship dashboard, contact Airship Support to request the codes.
Add Airship sender IDs to SFMC:
- Hover over AppExchange, then select Airship.
- Select the edit icon () for the project you want to add your sender IDs to.
- Under SMS Sender, select Add SMS Sender and configure for each sender you want to add:
Field or setting Description Steps Name Required. A descriptive name for the sender that will help you identify it in Salesforce. Enter a name. Number Required. The long code or short code you want to send messages from. Enter a long or short code. Enable MMS Optional. Allows sending MMS messages in your SFMC Journey Builder. Check the box to enable. - Select the add icon ().
Enable sending Airship wallet push notifications
To support including Airship wallet push notifications in an SFMC journey, you must add your Airship wallet project credentials to an SFMC project that is also configured for messaging. You can add or remove these credentials from SFMC at any time. When present, the wallet channel will be available when including an Airship message in an SFMC journey.
First, get your credentials from your Airship wallet project:
- Go to Settings, then API.
- Copy your wallet API key and secret.
Now you can add them to an SFMC project:
- If you are setting up a new project, follow the steps in Add Airship projects to SFMC and enter your credentials in the Wallet Config section.
- To add your credentials to an existing project in SFMC:
- Hover over AppExchange, then select Airship.
- Select the edit icon () for the project you want to enable for sending wallet push notifications.
- Under Wallet Config, enter your API key and secret.
- Select Save Project.
Use Airship activities in SFMC journeys
After you configure the inbound integration, use Airship activities in your Journey Builder journeys to engage your audience. In addition to sending app, SMS, and web messages, you can do the following:
- Send custom events from an SFMC journey to Airship
- Personalize messages and custom events with information from your SFMC Contacts model
- Set tags on named users that you can use for tracking or to trigger automation
When you install the Airship AppExchange package as part of the integration setup, two activities are automatically added to your Journey Builder:
- Message activity — Airship Notification
- Custom — Airship Events/Tags
You will use these activities in the following steps.
Include an Airship message
Include Airship app, web, and SMS messages to SFMC journeys. You must set up messages per channel in individual activities, but message types per channel can be combined. For example, you can set up a push notification and an in-app message in a single Mobile App activity.
In SFMC:
- Go to Journey Builder, then Journey Builder.
- Select an existing journey or select Create New Journey.
- In the left sidebar, go to Activities, then Messages, then drag the Airship Notification activity into your journey.
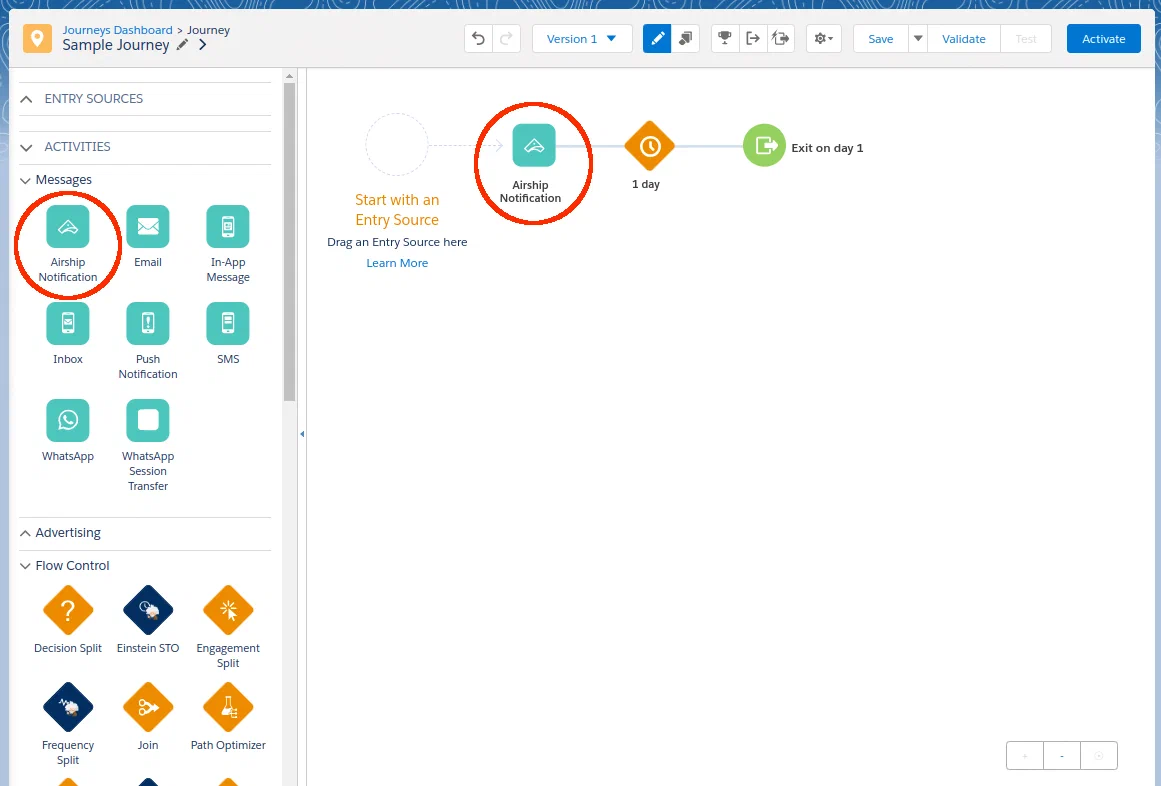
Adding an Airship Notification activity to a journey - Select the Airship Notification activity in the journey.
- Select a configuration section from sidebar and configure the message:
Project: Select the Airship project you want to send the message from.
Channel: Select an engagement channel for the message: Mobile App, Web, SMS, MMS, or Wallet. For Mobile App, also select a message type: Push Notification, In-App Message, or both. For SMS and MMS, also select a sender.
By default, audience members are targeted using Contact Data as configured for the project. To target using Entry Source data instead, select Entry Source, and then select a field and type. You must already have an Entry Source configured for the journey.
Content: Enter the text to display in the message.
For Mobile App, when you combine a push notification and in-app message, the in-app message’s alert text is the same as the push notification text by default. To use different messages, under In-App Message, select Write Alternative, then enter message text.
For Wallet, when using an external ID as the audience identifier, a template ID is required. Template IDs can be found in a wallet project dashboard under Templates.
All other Content settings are optional:
Setting Description Steps Title For Mobile App push notifications and Web only. A heading that appears above the notification text. For push notifications, it appears in the iOS Notification Center, Apple Watch Looks, and the Android and Fire OS Notification Area/Drawer.
For Web, the title entered here overrides the default set in Airship and appears in the iOS Notification Center and Android and Fire OS Notification Area/Drawer.
Enter text. Label For wallet push notifications only. A description of the notification. The label is for reference only, it is not included in the push notification. Enter text. Media For Mobile App, Web, and MMS only. Media to display in your message. See Media guidelines. Enter an HTTPS URL. Notification Buttons For Mobile App and Web only. Interactive buttons that appear after the message text. You can select from predefined interactive buttons and configure adding or removing tags when the button is selected. Some buttons also require setting an actionA configurable behavior that occurs when a user interacts with your message, such as opening a web page.: Home, Web Page, or Dismiss. Select and configure buttons. See also Actions. Shorten Links For SMS and MMS only. Enables link shorteningConverts HTTP/HTTPS URLs in your SMS messages to unique, shortened URLs for your recipients. The shortened URLs reduce the total number of characters that links consume and produce click tracking metrics, helping you determine how effective your SMS messages are in driving traffic to your links.. Check the box to enable. SMS Fallback Text Recommended, for MMS only. Users who cannot receive your MMS message will receive an SMS message with this text along with the media URL, if any. 160 characters maximum. Enter text. Action For Mobile App and Web only. The Home, Web Page, Landing Page, Deep Link, or Share actionA configurable behavior that occurs when a user interacts with your message, such as opening a web page.. You can also add or remove tagsMetadata that you can associate with a channel or named user for audience segmentation. Generally, a tag is a descriptive term indicating a user preference or other categorization, such as wine_enthusiastorweather_alerts_los_angeles. and set key value pairs (custom keysAdditional key-value pairs in your push notification payload for use by custom code in your app or website. You can use custom keys to pass additional campaign identifiers for analytics, pass user information to the device, control the look and feel of the app, provide image links, etc. in Airship) for users who interact with the message.Select and configure an action. Follow the steps in Actions. For tags, enter a tag name, select the add icon (), then select Add or Remove. For key value pairs, enter the key name and value, then and select the add icon (). Campaigns1 Tracks the message in Airship using campaign categoriesAn optional delivery feature used to group messages of similar types or messaging strategies for aggregate reporting. They help you track the efficacy of both your individual messages and a messaging campaign as a whole.. Each category has a 64-character maximum. 10 maximum categories. Enter categories. 1. In addition to campaign categories you add, Airship automatically adds two to each send from SFMC: the ID of the SFMC Journey and the ID of the activity in the Journey.
- Select Review to view a summary of the activity and a preview of your message.
- Select Done to save the activity.
Send custom events to Airship
You can send custom eventsA record of an action in your app, on your website, in the Airship system, or in an external system. Examples are a message send, an app open, or a purchase transaction. from an SFMC journey to Airship for triggering, segmentation, and reporting.
When you set up a custom event in your journey, you can determine the properties that you want to send with the event. The event name appears in the body.name of the custom event that SFMC sends to Airship, and its properties appear in the custom event’s body.properties object.
Issue a custom event to Airship as a part of a Salesforce journey:
- Go to Journey Builder, then Journey Builder.
- Select an existing journey or select Create New Journey.
- In the left sidebar, go to Activities, then Custom, then drag the Airship Events/Tags activity into your journey.
- Select the Airship Events/Tags activity in the journey.
- Select the Airship project you want to send the custom event to.
- For Audience Trigger, select Custom Event.
By default, audience members are targeted using Contact Data as configured for the project. To target using Entry Source data instead, select Entry Source, and then select a field and type. You must already have an Entry Source configured for the journey.
- Select Custom Event in the sidebar or scroll down to its section, then enter an event name in snake case. Example:
hot_sauce. Event names cannot contain uppercase characters. - Select Add Property, then enter a property name in snake case, and enter a value for the property and select its type. You can add up to 10 properties. Select Add Another Property for more properties.
- Select Done.
Personalize custom events and messages
To personalize Airship activities, create a merge field representing a value you want to personalize, surrounded by double percent signs, e.g., %%customer_name%%. Airship replaces the merge field (and braces) with the data specified by the merge field at send time — just like mail merge in a word processor or mail client.
Use the fields in your Salesforce Contacts model that are linked by Attribute Group (Attribute Sets).
For example, if you have a field called customer_name, you could use the value from that field in your custom event with %%customer_name%%. If you have multiple fields in the model with the same name, reference the data extension name to select the correct field, using the format %%data_extension_name.field_name%%.
The support of AMPScript syntax is limited. You may use it for referencing fields by name, but program logic control structures, such as if statements or function calls, are not supported.
Data that is available for personalization is tied to the audience being used in the activity. If the audience is Contact Data (the default), use Contact Attributes to personalize. Since the audience is linked to a Subscriber in that case, any Contact Attribute linked to that Subscriber should be available for personalizing messages and custom events. If the audience is Entry Data, there’s no guaranteed notion of associated Subscriber, so in that case you can only use fields in the Entry Source for personalization.
Add or remove tags
You can add tags to, or remove tags from, named users as they progress through a Salesforce journey. Setting tags on your audience results in tag_change events in Airship that you can use as message triggers or to track changes to your audience. All tags set from Salesforce appear in the Airship tag group sfmc-integration that is automatically created when configuring Airship in SFMC.
Set tags in Airship as a part of a Salesforce journey:
- Go to Journey Builder, then Journey Builder.
- Select an existing journey or select Create New Journey.
- In the left sidebar, go to Activities, then Custom, then drag the Airship Events/Tags activity into your journey.
- Select the Airship Events/Tags activity in the journey.
- Select the Airship project containing the audience you want to set tags on.
- For Audience Trigger, select Tag Change.
By default, audience members are targeted using Contact Data as configured for the project. To target using Entry Source data instead, select Entry Source, and then select a field and type. You must already have an Entry Source configured for the journey.
- In the Set Tags field, enter the name of the tag that you want to set or remove, select the add icon (), then select Add or Remove as the action. Repeat this step for each tag.
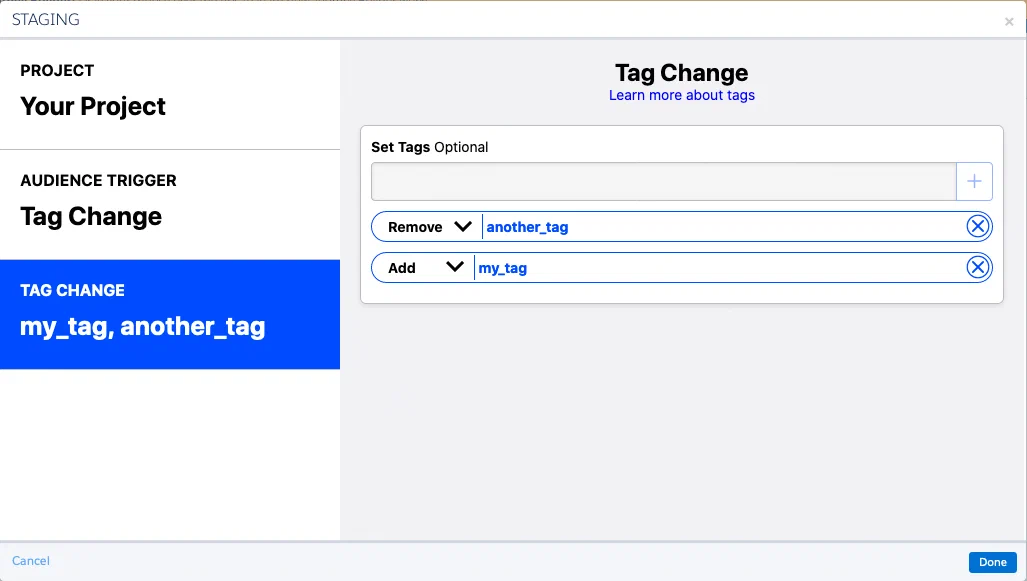
Setting tag change actions in an SFMC journey - Select Done.
Send Airship events to SFMC
These steps set up the OAuth-based integration. Salesforce is retiring SOAP username and password authentication on January 29, 2027, so if you use the legacy outbound integration, migrate to this integration before that date. See Migrating from the legacy integration.
This integration sends Airship events to SFMC using Real-Time Data StreamingA service that delivers user-level events in real time to your backend or third-party systems using the Data Streaming API., adding your audience’s message activity to your CRM environment. It supports the following use cases:
- Track Airship user engagement in Salesforce — Understand how and when your users engage with your app in the Marketing Cloud interface.
- Trigger SFMC journeys from Airship engagement events — Use Airship events in SFMC to trigger new journeys and keep your audience engaged.
Airship authenticates with OAuth through the AppExchange package and delivers events to SFMC Data Extensions using the SFMC REST API. Airship manages OAuth tokens automatically:
- Access tokens refresh in the background before they expire, so no manual token entry or rotation is required.
- If a refresh token becomes invalid, for example after you reinstall the SFMC package, the integration recovers when you re-authenticate from SFMC.
Requirements
This integration requires the following:
- An active SFMC account with API Integration permissions and the “Installed Packages | Administer” permission
- Access to the business unit you want to authorize
- An Airship account with messaging and Real-Time Data Streaming
- An Airship project access level of Owner, Administrator, or Full Access to configure the integration in Airship
Connect SFMC to Airship
Complete the following steps in SFMC to install the Airship package and authorize your business unit:
Install the AppExchange package:
- Follow the link below for your SFMC account and Airship project region:
- Follow the onscreen installation steps.
Note The Airship package requires Read and Write permissions for Data Extensions, to create Data Extensions and insert rows, and for File Locations, to create the Data Extensions folder. SFMC typically grants these permissions during installation. If you encounter errors, ask your SFMC admin to confirm that the package has them.
Connect the business unit:
- Switch to the desired business unit using the Business Unit selector next to your username.
- Go to AppExchange and select the Airship package.
- Select Connect RTDS and complete the OAuth setup. This authorizes the business unit MID.
The package installs across the enterprise, but the OAuth connection authorizes one business unit at a time. The business unit you’re logged into when you connect determines where Airship creates Data Extensions and delivers events. Repeat these steps for each business unit you want to connect.
Configure the integration in Airship
Complete the AppExchange OAuth connection in SFMC before you configure the integration in Airship. Airship only lists business units that you have already authorized.
First, get your Marketing Cloud Member ID (MID) from SFMC. Hover over the business unit name next to your username and copy the MID from the modal that appears:
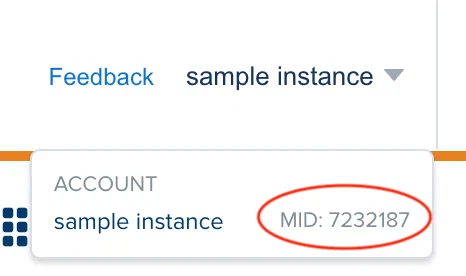
Now you can set up the integration in Airship:
- In the sidebar, select the settings icon ().
- Under Project settings, select Partner Integrations, then Salesforce Marketing Cloud.
- Select Configure for the outbound integration and follow the onscreen instructions to complete the following:
- Name the connection
- Select the authorized business unit (MID)
- Select the SFMC folder name. Select
airship_rtdsfor a new setup. Selectairshiponly if you already use the legacy integration and want to keep writing to its existing Data Extensions. See Migrating from the legacy integration. - Select the Airship event types you want to send to SFMC
Data Extensions and storage location
After you save the configuration and the integration starts, Airship creates the selected Data Extensions folder automatically. Do not create this folder manually.
The airship_rtds folder contains Data Extensions for all Airship event types, using the naming convention AIRSHIP_<EVENT_TYPE>. Only the event types you enable in the integration configuration receive rows.
The following table shows example Data Extension names:
| Event | Data Extension name |
|---|---|
| Open | AIRSHIP_OPEN |
| Send | AIRSHIP_SEND |
| Close | AIRSHIP_CLOSE |
| Tag Change | AIRSHIP_TAG_CHANGE and AIRSHIP_TAG_ACTION |
| Subscription List | AIRSHIP_SUBSCRIPTION_LIST and AIRSHIP_SUBSCRIPTION_LIST_ACTION |
| Custom | AIRSHIP_CUSTOM |
Two event types use a pair of Data Extensions: the parent event, plus an action Data Extension with one row per change. Tag change uses AIRSHIP_TAG_CHANGE and AIRSHIP_TAG_ACTION for added and removed tags. Subscription list uses AIRSHIP_SUBSCRIPTION_LIST and AIRSHIP_SUBSCRIPTION_LIST_ACTION for enrolled and canceled lists.
See Salesforce Marketing Cloud Data Extension schemas for the full list of fields per event type.
- Do not edit Data Extensions created by the integration, or you may break event delivery.
- Set a data retention policy on all Data Extensions in the folder Airship creates to prevent unbounded data growth. See Salesforce documentation:
Migrating from the legacy integration
The legacy integration for sending Airship events to SFMC authenticates using SOAP. Salesforce is retiring SOAP authentication on January 29, 2027, so the legacy integration will stop working after that date. Existing connections continue to work until then.
The legacy and current integrations differ in the following ways:
| Legacy | Current | |
|---|---|---|
| Authentication | SFMC API username and password | OAuth 2.0 through the Airship AppExchange package |
| Event delivery | SOAP API | REST API |
| Default folder | airship | airship_rtds |
| Data Extension naming | <EVENT_TYPE>_EVENTS, for example OPEN_EVENTS | AIRSHIP_<EVENT_TYPE>, for example AIRSHIP_OPEN |
| Business units | One | One or more, each connected separately |
You can run both integrations at the same time while you migrate. Keep the following in mind:
- Offsets do not transfer — Each integration tracks its own stream position. The current integration starts from the stream position at the moment you enable it. It does not continue from the legacy integration’s last processed offset.
- Insert-only delivery — SFMC Data Extension writes are insert-only, not upsert. If both integrations write to the same Data Extensions for the same event types, you can get duplicate rows.
- Naming conflicts — Data Extension CustomerKeys are unique per business unit. If
OPEN_EVENTSor another legacy name already exists in a different folder in that business unit, startup can fail when you selectairship.
To migrate, set up the current integration. If you select the airship folder to reuse legacy Data Extensions, disable the overlapping event types on the legacy integration before you enable them on the current one.
After you confirm that SFMC is receiving events from the current integration, disable or remove the legacy connection:
- In the sidebar, select the settings icon ().
- Under Project settings, select Partner Integrations, then Salesforce Marketing Cloud.
- Under Legacy Outbound Integration, disable the integration to pause sending events, or select the delete icon () to remove it.