Data extensions are displayed as they are represented in your SFMC Attribute Groups. If you need assistance locating the field, contact your SFMC administrator. | | **Wallet Config (Optional)** | Enables including Airship [wallet push notifications](https://www.airship.com/docs/guides/wallet/user-guide/notifications/push-notifications/) in an SFMC journey | See [Enable sending Airship wallet push notifications](#enable-sending-airship-wallet-push-notifications). | {class="table-col-1-20 table-col-2-40"} 1. Select **Add Project**. ### Enable sending Airship SMS messages To support including Airship SMS messages in an SFMC journey, you must add your Airship [sender IDs](https://www.airship.com/docs/reference/glossary/#sender_id) to SFMC. You add a sender ID to SFMC by entering a name and its Airship long code or short code. Do this after you add your Airship project to SFMC. If you do not know your long or short codes, you can find them in the Airship dashboard: 1. Select the **Messages** menu, then **SMS Keywords**. 1. Select **+ Create new keyword**. 1. Select **Settings**, then the **SMS Sender** menu. You will see all the long codes and short codes for your project. Each sender in the list is formatted as a 2-character country code followed by the actual long or short code. 1. Note the long and short codes, then leave the page without saving a new keyword. If you do not have access to the Airship dashboard, [contact Airship Support](https://support.airship.com) to request the codes. --- Add Airship sender IDs to SFMC: 1. Hover over **AppExchange**, then select **Airship**. 1. Select the edit icon ( ) for the project you want to add your sender IDs to. 1. Under **SMS Sender**, select **Add SMS Sender** and configure for each sender you want to add: | Field or setting | Description | Steps | | --- | --- | --- | | **Name** | Required. A descriptive name for the sender that will help you identify it in Salesforce. | Enter a name. | | **Number** | Required. The long code or short code you want to send messages from. | Enter a long or short code. | | **Enable MMS** | Optional. Allows sending MMS messages in your SFMC Journey Builder. | Check the box to enable. | 1. Select the add icon (+). ### Enable sending Airship wallet push notifications To support including Airship [wallet push notifications](https://www.airship.com/docs/guides/wallet/user-guide/notifications/push-notifications/) in an SFMC journey, you must add your Airship wallet project credentials to an SFMC project that is also configured for messaging. You can add or remove these credentials from SFMC at any time. When present, the wallet channel will be available when [including an Airship message in an SFMC journey](#include-an-airship-message). First, get your credentials from your Airship wallet project: 1. Go to **Settings**, then **API**. 1. Copy your wallet API key and secret. Now you can add them to an SFMC project: * If you are setting up a new project, follow the steps in [Add Airship projects to SFMC](#add-airship-projects-to-sfmc) and enter your credentials in the **Wallet Config** section. * To add your credentials to an existing project in SFMC: 1. Hover over **AppExchange**, then select **Airship**. 1. Select the edit icon ( ) for the project you want to enable for sending wallet push notifications. 1. Under **Wallet Config**, enter your API key and secret. 1. Select **Save Project**. ## Using the inbound integration with SFMC journeys In addition to sending Airship app, SMS, and web messages from an SFMC journey, you can: * Send custom events from an SFMC journey to Airship * Personalize messages and custom events with information from your SFMC Contacts model * Set tags on named users that you can use for tracking or to trigger automation When you install the Airship AppExchange package as part of the integration setup, two activities are automatically added to your Journey Builder: * Message activity — *Airship Notification* * Custom — *Airship Events/Tags* You will use these activities in the following steps. ### Include an Airship message Include Airship app, web, and SMS messages to SFMC journeys. You must set up messages per channel in individual activities, but message types per channel can be combined. For example, you can set up a push notification and an in-app message in a single Mobile App activity. In SFMC: 1. Go to **Journey Builder**, then **Journey Builder**. 1. Select an existing journey or select **Create New Journey**. 1. In the left sidebar, go to **Activities**, then **Messages**, then drag the **Airship Notification** activity into your journey. 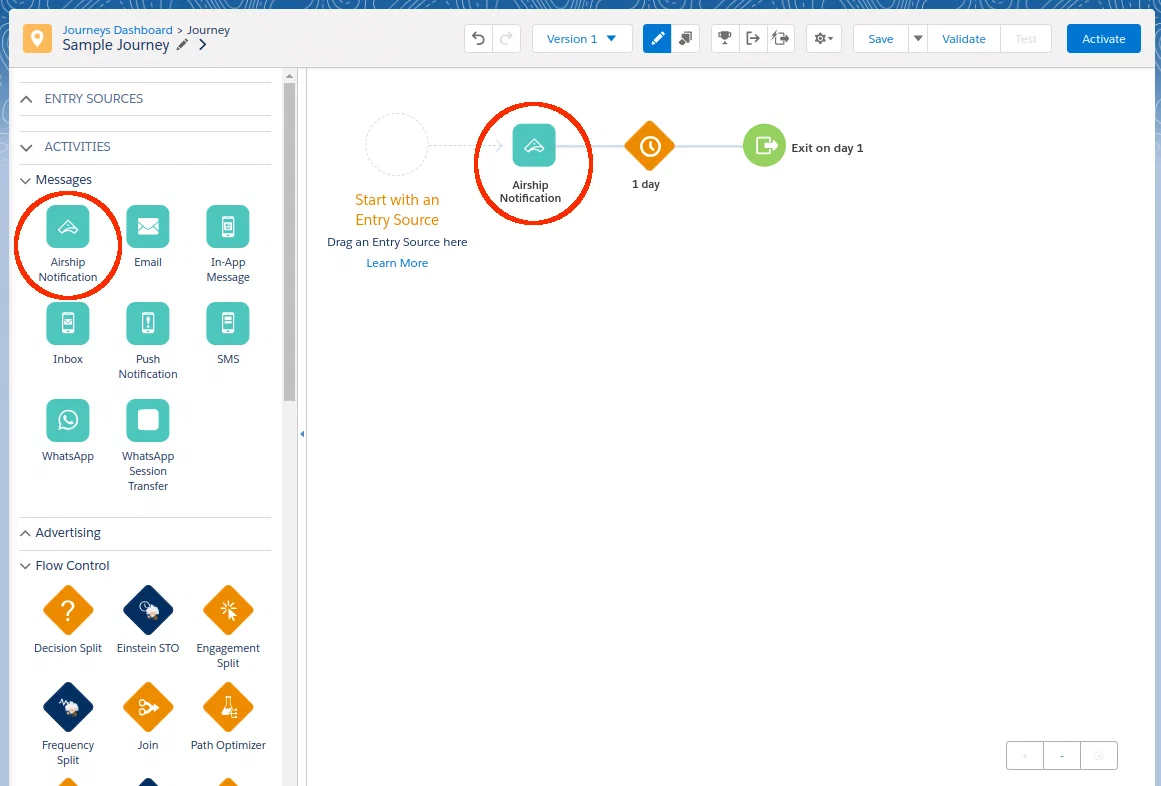 *Adding an Airship Notification activity to a journey* 1. Select the **Airship Notification** activity in the journey. 1. Select a configuration section from sidebar and configure the message: * **Project**: Select the Airship project you want to send the message from. * **Channel**: Select an engagement channel for the message: Mobile App, Web, SMS, MMS, or Wallet. For Mobile App, also select a message type: Push Notification, In-App Message, or both. For SMS and MMS, also select a [sender](#enable-sending-airship-sms-messages). By default, audience members are targeted using Contact Data as configured for the project. To target using Entry Source data instead, select **Entry Source**, and then select a field and type. You must already have an Entry Source configured for the journey. * **Content**: Enter the text to display in the message. For Mobile App, when you combine a push notification and in-app message, the in-app message's alert text is the same as the push notification text by default. To use different messages, under **In-App Message**, select **Write Alternative**, then enter message text. For Wallet, when using an external ID as the audience identifier, a template ID is required. Template IDs can be found in a wallet project dashboard under **Templates**. All other Content settings are optional: | Setting | Description | Steps | | --- | --- | --- | | **Title** | For Mobile App push notifications and Web only. A heading that appears above the notification text.
For push notifications, it appears in the iOS Notification Center, Apple Watch Looks, and the Android and Fire OS Notification Area/Drawer.
For Web, the title entered here overrides [the default set in Airship](https://www.airship.com/docs/developer/sdk-integration/web/getting-started/#airship-setup) and appears in the iOS Notification Center and Android and Fire OS Notification Area/Drawer. | Enter text. |
| **Label** | For wallet push notifications only. A description of the notification. The label is for reference only, it is not included in the push notification. | Enter text. |
| **Media** | For Mobile App, Web, and MMS only. Media to display in your message. See [Media guidelines](https://www.airship.com/docs/reference/messages/media-guidelines/). | Enter an HTTPS URL. |
| **Notification Buttons** | For Mobile App and Web only. Interactive buttons that appear after the message text. You can select from [predefined interactive buttons](https://www.airship.com/docs/reference/messages/built-in-interactive-notifications/) and configure adding or removing tags when the button is selected. Some buttons also require setting an [action](https://www.airship.com/docs/reference/glossary/#action): Home, Web Page, or Dismiss. | Select and configure buttons. See also [Actions](https://www.airship.com/docs/guides/messaging/messages/actions/). |
| **Shorten Links** | For SMS and MMS only. Enables [link shortening](https://www.airship.com/docs/reference/glossary/#sms_link_shortening). | Check the box to enable. |
| **SMS Fallback Text** | Recommended, for MMS only. Users who cannot receive your MMS message will receive an SMS message with this text along with the media URL, if any. 160 characters maximum. | Enter text. |
| **Action** | For Mobile App and Web only. The Home, Web Page, Landing Page, Deep Link, or Share [action](https://www.airship.com/docs/reference/glossary/#action). You can also add or remove [tags](https://www.airship.com/docs/reference/glossary/#tag) and set key value pairs ([custom keys](https://www.airship.com/docs/reference/glossary/#custom_keys) in Airship) for users who interact with the message. | Select and configure an action. Follow the steps in [Actions](https://www.airship.com/docs/guides/messaging/messages/actions/). For tags, enter a tag name, select the add icon (+), then select **Add** or **Remove**. For key value pairs, enter the key name and value, then and select the add icon (+). |
| **Campaigns1** | Tracks the message in Airship using [campaign categories](https://www.airship.com/docs/reference/glossary/#campaign_categories). Each category has a 64-character maximum. 10 maximum categories. | Enter categories. |
{class="table-col-2-50"}
1. In addition to campaign categories you add, Airship automatically adds two to each send from SFMC: the ID of the SFMC Journey and the ID of the activity in the Journey.
1. Select **Review** to view a summary of the activity and a preview of your message.
1. Select **Done** to save the activity.
### Send custom events to Airship
You can send [custom events](https://www.airship.com/docs/reference/glossary/#custom_event) from an SFMC journey to Airship for triggering, segmentation, and reporting.
When you set up a custom event in your journey, you can determine the properties that you want to send with the event. The event name appears in the `body.name` of the custom event that SFMC sends to Airship, and its properties appear in the custom event's `body.properties` object.
Issue a custom event to Airship as a part of a Salesforce journey:
1. Go to **Journey Builder**, then **Journey Builder**.
1. Select an existing journey or select **Create New Journey**.
1. In the left sidebar, go to **Activities**, then **Custom**, then drag the **Airship Events/Tags** activity into your journey.
1. Select the **Airship Events/Tags** activity in the journey.
1. Select the Airship project you want to send the custom event to.
1. For **Audience Trigger**, select **Custom Event**. By default, audience members are targeted using Contact Data as configured for the project. To target using Entry Source data instead, select **Entry Source**, and then select a field and type. You must already have an Entry Source configured for the journey.
1. Select **Custom Event** in the sidebar or scroll down to its section, then enter an event name in snake case. Example: `hot_sauce`. Event names cannot contain uppercase characters.
1. Select **Add Property**, then enter a property name in snake case, and enter a value for the property and select its type. You can add up to 10 properties. Select **Add Another Property** for more properties.
1. Select **Done**.
### Personalize custom events and messages
To personalize Airship activities, create a merge field representing a value you want to personalize, surrounded by double percent signs, e.g., `%%customer_name%%`. Airship replaces the merge field (and braces) with the data specified by the merge field at send time — just like mail merge in a word processor or mail client.
Use the fields in your Salesforce Contacts model that are linked by Attribute Group (Attribute Sets).
For example, if you have a field called `customer_name`, you could use the value from that field in your custom event with `%%customer_name%%`. If you have multiple fields in the model with the same name, reference the data extension name to select the correct field, using the format `%%data_extension_name.field_name%%`.
> **Note:** The support of AMPScript syntax is limited. You may use it for referencing fields by name, but program logic control structures, such as *if* statements or function calls, are not supported.
> **Important:** Data that is available for personalization is tied to the audience being used in the activity. If the audience is Contact Data (the default), use Contact Attributes to personalize. Since the audience is linked to a Subscriber in that case, any Contact Attribute linked to that Subscriber should be available for personalizing messages and custom events. If the audience is Entry Data, there's no guaranteed notion of associated Subscriber, so in that case you can only use fields in the Entry Source for personalization.
### Add or remove tags
You can add tags to, or remove tags from, named users as they progress through a Salesforce journey. Setting tags on your audience results in `tag_change` events in Airship that you can use as message triggers or to track changes to your audience. All tags set from Salesforce appear in the Airship tag group `sfmc-integration` that is automatically created when [configuring Airship in SFMC](#configure-airship-in-sfmc).
Set tags in Airship as a part of a Salesforce journey:
1. Go to **Journey Builder**, then **Journey Builder**.
1. Select an existing journey or select **Create New Journey**.
1. In the left sidebar, go to **Activities**, then **Custom**, then drag the **Airship Events/Tags** activity into your journey.
1. Select the **Airship Events/Tags** activity in the journey.
1. Select the Airship project containing the audience you want to set tags on.
1. For **Audience Trigger**, select **Tag Change**. By default, audience members are targeted using Contact Data as configured for the project. To target using Entry Source data instead, select **Entry Source**, and then select a field and type. You must already have an Entry Source configured for the journey.
1. In the **Set Tags** field, enter the name of the tag that you want to set or remove, select the add icon (+), then select **Add** or **Remove** as the action. Repeat this step for each tag.
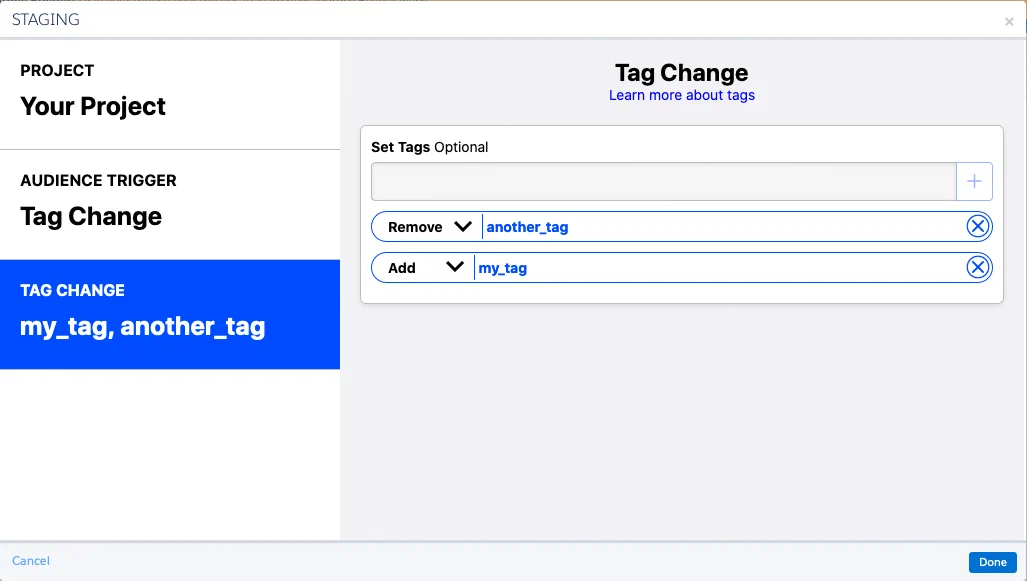
*Setting tag change actions in an SFMC journey*
1. Select **Done**.
## Outbound integration
> **Important:** This integration is not recommended for real-time workflows, as there are many factors that can limit the speed of updates.
Send events from Airship to SFMC using [Real-Time Data Streaming](https://www.airship.com/docs/reference/glossary/#rtds) to incorporate your audience's message activities into your CRM environment.
* **Track Airship user engagement in Salesforce** — Understand and leverage how and when your users are using (or not using) your app in the Marketing Cloud interface.
* **Trigger SFMC journeys from Airship engagement events** — Take advantage of Airship's Real-Time Data Streaming events in SFMC to trigger new journeys and keep your audience engaged.
### Configure your SFMC account
You need your SFMC API account credentials, SOAP WSDL URL, and MID when configuring the integration in Airship. If these items are not available to you, contact your SFMC admin.
Complete the following steps in SFMC:
1. Create an **API account username and password**:
1. Select your username in the upper right corner, then select **Setup**.
1. In the sidebar, select **Administration**, then **Users**, then **Users**.
1. Select **Create** and fill in the user information. **Make sure to check the box for *API User*.**
1. Select **Save**.
1. **Set permissions for the API user account**:
These permissions can also be set by a role assigned to the user account.
1. Select your username in the upper right corner, then select **Setup**.
1. In the sidebar, select **Administration**, then **Users**, then **Users**.
1. Check the box for the API user account and select **Manage Roles**.
1. Select **Edit Permission** and expand the **Email** section.
1. Navigate to each section and set each permission to Allow:
| Section path | Permission |
| --- | --- |
| Email » Subscribers » Data Extension | Create |
| Email » Subscribers » Data Extension | View |
| Email » Subscribers » Data Extension | Update |
| Email » Subscribers » Data Extension | Manage Data |
| Email » Admin » API Access | Webservice API |
1. Select **Save**.
1. Verify **web services permissions** for the Business Unit:
1. Select your username in the upper right corner, then select **Setup**.
1. In the sidebar, select **Security**, then **Security Settings**.
1. Under **Username and Logins**, verify that **Enable Username and Password for Web Services** is set to Yes. If not, contact your SFMC admin.
1. Get your **SOAP WSDL URL**:
1. Select your username in the upper right corner, then select **Setup**.
1. In the sidebar, select **Settings**, then **Company Settings**, then **Account Settings**.
1. In **General Settings**, copy the SOAP WSDL URL.
1. Get your **Marketing Cloud Member ID (MID)**:
Hover over the Business Unit name (it's to the left of your username) and copy the MID from the modal that appears:
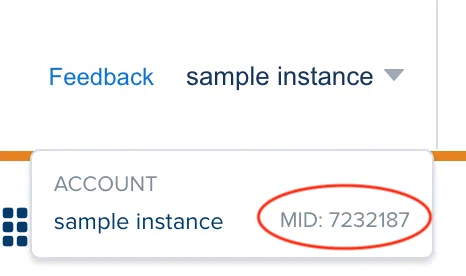
* Finding your Salesforce Marketing Cloud Member ID (MID)*
### Configure SFMC in Airship
In Airship:
1. Next to your project name, select the dropdown menu (▼), then **Settings**.
1. Under **Project settings**, select **Real-Time Data Streaming**.
1. Under **Real-Time Data Streaming**, select **Salesforce AppExchange**.
1. Follow the onscreen instructions to configure the integration to:
* Enter [your SFMC API account credentials, SOAP WSDL URL, and MID](#configure-your-sfmc-account)
* Select the Airship event types you want to send to SFMC
> **Tip:** You can configure different Airship project RTDS data to route to specific Business Units in SFMC by using the MID for the specific Business Unit in the RTDS configuration. It's also possible to use a single MID for all Airship projects, which will share Data Extensions. This is feasible because the app key is included in the Data Extensions.
### Data extensions and storage location
A short time after completing integration configuration, the folder /airship will be automatically created in your Data Extensions root folder. Do not create this folder manually.
The folder will contain data extensions representing the Airship event types you selected when setting up the integration. Unlike other event types, Airship `tag_change` events are represented by two data extensions: TAG_CHANGE_EVENTS and TAG_ACTION_EVENTS. The TAG_ACTION_EVENTS data extension lists added and removed tags.
See [SFMC Data Extension Schemas for RTDS](https://www.airship.com/docs/integrations/marketing-platforms/salesforce-schemas/).
> **Important:** 1. **DO NOT EDIT** Data Extensions, or you may break your integration.
> 1. In order to prevent data loss, integrations require a data retention policy for all
> Salesforce Data Extensions created in the /airship folder.
>
> See Salesforce documentation for more information about how to set up a data retention policy:
>
> * [Manage Data Retention Policy](https://help.salesforce.com/articleView?id=sf.mc_cab_manage_data_retention_policy.htm)
> * [Manage Contact Data](https://trailhead.salesforce.com/en/content/learn/modules/marketing-cloud-contact-management/manage-contact-data)
# Export Lists from Salesforce Marketing Cloud
> Export lists of users or attributes from Salesforce Marketing Cloud to Airship.
You can turn a Salesforce Marketing Cloud (SFMC) audience into an Airship [uploaded list](https://www.airship.com/docs/reference/glossary/#uploaded_list). You can also send SFMC Text, Number, and Date [attributes](https://www.airship.com/docs/reference/glossary/#attribute) to Airship for personalization and targeting. Even better, you can automate the exports to save time.
This document walks you through creating an SFMC Data Extension, creating keys and configuring SFTP for the file transfer, creating SFMC activities that perform the data extraction and file transfer, and automating the tasks.
## Creating the Data Extension
Your SFMC data will be converted to CSV format before transfer to Airship. The structure of your Data Extension table defines the CSV.
### Formatting for Static Lists
For Static Lists, your Data Extension must contain a [named user](https://www.airship.com/docs/reference/glossary/#named_user) value for each audience member. Configure your Data Extension with these two fields:
| Field name | Value |
| --- | --- |
| **Identifier type** | `named_user` |
| **Named User** | The ID string that represents the user in Airship |
Each row of the CSV will contain an `Identifier type, Named User` pair. However, the field names you enter in your Data Extension do not matter since they are omitted when the CSV is created. Example conversion to CSV:
```text
named_user,customer-009842
named_user,customer-277099
```
### Formatting for Attributes
For Attributes, configure your Data Extension with a field named `named_user` and an additional field for each attribute to associate with the named user:
| Field name | Value |
| --- | --- |
| **named_user** | The ID string that represents the user in Airship |
| **<attribute_id>** | The named user's data in [Text, Number, or Date format](https://www.airship.com/docs/guides/audience/attributes/about/#attribute-types), depending on the attribute type |
The Data Extension field names are used as the header row in the CSV, so you must enter the them exactly. Subsequent rows list a named user ID and the value of each attribute for that user. Example conversion to CSV:
```text
named_user,first_name,last_name
customer-009842,Freddy,Shoop
customer-059874,Denise,Green
customer-277099,Francis,Gremp
```
> **Important:** You must [define custom attributes or add predefined attributes in Airship](https://www.airship.com/docs/guides/audience/attributes/adding/) before associating them with named users. Using a custom or predefined attribute that you haven't yet set up in the Airship will result in an error.
## Setting up file transfer requirements
Airship's SFTP implementation uses SSH key pairs for authentication. You must create a pair of keys: a private key for your client and a public key for Airship. Then you can add the keys to Airship and SFMC and create a storage location to transfer your file from.
In Airship:
1. Follow the steps in [Generate keys](https://www.airship.com/docs/guides/audience/segmentation/sftp-upload/#generate-keys) in *SFTP upload for CSV files*.
1. Follow the steps in [Add your public key to Airship](https://www.airship.com/docs/guides/audience/segmentation/sftp-upload/#add-your-public-key-to-airship) in *SFTP upload for CSV files*.
* Making sure to set the Purpose to `Static Lists` or `Attributes`, depending on your list type.
* Note the host, port, and username for use in the following SFMC steps.
In SFMC:
1. Create an SSH encryption key. Follow the steps in Salesforce's [Create an Encryption Key for Marketing Cloud](https://help.salesforce.com/s/articleView?id=sf.mc_overview_create_a_key.htm&type=5). Since it is for file transfer activities, make sure to use the private key of the key pair generated using the Airship steps above.
1. Create an External SFTP Site [File Location](https://help.salesforce.com/s/articleView?language=en_US&id=sf.mc_overview_file_locations.htm&type=5). Follow the steps in Salesforce's [Set Up an External FTP, SFTP, or FTPS Site File Location](https://help.salesforce.com/s/articleView?id=sf.mc_overview_set_up_external_ftp_location.htm&type=5) using the stored key from the previous step as well as the host, port, and username provided by Airship. See also [Set up your client and transfer CSVs](https://www.airship.com/docs/guides/audience/segmentation/sftp-upload/#set-up-your-client-and-transfer-csvs) in *SFTP upload for CSV files*.
## Setting up data extraction and transfer
Set up SFMC tasks that extract the data from the Data Extension, format it, and transfer it to your SFTP File Location.
Follow the steps in the following two Salesforce documents:
1. [Data Extension Extract in Automation Studio](https://help.salesforce.com/s/articleView?id=sf.mc_as_data_extension_extract.htm&type=5)
For Static Lists:
* The file name entered will be the name of the Uploaded/Static list in Airship.
* Be careful about using wildcard dates. They could result in exceeding the 100 list per project limit.
* Use a comma as the column delimiter.
* Leave **Has Column Headers** unselected.
* Select **Uses Line Feed**.
For Attributes:
* The file name is not used anywhere in Airship, only in the File Transfer activity.
* Use a comma as the column delimiter.
* Select **Has Column Headers**.
* Select **Uses Line Feed**.
1. [Create a File Transfer Activity in Automation Studio](https://help.salesforce.com/s/articleView?id=sf.mc_as_use_a_data_extract_activity.htm&type=5)
* Use the same file naming pattern as the Data Extension Extract.
* Select file action **Move a File From Safehouse**. This is where the files will be when the previous activity completes.
* For **Destination**, select your previously created External SFTP Site File Location.
* Do not encrypt.
## Automating the flow
The final step is using SFMC's [Automation Studio](https://help.salesforce.com/s/articleView?id=sf.mc_as_automation_studio.htm&type=5) to automate running, in order, the two tasks created in the previous step.
## Verifying transfer
After running the automation, verify it was successfully transferred.
* For Static Lists, select the **Audience** menu, then **Lists**. You should see your list in **Uploaded Lists** with more than zero entries.
* For attributes, select the **Audience** menu, then **Attributes**, then **Upload History**. For more information, see [Viewing upload history](https://www.airship.com/docs/guides/audience/attributes/managing/#viewing-upload-history) in *Managing attributes*.
## Targeting users
You can now use the transferred data for targeting. See:
* [Using uploaded lists](https://www.airship.com/docs/guides/audience/segmentation/audience-lists/uploaded/#using-uploaded-lists)
* [Targeting your audience using attributes](https://www.airship.com/docs/guides/audience/attributes/targeting/)
* [Segments](https://www.airship.com/docs/guides/audience/segmentation/segments/)
# Zeta Global
> Create and adapt powerful app experiences that accelerate customer understanding for next-level personalization to capture more business value for everyone involved.
To create and adapt powerful app experiences that accelerate customer understanding for next-level personalization to capture more business value for everyone involved, Zeta has partnered with Airship, a leader in the space of push notifications with proven scale and a significant integration footprint. With this, we are leapfrogging our mobile app strategy and in no time, expanding to deliver data-driven personalized experiences to you all. Owing to this integration with Airship, you now have a multitude of options for push notification solutions to choose from:
* Deliver and report on mobile push messages
* Send push notifications to Android or iOS through the familiar interface of building Broadcast Campaigns or Experience Builder
* Retrieve push notification events and track your campaign’s performance through Report Builder
## Zeta Global Integration Requirements
**Accounts**
1. Zeta Global
1. Airship — Must include messaging
## Configuring the inbound Zeta Global Integration
1. Next to your project name, select the dropdown menu (▼), then **Settings**.
1. Under **Project settings**, select **Partner Integrations**.
1. Select **Zeta Global**.
1. Select **Configure** for the inbound integration and follow the onscreen instructions to:
* Create an authentication token. Zeta uses the token to communicate with your project in Airship.
* Add a new connector for Airship in Zeta Global.
## Configuring the outbound Zeta Global Integration
1. Next to your project name, select the dropdown menu (▼), then **Settings**.
1. Under **Project settings**, select **Partner Integrations**.
1. Select **Zeta Global**.
1. Select **Configure** for the outbound integration and follow the onscreen instructions to:
* Provide your Zeta Marketing Platform endpoint URL
* Select the Airship events to send to Zeta Global
For information about configuration and usage, see Zeta's [Airship integration](https://knowledgebase.zetaglobal.com/kb/integration-with-airship) documentation.