# Customer Data Platforms
Customer data platforms integrated with Airship unify audience profiles and orchestrate campaigns across your entire tech stack.
# Adobe Experience Platform CDP
> Send Airship data into Adobe Experience Platform CDP.
## Overview
Adobe Experience Platform (AEP) CDP creates a unified profiling system by capturing and passing data to Adobe native cloud solutions and third-party tools, like Airship. This integration supports passing Adobe segments and profile attributes to Airship, and sending Airship events to customer profiles within Adobe.
## Adobe Experience Platform Integration Requirements
* **Accounts**
1. Adobe Experience Platform
1. Airship
* Messaging
* [Real-Time Data Streaming](https://www.airship.com/docs/reference/feature-packages/#data) — *Required for source/outbound integration only*
* **Airship project**
* [named user](https://www.airship.com/docs/reference/glossary/#named_user) must be enabled for your project.
## Destination Integration
To send Adobe profile data to Airship, we have [Destination](https://experienceleague.adobe.com/docs/audience-manager/user-guide/features/destinations/destinations.html?lang=en#destinations) integrations for ingesting [tags](https://www.airship.com/docs/reference/glossary/#tag) and [attributes](https://www.airship.com/docs/reference/glossary/#attribute) to support message targeting and personalization on Airship channels and named users.
> **Example Attributes Use Case**: Leverage Experience Platform profile data to set location attributes within Airship, enabling a hotel brand to display an image for the nearest hotel location for each user.
> **Example Tags Use Case**: Retailers or entertainment platforms can create user profiles on their loyalty customers, and pass those segments into Airship for message targeting on mobile campaigns.
Documentation for our destination integrations is hosted on the Adobe site:
* [Airship Attributes Destination](https://experienceleague.adobe.com/docs/experience-platform/rtcdp/destinations/destinations-cat/mobile-engagement-destinations/airship-attributes-destination.html#destinations)
* [Airship Tags Destination](https://experienceleague.adobe.com/docs/experience-platform/rtcdp/destinations/destinations-cat/mobile-engagement-destinations/airship-tags-destination.html#destinations)
### Configuring the Destination Integration
In Airship:
1. Next to your project name, select the dropdown menu (▼), then **Settings**.
1. Under **Project settings**, select **Partner Integrations**.
1. Select **Adobe Experience Platform**.
1. Select **Configure** for the inbound integration and follow the onscreen instructions to:
* Create a [tag group](https://www.airship.com/docs/reference/glossary/#tag_group), [attributes](https://www.airship.com/docs/reference/glossary/#attribute), and an authentication token. Adobe uses the token to communicate with your project in Airship.
* Configure Airship as a new destination in AEP.
## Source Integration
This section describes an Airship [Source](https://experienceleague.adobe.com/docs/experience-platform/rtcdp/sources/sources-overview.html?lang=en#sources) integration for Adobe, meaning that Airship is the source of the data.
Our source integration uses [Real-Time Data Streaming](https://www.airship.com/docs/reference/glossary/#rtds) to send Airship event data, e.g., opens, tag change events, etc., to a cloud storage bucket. You map these events to Adobe profiles in the AEP dashboard.
> **Example Use Case**: Enrich your Adobe dataset with Airship-generated information gleaned from tags and events, e.g., *Predicted to Churn*, *Uninstall*, purchase events, etc. This data can then be used for further segmentation, triggering of campaigns in other Adobe tools, and profile enrichment.
### Configure Storage Bucket
This connection point takes Airship event data and sends it to a storage bucket in either [Google Cloud Storage](https://cloud.google.com/storage/) (GCS) or [Amazon S3](https://aws.amazon.com/s3/).
Before you can set up your connection point, you must create a storage bucket. See our [Google Cloud Storage](https://www.airship.com/docs/integrations/data-warehouse/gcs/) or [Amazon S3](https://www.airship.com/docs/integrations/data-warehouse/aws/#amazon-s3) documentation to create the bucket, and then proceed to the next section.
### Airship Outbound Integration Steps
You will need the following, depending on which bucket you created:
* **Google Cloud Storage:** Private key and bucket name
* **Amazon S3:** Bucket name
In Airship:
1. Next to your project name, select the dropdown menu (▼), then **Settings**.
1. Under **Project settings**, select **Real-Time Data Streaming**.
1. Under **Real-Time Data Streaming**, select **Adobe Experience Cloud**.
1. Follow the onscreen instructions to configure the integration.
It may take several minutes to begin populating events in AEP.
### AEP Mapping
Now you are ready to create your schema in the Adobe Experience Platform.
See [Create a schema using the Schema Editor](https://experienceleague.adobe.com/docs/experience-platform/xdm/tutorials/create-schema-ui.html#tutorials) on the Adobe documentation site to get started using the Airship Event mixin.
# DataGrail
> DataGrail delivers a single place to manage your privacy programs.
DataGrail provides a platform to manage compliance with data privacy regulations, such as
[GDPR (General Data Protection Regulation)](https://gdpr-info.eu/) and [CCPA (California Consumer Privacy Act)](https://leginfo.legislature.ca.gov/faces/billTextClient.xhtml?bill_id=201720180AB375).
DataGrail offers continuous system detection as well as real-time inventory of data assets.
## DataGrail Integration Requirements
* **Accounts**
1. DataGrail
1. Airship — Must include messaging
* **Airship project**
* [named user](https://www.airship.com/docs/reference/glossary/#named_user) must be enabled for your project.
## Configuring the DataGrail Integration
In Airship:
1. Next to your project name, select the dropdown menu (▼), then **Settings**.
1. Under **Project settings**, select **Partner Integrations**.
1. Select **DataGrail**.
1. Select **Configure** for the inbound integration and follow the onscreen instructions to:
* Create an authentication token. DataGrail uses the token to communicate with your project in Airship.
* Configure Airship in DataGrail. Contact DataGrail for configuration location.
# LiveRamp
> Export audience data to LiveRamp for activation across their network of advertising partners.
Use Airship's integration with LiveRamp to export audience data for activation across LiveRamp's extensive network of advertising partners. This integration uses [Performance Analytics](https://www.airship.com/docs/reference/glossary/#pa) to create and schedule exports of CSV data that can be accessed by your LiveRamp account.
The LiveRamp integration enables you to:
* Export audience data containing [identifying information](https://docs.liveramp.com/connect/en/identity-and-identifier-terms-and-concepts.html#identifier-data): email addresses, phone numbers, physical addresses
* Schedule regular exports of your data
* Choose between Cloud Storage (Amazon S3) or SFTP delivery methods
* Activate your audiences across LiveRamp's network of [advertising partners](https://partner-directory.liveramp.com/t/categories/media)
## LiveRamp integration requirements
This integration requires these accounts:
1. LiveRamp
1. Airship — Must include both:
* Messaging
* [Performance Analytics](https://www.airship.com/docs/reference/feature-packages/#analytics)
To export using SFTP, you must have this information to complete the configuration:
* SFTP server details from LiveRamp:
* Host address
* Username
* Password
* Preferred key exchange algorithm
To export to an Amazon S3 destination, you must have this information to complete the configuration:
* S3 bucket name
* Access key
* Secret key
* Region
* Optional: Path prefix for files
> **Important:** You must you have proper consent and legal basis for sharing the exported data with LiveRamp and their advertising partners.
## Set up data export
Follow the steps in [Scheduling delivery of Performance Analytics data](https://www.airship.com/docs/guides/reports/analytics/tasks-queries/scheduling/) with these settings:
* **Destination:** Amazon S3 or SFTP
* **Export Format**: CSV
* **Export recurrence interval**: Daily, weekly, or monthly
## Troubleshooting and support
If you encounter issues with the LiveRamp integration:
1. Check the export logs in Airship for errors.
1. Verify your LiveRamp account status.
1. Contact your LiveRamp account team or submit a [Support Ticket](https://docs.liveramp.com/connect/en/support.html#support) through the LiveRamp Community Portal
1. [Contact Airship Support](https://support.airship.com) if issues persist.
Additional Resources:
* [LiveRamp documentation](https://docs.liveramp.com)
* [Airship Feature packages reference](https://www.airship.com/docs/reference/feature-packages/)
# Lytics
> Connect disparate data sources with the popular customer data platform.
Your customers have many and varied interests. The quality of your customer data sources
varies too, ranging from structured to unstructured, current to dated. Lytics makes
it easy to aggregate customer data from a variety of sources and keep it up-to-date.
With Airship Real-Time Data Streaming as your source for mobile data, you can manage your
customer data platform with a Mobile First mentality.
**Optimize How Users Interact With Your Brand**
* Use rich behaviors from your website, email, social, and ad campaigns to inform and inspire your mobile design practices.
* Enhance your mobile experience using insights based on how users interact with your entire brand presence.
**Put Rich Mobile User Behavior To Work**
* Use what you learn about your users from native apps to inform the rest of your brand experience.
* Export Lytics behavior-rich segments back to your marketing tools to put mobile user insights to work on other channels.
**Adapt Mobile Data To Best-Of-Breed Marketing Tools**
* Connect your mobile and marketing data to Lytics to build exportable universal profiles that adapt to many best-of-breed marketing tools.
* Deploy behavior-rich audience segments with the click of a button.
**Predict Which Customer Segments Will Most Likely Drive Future Business**
* Apply the powerful prediction tools of Lytics on the rich behavioral mobile data from Airship.
## Lytics Integration Requirements
This integration requires these accounts:
1. Lytics
1. Airship — Must include both:
* Messaging
* [Real-Time Data Streaming](https://www.airship.com/docs/reference/feature-packages/#data)
## Configuring the Lytics Integration
In Airship:
1. Next to your project name, select the dropdown menu (▼), then **Settings**.
1. Under **Project settings**, select **Real-Time Data Streaming**.
1. Under **Real-Time Data Streaming**, select **Lytics**.
1. Follow the onscreen instructions to configure the integration.
# mParticle
> Map mobile engagement events to your customer data warehouse.
[mParticle](https://www.mparticle.com/) is a mobile data platform that aggregates data from your app, website, and other sources.
## mParticle Integration Types
There are three ways you can integrate with mParticle:
1. By integrating your **app** with the mParticle co-SDK — *Use mParticle to segment and target your Airship App audience.*
1. Via the Server-to-Server (S2S) integration for your **website** — *Send web events to Airship and use them to trigger messages and personalize message content.*
1. By sending [Real-Time Data Streaming](https://www.airship.com/docs/reference/glossary/#rtds) events from Airship to mParticle
## mParticle Integration Requirements
* **Accounts**
1. mParticle
1. Airship
* Messaging
* [Real-Time Data Streaming](https://www.airship.com/docs/reference/feature-packages/#data) — *Required for outbound integration only*
* **Airship project**
* The Airship SDK must use the same user identity as the mParticle SDK.
## App Integration
Use the App integration and set tags on your app audience from mParticle.
```mermaid
sequenceDiagram
participant a as User
participant b as mParticle
participant c as Airship
a->>b: Performs action recorded as event
b->>c: Sets tag on user in Airship
c->>a: Send message to user
```
### Configuring the App Integration
To integrate your app with mParticle, you must add mParticle's Airship Kit to your app's dependencies. The kit acts as a bridge between the mParticle and Airship SDKs, and it exposes the full range of Airship features to mParticle.
Follow mParticle's
[Airship Kit Integration](https://docs.mparticle.com/integrations/airship/event/#embedded-kit-integration) document to install the kit.
> **Note:** Location events are not automatically tracked in the co-SDK integration. See: [Gimbal integration](https://www.airship.com/docs/integrations/location/gimbal/) and [Radar integration](https://www.airship.com/docs/integrations/location/radar/).
>
> The co-SDK issues a custom event for each item in the array of the standard mParticle event.
### Troubleshooting
What do I do if I already have the Airship SDK in my app and want to add mParticle's SDK?
: To send events from mParticle to Airship, do one of the following:
* Reinstall the kit through mParticle for a SDK update and to map the
events.
* Map mParticle events to Airship-specific events, such as tags,
custom events, etc.
How do I update the Airship SDK when it was originally installed via the mParticle SDK?
: You can specify a newer Airship SDK cocoapod for iOS or define a newer
gradle dependency for Android. Both cocoapods and gradle resolve to the
newest dependency listed. For example, the kit could define 7.0.0, but if
the app wants 7.2.0, the kit will be forced to use 7.2.0.
### Mapping Attributes
[Airship predefined attributes](https://www.airship.com/docs/reference/data-collection/attributes/#predefined-attributes)
are mapped to [mParticle reserved user attributes](https://docs.mparticle.com/developers/server/json-reference/#user_attributes).
If this mapping is not possible, the event properties are flattened and added to
the `custom_attributes` object.
| Airship Attribute | mParticle Attribute |
|----------------------------|---------------------|
| age | $age |
| gender | $gender |
| country | $country |
| region (State or province) | $state |
| first_name | $firstname |
| last_name | $last_name |
| mobile_phone | $mobile |
Airship tags are grouped: mParticle creates a user attribute list for each tag group. The
key is prefixed with `Airship`. For example, a tag group *loyalty* which contains tags
`silver_member` and `special_offers` is mapped as follows:
```json
{"Airship loyalty" : ["silver_member", "special_offers"]}
```
| Airship Property | mParticle Property | Description |
|----------------------------------------------|------------------------|----------------------------------------------------------------|
| occurred | timestamp_unixtime_ms | Event timestamp |
| com.urbanairship.vendor | ios_idfv | IDFV |
| com.urbanairship.aaid | android_advertising_id | Android Advertising ID |
| com.urbanairship.limited_ad_tracking_enabled | limit_ad_tracking | Indicates if the user has enabled limit ad tracking |
| device_model | device_model | The device model |
| device_os | os_version | The device operating system |
| locale_language_code | locale_language | Current language device is set to |
| locale_country_code | locale_country | Current locale device is set to |
| locale_timezone | timezone_offset | The device's timezone offset setting in hours relative to UTC. |
| web_user_agent_string | http_header_user_agent | HTTP User Agent |
| app_package_name | package | A unique identifier for the app name |
| app_version | application_version | The version of the app |
| named_user_id | customer_id | Customer ID |
| channel | airship_channel_id | Partner ID |
Your app integration maps user attributes from mParticle to Airship [tags](https://www.airship.com/docs/developer/rest-api/ua/schemas/channels/#channellistingobject) in the `device` tag group. If a user attribute does not contain a value, the attribute key is mapped directly to an Airship tag. If the user attribute contains a value, Airship sets the tag as `key-value`.
For example, an mParticle user attribute in the format `"a_custom_property": "some_value"` would map to a `a_custom_property-some_value` tag in Airship.
## Web Integration
The Server to Server (S2S) integration sends mParticle events captured from your website to Airship using the [Custom Events API](https://www.airship.com/docs/developer/rest-api/ua/operations/custom-events/#addcustomevents). You can trigger automations, in-app automations, and sequences using incoming [custom events](https://www.airship.com/docs/reference/glossary/#custom_event) from mParticle. You can even [personalize messages](https://www.airship.com/docs/guides/personalization/about/) in automations or sequences using values from these events.
```mermaid
sequenceDiagram
participant a as User
participant b as mParticle
participant c as Airship
a->>b: Performs action recorded as event
b->>c: Sends custom event
c->>a: Automatically sends message based on event
```
Custom events are associated with [named users](https://www.airship.com/docs/reference/glossary/#named_user). You can map named users to a hashed email address, an mParticle `customer_id`, or `Other` (a field in mParticle's `user_identities` object).
The S2S integration uses the name of the event as the key in the properties of the event, containing an array of objects that you can iterate over — a list of
products, promotions, or impressions.
### Configuring the Web Integration
You must have an [access level of Owner, Admin or Full Access](https://www.airship.com/docs/guides/getting-started/messaging/teams-and-access/#access-levels) to configure the integration.
In Airship:
1. Next to your project name, select the dropdown menu (▼), then **Settings**.
1. Under **Project settings**, select **Partner Integrations**.
1. Select **mParticle**.
1. Select **Configure** for the inbound integration and follow the onscreen instructions to:
* Create [custom events](https://www.airship.com/docs/reference/glossary/#custom_event) `purchased`, `added_to_cart`, `browsed`, and `starred_item`.
* Configure Airship in mParticle.
Next, get your Airship project's [app key](https://www.airship.com/docs/reference/glossary/#app_key), which you will use to configure the integration in mParticle:
1. Next to your project name, select the dropdown menu (▼), then **Project Details**.
1. Copy your app key.
In mParticle:
1. Create an Output Configuration for Airship:
1. Select **Directory**, then **Airship**.
1. Select **Add Airship to Setup**.
1. For **Integration Type**, select **Output Event**, then select **Add to Setup**.
1. Select the **Airship** output configuration group.
1. Enter a Configuration Name, your Airship app key, and select your domain.
1. Select **App Key is for Web**, then **Save**.
1. Connect inputs to the output configuration you created in the previous step:
1. Go to **Connections**, then **Connect**.
1. Select the Input for the connection definition.
1. Select **Connect Output**.
1. Select the **Airship** Output Configuration that you created in previous steps.
1. Paste the bearer token that you created in earlier steps into the **Token** field.
1. Select the **Named User ID Type** that you want to map to your named users in Airship.
1. Select **Add Connection**.
### Mapping mParticle Events and Airship Events
[mParticle commerce events](https://docs.mparticle.com/developers/sdk/web/commerce-tracking/) are mapped to Airship events as follows:
| mParticle parent object | mParticle Event | Airship Mapped Name | Array of Objects (S2S integration only) |
|-------------------------|----------------------|----------------------|-----------------------------------------|
| product_action | purchase | purchased | `purchased.products` |
| product_action | add_to_cart | added_to_cart | `added_to_cart.products` |
| product_action | add_to_wishlist | starred_item | `starred_item.products` |
| product_action | remove_from_wishlist | remove_from_wishlist | `remove_from_wishlist.products` |
| product_action | remove_from_cart | remove_from_cart | `remove_from_cart.products` |
| product_action | checkout | checkout | `checkout.products` |
| product_action | refund | refund | `refund.products` |
| product_action | checkout_option | checkout_option | `checkout_option.products` |
| product_action | view_detail | view_detail | `view_detail.products` |
| promotion_action | unknown | unknown | `unknown.promotions` |
| promotion_action | view | view | `view.promotions` |
| promotion_action | click | browsed | `browsed.promotions` |
| product_impressions | | impression | `impression.impressions` |
> **Note:** To use mParticle's lifetime value feature, you must specify an event name for Airship. Usually, these are purchase events or other events you’d like to attribute to the lifetime value of the customer.
### Personalizing Messages and Sequences Using mParticle Events {#personalize}
You can use Airship [Handlebars](https://www.airship.com/docs/reference/glossary/#handlebars) to personalize messages in automation rules or sequences based on incoming mParticle events.
The mParticle event `name` generally contains an array of objects relevant to the event. For example, in the event below, the array of `products` appears in the `added_to_cart` key in the `added_to_cart` event.
Use object and array notation to access these properties. For example, using the incoming mParticle custom event below, you iterate over the array of `products` using `{{#each added_to_cart.products}}`.
```json
{
"occurred": "2020-02-27T09:41:54",
"user": {
"named_user_id": "hugh.manbeing"
},
"body": {
"value": 119.95,
"name": "added_to_cart",
"properties": {
"id": "c420c8f2-5b81-4236-a07e-176cec0e4327",
"source_id": "daba03c3-cc27-4395-b38f-deb9d44a0855",
"session_id": "-310836276167998200",
"coupon_code": "Example transaction coupon code",
"transaction_id": "example-transaction-id",
"tax_amount": 5.0,
"shipping_amount": 5.0,
"action": "added_to_cart",
"added_to_cart": {
"products": [
{
"id": "example-sku",
"name": "t-shirt",
"brand": "Nike",
"category": "Athletics",
"position": 0,
"price": 19.99,
"quantity": 4,
"totalAmount": 79.96
},
{
"id": "example-sku-2",
"name": "jacket",
"brand": "Columbia",
"category": "Outdoors",
"position": 0,
"price": 29.99,
"quantity": 1,
"totalAmount": 29.99
}
]
},
"source": "mParticle"
}
}
}
```
For example, you might create a template using `#each` to iterate over the `products` array in the example event above and let your audience know about the products that are still in their cart.
```text
You added the following items to your cart!
{{#each added_to_cart.products}}
{{quantity}}x {{name}} @ ${{price}} = {{totalAmount}}
{{/each}}
Use coupon code {{coupon_code}} to save now!
```
## Real-Time Data Streaming Integration
Take advantage of events recorded by Airship in your mParticle customer data aggregate.
```mermaid
sequenceDiagram
participant a as User
participant b as Airship
participant c as mParticle
b->>a: Sends a message
a->>b: App open event resulting from message
b->>c: Sends event to mParticle CDP
```
> **Important:** Only events that have at least one device ID (IDFV/AAID) or user identity ([named user](https://www.airship.com/docs/reference/glossary/#named_user)) ID are sent to mParticle.
### Configuring the RTDS Integration
This integration maps Airship app and web channels to mParticle platforms. First you will create a feed for each Airship channel in mParticle, then you will configure RTDS for each feed and specify which events to send to mParticle.
* iOS, Android, and Web have direct matches in mParticle, so you will select each when creating feeds.
* Email and SMS do not have direct matches in mParticle, so you will not select a platform when creating the feed. These events are instead sent as *Unbound* data to mParticle.
You can also opt to send **all** Airship data as unbound traffic. In this case, do not select a platform when creating an mParticle feed.
---
In mParticle, repeat these steps to create feeds for iOS, Android, Web, and/or Unbound channels:
1. Go to **Directory** to view the available integrations.
1. Hover over the Airship tile and select **Setup**.
1. Go to **Setup**, then **Inputs**.
1. Select the add icon (+).
1. Enter a unique configuration name.
1. Select a platform or leave unselected for an Unbound feed.
1. Select **Save**.
1. Copy the **Server to Server Key** and **Secret** for use in the next steps in Airship.
1. Select **Close**.
In Airship, complete these steps for each feed you created in mParticle:
1. Next to your project name, select the dropdown menu (▼), then **Settings**.
1. Under **Project settings**, select **Real-Time Data Streaming**.
1. Under **Real-Time Data Streaming**, select **mParticle**.
1. Follow the onscreen instructions to configure the integration.
* Be sure to enter the correct mParticle Server to Server Key and Secret for the platform you select.
* The default User Identity Type is Customer ID, but you can also select Other, which is a field in mParticle's `user_identities` object.
### Mapping Events
Most Airship events are mapped to mParticle's Custom Event, where:
`event_type` = `custom_event`
`custom_event_type` = `other`
`event_name` = `{Airship event type}`
| Airship Event | mParticle Event |
|---------------------------|--------------------------------------------------|
| ATTRIBUTE_OPERATION | Set as User Attributes |
| CLOSE | Custom Event |
| CONTROL | Custom Event |
| CUSTOM | Custom Event |
| FIRST_OPEN | Custom Event |
| FIRST_OPT_IN | Custom Event |
| IN_APP_BUTTON_TAP | Custom Event |
| IN_APP_EXPERIENCES | Custom Event |
| IN_APP_FROM_DISPLAY | Custom Event |
| IN_APP_FROM_RESULT | Custom Event |
| IN_APP_MESSAGE_DISPLAY | Custom Event |
| IN_APP_MESSAGE_EXPIRATION | Custom Event |
| IN_APP_MESSAGE_RESOLUTION | Custom Event |
| IN_APP_PAGE_SWIPE | Custom Event |
| IN_APP_PAGE_VIEW | Custom Event |
| IN_APP_PAGER_COMPLETED | Custom Event |
| IN_APP_PAGER_SUMMARY | Custom Event |
| LOCATION | Custom Event
`custom_event_type = location` |
| MOBILE_ORIGINATED | Custom Event |
| OPEN | Custom Event |
| REGION | Custom Event |
| RICH_DELETE | Custom Event |
| RICH_DELIVERY | Custom Event |
| RICH_READ | Custom Event |
| SCREEN_VIEWED | Screen View |
| SEND | Custom Event |
| SEND_ABORTED | Custom Event |
| SEND_REJECTED | Custom Event |
| SHORT_LINK_CLICK | Custom Event |
| SUBSCRIPTION | Custom Event |
| TAG_CHANGE | Set as User Attributes |
| UNINSTALL | Uninstall |
| WEB_CLICK | Custom Event |
| WEB_SESSION | Custom Event |
# Salesforce Data Cloud
> Share data between Airship and Salesforce Data Cloud using out-of-the-box tools on both platforms.
Salesforce Data Cloud is a real-time data platform that helps you unify, harmonize, and activate customer data across your organization. You can share data between Airship and Salesforce Data Cloud using native integration capabilities on both platforms without requiring custom development or third-party tools.
This guide covers bidirectional data flow:
* **From Salesforce Data Cloud to Airship** — Import customer data from Salesforce Data Cloud using SFTP to enrich your Airship [attributes](https://www.airship.com/docs/reference/glossary/#attribute).
* **From Airship to Salesforce Data Cloud** — Export Airship [Real-Time Data Streaming](https://www.airship.com/docs/reference/glossary/#rtds) event data to Salesforce Data Cloud using the Data Export integration with Amazon S3 storage.
## Import to Airship
You can import customer data from Salesforce Data Cloud into Airship using SFTP. This enables using Salesforce Data Cloud data for audience targeting and personalization in your Airship messaging campaigns.
1. **Set up attributes** — In Airship, create the necessary [attributes](https://www.airship.com/docs/reference/glossary/#attribute) that will receive the data from Salesforce Data Cloud. See the [Attributes guide](https://www.airship.com/docs/guides/audience/attributes/) for details.
1. **Configure SFTP in Airship** — Airship's SFTP implementation uses SSH key pairs for authentication. You must create a pair of keys: a private key for your client and a public key for Airship.
Follow the steps in [Generate keys](https://www.airship.com/docs/guides/audience/segmentation/sftp-upload/#generate-keys) and [Add your public key to Airship](https://www.airship.com/docs/guides/audience/segmentation/sftp-upload/#add-your-public-key-to-airship) in *SFTP upload for CSV files*. Make sure to set the Purpose to `Attributes`, and note the host, port, and username for use in the next section.
1. **Create a Data Lake Object** — In Salesforce Data Cloud, create a Data Lake Object (DLO) that matches the CSV structure required by Airship:
1. Go to **Data Cloud**, then **Data Streams**.
1. Create a new Data Lake Object.
* Configure the schema to match your Airship attributes.
* You must include a column for the channel identifier and one column for each attribute. The identifier can be a [channel](https://www.airship.com/docs/reference/glossary/#channel_term) ID, [named user](https://www.airship.com/docs/reference/glossary/#named_user) ID, or email address.
* Ensure field names match the attribute keys defined in Airship.
* For more information, see [Attributes CSV format](https://www.airship.com/docs/reference/messages/csv-formatting/#attributes) in the *CSV Formatting Reference*.
* Configure the output format as CSV.
* Set up SFTP as the destination using your credentials from Airship.
* Schedule the data export frequency based on your requirements.
1. **Verify data import** — Verify that data is being successfully imported into Airship:
1. Go to **Audience**, then **Attributes**.
1. Check that attribute values are being populated for your audience.
Monitor your SFTP logs in Salesforce Data Cloud for delivery issues.
## Export to Salesforce Data Cloud
You can export Airship event data to Salesforce Data Cloud using the [Data Export](https://www.airship.com/docs/integrations/data-warehouse/data-export/) integration with Amazon S3 as the destination. This provides hourly batches of structured [Real-Time Data Streaming](https://www.airship.com/docs/reference/glossary/#rtds) data that Salesforce Data Cloud can ingest.
[Real-Time Data Streaming](https://www.airship.com/docs/reference/feature-packages/#data) is required for this integration.
Before configuring the integration, you must set up a storage location:
1. Create an Amazon S3 bucket that will serve as the intermediate storage for Airship data.
1. Configure IAM credentials with write access to the S3 bucket. Follow [Amazon's documentation: Managing access keys](https://docs.aws.amazon.com/IAM/latest/UserGuide/id_credentials_access-keys.html#Using_CreateAccessKey).
1. Grant Salesforce Data Cloud read access to the S3 bucket. Follow [Salesforce documentation on S3 data sources](https://developer.salesforce.com/docs/data/data-cloud-int/guide/c360-a-awss3-bucket-policies.html).
Next, complete the integration steps:
1. **Configure Data Export in Airship** — Set up the Data Export integration to send event data to your S3 bucket:
1. Next to your project name, select the dropdown menu (▼), then **Settings**.
1. Under **Project settings**, select **Partner Integrations**.
1. Select **Data Export**.
1. Select **Configure** for the outbound integration and follow the onscreen instructions to:
* Select **Amazon S3** as your storage provider.
* Enter your AWS access key ID and secret access key.
* Select your AWS region.
* Enter your S3 bucket name.
* Select **Simplified** as the [file layout](https://www.airship.com/docs/integrations/data-warehouse/data-export/#structure-and-files). This structure works well with Salesforce Data Cloud ingestion.
* Select the Airship events to send to Salesforce Data Cloud.
* Configure options:
* Specify a folder path.
* Enable compression to save storage space.
* Enable server-side encryption.
After completing configuration, it may take several minutes to begin populating events. Files will be generated hourly for each event type, following this pattern:
> [folder_path]/appKey/integrationId/eventType/YYYY_MM_DD_HH_mm_ss.csv
1. **Create Data Lake Objects** — For each Airship event type you selected for export, create a corresponding Data Lake Object in Salesforce Data Cloud:
1. Navigate to **Data Cloud**, then **Data Streams**, and create a new Data Lake Object.
1. Configure the DLO to match the schema of the Airship event data. See the [Snowflake integration](https://www.airship.com/docs/integrations/data-warehouse/snowflake/) for detailed event schemas and field definitions.
1. Add the S3 bucket and folder path as a source for the DLO.
1. Configure the ingestion schedule. Hourly is recommended to align with Airship's export frequency.
1. Create field mappings between the CSV columns and the DLO fields.
Creating DLOs and mappings is a one-time setup exercise. Once configured, new data will automatically flow from Airship to Salesforce Data Cloud as events occur.
1. **Verify data export** — Monitor the integration to ensure data is flowing correctly:
1. In your S3 bucket, verify that CSV files are being created hourly in the expected folder structure.
1. In Salesforce Data Cloud, check the Data Stream status and verify that data is being ingested successfully.
1. Review any ingestion errors in Salesforce Data Cloud and adjust field mappings if necessary.
# Segment
> Use Segment to combine data across applications and platforms.
Segment is a Customer Data Platform (CDP) that lets you combine data across applications and platforms. Send Airship events to Segment for profile enrichment and event triggering (Airship as a source), and ingest external events from Segment with named users in Airship for email and SMS registration, message triggering, audience targeting, and analytics (Airship as a destination).
> **Note:** This page is for the integration based on Segment's Actions Framework, which provides flexibility by allowing Segment Events and their data to be mapped to Airship [custom events](https://www.airship.com/docs/reference/glossary/#custom_event), [attributes](https://www.airship.com/docs/reference/glossary/#attribute), or [tags](https://www.airship.com/docs/reference/glossary/#tag) based on workflows and requirements.
>
> We also have a legacy destination/inbound integration. See [Segment Legacy Destination Integration](https://www.airship.com/docs/integrations/cdp/segment-legacy/).
## Segment integration requirements
* **Accounts**
1. Segment
1. Airship
* Messaging
* [Real-Time Data Streaming](https://www.airship.com/docs/reference/feature-packages/#data) — *Required for source/outbound integration only*
* **Airship project**
* [named user](https://www.airship.com/docs/reference/glossary/#named_user) must be enabled for your project.
## Source integration
The Segment source integration sends Airship events to Segment. To properly feed events into, and associate events with, Segment profiles, you must map `named_user_id` to Segment profile `userId` properties.
### Configuring the Segment source integration
To configure the integration, first you will add Airship to Segment as a source and retrieve your *Write Key*. Then you will create a Real-Time Data Stream integration for Segment in Airship.
In Segment:
1. Go to **Catalog**.
1. Find the Airship source and select **Add Source**.
1. Add a name and optional labels for your source integration, then select **Add Source**.
1. Copy the **Write Key**. You will use this token when enabling your Segment integration in Airship.
In Airship:
1. Next to your project name, select the dropdown menu (▼), then **Settings**.
1. Under **Project settings**, select **Real-Time Data Streaming**.
1. Under **Real-Time Data Streaming**, select **Segment**.
1. Follow the onscreen instructions to configure the integration.You have the option to include anonymous data. Enable this if you want to send events that are not attributed to a named user to Segment. This can increase the number of customer profiles and the cost of using Segment.
By default, custom events that are sent from Segment to Airship are excluded from being sent back to Segment. If you would prefer to receive these events, [contact Airship Support](https://support.airship.com).
It may take several minutes to begin populating events in Segment. You can open the Airship source in Segment and use the Debugger option to see incoming data and confirm that your integration is working properly.
## Destination integration
This Segment destination integration uses the [Segment Actions framework](https://segment.com/docs/connections/destinations/actions/) to map Segment events of all types to Airship custom events, attributes, and tags. It can also be used to register email addresses and SMS [MSISDNs](https://www.airship.com/docs/reference/glossary/#msisdn) as well as associate them with named users.
There are predefined mappings for the Segment Actions *Set Attributes*, *Custom Events*, and *Register and Associate*. The Airship `named_user_id` is sourced from the Segment `userId` by default. You can customize these mappings and also manually map the *Manage Tags* actions.
### Configuring the Segment destination integration
In Airship:
1. Next to your project name, select the dropdown menu (▼), then **Settings**.
1. Under **Project settings**, select **Partner Integrations**.
1. Select **Segment**.
1. Select **Configure** for the destination integration and follow the onscreen instructions to:
* Create [tag group](https://www.airship.com/docs/reference/glossary/#tag_group), [attributes](https://www.airship.com/docs/reference/glossary/#attribute), and an authentication token. Segment uses the token to communicate with your project in Airship.
* Configure Airship as a destination in Segment. You must select the Airship Actions integration, not the Airship integration.
### Custom events
The default trigger for the Custom Events Action is the `Track` event type. This, like the rest of the mappings, is configurable in Segment to suit your requirements.
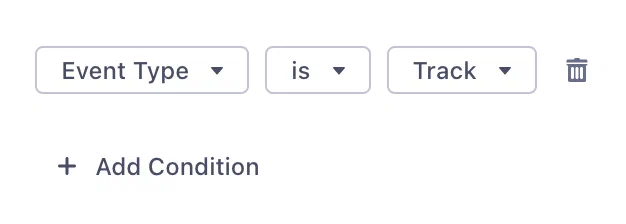
*The default trigger mapping for the Segment Action Custom Events*
Airship custom events must have an audience identifier, an occurred time, and a name. In the Segment mapping, these are sourced from the Segment properties `userId`, `timestamp`, and `event`, which populate the Airship fields `named_user_id`, `occurred`, and `name`. You can modify the mappings, but the values must exist and be valid. Custom events can also optionally have properties, which default to items in the Segment `properties` object.
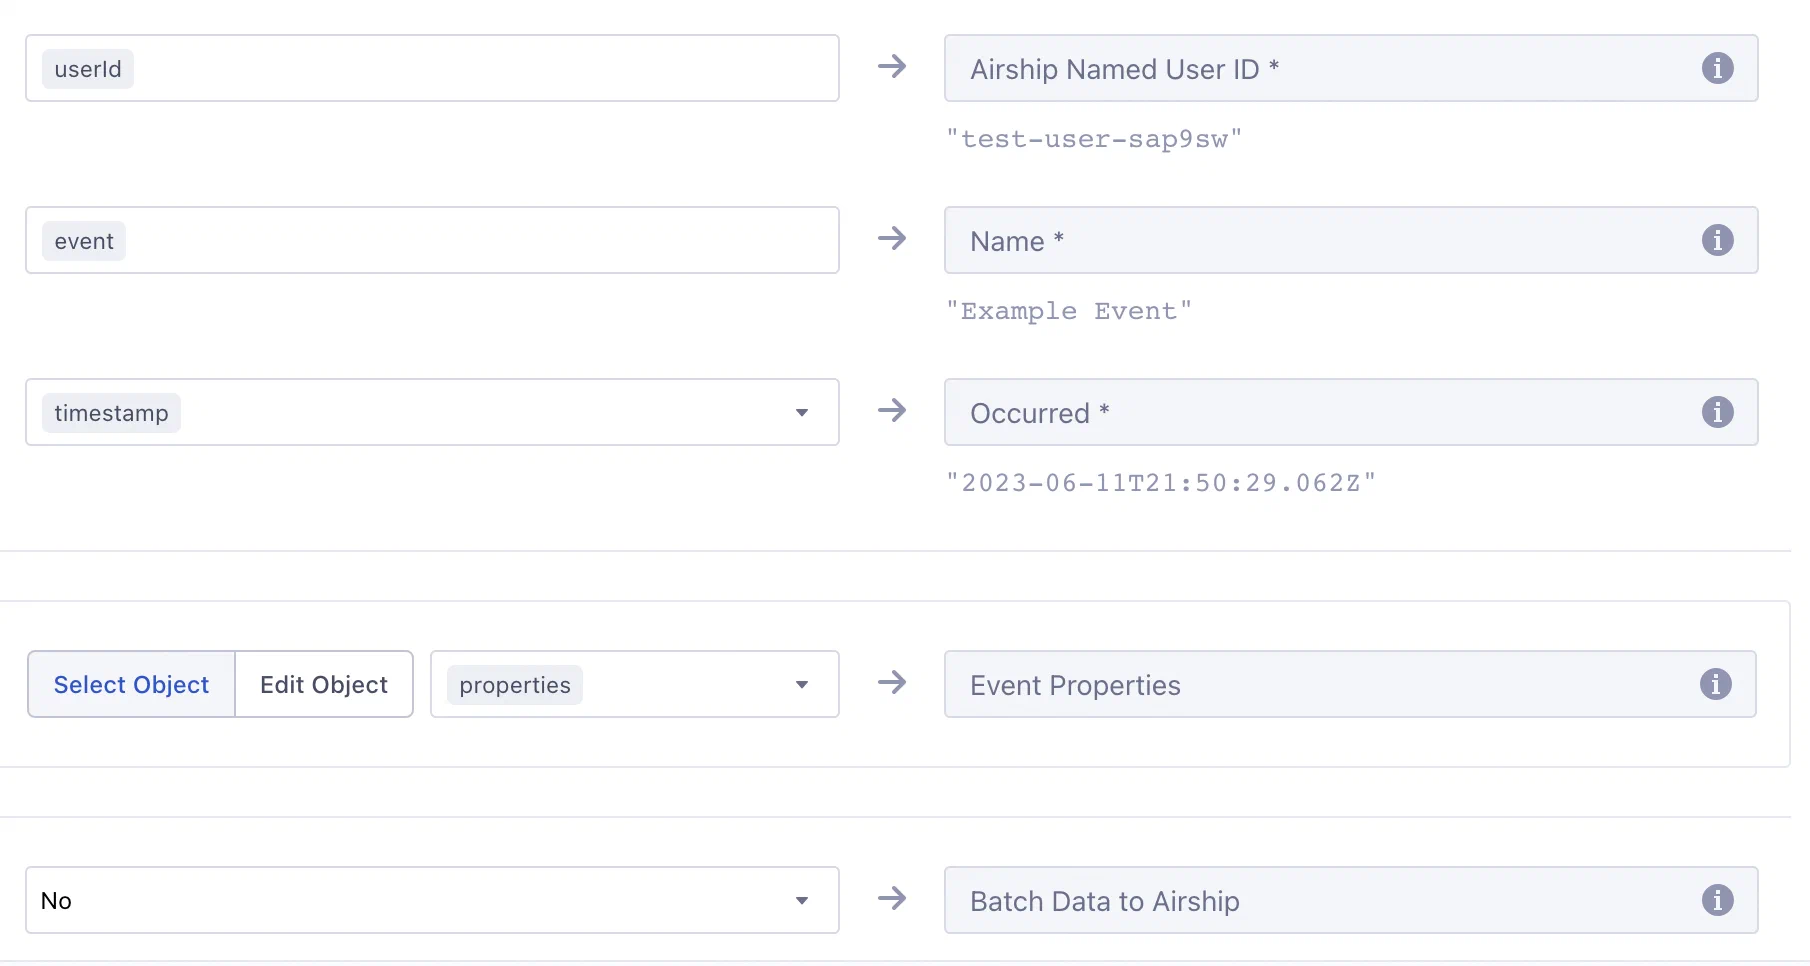
*Mapping the Custom Events Action in Segment*
**Example `track` event from Segment**
```json
{
"receivedAt": "2019-07-09T19:24:15Z",
"messageId": "6dJnUw1OKG",
"type": "track",
"properties": {
"provider": "Branch",
"campaign": {
"source": "AdWords",
"name": "Campaign Name",
"content": "Organic Content Title",
"ad_creative": "Red Hello World Ad",
"ad_group": "Red Ones"
},
"categories": ["test-campaign"]
},
"event": "Install Attributed",
"userId": "sKQR2ORpaw",
"timestamp": "2019-07-09T19:24:15Z"
}
```
**Example custom event in Airship**
```json
{
"occurred": "2019-07-09T19:24:15",
"user": {
"named_user_id": "sKQR2ORpaw"
},
"body": {
"name": "install attributed",
"interaction_type": "cdp",
"properties": {
"provider": "Branch",
"campaign": {
"source": "AdWords",
"name": "Campaign Name",
"content": "Organic Content Title",
"ad_creative": "Red Hello World Ad",
"ad_group": "Red Ones"
},
"categories": ["test-campaign"],
"source": "Segment"
}
}
}
```
> **Note:** * Airship transforms all custom event names to lowercase. In the following
> example, note that the value of `event` appears as *Install Attributed* for
> Segment while in Airship it is recorded as *install attributed* in the `name`
> attribute.
>
> * Events from Segment are sent as server-side events, which cannot be used to trigger an [In-App Automation](https://www.airship.com/docs/reference/glossary/#iaa) or [Scene](https://www.airship.com/docs/reference/glossary/#scene).
### Manage Tags
For the Manage Tags Action, you must manually map Segment event objects to Airship tags. When mapping, the tag names default to `traits.airship_tags`. Change these to whatever is relevant, noting that values must be boolean.
The integration uses the `segment-integration` Airship tag group, which is created automatically when you configure the integration in the Airship project settings. You can use a different tag group that better fits your use case, but the examples on this page refer to `segment-integration`.
This integration supports boolean properties only. Airship adds or removes its key as a tag in the `segment-integration` tag group depending on the boolean value. Airship adds tags for properties that are `true` and removes tags for properties that are `false`.
**Example Segment Identify Event**
```json
{
"userId": "jane",
"type": "identify",
"timestamp": "2019-06-12T22:21:33Z",
"traits": {
"airship_tags": {
"new-customer": false,
"order-completed-last-60-days": true
}
}
}
```
**Example Airship tag change event**
```json
{
"id": "00000170-cff9-7e5e-6a5a-21814f6b3a37",
"offset": "1000031868729",
"occurred": "2019-06-12T22:21:33Z",
"processed": "2019-06-12T22:21:33Z",
"device": {
"named_user_id": "jane"
},
"body": {
"add": {
"segment-integration": ["order-completed-last-60-days"]
},
"remove": {
"segment-integration": ["new-customer"]
}
},
"type": "TAG_CHANGE"
}
```
### Set Attributes
The default trigger for the Set Attributes Action is the `Identify` event type, but you can change it in Segment.
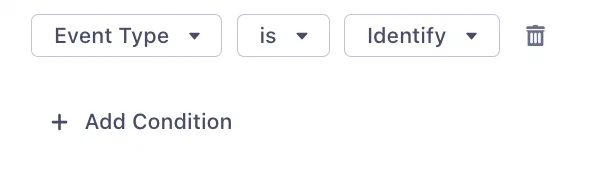
*The default trigger mapping for the Segment Action Set Attributes*
The integration maps [Segment reserved traits](https://segment.com/docs/connections/spec/identify/#traits) to [Airship predefined attributes](https://www.airship.com/docs/reference/data-collection/attributes/#predefined-attributes):
| Segment Property | Attribute Name | Attribute ID | Attribute Type |
|---|---|---|---|
| `traits.address.city` | City | `city` | Text |
| `traits.address.country` | Country | `country` | Text |
| `traits.address.postalCode` | Zipcode | `zipcode` | Number |
| `traits.address.region` | Region | `region` | Text |
| `traits.age` | Age | `age` | Number |
| `traits.birthday` | Birthdate | `birthdate` | Date |
| `traits.company_name` | Company | `company` | Text |
| `traits.account_creation` | Account Creation | `account_creation` | Date |
| `traits.email` | Email Address | `email` | Text |
| `traits.first_name` | First Name | `first_name` | Text |
| `traits.gender` | Gender | `gender` | Text |
| `traits.last_name` | Last Name | `last_name` | Text |
| `traits.full_name` | Full Name | `full_name` | Text |
| `traits.phone` | Mobile Phone Number | `mobile_phone` | Number |
| `traits.home_phone` | Home Phone Number | `home_phone` | Number |
| `traits.work_phone` | Work Phone Number | `work_phone` | Number |
| `traits.title` | Title | `title` | Text |
| `traits.username` | Username | `username` | Text |
| `traits.loyalty_tier` | Loyalty Tier | `loyalty_tier` | Text |
| `traits.altitude` | Altitude | `altitude` | Number |
| `traits.longitude` | Longitude | `longitude` | Number |
| `traits.latitude` | Latitude | `latitude` | Number |
| `context.device.advertisingId` | Advertising ID | `advertising_id` | Text |
The following example `identify` call assigns attributes to the named user `jane`. In this example, `age` maps to a predefined Airship attribute. The integration assumes that there is an attribute defined in Airship with the ID `favorite_color`.
**Example Segment call**
```json
{
"type": "identify",
"traits": {
"age": 30,
"favorite_color": "purple"
},
"userId": "jane"
}
```
For traits in the `identify` call that do not
map to a predefined or customer-defined Airship attribute, you must create and enable the attribute in the Airship dashboard. Go to *Audience » Attributes* in your project. See [About attributes](https://www.airship.com/docs/guides/audience/attributes/about/) for details.
### Register and Associate
The default trigger for the Register and Associate Action is the `Track` event type with an `Address Registered` event, but you can change it in Segment.

*The default trigger mapping for the Segment Action Register and Associate*
The main requirement for registering an email address is simply an email address. This, and most of the other channel objects default to the `properties` object. The only exception is `suppression_state` which defaults to `context.suppression_state`. If a `userId` (or alternatively mapped) value is present, the email address will be registered and associated with the named user ID in the same trigger. If `new_email` is present, it will replace the old email address.
To use [delivery by time zone](https://www.airship.com/docs/guides/messaging/messages/delivery/delivery/#schedule) for email or SMS, include `timezone` as a property when registering. For email, all other registration properties are optional and mostly involve opt-in state for various features.

*Mapping the Register and Associate Action in Segment*
**Example `track` event from Segment for email registration and named user association**
```json
{
"type": "track",
"properties": {
"email": "floofy@kittens.org",
"commercial_opted_out": "2023-08-30T22:19:03.944Z",
"transactional_opted_in": "2023-08-30T22:19:03.944Z",
"click_tracking_opted_in": "2023-08-30T22:19:03.944Z",
"open_tracking_opted_in": "2023-08-30T22:19:03.944Z",
"timezone": "PST"
},
"userId": "6319ffd6-f486-4258-9e96-f256fe7c712f",
"event": "Address Registered"
}
```
The above call registers the email address `floofy@kittens.org` and also:
* Associates the address with the named user `6319ffd6-f486-4258-9e96-f256fe7c712f`
* Opts the address in to receiving Commercial and Transaction emails
* Opts the address in to tracking clicks and opens
* Sets the registered email address's time zone to "PST"
SMS registration works in the same way but with more limited fields.
**Example `track` event from Segment for SMS registration and named user association**
```json
{
"type": "track",
"properties": {
"msisdn": "15035551212",
"sender": "12345",
"opted_in": "2023-08-30T22:19:03.944Z"
},
"userId": "77565D39-CF68-44AC-86C2-ACE7E8892439",
"event": "Address Registered"
}
```
The above call registers the SMS [MSISDN](https://www.airship.com/docs/reference/glossary/#msisdn) `15035551212`, associates it with the named user `77565D39-CF68-44AC-86C2-ACE7E8892439`, and sets the opt-in date to `2023-08-30T22:19:03.944Z`.
> **Note:** The date-times should be in ISO 8601 format. The integration will attempt to convert them to Airship-compliant values.
## Troubleshooting your Segment integration {#troubleshooting}
Airship returns errors based on the events received as a part of this integration.
`400` Bad Request
: The call is either missing traits or traits are empty, resulting in no Airship API calls to set tags or attributes.
If you don't see events in Airship and you don't see errors in Segment, make sure that your `userId` values in Segment exist as named users in Airship. Airship returns `200 OK` when attributing events to named users, even if the `named_user_id` does not exist in Airship.
# Simon Data
> Unify, explore, and enable acting on all client data, leveraging existing infrastructure.
[Simon Data](https://www.simondata.com) offers unified customer identity, dynamic
personalized content for creating consistent experiences across all end
channels, centralized orchestration, collaboration, and actionable insights.
## Simon Data Integration Requirements
This integration requires these accounts:
1. Simon Data
1. Airship — Must include both:
* Messaging
* [Real-Time Data Streaming](https://www.airship.com/docs/reference/feature-packages/#data)
## Configuring the Simon Data Integration
You will need to know your webhook endpoint URL and any key/value pairs to add as custom headers.
In Airship:
1. Next to your project name, select the dropdown menu (▼), then **Settings**.
1. Under **Project settings**, select **Real-Time Data Streaming**.
1. Under **Real-Time Data Streaming**, select **Webhooks**.
1. Follow the onscreen instructions to configure the integration.
See [Configuring an RTDS webhook integration](https://www.airship.com/docs/guides/reports/real-time-data-streaming/#configure-an-rtds-webhook-integration) for more information.
# Tealium
> Consume Tealium data and send Airship engagement data to Tealium.
Tealium is a Customer Data Platform (CDP). CDPs collect, store, and normalize large volumes of data while creating a persistent identifier that spans across data sets. You can use the inbound and source integrations together or separately.
Inbound Integration
: Use Tealium to set [tags](https://www.airship.com/docs/reference/glossary/#tag), [attributes](https://www.airship.com/docs/reference/glossary/#attribute), and deliver [custom events](https://www.airship.com/docs/reference/glossary/#custom_event) in Airship. This data is synced between Tealium and Airship using [named user](https://www.airship.com/docs/reference/glossary/#named_user).
Once in Airship, customers can segment based on those tags, events, and custom event properties, as well as trigger Automations and Sequences. Personalization using attributes and custom event properties is also supported.
Source Integration
: Rich user-level app, SMS, web, email, and open channel data is sent from Airship to Tealium using [Real-Time Data Streaming](https://www.airship.com/docs/reference/glossary/#rtds). Tealium then transforms Airship data into traits and audiences, unifying users and content across different platforms. You choose which RTDS events to send to Tealium.
## Tealium integration requirements
* **Accounts**
1. Tealium
1. Airship
* Messaging
* [Real-Time Data Streaming](https://www.airship.com/docs/reference/feature-packages/#data) — *Required for outbound integration only*
* **Airship project**
* [named user](https://www.airship.com/docs/reference/glossary/#named_user) must be enabled for your project.
## Configuring the Tealium inbound integration
In Airship:
1. Next to your project name, select the dropdown menu (▼), then **Settings**.
1. Under **Project settings**, select **Partner Integrations**.
1. Select **Tealium**.
1. Select **Configure** for the inbound integration and follow the onscreen instructions to:
* Create [attributes](https://www.airship.com/docs/reference/glossary/#attribute), a [tag group](https://www.airship.com/docs/reference/glossary/#tag_group), and an authentication token. Tealium uses the token to communicate with your project in Airship.
* Add a new connector for Airship in Tealium.
## Configuring the Tealium source integration
To set up this integration, you will:
1. Configure your app to set the `tealium_visitor_id` on Airship events. See the Kotlin and iOS setup sections below for more information.
1. Add Airship to Tealium as a source and retrieve your Data Source Endpoint.
1. Set up the RTDS integration for Tealium in the Airship dashboard.
When you set up a Tealium RTDS integration, your events will contain a `tealium_visitor_id` key. This is the identifier Tealium uses to differentiate between unique events. As a fallback, you may want to set your Airship [named user](https://www.airship.com/docs/reference/glossary/#named_user) value to `tealium_visitor_id` to ensure that events are matched within Tealium.
### Set the `tealium_visitor_id` on Airship events
**Kotlin SDK example**
```kotlin
// Initialize the Tealium library
TealiumConfig tealiumConfig = TealiumConfig(
application,
{ACCOUNT},
{PROFILE},
{ENVIRONMENT},
dataSourceId = {DATASOURCE_ID}, //optional
modules = mutableSetOf(VisitorService),
dispatchers = mutableSetOf(TagManagement, Collect)
);
Tealium tealium = Tealium.create("tealium_instance", tealiumConfig);
// Get the Tealium visitor ID
String visitorId = tealium.getVisitorId();
// Add the visitor ID to the current associated identifiers
Airship.getAnalytics()
.editAssociatedIdentifiers()
.addIdentifier("tealium_visitor_id", visitorId)
.apply();
```
See also: [Tealium Kotlin Identity Resolution documentation](https://docs.tealium.com/platforms/getting-started-mobile/identity-resolution/).
**Swift SDK example**
```swift
// Initialize the Tealium library
let config = TealiumConfig(account: {ACCOUNT},
profile: {PROFILE},
environment: {ENVIRONMENT},
datasource: {DATASOURCE})
let tealium = Tealium(config: config)
// Get the Tealium visitor ID
let visitorId = tealium.visitorId
// Add the visitor ID to the current associated identifiers
let identifiers = Airship.analytics.currentAssociatedDeviceIdentifiers()
identifiers.set(identifier: visitorId, key:"tealium_visitor_id")
Airship.analytics.associateDeviceIdentifiers(identifiers)
```
See also: [Tealium Swift Identity Resolution documentation](https://docs.tealium.com/platforms/getting-started-mobile/identity-resolution/).
### Add Airship to Tealium as a source
You will also retrieve your *Data Source Endpoint URL*.
1. Log in to [Tealium](https://my.tealiumiq.com/).
1. In the sidebar, select **Sources**, then **Data Sources**, which will take you to a page where you can add Airship as a data source.
1. Select **Add Source**.
1. Under **Communication**, select **Airship**.
1. Enter a name for your Airship source integration.
1. Select **Continue** until you reach the **Choose Event Specifications** page.
> **Note:** The event specifications currently do not support Airship-specific events. Tealium may add these in the future. For now, you can ignore the event specifications.
1. Select **Continue** to proceed to the **Get Code** page.
1. Copy the Data Source Endpoint URL. You will paste this in the Airship dashboard when setting up the RTDS integration.
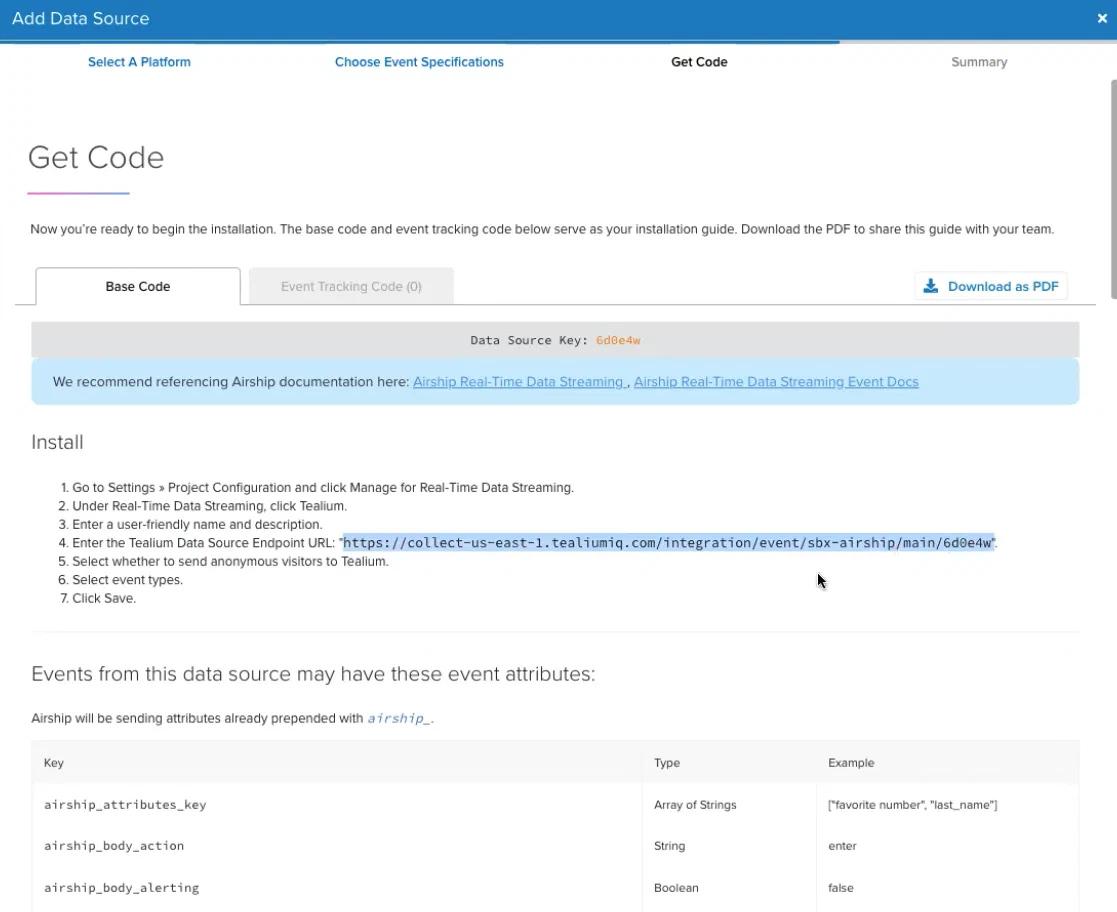
*Copying the Data Source Endpoint URL from Tealium*
> **Note:** The Install steps listed in the Tealium **Get Code** page are the same as provided in the next section on this page. Please read the steps for information not provided by Tealium.
### Set up a Tealium RTDS integration in Airship
You will need your Tealium Data Source Endpoint URL.
In Airship:
1. Next to your project name, select the dropdown menu (▼), then **Settings**.
1. Under **Project settings**, select **Real-Time Data Streaming**.
1. Under **Real-Time Data Streaming**, select **Tealium**.
1. Follow the onscreen instructions to configure the integration.
You have the option to include anonymous data. Events that have a `tealium_visitor_id`, named user, or [delivery_address](https://www.airship.com/docs/developer/rest-api/connect/schemas/device-information/#sms-email-devices) (phone number, [MSISDN](https://www.airship.com/docs/reference/glossary/#msisdn), or email address) are delivered to Tealium by default. When electing to send anonymous data, Airship sends all events to Tealium regardless of whether the user is identified with a Visitor ID or Secondary Visitor ID.
See also [Airship incoming webhook setup guide](https://docs.tealium.com/server-side/data-sources/webhooks/airship/) in Tealium's *Incoming Webhooks* documentation.
# Treasure Data
> Treasure Data offers an enterprise customer data platform that unifies all types of online, offline, and IoT device customer data.
You can set up an inbound integration in Airship or an outbound integration in Treasure Data.
See Treasure Data's [April 2021 release note](https://docs.treasuredata.com/release-notes/archive/2021/april-2021-release-note#airship-import-and-export-integrations) about Airship Import and Export Integrations.
## Inbound integration
With an inbound integration, you can do the following directly from Treasure Data:
* **Export audience lists**: Send predefined lists of users from Treasure Data directly to create Airship [uploaded lists](https://www.airship.com/docs/reference/glossary/#uploaded_list) for targeted messaging and campaigns.
* **Export custom events**: Export custom event data, such as omnichannel events from web, CRM, or POS systems, to Airship.
* **Synchronize Attributes**: Update both non-JSON (text, number, date/time) and JSON [attributes](https://www.airship.com/docs/reference/glossary/#attribute) on Airship users. You have granular control to set or remove attribute values and specify whether to target [named users](https://www.airship.com/docs/reference/glossary/#named_user) or individual channels. For large volumes of data, the integration supports and recommends batch CSV uploads specifically for efficiently adding and updating attributes in Airship.
### Inbound integration requirements
This integration requires these accounts:
1. Treasure Data
1. Airship — Must include messaging
### Configure the inbound integration
In Airship:
1. Next to your project name, select the dropdown menu (▼), then **Settings**.
1. Under **Project settings**, select **Partner Integrations**.
1. Select **Treasure Data**.
1. Select **Configure** for the inbound integration and follow the onscreen instructions to:
* Create an authentication token. Treasure Data uses the token to communicate with your project in Airship.
* Configure the Airship integration in Treasure Data.
For additional implementation steps, see the Treasure Data documentation:
* [Airship Export Integration](https://docs.treasuredata.com/int/airship-export-integration)
* [Airship Export Integration CLI](https://docs.treasuredata.com/int/airship-export-integration-cli)
## Outbound integration
You can configure an Airship outbound integration in Treasure Data so you can import the following:
* **Uploaded (Static) Lists**: Synchronize Airship [uploaded lists](https://www.airship.com/docs/reference/glossary/#uploaded_list) with profiles stored in the Treasure Data database.
* **User data**: Send information, such as [named user](https://www.airship.com/docs/reference/glossary/#named_user) IDs, to enrich Treasure Data user profiles.
* **Reporting data**: Import various Airship report types, including Custom Event, Opt-in, Opt-out, Time In App, Web Response, Response List, and Device reports, to analyze marketing strategy and campaign performance.
See [Airship Import Integration](https://docs.treasuredata.com/int/airship-import-integration) in Treasure Data's Integrations Portal documentation.
# Zeotap
> Zeotap CDP is the easy, secure, and impactful customer data platform made in Europe for Europe.
Zeotap CDP empowers brands to integrate, unify, segment and orchestrate customer data now and in the cookieless future, all while putting consumer privacy and compliance front and center.
These integrations support:
* Creating [uploaded lists](https://www.airship.com/docs/reference/glossary/#uploaded_list)
* Setting [custom events](https://www.airship.com/docs/reference/glossary/#custom_event)
* [named user](https://www.airship.com/docs/reference/glossary/#named_user) export
* [Real-Time Data Streaming (RTDS)](https://www.airship.com/docs/reference/glossary/#rtds)
## Zeotap Integration Requirements
* **Accounts**
1. Zeotap
1. Airship
* Messaging
* [Real-Time Data Streaming](https://www.airship.com/docs/reference/feature-packages/#data) — *Required for outbound integration only*
* **Airship project**
* [named user](https://www.airship.com/docs/reference/glossary/#named_user) must be enabled for your project — *Required for inbound integration only*
## Configuring the inbound integration
In Airship:
1. Next to your project name, select the dropdown menu (▼), then **Settings**.
1. Under **Project settings**, select **Partner Integrations**.
1. Select **Zeotap**.
1. Select **Configure** for the inbound integration and follow the onscreen instructions to:
* Create an authentication token. Zeotap uses the token to communicate with your project in Airship.
* Configure Airship in Zeotap.
## Configuring the outbound integration
In Airship:
1. Next to your project name, select the dropdown menu (▼), then **Settings**.
1. Under **Project settings**, select **Partner Integrations**.
1. Select **Zeotap**.
1. Select **Configure** for the outbound integration and follow the onscreen instructions to:
* Set up Airship Real-Time Data Streaming in Zeotap as a source.
* Enter your Zeotap API Endpoint URL and Write Key in Airship.
* Select the Airship events to send to Zeotap.
For information about using this integration, see [Zeotap documentation](https://docs.zeotap.com/articles/#!integrate-customer/airship).