For Google Boarding Passes, Google automatically notifies holders when departureGate, departureTerminal, departureTime, or boardingTime are updated. These are independent of any notifications you send through Airship.
## Best Practices for Wallet Push Notifications * **Daily Notification Limits:** Google Wallet currently limits to **maximum three notifications per day** per pass, and Apple Wallet limits to **maximum twenty notifications per day** per pass. Limit the daily notifications across both platforms to three notifications per day. Sending too many notifications can create an unpleasant user experience and increase the likelihood that your pass holder will disable wallet notifications or remove the pass. * **Identical Message Content:** Airship blocks attempts to send identical notification messages back to back, regardless of how much time has passed in between. If your use case requires sending the same message content in back to back notifications, be sure to change the message slightly so that it is not exactly the same as the previous message. Otherwise, pass holders may assume subsequent messages were sent in error. # Pass Update Notifications > Send your pass holders a change message when you update their pass content. Alert pass holders when their pass has been updated. For example, if their membership status has changed or if their loyalty points have increased, this would be an opportunity to notify the user and open the wallet pass for them to see that the pass has been updated. > **Note:** Alerting pass holders when pass content has been changed is only available for Apple Wallet. [Google sends automatic notifications](https://www.airship.com/docs/guides/wallet/user-guide/notifications/push-notifications/#automatic-notifications) for some boarding pass updates. When a change message is posted to a user's device, the screen displays a title and the pass's icon image along with the notification. The user's device will not play a sound or vibrate. 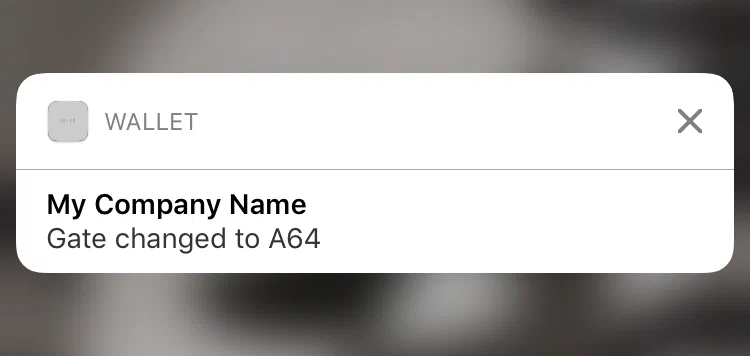 *A pass update notification on a device* The title displayed with a notification is the company name associated with your Wallet account, unless you set a [custom change message title](#change-message-title) for the template. Each field object on an Apple Wallet pass can include an optional *change message* value. A change message is the text that appears in an alert that is displayed when a pass field's value is changed. The change message must include the escape value `%@`, which is replaced by the field value when that value is changed. For example, if you enter the change message `Gate changed to %@` and you later change the field value to `A64`, the alert text would be `Gate changed to A64`. > **Note:** * If you don’t specify a change message, the pass holder isn’t notified when the field value changes. > * Setting a change message will not trigger sending a notification. The notification is triggered when you change the field value. > * When multiple fields with change messages are updated at the same time, we cannot control the processing order. That is handled by Apple. ## Add a Change Message Using the Dashboard 1. Go to *Templates*. 1. Click anywhere in a template's row to see its expanded view. If you have only one template in the project, the initial view is expanded. 1. Click **Edit Design**. 1. Select a field, click **Advanced Options** at the bottom of its configuration pane, then check the box for *Notify the user when this value changes.* 1. Enter the text that you want to appear in the notification, including the placeholder `%@` for the field's new value. > **Important:** A notification will not be triggered if `%@` is not in your change message. 1. Click **Save**. ## Add a Change Message Using the API The following is an example of a pass field that includes an optional change message value using the key `changeMessage`. The value of `changeMessage` is the text that will appear in the notification. The placeholder `%@` for the field's future value is required. When updating a pass, if the specified value is different than what is currently included on the pass, then the change message will be displayed on the user's device. The notification for the sample below would be `The value for this field has changed to New text value`. **Example `fields` object with `changeMessage`** ```json { "fields": { "TextField": { "changeMessage": "The value for this field has changed to %@", "value": "New text value", "label": "Text Field Label" } } } ``` ## Set a Custom Title For Change Messages {#change-message-title} By default, the title of change message notifications for iOS is the company name associated with your Wallet account. In some cases, pass holders may not recognize this name as the issuer of the pass, so you may want to change it. You can set a custom title for change messages by adding a `changeMessageTitle` field to your template. The default value set for the field becomes the new title of change message notifications. To set a custom change message title for your template: 1. Click **Add a Field** or **Add Another Field**. You can place the field anywhere, but we recommended adding it to the back of your pass template so that it is unobtrusive. 1. Enter `changeMessageTitle` for the field ID, and click **Add custom changeMessageTitle field**. 1. Set the Field Type to *Text*. 1. Change the Label Text to `Issuer`. 1. Enter a recognizable sender name for the Default Value. This value will be the title of all change message notifications for passes created from this template. 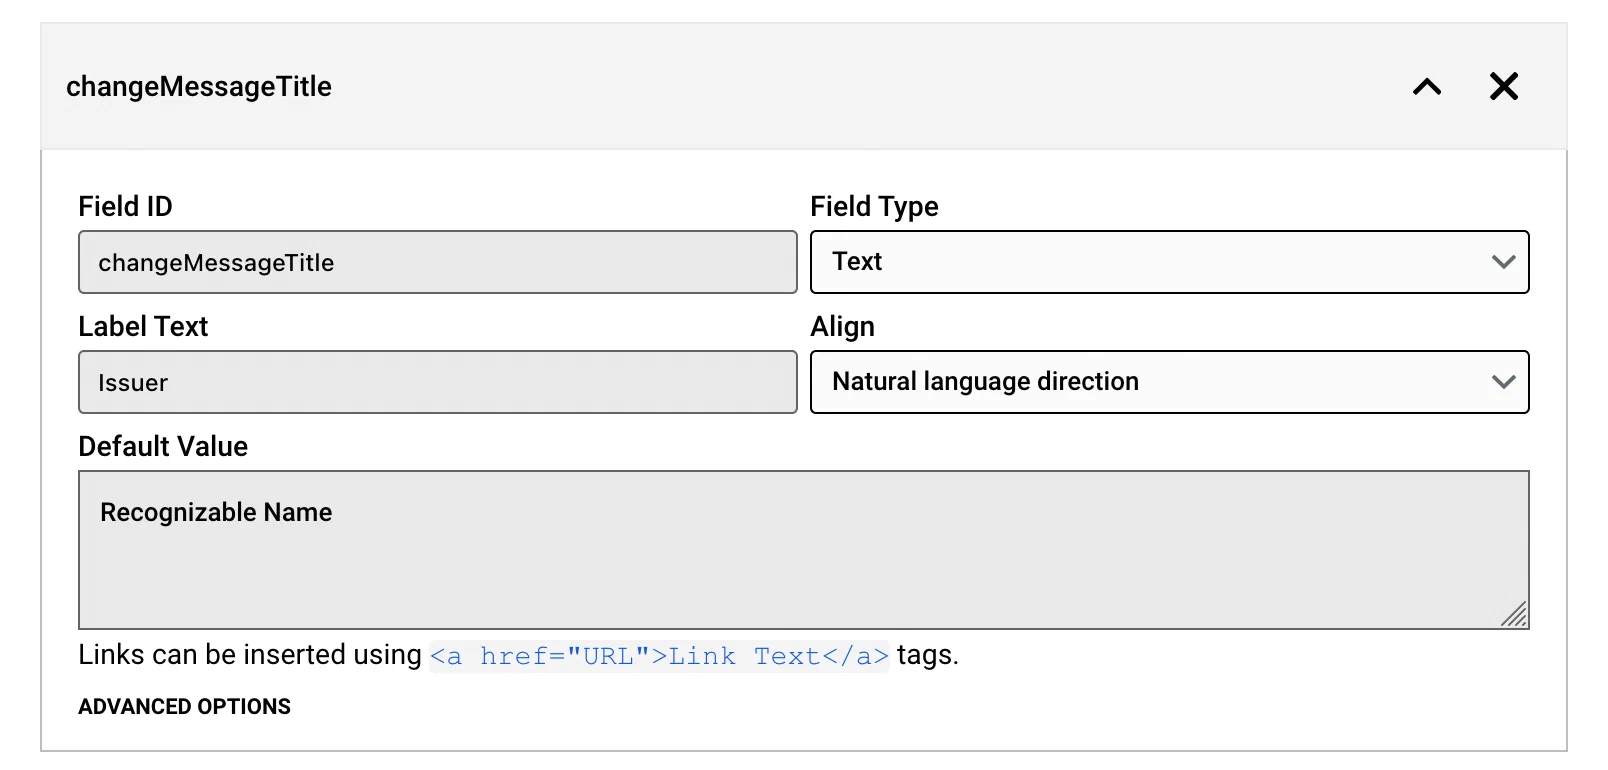 *Setting a custom title for change messages* You can represent the field in the API as a `changeMessageTitle` object in the `fields` object of a template. **Example `fields` object with `changeMessageTitle`** ```json { "fields": { "changeMessageTitle": { "value": "Title for change messages", "label": "Issuer", "fieldType": "back" } } } ``` > **Note:** The `changeMessageTitle` value also appears in the pass preview card that is shown when a pass is shared by Messages or Mail. ## Send a Pass Update Now that you have a change message set, the alerts are handled automatically. After you edit the value of a field in a template and save the changes, you then need to give your pass holders the latest version of the pass, via the [Update Pass API](https://www.airship.com/docs/developer/rest-api/wallet/operations/passes/#updatepass) or by [publishing changes in the dashboard](https://www.airship.com/docs/guides/wallet/user-guide/updating-passes/publish/). > **Note:** Publishing changes only updates fields on the back of a pass. If you intend to send pass updates via Publish, add a `Messages` field to back of the pass template, include a change message, and use the field for your change notifications. ## Best Practices for Change Messages * **Message Length:** Keep your change messages short. The notification will be truncated if it's too long, just like other notifications. If you need to deliver a longer message, consider using [Wallet Push Notifications](https://www.airship.com/docs/guides/wallet/user-guide/notifications/push-notifications/) instead. * **Spam:** Do not change field values frequently. Multiple alerts will likely lead to users removing your pass. * **Wallet Push Notifications:** If you plan on sending promotional, marketing messaging or other general alerts to your users, consider using [Wallet Push Notifications](https://www.airship.com/docs/guides/wallet/user-guide/notifications/push-notifications/) instead. # Location-Based Pass Alerts > Set triggers to make pass-relevant text appear on a user's lock screen based on location, date, or proximity to a beacon. * The user must have already installed the pass for the trigger to function. * See [Mobile Wallet Reference: Location and Date Triggers](https://www.airship.com/docs/guides/wallet/user-guide/reference/#location-and-date-triggers) for available triggers per pass type, requirements, and location radius and date window information. * For Apple specifications, see [Relevance Information Displays Passes on the Lock Screen](https://developer.apple.com/library/archive/documentation/UserExperience/Conceptual/PassKit_PG/Creating.html#//apple_ref/doc/uid/TP40012195-CH4-SW53), including Table 4-2, in the Apple Wallet Developer Guide. * For Google specifications, see [Nearby Notifications](https://developers.google.com/wallet/retail/loyalty-cards/use-cases/trigger-push-notifications#nearby-notifications) in the Google Wallet Developer Guide. ## Add a Relevant Location Trigger Display a shortcut to your pass on the user's screen when the device is in the vicinity of a certain location. The radius around the location where the shortcut appears is determined by the wallet platform and varies by pass type. For instance, Boarding Passes will appear on the lock screen at around 1,000 m, while Coupons will appear at around 100 m. You can add up to ten Relevant Locations per template and per pass. 1. Go to **Triggers**. 1. Click anywhere in a template's row to see its trigger settings in the expanded view. If you have only one template in the project, the initial view is already expanded. 1. Click **Add Triggers** then **Add a Relevant Location**. 1. Enter an *Address*, then click to choose the address from the list of matches that appears. After selecting the address, its GPS coordinates will be listed next to the Location pane's title. 1. (Optional) Enter the *Relevant Text* that will appear on the lock screen when a pass holder is near the location. For example, "Store nearby on 3rd and Main." For Google passes, the *Relevant Text* field is determined by Google, so it is not editable. 1. (Optional) Click **Add Another Location** and continue with your specifications. 1. Click **Save Changes**. Location triggers can be used in combination with [Date/Time Triggers](#add-a-relevant-date-time-trigger). Alternatively, you can define up to 10,000 locations for passes installed from an [Adaptive Link](https://www.airship.com/docs/reference/glossary/#adaptive_link), which will detect the 10 locations nearest the user and associate them with the pass as the location triggers. See the locations array for an [Adaptive Link request](https://www.airship.com/docs/developer/rest-api/wallet/schemas/adaptive-links/#adaptivelinkrequest) in our Wallet API reference. ## Add a Relevant Date/Time Trigger Display a shortcut to your pass on a user's lock screen when the device is in the vicinity of a certain location during a certain date and time. This is handy for certain types of passes that have date and time relevancy, like Events and Boarding Passes. Relevant Date/Time triggers have the following requirements and behaviors: * Relevant Date/Time triggers are supported for Apple Wallet passes only. * The timing when the shortcut appears is determined by the wallet app and varies by pass type. * Relevant Date is not supported for Coupons or Store Cards. * You can use Date and Time without Location for Event passes only. * Once `relevantDate` is added to a template, passes pick it up at create time. You can overwrite the value using the [Create pass](https://www.airship.com/docs/developer/rest-api/wallet/operations/passes/#createpass) or [Update pass](https://www.airship.com/docs/developer/rest-api/wallet/operations/passes/#updatepass) API, or by using query parameters when [generating a pass from an Adaptive Link](https://www.airship.com/docs/developer/rest-api/wallet/operations/adaptive-links/#generatepassfromadaptivelink). 1. Follow the steps above to set up a [Relevant Location trigger](#add-a-relevant-location-trigger). 1. Go back to **Triggers**. 1. Click anywhere in a template's row to see its trigger settings in the expanded view. If you have only one template in the project, the initial view is already expanded. 1. Click **Add Triggers** then **Add a Relevant Time**. 1. Make selections for the *day*, *time*, and *time zone* when you want the pass to display. * **Select a day:** Use the date picker, or enter a date in MM/DD/YYYY format. * **Select a time:** Select a time from dropdown menu, or enter a time in 24-hour notation, e.g., 16:47 for 4:47 p.m. * **Select a time zone:** Select from the dropdown menu. 1. Click **Save Changes**. ## Add a Beacon Trigger Display a lock screen notification with a shortcut to the pass when the device is within the proximity range of a certain [beacon](https://en.wikipedia.org/wiki/IBeacon). You can add up to ten beacons per template. Beacon triggers are supported for Apple Wallet passes only. 1. Go to **Triggers**. 1. Click anywhere in a template's row to see its trigger settings in the expanded view. If you have only one template in the project, the initial view is already expanded. 1. Click **Add Triggers** then **Add a Beacon**. 1. Enter the beacon's *UUID* and the *Relevant Text* that will appear on the lock screen when the pass holder is near the beacon. 1. (Optional) Enter the beacon's *Major* and *Minor* values. 1. (Optional) Click **Add Another Beacon** and continue with your specifications. 1. Click **Save Changes**. ## Edit or Remove a Trigger 1. Go to *Triggers*. 1. Click anywhere in a template's row to see its trigger settings in the expanded view. If you have only one template in the project, the initial view is already expanded. 1. Click a trigger to highlight it, then make your desired changes, or click the X in the upper right corner of its pane to delete it. 1. Click **Save Changes**.