# Creating and distributing pass links
Generate links for your Wallet passes and distribute them to users.
# About Adaptive Links
> {{< glossary_definition "adaptive_link" >}}
After you create a pass template, you then generate URLs for the pass (create pass links) that you distribute to your users. When your audience clicks or taps the link, it displays the viewable pass generated from the template, and the user can then install it on their device. Adaptive Links are the preferred pass distribution method since you can distribute a single link to each recipient instead of needing separate pass URLs for Apple Wallet and Google Wallet.
You can set a limit on the number of passes that can be generated from an Adaptive Link. You can also create [multi-pass Adaptive Links](https://www.airship.com/docs/guides/wallet/user-guide/create-links/api/#creating-multi-pass-adaptive-links) that allow users to install up to 10 related passes at once.
## Link behavior

*An Adaptive Link landing page after installing a pass on iOS*
Adaptive Links behave differently on Android and iOS devices.
On an Android device, the user is redirected to a Google-hosted landing page, which displays a simple preview of the pass to be installed and buttons indicating the install status and deep linking to the pass in the users Google Wallet.
On iOS, the first time a user opens an Adaptive Link, they are prompted to add the pass to the Wallet app. After adding the pass or canceling, Wallet closes, and a landing page displays these elements:
* **Logo image** — The full pass rendering is replaced with its template's logo image laid over its background color. You can customize this to also add the strip image.
* **View prompt** — If the pass was already added to Wallet, selecting this prompt opens the pass in the app. If not added to Wallet, it opens the app's home screen.
* **Add prompt** — Selecting this prompt downloads the pass file and opens it in Wallet with a prompt to add it.
This is the default appearance and behavior for Adaptive Links opened on an iOS device for projects created after April 10, 2025. You can also enable it for older projects and disable it at any time: Go to **Settings**, then **Project Details**, and then toggle the **Adaptive Link Landing Pages** option. When disabled, the landing page displays a blank white screen after adding the pass or canceling.
## Error handling

*The error shown on an Adaptive Link landing page when the link has reached its installation limit*
Error messages display when an Adaptive Link is opened on an unsupported platform, when a device type cannot be detected, a link has expired or reached its installation limit, and other error states.
### Redirecting unsupported platforms
Airship supports Android and iOS only. For unsupported platforms, instead of the default error handling, you can redirect users to a self-hosted landing page where you can provide custom content. For example, if your link is configured for Apple Wallet only, your landing page should include instructions for Android users.
To set up a redirect when creating an Adaptive Link using the API, use ID `null` for the second template, and make sure to include a value for `landingPageUrl`. When creating an Adaptive Link from the dashboard, select **Redirect to a landing page** and enter the URL that the pass link should redirect to.
## Personalization and location
Customize the user experience with these features:
* **URL-encoded pass personalization** — Add query parameters to your links to personalize passes for each user. This can help you leverage your CRM data to populate passes without performing additional API calls. See [Personalizing passes from Adaptive Links](https://www.airship.com/docs/guides/wallet/user-guide/create-links/distribute/#personalizing-passes-from-adaptive-links).
* **Location detection** — Define up to 10,000 locations per Adaptive Link, and a Wallet pass installed from that Adaptive Link will detect the 10 locations nearest the user and associate them with the pass. See the locations array for an [Adaptive Link request](https://www.airship.com/docs/developer/rest-api/wallet/schemas/adaptive-links/#adaptivelinkrequest) in our Wallet API reference.
Make pass-relevant text appear on a user's lock screen based on location or proximity to a beacon. See [Location-based pass alerts](https://www.airship.com/docs/guides/wallet/user-guide/notifications/triggers/).
## Expiration
> **Note:** Adaptive Link expiration is distinct from pass expiration, which determines when a pass will expire from the end user's mobile device wallet. For pass expiration default values and editing options, see [Editing Wallet Pass Expiration](https://www.airship.com/docs/guides/wallet/user-guide/updating-passes/edit-expiration/).
Adaptive Links automatically expire after a period that begins upon creation and ends after a duration determined by its associated pass type:
- Boarding pass: 30 days
- Event ticket: 30 days
- Coupon: 365 days
- Generic: 730 days
- Gift card: 730 days
- Loyalty: 730 days
- Member card: 730 days
This automatic expiration period is known as its time-to-live (TTL). Once the TTL for a link has elapsed, it is considered expired and will no longer generate new passes. After a 90-day grace period, the expired link is deleted permanently.
Creating a pass from an Adaptive Link or updating any part of the link causes its TTL to reset to its initial value. A TTL may be reset this way indefinitely.
Reset example for an Adaptive Link for a Coupon pass created on June 1st:
* The link has an initial TTL of 365 days.
* On June 22nd, a user follows the link to create the first pass. This resets the TTL from 344 days to 365 days.
* On May 1st of the following year, without additional passes created, an API call updates the payload on that link. This resets the TTL from 21 days to 365 days.
You can set a custom expiration date when creating Adaptive Links. Any link configured with a custom expiration date expires on that date regardless of its remaining TTL. This is useful if you want to guarantee a link will not generate any new passes after a specific date.
## Creating Adaptive Links
You can create Adaptive Links using the API or the dashboard. For event tickets and boarding passes, you must use the API.
User guides for each method:
* [Dashboard](https://www.airship.com/docs/guides/wallet/user-guide/create-links/dashboard/)
* [API](https://www.airship.com/docs/guides/wallet/user-guide/create-links/api/)
* [Event tickets](https://www.airship.com/docs/guides/wallet/user-guide/create-links/event-tickets/)
* [Flights and boarding passes](https://www.airship.com/docs/guides/wallet/user-guide/create-links/flights-boarding-passes/)
# Create Adaptive Links using the API
> Use the Airship Wallet API to create and configure Adaptive Links.
> **Note:** You must use the API to create Adaptive Links for event tickets and boarding passes. See:
> * [Adaptive Links for Event Tickets](https://www.airship.com/docs/guides/wallet/user-guide/create-links/event-tickets/#adaptive-links-for-event-tickets)
> * [Adaptive Links for Boarding Passes](https://www.airship.com/docs/guides/wallet/user-guide/create-links/flights-boarding-passes/#adaptive-links-for-boarding-passes)
> **Tip:** You can take advantage of Adaptive Links even when supporting a single platform. If a user on the unsupported platform attempts to install your pass, you can send the user to a landing page.
>
> When creating the Adaptive Link, use ID `null` for the second template, and make sure to include a value for `landingPageUrl`.
## Creating Adaptive Links
You must have at least one Apple Wallet and one Google Wallet template to create an Adaptive Link.
Perform a one-time `POST` API call to
`https://wallet-api.urbanairship.com/v1/links/adaptive`, referring to your
template ID. Sample data
and JSON parameters are below.
For more information, see [Create Adaptive Link](https://www.airship.com/docs/developer/rest-api/wallet/operations/adaptive-links/#createadaptivelink) in the Wallet API reference.
**Create Adaptive Link**
```http
POST /v1/links/adaptive HTTP/1.1
Authorization: Basic
Content-Type: application/json
{
"androidTemplateId": "610213",
"availablePasses": 100000,
"iosTemplateId": "581252",
"isPersonalized": "false",
"landingPageUrl": "https://airship.com",
"locationRadius": 10,
"maxResultLocations": 5,
"locations": [
{
"latitude": 45.5898,
"longitude": -122.5951,
"relevantText": "Welcome to Portland... Voodoo Donuts is near..."
},
{
"latitude": 37.7835926,
"longitude": -122.3982583,
"relevantText": "Hello Airship SF"
}
],
"payload": {
"externalId": null,
"fields": {
"offercode": {
"value": "MJ85SMR"
}
},
"headers": {
"barcodeAltText": {
"value": "MJ85SMR"
},
"barcode_value": {
"value": "MJ85SMR"
}
}
}
}
```
## Creating passes from Adaptive Links using URL query parameters
You can generate passes directly from your Adaptive Link with a `GET` call to `https://wallet-api.urbanairship.com/v1/pass/adaptive/{adaptiveLinkId}`.
Request parameters may be appended to the base URL to add or update values on the generated pass. For some specialized query parameters, see [Generate pass from Adaptive Link](https://www.airship.com/docs/developer/rest-api/wallet/operations/adaptive-links/#generatepassfromadaptivelink) in the Wallet API reference.
In addition to the specialized parameters, you may provide a URL parameter as `fieldName=value` for any field contained in the templates associated with the Adaptive Link. For example, if you wanted to add an offer code, barcode, tags for time zone and location, and a member ID using an external ID, you could append URL query parameters to a base Adaptive Link URL as follows:
```text
https://wallet-api.urbanairship.com/v1/pass/adaptive/QXynXTbMhS?offercode=AUGUST&barcode=A1234567&tags=PST~OR&exid=A1234567
```
> **Note:** You cannot personalize Google Wallet `class` fields with unique values. Any field preceded by `class` constitutes a class field. See [Google Wallet Pass Verticals documentation](https://developers.google.com/pay/passes/guides/overview/basics/about-google-pay-api-for-passes) for a full list of
> class fields for each pass type.
## Creating multi-pass Adaptive Links
Adaptive Links support generating multiple passes from a single URL. Combine passes from multiple templates in different projects, even if they are different pass types, to do things like:
* Provide multiple boarding passes at once for a group of travelers
* Bundle event tickets with parking passes
* Include a coupon with a loyalty card download
First, [create individual Adaptive Links](#creating-the-adaptive-link). Then append up to 10 comma-separated Adaptive Link IDs in this format: `https://wallet-api.urbanairship.com/v1/pass/adaptive?ids={adaptiveLinkId},{adaptiveLinkId},{adaptiveLinkId}`.
**Example multi-pass Adaptive Link URL**
```text
https://wallet-api.urbanairship.com/v1/pass/adaptive?ids=7XRMaSpcEQk,Y0E6EXuTx5i,XGMuDpx2RDs
```
You can distribute the URL to users in the above format. As with any other pass link, you can send multi-pass Adaptive Links to users in numerous ways. See [Distributing Pass Links to your Audience](https://www.airship.com/docs/guides/wallet/user-guide/create-links/distribute/).
You also have the option to use multi-pass URLs in `GET` API calls. Use a `GET` call if you don't want to serve your users an Adaptive Link. Specify a device type in the `GET` URL to request a .pkpass or JSON and stream it to the user from your app or website. See [Generate multiple passes from a single Adaptive Link](https://www.airship.com/docs/developer/rest-api/wallet/operations/adaptive-links/#generatemultipassfromadaptivelink) in the Wallet API reference.
> **Note:** * Multi-pass Adaptive Links do not support query parameters for personalizing passes.
> * An error will be displayed to the end user if a link contains more than 10 Adaptive Link IDs.
> * If a URL contains an invalid, unknown, or mismatched platform, an error will be displayed to the end user. For example, if one ID from an Adaptive Link supports both iOS and Android but another only supports Android, then when a user attempts to download the multi-pass bundle on iOS, the download will not work.
> * If any of the Adaptive Links IDs are expired, the multi-pass link will not work.
> * If there are no available passes remaining for any of the included Adaptive Links, the multi-pass link will not work.
# Create Adaptive Links using the dashboard
> Use the Airship dashboard to create and configure settings for Adaptive Links.
> **Note:** You must use the API to create Adaptive Links for event tickets and boarding passes. See:
> * [Adaptive Links for Event Tickets](https://www.airship.com/docs/guides/wallet/user-guide/create-links/event-tickets/#adaptive-links-for-event-tickets)
> * [Adaptive Links for Boarding Passes](https://www.airship.com/docs/guides/wallet/user-guide/create-links/flights-boarding-passes/#adaptive-links-for-boarding-passes)
You must have at least one Apple Wallet and one Google Wallet template to create an Adaptive Link.
1. Go to *Templates*.
1. Click anywhere in a template's row to see its expanded view, then click
**Create an Adaptive Link**.
1. Enter a descriptive name for the link, then enter a template name or ID and select from the results.
* You only need to enter a name OR specify a template. Both can be edited after saving.
* The name appears in the list of all the template's Adaptive Links. It does not appear to recipients
of the link. If you do not enter a name, it will automatically generate after saving based on the template you select in the next step.
* To change your template selection, select the edit icon (
) and start over.
1. Choose what will happen if the pass is opened in a desktop browser or
undetectable device type rather than a mobile device.
* **Display error on the device** — The device will display:
`{"error":{"code":1004,"message":"Device not supported."}}`.
* **Redirect to a landing page** — Enter the URL that the pass link should redirect to.
> **Important:** If you intend to send the link to web browsers via the Adaptive Link action
> in a message, select *Redirect to a landing page* to ensure that your
> web users do not get an error. See:
>
> * [Actions for App and Web messages](https://www.airship.com/docs/guides/messaging/messages/actions/)
> * [Actions for In-App Experiences](https://www.airship.com/docs/guides/messaging/in-app-experiences/configuration/button-actions/)
> * [Actions in the Interactive editor](https://www.airship.com/docs/guides/messaging/editors/interactive/actions/)
1. Configure options:
* **Personalized** — Determines whether the link generates a new pass each time the Adaptive Link is clicked.
* When **enabled** (box checked), an individual pass URL is generated each time the Adaptive Link is clicked, e.g., 10 clicks = 10 unique passes created.
If you designed the pass templates to use personalized data such as first name, points, or a barcode value, enable this feature.
* When **disabled** (box unchecked), the same pass is returned each time the Adaptive Link is clicked, e.g., 10 clicks = 1 unique pass created.
> **Note:** * In almost all cases, you will want to leave Personalized disabled to ensure only one pass ID exists for each personalized pass.
>
> * When Personalized is disabled, you cannot update an Adaptive Link to update passes generated from the Adaptive Link. Rather, you must [publish template updates](https://www.airship.com/docs/guides/wallet/user-guide/updating-passes/publish/) through the dashboard or using the [Bulk Update API](https://www.airship.com/docs/developer/rest-api/wallet/operations/templates/#updatepassesbytemplate) to push updates to passes generated from the Adaptive Link.
* **Limit available passes** — Enter the number of passes that can be created from the Adaptive Link. When disabled, the number of passes is not limited. A value is required when editing an existing Adaptive Link.
* **Expiration date** — Controls when the link will no longer generate passes. Select a date up to 1,080 days in the future. If left blank, the link remains valid as long as it is [actively in use](https://www.airship.com/docs/guides/wallet/user-guide/create-links/adaptive-links/#expiration).
1. Click **Save**.
# Create pass links using CSV upload
> Format and upload a CSV file to create pass links.
## About CSV upload
To create pass links using CSV upload, your CSV file must be
formatted with columns that match the field layout for your pass template.
After uploading the CSV file in the dashboard, you will receive a link
to download the processed file appended with the pass URLs. You can then distribute the URLs/links to your users.
> **Important:** 1. The CSV upload method does not generate [Adaptive Links](https://www.airship.com/docs/reference/glossary/#adaptive_link).
>
> 1. The URLs returned by the CSV upload are multi-use passes — they
> can be downloaded by multiple devices.
>
> 1. **URLs are Dynamic** — Viewable passes are not generated until the user interacts with the pass
> URL and installs the pass on a device. Due to the dynamic nature of
> pass URLs, keep in mind the following:
> * When a pass is created with specific values, the pass cannot be updated until after it has been installed.
> * If a template is changed before a pass is installed, the pass will have the newest template state.
> * **Caution**: Creating multiple passes with a single external ID will cause any pass after the first one that is installed to fail and send an error message. **Make sure that each pass has a unique external ID**.
## CSV Formatting {#format-csv}
Find the headers you will use for your CSV:
1. Go to *Templates*.
1. Select the template that will serve as the base model for
your passes, then click **Edit Design**.
1. Use the field names as the initial data in your CSV file. The field names
shown in this image are *Tier* and *Tier Name*.

*Field names in the pass template*
Now you can create a CSV file with a header row that specifies field names, followed by rows specifying values for each field name. Each row represents a single pass.
> **Note:** You will be able to map your CSV headers to the correct Field Names after import.
We recommend your CSV file contain no more than 500,000 rows. The CSV file size limit is 250 MB, but there is no limit to the number of passes you can create this way.
In addition to columns specifying each field name, you can also include columns for:
* `barcode_value` : Provide custom barcode values for each pass.
* `externalId` : The external identifier value specifies a user ID in a backend system (e.g. a CRM database) that you can use to map a pass to your data. For example, if a customer receives a pass with an `externalId` value that links to an ID in your backend loyalty system. When your customer makes a purchase that earns loyalty points, you can update his or her pass can with this new data. This field *must* be unique. Airship will not process rows containing duplicate `externalId` values.
Here is the start of a valid CSV file:

*A sample CSV file for batch pass import*
> **Warning:** The only date format accepted for Google templates is YYYY-MM-DD.
## Upload Your CSV and Map Fields
1. Go to the same project and template used when [formatting your CSV](#format-csv).
1. Click **Batch Importer**.
1. Click **Select a .csv file** and choose your file.
1. Matched CSV headers and Field Names will auto-select. Use the dropdown menu
to select the correct Field Name per CSV header, or leave blank if there is
no corresponding Field Name or if you wish to not match to the CSV header,
e.g. a field name matches but you don't want it displayed on the pass.
1. Click **Confirm Mapping** after you have completed mapping each
field.
1. Enter your email address. This defaults to the email address in your
Airship account, but you can enter any valid email address.
1. Click **Process CSV**.
## Pass URLs
When your CSV file has finished uploading/validating, an email confirmation and a
download link will be sent to the provided address.
The validation process will search for errors, and if any are detected, the
email will direct you to the offending line(s). Once your CSV file has finished
uploading/validating, an updated CSV file containing `Pass ID` and
`Download URL` columns will be sent to the given address.

*The updated CSV file with pass download URLs*
Each URL can be used to download the associated pass. The updated file will
also be available via the **Download CSV file** button.
When you receive the processed CSV file, an additional column titled *Download
URL* is added to the file. The URLs in the Download URL column are formatted like so:
```text
https://wallet-api.urbanairship.com/v1/pass/dynamic/2931580989855247863.50827_457a6a69-cea8-4bbe-860a-aba56ee5a269
```
In the above example URL, `2931580989855247863.50827_457a6a69-cea8-4bbe-860a-aba56ee5a269`
is the internal reference ID that you will need when referencing this pass via
the Wallet API.
> **Note:** URLs that are not activated will expire after 6 months.
# Event tickets
> Event tickets in a mobile wallet project are different from most other pass types. This document covers information specific to setting up events and issuing adaptive links for event tickets.
While you can create and modify event ticket templates from the [mobile wallet](https://www.airship.com/docs/guides/wallet/getting-started/wallet/) dashboard,
you must perform all other operations — creating and modifying events, creating [adaptive links](https://www.airship.com/docs/reference/glossary/#adaptive_link) with event and attendee information, etc. — through the API. See the [Events
API](https://www.airship.com/docs/developer/rest-api/wallet/operations/events/)
and [Multiple Adaptive Links APIs](https://www.airship.com/docs/developer/rest-api/wallet/operations/adaptive-links/#createboardingpassoreventticketadaptivelinks) for a complete
reference of methods
and payloads.
## Event Ticket Composition
An event ticket is an [Adaptive Link](https://www.airship.com/docs/reference/glossary/#adaptive_link) that references an event ticket template populated with one or more events and an array of attendees per ticket.
Because of the specific event and attendee information required for each
event ticket, you cannot create event tickets using the standard dashboard or
`/links/adaptive` methods. You must use the `/links/adaptive/multiple/project`
endpoint instead.
An event ticket works like a standard adaptive link, with the following
differences.
1. Event ticket templates are referenced by ID. You must provide at least one iOS or Android template ID in the adaptive link payload.
1. The adaptive link payload references an `eventId`, `eventExternalId`, or contains a complete [event object](https://www.airship.com/docs/developer/rest-api/wallet/schemas/event-tickets/#eventrequest).
1. Each event in an event ticket adaptive link request includes an array of `attendees`. The endpoint generates an adaptive link for each attendee.
1. Assets referenced by ID (templates, events, etc.) must belong to the same
project; you cannot specify events or templates belonging to different
projects when creating an event ticket.
## Events
An *Event* is the part of an event ticket representing the venue and times of an event. You can make changes to an event to easily update passes for attendees. You can create events either:
* Using the `POST` method for the `/events` endpoint.
* By providing an event payload when creating adaptive links.
In both cases, the result of your request is an `eventId` or `eventExternalId`that
you can use to reference the event. After you create an event, you can modify it
from the `/events` endpoint. Any changes you make — moving the venue, pushing back
event times, etc. — automatically propagate to event tickets (adaptive links) that
reference the event.
The example below represents a single baseball game that you can use when generating tickets for attendees. You can edit the event to update the passes of all attendees.
**Event request example**
```http
POST /v1/events/project//id/ HTTP/1.1
Authorization: Basic
Content-Type: application/json
{
"fields": {
"eventName": {
"label": "Event",
"value": "LA Dodgers at SF Giants"
},
"venueTitle": {
"label": "Venue",
"value": "AT&T Park"
},
"venueAddress": {
"label": "Address",
"value": "24 Willie Mays Plaza\nSan Francisco, CA 94107"
},
"doorsOpen": {
"label": "Doors Open",
"value": "2019-09-25T08:35:00"
},
"startTime": {
"label": "Start Time",
"value": "2019-09-25T09:00:00"
},
"endTime": {
"label": "End Time",
"value": "2019-09-25T11:00:00"
}
},
"passGroups": ["giants_2019-09-25"]
}
```
### External IDs for Events
You can create an event with a custom identifier using the
`/v1/events/project/id/{projectExternalId}/id/{eventExternalId}` endpoint or by providing an `eventExternalId`
when you provide an event object as a part of an adaptive link request. A request
specifying an external event ID returns the custom identifier as `eventExternalId`,
which you can use to reference events in lieu of the
standard `eventId` in subsequent payloads, including the request to create event ticket
adaptive links.
### Pass Groups for Events {#pass-groups}
You can group events together, so that you can modify multiple events simultaneously — something you might need to do for multiple events at the same venue, e.g., a concert with a backstage pass, baseball game with a pre-game or field-level event, etc.
To do this, you can assign [events](https://www.airship.com/docs/reference/glossary/#wallet_event) to `passGroups` — plain text strings, similar to tags for passes. You can assign pass groups in any payload where you create an event or after you create an event using `/passgroups` endpoints.
**Add a pass group to an existing event with an external ID**
```http
POST /v1/events/project/id//id//passGroups HTTP/1.1
Authorization: Basic
Content-Type: application/json
{
"passGroups": [
"giants_2019-09-25"
]
}
```
You can get a list of, or modify, all the events belonging to a `passGroup`. When you modify a pass group, you only need to provide the individual fields that you want to update for all events in the pass group. Any passes generated from events in the group are automatically updated accordingly.
**Update all events in a pass group**
```http
PUT /v1/events/project/12345/passGroups/giants_2019-09-25 HTTP/1.1
Authorization: Basic
Content-Type: application/json
{
"fields": {
"venueTitle": {
"value": "Oracle Park"
}
}
}
```
## Attendees
The `attendees` array represents pass holders. Each object in the array represents an individual attendee and results in an individual adaptive link.
The `attendees` array appears within an event object when creating
event ticket adaptive links.
**Example event ticket with attendee array**
```json
{
"iosTemplateExternalId": "giantsBaseballTicket-ios",
"androidTemplateExternalId": "giantsBaseballTicket-android",
"payload":{
"events":[
{
"eventExternalId": "dodgersAtGiants-2019-09-25",
"attendees":[
{
"adaptiveLinkExternalId": "",
"fields":{
"ticketHolderName": { "label": "Name", "value":"SMITH/JOE" },
"seat": { "value":"33" },
"ticketType": { "value":"VIP" },
"barcode_value": { "value": "1234" },
"barcodeAltText": { "value": "1234" },
"faceValue": { "value": "50" }
}
}
]
}
]
}
}
```
## Google Wallet Event Ticket Templates
Event ticket templates are not as customizable as other template types. Many
of the fields on an event ticket adaptive link are required and cannot be moved
or customized in any way.
You can set colors, logos, and otherwise customize the general feel of your
event tickets. But event tickets templates take a defined set of information
(from both `events` and `attendees`) and do not offer as much variance as other
pass types that take a wider and more customizable range of information.
In the dashboard template editor, you can provide sample event data to test the look
and feel of your pass. The event data you fill out in the template editor is purely
an example to help you visualize your event ticket. It is not saved as an event or
used when creating event tickets.
> **Important:** The event information you enter when creating your template is only to help you design your template and send test passes; it is overwritten by a [event object](https://www.airship.com/docs/developer/rest-api/wallet/schemas/event-tickets/#eventrequest) when you create event tickets. See the [Event Ticket Request object](https://www.airship.com/docs/developer/rest-api/wallet/schemas/event-tickets/#eventticketrequest) for information about the event object or ID you must provide when creating passes.
> **Note:** In general, you should set
> set `ignoresTimeZone: true` for template fields that take date-time values. Event
> dates and times are typically UTC local to the venue;
> setting `ignoresTimeZone: true` prevents Apple Wallet from modifying times
> based on the time zones of attendees' devices.
## Apple Wallet Event Ticket Templates
While `event` and `attendee` fields are native to Google Wallet templates, they are not native to Apple Wallet templates. You must name fields on your Apple Wallet template according to the `event` and `attendee` schemas to support event ticket adaptive links. See [Event Ticket Objects](https://www.airship.com/docs/developer/rest-api/wallet/schemas/event-tickets/) for a complete list of the field names your template should use.
* If you create your Apple Wallet event ticket template through the **dashboard**, you must rename fields on your template to match `event` and `attendee` object fields through the API.
* If you create your Apple Wallet event ticket template through the **API**, you must name fields identically to `event` and `attendee` objects.
**Example default Apple Wallet field names and supported event ticket equivalents:**
| Default field name | Rename field to |
|--------------------|-------------------------------------|
| `Seat` | `seat` |
| `Row` | `row` |
| `Vendor Name` | `venueTitle` |
| `Section` | `section` |
| `Ticket Details` | `finePrint`
| `Location` | `venueAddress` |
> **Important:** The event information you enter when creating your template is only to help you design your template and send test passes; it is overwritten by a [event object](https://www.airship.com/docs/developer/rest-api/wallet/schemas/event-tickets/#eventrequest) when you create event tickets. See the [Event Ticket Request object](https://www.airship.com/docs/developer/rest-api/wallet/schemas/event-tickets/#eventticketrequest) for information about the event object or ID you must provide when creating passes.
## Adaptive Links for Event Tickets
Event ticket adaptive links are adaptive link that generate or
return platform-appropriate passes of the `eventTicket` type. They are created from
event ticket templates and associated with `events` and `attendees`.
> **Note:** You must use the `/links/adaptive/multiple/project/` endpoint to create event tickets.
> While event ticket adaptive links have a similar request structure to other
> adaptive links, you cannot create event tickets through the standard
> `/links/adaptive` endpoint.
When you create an event ticket adaptive link, you can specify events by `eventId` (returned when creating an event), or you can create the event as
a part of the adaptive link request. Creating an event as a part of an adaptive link
request is the same as creating an event ticket through the `/events` endpoint: the
adaptive link response will return an `eventId` or `eventExternalId` that you can
use to reference or modify the event later on.
> **Note:** Templates and events in an adaptive link payload must belong to the same
> project.
Within each event, you will specify `attendees` — an array of objects, each
object representing an individual event ticket holder. In general, you should
set an `adaptiveLinkExternalId` for each attendee. You will modify event
ticket adaptive links with a `POST` to the `/v1/links/adaptive/multiple/id/{adaptiveLinkExternalId}`
endpoint; you cannot modify an event with an `adaptiveLinkId`
in the same way.
**Example adaptive link request**
```http
POST /v1/links/adaptive/multiple/project/id/ HTTP/1.1
Authorization: Basic
Content-Type: application/json
{
"iosTemplateExternalId": "",
"androidTemplateExternalId": "",
"payload":{
"events":[
{
"eventExternalId": "",
"fields":{
"eventName": { "value":"LA Dodgers at SF Giants" },
"venueTitle": { "value":"AT&T Park" },
"venueAddress": { "label": "Address", "value":"24 Willie Mays Plaza\nSan Francisco, CA 94107" },
"doorsOpen": { "label": "Doors Open", "value":"2019-09-25T08:35:00" },
"startTime": { "label": "Start Time", "value":"2019-09-25T09:00:00" },
"endTime": { "label": "End Time", "value":"2019-09-25T11:00:00" }
},
"attendees":[
{
"adaptiveLinkExternalId": "",
"fields":{
"ticketHolderName": { "label": "Name", "value":"SMITH/JOE" },
"seat": { "value":"33" },
"ticketType": { "value":"VIP" },
"barcode_value": { "value": "1234" },
"barcodeAltText": { "value": "1234" },
"faceValue": { "value": "50" }
}
},
{
"adaptiveLinkExternalId": "",
"fields":{
"ticketHolderName": { "label": "Name", "value":"SMITH/SALLY" },
"seat": { "value":"34" },
"ticketType": { "value":"VIP" },
"barcode_value": { "value": "1235" },
"barcodeAltText": { "value": "1235" },
"faceValue": { "value": "50" }
}
}
]
}
]
}
}
```
**Adaptive link response**
```http
HTTP/1.1 200 OK
Content-Type: application/json; charset=utf-8
[
{
"adaptiveLinkId": "",
"adaptiveLinkExternalId": "",
"iosTemplateId": "iosTemplateId>",
"iosTemplateExternalId": "",
"androidTemplateId": "",
"androidTemplateExternalId": "",
"eventId": 476,
"eventExternalId": "",
"url": "https://wallet-api.urbanairship.com/v1/pass/",
"iosUrl": "https://wallet-api.urbanairship.com/v1/pass//ios",
"androidUrl": "https://wallet-api.urbanairship.com/v1/pass//android",
"createdAt": "2018-09-24T09:12:32Z",
"updatedAt": "2018-09-24T09:15:32Z",
"isPersonalized": "false",
"availablePasses": 1000000,
"iosPassLinkId": "a5711a29-7b38-41f2-8202-8f792df89b0b",
"androidPassLinkId": "c1f512e5-fda3-4ddf-82c6-066c5681161d",
"status": 200
},
{
"adaptiveLinkId": "",
"adaptiveLinkExternalId": "",
"iosTemplateId": "iosTemplateId>",
"iosTemplateExternalId": "",
"androidTemplateId": "",
"androidTemplateExternalId": "",
"eventId": 476,
"eventExternalId": "",
"url": "https://wallet-api.urbanairship.com/v1/pass/",
"iosUrl": "https://wallet-api.urbanairship.com/v1/pass//ios",
"androidUrl": "https://wallet-api.urbanairship.com/v1/pass//android",
"createdAt": "2018-09-24T09:12:32Z",
"updatedAt": "2018-09-24T09:15:32Z",
"isPersonalized": "false",
"availablePasses": 1000000,
"iosPassLinkId": "a5711a29-7b38-41f2-8202-8f792df89b0b",
"androidPassLinkId": "c1f512e5-fda3-4ddf-82c6-066c5681161d",
"status": 200
},
]
```
## Modifying Events
Any endpoint you can provide an event payload to returns an `eventId`. You can
look up, modify, or delete an event using its ID in the path of the `/v1/events`
endpoint, regardless of whether you created the event using the `/v1/events` endpoint or provided all event information directly in an adaptive link payload.
If you assigned your events to [Pass Groups](https://www.airship.com/docs/reference/glossary/#pass_groups), you can target the pass group to modify a common field across multiple events in a group. For example, if you need to update `venueTitle` for a group of events, you could target the group and with a single update rather than updating each flight individually. When you update events in a pass group, event tickets associated with events in the group are updated accordingly.
**Modify all events belonging to a pass group**
```http
PUT /v1/events/project/12345/passGroups/giants_2019-09-25 HTTP/1.1
Authorization: Basic
Content-Type: application/json
{
"fields": {
"venueTitle": {
"value": "Oracle Park"
}
}
}
```
You can also modify an event while modifying corresponding event tickets, using a `POST` to `/v1/links/adaptive/multiple/project/id/{externalProjectId}`, specifying an existing event and existing `adaptiveLinkExternalId` values for the tickets you want to modify in the payload.
## Modifying, Looking-up, and Deleting Event Tickets
Each attendee represents receives their own event ticket adaptive link. You can modify
event ticket adaptive links using a POST to `/v1/links/adaptive/multiple/project/id/{externalProjectId}`, specifying an existing event and `adaptiveLinkExternalId` value for each event ticket you want to modify in the payload; Airship treats this call as a `PUT` and updates event tickets for the specified adaptive links. You cannot do the
same with the standard `adaptiveLinkId`. Therefore, you should expect to set external
IDs for your adaptive links.
You can look up and delete event ticket adaptive links using the standard GET and
DELETE methods for the `/v1/links/adaptive/{adaptiveLinkId}` and `/v1/links/adaptive/id/{adaptiveLinkExternalId}` endpoints.
# Flights and boarding passes
> Set up flights and boarding passes using Adaptive Links.
Managing boarding passes in a wallet project
involves some unique differences from other pass types. This document covers
information about flights, passengers, and boarding passes.
> **Note:** While you can create and modify boarding pass templates from the dashboard,
> all other operations — flight creation, creating adaptive links with flight and passenger information, etc. — are performed through the API.
## Boarding Pass Composition
A boarding pass is an [Adaptive Link](https://www.airship.com/docs/reference/glossary/#adaptive_link) that references a
boarding pass template, populated with one or more flights and one or more
passengers per flight.
While boarding passes resemble adaptive links for other pass types, you cannot create
a boarding pass using the standard dashboard or `/links/adaptive`
methods. You must use the `/links/adaptive/multiple/project` endpoints instead.
A boarding pass works much like a standard adaptive link, with the following differences.
* Boarding pass templates are referenced by ID. You must include at least one of `iosTemplate` or `googleTemplate` (or external ID equivalents `iosTemplateExternalId`, `androidTemplateExternalId`) in an adaptive link payload.
* The adaptive link payload references a `flightId`, `flightExternalId`, or contains a complete [flight object](https://www.airship.com/docs/developer/rest-api/wallet/schemas/flights-and-boarding-passes/#flightrequest).
* Each flight in a boarding pass adaptive link request includes an array of `passengers`. The request generates an adaptive link for each passenger in the array.
* Assets referenced by ID (templates, flights, etc.) must belong to the same project; you cannot use combinations of flights or templates across projects to create a boarding pass.
## Flights
You can create flights either:
* Using the `POST` method for the `/flights` endpoint. The `/flights` endpoint is a convenient way to create and modify flight information, independent of adaptive links and pass holders.
* By providing a flight payload when creating adaptive links.
In both cases, the result of your request is a `flightId` or `flightExternalId`that
you can use to reference the event — either to create boarding passes or to modify flight information from the `/flights` endpoint.
Any changes you make to an flight — moving the gate, changing departure or arrival times, etc. — automatically propagate to boarding passes (adaptive links) that
reference the flight.
**Flight request example**
```http
POST /v1/flights/project/ HTTP/1.1
Authorization: Basic
Content-Type: application/json
{
"fields": {
"flightNumber": {
"value": "815"
},
"airlineCode": {
"value": "OA"
},
"airlineName": {
"value": "Sabine Airlines"
},
"departureAirport": {
"label": "San Francisco",
"value": "SFO"
},
"departureGate": {
"label": "Gate #",
"value": "25"
},
"boardingTime": {
"value": "2018-07-30T08:35:00"
},
"departureTime": {
"value": "2018-07-30T09:00:00"
},
"arrivalAirport": {
"label": "Portland",
"value": "PDX"
},
"arrivalTime": {
"value": "2018-07-30T11:00:00"
},
"flightStatus": {
"value": "scheduled"
}
},
"passGroups": [
"sfo-pdx-20180730"
]
}
```
### External IDs for Flights
You can create a flight with a custom identifier using the `/v1/flights/project/id/{projectExternalId}/id/{flightExternalId}`
endpoint. A request specifying an external
flight ID returns the custom identifier as `flightExternalId`, and you reference flights
using this external identifier in lieu of the standard `flightId` in subsequent payloads,
including the request to create boarding pass adaptive links.
### Pass Groups for Flights and Boarding Passes {#pass-groups}
You can group flights together, so that you can modify multiple flights simultaneously — something you might need to do for flights with multiple stops.
To do this, you can assign flights to `passGroups` — plain text strings, similar to tags for passes. You can assign pass groups in any payload where you create a flight or after you create a flight using `/passgroups` endpoints.
**Add a pass group to an existing flight with an external ID**
```http
POST /v1/flights/project/id//id//passGroups HTTP/1.1
Authorization: Basic
Content-Type: application/json
{
"passGroups" :["sfo-pdx-20180730", "pdx-yvr-20180730"]
}
```
You can then return a list of all flights bearing the `passGroup` string, or modify the group. When you modify a pass group, you only need to provide the individual fields that you want to update for all flights in the pass group. Any passes generated from flights in the group are automatically updated accordingly.
**Update all flights in a pass group**
```http
PUT /v1/flights/project/12345/passGroups/sfo-pdx-20180730 HTTP/1.1
Authorization: Basic
Content-Type: application/json
{
"fields": {
"departureTime": {
"value": "2018-08-30T10:00:00"
}
}
}
```
## Passengers
The `passengers` array represents pass holders. Each object in the array is an individual pass holder and results in adaptive link. The `passengers` array appears within a flight object when creating boarding passes.
**Example boarding pass request with an array of passengers**
```http
POST /v1/links/adaptive/multiple/project/ HTTP/1.1
Authorization: Basic
Content-Type: application/json
{
"iosTemplateExternalId": "boardingPass-ios",
"androidTemplateExternalId": "boardingPass-android",
"payload":{
"flights":[
{
"flightExternalId": "sfo-tac-2018-08-30",
"passengers": [
{
"fields": {
"passengerName": { "value": "SMITH/JOE" },
"seatNumber": { "value": "13A" },
"seatClass": { "value": "Economy" },
"boardingGroup": { "value": "5" },
"securityProgram": { "value": "tsaPrecheck" },
"confirmationCode": { "value": "E4583B" },
"eticketNumber": { "value": "20595923485" },
"frequentFlyerProgramName": { "value": "Rapid Rewards®" },
"frequentFlyerNumber": { "value": "34525" },
"drinkCoupon": { "label": "Drink Coupon", "value": "Premium Drink" },
"fareType": { "label": "Fare Type", "value": "Business Select" },
"specialAssistance": { "label": "Special Assistance", "value": "Wheelchair" }
}
}
]
}
]
}
}
```
## Google Wallet Boarding Pass Templates
Google boarding pass templates are not as customizable as other template types. Many
of the fields on a boarding pass are required, like seat number, gate number,
etc. These fields cannot have default values, nor can they be moved or
customized in any way.

*The boarding pass template in the dashboard*
You can set colors, logos, and otherwise customize the general feel of your
boarding pass. But with boarding passes, more so than other pass types, you
will focus less on templates, and much more on modifying the information that
populates adaptive links built from those templates.
> **Important:** The flight information you enter when creating your template is only to help you design your template and send test passes; it is overwritten by a [flight object](https://www.airship.com/docs/developer/rest-api/wallet/schemas/flights-and-boarding-passes/#flightrequest) when you create boarding passes. See the [Boarding Pass Request object](https://www.airship.com/docs/developer/rest-api/wallet/schemas/flights-and-boarding-passes/#boardingpassrequest) for information about the flight object or ID you must provide when creating passes.
> **Note:** The Google Wallet boarding pass type supports airline boarding passes only. It does not support ferry, bus, or train tickets.
## Apple Wallet Boarding Pass Templates
While `flight` and `passenger` fields are native to Google Wallet templates, they are not native to Apple Wallet templates. You must name fields on your Apple Wallet template according to the `flight` and `passenger` schemas to support event ticket adaptive links. See [Flight and Boarding Pass Objects](https://www.airship.com/docs/developer/rest-api/wallet/schemas/flights-and-boarding-passes/) for a complete list of the field names your template should use.
* If you create your Apple Wallet Boarding Pass template through the dashboard: you must rename fields on your template to match `flight` and `passenger` object fields through the API.
* If you create your Apple Wallet Boarding Pass template through the API: you must name fields identically to `flight` and `passenger` objects.
> **Important:** The flight information you enter when creating your template is only to help you design your template and send test passes; it is overwritten by a [flight object](https://www.airship.com/docs/developer/rest-api/wallet/schemas/flights-and-boarding-passes/#flightrequest) when you create boarding passes. See the [Boarding Pass Request object](https://www.airship.com/docs/developer/rest-api/wallet/schemas/flights-and-boarding-passes/#boardingpassrequest) for information about the flight object or ID you must provide when creating passes.
> **Note:** For date-time fields on iOS boarding pass templates, you may want to set
> set `ignoresTimeZone: true`. Date-times for flights are set local to an airport terminal.
> Setting `ignoresTimeZone: true` prevents Apple Wallet from modifying times based on
> recipients' time zones.
**Example default Apple Wallet field names and supported boarding pass equivalents**
| Default field name | Rename field to |
|--------------------|-------------------------------------|
| `Seat` | `seatNumber` |
| `Depart Time` | `departureTime` |
| `Departure Airport` | `departureAirport` |
| `Class` | `seatClass` |
| `Arrival Airport` | `arrivalAirport` |
| `Passenger` | `passengerName` |
| `Ticket #` | `eticketNumber` |
| `Terminal Gate` | `departureTerminal` |
| `Flight #` | `flightNumber` |
## Adaptive Links for Boarding Passes
A boarding pass adaptive link is an adaptive link that generates or returns
platform-appropriate passes of the boarding pass type. It is created from
boarding pass templates and associated with `flights` and `passengers`.
> **Note:** You must use the `/links/adaptive/multiple/project/` endpoint to create boarding
> passes. While a boarding pass adaptive link has a similar request structure to other
> adaptive links, you cannot create boarding pass adaptive links through the standard
> `/links/adaptive` endpoint.
When you create an adaptive link, you can specify flights by `flightId` — the
identifier from a successful POST to the `/flights` endpoint. Templates and flights
referenced by ID must belong to the same project.
Within each flight, you will specify `passengers` — an array of objects, each
object representing an individual passenger with information like their
seat number, boarding group, etc.
**Example adaptive link request**
```http
POST /v1/links/adaptive/multiple/project/id/ HTTP/1.1
Authorization: Basic
Content-Type: application/json
{
"availablePasses": 1,
"iosTemplateExternalId": "",
"androidTemplateExternalId": "",
"payload": {
"isEventTicketUpdatePermitted": false,
"flights": [
{
"flightId": "",
"passengers": [
{
"adaptiveLinkExternalId": "",
"fields": {
"seatNumber": { "value": "13A" },
"confirmationCode": { "value": "E4583B" },
"passengerName": { "value": "SMITH/JOE" },
"specialAssistance": { "label": "Special Assistance", "value": "Wheelchair" }
}
},
{
"adaptiveLinkExternalId": "",
"fields": {
"seatNumber": { "value": "13B" },
"confirmationCode": { "value": "E4583B" },
"passengerName": { "value": "SMITH/SALLY" }
}
},
{
"adaptiveLinkExternalId": "",
"fields": {
"seatNumber": { "value": "13C" },
"confirmationCode": { "value": "E4583B" },
"passengerName": { "value": "SMITH/SAM" }
}
}
]
}
]
}
}
```
**Adaptive link response**
```http
HTTP/1.1 201 Created
Content-Type: application/json; charset=utf-8
[
{
"status": 201,
"adaptiveLinkId": "",
"adaptiveLinkExternalId": "",
"iosTemplateId": "",
"iosTemplateExternalId": "",
"androidTemplateId": "",
"androidTemplateExternalId": "",
"url": "https://wallet-api.urbanairship.com/v1/pass/",
"iosUrl": "https://wallet-api.urbanairship.com/v1/pass//ios",
"androidUrl": "https://wallet-api.urbanairship.com/v1/pass//android",
"createdAt": "2018-07-05T09:12:32Z",
"updatedAt": "2018-07-05T09:12:32Z",
"isPersonalized": "false",
"availablePasses": 1000000,
"flightId": 465,
"flightExternalId": "",
"iosPassLinkId": "eb94e8e0-4353-4e0b-bfe9-cfd21c52a540",
"androidPassLinkId": "41c1ea48-f469-4968-b610-a98629ea19bc"
}
]
```
## Modifying Flights and Passengers
Any endpoint supporting a `flight` payload will return a `flightId`. You can
look up, modify, or delete a flight using this ID in the path of the `/v1/flights`
endpoint, regardless of whether you created the flight using the `/v1/flights` endpoint or provided all flight information directly in an adaptive link payload.
If you assigned your flights to [Pass Groups](https://www.airship.com/docs/reference/glossary/#pass_groups), you can target the pass group to modify a common field across multiple flights in a group. For example, if you need to update `departureTime` for a group of flights, you could target the group and with a single update rather than updating each flight individually. When you update flights in a pass group, boarding passes associated with flights in the group are all updated accordingly.
**Modify all flights belonging to a pass group**
```http
PUT /v1/flights/project/12345/passGroups/sfo-pdx-20180730 HTTP/1.1
Authorization: Basic
Content-Type: application/json
{
"fields": {
"departureTime": {
"value": "2018-08-30T10:00:00"
}
}
}
```
Passenger objects exist on adaptive links (boarding passes). If you want to modify
passengers on a flight (if a passenger moves seats, or cancels their ticket), you
will do so by modifying adaptive links directly.
You can also modify a flight at the same time you modify corresponding boarding passes, using a `POST` to `/v1/links/adaptive/multiple/project/id/{externalProjectId}`
specifying both an existing flight and the existing `adaptiveLinkExternalId` for the boarding passes you want to modify in the payload
## Modifying, Looking-up, and Deleting Boarding Passes
You can modify boarding passes using a POST to `/v1/links/adaptive/multiple/project/id/{externalProjectId}`
specifying both an existing flight and the existing `adaptiveLinkExternalId` for the boarding passes you want to modify in the payload; Airship treats this call as a `PUT` and updates boarding passes for the specified adaptive links. You cannot do the
same with standard `adaptiveLinkId`. Therefore, you should expect to set external
IDs for your adaptive links.
You can look up and delete boarding pass adaptive links using the standard GET and
DELETE methods for the `/v1/links/adaptive/{adaptiveLinkId}` and `/v1/links/adaptive/id/{adaptiveLinkExternalId}`
endpoints.
**Update the seat number for a passenger to 25A**
```http
POST /v1/links/adaptive/multiple/project/7341 HTTP/1.1
Authorization: Basic
Content-Type: application/json
{
"iosTemplateId": 140633,
"androidTemplateId": 122802,
"projectId": 7341,
"payload": {
"flights": [
{
"flightId": 17385,
"passengers": [
{
"adaptiveLinkExternalId": "test_user-1011",
"fields": { "seatNumber": {"value": "25A"} }
}
]
}
]
}
}
```
## Related Links
> * [Wallet API: Flights](https://www.airship.com/docs/developer/rest-api/wallet/operations/flights/)
> * [Wallet API: Adaptive Links for Boarding Passes](https://www.airship.com/docs/developer/rest-api/wallet/operations/adaptive-links/#createboardingpassoreventticketadaptivelinks)
# Distributing Pass Links to your Audience
> You can send a pass link to a user via an app, email, SMS, or any other medium.
You can distribute pass URLs over any channel you use to communicate with your audience.
It's important to remember that you are sending a link to generate and install a pass on the device, not an
attachment to a message body. You should send adaptive links over a medium that you
expect to persist, in case your users decide to dismiss a notification alert and install the pass later.
If you are also an Airship messaging customer, you can include an adaptive link in your message. The way your audience uses an adaptive link depends on your message type:
* When the user taps or clicks the notification.
* When the user taps a button in the message.
* Include the link in the body of the message.
While you can include a pass link in the body of a message sent to **any channel**, you can configure messages you send to apps or web browsers to open the pass link based on a user interaction.
* **Push Notifications and In-App Messages:** When creating your message, choose the action that occurs when a user clicks or taps the message. Select either the *Web Page* action and paste the pass link, or the *Adaptive Link* action and select an adaptive link from the list.
* **In-App Automation:** Choose what action occurs when a user taps a button in your message and associate the pass link with the button.
Apple Wallet passes have an additional option: when the user taps your notification, your app will open and prompt the user to view or add the pass.
* Add the Airship In-App Wallet Action to your app.
* When creating a push notification or in-app message in the dashboard, add the pass link in a *Custom Key*.
Caveats for Google Wallet and Apple Wallet pass links are noted below. You can also distribute an [Adaptive Link](https://www.airship.com/docs/reference/glossary/#adaptive_link) instead.
* **Apple Wallet:** When the user clicks a pass link, the device’s default browser will open the link and render the pass, and the user may then save the pass to the device's Wallet app.
* **Google Wallet:** When the user clicks the pass link, the device’s Google Wallet app will open the link, and the user may then save the pass.
### Single- vs Multi-Use Public URL
When generating a pass via the
API, you can
create a publicly accessible URL for the pass, hosted at
https://wallet-api.urbanairship.com. The Public URL can be either a single
or multiple (multi-use) pass type, referring to the number of times the pass
can be be downloaded.
-
Use the Single option if you are creating a unique pass. A Single Public
URL can only be downloaded once, but the user can share the pass from the
Apple Wallet directly.
-
Use the Multiple option if the pass is non-unique and can be downloaded
by multiple devices and shared many times.
> **Important:** A public URL is required for Android and optional for iOS.
> **Note:** The URLs returned by the [CSV Batch Importer](https://www.airship.com/docs/guides/wallet/user-guide/create-links/csv-batch-import/)
> are multi-use passes — they can be downloaded by multiple devices.
### Apple vs Google URL Differences
From the user’s perspective, the pass installation experience is similar on either iOS
or Android — the pass is ultimately downloaded directly to either the Apple Wallet or
Google Wallet app. However, there are differences between the pass URLs:
-
Apple Wallet: Pass URLs generated from Apple Wallet templates point to
a stored .pkpass file. A .pkpass file can be considered similar to a PDF or
any other document that you might link to.
-
Google Wallet: Pass URLs generated from Google Wallet templates provide a
deep link from Google into the Google Wallet app so that the pass can be
downloaded directly without requiring a browser window to facilitate the
request.
For additional detail about the publicUrl object and pass deep linking, see:
API: Passes.
### Push Notification or In-App Message
Configuration steps vary between composers, but the *Content* steps for push notifications and in-app messages have the same relevant options. Refer to the [Airship composers](https://www.airship.com/docs/guides/getting-started/ui/composer-navigation/) guide for full documentation.
1. In the *Content* step of a composer, enter your message text and select either:
* [Web Page](https://www.airship.com/docs/guides/messaging/messages/actions/) action and paste your pass link.
* [Adaptive Link action](https://www.airship.com/docs/guides/messaging/messages/actions/) action and select from the dropdown menu.
> **Note:** Only adaptive links created in the dashboard will appear in the dropdown list.
1. Complete the remaining steps in the composer setup.

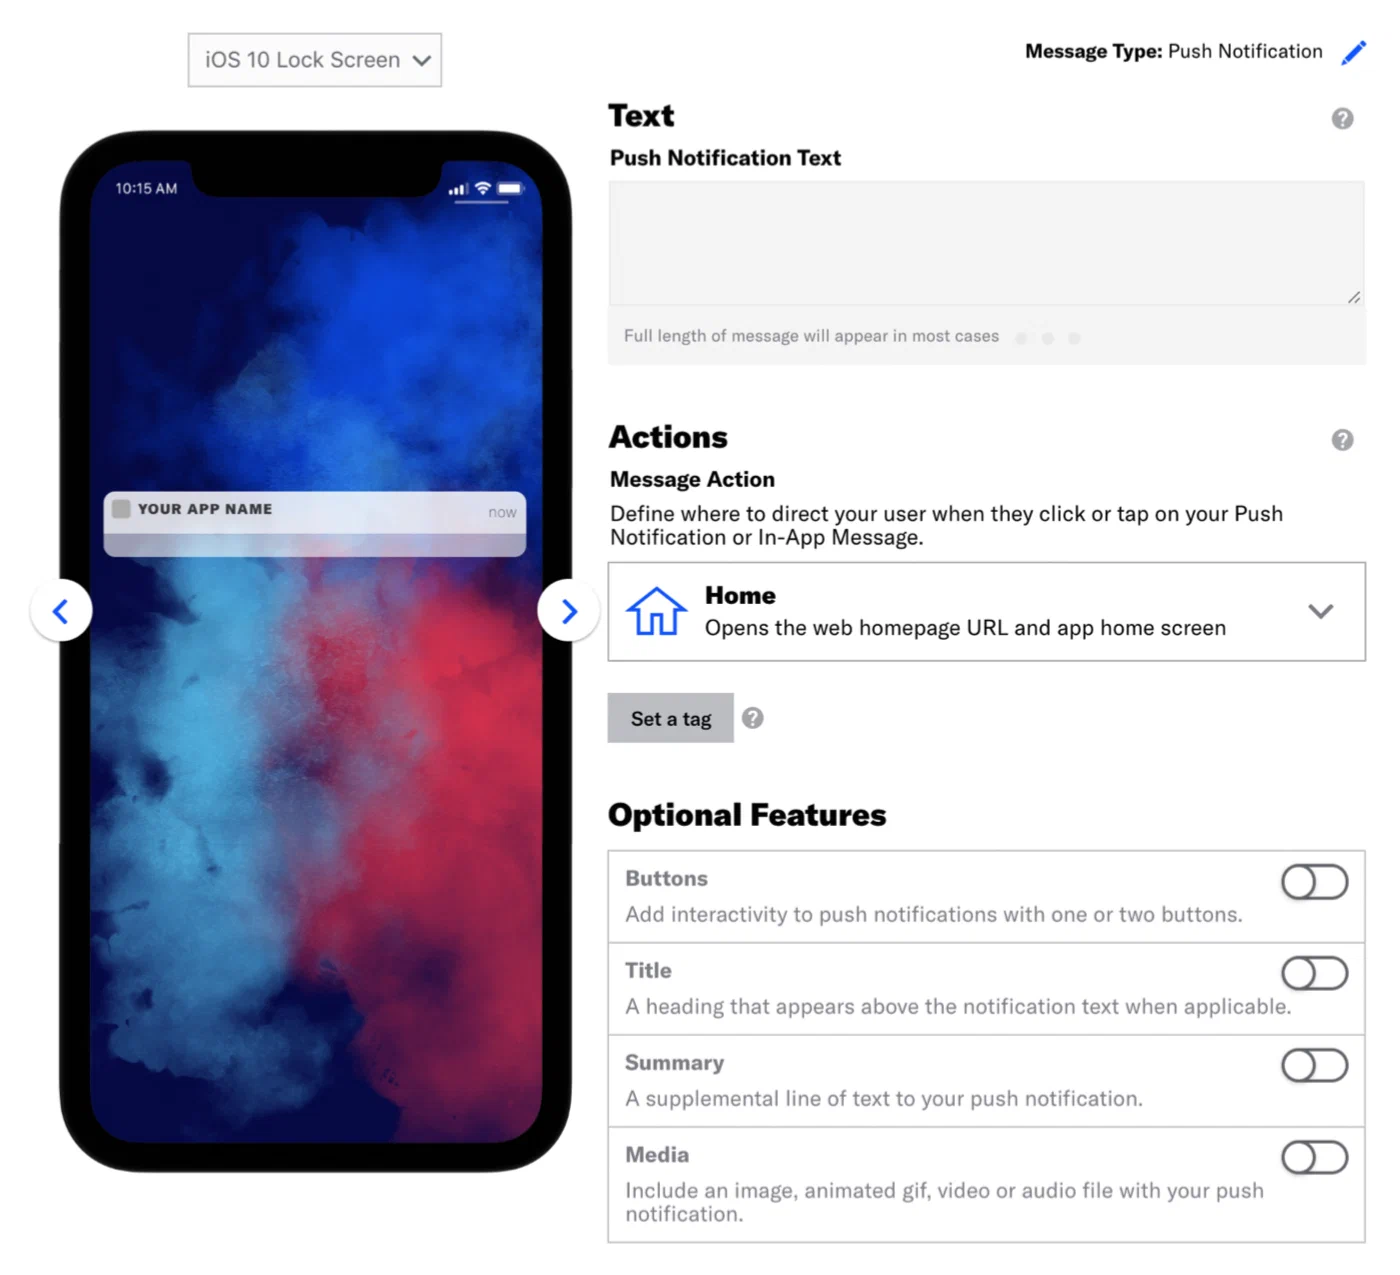
*Composing the push notification content*
### Push Notification using a Custom Key
First add the [Airship In App Wallet Action](https://github.com/urbanairship/ua-extensions/tree/master/AppleWallet) to your app so it can handle a Wallet custom key. This allows users to save passes directly in the app without being redirected to Safari. Then register the action in the app registry.
> **Note:** The Custom Key method is for Apple Wallet passes only.
Once your app is capable of handling a Wallet custom key, substitute the following Content and Delivery steps in each composer.
> **Note:** The configuration steps vary between composers, but the *Content* and *Delivery* steps have the same relevant options. The please refer to the individual tutorials for full documentation.
1. Follow the steps in these tutorials, selecting Push Notification as the message
type, and pause at the *Content* step.
* [Message Composer](https://www.airship.com/docs/guides/messaging/messages/create/)
* [Automation Composer](https://www.airship.com/docs/guides/messaging/messages/sequences/create-automation/)
* [A/B Test Composer](https://www.airship.com/docs/guides/experimentation/a-b-tests/messages/)
1. In the *Content* step, enter the text that will display in your message,
then select the [Home action](https://www.airship.com/docs/guides/messaging/messages/actions/).
1. Click *Delivery* in the header.
1. Select a delivery type, then enable
[Custom Keys](https://www.airship.com/docs/guides/messaging/messages/delivery/delivery-options/#custom-keys), and complete the configuration.
1. Select *iOS* from the platform dropdown menu
1. Enter the key and value:
* **key** = `wallet_action` or `^w`
* **value** = the public pass URL or the adaptive link URL
1. Complete the remaining steps in the composer.
### In-App Automation
1. In the *Actions* step of the [In-App Automation composer](https://www.airship.com/docs/guides/messaging/in-app-experiences/in-app-automation/create/), select either:
* [Web Page](https://www.airship.com/docs/guides/messaging/in-app-experiences/configuration/button-actions/#web-page) action and paste your pass link.
* [Adaptive Link](https://www.airship.com/docs/guides/messaging/in-app-experiences/configuration/button-actions/#adaptive-link) action and select an adaptive link from the dropdown menu.
> **Note:** Only adaptive links created in the dashboard will appear in the dropdown list.
1. Complete the remaining steps in the composer.
## API Examples
The examples below use this sample pass URL:
```text
https://wallet-api.urbanairship.com/v1/download/pass/9cde359c-c6b6-c6b6-c6b6-1159b754c89c
```
See [Actions](https://www.airship.com/docs/developer/rest-api/ua/schemas/push/#actionsobject) in the Airship API reference.
**Example `actions` object using the sample pass URL**
```json
{
"audience":{
"ios_channel": "b8f9b663-0a3b-cf45-587a-be880946e881"
},
"device_types":[ "ios" ],
"notification":{
"ios":{
"alert":"20% off Kung Fu classes!"
},
"actions":{
"open":{
"type":"url",
"content":"https://wallet-api.urbanairship.com/v1/download/pass/9cde359c-c6b6-c6b6-c6b6-1159b754c89c"
}
}
}
}
```
**Send automated message with adaptive link action through Airship**
```http
POST /api/pipelines HTTP/1.1
Authorization: Basic
Accept: application/vnd.urbanairship+json; version=3
Content-Type: application/json
{
"name":"Ticket Purchases",
"enabled": true,
"immediate_trigger": [
{
"custom_event": {
"key": "ticket_purchase"
}
}
],
"outcome":{
"push":{
"audience": {
"tag": "needs_ticket",
"group": "future_passengers"
},
"device_types":[
"ios",
"android",
],
"notification":{
"alert":"Tap to install your pass!",
"actions": {
"open": {
"type": "url",
"content": "https://wallet-api.urbanairship.com/v1/pass/adaptive/"
}
}
}
}
}
}
```
### API Push using a Custom Key
Use the `extra` key in the [iOS Override Object](https://www.airship.com/docs/developer/rest-api/ua/schemas/platform-overrides/#iosoverrideobject) to specify the pass URL.
**Example iOS override object with extra key using the sample pass URL**
```json
{
"audience":{
"ios_channel": "b8f9b663-0a3b-cf45-587a-be880946e881"
},
"device_types":[ "ios" ],
"notification":{
"ios":{
"alert":"20% off Kung Fu classes!",
"extra":{
"^w" : "https://wallet-api.urbanairship.com/v1/download/pass/9cde359c-c6b6-c6b6-c6b6-1159b754c89c"
}
}
}
}
```
## Personalizing Passes from Adaptive Links
> **Note:** You cannot personalize boarding passes or event tickets using query parameters. You must provide all values pass in the adaptive link `payload` object including passenger/attendee information.
When you send adaptive links, you can add query parameters to the link that will populate the pass when the user installs it.
For example: if you want to add an offer code, barcode value, member ID, and time/location to a pass, you could append query parameters to the adaptive link:
`https://wallet-api.urbanairship.com/v1/pass/adaptive/QXynXTbMhS?offercode=AUGUST&barcode=A1234567&tags=PST~OR&exid=A1234567`
> **Tip:** If you send a message using a template, you can use [Handlebars](https://www.airship.com/docs/reference/glossary/#handlebars) in the adaptive link action to automatically personalize adaptive links for your audience
> **Note:** You cannot personalize Google Wallet `class` fields with unique values. Any field preceded by `class` constitutes a class field. See [Google Wallet Pass Verticals documentation](https://developers.google.com/pay/passes/guides/overview/basics/about-google-pay-api-for-passes) for a full list of class fields for each pass type.
# Google Wallet deep links
> Use the Airship Android SDK to programmatically create and deep link Google Wallet passes in your app.
The following examples demonstrate how to create and deep link Google Wallet passes with the [Airship Android SDK](https://www.airship.com/docs/developer/sdk-integration/android/).
#### Android Kotlin
```kotlin
val field: Field = Field.Builder()
.setName("text")
.setValue("text value")
.setLabel("text label")
.build()
val passRequest = PassRequest.newBuilder()
.setAuth("User Name", "Airship API key")
.setTemplateId("template ID")
.addField(field)
.setTag("tag")
.build()
```
#### Android Java
```java
Field field = new Field.Builder()
.setName("text")
.setValue("text value")
.setLabel("text label")
.build();
PassRequest passRequest = PassRequest.newBuilder()
.setAuth("User Name", "Airship API key")
.setTemplateId("template ID")
.addField(field)
.setTag("tag")
.build();
```
#### Android Kotlin
```kotlin
passRequest.execute(object : Callback {
override fun onResult(pass: Pass) {
// Handle the pass
}
override fun onError(errorCode: Int) {
if (errorCode >= 500) {
// retry
}
}
})
```
#### Android Java
```java
passRequest.execute(new Callback() {
@Override
public void onResult(Pass pass) {
// Handle the pass
}
@Override
public void onError(int errorCode) {
if (errorCode >= 500) {
// retry
}
}
});
```
#### Android Kotlin
```kotlin
passRequest.cancel()
```
#### Android Java
```java
passRequest.cancel();
```
#### Android Kotlin
```kotlin
pass.requestToSavePass(applicationContext)
```
#### Android Java
```java
pass.requestToSavePass(getApplicationContext());
```
# Google Wallet Auto Linked Passes
> Send additional passes to users who already have a pass in their Google Wallet, automatically grouped with the existing pass.
## About Auto Linked Passes
Google Wallet's Auto Linked Passes feature automatically groups related passes together in a user's wallet. You use the Wallet API to link passes to a primary pass that the user already has, and Google Wallet handles the rest:
- The linked passes appear alongside the primary pass without the user needing to save or install them.
- The Wallet app displays a notification on the primary pass when a new linked pass arrives.
You can use auto-linking for all [Airship-supported Google Wallet pass types](https://www.airship.com/docs/guides/wallet/user-guide/reference/), and any pass type can serve as either the primary or linked pass. Because the user doesn't need to take any action, auto-linking increases the likelihood that they see and use the pass at the right moment.
Use this feature whenever a customer's journey involves multiple complementary passes:
- **Boarding pass + loyalty card** — When a frequent flyer already has your loyalty card in their Google Wallet, you can issue a boarding pass and link it to the loyalty card so the boarding pass appears alongside it automatically.
- **Event ticket + parking pass** — For a stadium or venue event, link a parking pass to the event ticket at the time of purchase. When the user opens their wallet on arrival, both passes are grouped and immediately accessible.
- **Boarding pass + lounge access** — When a business class traveler is issued a boarding pass, link their lounge access pass to it so they can locate it without a separate distribution step.
- **Member card + coupon** — During a promotional campaign, link a discount pass to a customer's existing member card so the offer appears in their wallet without requiring them to install it separately.
## Link passes
To link passes, submit a `POST` request to the [Wallet API](https://www.airship.com/docs/developer/rest-api/wallet/). The primary pass must be created using the Wallet API.
Three endpoints are available for linking passes, each based on how you identify the primary pass: by pass ID, by template ID and external pass ID, or by external template ID and external pass ID. In the request body, provide a `passURIs` array listing the passes to link. See [Pass URI formats](#pass-uri-formats) for supported formats.
Use the [Auto link passes to existing Google Pass](https://www.airship.com/docs/developer/rest-api/wallet/operations/google-passes-only/#autolinkedpassesforpassid) endpoint when you have the Airship-generated numeric ID for the primary pass.
**Link passes using a pass ID**
```http
POST /v1/pass/12345/linkedPasses HTTP/1.1
Authorization: Basic
Content-Type: application/json
{
"passURIs": ["v1/pass/adaptive/fqsl9UyW3O7", "v1/pass/adaptive/Xzq5O7lf262"]
}
```
Use the [Auto link passes to Google Pass with external ID](https://www.airship.com/docs/developer/rest-api/wallet/operations/google-passes-only/#autolinkedpassesforpassexternalid) endpoint when you have the Airship-generated template ID and your own external ID for the primary pass.
**Link passes using a template ID and external pass ID**
```http
POST /v1/pass/template/12345/id/boarding-pass-smith-815/linkedPasses HTTP/1.1
Authorization: Basic
Content-Type: application/json
{
"passURIs": ["v1/pass/adaptive/gqsl9UyW3O8", "v1/pass/template/id/lounge-template/id/lounge-smith-815"]
}
```
Use the [Auto link passes to Google Pass with external template ID](https://www.airship.com/docs/developer/rest-api/wallet/operations/google-passes-only/#autolinkedpassesforpassandtemplateexternalid) endpoint when you manage both the template and pass with your own external IDs.
**Link passes using an external template ID and external pass ID**
```http
POST /v1/pass/template/id/boarding-pass-template/id/boarding-pass-smith-815/linkedPasses HTTP/1.1
Authorization: Basic
Content-Type: application/json
{
"passURIs": ["v1/pass/template/id/parking-template/id/parking-lot-b-007", "v1/pass/template/id/lounge-template/id/lounge-smith-815"]
}
```
Each of these endpoints returns HTTP 200 with a `ticketId` on success. Use the `ticketId` to look up the status of the operation. See the [Tickets API](https://www.airship.com/docs/developer/rest-api/wallet/operations/tickets/) in the Wallet API reference.
**Example link passes response**
```json
{
"ticketId": 12345
}
```
## Pass URI formats
Each entry in the `passURIs` array is a URI that identifies a pass. The format depends on which identifier you have:
| Format | Identifier referenced |
| --- | --- |
| `v1/pass/{passId}` | Airship-generated pass ID |
| `v1/pass/adaptive/{adaptiveLinkId}` | Adaptive Link ID |
| `v1/pass/template/{templateId}/id/{passExternalId}` | Template ID and external pass ID |
| `v1/pass/template/id/{templateExternalId}/id/{passExternalId}` | External template ID and external pass ID |
| `v1/pass/dynamic/{dynamicPassId}` | Dynamic pass ID |
For more information about external IDs, see [External (or Custom) IDs](https://www.airship.com/docs/guides/wallet/user-guide/basics/#external-or-custom-ids) in *Wallet basics*.