# External Data Feeds
{{< glossary_definition "external_feed" >}}
## About External Data Feeds
Using External Data Feeds can help you tell your audience about things they might be interested in, without having to send custom events to Airship or assign [Attributes](https://www.airship.com/docs/reference/glossary/#attributes).
In your message, you'll create a merge field representing a value you want to personalize, surrounded by double curly braces `{{ }}`, also known as [Handlebars](https://www.airship.com/docs/reference/glossary/#handlebars). Airship replaces the merge field (and braces) with the data specified by the merge field at send time — just like mail merge in a word processor or mail client.
For example, if your audience requests weather updates, you can set up an External Data Feed to fetch weather data when you send your message and personalize messages with relevant weather updates for each member of your audience.
You can use External Data Feeds when creating messages in both the dashboard and API.
### Throttling and caching
Personalization using External Data Feeds can mean a lot of API calls in a short period of time. With throttling, you can set a frequency rate for your requests. The minimum rate is 100 requests per second.
You can also cache responses from your feeds and use them for multiple recipients. You may want to cache a response if you don’t expect your feed to return a different response when using the same feed URL and parameters.
You can enable throttling or caching for a feed but not both.
### Object locations
You can enter names and paths for objects in your feed so they are available in the code copying helper in the [Interactive Editor](https://www.airship.com/docs/reference/glossary/#interactive_editor). See the TIP box in [Formatting content](#formatting-content) below.
Use JSON dot notation to enter the paths to the variables you want to reference.
For example, if you have a user object, you might want to access the first name of your user. You would enter `firstName` as the *Name* for the data and `user.firstName` as the *Object location*.
See also: [Object and array notation](https://www.airship.com/docs/guides/personalization/handlebars/basics/#dot-notation).
### External API requirements
Your external API must operate in the following ways to work with External Data Feeds:
* Return the correct `Content-Type` header for the response. We support `application/json`.
* Return the correct `Content-Encoding` header if you are compressing your responses. We support gzip for compression.
* Return your content as a JSON object. We do not support top-level JSON arrays. Array content must be nested in an object.
### Workflow
The following is the general workflow for using External Data Feeds in messages.
1. [Create an External Data Feed](#create-a-feed) in the dashboard.
1. [Reference a feed when entering content in a message or template](#using-a-feed-in-messages) using the following format.
```text
{{#feed "feed_id"}}
Content referencing the feed, like {{first_name}} or {{mtn_weather}}.
{{/feed}}
```
1. [Set failure behavior and variable values when sending the message](#setting-feed-failure-behavior-and-variable-values).
* In the dashboard, you'll do this in the Delivery step of a composer.
* With the API, you'll make these specifications in the [External Data Feed References Object](https://www.airship.com/docs/developer/rest-api/ua/schemas/external-data-feeds-references/).
## Create a feed
You can create up to 10 feeds per project. [Contact Support](https://support.airship.com/) to request increasing this limit.
1. Next to your project name, select the dropdown menu (
), then **Settings**.
1. Under **Project settings**, select **External Data Feeds**.
1. Select **Create external data feed**.
1. 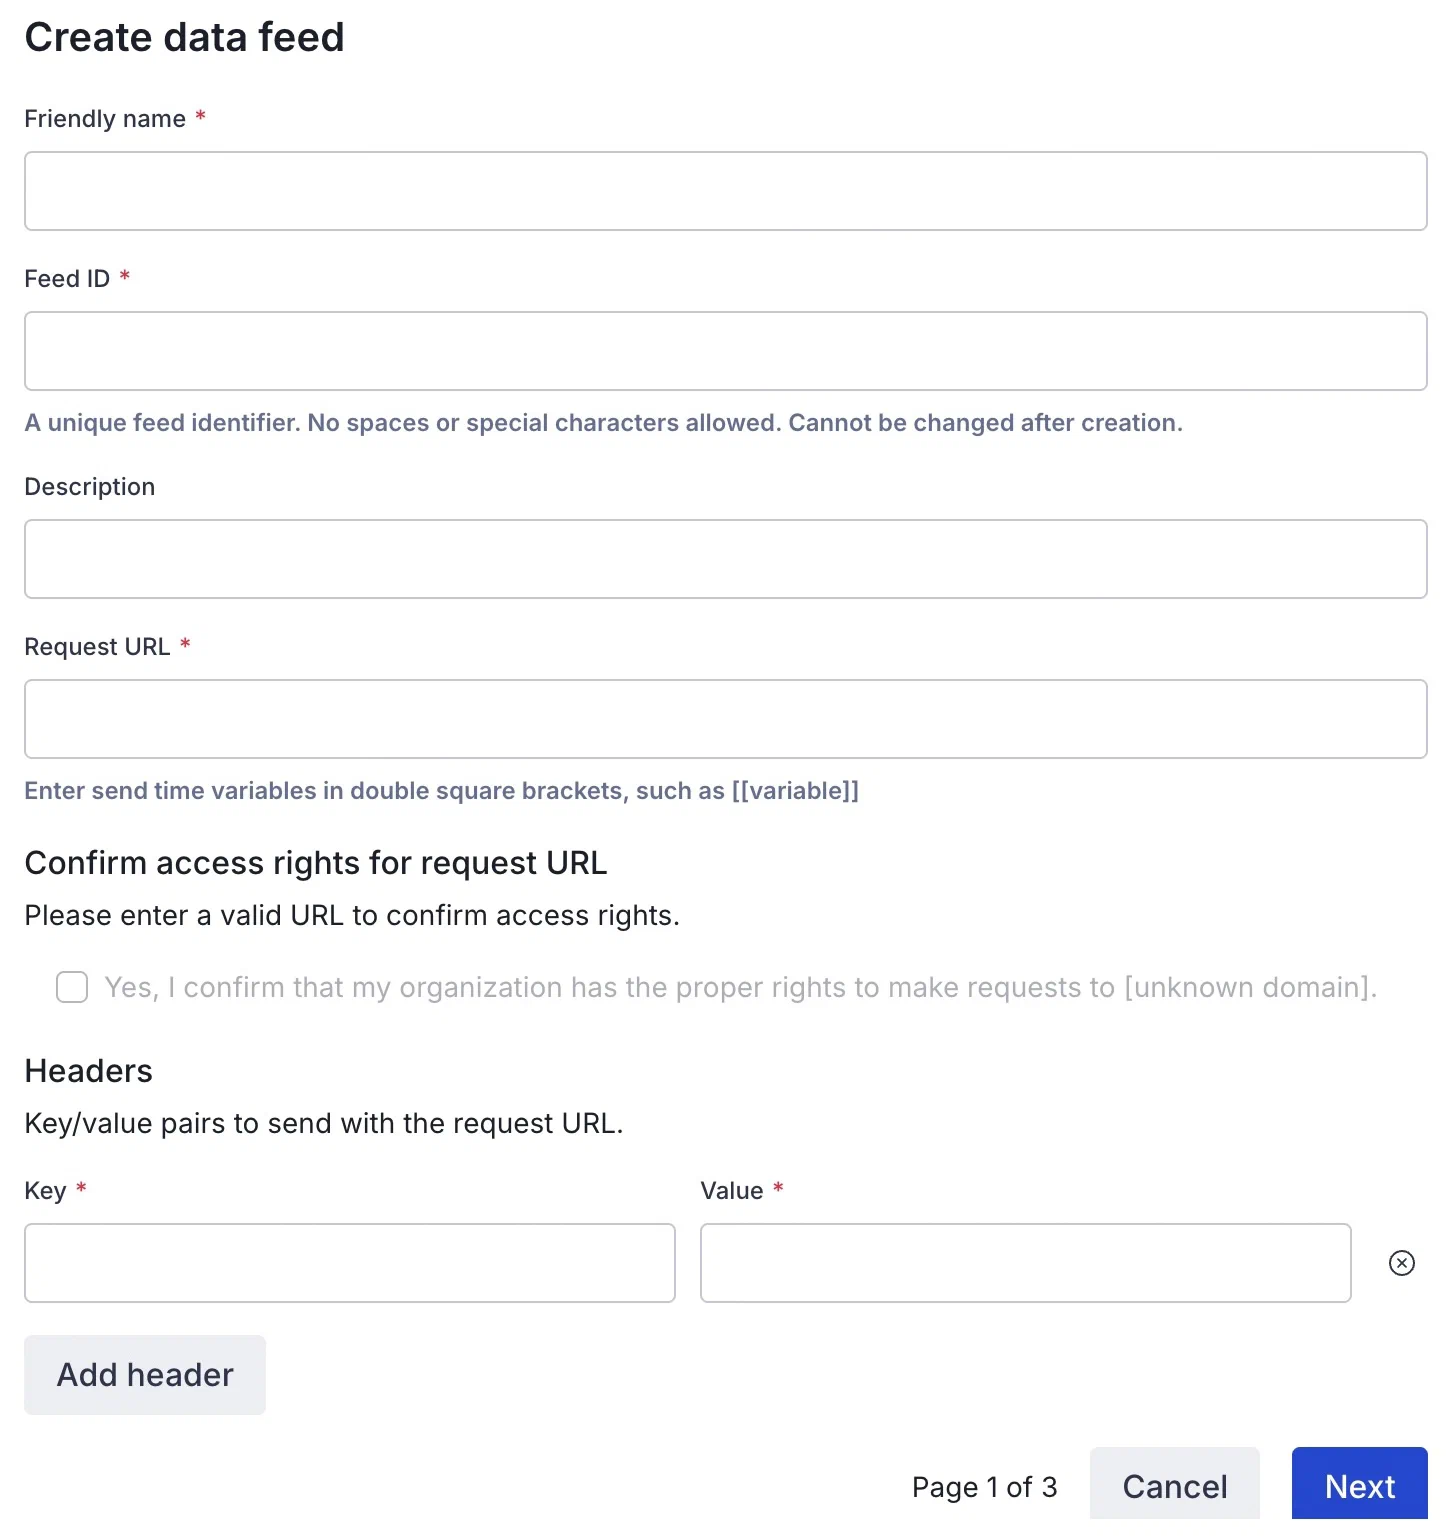
*Configuring an External Data Feed*
Configure the feed settings:
* *Friendly name* — Helps you find the feed in the Airship dashboard.
* *Feed ID* — How you will reference the feed. The ID must be unique, without spaces or special characters. Use a feed ID that is meaningful to use and relatively easy to type. **You cannot change the feed ID later.**
* *Description* — A summary of the data returned by the feed.
* *Request URL* — The URL to retrieve data from, also called the *feed URL*. The URL is your domain, protocol, and path (e.g., `https://api.example.com/products/`) and any variables you want to use to personalize your messages.
* Use double square brackets (`[[var]]`) for send time, or *message-level*, variables.
* Use curly brackets (`{{var}}` — standard [Handlebars](https://www.airship.com/docs/reference/glossary/#handlebars)) for variables whose values come from audience data — attributes, custom event properties, etc.
This example feed URL has a send time variable (`msg_purpose`) and variables populated with audience data (`first_name` and `last_name`):
`https://api.example.com/[[msg_purpose]]?user={{first_name}}%20{{last_name}}`
> **Tip:** If you have users with [Named User](https://www.airship.com/docs/reference/glossary/#named_user) set, you can use the `ua_named_user_id` [default attribute](https://www.airship.com/docs/reference/data-collection/attributes/#default-attributes) to fetch feed data for their external ID:
>
> `https://api.example.com/[[msg_purpose]]?user={{ua_named_user_id}}`
* *Default values* — These fields appear automatically based on the request URL. Enter a default value for each send time variable used in the request URL.
* *Confirm access rights for request URL* — Check the box to confirm.
* *Headers* — Optional. HTTP request headers that may be required to successfully communicate with the external feed (e.g., `authorization` headers).
Header values support Handlebars as well, so you can populate header values from attributes and other personalization sources. Header information is not a part of the request URL.
Select **Add header**, then enter a *Key* and *Value*. Repeat for additional headers.
Select **Next** to move on.
1. 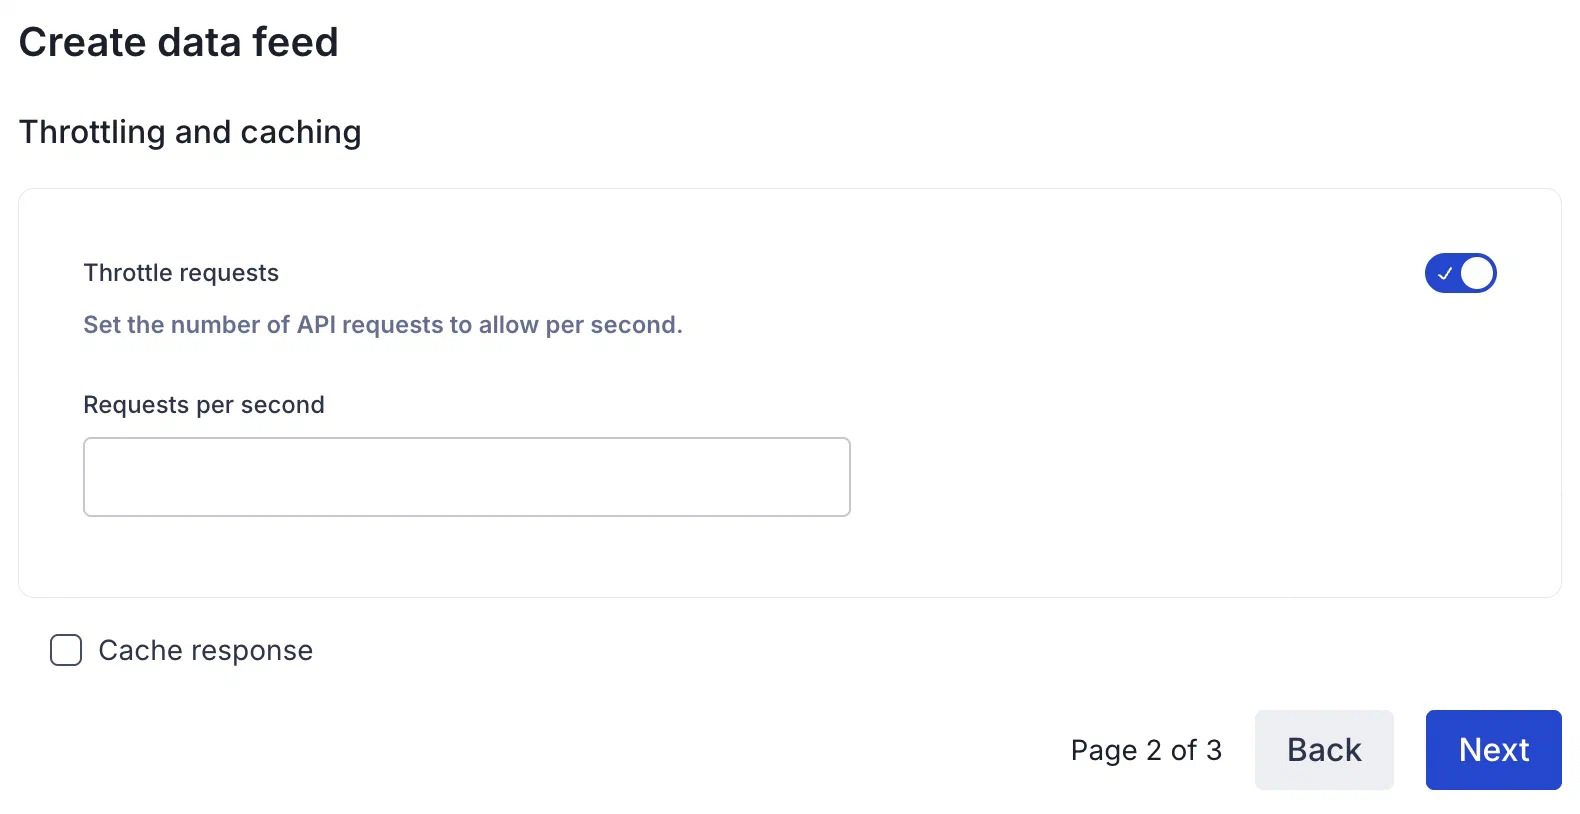
*Setting throttling and caching options for an External Data Feed*
(Optional) Configure throttling or caching:
* [*Throttle requests*](#throttling-and-caching) — Enable to set a frequency rate for your requests. Enter the number of API requests per second. The minimum rate is 100 requests per second.
* [*Cache response*](#throttling-and-caching) — Check box to enable.
Select **Next** to move on.
1. 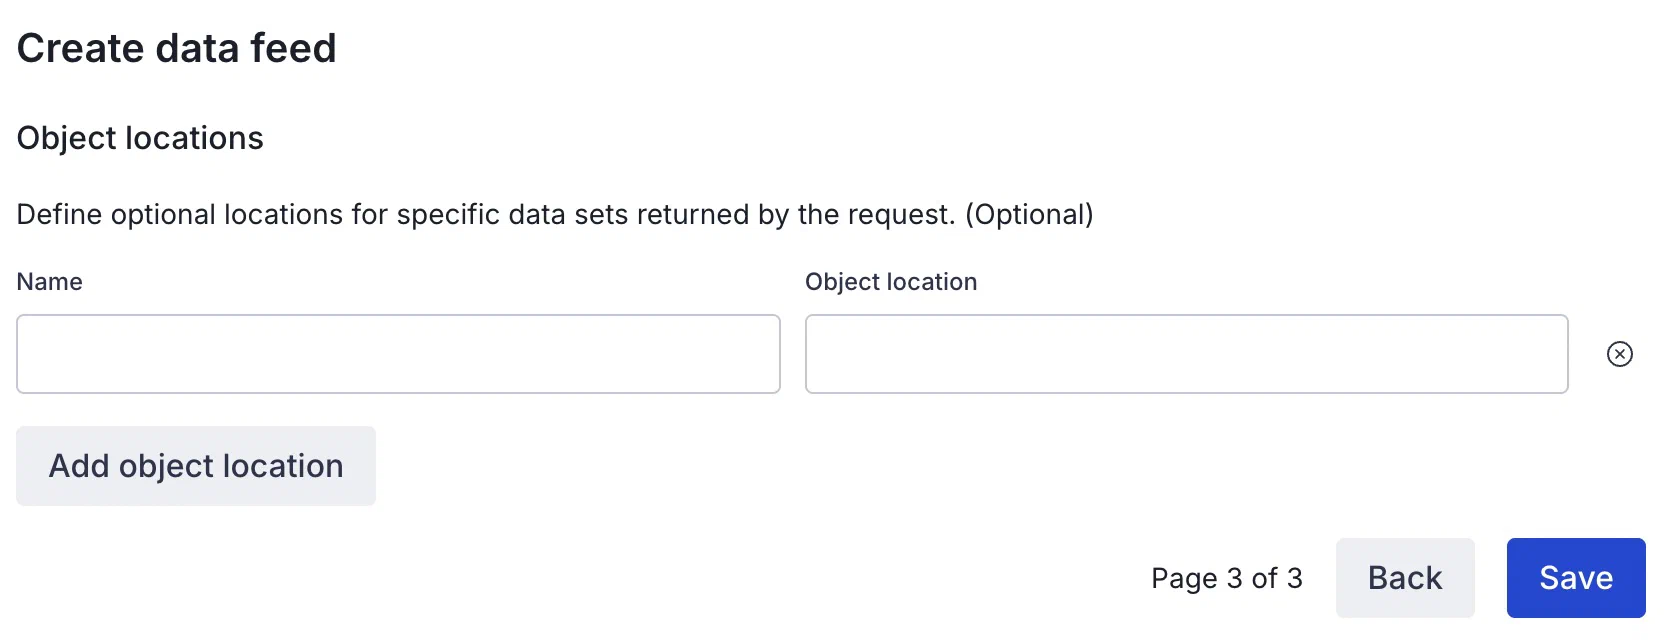
*Adding object locations for an External Data Feed*
(Optional) Configure [object locations](#object-locations). Select **Add object location** and enter a name and object location.
1. Select **Save**.
## Using a feed in messages
You add your data feed to messages in two parts:
1. Formatting the message content
1. Entering default values for the variables you referenced in your message and determining how to handle the message if the feed fails
### Formatting content
Formatting your message content is identical in the dashboard and the API. In the dashboard you add content when configuring a template or in the Content step in a composer.
**Content format for External Data Feeds**
```text
{{#feed "feed_id"}}
Content referencing the feed, like {{first_name}} or {{mtn_weather}}.
{{/feed}}
```
If your feed URL includes send time variables, you can override their default values in the `#feed` block as `{{#feed "feed_id" var="value"}}`. Or you can [set a value in the *Delivery* step](#setting-feed-failure-behavior-and-variable-values) that applies to all of the channels selected for the message.
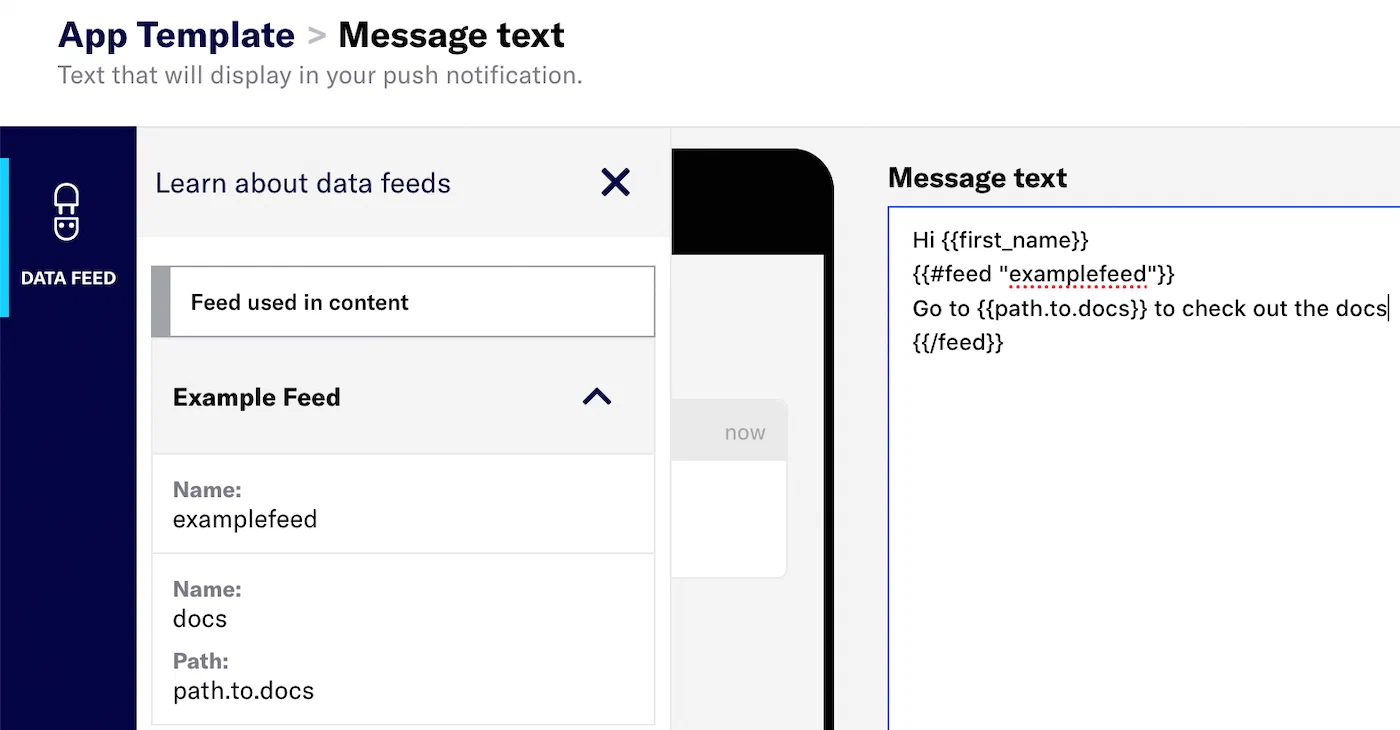
> **Tip:** When using the [Interactive Editor](https://www.airship.com/docs/reference/glossary/#interactive_editor) to create content for a template, email, landing page, or Message Center message, we provide a helper for inserting feed code. Available code:
>
> * Object locations — Paths defined in the feed settings.
> * `#feed` blocks — Available for all feeds in your project. A preformatted block that includes the feed ID:
> ```text
> {{#feed "feed_id"}}
> {{/feed}}
> ```
>
>
> When adding content:
>
> 1. Select *Data Feed* in the left sidebar.
> 1. Select
> for a feed.
> 1. Hover over a feed name or object location and select
> to copy the code.
> 1. Select a field in your message content and paste the copied data.
>
> 
>
> *Copied and pasted feed code in an App template*
#### Differentiating data sources
You can use reference variables (or [Merge Fields](https://www.airship.com/docs/reference/glossary/#merge_field)) that aren't a part of a feed and variables that are part of a feed in the same `#feed` block. For instance, if your content uses project attribute `first_name` and the feed also has a property `first_name`, if you don't namespace it, the feed data will take precedence over the project attribute.
To differentiate the data sources, set the feed namespace using `as |alias|`. This ensures that Airship uses the proper data for the variables in your messages.
In the example below, we can differentiate between attributes (`first_name` and `user_id`) and feed properties based on the parent namespace set within the `feed` and `each` blocks.
```text
{{#feed "featured_products" region="us" as |result|}}
Hi, {{first_name}}. Take a look at
{{#each (limit result.products 2) as |product|}}
{{product.name}}: {{product.price}}
https://example.com/us/{{user_id}}/featured/{{urlEncode product.slug}}/
{{else}}
Products that might interest you at https://example.com/us/products/featured
{{/each}}
{{else}}
Couldn't fetch featured products!
{{/feed}}
```
### Setting feed failure behavior and variable values
In the *Delivery* step of a composer, you must configure each feed listed in *External data feed options*.
* **Failure behavior** — Determine how your message is handled if the feed fails. If your message still makes sense without a feed, you may want to send the message even if your data feed fails. Also consider how ongoing (automated and recurring) messages will be affected if you later [delete the feed](#deleting-a-feed).
Select *Abort sending the message* or *Send message without this data*.
See also: [Success, Retry, and Error Conditions](#success-retry-and-error-conditions).
* **Send time variables** — If your feed URL contains send time variables, each one will be listed as `Default value for [var]` with its default value. You can change the value here to override the default. Changes apply to the current message only.
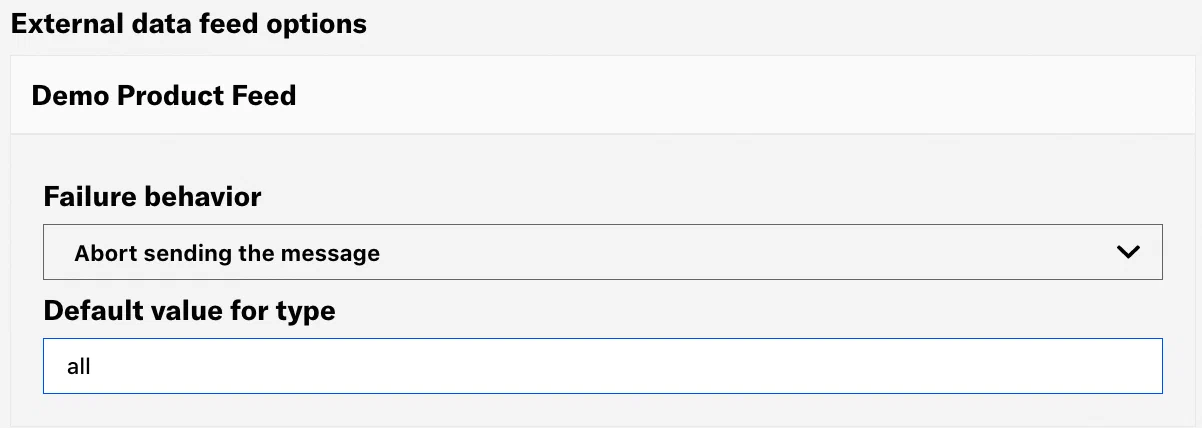
*External data feed settings in a composer's Delivery step*
---
With the API, you set the failure (error) behavior in the [External Data Feed References Object](https://www.airship.com/docs/developer/rest-api/ua/schemas/external-data-feeds-references/). When using a data feed you must include a [`templates` object](https://www.airship.com/docs/developer/rest-api/ua/operations/personalization/) in the payload or set the `personalization` option to `true`.
* The value for `name` is the Feed ID you set when [creating your feed](#create-a-feed).
* The possible values for `on_error` are `cancel` and `continue`. These are equivalent to the dashboard options *Abort sending the message* and *Send message without this data*.
`continue` will result in sending the message despite an error. Otherwise, a feed failure will prevent Airship from sending your message.
**Example push request using an External Data Feed**
```json
{
"feed_references": {
"feeds": [
{
"name": "featured_products",
"params": {
"region": "us"
},
"on_error": "continue"
}
]
}
}
```
## Managing External Data Feeds
To see a list of all your feeds:
1. Next to your project name, select the dropdown menu (
), then **Settings**.
1. Under **Project settings**, select **External Data Feeds**.
To edit all fields except the Feed ID, select the more menu icon () for a feed, select **Edit**, make your changes, and then select **Save**. If you make changes to the Request URL, you will need to reconfirm the request URL domain. You must confirm access rights for request URL every time you edit a feed.
### Deleting a feed
> **Warning:** * If you delete an External Data Feed, any messages content referencing its data will be handled according to the message's [feed failure behavior settings](#setting-feed-failure-behavior-and-variable-values).
> * Your External Data Feed is deleted immediately. There is no confirmation and your External Data Feed cannot be restored once deleted.
1. Next to your project name, select the dropdown menu (
), then **Settings**.
1. Under **Project settings**, select **External Data Feeds**.
1. Select the more menu icon () for a feed, and then select **Delete**.
## Success, Retry, and Error Conditions
Airship considers any 2xx response from a feed to be a success and will continue a message using the feed response. Airship considers any 3xx, 4xx, and 5xx codes (except 502/503) to be error conditions.
| HTTP status |
Result |
Behavior |
| 2xx |
Success |
Airship uses the feed response, even if empty. |
| 3xx |
Error |
Error behavior determined by user. |
| 4xx |
Error |
Error behavior determined by user. |
| 5xx |
Error |
Error behavior determined by user. |
| timeout (60 sec) |
Retry |
Up to 4 retries, 60 sec between attempts. |
| 502/503 |
Retry |
Up to 4 retries, 60 sec between attempts. |
## Send Aborted event
The [Real-Time Data Streaming](https://www.airship.com/docs/reference/glossary/#rtds) `SEND_ABORTED` event occurs when a push is dropped from our system before delivery is attempted. Device information for the device that did not receive the push is included with `SEND_ABORTED` events, and the `reason` property gives more information about the error.
For additional information and a sample event, see the [Send Aborted event](https://www.airship.com/docs/developer/rest-api/connect/schemas/events/#send-aborted) in the *Real-Time Data Streaming API* reference.