# Project Settings
View and manage project details, enable features, create tokens, and set up individual features.
# Enable dashboard features and set behavioral defaults
> Control which features are available in the dashboard and set project-level behavioral defaults.
## Setting behavioral defaults
Control behaviors for your project:
1. Next to your project name, select the dropdown menu (▼), then **Settings**.
1. Under **Project settings**, select **Dashboard Settings**.
1. Toggle to enable or disable the settings, then configure as required:
| Feature | Description | Steps |
| --- | --- | --- |
| **Background Push** | (Applies to SDK versions prior to iOS SDK 16.6 and Android SDK 16.4 only) Pre-loads In-App Automations and Scenes on users' devices, which increases the speed and reliability of message delivery. It is disabled by default. When disabled, the SDK downloads and refreshes the entire message list upon next app open. | n/a |
| **Missed Behavior** | Specifies how messages are handled when audience conditions are not fully met. You can override this setting on a per message basis in the Settings step in the In-App Automation and Scene composers. | Select from the options described in the next table. |
| **Ban List** | A Ban List is an externally maintained record of users that should not be included in Airship message audiences. Before sending a message, Airship validates the audience members with the Ban List. Any matching recipients are dropped from the audience before sending the message. | See [Configuring your Ban List](https://www.airship.com/docs/guides/audience/segmentation/ban-lists/#configuring-your-ban-list). |
Missed Behavior options:
| Option | Description |
| --- | --- |
| **Cancel** | The message cannot be displayed again on the device, even if the message is edited. |
| **Ignore** | The message will not count toward the display limit set for [Repeat this message](https://www.airship.com/docs/guides/messaging/in-app-experiences/configuration/optional-features/#repeat-this-message), and the waiting period will not apply. The trigger event must occur again before the message is eligible for redisplay. |
| **Increment** | The message will count toward the display limit set for [Repeat this message](https://www.airship.com/docs/guides/messaging/in-app-experiences/configuration/optional-features/#repeat-this-message), and the waiting period will apply. The trigger event must occur again before the message is eligible for redisplay. |
## Enabling features
1. Next to your project name, select the dropdown menu (▼), then **Settings**.
1. Under **Project settings**, select **Dashboard Settings**.
1. Toggle to enable or disable features. Message Purpose has an additional configuration step and requirements.
* App SDK minimums are listed for each feature.
* Enabling or disabling features in the dashboard does not affect API functionality.
Features you can hide/show in the dashboard:
| Feature | Description |
| --- | --- |
| **Message Center** | Deliver rich content to your app's [Message Center](https://www.airship.com/docs/reference/glossary/#message_center).> **Important:** Message Center also requires enabling **Message Center, Landing Page, Deep Link, URL, and Add Tags**
|
| **Delivery by Time Zone** | Schedule a message to go out at the same time in different time zones. Available in the Message and A/B Test composers. |
| **Message Center, Landing Page, Deep Link, URL, and Add Tags** | The Airship Actions Framework |
| **Remove Tags** | Remove a tag when a user interacts with a push notification or button. |
| **Notification Buttons** | [Interactive notifications](https://www.airship.com/docs/guides/messaging/messages/buttons/) for your app, including Airship's 30+ out-of-the-box buttons. |
| **In-App Messages** | Send a message that appears inside your app. |
| **Segment Operators** | Enable all operators for device properties in a [Segment](https://www.airship.com/docs/reference/glossary/#segment). When disabled, the only available operators are _Equals_ and _Does not equal_. |
| **Link In-App Experiences in Journeys** | Link from one [In-App Automation](https://www.airship.com/docs/reference/glossary/#iaa) or [Scene](https://www.airship.com/docs/reference/glossary/#scene) to another. See [Link Journey components](https://www.airship.com/docs/guides/features/orchestration-experimentation/journeys/#link-journey-components). |
| **Custom Keys**1 | Pass key/value pairs of custom data through the push to your app. |
| **Broadcast Push** | Send to all devices. In the composers, this is the audience option **All Users**. |
| **SMS Link Shortening** | Use SMS [Link Shortening](https://www.airship.com/docs/reference/glossary/#sms_link_shortening) for all SMS messages sent through the Airship dashboard. You can override the setting for individual messages. |
| **Message Purpose** | See following page section. |
| **Bypass Ban List** | See [Bypassing Your Ban List](https://www.airship.com/docs/guides/audience/segmentation/ban-lists/#bypassing-your-ban-list) in our [Ban List](https://www.airship.com/docs/reference/glossary/#ban_list) documentation. |
| **Performance Analytics Labs** | Enable the Labs Dashboard in [Performance Analytics](https://www.airship.com/docs/reference/glossary/#pa). See [Labs](https://www.airship.com/docs/guides/reports/analytics/definitions/#labs) in _Performance Analytics Dashboard and Look definitions_. |
1. Custom Keys cannot be hidden in the In-App Automation and Scene composers.
### Message Purpose
When enabled, Message Purpose requires designating each message (sent to any channel) as commercial or transactional. You must select a default value of Commercial, Transactional, or Unset.
The purpose selection appears in the Delivery step in the Message, A/B Test, Automation, and Sequence composers and in the Settings step in the Scene and In-App Automation composers. When creating messages using one of these composers, the purpose will be preset or unset according to the selected value. You can override the default per message.

*Setting the message purpose in a composer*
If you have any scheduled or ongoing (Automation, Sequence, In-App Automation, Scene, or recurring) messages at the time of enabling Message Purpose, edit each message and select a purpose. Until you do so, Airship will send the messages as if they were set to Transactional.
* **Email** — The [commercial vs transactional](https://www.airship.com/docs/developer/api-integrations/email/commercial-transactional/) designation is required for all email messages. Even when this setting is disabled, you will still set the purpose in [Sender Information](https://www.airship.com/docs/guides/messaging/messages/content/email/email/#creating-content) when creating email messages in the dashboard.
When Message Purpose is enabled and email and at least one other channel are selected for a message, the commercial/transactional designation set in the email Sender Information will apply to all channels.
For non-email messages, the message purpose informs Airship about your usage, which helps us develop better reporting.
* **Holdout Experiments** — Message Purpose is required when using [Holdout Experiments](https://www.airship.com/docs/reference/glossary/#holdout_experiment). Message Purpose is automatically enabled when you create your first Holdout Experiment, and you cannot disable it later.
## Configuration
Set up individual features.
# Manage Android Notification Categories
> Airship notification categories map to Android notification channels.
After a developer has created [Android notification channels](https://www.airship.com/docs/developer/sdk-integration/android/push-notifications/advanced-customizations/) within your app, add them to your project as *Android Notification Categories*. Then you can select a category as an [delivery option](https://www.airship.com/docs/guides/messaging/messages/delivery/delivery-options/#notification-category) when creating a message. Android Notification Categories are supported in Android O (8.0) and later.
## Add an Android Notification Category
1. Next to your project name, select the dropdown menu (▼), then **Settings**.
1. Under **App settings**, select **Android Notification Categories**.
1. Click **Create Notification Category** and complete the form.
* **Name:** This name appears when creating messages in the dashboard when you enable Notification Category as a [delivery option](https://www.airship.com/docs/guides/messaging/messages/delivery/delivery-options/#notification-category).
* **Category ID:** Enter the String id defined for your Android notification channel.
1. Click **Save**.
## Edit or Delete an Android Notification Category
1. Next to your project name, select the dropdown menu (▼), then **Settings**.
1. Under **App settings**, select **Android Notification Categories**.
1. Select the more menu icon (⋯) for a category, and then select **Delete**, or select **Edit**, make your changes, and select **Save**.
# Manage Deep Links
> A deep link directs a user to a specific resource, either within your app or on the web, when they interact with your message.
You can select a deep link when configuring:
* An [Action](https://www.airship.com/docs/reference/glossary/#action) in a Message, Automation, A/B Test, or Sequence.
* An [action](https://www.airship.com/docs/guides/messaging/in-app-experiences/configuration/button-actions/) in in-app experiences.
* An [action](https://www.airship.com/docs/guides/messaging/editors/interactive/actions/) when creating content using the Interactive editor.
* The *Link* element in a [rich page](https://www.airship.com/docs/reference/glossary/#rich_page) template. See [Configuration steps](https://www.airship.com/docs/guides/messaging/editors/visual/#configuration-steps) in *The Visual editor*.
A deep link must be in the format of a URL or a custom app URL scheme. You can also create deep link *templates* — URLs with placeholders in the path. When you create a message specifying a deep link, each placeholder segment appears as an individual text field that you can populate.
When you create your deep link, items in the path surrounded by brackets are templated fields. For example, deep link to `http://www.widgets.com/products/{widgetType}` or `widgetapp://products/{widgetType}` will take the user to `http://www.widgets.com/products/` or the products page in the app, and the `widgetType` is a variable you can specify when you create your message.
For instructions for implementing deep links in your mobile app, see the Deep Link guide for your platform in [SDK Integrations](https://www.airship.com/docs/developer/sdk-integration/).
## Add a Deep Link
1. Next to your project name, select the dropdown menu (▼), then **Settings**.
1. Under **App settings**, select **Deep Links**.
1. Click **Create Deep Link**.
1. Enter a *Name* for the deep link. This is how you will identify the deep link in messages.
1. Enter the *URL Template* for the deep link, no more than 1,024 characters. Example: `http://widgets.com/productivity/{calculator}` or `widgetapp://productivity/{calculator}`. Fields you enter using curly brackets `{}`, are templated fields that you can populate when you use a deep link in a message.
1. (Optional) Set a default value for any templated fields you added to the deep link.
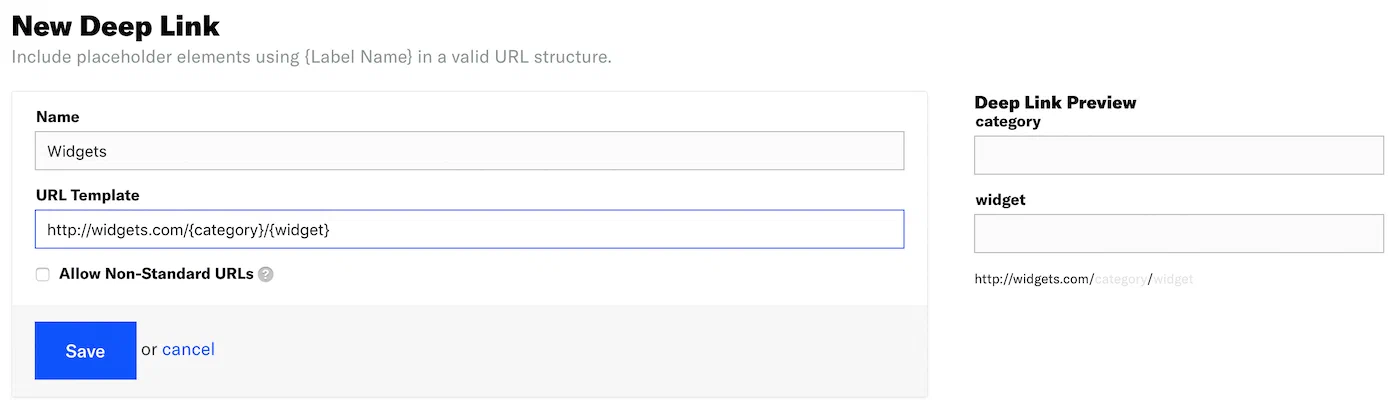
*Creating a deep link with a templated URL field*
1. (Optional) Check the box to allow a non-standard URL pattern.
1. Click **Save**.
## Edit or Delete a Deep Link
1. Next to your project name, select the dropdown menu (▼), then **Settings**.
1. Under **App settings**, select **Deep Links**.
1. Select the more menu icon (⋯) for a deep link, and then select **Delete**, or select **Edit**, make your changes, and select **Save**.
## Airship internal deep links
The Airship SDK provides several internal deep links with the `uairship://` scheme. These deep links are handled automatically by Airship messaging features and are not externally exposed.
Available internal deep links:
- `uairship://preferences/` — Opens a preference center
- `uairship://message_center` — Opens the message center
- `uairship://message_center/message/` — Opens a specific message in the message center
- `uairship://app_settings` — Opens the system app settings
- `uairship://app_store?itunesID=` — Opens the app's listing in the App Store
Any other `uairship://` deep links that are not handled by Airship automatically are delivered to your deep link callback if one is set in your app.
> **Note:** These internal deep links are used by Airship across all platforms. Do not expose them directly in your app's URL scheme. Instead, create your own deep links that map to Airship's internal links. For example, expose `myapp://airship/preference/`, and when your app handles it, call Airship to display the preference center.
# Manage iTunes ID
> Some Airship features depend on your app's Apple ID, which is used as the iTunes App Store Identifier.
To add Your iTunes ID to your project:
1. Next to your project name, select the dropdown menu (▼), then **Settings**.
1. Under **App settings**, select **iTunes ID**.
1. Enter your ID and click **Save**.
After editing or deleting the ID, select **Save**.
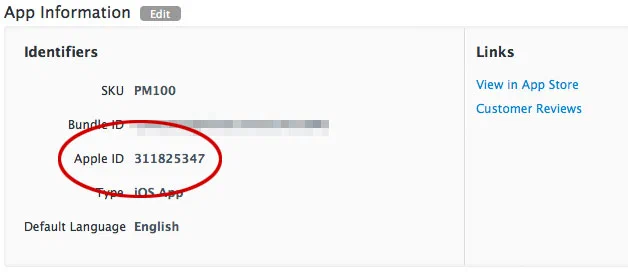
> **Tip:** A quick way to find the Apple ID is to copy the numbers at the end of the
> app's App Store URL. If the URL is `https://apps.apple.com/app/id1195168544`,
> the Apple ID is `1195168544`.
>
> Another way is to locate your app in
> [iTunes Connect](https://itunesconnect.apple.com/)
> and copy the Apple ID.
> 
>
> *Locating the Apple ID in iTunes Connect*
# Message Limits
> Message limits cap the number of messages you can send within a specified time frame, preventing you from over-messaging your users.
## About message limits
You set message limits at the project level, setting the maximum number of messages that can be sent within a period of time. When a member of your audience reaches a message limit, Airship suppresses any messages they would otherwise receive for the remainder of the time period.
*SMS message limits*
You can set limits for messages sent using [Automation](https://www.airship.com/docs/reference/glossary/#automation), [Sequences](https://www.airship.com/docs/reference/glossary/#sequence), [In-App Automation](https://www.airship.com/docs/reference/glossary/#iaa), and [Scenes](https://www.airship.com/docs/reference/glossary/#scene). Limits set for Automation and Sequences apply to **all channels and message types**.
And you can set message limits for **individual channels**:
* App — *Limits apply to push notifications only*
* Web
* SMS
* Email — *Limits apply to* [Commercial Email](https://www.airship.com/docs/reference/glossary/#commercial_email) *only*
Combined limits:
* **Message limits for In-App Automations and Scenes are combined.** App and Web Scene limits are not differentiated. If you set a limit of no more than one message in 24 hours, a user can receive a Scene triggered on both App and Web channels: once in the app and once on the web within 24 hours.
* **Message limits for Automation and Sequences are combined** and apply at the [Named User](https://www.airship.com/docs/reference/glossary/#named_user) level, preventing you from over-messaging users, regardless of channel. If named user is not set, the limits will apply at the channel level.
* **Each Automation and message in a Sequence counts toward your *Sequences and Automation* limits.** So, with a limit of 2 messages per day, if a user triggers Automations for app, SMS, and email messages in the same day, that user would only receive 2 of the 3 automated messages.
* **Message limits for channels overlap with your *Sequences and Automation* limits.** For example, if you limit *Mobile App Push Notification* to 1 per day and *Sequences and Automation* to 2 messages per day, your users are still limited to 1 push notification per day, even in a Sequence. If you were to set up a Sequence with 2 push notifications in a day, your audience would not receive the second app message due to your *Mobile App Push Notification* message limit, and the Sequence would end prematurely.
Exclusions:
* [Message Center](https://www.airship.com/docs/reference/glossary/#message_center) messages are not limited since they only appear within your app and are less obtrusive than other notification types — the user must actively open the messages in your app to experience them.
* [Silent Push Notifications](https://www.airship.com/docs/reference/glossary/#silent_push_notification) are also excluded from message limits since they are not viewed by users.
> **Note:** Reaching a message limit does not result in exiting a Sequence.
> **Important:** If you send a push notification with an in-app message using the Airship dashboard and a member of your audience has reached the *Mobile App Push Notifications* message limit, they will not receive either message.
>
> For the same scenario, but for a push notification with a Message Center message, the push notification will not be sent and the Message Center message will be sent.
### Sequence and Automation rule limits
In addition to project-level message limits on the total number of Sequence and Automation messages your audience can receive within a time frame, you can also set daily or all-time *rule limits* for each Sequence and Automation. This can prevent over-messaging your audience. You can set rule limits when configuring automation triggers and in Settings for a Sequence. See:
* [Rule Limits](https://www.airship.com/docs/guides/messaging/messages/sequences/create-automation/#rule-limits) in *Create an Automation*
* [Scheduling and frequency](https://www.airship.com/docs/guides/messaging/messages/sequences/create/create/#scheduling-and-frequency) in *Create a Sequence*
> **Note:** * If a user reaches an Automation rule limit, they will not receive the message.
> * If a user reaches a Sequence rule limit, they will not receive the message and will exit the Sequence.
### Overriding message limits
You can override project-level message limits, ensuring that your audience will receive a message even if they've reached the message limit. You may want to override message limits for important messages like breaking news, account alerts, or location proximity-based messages. Overriding message limits does not override [Sequence or Automation rule limits](#sequence-and-automation-rule-limits).
Enable *Ignore Channel Message Limits* in these locations:
* **Message, A/B Test, and Automation composers:** In the *Delivery* step.
* **In-App Automation and Scene composers:** In the *Settings* step.
* **Sequences:** In the *Trigger* tab in *Settings*.
## Set message limits
You can set up to 50 of each limit type.
1. Next to your project name, select the dropdown menu (▼), then **Settings**.
1. Under **App settings**, select **Message Limits**.
1. Select **Add +** for the item you want to limit, and enter the maximum number of messages that can be sent within a number of hours or days. In-App Automations and Scenes also have *Second* and *Minute* options.
1. (Optional) Click **Add another** to set another limit for a different time frame.
1. Select **Add**.
## Set limits for a category
> **Note:** * Adding a category to a message limit will affect only messages this category applies to.
> Multiple message limits are compared only when applied to the same category.
> * Reaching a category limit does not result in exiting a Sequence.
1. Next to your project name, select the dropdown menu (▼), then **Settings**.
1. Under **App settings**, select **Message Limits**.
1. Click **Add +** or **Edit
** for the item you want to limit.
1. Click **Add Category** and select from existing campaign categories or create new ones.
## Manage message limits
To view your current limits:
1. Next to your project name, select the dropdown menu (▼), then **Settings**.
1. Under **Project settings**, select **Message Limits**.
To edit:
1. Click **Edit
** for the limit you want to change.
1. Edit an existing limit, or click **Add another** and configure a new limit.
1. Click **Update**.
To delete:
1. Click **Edit
** for the limit you want to delete.
1. Select the remove icon (×) to delete one of multiple limits and click **Update**, or click **Remove all**.