Buttons
Add buttons to your push notifications, in-app messages, and web push notifications.
About buttons
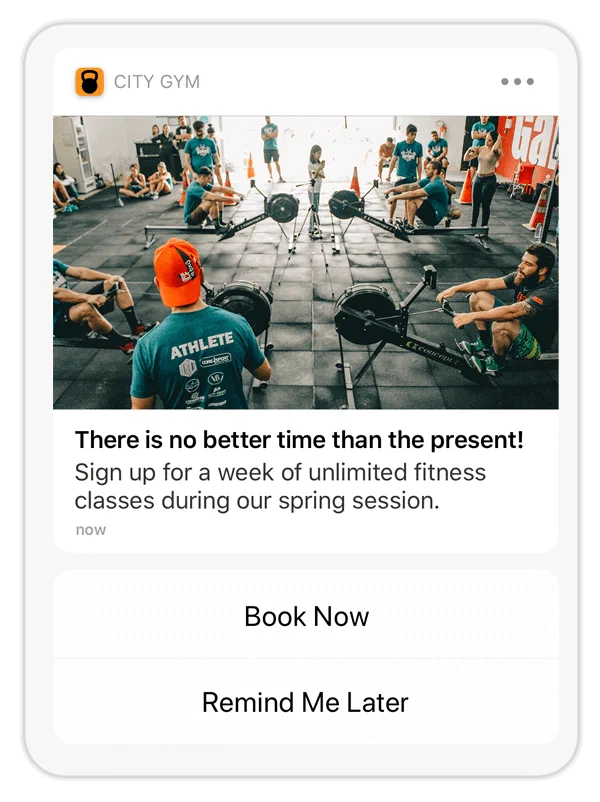
Buttons in your message content can drive users to:
- Take immediate, specific action
- Make decisions or choices
- Express preferences
Messages support a single button or a pair, such as Opt-in or a Yes/No pair. Each button has an associated actionA configurable behavior that occurs when a user interacts with your message, such as opening a web page. that occurs when the user selects it.
When that interaction occurs, you can add or remove tagsMetadata that you can associate with a channel or named user for audience segmentation. Generally, a tag is a descriptive term indicating a user preference or other categorization, such as wine_enthusiast or weather_alerts_los_angeles. or opt a user in to or out of a subscription listAn audience list users opt in to for a specific messaging topic. Users can manage their opt-in status using a Preference Center.. For push notifications and in-app messages, you can also emit a custom eventA record of an action in your app, on your website, in the Airship system, or in an external system. Examples are a message send, an app open, or a purchase transaction..
Predefined buttons
Airship provides 30+ predefined buttons for common use cases. They have preset labels and actions. Some buttons support changing their associated actions.
You can use these buttons in your messages at any time. They do not require SDK or project configuration.
Built-in Interactive Notifications
Our SDK also includes translations for these buttons in several languages. In addition to text-based interactive notification types, Airship also provides Emoji buttons. Use emojis to track user sentiment on a certain story or offer. Learn more in our iOS and Android/Fire OS documentation.
For the full list, see Built-In Interactive Notification Types.
Custom buttons
Create custom buttons to reuse across multiple messages.
Web buttons: You can create web buttons for a single message without adding them to your project, or add them to your project to reuse across messages. Web buttons can be used immediately.
App buttons: Custom app buttons require a developer to register button categories in your app before you can use them in messages. You can also associate custom app buttons with custom actions instead of only Airship actions.
Custom buttons you add in your project settings appear alongside predefined buttons when selecting buttons for a message.
Enable buttons
For the Buttons option to appear when configuring your message content, you must enable Notification Buttons in your project settings. By default, new projects have Notification Buttons enabled. For App buttons, you must also enable custom keysAdditional key-value pairs in your push notification payload for use by custom code in your app or website. You can use custom keys to pass additional campaign identifiers for analytics, pass user information to the device, control the look and feel of the app, provide image links, etc., which send information about buttons between your app and the Airship SDK.
In the dashboard:
- Next to your project name, select the dropdown menu (), then Settings.
- Under Project settings, select Dashboard Settings.
- Enable Notification Buttons.
- (Required for app buttons only) Enable Custom Keys.
Create custom app buttons
Buttons are associated with an action within your app, so a developer must first update your app, registering new Interactive Notification types in the Airship SDK. See the platform documentation for implementation details:
After your developer registers the new types, you can add buttons to your project. You will need the ID for each button.
In the dashboard:
- Next to your project name, select the dropdown menu (), then Settings.
- Under App settings, select Mobile App Notification Buttons.
- Select Create Notification Buttons.
- Enter a name and description for the button, so you can identify it in your project.
- Enter the category name that should be passed to the mobile device to identify which notification buttons to display with a message.
- (Optional) Clear the Enabled check box if you do not yet want these buttons to appear in the list of buttons when composing messages.
- Specify the label and actions for each button. If you set up both a primary and secondary buttons, they will appear as a pair.
- Button Label: Identifies the button label for display purposes in the dashboard. It should match the label defined in the app. This label does not change button labels in your app.
- ID: Associates actions with the correct button label when passed by message.
- Foreground or Background: Controls which actions are available in the dashboard. Must match button ID defined in the app.
- Destructive: For iOS, indicates if button action causes the removal of data, features, etc., for display purposes in the dashboard. Must match capability defined in the app. Check the box to enable.
- Select Save.
Create custom web buttons
To add custom web buttons to your project:
- Next to your project name, select the dropdown menu (), then Settings.
- Under App settings, select Web Notification Buttons.
- Select Create Web Buttons.
- Enter a name and description. The name helps you identify your buttons when setting up a message.
- Enter a label for each button. These are the button labels users see in your web messages. For a single button, enter one label. For a button pair, enter two labels.
- Select Save.
Add buttons to message content
Follow these steps to add buttons to your message content:
- Enable Buttons.
- Select buttons for your message:
- If you are creating an app message, choose Select buttons, then select a button or pair to add it to your message. You can search for predefined buttons by their type, or search for custom buttons by name.
- If you are creating a web message, choose Select or add buttons, and then:
- To add custom buttons for this message only, enter a button label, or two for a pair, then select Add buttons.
- To add predefined or existing custom buttons, go to Select buttons and choose which buttons to add to your message.
- Set an actionA configurable behavior that occurs when a user interacts with your message, such as opening a web page. for each button. Predefined buttons already have set actions, but some support selecting a different action. You cannot use HandlebarsHandlebars is Airship’s templating language for personalization. Handlebars expressions use double curly braces wrapped around a content template, ranging from a simple variable, e.g.,
{{first_name}}, to complex evaluations of personalization data. to personalize actions for Web buttons. - (Optional) Select Configure options for additional behaviors when a user taps the button:
- Tags — Set and/or remove tagsMetadata that you can associate with a channel or named user for audience segmentation. Generally, a tag is a descriptive term indicating a user preference or other categorization, such as
wine_enthusiastorweather_alerts_los_angeles.. You can search for a tag that exists in the system or create a new one. Setting a tag that belongs to a custom tag group requires iOS SDK 20+Android SDK 20+. - Subscription lists — AXP Opt a user in to or out of a subscription listAn audience list users opt in to for a specific messaging topic. Users can manage their opt-in status using a Preference Center.. Search for a list by name.
- Custom events — iOS SDK 20+Android SDK 20+ For push notifications and in-app messages only, emit an existing custom event or define a new one. You can also set values and properties. For requirements and usage information, see Tracking events from message interaction.
- Tags — Set and/or remove tagsMetadata that you can associate with a channel or named user for audience segmentation. Generally, a tag is a descriptive term indicating a user preference or other categorization, such as
Reporting
Airship records button clicks as custom eventsA record of an action in your app, on your website, in the Airship system, or in an external system. Examples are a message send, an app open, or a purchase transaction. to help you track how your audience engages with your messages.
In Message Reports and the aggregate Event Tracking report, the events have the name button--<button_label>, where button_label is either the button’s label or the API ID.

In Real-Time Data StreamingA service that delivers user-level events in real time to your backend or third-party systems using the Data Streaming API. button clicks are custom events with button--<button_label> as the body.name property.
{
  "id": "11f6d751-7818-4436-8f40-6c4a343deb5e",
  "offset": "1000032296503",
  "occurred": "2020-07-17T18:13:49.000Z",
  "processed": "2020-07-17T18:13:49.905Z",
  "device": {
    "channel": "21f72485-47a4-c369-a21b-c0d73698b14c",
    "device_type": "WEB",
    "named_user_id": "cool_person"
  },
  "body": {
    "name": "button--hello world",
    "interaction_type": "url",
    "interaction_id": "https://www.airship.com",
    "session_id": "45a1576f-1af3-4c8e-9d6d-44d546e1271a",
    "source": "SDK"
  },
  "type": "CUSTOM"
}