# Create a Scene

Set up multi-screen in-app experiences, with no development required. {{< badge "axp" >}}

These steps walk you through creating a new [Scene](https://www.airship.com/docs/reference/glossary/#scene) using the Scene composer. You can also create a draft Scene from the [Journey Map](https://www.airship.com/docs/reference/glossary/#journey_map) then edit and complete the steps described here. See [Create Journey components
](https://www.airship.com/docs/guides/features/orchestration-experimentation/journeys/#create-journey-components) in the *Journeys* documentation.

## Getting started

In the sidebar, select the **Create** dropdown menu (
), then **Scene**. Next, enter a message name and save it. After completing a step, select the next one in the header to move on.

## Settings

Configure [optional features](https://www.airship.com/docs/guides/messaging/in-app-experiences/configuration/optional-features/) and set or verify the [Message Purpose](https://www.airship.com/docs/reference/glossary/#message_purpose). Purpose only appears if enabled for the project.

## Audience

In this step, define who you want to send your message to and which channel types to include. You can also filter channels in your audience based on user data.

First, determine who can see your message:

| User group | Description | Steps |
| --- | --- | --- |
| **Target by conditions** | Include only users who meet conditions you define based on user data. | Use the same procedure as when building a [Segment](https://www.airship.com/docs/reference/glossary/#segment). |
| **Test users** | Include the members of a [Test Group](https://www.airship.com/docs/reference/glossary/#preview_test_groups). | Select a Test Group. |
| **Feature Flag Audience** | Include members of a [Feature Flag](https://www.airship.com/docs/reference/glossary/#feature_flag) Configuration audience<sup>1</sup>. | Search for a flag by name, display name, or description, and then select a Configuration. |
| **All Users** | Include your entire app audience. | n/a |

<sup>1. Configurations using the <a href="/guides/experimentation/feature-flags/#conditions">Feature Flag access condition</a> are excluded.</sup>

Next, under **Delivery channels**, enable the channel types to include in your audience. Channel type selection only appears if Web Scenes are enabled for the project.

> **Note:** For projects using the [channel-level segmentation system](https://www.airship.com/docs/guides/audience/segmentation/segmentation/#channel-level-segmentation), use the following steps for user group and channel configuration:
> 
> 1. (If Web Scenes are enabled for the project) Select from channels: App and/or Web.
> 
> 1. Select and configure a user group:
>    <table>
>      <thead>
>          <tr>
>              <th>Option</th>
>              <th>Description</th>
>              <th>Steps</th>
>          </tr>
>      </thead>
>      <tbody>
>          <tr>
>              <td><strong>All Users</strong></td>
>              <td>Your entire app and/or web audience</td>
>              <td>n/a</td>
>          </tr>
>          <tr>
>              <td><strong>Target Specific Users</strong></td>
>              <td>Audience members in a group you define</td>
>              <td>See <a href="https://www.airship.com/docs/guides/audience/segmentation/target-specific-users/">Targeting Specific Users</a>.</td>
>          </tr>
>          <tr>
>              <td><strong>Test Users</strong></td>
>              <td>Members of a [Test Group](https://www.airship.com/docs/reference/glossary/#preview_test_groups)</td>
>              <td>Select a Test Group.</td>
>          </tr>
>          <tr>
>              <td><strong>Feature Flag Audience</strong></td>
>              <td>Members of a [Feature Flag](https://www.airship.com/docs/reference/glossary/#feature_flag) Configuration audience<sup>1</sup></td>
>              <td>Search for a flag by name, display name, or description, and then select a Configuration.</td>
>          </tr>
>      </tbody>
>    </table>
>    <p><sup>1. Configurations using the <a href="https://www.airship.com/docs/guides/experimentation/feature-flags/#conditions">Feature Flag access condition</a> are excluded.</sup></p>


### Channel conditions

> **Note:** For projects in accounts using the [channel-level segmentation system](https://www.airship.com/docs/guides/audience/segmentation/segmentation/#channel-level-segmentation), channel conditions are instead set when using the **Target Specific Users** option for your message audience.

<p>Use channel conditions to filter which channels are included in the audience. A channel must meet the conditions to remain in the audience.</p>
<p>To set channel conditions, use the same process as when building a [Segment](https://www.airship.com/docs/reference/glossary/#segment). You can use the following data in your conditions:</p>
<ul>
<li>App version</li>
<li>Device tags</li>
<li>Locale</li>
<li>Location opt-in status</li>
<li>New users</li>
<li>Platforms</li>
<li>Push opt-in status</li>
</ul>
<p>Follow the configuration steps in <a href="https://www.airship.com/docs/guides/audience/segmentation/target-specific-users/">Targeting Specific Users</a>.</p>

### Rollout

[ADD-ON](https://www.airship.com/docs/reference/feature-packages/) *Rollouts for Scenes require the Feature Flags add-on for your Airship plan.*

A rollout is a method of limiting a Scene's total or targeted audience by setting an adjustable percentage. For more information, see [Scene rollouts](https://www.airship.com/docs/guides/features/messaging/scenes/rollouts/).

To set up a rollout:

1. Select **All users**, **Target by conditions**, or **Target Specific Users**. 
1. Enable **Audience Allocation**.
1. Set a percentage.

You can change the percentage at any time. For **Target by conditions** and **Target Specific Users**, the percentage applies to users who meet the set conditions.

![Configuring a controlled rollout for a Scene](https://www.airship.com/docs/images/scene-controlled-rollout_hu_865b614f16a884a7.webp)

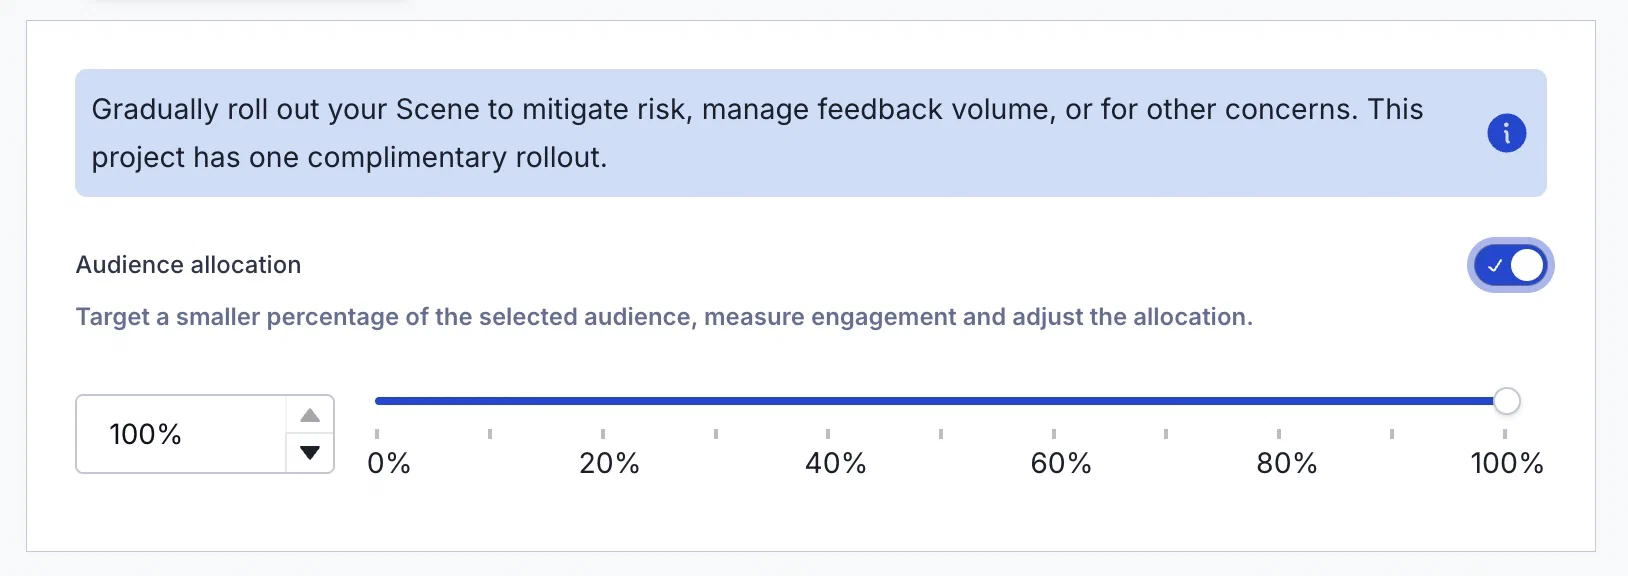
*Configuring a controlled rollout for a Scene*

## Content

![The Content step in the Scene composer](https://www.airship.com/docs/images/scene-layout-grid_hu_f0b13f27fb574377.webp)

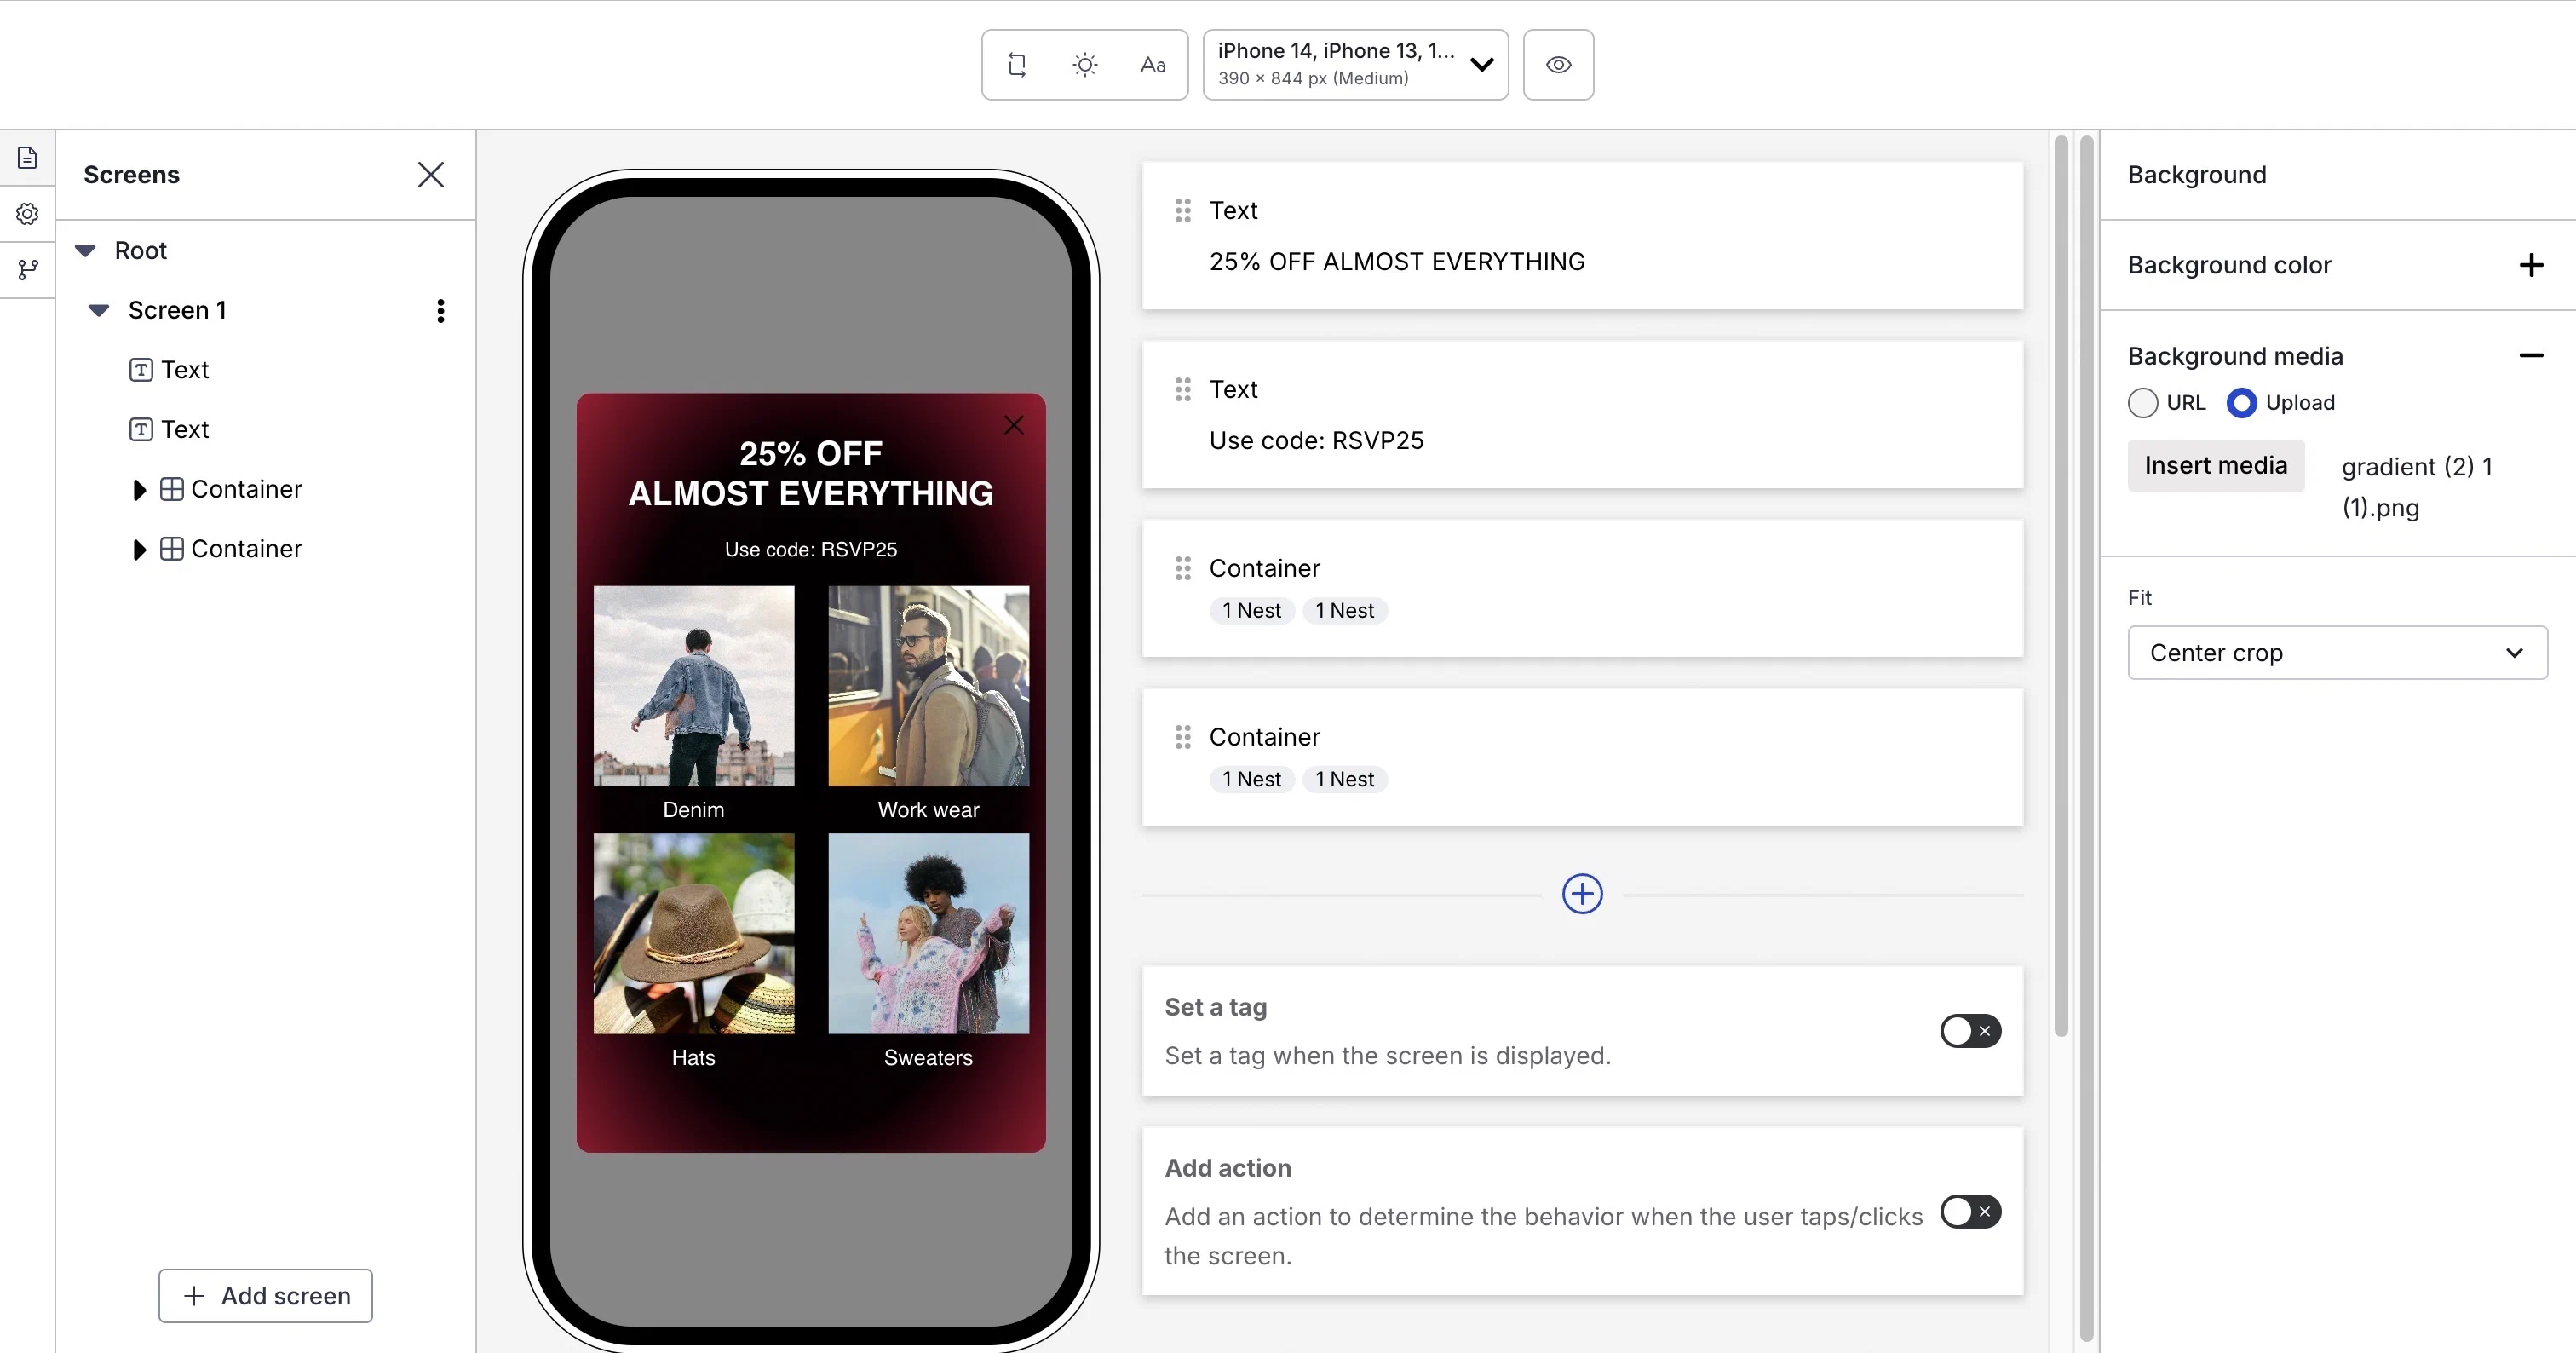
*The Content step in the Scene composer*

1. Select **Start from Scratch**, **Custom HTML**, or a content layout. Toggle **Default** and **Custom** to see available content layouts. For [custom content layouts](https://www.airship.com/docs/guides/messaging/in-app-experiences/configuration/content/#create-custom-content-layouts), you can search by layout name or description. After selecting a layout, it appears in the device preview. Select the arrows to page through each screen.

1. Select **Continue with selection**. You can change your selection up until selecting **Done**.

1. Configure settings for the entire Scene and the content of each screen. Follow the steps in [Configuring Scene content](https://www.airship.com/docs/guides/messaging/in-app-experiences/configuration/content/).

## Behavior

![The Behavior step in the Scene composer](https://www.airship.com/docs/images/scene-behavior_hu_c1c5ab91a5d9a7ca.webp)

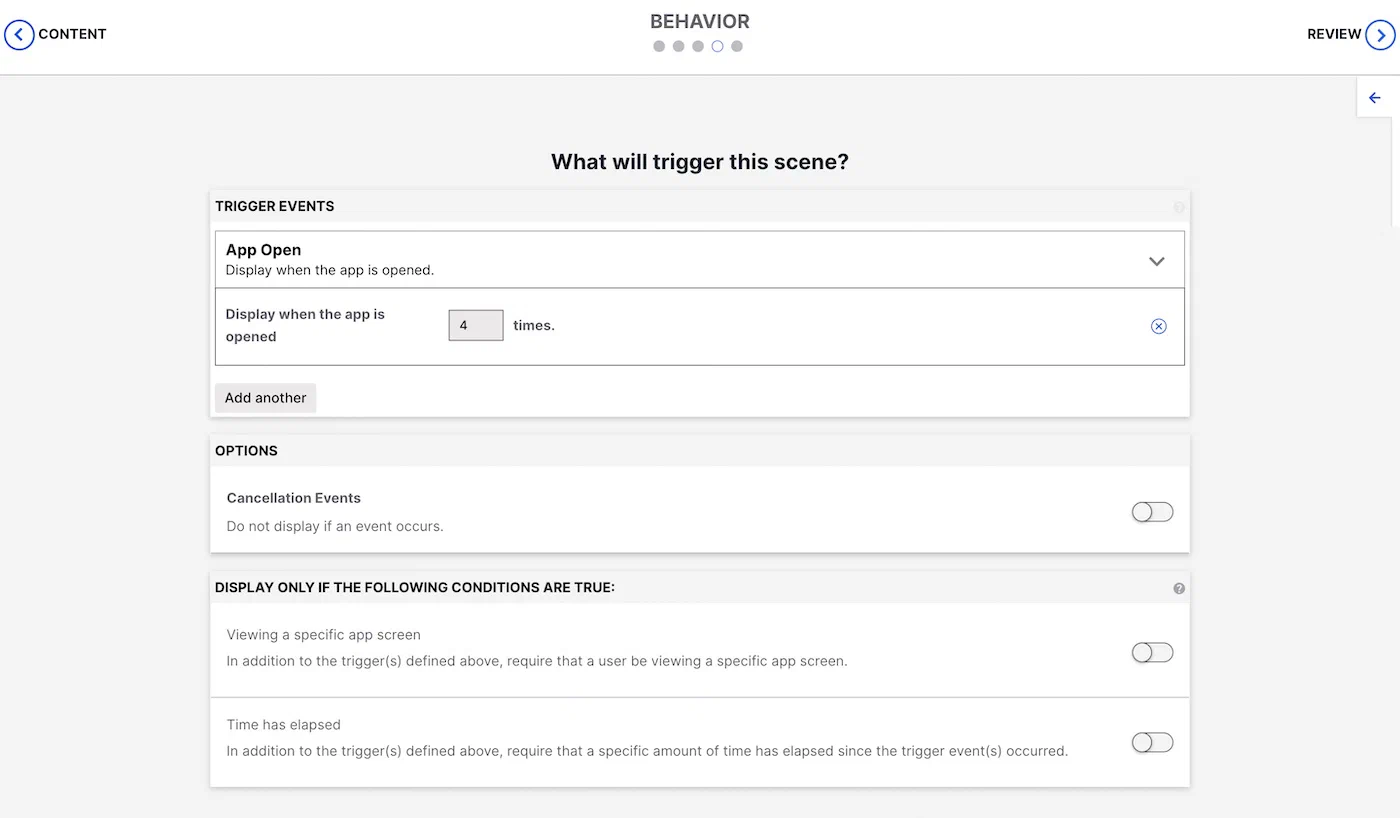
*The Behavior step in the Scene composer*

Configure the event that will cause the Scene to appear to users. You can also configure cancellation events and conditions for displaying the Scene. 

Follow the steps in [In-app experience triggers](https://www.airship.com/docs/guides/messaging/in-app-experiences/configuration/triggers/).

## Review {#review-scene}

Review your Scene appearance and summary.

* For Scenes with more than one screen, select the arrows at the side of the screen to page through each screen's preview and content summary. Toggle the Light/Dark selector above the preview to see the appearance of elements with an assigned [Color Set](https://www.airship.com/docs/reference/glossary/#color_set). Light Mode values appear in Dark Mode preview if no Dark Mode value was entered for a color set.
* If you selected **Feature Flag Audience** in the [Audience step](#audience), compare the flag and Scene start and end dates in the Schedule section to make sure your intended timing is set up correctly.
* If you want to make changes, select **Edit**, make your changes, then either select the right arrow icon (
) or select the central navigation dot to return to the Review step.

Select **Finish** to make the Scene active. If you exit before selecting **Finish**, the Scene is saved as a draft.
