# Get Started with Airship New to Airship? Learn how messaging works, navigate the dashboard, and set up your project to send your first message — no prior experience required. # 1st Flight App Guide > Install our ready-to-use app and send messages without writing a single line of code. ![Airship 1st Flight app](https://www.airship.com/docs/images/1st-flight-learning-tracks_hu_99f81a27ea51dab0.webp) *Airship 1st Flight app* Airship's 1st Flight app lets you kick the tires (and honk the horn and try the turn signals) immediately. After installation and connecting to your Airship account, you can start sending messages to your own device. For a guided experience, follow the app's learning tracks about features, capabilities, and data. You can read an overview of each topic, plus key benefits and use cases. These tracks walk you through completing tasks in the app or in the Airship dashboard, giving you hands-on experience building campaigns and seeing them live on your device. Sounds good? Let's get you set up. ## Create an account and set up the app First set up your Airship account, then request a magic link to install the 1st Flight app:
  1. Create an Airship account on go.airship.com or go.airship.eu. Make sure your Region selection matches the location where you want your data to be hosted.
  2. Check your inbox for a verification email from Airship and click Activate account to open the account setup page.
  3. Set up a password.
> **Tip:** After creating an Airship account, you can access [Flight School](https://www.airship.com/blog/fast-track-your-airship-expertise-and-value-creation-with-flight-school/) to take training courses and complete our Certification Track. > > Select the help icon (?) in the dashboard header, then **Flight School**. Or you can go directly to [https://flightschool.airship.com/](https://flightschool.airship.com/). On the next screen, enter your email address and select **Get magic link**. If on a mobile device, scroll to the right to see the field and button. Perform the next steps **on your mobile device**: 1. Check your email for our message, and tap **Install the app**. Your device's app store will open to the Airship app. 1. Install and open the app. 1. Tap **Connect My App**. 1. Select your region (US or EU) and log in with your Airship username and password. Your Airship account is now associated with the 1st Flight app on your device. 1. For iOS mobile devices, tap **Enable Push** then **Allow** to allow the device to receive push notifications. Push is automatically enabled for **Android**, so this screen will not appear for Android mobile devices. ## Start sending messages Now that your device is connected with your 1st Flight project in Airship, you're ready to send yourself messages. ### Send a push notification Send a [Push Notification](https://www.airship.com/docs/reference/glossary/#push_notification) to your mobile device. We'll try out a few features along the way too. 1. Open the 1st Flight project from the [Dashboard](https://www.airship.com/docs/reference/glossary/#dashboard) and select **Create a message**. > **Tip:** After sending your first message, this screen will display your [Messages Overview](https://www.airship.com/docs/reference/glossary/#messages_overview). Select **Create** to create more messages. 1. Enter a message name and save it. 1. In Audience, select **All Users** and [Fan Out](https://www.airship.com/docs/reference/glossary/#fan_out), and enable **Mobile Apps**. Then, select **Content** in the header. 1. Select **Push Notification**, then **Add content**. 1. Enter your message in the text field. You will see your message appear in the device preview. 1. Select the **Web Page** action and enter a URL. We recommend [http://bit.ly/IqT6zt](http://bit.ly/IqT6zt). When your device receives the message and you tap the notification, its web browser will open the URL entered here. 1. Enable the **Title** option and enter a title in the text field. Notice its position in the preview. 1. Select **Delivery** in the header and then **Send Now**. 1. Select **Review & Send** in the header and review the appearance and content of your message. You can page through the images in the device preview. ![Reviewing the message summary before sending](https://www.airship.com/docs/images/ab-preview_hu_18dda5767a7acfd8.webp) *Reviewing the message summary before sending* 1. Select **Send Message**. Your push notification should appear momentarily. Tap the message and the device's browser should open the URL you entered when composing your message. Want to send more messages? Our [Message composer tutorials](https://www.airship.com/docs/guides/messaging/messages/) walk you through all the features and options. Ready to integrate Airship with your own app? See [Create a messaging project](https://www.airship.com/docs/guides/getting-started/setup/#create-a-messaging-project) and [Configure channels](https://www.airship.com/docs/guides/getting-started/setup/#configure-channels) in *Try Airship*. ### Automate a push notification After you've sent your first message, try setting up some automated messages. Airship's [Automation](https://www.airship.com/docs/reference/glossary/#automation) features make it easy to send your audience relevant messages based things they do in your app, changes in their preferences, or changes in their location. Learn more in the [Automation and Sequences user guide](https://www.airship.com/docs/guides/messaging/messages/sequences/about/). **Automate a push notification using the** [Tag Change Trigger](https://www.airship.com/docs/reference/glossary/#tag_change_event_trigger): 1. Follow the steps in the [Automation Composer Tutorial](https://www.airship.com/docs/guides/messaging/messages/sequences/create-automation/), using these settings: * In the Setup step, select the Tag Change trigger, then enter a tag in the search field (e.g., `heyo`) and select **Create tag**. * In the Content step, select **Push Notification** as your content type. 1. Set the tag on your Channel ID so you can trigger the message: 1. In the 1st Flight app, go to **Account**, then **Tags**. 1. Select **Tag, you're it!**, then **Set tags**. 1. Enter the tag you used when setting up your automation rule and select **Add**. This simulates how you would assign tags to your audience as they use your app and also demonstrates how you can use tags with your messages. Tags are case-sensitive. Your push notification should appear momentarily. ### Try In-App Automation In-App Automation messages are cached in your app, helping you immediately respond to your audience's behaviors with contextual messages. Using In-App Automation, you can even reach users who may have opted out of traditional push notifications. Learn more in the [In-App Automation feature guide](https://www.airship.com/docs/guides/features/messaging/in-app-automation/). **Try In-App Automation using the** [App Open (Mobile App), Session Start (Web) Trigger](https://www.airship.com/docs/reference/glossary/#app_open_iaa_trigger): 1. Follow the steps in the [In-App Automation Composer Tutorial](https://www.airship.com/docs/guides/messaging/in-app-experiences/in-app-automation/create/), using these settings: * In the Behavior step, select the **App Open** trigger and leave the value set to `1`. This triggers your message the next time your audience opens the app. 1. Close and open the 1st Flight app to see your message. If you don't see your message, go to **Messages**, then **Messages Overview**, and make sure it is listed as Active. After it is Active, reopen the app. ### Create your first Sequence [Sequences](https://www.airship.com/docs/reference/glossary/#sequence) are a quick and powerful way to encourage your audience to reach a goal with an automated series of messages. You might use a Sequence to encourage your audience to buy items that they left in their shopping cart, or count down to an upcoming event that they have tickets for. You can set goals to end the Sequence when your audience achieves a desired result. For example, if you start a Sequence when your audience leaves items in their cart, you might end the Sequence when your audience completes a purchase. Learn more in the [Sequences guide](https://www.airship.com/docs/guides/messaging/messages/sequences/). > **Tip:** To get started without having to create a Sequence from scratch, try a [Sequence Template](https://www.airship.com/docs/reference/glossary/#sequence_template). **Set up a Sequence using the** [Tag Change Trigger](https://www.airship.com/docs/reference/glossary/#tag_change_event_trigger): 1. Follow the steps in [Create a Sequence](https://www.airship.com/docs/guides/messaging/messages/sequences/create/create/), using these settings: * For the trigger, select **Tag Change**, then enter a tag in the search field (e.g., `woohoo`) and select **Create tag**. 1. Set the tag on your Channel ID so you can trigger the Sequence: 1. In the 1st Flight app, go to **Account**, then **Tags**. 1. Select **Tag, you're it!**, then **Set tags**. 1. Enter the tag you used when setting up your Sequence and select **Add**. This simulates how you would assign tags to your audience as they use your app and also demonstrates how you can use tags with your messages. Tags are case-sensitive. Your audience will receive messages in the Sequence according to the schedule and conditions you set. When your audience no longer meets the conditions to continue receiving messages, or achieves a goal of the Sequence (set in [Outcomes](https://www.airship.com/docs/guides/messaging/messages/sequences/create/outcomes/)), they stop receiving messages and their Sequence ends. > **Tip:** You can test your Sequence now instead of waiting for scheduled messages. Send the Sequence to yourself as a [Named User](https://www.airship.com/docs/reference/glossary/#named_user): > > 1. Associate a Named User with your Channel ID: > 1. In the 1st Flight app, go to **Account**, then **Named User**. > 1. Select **Say my name**, then **Named User**. > 1. Enter an ID (e.g., `julia`), then tap **Apply**. > 1. Follow the steps to [Test a Sequence](https://www.airship.com/docs/guides/messaging/messages/sequences/create/test/#test-a-sequence). When you set up the Test Audience, enter the Named User you set in the 1st Flight app. ### Try Message Center Message Center is both a place in your app where you can display persistent rich messages, including HTML, video, etc., and a message type. Similar to email, Message Center represents both the medium (the in-app inbox) and the message type (the messages you send to the inbox). Message Center messages support HTML messages with images and video, helping you keep your audience engaged with creative visuals. You might use the Message Center to send your audience coupons, or notify them of upcoming events, encouraging them to keep returning to your app and services. See [Message Center content](https://www.airship.com/docs/guides/messaging/messages/content/app/message-center/) to create an HTML message with images and video. * You can send Message Center messages from the Message, Automation, and Sequence composers. * You can send a Message Center message by itself, or you can combine it with a push notification and/or in-app message. Interacting with the push notification or in-app message sends your audience to the Message Center. ### Try the API If you'd like to try out the [Airship API](https://www.airship.com/docs/developer/rest-api/ua/) with your new 1st Flight app, you can use the [Airship Public Workspace](https://www.postman.com/airship-api) on Postman.com. From the Airship public workspace, select the [Airship 1st Flight](https://www.postman.com/airship-api/workspace/airship-public-workspace/collection/13307663-e55b622e-beeb-42cc-9bf2-e1677fc79db0) collection to get started. In the upper-right hand corner, choose the Airship 1st Flight environment and populate it with your 1st Flight app key, secret, and other variables to use the Airship API. > **Tip:** If you use an AI coding assistant, you can connect it to Airship with Skills and an MCP server. See [Airship AI Tools](https://www.airship.com/docs/developer/ai-tools/ai-tools/). # Messaging basics > How messaging works, what you can send, and how you can send it > **Tip:** Throughout our documentation, you will see underlined terms. Hover over a term to see its definition. Most terms also function as links. We also have a full [Glossary](https://www.airship.com/docs/reference/glossary/). ## How messaging works Before you can send messages, you need: 1. An **app or website** integrated with the Airship software developer kit (SDK). The SDK enables communication with mobile devices and web browsers. If you are only sending SMS or email notifications, SDK integration is not required. Notifications sent to [Open Channels](#message-types) also do not require SDK integration, but your webhook server must be able to process and interpret a JSON payload. 1. An **audience** of your app's or website's opted-in users. An exception to this is [Apple News](https://www.airship.com/docs/reference/glossary/#apple_news) notifications, which are sent to Apple News subscribers. Apple News audience management is not handled via Airship. 1. A **container** for your messages. In Airship, this container is a *project*. You will create a project in the [Dashboard](https://www.airship.com/docs/reference/glossary/#dashboard) for each app or website you want to communicate with. Almost everything you do with Airship, including creating messages, happens inside a project. A project is essentially Airship's representation of your app or website. A project: * Is a record for your app, website, and any other channels you use to communicate with your audience * Stores your message history, message templates, audience and analytic data, channel configuration, default message configuration settings, and more * Contains the keys required to talk to various notification services — More about keys: [The SDKs and APIs: Authentication](https://www.airship.com/docs/guides/getting-started/developers/sdk-api/#authentication) With the above in place, then: 1. **You create a message** using a [[Composer](https://www.airship.com/docs/reference/glossary/#composer)](#composers) or the API. 1. **Your app or website interprets the message** via the Airship SDK, **displaying or delivering it to users.** SMS, email, and Apple News notifications are instead interpreted by a native client. 1. **Users see your message.** When and where they see the message depends on message type, delivery settings, and automation. ## Channels When you read "channel," it could mean one of three things: * **Engagement** channel — A communication medium supported by the Airship Service. Supported channels include app, web, email, SMS, and Open Channels. * **Development** channel — An instance representing an entity addressable via the Airship Service, e.g., an iOS device, email address, SMS number, or web browser. * **Channel ID** — An Airship-specific unique identifier for a development channel instance, e.g., a mobile device, web browser, or email address. We specify *Channel ID* as such in our documentation. *Engagement* and *development* are generally implied by context. For more information, see [Intro to Channels](https://www.airship.com/docs/guides/getting-started/developers/channels-intro/). ## Message types — *What you can send* {#message-types} Message type availability varies per engagement channel. Being able to send from the [Dashboard](https://www.airship.com/docs/reference/glossary/#dashboard) or API varies per message type. The next sections describe both. See also [Live Activity](https://www.airship.com/docs/reference/glossary/#live_activity) and [Live Update](https://www.airship.com/docs/reference/glossary/#live_update). ### App Supported message types for the App channel and whether they can be sent from the [Dashboard](https://www.airship.com/docs/reference/glossary/#dashboard) or API: | Message type | Description | Dashboard or API support | | --- | --- | --- | | **Push notification** | A push notification is a message that can appear on any screen on a mobile device. Push notifications appear as banners. [Learn more](https://www.airship.com/docs/guides/messaging/messages/content/app/push-notifications/) | Dashboard, API | | **Message Center** | Message Center is both a place in your app where you can display persistent rich messages, including HTML, video, etc., and a message type. Similar to email, Message Center represents both the medium (the in-app inbox) and the message type (the messages you send to the inbox). [Learn more](https://www.airship.com/docs/guides/features/messaging/message-center/) | Dashboard, API | | **In-app message** | An in-app message is a message that appears inside of your app. You can send in-app messages to your entire app audience, not just users who have opted-in to push notifications. The standard format, as opposed to In-App Automation, is a banner that slides downward or upward from the top or bottom of a device screen. [Learn more](https://www.airship.com/docs/guides/messaging/messages/content/app/in-app-messages/) | Dashboard, API | | **In-App Automation** | In-App Automation refers to messages cached on users' devices and displayed when users meet certain conditions within your app, such as viewing a particular screen or opening the app a certain number of times. [Learn more](https://www.airship.com/docs/guides/features/messaging/in-app-automation/) | Dashboard | | **Scene** | A Scene is a mobile app or web experience of one or more screens displayed with fully native UI components in real time, providing immediate, contextual responses to user behaviors. Scenes can be presented in full-screen, modal, or embedded format using the default swipe/click mode or as a Story. They can also contain survey questions. [Learn more](https://www.airship.com/docs/guides/features/messaging/scenes/scenes/) | Dashboard | | **Story** | A Story is a Scene set to automatically transition to the next screen without swiping or clicking. [Learn more](https://www.airship.com/docs/guides/features/messaging/scenes/surveys-stories/#story-mode) | Dashboard | | **Embedded Content** | Embedded Content is an alternative Scene format that can be displayed on any app or web screen in a view defined by a developer. It can also be presented in Story format. [Learn more](https://www.airship.com/docs/guides/features/messaging/scenes/embedded-content/) | Dashboard | ### Web Supported message types for the Web channel and whether they can be sent from the [Dashboard](https://www.airship.com/docs/reference/glossary/#dashboard) or API: | Message type | Description | API support | | --- | --- | --- | | **Web push notification** | A web push notification is a message that appears in the top or bottom right corner of a web browser or in a notification center. On mobile devices, web push notifications appear similar to push notifications. [Learn more](https://www.airship.com/docs/guides/features/messaging/push-notifications/) | Dashboard, API | | **Scene** | A Scene is a mobile app or web experience of one or more screens displayed with fully native UI components in real time, providing immediate, contextual responses to user behaviors. Scenes can be presented in full-screen, modal, or embedded format using the default swipe/click mode or as a Story. They can also contain survey questions. [Learn more](https://www.airship.com/docs/guides/features/messaging/scenes/scenes/) | Dashboard | | **Story** | A Story is a Scene set to automatically transition to the next screen without swiping or clicking. [Learn more](https://www.airship.com/docs/guides/features/messaging/scenes/surveys-stories/#story-mode) | Dashboard | | **Embedded Content** | Embedded Content is an alternative Scene format that can be displayed on any app or web screen in a view defined by a developer. It can also be presented in Story format. [Learn more](https://www.airship.com/docs/guides/features/messaging/scenes/embedded-content/) | Dashboard | ### Email, SMS, and Open channels Supported message types for the Email, SMS, and Open channels and whether they can be sent from the [Dashboard](https://www.airship.com/docs/reference/glossary/#dashboard) or API: | Message type | Description | Dashboard or API support | | --- | --- | --- | | **Email** | Email is an HTML or plain-text message that you send to registered users. Email notifications appear in recipients' email inboxes. [Learn more](https://www.airship.com/docs/guides/features/messaging/email/) | Dashboard, API | | **SMS** | An SMS is a message that you can send to an MSISDN (phone number) over the SMMP protocol to devices that have opted in for a specific sender ID (long or short code). SMS messages appear in recipients' native SMS clients. Generally speaking, SMS is inclusive of MMS and RCS. [Learn more](https://www.airship.com/docs/guides/messaging/messages/content/sms/) | Dashboard, API | | **Open channel** | An Open channel message can be sent to any medium that can accept a JSON payload. [Learn more](https://www.airship.com/docs/guides/features/messaging/open-channels/) | Dashboard, API | ## Composers — *How you can send* {#composers} You can create a message of any type in the dashboard using a composer. Composers are defined by what you can include and control: message types, delivery, and automation. The following sections describe the composers you can use per channel and which message types are supported for each. See [Message types](#message-types) above for API support per message type. ### App These composers support the app channel only and are for sending the single message type they are named for: * [Apple News](https://www.airship.com/docs/reference/glossary/#apple_news) * [In-App Automation](https://www.airship.com/docs/reference/glossary/#iaa) ### App and Web The Scene composer supports the app and web channels for these message types: * Scene * Story * Embedded Content ### All channels The composers listed in the following table support all channels for these message types: * Push notification * In-app message * Message Center * Web push notification * Email * SMS * Open channel They also support combining message types in a single send. | Composer | Description | | --- | --- | | **Message** | Send a single message. [Learn more](https://www.airship.com/docs/guides/messaging/messages/create/) | | **A/B Test** | Experiment with different variations of a message. [Learn more](https://www.airship.com/docs/guides/experimentation/a-b-tests/messages/) | | **Automation** | Automatically send a message to users when they meet certain conditions. [Learn more](https://www.airship.com/docs/guides/messaging/messages/sequences/about/) | | **Sequence** | Automatically send a series of messages to users when they meet certain conditions. [Learn more](https://www.airship.com/docs/guides/messaging/messages/sequences/about/) | ## Reporting So you've established an audience and sent your messages. Now what? Dig into reporting at every level: * [Message Reports](https://www.airship.com/docs/guides/reports/message/) evaluate the performance of individual messages. Messages created with the A/B Test higher-level statistical report along with a message report for each variant. For Sequences, the Performance report shows audience behavior compared to the Sequence’s goal and a message report for each message in the Sequence. * [Scene Reports](https://www.airship.com/docs/guides/messaging/in-app-experiences/scenes/create/scene-reports/) * [A/B Test Reports](https://www.airship.com/docs/guides/experimentation/a-b-tests/messages/) * [Sequence Performance](https://www.airship.com/docs/guides/messaging/messages/sequences/performance/) * [Engagement Reports](https://www.airship.com/docs/guides/reports/engagement/) explain aggregate user engagement activity, response rates, and important high-level statistics such as opt-in/opt-out and uninstall levels by platform. * [Performance Analytics](https://www.airship.com/docs/reference/glossary/#pa) provides customizable dashboard-style reports using advanced analytics to show and interpret engagement with your app, website, and across multiple apps. You can also set up [integrations with Airship partners](https://www.airship.com/docs/integrations/) and use [Real-Time Data Streaming](https://www.airship.com/docs/reference/glossary/#rtds) to send you Airship events to an outside system. # Set up Airship and send a message > Create an Airship account and project, configure a channel, and then send your first message to your app or website. If you already have an Airship account, skip right to [Create a messaging project](#create-a-messaging-project). If you are creating an Airship account now, you will start on our free plan and can [upgrade to a more feature-rich paid plan at any time](https://www.airship.com/docs/guides/getting-started/admin/company-plan/). ## Set up your account
  1. Create an Airship account on go.airship.com or go.airship.eu. Make sure your Region selection matches the location where you want your data to be hosted.
  2. Check your inbox for a verification email from Airship and click Activate account to open the account setup page.
  3. Set up a password.
> **Tip:** After creating an Airship account, you can access [Flight School](https://www.airship.com/blog/fast-track-your-airship-expertise-and-value-creation-with-flight-school/) to take training courses and complete our Certification Track. > > Select the help icon (?) in the dashboard header, then **Flight School**. Or you can go directly to [https://flightschool.airship.com/](https://flightschool.airship.com/). Now you can enter an email address to request a magic link to install our [1st Flight app](https://www.airship.com/docs/guides/getting-started/1st-flight-app/) or skip. After either choice, your next screen is your [Dashboard](https://www.airship.com/docs/reference/glossary/#dashboard), where you can create a messaging project. ## Create a messaging project From the top-level dashboard: 1. Select **Create project**, then **Messaging project**. 1. Enter details about your project: * **Project Name** — You can edit this at any time. * **Icon (Optional)** — Upload your icon. This does not have to be the same icon you submit to app marketplaces, but that is the typical practice. * **Type** — Specify whether this project is live or for testing. If this is your first time configuring a project for Airship, you should choose **Test**. **This setting cannot be changed later.** * **Industry** — Select an industry type and sub-industry. These are used for reporting. * **Website URL (Optional)** — Enter your homepage URL to provide context for [Audience Pulse](https://www.airship.com/docs/guides/audience/segmentation/audience-pulse/#ai-recommendations) AI recommendations. > **Tip:** * **Project Name** — If you work in a large organization with multiple projects, keep in mind that other people in your company may need to search for this project, so give it as descriptive a name as > possible and adopt a naming convention. Examples: "Anytown News iOS — > Development" or "McDowell's Chicago Android — Production". > > * **Live/Test** — Ultimately, you should have both a Test build (development for sending test messages) and a Live build (production for sending messages to customers). > > Apple treats the production and development servers separately, so a device token for a testing sandbox will not work in production. See [iOS Channel Configuration](https://www.airship.com/docs/guides/getting-started/developers/configure-channels/#ios-channel-configuration) in *Configuring Mobile Channels*. 1. Select **Create project**. Now you can configure channels for your project. ### Manage projects After creating a messaging project, you can access its details for integration. You can also edit or delete the project. Next to your project name, select the dropdown menu (▼), then **Project details**. From there you can view the following information: * Project name * Industry * App key * Secret — Owner, Administrator, or Full access level is required. * Master Secret — Owner or Administrator access level is required. To edit your project's [name, icon, or industry](#create-a-messaging-project): 1. Select **Edit project details** and make your changes: 1. Select **Save project details**. To delete your project, select **Delete project**. > **Warning:** When you delete a project: > > * All messages are deleted, including any scheduled or ongoing messages. > * All analytics are deleted. > * All channels are uninstalled. > * After 90 days, data related to the deleted project is purged. > > This action is irreversible. See also: * [Access levels](https://www.airship.com/docs/guides/getting-started/admin/teams-messaging/#access-levels) in *Manage Messaging teams and access* * [App Keys & Secrets: Security](https://www.airship.com/docs/guides/getting-started/developers/app-keys-secrets/) ## Configure channels After creating a project, configure the channels you want to send messages to. While anyone should be able to follow these instructions and send a push notification, this is a technical process and should be completed by a developer with access to the proper mobile development tools and credentials for developer programs. Follow the steps in the documentation for each channel: * Mobile app [Channel configuration](https://www.airship.com/docs/guides/getting-started/developers/configure-channels/) and [SDK setup](https://www.airship.com/docs/sdk-topics/installation/) * [Getting Started](https://www.airship.com/docs/developer/sdk-integration/web/getting-started/) for Web ## Create a Test Group You will send your first notification to a [Test Group](https://www.airship.com/docs/reference/glossary/#preview_test_groups) that contains your [Channel ID](https://www.airship.com/docs/reference/glossary/#channel_id) as a member. Your Channel ID is available after integrating the Airship SDK with your app or website. To find your Channel ID, you can speak with one of your developers about adding it to a Test Group or do so yourself. See [Find a Channel ID](https://www.airship.com/docs/guides/getting-started/developers/identifiers/#find-a-channel-id) in *Finding identifiers*. Next, create a Test Group in the Airship dashboard: 1. Go to **Audience**, then **Preview and Test Groups**. 1. Select **Create group**. 1. Enter a name for the group and enable **Test group**. 1. Select **Save and continue**. 1. Select **Add user** and enter your name and app or web Channel ID. 1. Select **Done**. See [Preview and Test Groups](https://www.airship.com/docs/guides/audience/preview-test-groups/) for caveats and additional information. ## Send your first message Now you are ready to send your message: 1. In the sidebar, select the **Create** dropdown menu (▼), then **Message**. 1. In Audience, select **All Users** and [Fan Out](https://www.airship.com/docs/reference/glossary/#fan_out), and enable **Mobile Apps** or **Web**. Then, select **Content** in the header. 1. ![Selecting the message type](https://www.airship.com/docs/images/ug-gs-content-push_hu_e5155038c9e843fd.webp) *Selecting the message type* Select **Content** in the header, then **Push Notification**, then **Add Content**. 1. ![Entering push notification text](https://www.airship.com/docs/images/content-body_hu_47c8439af54bdaa8.webp) *Entering push notification text* Enter the text that will display in your message. A preview will display as you type. 1. Select **Delivery** in the header, then **Send Now**. 1. ![Reviewing the message summary before sending](https://www.airship.com/docs/images/ab-preview_hu_18dda5767a7acfd8.webp) *Reviewing the message summary before sending* Select **Review & Send** in the header, then review the device preview and message summary. Use the arrows to page through the various previews. The channel and display type dynamically update in the dropdown menu above. You can also select a preview directly from the menu. 1. Select **Send Message**. If all has been configured correctly, you just sent your first push or web push notification! Because the message was sent to Test Users, you should see the push notification appear on the mobile device or web browser for the users defined in your selected Test Group. If this is not the case, review the steps for creating your Test Group and reattempt this procedure. # Twilio and SendGrid activation > Enable your Twilio SMS and SendGrid email programs for Airship. ## Prerequisites Your Airship contract must include Email and/or SMS. Depending on purchase date, your contract may require an amendment. Contact your account manager for details. To enable Twilio for your Airship SMS channel, you must have a Twilio account or Subaccount. While not required, we recommend using a separate Subaccount within your Twilio account to isolate Airship messaging campaigns and sender configurations from any existing campaigns. You must also have the following prerequisites in place: | Prerequisite | Detail | Resource | | --- | --- | --- | | **Account SID** | This is a unique key that is used to identify a specific Twilio Parent Account or Subaccount and is a credential that acts as a username. | [What is a Twilio Account SID and where can I find it?](https://help.twilio.com/articles/14726256820123) | | **Auth Token** | This acts as the password for API authorization requests. The Auth Token must be a Primary or Secondary token, though we recommended using a Secondary token to avoid interference with existing API integrations. | [REST API: Secondary Auth Token](https://www.twilio.com/docs/iam/api/secondary_authtoken) | | **A registered SMS Sender** | The SMS sender must be one of Short code, Long code, or Alphanumeric code. | [SMS Senders](https://www.airship.com/docs/developer/api-integrations/sms/senders/) | To enable SendGrid for your Airship Email channel, you must have a SendGrid account or subuser. While not required, we recommend using a separate subuser within your SendGrid account to isolate Airship messaging campaigns and sender configurations from any existing campaigns. You must also have the following prerequisites in place: | Prerequisite | Detail | Resource | | --- | --- | --- | | **API key** | The key must have Full Access permission. | [API Keys](https://www.twilio.com/docs/sendgrid/ui/account-and-settings/api-keys) | | **Sending domain** | Domain authentication must already be completed for the sending domain with proper DNS configuration. | [How to Set Up Domain Authentication](https://www.twilio.com/docs/sendgrid/ui/account-and-settings/how-to-set-up-domain-authentication) | | **Marketing and transactional IP pools** | IP pools may be either shared or dedicated. We recommended provisioning separate pools for commercial marketing messaging and transactional messaging. | [IP Pools: All You Need to Know](https://sendgrid.com/en-us/blog/ip-pools-all-you-need-to-know) | | **Webhook verification key** | Configure your SendGrid webhook using the Post URL `https://go.urbanairship.com/api/email/twilio/events/`, with all Engagement and Delivery Actions enabled, and with Signature Verification enabled. | [Add an Event Webhook](https://www.twilio.com/docs/sendgrid/for-developers/tracking-events/getting-started-event-webhook#add-an-event-webhook) | ## Request Airship integration Once your prerequisites are met, contact your Airship account manager or [Support](https://support.airship.com/) and request integrating your Airship account with Twilio. Then Airship will: 1. Prepare your account for the integration 1. Request that you provide details about your [prerequisites](#prerequisites) 1. Assign a dedicated technical consultant, who will complete the necessary project configuration 1. (For Twilio SMS) Provide a unique Mobile Originated Callback URL to add to your Sender or Messaging Service configuration in Twilio ## Importing your audience There are several methods available to **import your existing audience** into Airship, and your Airship technical consultant will recommend the best method for your specific needs. A common method is [SFTP upload](https://www.airship.com/docs/guides/audience/segmentation/sftp-upload/). You can upload to Airship using this method after exporting from Segment Engage or another CRM/CDP. See [Download your audience as a CSV file](https://www.twilio.com/docs/segment/engage/audiences#download-your-audience-as-a-csv-file) in Segment's Engage documentation. You can also **enable email and SMS audience syncing** via Segment integration, which is our recommended method. Synchronization automatically associates audience members to [Named Users](https://www.airship.com/docs/reference/glossary/#named_user) based on your existing track events in Segment. Our technical consulting team will work with you to import your mobile device IDs using our import API endpoint. See [Register and associate](https://www.airship.com/docs/integrations/segment/#register-and-associate) in our Segment integration documentation. ## Importing templates from Segment Engage Email and SMS templates built in Engage use a scripting language called Liquid for personalization and dynamic content. Your Airship onboarding team will help with converting your templates to use [Handlebars](https://www.airship.com/docs/reference/glossary/#handlebars) instead of Liquid. First, export your templates from Segment Engage. Your Airship onboarding team will ask you to copy and paste your template content from Engage to a shared document. Airship will use a script to convert your templates and add them to your Airship projects for you to test and validate. From there, you can use Airship's [Interactive editor](https://www.airship.com/docs/guides/messaging/editors/interactive/about/) to create new templates or upload your own HTML templates personalized using Handlebars. ## Migrating your Segment email campaigns The method of migrating your email campaigns from Segment Engage to Airship will depend on the types of campaigns you have configured. For triggered messaging, recreate the messages as Airship [Journeys](https://www.airship.com/docs/reference/glossary/#journey). You can use many of your existing events and properties already tracked in Segment via our pre-built integration. See [Segment](https://www.airship.com/docs/integrations/segment/#destination-integration) in our integration docs. For ad hoc or recurring campaigns like newsletters, recreate the messages using the Message [Composer](https://www.airship.com/docs/reference/glossary/#composer) and configure delivery according to your preferred channels and schedule. See [Create a message](https://www.airship.com/docs/guides/messaging/messages/create/). ## Optional: Syncing Opt-Outs or Unsubscribes from Twilio If you are handling opt-out state outside of Airship, for instance, by using Twilio's Advanced Opt-Out for Messaging Services, you'll need to make sure that Airship remains in sync to avoid messaging users who have unsubscribed. This includes STOP messages and any other unsubscribe signals you receive from users. For SMS, send these events to the [Opt-out of SMS messages API endpoint](https://www.airship.com/docs/developer/rest-api/ua/operations/sms/#optoutsmschannel). For email, send these events to the [Update an email channel API endpoint](https://www.airship.com/docs/developer/rest-api/ua/operations/email/#updateemailchannel), updating the `commercial_opted_out` channel property. This ensures that Airship has the latest opt-out state for each MSISDN or email address and can suppress messages accordingly. If you are unable to automate this process through the API for email, you can manage opt-outs by manually uploading a CSV file through the Airship dashboard. This CSV should contain the email addresses of users who have opted out, based on your internal records. See [Setting and removing Text, Number, and Date Attributes](https://www.airship.com/docs/guides/audience/attributes/setting/#setting-and-removing-text-number-and-date-attributes) and follow the steps for the CSV method to provide a date for [Attribute](https://www.airship.com/docs/reference/glossary/#attributes) `ua_commercial_opted_out`. For individual channels, you can change opt-in status manually in the dashboard. See [Viewing channel details](https://www.airship.com/docs/guides/audience/contact-management/#viewing-channel-details) in *Contact Management*. Whether using automated or manual sync, it's important to keep Airship's records updated. Airship does not assume responsibility for enforcing opt-outs that have not been communicated through one of these methods. ## Bringing your own RCS branded sender If you manage your own Twilio Subaccount, you can configure an [RCS](https://www.airship.com/docs/reference/glossary/#rcs) branded sender to use with Airship. After adding RCS to your Airship plan, we will provide detailed instructions and validate your configuration. At a high level, you will: * Assign both senders to a Twilio Messaging Service and configure incoming messages to post to Airship * Share your Messaging Service SID and chosen SMS sender with your Airship representative so we can complete the connection on our side For more information, see [RCS branded sender](https://www.airship.com/docs/developer/api-integrations/sms/rcs/). ## Learn the Airship UI Learn how to navigate the Airship dashboard, use composers to create and send messages, and manage your message history with list and calendar views. # The Airship dashboard > {{< glossary_definition "dashboard" >}}

The dashboard is where you create and access projects, containers for the settings, certificates, reports, and other details related to your messages and mobile wallet passes.

The dashboard has two levels:

  1. A list of all your messaging and mobile wallet projects.
  2. An individual project after opening it from the list of all projects.

Almost everything you do with Airship happens inside a project, including creating messages and wallet pass templates.

Viewing and finding your projects

At the top level of the dashboard, tiles display each messaging and mobile wallet project. Messaging projects list their name, environment, and channels. Mobile wallet projects list their name and pass type.
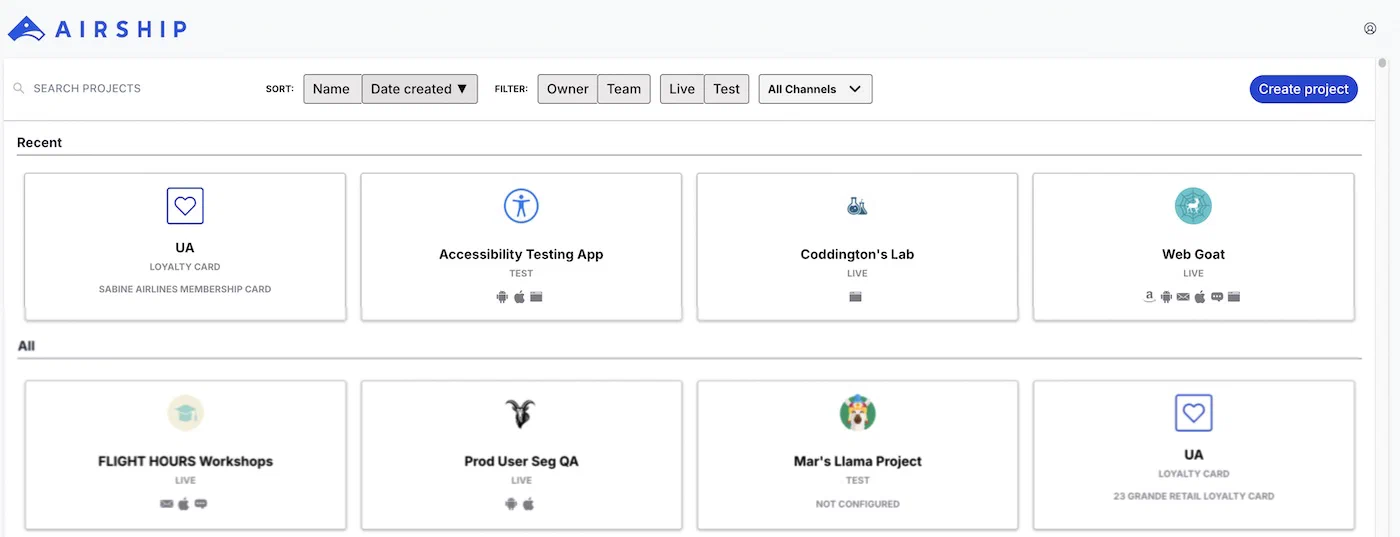
![The top-level dashboard in Airship](https://www.airship.com/docs/images/dashboard-projects_hu_d6573926026b8fb7.webp) *The top-level dashboard in Airship*

If you have more than eight projects, up to four of your most recently accessed projects appear under Recent. Recent projects are not shown when sort, filter, or search are applied.

The default view is sorted by creation date, newest projects first. Select Name or Date Created to sort. Select again to toggle ascending/descending order. You can search for projects by complete or partial name.

Use filters to toggle views:

Filter Description
Owner/Team Toggle between projects you own and projects you have non-owner access to. See Managing project access in Manage Messaging teams and access. All mobile wallet projects appear for Owner.
Live/Test Toggle between projects by environment type. All mobile wallet projects appear for Live.
Channel Select a channel configured for your account: Mobile apps, Web, SMS, Email, and Mobile wallet. After selecting Mobile apps you can filter again by platform. After selecting Mobile wallet you can further filter by pass type and company.
## Navigating individual projects From the top-level dashboard, select a tile to open a project, then navigate using the header and sidebar. ![Information and actions in the project dashboard header](https://www.airship.com/docs/images/messaging-project-header_hu_633b20661ac17c28.webp) *Information and actions in the project dashboard header* Select the help icon (?) for links to resources and the account menu icon (user-circle) for account-related information. Select the sidebar icon in the header to toggle its visibility. Menus in the sidebar: | Menu | Description | | --- | --- | | **Favorites** | Your [bookmarked dashboard pages](#searching-and-favorites) | | **Messages** | [Messages Overview](https://www.airship.com/docs/reference/glossary/#messages_overview), calendar, logs, tools, and more | | **Content** | Web pages for [Preference Centers](https://www.airship.com/docs/reference/glossary/#preference_center), plus reusable content: [Templates](https://www.airship.com/docs/reference/glossary/#template), [Scene](https://www.airship.com/docs/reference/glossary/#scene) [Layouts](https://www.airship.com/docs/guides/messaging/editors/native/custom-layouts/), [Snippets](https://www.airship.com/docs/reference/glossary/#snippet) and the [Media library](https://www.airship.com/docs/guides/messaging/features/media/) | | **Journeys** | Opens the [Journey Map](https://www.airship.com/docs/reference/glossary/#journey_map) | | **Audience** | Information about and tools to help you effectively target your users | | **Experiments** | [Holdout Experiments](https://www.airship.com/docs/reference/glossary/#holdout_experiment), [Feature Flags](https://www.airship.com/docs/reference/glossary/#feature_flag), and the Experimentation Hub | | **Reports** | Analysis of your project's messaging use | ### Project settings and details ![The messaging project menu](https://www.airship.com/docs/images/messaging-project-menu_hu_6cd94e0889fd1124.webp) *The messaging project menu* Select the project dropdown menu (▼) to access channel, app, and project settings. You can also go to your [Brand guidelines](https://www.airship.com/docs/guides/messaging/features/brand-guidelines/) and [project details](https://www.airship.com/docs/guides/getting-started/setup/#access-project-details). To switch to a recently-accessed project, select a name from the list. A link to return to the top-level dashboard is at the bottom of the list. ### Searching and Favorites Use the search box to find individual pages within the dashboard. To bookmark dashboard pages for quick access: 1. Go to the page you want to bookmark. 1. Select the favorite icon (★) in the header. 1. Enter a page name as you want it to appear in the quick access menu. 1. Select **Save**. Your saved pages are available in the **Favorites** sidebar menu. To change a page name or remove it from Favorites, select the favorite icon (★) again. ### Creating messages ![Sidebar options in a messaging project](https://www.airship.com/docs/images/messaging-project-sidebar_hu_9242816f92b73334.webp) *Sidebar options in a messaging project* Select the **Create** dropdown menu (▼) to choose **Message**, **Journey**, **Apple News**, **Scene**, or **A/B Test**. Select **Create** to access all message creation options and [Composer Favorites](https://www.airship.com/docs/reference/glossary/#composer_favorites). When the sidebar is collapsed, select the edit icon (✏) in the header to access the Create dropdown menu options. # Composer navigation > A composer is a tool for creating messages using the dashboard. To open a composer, select the plus sign icon (+) in the project dashboard and make a selection. ## Layout After you open a composer, the layout is generally the same for each. See the image and legend for each part of the composer: ![The content step in the Message composer](https://www.airship.com/docs/images/composer-content-app-nav_hu_b7673e2053183a0b.webp) *The content step in the Message composer* | Number | Description | | --- | --- | | 1 | Go to the top-level [Dashboard](https://www.airship.com/docs/reference/glossary/#dashboard). | | 2 | These are the project's icon, name, and environment type. | | 3 | [Name a message](https://www.airship.com/docs/guides/messaging/manage/edit/#message-names) or [flag a message as a test](https://www.airship.com/docs/guides/messaging/manage/flag-as-test/). In a [Sequence](https://www.airship.com/docs/reference/glossary/#sequence), the Sequence name and message position appear to the right of the settings icon (⚙). | | 4 | Progress through the composer steps. For more information, see [Composer progress](#composer-progress) below. | | 5 | [Preview personalized content](https://www.airship.com/docs/guides/personalization/previewing/). | | 6 | Create a [Composer Favorite](https://www.airship.com/docs/reference/glossary/#composer_favorites). Available in the Message composer only. | | 7 | Exit the composer or perform other actions, like reverting an edit. For more information, see [Exit menu](#exit-menu) below. | | 8 | Select the arrow icon (arrow-left) to expose Help & Summary. The Help tab displays information relevant to the current step. Select the help icon (?) in the composer and the Help tab will open to that topic. The Summary tab lists your message's current content and configuration. | | 9 | Select a channel to configure the content in multi-channel messages. For more information, see [Content configuration](#content-configuration) below. | | 10 | On the Content and Review steps, the device preview updates with your changes. Select the arrows to page through the various device previews. The [Scene](https://www.airship.com/docs/reference/glossary/#scene) composer has various [preview tools](https://www.airship.com/docs/guides/messaging/editors/native/about/#preview-tools). The preview for open channels is a table. | | 11 | Select a different message type or [Template](https://www.airship.com/docs/reference/glossary/#template). | | 12 | For App and Web, a color-coded indicator appears below the text box, warning when your message may be truncated on some devices. For SMS, a counter appears above the text box, showing the total number of characters and how many individual SMS messages will be sent. Best practice is to make your message as brief as possible, though some customers find success when a message truncates, teasing their audience to learn more. | | 13 | Your drafts are saved automatically. To access your draft messages, go to **Messages**, then **Messages Overview**, then **Drafts**. | {class="table-col-1-compact"} ## Composer progress In the Message, Automation, A/B Test, and Sequence composers, completed steps are green and a check mark icon (✓) indicates you have met the minimum requirements for the current step. An exclamation point icon ( ) indicates the minimum requirements are not met. Select a step name to move ahead or to go back and edit. ![A completed Content step in the Message composer](https://www.airship.com/docs/images/composer-progress_hu_bcee74901bdedb82.webp) *A completed Content step in the Message composer* ![An incomplete Content step in the Message composer](https://www.airship.com/docs/images/composer-attention_hu_5b26bdc06660d435.webp) *An incomplete Content step in the Message composer* In the In-App Automation and Scene composers, each step is indicated as a dot. Hover over a dot to see its step name appear. Return to any previous step by seelcting its dot. Select the right arrow icon (caret-circle-right) to continue to the next step. The icon will be greyed out and inactive until the step's minimum requirements are fulfilled. In the final step, Select **Finish**. ![The Audience step in the In-App Automation composer](https://www.airship.com/docs/images/composer-progress-in-app_hu_1de6da2e5e24dbed.webp) *The Audience step in the In-App Automation composer* ## Exit menu When you select **Exit** while composing a message, your message is saved as a draft and you will go to [Messages Overview](https://www.airship.com/docs/reference/glossary/#messages_overview). For messages in a [Sequence](https://www.airship.com/docs/reference/glossary/#sequence), you will go to the [Sequence Manager](https://www.airship.com/docs/reference/glossary/#sequence_manager) instead of Messages Overview. If composing a new message in a Sequence, your message is saved as a draft. If editing a message in a Sequence, your changes are saved. In a message, select the down arrow icon (▼) for more options: | Option | Description and supported composers | | --- | --- | | **Delete** | Deletes a Message, Automation, Scene, In-App Automation, A/B Test, or [Composer Favorite](https://www.airship.com/docs/reference/glossary/#composer_favorites) | | **Revert** | Cancels edits to a Message, Automation, A/B test, Sequence, or Composer Favorite | | **Save changes** | Saves edits in a Composer Favorite | | **Make a copy...** | Makes a copy of a Composer Favorite | In the Sequence Manager, select the down arrow icon (▼) for more options: | Option | Description | | --- | --- | | **Save and exit** | Applies changes to the Sequence and opens the Sequence in the [Journey Map](https://www.airship.com/docs/reference/glossary/#journey_map) — If your Sequence is in progress, select the Sequence in the map, then select **Publish changes** to resume your Sequence with your changes applied. Changes to [outcomes](https://www.airship.com/docs/guides/messaging/messages/sequences/create/outcomes/) are published automatically after saving. | | **Revert** | Exits the Sequence without saving changes and opens the Sequence in the [Journey Map](https://www.airship.com/docs/reference/glossary/#journey_map) | | **Archive** | Stops and archives the Sequence — **Archiving a started/active Sequence also cancels its undelivered messages and may affect linked components in a [Journey](https://www.airship.com/docs/reference/glossary/#journey)**. | ## Content configuration When you select multiple channels in the Message, Automation, A/B test, and Sequence composers, you configure the content on a separate tab for each: ![Configuring App content](https://www.airship.com/docs/images/composer-content-app_hu_28a88387be2dfd33.webp) *Configuring App content* ![Configuring Web content](https://www.airship.com/docs/images/composer-content-web_hu_6727bcaa97e417fb.webp) *Configuring Web content* ![Configuring Email content](https://www.airship.com/docs/images/composer-content-email_hu_f156989fe2bb2555.webp) *Configuring Email content* ![Configuring SMS content](https://www.airship.com/docs/images/composer-content-sms_hu_1daaee817ad927ac.webp) *Configuring SMS content* ![Configuring Open channel content](https://www.airship.com/docs/images/composer-content-open_hu_d7e540bb74030620.webp) *Configuring Open channel content* # Messages Overview and Calendar > List and calendar views organize the messages in your project. You can search, filter, and manage messages from both views. The list and calendar views show messages based on retention periods that vary by message type: * [In-App Automations](https://www.airship.com/docs/reference/glossary/#iaa) and [Scenes](https://www.airship.com/docs/reference/glossary/#scene) with a set end date or those that were cancelled appear for 386 days after the end or cancellation date. * Messages in a Sequence, Automations, and messages with recurring delivery remain visible while active and are removed 12 months after cancellation or a set end date. ## Messages Overview To view your messages in a list, select **Home** or go to **Messages**, then **Messages Overview**. This is also the first screen you see after opening a messaging project. ### Viewing by status Your messages are organized into various views you can select from the top of the page: | View | Origin composer or experiment type | Available messages | | --- | --- | --- | | **All** | All composers | All messages | | **Ongoing** | Message, A/B Test1 | Messages with recurring delivery | | **Ongoing** | Automation, Sequence, In-App Automation, Scene | Active automated messages, including paused Sequences | | **Scheduled** | Message, A/B Test1 | Messages with a future delivery date | | **Drafts** | All composers and A/B Test1 | Messages that are not yet sent, not yet active, or incomplete | | **History** | All composers and A/B Test1 | Messages that have been sent, stopped, or have reached their end date, including recurring messages and any In-App Automations or Scenes that have been expired or stopped for more than 14 days | | **Tests** | All composers and A/B Test1 | Messages that were designated as a test, sent to a [Test Group](https://www.airship.com/docs/reference/glossary/#preview_test_groups), or sent using the Send Test feature | | **Archive** | All composers and A/B Test1 | [Archived messages](https://www.airship.com/docs/guides/messaging/manage/archive/) | 1. Message variants in a [message A/B test](https://www.airship.com/docs/guides/experimentation/a-b-tests/messages/) are listed individually and labeled as originating from the Message composer. The label **A/B Test** refers to a [legacy message A/B test](https://www.airship.com/docs/guides/experimentation/a-b-tests/messages-legacy/), whose messages are contained within the test and are not listed individually in Messages Overview. Each view displays messages in a table, last updated first, with the following information: | Column | Description | | --- | --- | | **Name** | This is the name entered when creating the message, or "Untitled". If the message is a component in a [Journey](https://www.airship.com/docs/reference/glossary/#journey), the node icon ( ) appears next to the name. If the message is a variant in a [message A/B test](https://www.airship.com/docs/guides/experimentation/a-b-tests/messages/), the test name appears above the message name and links to the test. | | **Text** | When available, this is the message text. It does not appear for A/B Tests, Scenes, or Sequences since they may contain multiple screens or messages. | | **Channels** | These are the channels selected for delivery. | | **Audience** | This is the audience selected for delivery. | | **Delivery** | When available, this is the date and time when the message was sent. Information varies per composer and delivery specification. | | **Throttle Delivery** | This is the rate of delivery, if [set for the message](https://www.airship.com/docs/guides/messaging/messages/delivery/delivery-options/#throttle-delivery). | | **Message Details** | This is a summary of data shown for a message in its expanded view. | Toggle **Expand All Messages** to see a full version of the message information or a summary. ### Filtering and searching the list Apply filters to update the list: | Filter type | Description | | --- | --- | | **Date** | Use the date filter to apply a predetermined range or enter a custom range. Within a time frame, you can also apply **Last Updated**, **Delivery Date**, and **Creation Date** filters. All dates and times are in UTC. | | **Tests** | Toggle **Hide Tests** to show/hide messages that were flagged as a test or sent to a test group. This option is not present in the Tests view. | | **Trigger** | In the Ongoing view, filter by **Automation trigger** for Automations and Sequences or **In-app automation trigger** for In-App Automations and Scenes. | You can also apply filters when searching. Select a filter next to the search field, then enter a search term or choose from matches available when selecting the search field. Search filters: | Search filter | Where search is applied to | | --- | --- | | **Campaign Categories** | [Campaign Categories](https://www.airship.com/docs/reference/glossary/#campaign_categories) added when creating a message | | **Channels** | [Channels](https://www.airship.com/docs/reference/glossary/#channel_engage) configured for your project | | **Composers** | [Composers](https://www.airship.com/docs/reference/glossary/#composer) available in your project | | **Created By** | Usernames of message creators | | **Experience Type** | Scenes of type Branching, Embedded Content, Experiment (A/B test), NPS Survey, Survey (non-NPS), or Story | | **Message Content** | Text in the body of messages, and message, Sequence, and legacy A/B test names | | **Message Type** | Push notification, In-App Message (not In-App Automation), and Message Center | | **Push ID** | [Push IDs](https://www.airship.com/docs/reference/glossary/#push_id) of messages sent from the Airship dashboard | ### Managing messages At the end of each message row are icons for message management options: | Option | Description | Steps | | --- | --- | --- | | **Edit** | [Opens the message for editing](https://www.airship.com/docs/guides/messaging/manage/edit/) | Select the edit icon ( ). | | **Duplicate** | [Makes a copy of the message](https://www.airship.com/docs/guides/messaging/manage/duplicate/) | Select the duplicate icon ( ). | | **Archive or unarchive a message** | [Moves the message to or from the Archive view](https://www.airship.com/docs/guides/messaging/manage/archive/) | Select the archive icon ( ). | | **Delete** | [Removes the message from the project](https://www.airship.com/docs/guides/messaging/manage/delete/) | Select the delete icon (trash). | | **Change status** | [Starts, pauses, or stops ongoing, throttled, and recurring messages](https://www.airship.com/docs/guides/messaging/manage/change-status/) | Select the play icon (play), pause icon (⏸), or stop icon ( ). | | **View the message in a mapped view** | For Scenes, In-App Automation, and Sequences, opens the message in the [Journey Map](https://www.airship.com/docs/reference/glossary/#journey_map) | Select the node icon ( ). | | **Collapse or expand details** | Displays a full version of the message information or a summary | Select the collapse icon ( ) or expand icon ( ). | | **Open its report** | Opens a [message report](https://www.airship.com/docs/guides/reports/message/), [Scene report](https://www.airship.com/docs/guides/messaging/in-app-experiences/scenes/create/scene-reports/), Sequence [Performance report](https://www.airship.com/docs/reference/glossary/#sequence_performance), or [legacy message A/B test report](https://www.airship.com/docs/guides/experimentation/a-b-tests/messages-legacy/) | Select the report icon ( ). | ### Viewing automation counts To view your current number of automations and your project limits, go to the **Ongoing** view and select the info icon (ⓘ). * **Active and Total Automations** — The number of active and total (active plus paused) automations, which includes: * Automations created using the [Automation composer](https://www.airship.com/docs/guides/messaging/messages/sequences/create-automation/) * Automations created using the [`/pipelines` endpoint](https://www.airship.com/docs/developer/rest-api/ua/operations/automation/) * Each message in [Sequences](https://www.airship.com/docs/reference/glossary/#sequence) Archived and draft messages are not included in these counts. Automation limits are determined by your Airship package. See [Automation](https://www.airship.com/docs/reference/feature-packages/#automation) in the *Feature packages reference*. * **In-App Automation and Scenes** — The total number of active and paused in-app experiences. See also [Message Limits](https://www.airship.com/docs/reference/glossary/#message_limits). ## Calendar To view your messages in a calendar, go to **Messages**, then **Calendar**. The calendar view shows you: * When messages are scheduled to send * The duration of messages with start and/or end dates * How message schedules overlap * Send history The calendar does not include drafts or messages designated as a test, sent to a [Test Group](https://www.airship.com/docs/reference/glossary/#preview_test_groups), or sent using the Send Test feature. ### Visual indicators Colors identify messages by their origin composer. Each color corresponds to a Message Type filter you can use to update the view. The Message, A/B Test, and Automation composers support multiple channels and message types. See [Composers — How you can send](https://www.airship.com/docs/guides/getting-started/basics/#composers) in *Messaging basics*. These colors correspond to the following filters and composers: | Color | Message Type filter | Composer | | --- | --- | --- | | **Blue** | Message | [Message](https://www.airship.com/docs/guides/messaging/messages/create/), [Automation](https://www.airship.com/docs/guides/messaging/messages/sequences/create-automation/), and [A/B Test](https://www.airship.com/docs/guides/experimentation/a-b-tests/messages/) | | **Purple** | Sequence | [Sequence](https://www.airship.com/docs/reference/glossary/#sequence) | | **Green** | In-App Automation and Scene | [In-App Automation](https://www.airship.com/docs/reference/glossary/#iaa) and [Scene](https://www.airship.com/docs/reference/glossary/#scene) | Color shading indicates message status. These shading styles correspond to the following filters and message statuses: | Shade | Status filter | Description | | --- | --- | --- | | **Solid** | Active | Applicable to recurring messages and active Automations, Sequences, Scenes, and In-App Automations | | **Solid** | Scheduled | Applicable to messages with a future delivery date | | **Slashes** | Paused | Applicable to paused Sequences, recurring messages, and any In-App Automations or Scenes that have been expired or stopped for fewer than 14 days | | **Lighter shade** | Done | Applicable to messages that have been sent, stopped, or have reached their end date, including recurring messages and any In-App Automations or Scenes that have been expired or stopped for more than 14 days | ### Viewing message details ![Viewing a message's details in the project calendar](https://www.airship.com/docs/images/calendar-message_hu_71eb4ddba9c76b75.webp) *Viewing a message's details in the project calendar* Select a message in the calendar to view its details: * Message name * Associated Message Type filter * Send, scheduled, start, and/or end dates, depending on message configuration * Message status Following the message details, when available, select **View message** to open the message in its origin composer. Select **View report** to open its [message report](https://www.airship.com/docs/guides/reports/message/), [Scene report](https://www.airship.com/docs/guides/messaging/in-app-experiences/scenes/create/scene-reports/), or Sequence [Performance report](https://www.airship.com/docs/reference/glossary/#sequence_performance). ### Filtering and searching the calendar Search for a specific message by name. Use the Message Type, Status, or time range filters to update the calendar content. See the [Message Type and Status descriptions](#visual-indicators) in *Visual indicators* above. These are the formats for the time range filters: | Filter type | Format | | --- | --- | | **Month** | Sunday to Saturday, one week per row | | **Week** | Sunday to Saturday, one hour per row | | **Day** | One hour per row | Select **Back** or **Next** to navigate between time periods. Select **Today** to return to the current date. In the Month view, when a day contains more messages than can be displayed, select **+ X more** to go to the Day view and see all messages for that day. ## Get started as an Airship developer Find everything you need to integrate Airship's SDKs and APIs — channel configuration, authentication credentials, identifier lookups, and a Postman collection. # Intro to Channels > Channels represent the various devices, users, and addresses that make up your audience. Channels are a concept fundamental to Airship. Understanding the various applications of channels can help you better understand and target your audience. > **Important:** **Channels** can also refer to *engagement channels*, a medium for engaging with your users, e.g., app, web, SMS, email. > See [Disambiguation](#disambiguation) below. ## Origin and Purpose Airship introduced *channels* in 2014 as a new means of addressing apps via the *channel ID*. Prior to channels, in order to target a device for a push notification, we used the *push address*, the identifier provided by the downstream delivery service for the given mobile OS. For example, to deliver to an iOS device, we used the *device token* provided by Apple Push Notification service (APNs). Because a push address can change without notice, we introduced channel IDs to abstract the notion of an addressable app from the push address. This change lessened the burden on our customers of having to store push addresses, e.g., device tokens. We simply map the channel ID to a device token if it changes. Channels also became a useful framework for us to develop new services around the concept of an addressable entity and to move beyond apps into new engagement mediums such as web browsers, email, and SMS. We subsequently introduced [Named Users](https://www.airship.com/docs/reference/glossary/#named_user) as a way to map multiple channels together, and [Channel Coordination](https://www.airship.com/docs/reference/glossary/#channel_coordination) features, which rely on both channels and named users to help you optimize your multi-channel marketing campaigns. ## Disambiguation {#disambiguation} You will find that throughout our documentation and in the Airship [Dashboard](https://www.airship.com/docs/reference/glossary/#dashboard) we use the term *channel* differently, depending on context: engagement vs. development. ### Engagement Channels {#engagement-channels} At a high level, we use the term *channel* to denote an **engagement channel** over which you can reach your end users. We support the following channels, some of which encompass more than one *platform*, e.g., _The iOS platform is a supported **app** channel_. | Engagement channel | Platform | | --- | --- | | App | iOS, Android, Fire OS, Windows, Apple News | | Web | Chrome, Firefox, Edge, Safari, Opera | | Email | n/a | | SMS | n/a | | Open | *Configurable* | ### Development Channels {#development-channels} In the development context, a channel describes a **deliverable endpoint**, such as an email address, SMS number, or iPhone app installation. The defining property of a development channel is the [*channel ID*](#channel-ids), but development channels are also associated with other information. This information varies depending on the associated [engagement channels](#engagement-channels), and also for the platforms within a type of engagement channel. For example, an email channel has a `sender_name`, and an SMS channel has a `msisdn`. Development channels can further be thought of as one of two basic types: *native* and *open*. This distinction is largely tied to how you interact with the channels — either via an installed SDK for a native platform, or our channels API for open platforms. See [Native vs Open Platforms](#native-open) below. **Example iOS Channel Object**: ```json { "channel": { "channel_id": "01234567-890a-bcde-f012-3456789abc0", "device_type": "ios", "installed": true, "background": true, "opt_in": true, "push_address": "FE66489F304DC75B8D6E8200DFF8A456E8DAEACEC428B427E9518741C92C6660", "created": "2013-08-08T20:41:06", "last_registration": "2018-05-01T18:00:27", "named_user_id": "some_id_that_maps_to_your_systems", "tags": [ "one_fish", "two_fish" ], "tag_groups": { "fish_colors": [ "red", "blue" ], "fish_ages": [ "old", "new" ] }, "ios": { "badge": 0, "quiettime": { "start": null, "end": null }, "tz": "America/Los_Angeles" } } } ``` ## Channel IDs {#channel-ids} [Development channels](#development-channels) are addressable via the *channel ID*. A channel ID is a unique identifier generated by Airship for each channel. In cases where a downstream service (such as APNs for iOS devices) provides the [push address](#terminology) for ultimate delivery, the channel ID maps to that delivery address. This mapping ensures consistency of channel metadata — information about the channel, such as segmentation information — even if the mapped service changes its own delivery address, e.g., device token for iOS or registration token for Android. ## Channels API {#channels-api} Airship’s [Channels API](https://www.airship.com/docs/developer/rest-api/ua/operations/channels/) provides a set of endpoints for the management of [engagement channels](#engagement-channels) and their platforms. You can create, look up, list, and manage channel information, as well as extend Airship by defining new platforms for use with our core platform services, e.g., segmentation, scheduling, automation. > **Tip:** If you use an AI coding assistant, you can connect it to Airship with Skills and an MCP server. See [Airship AI Tools](https://www.airship.com/docs/developer/ai-tools/ai-tools/). ## Native vs Open Platforms {#native-open} App and web platforms are supported by an [Airship SDK](https://www.airship.com/docs/guides/getting-started/developers/sdk-api/) and as such are considered *native*. **Native Platforms**: | Channel | Platform | |---------|----------| | App | iOS | | App | Android | | App | Fire OS | | Web | Chrome | | Web | Safari | | Web | Firefox | | Web | Opera | | Web | Edge | Email, SMS, and Open channels are supported by our Channels API for channel registration, and other operations, e.g., adding tags, opt-out, unsubscribe/uninstall, etc. Open platforms are not supported by an Airship SDK because the delivery mechanism is not a traditional client application like an app or web browser. **Open Platforms**: | Channel | Platform | API reference | | --- | --- | --- | | [Email](https://www.airship.com/docs/developer/api-integrations/email/) | n/a | [Email Channels API reference](https://www.airship.com/docs/developer/rest-api/ua/operations/email/) | | [SMS](https://www.airship.com/docs/developer/api-integrations/sms/) | n/a | [SMS Channels API reference](https://www.airship.com/docs/developer/rest-api/ua/operations/sms/) | | [Open](https://www.airship.com/docs/developer/api-integrations/open/) | *Configurable* | [Open Channels API reference](https://www.airship.com/docs/developer/rest-api/ua/operations/open-channels/) | ### Channel Registration For **native platforms**, [channel IDs](#channel-ids) are created and persisted during the registration process: When your app runs for the first time (it may run in the background or when a user opens the app for the first time), our SDK creates a [(development) channel](#development-channels) and maps it to that installation. For example, on iOS it will map a device token to that channel. The channel ID then becomes the primary identifier used to address notifications/messages to the device. If iOS ever changes the device token, we can update the device token behind the scenes without changing the channel. For **open platforms**, channel registration and manipulation are handled via our [Channels API](#channels-api), giving you maximum flexibility to create and update, opt-in or -out, look up, or uninstall channels, and add or remove tags and other metadata. Delivery addresses on open platforms can be an IP address, webhook URL, phone number, or email address, depending on the channel type. ## Terminology Channel (Development) : A *channel* is an instance representing an entity addressable via the Airship service, e.g., an iOS device, email address, SMS number or web browser. The channel instance or [channel object](/docs/developer/rest-api/ua/#schemas-channelobject) contains all relevant information about a channel, including metadata used for targeting, opt-in status, device-specific information, and, importantly, a unique identifier for the channel, the *Channel ID*. Channel (Engagement) : A *channel* is a communication medium supported by the Airship service. Supported channels include app, web, email, SMS, and *Open Channels*. Within some channels there may be specific *platforms* with individual characteristics. Example platforms include Chrome for the web channel and Android for the mobile app channel. Channel ID : A *Channel ID* is an Airship-specific unique identifier for a channel instance, e.g., a smartphone, web browser, email address. Platform : A *platform* is an external OS or other system to which notifications are delivered. Mobile platforms include iOS and Android, web platforms include Chrome and Firefox, etc. Airship-supported platforms may be either *native platforms*, which require an installed SDK, or *open platforms*, which do not. Native platform : A *native platform* is a platform for which an installed SDK is required to register and manipulate channels. Examples: iOS, Chrome. Open platform : An *open platform* is a platform for which an SDK is not available, and channel registration and manipulation are handled via the Channels API. Examples: Open Channels, Email. Push address : The *push address* is the underlying device identifier that maps to a Channel ID for message delivery. The push address is analogous to a phone number and has the information necessary to locate and authenticate an installation of an app or browser. Because a push address can change, Airship maps push addresses to channels, which do not change. An example of a push address is a *device token* in the case of iOS. # Finding Channel IDs > {{< glossary_definition "channel_id" >}} Follow these methods to find the [Channel ID](https://www.airship.com/docs/reference/glossary/#channel_id) in a mobile app or web browser. ## Find a mobile app Channel ID You can find a device's Channel ID by accessing it programmatically in your app or using the Channel Capture tool. ### Accessing the Channel ID programmatically You can access the Channel ID directly through the SDK in your app code: #### iOS Swift ```swift let channelID = Airship.channel.identifier ``` #### iOS Objective-C ```objc NSString *channelID = UAirship.channel.identifier; ``` #### Android Kotlin ```kotlin val channelId = Airship.channel.id ``` #### Android Java ```java String channelId = Airship.getChannel().getId(); ``` #### React Native ```ts const channelId = await Airship.channel.getChannelId(); ``` #### Flutter ```dart String channelId = await Airship.channel.identifier; ``` #### Cordova ```js Airship.channel.getChannelId((channelID) => { console.log("Channel: " + channelID) }) ``` #### Capacitor ```js const channelID = await Airship.channel.getChannelId() ``` #### .NET MAUI ```csharp using AirshipDotNet; string channelId = Airship.Instance.ChannelId; ``` #### Unity ```csharp string channelId = UAirship.Shared.ChannelId; ``` For more detailed information about accessing channel IDs, see the platform-specific documentation: * [iOS Audience Management](https://www.airship.com/docs/developer/sdk-integration/apple/audience/channels/) * [Android Audience Management](https://www.airship.com/docs/developer/sdk-integration/android/audience/channels/) * [React Native Audience Management](https://www.airship.com/docs/developer/sdk-integration/react-native/audience/channels/) * [Flutter Audience Management](https://www.airship.com/docs/developer/sdk-integration/flutter/audience/channels/) * [Cordova Audience Management](https://www.airship.com/docs/developer/sdk-integration/cordova/audience/channels/) * [Capacitor Audience Management](https://www.airship.com/docs/developer/sdk-integration/capacitor/audience/channels/) * [.NET Audience Management](https://www.airship.com/docs/developer/sdk-integration/dotnet/audience/channels/) * [Unity Audience Management](https://www.airship.com/docs/developer/sdk-integration/unity/audience/channels/) ### Using the Channel Capture tool The Channel Capture tool is a feature built into the SDK that helps users find their Channel ID. It is valuable for troubleshooting individual device issues in production apps since it can expose the Channel ID to the user, who can then send it to Support. Users can also use it to find their Channel ID for a [Preview or Test Group](https://www.airship.com/docs/reference/glossary/#preview_test_groups).
[Channel Capture](https://airship.wistia.com/medias/w5v083w2oj)
If the Channel Capture tool is enabled, it will listen for six app foregrounds within 30 seconds. On the sixth app open, the Channel ID will be copied to the user's clipboard with a leading `ua:`. Paste your Channel ID from the clipboard to your preferred document. If there is no channel, only `ua:` will be present. The Channel ID will remain on the clipboard for 60 seconds on iOS and until cleared on Android. The Channel Capture tool is enabled by default and can be disabled through the Airship Config options. For information on how to disable it, see the platform-specific documentation linked above. #### Android Kotlin ```kotlin val options = AirshipConfigOptions.newBuilder() // ... .setChannelCaptureEnabled(false) .build() ``` #### Android Java ```java AirshipConfigOptions options = AirshipConfigOptions.newBuilder() // ... .setChannelCaptureEnabled(false) .build(); ``` #### iOS Swift ```swift config.isChannelCaptureEnabled = false ``` #### iOS Objective-C ```objc config.isChannelCaptureEnabled = NO; ``` #### React Native ```ts await Airship.takeoff({ ... isChannelCaptureEnabled: false, }) ``` #### Flutter ```dart Airship.takeOff( AirshipConfig( ... isChannelCaptureEnabled: false ) ); ``` #### Cordova ```js Airship.takeoff({ ... isChannelCaptureEnabled: false, }) ``` #### Capacitor ```js await Airship.takeoff({ ... isChannelCaptureEnabled: false, }) ``` #### .NET MAUI ```csharp // Not supported ``` #### Xamarin ```csharp // Not supported ``` #### Titanium ```js // Not supported ``` #### Unity ```csharp // Not supported ``` ### Alternative methods You can also find a device's Channel ID by logging it to the console. You can view the console with these tools: * **iOS:** [iPhone Configuration Utility](https://support.apple.com/downloads/iphone_configuration_utility) or [Xcode](https://developer.apple.com/xcode/) * **Android:** [Android Debug Bridge](https://developer.android.com/tools/adb) If you didn't write the device identifier to the console, you can use the steps here to help retrieve it: [Using Charles Proxy to profile an Airship Implementation](https://support.airship.com/hc/en-us/articles/213491123-Using-Charles-Proxy-to-profile-an-Airship-Implementation). > **Tip:** Even if you're comfortable with using Charles Proxy, you may want to speak with your developer before you attempt to retrieve your Channel ID yourself. Your app may have been designed with a hidden feature that allows you to quickly retrieve your ID, saving you the difficulty of working with Charles Proxy. ## Find a web browser Channel ID Your web Channel ID is only available if you have already [integrated the Airship SDK](https://www.airship.com/docs/developer/sdk-integration/web/getting-started/) with your website. To access your web Channel ID, you will need to open the Developer console in your browser and paste in a small amount of code. Instructions for Google Chrome and Mozilla Firefox are provided. 1. Open the console via keyboard shortcut or the menu. **Google Chrome** * **Keyboard Shortcuts:** In macOS you can go directly to the console with *Cmd+Opt+J*. In Windows, the shortcut is *Ctrl+Shift+J*. * **Menu:** Select the more menu icon (⋮), then **More Tools**, then **Developer Tools**, then select the Console tab. **Mozilla Firefox** * **Keyboard Shortcuts:** In macOS you can go directly to the console with *Cmd+Opt+K*. In Windows, the shortcut is *Ctrl+Shift+K*. * **Menu:** Select the "hamburger" icon, then **More Tools**, then **Web Developer Tools**, and then select the Console tab. 1. Depending on the web SDK version, paste the following code in the console, then hit Enter. If a browser has registered, the resulting line is the Channel ID. **Version 1** ```javascript UA.then(sdk => {console.log(sdk.channel.id)}) ``` ![The Channel ID in a successful console response](https://www.airship.com/docs/images/channel_id_console_response_hu_60bcff090b24cb03.webp) *The Channel ID in a successful console response* **Version 2 (asynchronous call)** ```javascript UA.then(sdk=>console.log(sdk.channel.id().then((channel)=>console.log(channel)))) // Or if you are using async/await syntax (async function getChannel() { const sdk = await UA; const channelId = await sdk.channel.id(); console.log(channelId); })(); ``` **Common errors:** * ![Response: null](https://www.airship.com/docs/images/channel_id_console_null_hu_1ae99c08456231dd.webp) *Response: null* The SDK will return `null` if the browser is unregistered. Only registered browsers will have a Channel ID. See our documentation on [how to register the current browser with Airship](https://www.airship.com/docs/developer/sdk-integration/web/getting-started/#uasdk). * ![Response: UA is not defined](https://www.airship.com/docs/images/channel_id_console_no_sdk_hu_d5edbddbbc20e773.webp) *Response: UA is not defined* A `UA is not defined` response can indicate that the SDK snippet is not present within the page. Navigate to a page on your site that does have the SDK snippet and repeat step 2 above. > **Note:** Ideally, the SDK snippet will be present in every page on your site, as per the [Add JavaScript Snippet section](https://www.airship.com/docs/developer/sdk-integration/web/getting-started/#add-javascript-snippet-to-web-pages) of our Web Getting Started guide. If, for testing or other reasons, you have added the snippet to just one page of your site, you will need to be on that specific page for retrieving your Web Channel ID to be successful. # Configuring Mobile Channels > Configure mobile channels and push providers in the Airship dashboard.Configuration information and steps are provided for iOS, Android, and Fire OS. ## iOS channel configuration To configure an iOS channel, you must configure the Apple Push Notification Service (APNs). To do this, you can either use token or certificate authentication. Use token auth to simplify setup and to avoid having to renew your certificate every year. ### APNs token and certificate authentication Airship uses token-based authentication for APNs when configured for the iOS channel. When token-based authentication is not configured, Airship uses certificate authentication instead. The authentication choice depends on what you have configured, not on fallback from token to certificate. If token auth is configured but becomes invalid or stops working, Airship does not automatically use your certificate. As a result, the iOS channel may be disabled until you correct your authentication configuration in the Airship dashboard. For existing projects: * Leave your certificate in place while migrating to token-based authentication. If you remove your certificate before token auth is working, you may be unable to send messages until your credentials are valid. * Once you have confirmed that token auth is working, you may let the certificate expire or revoke it in the Apple Developer Member Center. ### Production versus development projects When creating your certificate or token, you must choose which environment the application on your device should use. Unlike Android, APNs uses two different environments for push notifications depending on the type of app you are using: | Environment | Description | | --- | --- | | **Sandbox** | The Sandbox environment is intended for applications that are being developed and tested directly off of a computer. | | **Production** | The Production environment is for applications that are distributed via the App Store or any ad hoc platform like Test Flight. | When you [create or edit an Airship project](https://www.airship.com/docs/guides/getting-started/setup/#create-a-messaging-project) (and thus its application record on our server), you must select its type, which directly affects which APNS environment it will communicate with: | Project type | Description | Relationship with APNs environment | | --- | --- | --- | | **Test** | Development for sending test messages | A Test project only sends APNs push notifications to the Sandbox environment | | **Live** | Production for sending messages to users | A Live project only sends APNs push notifications to the Production environment | Apple treats the production and development servers separately, so a device token for a test project will not work in a production project. Because of this, we suggest creating both Live and Test projects in the Airship dashboard so you can continue to build and develop your application without interrupting your users. Configure the `development` credentials for the test project, and `production` credentials for live project. Then switch between the two credentials using the `inProduction` flag when configuring the Airship SDK. > **Warning:** * There is no way to change the Test/Live setting after an Airship project has been created. You will need to make a new project to switch environments. When these environments are not aligned, you will see errors in your error console, and typically the Push Address will be removed from the channel. > > * Always create a **Live** Airship project first, and > make sure your application code is pointing to the live project's app > key. For more tips on what to check before you release your app, see the > [iOS Production Launch Checklist](https://support.airship.com/hc/en-us/articles/6613974842523-iOS-Production-Launch-Checklist)). > > * Test apps use different tokens that, when included in a push to a **Live** app, will fail and in many cases cause all other pushes to fail. While your app's code is pointing to an Airship app key that is set as **Test**, do not: > 1. Submit to the App Store, or > 1. Test notifications on an ad hoc build. ### Configure token auth (Recommended) Apple's token authentication for APNs uses two key types: team-scoped and topic-scoped. Understanding their difference is key for Airship setup: * **Team-scoped keys: Broad and simple** * Team-wide access: One key for all your team's apps * Limited number: Maximum two per environment (Sandbox/Production) * Simpler setup and easier management * **Topic-scoped keys: Granular and more secure** * App-specific access: Key for specific apps/topics only * Higher number: Up to 200 per environment (Sandbox/Production) To get started, register a new key: 1. Log in to the [Apple Developer Member Center](https://developer.apple.com/). 1. Go to **Account**, then **Membership details**, then note your **Team ID**. 1. Go to **Program Resources**, then **Certificates, IDs & Profiles**, then **Identifiers**. 1. If you already registered an iOS App ID: 1. Select its name in the list of App IDs. 1. Note the **Bundle ID** for the app. 1. Enable **Push Notifications**. ![Enabling push notifications for an iOS app ID](https://www.airship.com/docs/images/creating-app2_hu_7ef0bbaf2358105d.webp) *Enabling push notifications for an iOS app ID* 1. If Push Notifications was already enabled, select **All Identifiers** at the top of the page to go back. Otherwise, select **Save**. 1. Continue to step 6 below. 1. If you have not already registered an iOS App ID, add one now: 1. Select the add icon (+), then select **App IDs**. ![Adding an iOS app identifier](https://www.airship.com/docs/images/creating-app0_hu_fa8b12bbff72282.webp) *Adding an iOS app identifier* 1. Select **Continue**. 1. Fill out the **Register an App ID** form and enable **Push Notifications**. Also note the **Bundle ID** you enter. ![Registering an app ID](https://www.airship.com/docs/images/creating-app1_hu_5784ce6faf347971.webp) *Registering an app ID* 1. Select **Continue**, then **Register**. 1. In the sidebar, select **Keys**. 1. Select the add icon (+). 1. Enter a unique key name. 1. Enable **Apple Push Notifications service (APNs)**. 1. Select **Configure**. 1. (For team-scoped token auth) Select **Sandbox & Production** for the environment and **Team Scoped (All Topics)** for Key Restriction. ![Configuring a team-scoped key](https://www.airship.com/docs/images/token-auth-team-scoped_hu_3f21037e6124fce9.webp) *Configuring a team-scoped key* 1. (For topic-scoped token auth) Select **Sandbox** for development apps or **Production** for production apps in the environment menu and **Topic Specific** for Key Restriction, then: 1. Select the specific apps/topics that this key should be allowed to send notifications to. ![Configuring a topic-scoped key](https://www.airship.com/docs/images/token-auth-topic-scoped_hu_dee79f82fa24c18c.webp) *Configuring a topic-scoped key* 1. Select topics you wish to add to your scope, then **Done**. ![Selecting topics](https://www.airship.com/docs/images/token-auth-topic-scoped-topic-selection_hu_d521ade74dcd4bc4.webp) *Selecting topics* 1. Select **Save**, then **Continue**, then **Register**. 1. Note the **Key ID**, then select **Download** to save the key in .p8 format. ![Getting your key ID and downloading the key](https://www.airship.com/docs/images/download-key_hu_a3f73b0e05fc0130.webp) *Getting your key ID and downloading the key* > **Important:** **For team-scoped keys:** Be sure to save your key in a secure location if you intend to use it across multiple apps or Airship > projects. Apple only allows **two** team-scoped APNs keys per team, so reaching this limit would require you > to revoke one of your existing keys before creating a new one, which in turn would require an update for > any apps previously using the revoked key. Airship will not make your key available for download or > sharing across projects once it has been uploaded. > > **For topic-scoped keys:** > You may create up to 200 topic-scoped APNs keys per environment. If you want to reuse a key across multiple > Airship projects or apps, store it securely. Apple will not let you re-download it later, and Airship > will not make it available for download once uploaded. Finally, configure your iOS channel in Airship: 1. Next to your project name, select the dropdown menu (▼), then **Settings**. 1. Under **Channels**, select **iOS**. 1. For **Token-based authentication**, select **Edit**. 1. Under **Signing key**, upload your .p8 file. 1. Enter your Team, Bundle, and Key IDs. 1. Select **Save**. ### Configure certificate auth 1. Log in to the [Apple Developer Member Center](https://developer.apple.com/). 1. Go to **Account**, then **Program Resources**, then **Certificates, IDs & Profiles**, then **Identifiers**. 1. If you already registered an iOS App ID, select its name in the list of App IDs, then go to step 5 below. 1. If you have not already registered an iOS App ID, add one now: 1. Select the add icon (+), then select **App IDs**. ![Adding an iOS app identifier](https://www.airship.com/docs/images/creating-app0_hu_fa8b12bbff72282.webp) *Adding an iOS app identifier* 1. Select **Continue**. 1. Fill out the **Register an App ID** form and enable **Push Notifications**. ![Registering an app ID](https://www.airship.com/docs/images/creating-app1_hu_5784ce6faf347971.webp) *Registering an app ID* 1. Select **Continue**, then **Register**. 1. Select your app's name in the list of App IDs, then continue to step 5 below. 1. Under **Capabilities**, enable **Push Notifications**, then select **Configure**. The button is labeled **Edit** if it was previously configured. ![Enabling Push Notifications for an App ID](https://www.airship.com/docs/images/configure-push_hu_c2a845fd1bae4062.webp) *Enabling Push Notifications for an App ID* > **Note:** If the **Configure/Edit** button is not available, you may not be the > team agent or an admin. The person who originally created the developer > account is your team agent, and they will have to carry out the remaining > steps in this section. 1. Select **Create Certificate**: ![Creating a certificate for Push Notifications](https://www.airship.com/docs/images/ssl-certs-section_hu_516f4ac8c7e1023c.webp) *Creating a certificate for Push Notifications* You should now see the **Create a New Certificate** section, where you will generate an Apple Push Notification service SSL (Sandbox & Production) certificate compatible with both the Production and Development environments: ![Creating a new APNs SSL certificate](https://www.airship.com/docs/images/ssl-certs-universal_hu_595879e37f151706.webp) *Creating a new APNs SSL certificate* 1. Follow Apple's instructions to [create a certificate signing request](https://developer.apple.com/help/account/create-certificates/create-a-certificate-signing-request), then upload the file under **Create a New Certificate**. 1. Select **Continue** after uploading your certificate signing request. You can now use the newly-created Certificate Signing request to generate the APNs Push SSL certificate. The next step requires the **Download** button to be active. You may need to reload the page if it is not yet active. 1. Select **Download** and save the file for use in the next step. ![Downloading your APNs certificate](https://www.airship.com/docs/images/download-cert_hu_dd3be2b79175a02d.webp) *Downloading your APNs certificate* 1. Open the certificate you downloaded in the previous step. It should open in the Keychain Access app and be listed in My Certificates. ![The certificate in Keychain Access](https://www.airship.com/docs/images/keychain-cert_hu_40601819eb30f4ea.webp) *The certificate in Keychain Access* 1. Select the certificate in the list, then from the **File** menu, select **Export Items...**. ![Exporting the certificate as a .p12 file](https://www.airship.com/docs/images/p-export-p12_hu_853f430fb03d4b60.webp) *Exporting the certificate as a .p12 file* > **Note:** Be sure to select > **My Certificates** under the Category menu on the lower left-hand side. > If **My Certificates** is not highlighted, you will not be able to export > the certificate as a .p12 file. 1. Save the file in the Personal Information Exchange (.p12) format. ![Saving the certificate in .p12 format](https://www.airship.com/docs/images/export-filename_hu_a67ac4824a950386.webp) *Saving the certificate in .p12 format* You will be prompted to create a certificate password. Use this password in the Airship dashboard. Now you can configure the iOS channel for the project in Airship: 1. Next to your project name, select the dropdown menu (▼), then **Settings**. 1. Under **Channels**, select **iOS**. 1. For **Certificate-based authentication**, select **Edit**. 1. Enter the certificate password and upload the .p12 file. 1. Select **Save**. ## Android channel configuration To configure Android channels, you must configure either Firebase Cloud Messaging (FCM) and/or Huawei Mobile Services (HMS). If both push providers are configured, the Airship SDK prioritizes FCM as the push provider if the app and the SDK are set up for both. ### FCM rate limit The Firebase Cloud Messaging API has a default rate limit of 600,000 requests per minute. If your project reaches that limit, Airship will retry after one minute. You may want to request a rate limit increase if you send to large volume audiences when sending time-sensitive messaging such as breaking news. * To check your current limit: 1. Log in to the [Google Cloud console](https://console.cloud.google.com/). 1. Select your FCM project, then **APIs & Services**, then **Firebase Cloud Messaging API** then **Quotas & System Limits**, or go directly to https://console.cloud.google.com/apis/api/fcm.googleapis.com/quotas. 1. In the table, see the value for **Send requests per minute**. * To request a rate limit increase, [contact Firebase Support](https://firebase.google.com/support). See [When to reach out to FCM](https://firebase.google.com/docs/cloud-messaging/scale-fcm#when-reach) in Google's *Best practices when sending FCM messages at scale*. ### Configure FCM token auth Firebase projects use Google's FCM HTTP v1 API, which uses short-lived access tokens that follow the [OAuth2](https://en.wikipedia.org/wiki/OAuth) security model. In the event of tokens becoming public, they can only be used for about an hour before they expire. > **Important:** In July 2024, Google replaced the Cloud Messaging API with the FCM HTTP v1 API. This change affected sending Android push notifications. We updated our services to use the new API, but your project cannot start using it until authenticated. > > If your Airship project has not yet moved to token-based authentication, complete the setup steps that follow this note. You will enable the Firebase Cloud Messaging API (V1) for your Firebase project, generate a private key and download the file, and upload the file in your Airship project settings. > > Your Airship project will immediately switch to using the new API to send Android push notifications. You do not need to update your SDK and/or release a new version of my app. This is a server-side change only. > > If you have questions, [contact Airship Support](https://support.airship.com/) or your account manager. First, enable the Firebase Cloud Messaging API (V1) for your Firebase project: 1. Log in to the [Firebase console](https://console.firebase.google.com/). 1. Either create a new project or select an existing project that you want to configure with Airship. 1. In the sidebar, select the settings icon (⚙), then **Project settings**: ![Selecting Firebase Project settings](https://www.airship.com/docs/images/android/fcm-project-settings_hu_f1e317b06e57c88d.webp) *Selecting Firebase Project settings* 1. Select the **Cloud Messaging** tab. 1. For **Firebase Cloud Messaging API (V1)**, select the more menu icon (⋮), then **Manage API in Google Cloud Console**, which will open in a new browser window or tab: ![Managing the API](https://www.airship.com/docs/images/android/fcm-token-enable-api_hu_2d8cc25c05392763.webp) *Managing the API* 1. Select **Enable**: ![Enabling the Firebase Cloud Messaging API](https://www.airship.com/docs/images/android/fcm-enable-api_hu_85291aaf1c2038dc.webp) *Enabling the Firebase Cloud Messaging API* 1. Close the Google Cloud Console window or tab. --- If you are setting up token authentication after previously using server key auth, you must give your Firebase service account the `cloudmessaging.messages.create` permission to send notifications and data messages through the FCM HTTP API and Admin SDK. You can create and assign a custom role for the single permission or you can assign the Firebase Cloud Messaging API Admin role, which includes the permission and other permissions. For additional information, see Google references: * [Firebase Cloud Messaging permissions](https://firebase.google.com/docs/projects/iam/permissions/#messaging) in *Firebase IAM permissions* * [Firebase Cloud Messaging API Admin](https://cloud.google.com/iam/docs/understanding-roles#firebasecloudmessaging.admin)in *IAM basic and predefined roles reference* * [Custom roles](https://cloud.google.com/iam/docs/roles-overview#custom)in *About IAM access roles: Roles and permissions* To get your Firebase service account: 1. Go to the [Firebase console](https://console.firebase.google.com/) and select your project. 1. In the sidebar, select the settings icon (⚙), then **Project settings**. 1. Select **Service Accounts**. 1. In the **Firebase Admin SDK** section, see the value under **Firebase service account**. The account has the naming convention `firebase-adminsdk-@.iam.gserviceaccount.com`. To create and assign a **custom role** for the single permission: 1. Log in to the [Google Cloud console](https://console.cloud.google.com/). 1. Select **IAM & ADMIN**. 1. If you are not viewing the permissions for the correct project, select the correct project from the menu in the header. 1. Create the role: 1. Select **Roles** in the sidebar. 1. Select **(+) CREATE ROLE**. 1. Add a meaningful title, description, and ID, then select a role launch stage. 1. Select **(+) ADD PERMISSIONS**. 1. Enter property name `cloudmessaging.messages.create`, check the box for it in the list, then select **ADD**. ![Adding permission to an IAM role.](https://www.airship.com/docs/images/android/fcm-iam-role-permission_hu_4f58672467df24e9.webp) *Adding permission to an IAM role.* 1. Select **CREATE**. 1. Assign the role to your service account: 1. Select **IAM** in the sidebar. 1. Under **View by principals**, select the edit icon ( ) next to your Firebase service account. 1. Select **(+) ADD ROLE** or **(+) ADD ANOTHER ROLE**. 1. Select the **Select a role** menu, then select your custom role from the Quick Access list or type its name created and select it from the results. 1. Select **Save**. To assign the **Firebase Cloud Messaging API Admin role** that includes the permission: 1. Log in to the [Google Cloud console](https://console.cloud.google.com/). 1. Select **IAM & ADMIN**. 1. If you are not viewing the permissions for the correct project, select the correct project from the menu in the header. 1. Under **View by principals**, select the edit icon ( ) next to your Firebase service account. 1. If the role "Firebase Cloud Messaging API Admin" is not already listed: 1. Select **(+) ADD ROLE** or **(+) ADD ANOTHER ROLE**. 1. Select the **Select a role** menu, then type "Firebase Cloud Messaging API Admin" and select it from the results. > **Warning:** Be sure to select **Firebase Cloud Messaging *API* Admin**, not **Firebase Cloud Messaging Admin**. 1. Select **Save**. --- Next, generate a private key: 1. Return to the [Firebase console](https://console.firebase.google.com/) and select your project. 1. In the sidebar, select the settings icon (⚙), then **Project settings**. 1. Select the **Service accounts** tab. 1. Under **Firebase Admin SDK**, select **Generate new private key**, then **Generate key**. The key will download as .json file with a name like `project--4173162SAMPLE949879-firebase-adminsdk-0ddvl-1d0bc7bacb.json`. Make sure to store this file in a secure location. --- Now you can configure the Android channel for your project in Airship: 1. Next to your project name, select the dropdown menu (▼), then **Settings**. 1. Under **Channels**, select **Android**. 1. For **Application ID**, select **Edit**, enter your [application ID](https://developer.android.com/build/configure-app-module), then select **Save**. 1. For **Firebase Cloud Messaging (FCM) Token-based authentication**, select **Edit** and upload your Firebase private key file, then select **Save**. ### Configure HMS First you need to configure your app information in AppGallery Connect, then you can enter your HMS client ID and secret in Airship. * If you have not yet configured your app, complete the steps in Huawei's [Configuring App Information in AppGallery Connect](https://developer.huawei.com/consumer/en/doc/HMSCore-Guides/android-config-agc-0000001050170137). In the section [Configuring the Signing Certificate Fingerprint](https://developer.huawei.com/consumer/en/doc/HMSCore-Guides/android-config-agc-0000001050170137#section1159841225116), make sure to copy the values for **Client ID** and **Client secret**. * If you already configured your app information in AppGallery Connect, get your client ID and secret: 1. Log in to [AppGallery Connect](https://developer.huawei.com/consumer/en/console). 1. Select **My projects**, then select the project that contains the app you configured with Airship, then select the Airship app. 1. Under **App information**, copy the values for **Client ID** and **Client secret**. ![Retrieving the client ID and secret from AppGallery Connect](https://www.airship.com/docs/images/android/hms-auth_hu_9088aab7d3ddfd47.webp) *Retrieving the client ID and secret from AppGallery Connect* These steps are also provided in [Viewing Basic App Information](https://developer.huawei.com/consumer/en/doc/HMSCore-Guides/android-config-agc-0000001050170137#section125831926193110) in *Configuring App Information in AppGallery Connect*. Now you can configure the Android channel for the project in Airship: 1. Next to your project name, select the dropdown menu (▼), then **Settings**. 1. Under **Channels**, select **Android**. 1. Under **Huawei Mobile Services (HMS)**, enter your Huawei client ID and client secret in the **Huawei app ID** and **Huawei app secret** fields. 1. Select **Add Android**. ## Fire OS channel configuration To configure Fire OS channels, you must configure Amazon Device Messaging (ADM). > **Note:** While you will not need in-depth knowledge of the ADM platform > in order to use ADM for push notifications, we recommend that you > review Amazon's [Overview of Amazon Device Messaging](https://developer.amazon.com/docs/adm/overview.html) before continuing. ### Configure Fire OS First, follow [Amazon's documentation](https://developer.amazon.com/docs/adm/obtain-credentials.html) to obtain your OAuth Credentials and API Key. Then you can configure the Fire OS channel for the project in Airship: 1. Next to your project name, select the dropdown menu (▼), then **Settings**. 1. Under **Channels**, select **Fire OS**. 1. Enter your OAuth credentials for the **Client ID** and **Client secret**. 1. Select **Save**. # The SDKs and APIs > Airship's SDKs expose messaging and data-gathering functionality on your client devices, and our APIs support messaging mediums that can't use an SDK. Airship has SDKs for iOS, Android/Fire OS, Windows, and Web platforms. The APIs correspond to Airship's engagement (messaging) and real-time event stream products. ## SDK Uses The SDK registers [channels](https://www.airship.com/docs/reference/glossary/#channel_dev) and interprets notifications sent from Airship. You must integrate the SDK with your app or website in order to issue notifications to your mobile and/or web audiences. Devices that have installed your app and web browsers that have opted-in are eligible to receive notifications. Refer to your app's [platform documentation](https://www.airship.com/docs/developer/sdk-integration/) for help integrating and using the SDK. ## API Uses Most features are available via the APIs, however some are available only from the [Dashboard](https://www.airship.com/docs/reference/glossary/#dashboard). Dashboard- and API-only exceptions are noted throughout the docs. See [API vs Dashboard](#api-vs-dashboard) below for more information. [Airship API](https://www.airship.com/docs/developer/rest-api/ua/) : Create and send messages to users, and use advanced messaging features like [Automation](https://www.airship.com/docs/reference/glossary/#automation). This API encompasses the majority of the Airship feature set. [Data Streaming API](https://www.airship.com/docs/developer/rest-api/connect/) : Access your app's event stream, helping you gather information about user interactions with your notifications and app. With [Real-Time Data Streaming](https://www.airship.com/docs/reference/glossary/#rtds), you have access to the data that will help you maximize the effectiveness of your communications. ## Channel Registration Airship's SDK and Airship API are fundamental to the platform, as they are the mechanisms for registering [channels](https://www.airship.com/docs/reference/glossary/#channel_dev). Channel registration is a basic requirement for sending notifications; you cannot send notifications to a channel that is not registered or in the process of becoming registered. ### SDK vs API The SDK enables communications with mobile devices and web browsers; it makes devices and browsers Airship clients. You will bundle the SDK with your app or website to register and issue notifications to mobile devices and web browsers. For an [Open Platform](https://www.airship.com/docs/reference/glossary/#open_platform), you will use our [Channels API](https://www.airship.com/docs/guides/getting-started/developers/channels-intro/#channels-api) to register and manage the opt-in/opt-out status of end users. ### Registration Requirements This table represents the minimum requirements for communicating with the various channels supported by Airship. A channel must either have installed the SDK or be registered via the API. | Channel type | API registration | SDK registration | | --- | :---: | :---:| | App | | ✓ | | Web | | ✓ | | Email | ✓ | | | SMS | ✓ | | | Open Channel | ✓ | ✓ | ## Authentication All Airship APIs require authentication. Some endpoints allow multiple authentication schemes. In general, your app should use Basic App authentication, and server-side implementations should use Bearer authentication where available. See also: [App Keys & Secrets: Security](https://www.airship.com/docs/guides/getting-started/developers/app-keys-secrets/). | Auth type | Value | API | Description | |-----------|-------|----------|-------------| | Basic App | App Key and App Secret, Base64 encoded || The typical authentication scheme for apps integrating with Airship. Basic App authentication is limited to low-security API endpoints, ensuring that users can't compromise your data with your app in the wild.| | Basic Master | App Key and Master Secret, Base64 encoded || Grants access to the complete Airship API and should be reserved for server-to-server communications only. You should not give out your Master Secret or use Basic Master authorization with your app. | Bearer | Bearer Token | | Bearer authentication uses a token that you can create and revoke. Because you can create and revoke tokens for your team at will, bearer authentication maximizes your control over who can access Airship. | ## API vs Dashboard It may be helpful to think of Airship APIs as an expansion of the dashboard feature set. You can do almost anything via the API that you would do using the dashboard — with notable additions, such as: * Use the `custom-events` endpoint to associate external data with channels and users. * Open an event stream with the Data Streaming API to determine the effectiveness of your notifications. * Use `open-channels` to communicate with channels and platforms that aren't natively supported by Airship. > **Note:** Some API endpoints may be restricted by your Airship feature bundle. > [Contact Airship Sales](https://www.airship.com/contact-us/) if you do not have access to an endpoint or > feature that you want to take advantage of. > **Tip:** If you use an AI coding assistant, you can connect it to Airship with Skills and an MCP server. See [Airship AI Tools](https://www.airship.com/docs/developer/ai-tools/ai-tools/). ### Airship The Airship API and dashboard support similar functionality, with some differences in terminology between the two. The tables below map message types, composer types, and features to their respective API objects and endpoints. #### Message Types | Message type | Dashboard | API object | Requires SDK | |---------------|:---------:|-----------|:------------:| | Push Notification | ✓ | `"notification": {}` | ✓ | | Silent Push Notification | ✓ | `"notification": {}` | ✓ | | Web Push Notification | ✓ | `"notification": { "web": {}}` | ✓ | | In-App Message | ✓| `"in_app": {}` 1 | ✓ | | Message Center | ✓ | `"message": {}` | ✓ | | Apple News Notification | ✓ | Not supported | | | Email Notification | ✓ | `"notification": { "email": {}}` | | | SMS Notification | ✓ | `"notification": { "sms": {}}` | | 1. There is currently no API for in-app automation. #### Composers and API Equivalents | Composer | API endpoint| | --- | --- | | Message | `/push` | | A/B Test | `/experiments` | | Automation | `/pipelines` | | In-App Automation | Not supported | | Scene | Not supported | | Sequence | Not supported | | Apple News | Not supported | #### Features Some features, e.g., tags and named users, can be set via the API (server-side) or the SDK (device-side) but not via the dashboard. | Feature | Dashboard | API endpoint | |---------|:---------:|--------------| | Email Channel registration | | `/channels/email` | | SMS Channel registration | | `/channels/sms` | | Open Channel registration1 | | `/channels/open` | | Named Users2 | | `/named-users` | | Tags2 | ✓ | various | | Segments | ✓ | `/segments` | | Lists | ✓ | `/static-lists` | | Custom Events | | `/custom-events` | | Reports | ✓ | `/reports` | | Location | ✓ | | 1 Open Channels require a webhook server that will accept a `/push` payload.
2 Named users and tags can be set client-side, via the SDK. ### Real-Time Data Streaming **Real-Time Data Streaming is an API-only feature.** The Date Streaming API consists of a single endpoint that opens a real-time event stream for a messaging project. You can authorize event streams for various apps via the dashboard, but you can only access an event stream via the API. The event stream reflects user actions, changes in device environment, e.g., encountering beacons, and server-side actions, e.g., sending push notifications. You can use the event stream to gather information about how users use your app and determine effectiveness of your communications with your users. When you make a call to the Data Streaming API, you can set the criteria that determines the events the stream will return. See the [Data Streaming API Reference](https://www.airship.com/docs/developer/rest-api/connect/) for help with opening and filtering the event stream. # Custom Domain Proxy > Send Airship traffic through your own domain. Airship traffic is routed using domains including *urbanairship.com*, *aswpapius.com*, and *airsp.co*. Customers viewing these domains in URLs will likely not associate them with your brand. The domains may also be denied by content blockers, resulting in disabled Airship features. Substituting your own domain instead can provide a consistent brand experience for your users and make it easily identifiable when adding to a trusted domains list in a content blocker. For example, your email [Preference Center](https://www.airship.com/docs/reference/glossary/#preference_center) URL could be *preferences.[yourdomain].com* instead of *pages.airsp.co*. This is accomplished by setting up a **custom domain proxy**, which relays requests (traffic) from your custom domain to Airship instead of directly to Airship. ## Supported features Custom domains are supported for the following Airship features: * [Android](https://www.airship.com/docs/developer/sdk-integration/android/) and [iOS](https://www.airship.com/docs/developer/sdk-integration/apple/) SDKs * [Web SDK](https://www.airship.com/docs/developer/sdk-integration/web/) * [Email preference centers](https://www.airship.com/docs/guides/messaging/features/preference-centers/) * Email [unsubscribe links](https://www.airship.com/docs/guides/messaging/messages/content/email/email-unsubscribe-links/) and [double opt-in links](https://www.airship.com/docs/guides/messaging/messages/content/email/email-double-opt-in-links/) ## Configuration process Complete these steps to configure a custom domain: 1. **Configure your CDN proxy.** This includes: * **Creating your custom domain.** We recommend creating a dedicated subdomain, e.g., `analytics.example.com`. * **Pointing traffic from your custom domain to Airship.** You will specify a *CDN origin* based on the location of your Airship data center. 1. **Request proxy access.** Airship will configure feature support your test projects. 1. **Test** the configured features in your test projects. 1. After a successful test, **request production support**. Airship will configure feature support for your live/production projects. In this document, configuration steps use an example subdomain: `analytics.example.com`. > **Note:** You may use a configured CDN to support more than one Airship project. We recommend trying the custom domain on a test project first, and then moving to your live/production project once it has passed testing. ### Requirements In order to configure a custom domain, you will need access to the following: * Your domain's DNS configuration * A CDN proxy, and access to configure it * A security certificate issued for the proxy domain You must provide your own CDN, which you will configure with your own TLS certificates, and point to an origin we provide. We have tested the following providers: * [Amazon CloudFront](https://aws.amazon.com/cloudfront/) * [Cloudflare](https://www.cloudflare.com/) > **Note:** For assistance with a CDN product, please contact that product's support team. Airship Support is unable to help you directly for those products. ### CDN origin The origin you use as a target for your CDN depends on your project's data center: * North American data center: `ext.airship.com` * EU data center: `ext.airship.eu` [Contact Airship Support](https://support.airship.com) if you are unsure which value to use. ## Configuration steps CDN proxy configuration varies depending on your CDN provider. We provide information for configuring Cloudflare and Amazon CloudFront. > **Important:** We recommend using a dedicated subdomain for the CDN, as you will be passing *all* traffic from the domain to Airship. We do not support any setup which routes traffic for only some paths. ### Configure your CDN proxy: Amazon CloudFront Create a new CloudFront distribution with the following settings: * **Origin:** The correct [origin](#cdn-origin) for your data center: `ext.airship.com` or `ext.airship.eu`. * **Viewer protocol policy:** `HTTPS only` * **Allowed HTTP methods:** `GET, HEAD, OPTIONS, PUT, POST, PATCH, DELETE` * **Cache key and origin requests** * **Cache policy:** `CachingOptimized` * **Origin request policy:** `AllViewer` The remaining settings are your responsibility, but you **must** provide a valid certificate. ### Configure your CDN proxy: Cloudflare > **Note:** Cloudflare is typically configured for an entire domain (e.g., `example.com`), not just a subdomain. This is the only configuration Airship has tested, and these instructions assume you have already successfully configured Cloudflare for your domain. Under Cloudflare's DNS management, add a new subdomain record: * **Type:** `CNAME` * **Name:** Your chosen subdomain name, e.g., `analytics` * **Content/Origin:** The correct [origin](#cdn-origin) for your data center: `ext.airship.com` or `ext.airship.eu` * **Proxy Status:** Proxied > **Important:** In order for Cloudflare to work with an Airship origin, the SSL/TLS mode **must** be set to `Full (strict)`. ### Request proxy access for test projects Once your proxy is configured, you can visit the custom domain in a web browser, however you will receive a generic "Error 404" message. This is expected. Next, [contact Airship Support](https://support.airship.com) with a request for your custom domain to be configured for proxy access. Provide this information: * The Airship project app keys for **test projects** you wish to configure to use the custom domain. You can get your app key from your project dashboard: Next to your project name, select the dropdown menu (▼), then **Project Details**. * Your custom domain, e.g. `analytics.example.com` * The features you wish to enable: Email preference centers and/or the Web SDK. Airship Support will confirm when they complete configuration. You can then test the proxy in a test (non-live/production) project. ### Test: Email preference center For an email preference center, edit an existing [preference center URL](https://www.airship.com/docs/guides/messaging/features/preference-centers/#directing-users-to-a-preference-center), replacing the default Airship domain `pages.airsp.co` with your custom domain: * **Default:** `https://pages.airsp.co/pages//?channel_id=` * **Custom:** `https://analytics.example.com/pages//?channel_id=` The preference center should work with no further changes. See also [Testing an Email Preference Center web page](https://www.airship.com/docs/guides/messaging/features/preference-centers/#testing-an-email-preference-center-web-page). ### Test: Email unsubscribe and double opt-in links > **Important:** The custom domain proxy feature will not affect email link tracking domains. You may not use the same domain for email tracking links and a custom domain proxy. When sending an email, you may use [Unsubscribe / List unsubscribe](https://www.airship.com/docs/guides/messaging/messages/content/email/email-unsubscribe-links/) or [Double opt-in](https://www.airship.com/docs/guides/messaging/messages/content/email/email-double-opt-in-links/) links to allow end users to update their opt in status. When using these links, Airship provides a default "success" landing page if you do not specify your own. When using the custom domain proxy feature for these links, they will use your custom domain instead of the Airship default domains. To test this feature, send an email to yourself that includes an [Unsubscribe link](https://www.airship.com/docs/guides/messaging/messages/content/email/email-unsubscribe-links/), without specifying a redirect URL. After following the link in the email you receive, you should be redirected through your custom domain and arrive at a default landing page on that same domain. **HTML example** ```html Unsubscribe ``` **Plain text example** ```plaintext [[ua-unsubscribe]] ``` ### Test: Android and iOS SDKs > **Important:** You should test the domain configuration on a test project to avoid interruptions to your audience. An invalid configuration will prevent the SDK from communicating with Airship, and this configuration can only be enabled for your full audience. Enabling a custom domain for Android and iOS SDK traffic can only be done by [contacting Airship Support](https://support.airship.com); you will coordinate with our support staff to determine when the setting should be enabled for your Test and Live projects. Once a custom domain is enabled for your project, the configuration will automatically be pulled by the SDK once its local cache expires. This will allow you to test SDK communications, however the initial configuration will still be pulled from Airship domains. To fetch this initial configuration from your custom domain you must update your application's configuration with the new "initial configuration URL" setting, which requires the following SDK versions: * Android: 16.8.0+ * iOS: 16.10.0+ #### Android Kotlin ```kotlin val config = AirshipConfigOptions.Builder() ... .setInitialConfigUrl("https://analytics.example.com") .setUrlAllowList(arrayOf(..., "https://analytics.example.com")) .build() ``` Apps that load config from a properties file can set the domain using the keys `urlAllowList` and `initialConfigUrl`. #### Android Java ```java AirshipConfigOptions config = AirshipConfigOptions.newBuilder() ... .setInitialConfigUrl("https://analytics.example.com") .setUrlAllowList(new String[]{..., "https://analytics.example.com"}) .build(); ``` Apps that load config from a properties file can set the domain using the keys `urlAllowList` and `initialConfigUrl`. #### iOS Swift ```swift let config = Config() ... config.initialConfigURL = "https://analytics.example.com" config.urlAllowList = [..., "https://analytics.example.com"] ``` Apps that load config from a plist can set the domain using the keys `urlAllowList` and `initialConfigURL`. #### iOS Objective-C ```objc UAConfig *config = [[UAConfig alloc] init]; ... config.initialConfigURL = @"https://analytics.example.com"; config.urlAllowList = @[..., @"https://analytics.example.com"]; ``` Apps that load config from a plist can set the domain using the keys `urlAllowList` and `initialConfigURL`. #### React Native ```ts import { UrbanAirship } from 'urbanairship-react-native'; Airship.takeOff({ ... urlAllowList: [..., "https://analytics.example.com"], initialConfigUrl: "https://analytics.example.com" }); ``` Apps that load config from a properties file can set the domain using the keys `urlAllowList` and `initialConfigUrl`. Apps that load config from a plist can set the domain using the keys `urlAllowList` and `initialConfigURL`. #### Flutter ```dart var config = AirshipConfig( ... initialConfigUrl: "https://analytics.example.com", urlAllowList: [..., "https://analytics.example.com"] ); Airship.takeOff(config); ``` Apps that load config from a properties file can set the domain using the keys `urlAllowList` and `initialConfigUrl`. Apps that load config from a plist can set the domain using the keys `urlAllowList` and `initialConfigURL`. #### Cordova ```js Airship.takeOff({ ... urlAllowList: [..., "https://analytics.example.com"], initialConfigUrl: "https://analytics.example.com" }); ``` ### Test: Web SDK > **Important:** You should test the domain configuration on a staging deployment of your website to avoid interruptions. The Web SDK's initialization code must be updated to specify the new SDK source URL, as well as the API endpoints. These will have the same value. For example: **snippet.html (SAMPLE ONLY)** ```html ``` **push-worker.js (SAMPLE ONLY)** ```javascript importScripts('https://analytics.example.com/notify/v1/ua-sdk.min.js') uaSetup.worker(self, { defaultIcon: '', defaultTitle: 'Example Site', defaultActionURL: 'https://example.com', appKey: '', token: '', vapidPublicKey: '', // this configuration key is new, and needed for the custom domain apiUrl: 'https://analytics.example.com' }) ``` Make the following changes: * Update the path to `ua-sdk.min.js` to the custom domain, keeping the path the same as before. * Add a new configuration key `apiUrl`, containing the custom domain and protocol, *without* a trailing slash. > **Note:** You **must** update the initialization code both in the snippet in your web pages **and** in your push worker, e.g., `push-worker.js`. Once configured, you should see any SDK traffic being sent from the browser through your custom domain without error. ### Request support for live/production projects After your configuration has been tested with a successful outcome, once again [contact Airship Support](https://support.airship.com). Reply to your original [proxy access request](#request-proxy-access-for-test-projects) with a request to have the configuration committed to your live/production projects and provide: * The Airship project app keys for **live projects** you wish to configure to use the custom domain. You can get your app key from your project dashboard: Next to your project name, select the dropdown menu (▼), then **Project Details**. This final step by Support ensures that any URLs generated by the Airship dashboard will reflect the correct settings for your custom domain. # Airship API Security > The Airship messaging API supports HTTP and OAuth authentication. Different security and authorization levels are available for both. Authentication verifies who is requesting access to the API. Authorization determines what the requester has access to. Use this page to determine what authentication you want to use and the levels of access you want to grant. It also contains setup procedures. ## Supported authentication methods HTTP authentication supports Basic Auth and Bearer Token. OAuth authentication supports OAuth 2.0. The basic differences between authentication methods: | Authentication method | Credentials | Lifetime | API permissions | | --- | --- | --- | --- | | **[Basic Auth](#basic-auth)** | [App Key](https://www.airship.com/docs/reference/glossary/#app_key) and [App Secret](https://www.airship.com/docs/reference/glossary/#app_secret) or [Master Secret](https://www.airship.com/docs/reference/glossary/#master_secret) | 🚨 Permanent 🚨 | Master Secret allows access to most APIs, App Secret allows access to only the APIs necessary for providing Airship access to your audience's apps and browsers. | | **[Bearer Token](#bearer-token)** | A token created in the dashboard | Until revoked | Role-based. Audience Modification grants access to register and modify audiences. All Access grants complete access to all endpoints and features that support Bearer Token authentication. | | **[OAuth 2.0](#oauth-20)** | A token generated by a `POST` using credentials created in the dashboard | Token=1 hour
Credentials=Until expiration, if set | Scope-based. Specify one or more scopes that define allowed endpoints and operations. | {class="table-col-1-20 table-col-2-30 table-col-3-20 table-col-4-30"} ![Supported authentication methods listed for POST /api/push](https://www.airship.com/docs/images/send-push_hu_a7bba359be8cd4c.webp) *Supported authentication methods listed for POST /api/push* For a list of endpoints allowed per authentication method, see the [Airship API Authorization Reference](https://www.airship.com/docs/developer/rest-api/ua/api-auth-reference/). In addition to the differences noted in the above table, the HTTP and OAuth methods use different base URLs. For detailed information, see each method's section on this page. In the [Airship API reference](https://www.airship.com/docs/developer/rest-api/ua/) and [Real-Time Data Streaming](https://www.airship.com/docs/reference/glossary/#rtds) [API reference](https://www.airship.com/docs/developer/rest-api/connect/), each endpoint's supported authentication methods, and scopes for OAuth 2.0, are listed under **Security**. ## Basic Auth Basic Auth is a form of HTTP authentication and authorization. You provide your project's [App Key](https://www.airship.com/docs/reference/glossary/#app_key) and [App Secret](https://www.airship.com/docs/reference/glossary/#app_secret) or [Master Secret](https://www.airship.com/docs/reference/glossary/#master_secret) to generate a Base-64 authorization string. The App Secret grants access to most product features, while the Master Secret grants access to the majority of the Airship API. While Basic Master grants access to the complete Airship API, you should use this method for server-to-server communications only. You should not give out your Master Secret or use Basic Master authentication with your app. See the [Basic Authentication Map](https://www.airship.com/docs/guides/getting-started/developers/app-keys-secrets/#api-authentication-map) for more information about the features you can access with Basic Auth. You can access your App Key, Secret, and Master Secret in your project dashboard. Next to your project name, select the dropdown menu (▼), then **Project Details**. Access level [Owner, Administrator, or Full Access](https://www.airship.com/docs/guides/getting-started/admin/teams-messaging/#access-levels) is required to view the Secret. Owner and Administrator can view the Master Secret. In the API reference, see: * [Base URLs for HTTP authentication](https://www.airship.com/docs/developer/rest-api/ua/introduction/#servers) in the *Base URLs* section * [HTTP Authentication: Basic Auth (App) and Basic Auth (Master)](https://www.airship.com/docs/developer/rest-api/ua/introduction/#security) in the *Authentication* section ## Bearer Token Bearer Token is a form of HTTP authentication and authorization. You provide a token string generated from your Airship project settings. You can set bearer tokens to allow complete access to all endpoints and features that support Bearer Token authentication or only allow registering and modifying audiences. Bearer tokens do not expire. To revoke access, you must delete the token. In the API reference, see: * [Base URLs for HTTP authentication](https://www.airship.com/docs/developer/rest-api/ua/introduction/#servers) in the *Base URLs* section * [HTTP Authentication: Bearer Token](https://www.airship.com/docs/developer/rest-api/ua/introduction/#security) in the *Authentication* section ### Creating bearer tokens Project [Owners and Administrators](https://www.airship.com/docs/guides/getting-started/admin/teams-messaging/#access-levels) can create bearer tokens. First, determine which access role you need for your token. See the columns **Bearer — All Access** and **Bearer — Audience Modification** in the [Airship API Authorization Reference](https://www.airship.com/docs/developer/rest-api/ua/api-auth-reference/#authorization-per-authentication-method). Then create the token in your Airship project: 1. Next to your project name, select the dropdown menu (▼), then **Settings**. 1. Under **Project settings**, select **Tokens**. 1. Select **Create token**. 1. Enter a token name. This is used to recognize your tokens in Airship. 1. Select an access role for the token: | Role | Description | Typical use | | --- | --- | --- | | **Audience Modification** | Grants read and write permission to audience-related APIs | Sending custom events into Airship | | **All Access** | Grants full access to your Airship project | Inbound message handling webhooks | 1. Select **Create token**. 1. Copy the App Key and token strings, then select **Got it** to close the window. You cannot view the token again after closing. ### Managing bearer tokens Project [Owners and Administrators](https://www.airship.com/docs/guides/getting-started/admin/teams-messaging/#access-levels) can manage bearer tokens. Next to your project name, select the dropdown menu (▼), then **Settings**. Then, under **Project settings**, select **Tokens**. The default sort order is by last created, and each row displays the token name, assigned role, and creation date and time. To immediately revoke a token's access to the Airship API, select **Delete**. If your request returns an "Invalid bearer token" error, verify your token is active and includes the [access role necessary](https://www.airship.com/docs/developer/rest-api/ua/api-auth-reference/#authorization-per-authentication-method) for the given request. ## OAuth 2.0 [OAuth 2.0](https://oauth.net/2/) is an authorization framework you can use to provide secure, limited access to the Airship API. Instead of providing a single string like with Basic Auth or Bearer Token authentication, you regularly fetch short-lived bearer tokens to use in your API calls. This method provides better security than Basic Auth and Bearer Token since, in the event of the tokens becoming public, they can only be used for a short time before they expire. Another benefit is control of permissions. Instead of broad access to the API, you select one or more scopes that define which endpoints and operations are authorized for the tokens, and you can edit them at any time. The general workflow for OAuth 2.0 and Airship: 1. Create client credentials in your Airship project settings and set the [scope of permissions](https://www.airship.com/docs/developer/rest-api/ua/api-auth-reference/#oauth-token-scopes) to authorize for issued tokens. You can also specify an expiration date and time for the credentials or revoke them later. After expiration or revocation, no tokens will be issued for requests using those credentials, but any tokens already issued will continue to be valid until their own expiration date and time. 1. Request a token in a `POST` using HTTP Basic Auth with your client credentials or, for additional security, using an assertion. An assertion is a JSON Web Token (JWT) used for authentication. You may want to use an assertion since it does not require regularly transmitting long-lived secrets and provides some defense against replay attacks by requiring a `nonce`. However, it is less convenient, and OAuth clients are unlikely to support this flow. In your request, you can also restrict a token to specific scopes and/or IP addresses. 1. Use the token for authentication in API calls. Make sure your requests are using the appropriate [domain](https://www.airship.com/docs/developer/rest-api/ua/introduction/#servers). 1. Refresh the token before it expires. The `expires_in` property in the response from the token request tells you the number of seconds from the time the token is generated until it expires. Keep refreshing until it is no longer needed, or revoke the credentials in the dashboard if you want to disallow further token requests. In the Airship API reference, see: * [Base URLs for OAuth authentication](https://www.airship.com/docs/developer/rest-api/ua/introduction/#servers) in *Introduction* * [HTTP Authentication: Basic Auth (OAuth)](https://www.airship.com/docs/developer/rest-api/ua/introduction/#security) and [OAuth Authentication: OAuth 2.0](https://www.airship.com/docs/developer/rest-api/ua/introduction/#security) in *Introduction* * [OAuth API endpoints](https://www.airship.com/docs/developer/rest-api/ua/operations/oauth/) in *Operations* * [Assertion JWT](https://www.airship.com/docs/developer/rest-api/ua/schemas/oauth/#assertionjwt) in *Data Formats* ### Create client credentials Client credentials are used for communicating with the authorization server that issues OAuth tokens. By default, the credentials are a Client ID, Public Key, and Private Key. You can also generate a Client Secret to use in HTTP Basic Auth token requests. You can edit the credentials' name, expiration, and permissions after saving. Project [Owners and Administrators](https://www.airship.com/docs/guides/getting-started/admin/teams-messaging/#access-levels) can create client credentials: 1. Next to your project name, select the dropdown menu (▼), then **Settings**. 1. Under **Project settings**, select **OAuth**. 1. Select **Add credentials**. 1. Enter a name and description to help you identify them in your list of all client credentials. 1. Configure options: | Option | Description | Steps | | --- | --- | --- | | **Allow Basic Auth** | Generates a Client Secret for use in HTTP Basic Auth token requests. You cannot change this setting later. | Toggle to enable. | | **Expiration** | Sets the credentials to expire at a specific date and time. After expiration, no tokens will be issued for requests using the credentials, but any tokens already issued will continue to be valid until their own expiration date and time. | Toggle to enable, then enter a date and time in UTC. | 1. Select **Next**. 1. Toggle to enable the scope of permissions for the issued tokens. For a list of endpoints and related operations allowed for each scope, see [OAuth token scopes](https://www.airship.com/docs/developer/rest-api/ua/api-auth-reference/#oauth-token-scopes) in the *Airship API Authorization Reference*. 1. Select **Save**. 1. Select the copy icon for each credential string or select **Download all** to save them in a zip file. 1. Select **Close**. After closing, only the Client ID and Public Key are accessible in the Airship dashboard. ### Request tokens See [Request token](https://www.airship.com/docs/developer/rest-api/ua/operations/oauth/#requestoauthtoken) in the *OAuth* section of the API reference. ### Manage client credentials Project [Owners and Administrators](https://www.airship.com/docs/guides/getting-started/admin/teams-messaging/#access-levels) can manage client credentials. Next to your project name, select the dropdown menu (▼), then **Settings**. Then, under **Project settings**, select **OAuth**. The default sort order is by last created, and each row displays the name, Client ID, status, description, creation date and time, and expiration date and time. You can search by name, Client ID, and description. You can filter by status: Active, Revoked, or Expired. Client credentials management options: | Option | Description | Steps | | --- | --- | --- | | **Copy credentials** | You can view and copy the Client ID and Public Key. | Select the copy icon for each credential string, then select **Save**. | | **Edit credentials** | You can change the name, description, expiration, or permissions. | Select the edit icon (✏), edit, then select **Save**. | | **Revoke active or expired credentials** | Disables the credentials' ability to request new tokens from the authorization server. Tokens already issued will continue to be valid until their own expiration date and time. You cannot restore revoked credentials. | Select the revoke credentials icon. | | **Delete revoked credentials** | Removes the credentials from the list of all credentials | Select the delete icon (trash). | # App Keys & Secrets: Security > In order for your app to communicate with the Airship API it must use a key and secret combination that authenticates it to your Airship app setup. These keys are generated automatically when you create an app in our dashboard, and you manually copy them into your iOS, Android/Fire OS, or Windows app configuration. Since app bundles are fundamentally considered insecure (they can be decompiled), this key and secret combination limits the APIs that your device can communicate with. This allows the device to modify tags and named user for a specific channel, device token, or APID, and nothing more. Push addresses/tokens are sufficiently random that they can be considered obscure, and the associated data is low risk. We employ additional security on our servers to monitor for abuse. Tags and named user should be considered obscure, however they are trusted APIs for devices to access so you should not place sensitive information in a tag or named user. We generate one additional piece of data called the Master Secret, which is used to do all communication with our wider APIs. The Master Secret should never be placed in an app bundle, nor released to the public. This is the secret you use to authenticate requests to our server for generating pushes, rich app pages, and more. ## Definitions App Key : Airship-generated string identifying the app setup. Used in the application bundle. Only available in the Airship dashboard. App Secret : Airship-generated string identifying the app setup secret. Used in the application bundle. Only available in the Airship dashboard. This can be reset by Airship's Support team, but only for emergency security issues. If you want to change this periodically, we suggest you use the bearer token instead. Master Secret : Airship-generated string used for server-to-server API access. This secret must never be shared or placed in an application bundle. Only available in the Airship dashboard. This can be reset by Airship's Support team, but only for emergency security issues. If you want to change this periodically, we suggest you use the bearer token instead. Partner Secret : Airship-generated string used for server-to-server API access to create and manage applications for partner integrations. This should never be shared or placed in an application bundle. Only available through manual channels. Bearer Token : A token you can create and revoke from within Airship to be used for custom event servers, SMS webhook servers, and API consumers. Because you can create and revoke tokens for your team at will, bearer authentication maximizes your control over who can access Airship. This should never be shared or placed in an application bundle. Only available in the Airship dashboard. User ID : Airship-generated string passed back to devices and stored in the device keychain for authenticating user-related device API actions when paired with the Password. This is not the same as your Airship dashboard user ID. Password : Airship generated string passed back to devices and stored in the device keychain for authenticating User related device API actions when paired with the User ID. This is not the same as your Airship dashboard password. Push Address *or* Token : A unique proprietary string generated by device vendors (Apple, Google, Windows, Fire OS) for identifying an addressable push device. This is passed back to the device via vendor specific APIs and then stored by Airship for addressing push messages and authenticating push related APIs. Dashboard User ID and Password : The credentials used to log in to the Airship [Dashboard](https://www.airship.com/docs/reference/glossary/#dashboard). ## API Authentication Map | API feature | Create | Read | Update | Delete | | --- | --- | --- | --- | --- | | Tags | App Key/Secret & Token | Single: App Key/Secret & Token Enumerate: App Key/Secret | App Key/Secret & Token | Single from Device: App Key/Secret & Token All tags, all devices: Master Secret | | Device Token/APID/PIN Registration | App Key/Secret & Token | Single: App Key/Secret & Token Enumerate: Master Secret | App Key/Secret & Token | App Key/Secret & Token1 | | Push Message | Master Secret2 | Scheduled Push: Master Secret | Scheduled Push: Master Secret | Scheduled Push: Master Secret | | Rich Push Message | App Key/Master Secret | User ID/Password | N/A | User ID/Password | | User | App Key/Master Secret | Single: User ID/Password or Master Secret Enumerate: Master Secret | User ID/Password or Master Secret | User ID/Master Secret1 | | Partner API | Partner Key/Secret3 | Partner Key/Secret | Partner Key/Secret | Partner Key/Secret | 1. Marks as inactive.
2. Unless push from device feature.
3. Only available to Airship partners. ## Tag & Named User Security Tags and named users are considered obscure, but not secure in our system. We recommend that you not use them to store sensitive information. The obscurity varies by platform, as push addresses/tokens are a different format for each vendor (Apple, Google, Microsoft, Fire OS). Typically these are UUIDs or similar, but this is not guaranteed and should be considered proprietary in nature. To gain access to a specific device's tags or the named user it belongs to from an unauthorized source you would need to guess the push identifier, which is mathematically improbable, or obtain it by other means. Given that certain tag operations can be completed without the master secret it is possible for a user, with the app key, secret, and push address, to list tags for an app and subscribe or unsubscribe themselves to those tags. Please be aware of this as you plan your own usage of the tag API. # Airship Postman collection > Use our Postman public workspace to experiment with the Airship API. The Airship API v3 [Postman](https://www.postman.com/) collection provides sample API requests for our most popular endpoints. To use the Airship collection, you will fork the collection and an environment to your personal workspace, where you can personalize your payloads and add your project credentials, channels, etc. You can also choose to get updates when there are changes to the main collection. > **Tip:** If you use an AI coding assistant, you can connect it to Airship with Skills and an MCP server. See [Airship AI Tools](https://www.airship.com/docs/developer/ai-tools/ai-tools/). ## Forking the Airship collection 1. Go to our [Airship Public Workspace](https://www.postman.com/airship-api). 1. Select **Collections** in the sidebar, then select **Airship API v3**. 1. Select the more menu icon (⋯), then select **Create a fork**. 1. Enter a label for your fork, then select location **My Workspace**. 1. (Optional) Check the box for **Watch original collection** to get notified about updates to the original collection. 1. Select **Fork Collection**. Your forked collection will be created in **My Workspace**. ![Forking the Airship collection](https://www.airship.com/docs/images/ug-gs-fork-airship-collection_hu_630d39983dc176c9.webp) *Forking the Airship collection* ## Forking the Airship environment After forking the collection: 1. Select **Environments** in the sidebar, then select **Public Airship Environment**. 1. Select the more menu icon (⋯), then select **Create a fork**. 1. Enter a label for your fork, then select location **My Workspace**. 1. Select **Fork Environment**. Your forked environment will be created in **My Workspace**. Initial values are shared when you share a collection or environment. Current values are local and not synced or shared. ![Forking the Airship environment](https://www.airship.com/docs/images/ug-gs-fork-airship-environment_hu_e3f9f93f5e8b1d29.webp) *Forking the Airship environment* ## Setting up your Postman environment The Airship Public Workspace contains the Airship API v3 collection and Public Airship Environment. Global variables, such as `{{baseUrl}}`, and variables defined in the Public Airship Environment are used for all the pre-built requests in the collection. The endpoints use either a bearer token `{{bearer_token}}` or both app key `{{app_key}}` and master secret `{{master_secret}}` for authorization. . Follow the steps below to set up your variables in your Postman environment. All the variables defined in the Public Airship Environment are used in the Airship API v3 requests. 1. Go to **My Workspace**. 1. Select **Environments** in the sidebar, then select **Public Airship Environment**. 1. Select the down arrow icon (▼) at the top right of the screen, then select **Public Airship Environment**. 1. Edit the values in the **CURRENT VALUE** column for variables to be used in the API requests: | Variable | Value | | --- | --- | | app_key and master_secret | Replace the current values with values from your Airship project. In Airship, go to **Settings** and copy them from the sidebar, | | bearer_token | Replace the current values with values from your Airship project. If you don't already have a bearer token, follow the steps for [Creating bearer tokens](https://www.airship.com/docs/guides/getting-started/developers/api-security/#creating-bearer-tokens) in _Airship API Security_. | | android_channel and ios_channel | Replace the current values with your Android and iOS channel IDs. See [Finding Channel IDs](https://www.airship.com/docs/guides/getting-started/developers/identifiers/). | Your current values are local and not synced or shared. You can ignore variables with blank values. They will be populated via scripts. 1. Select **Save**. ![Setting up your Postman environment](https://www.airship.com/docs/images/ug-gs-set-up-environment_hu_5193fb05ea52ee94.webp) *Setting up your Postman environment* > **Note:** Before adding tag groups to the environment and using them in requests, make sure they exist in Airship. In your Airship project, go to **Audience**, then **Tags**, then **Tag Groups**. ## Sending a push request The Airship API v3 collection is organized in folders based on endpoints. Selecting a folder expands all pre-built requests related to that endpoint. Selecting a request opens a new tab in the main window of Postman. 1. Go to **My Workspace**. 1. Select **Collections** in the sidebar, then select the **Airship API v3** collection. 1. Select the down arrow icon (▼) at the top right of the screen, then select **Public Airship Environment**. 1. In **Airship API v3** select the **Push** folder, then open the request **POST Send a Push**. 1. Select the **Body** tab to review the request body. 1. Select **Send**, then verify the response data that is returned below the request section. ![Sending a push request](https://www.airship.com/docs/images/ug-gs-send-push-request_hu_ce281c2d345dae18.webp) *Sending a push request* ## Manage your Airship account and team Manage user accounts, team access and permissions, security settings, and billing for your Airship projects. # Airship login guidelines and account management > Learn about Airship login guidelines and behavior and how to manage your account. ## Login guidelines and behavior > **Note:** If you are having login issues, [email Support](mailto:support@airship.com) from the email address associated with your Airship account. ![Select US or EU when logging in](https://www.airship.com/docs/images/login-region_hu_f4c5fde0b8a927.webp) *Select US or EU when logging in* ### Login guidelines 1. Verify you have the right region selected for your account: EU or US. The selection updates the URL to https://go.airship.com or https://go.airship.eu. 1. Make sure you are entering your username/email address correctly. The field is case sensitive for accounts that are not enabled for [Multi-Factor Authentication (MFA)](https://www.airship.com/docs/guides/getting-started/admin/security/mfa/). ### Account sharing Sharing accounts is not a secure practice. Instead, give access to individual Airship accounts. See: * [Manage Messaging teams and access](https://www.airship.com/docs/guides/getting-started/admin/teams-messaging/) * [Manage Wallet teams and access](https://www.airship.com/docs/guides/getting-started/admin/teams-wallet/) ### Browser sessions To end your current browser session, select the account menu icon (user-circle) in the dashboard header, then **Log Out**. To end a team member's session, see [Managing user sessions](https://www.airship.com/docs/guides/getting-started/admin/security/account-security/) in *Manage account security*. Multiple browser sessions are not allowed. If you log in again while another session is active, you will be prompted to either end the new session or log out of all other browsers. ### Last login In the Airship dashboard, your username, the date and time of your last login, and your IP address are in the page footer. The time is your browser's local time. ### Account lockout After six unsuccessful login attempts, Airship locks the account and sends the user an email with information and instructions. For non-MFA-enabled accounts, lockout is after five unsuccessful attempts. ## Account management You can update your username or password or remove your Airship account. ### Change your password Users with [Multi-Factor Authentication (MFA)](https://www.airship.com/docs/guides/getting-started/admin/security/mfa/)-enabled accounts are required to change their password every 90 days and cannot reuse their previous 15 passwords since first configuring MFA. If you are already logged in: 1. Select the account menu icon (user-circle) in the dashboard header, then select **Profile**. 1. Under **Login Info**, select the edit icon (✏) for **Password**. 1. (For MFA-enabled accounts) Follow the onscreen steps on the Okta MFA account management page that opens in a new tab. 1. (For non-MFA-enabled accounts) Enter your current and new passwords, then select **Save**. If you cannot log in: 1. On https://go.airship.com or https://go.airship.eu, enter your email address and select **Continue**. The email field is case sensitive for non-MFA-enabled accounts. 1. Select **Forgot your password?** to go to account recovery. 1. (For MFA-enabled accounts) Select **Forgot password?**, then **Send me an email**. 1. (For non-MFA-enabled accounts) Enter your email address and select **Recover account**. 1. Check your email inbox for a reset request, and follow the link to reset your password.

If you created an account but never activated it by setting a password, you will receive an activation email instead of a password reset email. Follow the instructions there to set a password and activate your account. ### Password requirements When creating an account or changing your password, your password must meet these requirements: * At least 12 characters * A lowercase letter * An uppercase letter * A number * A symbol * No parts of your username * Does not include your first name * Does not include your last name * Your password cannot be any of your last 15 passwords * At least 1 day must have elapsed since you last changed your password ### Change your username 1. Select the account menu icon (user-circle) in the dashboard header, then select **Profile**. 1. Under **Login Info**, select the edit icon (✏) for **Username/email address**. 1. Enter your password and select **Continue**. If your account is enabled for [MFA](https://www.airship.com/docs/guides/getting-started/admin/security/mfa/), enter your password and select **Next**, then authenticate with one of your MFA factors. 1. Enter a new email address, then select **Change username and email address**. 1. Check your email inbox for a profile change notification, and follow the verification link. ### Update your personal info To update the name, role, industry, or country in your Airship profile: 1. Select the account menu icon (user-circle) in the dashboard header, then select **Profile**. 1. Select the edit icon (✏) for the **Personal Info** section. 1. Edit your information. 1. Select **Save**.. ### Manage communication preferences To change your marketing email preferences: 1. Select the account menu icon (user-circle) in the dashboard header, then select **Profile**. 1. Under **Preferences**, toggle **Marketing communications** to opt in to or out of Airship marketing email. --- To subscribe to Airship system status updates, go to https://status.airship.com/ or https://status.airship.eu/, or access the page from the dashboard: 1. Select the account menu icon (user-circle) in the dashboard header, then select **Profile**. 1. Follow the link for **Airship Status Page Updates**. On the status page: 1. Verify you are on the status page for the environment you want to monitor. If not, select **🇺🇸 Go to US status** or **🇪🇺 Go to EU status**. 1. Select **Subscribe to updates** and fill out the form. 1. Select **Subscribe**. To unsubscribe, follow the Unsubscribe link provided in status emails. ### Deactivate your account Non-enterprise customers can deactivate their own user accounts. Please [contact Airship Support](https://support.airship.com/) to deactivate enterprise user accounts. 1. Select the account menu icon (user-circle) in the dashboard header, then select **Usage and Plan**. 1. Select **Deactivate Account** and confirm deactivation. # Manage your Airship company account > Change your company account owner or plan. ## Account types When you create an Airship account, we create two linked accounts for you: | Account type | Description | | --- | --- | | **Company** | Contains your projects and is controlled by a single User account | | **User** | The Owner of the Company account | By default, a Company account has a single Owner. Every Airship user is the Owner of their own Company account. ## Adding or changing a Company account Owner [Contact Airship Support](https://support.airship.com) with your request and include: | Request type | Content | Support handling | | --- | --- | --- | | **Owner change** | The current Owner’s email address and the new Owner’s Airship username, email address, and first and last names | Support will deactivate the current owner’s account. Transferring ownership is generally completed within five business days. | | **Additional Owner** | The new Owner’s Airship username, email address, and first and last names | Adding owners is generally completed within five business days. | ## Changing your Airship plan Non-enterprise customers can change their Airship messaging plan and add-ons at any time. Some add-ons available for a 30-day trial require contacting Airship. Compare plans in the [Features packages reference](https://www.airship.com/docs/reference/feature-packages/). Enterprise customers, [contact Airship Sales](https://www.airship.com/contact-us/) with any change requests. Additions and upgrades are effective immediately. Canceled add-ons remain available until the end of your current billing cycle. 1. Select the account menu icon (user-circle) in the dashboard header, then select **Usage and Plan**. **Plan** states your current plan subscription. **Additional Products** lists add-ons and trials. 1. Select the edit icon (✏) to make changes. Upgrades require entering a credit card if one is not currently stored for your account. # View usage and manage payment > View messaging usage data and update your payment information. ## View monthly audience counts [Company Owners](https://www.airship.com/docs/guides/getting-started/admin/teams-messaging/#access-levels) can view the audience counts that contribute to your monthly messaging billing totals. Monthly audience counts are for your top 20 production projects. Count values vary per contract and may refer to addressable users, contacts, or another value. Please refer to your contract. For additional information, see [Billing terms definitions for the Airship Service](https://www.airship.com/docs/reference/billing/). 1. Select the account menu icon (user-circle) in the dashboard header, then **Usage and Plan**, then **Monthly Audience**. 1. Select the billing period to view. The total quantity is listed per month, followed by counts per channel or app platform. Non-enterprise customers have **Addressable Users** counts for the current month and previous months. See the [Addressable Users section](https://www.airship.com/docs/reference/billing/#addressable-users) in the *Billing* reference for the calculation method.

To see usage per project, select the arrow icon for a month. Select **Download CSV** to export the data for all projects for the selected period. > **Important:** At the end of the month it can take up to 10 business days for our systems to complete and update these metrics. Metrics can change slightly during this period due to a small number of events that trickle in later because of connectivity issues. It is best to view a month's metrics at least 10 days after the end of a month. ## View impressions usage [Company Owners](https://www.airship.com/docs/guides/getting-started/admin/teams-messaging/#access-levels) can view the counts of [Scene](https://www.airship.com/docs/reference/glossary/#scene) and [Embedded Content](https://www.airship.com/docs/reference/glossary/#embedded_content) [Impressions](https://www.airship.com/docs/reference/glossary/#impression) that contribute to your billing totals. For additional information, see [Impression](https://www.airship.com/docs/reference/billing/#impression) and [Embedded Content Impression](https://www.airship.com/docs/reference/billing/#embedded-content-impression) in the *Billing* reference. > **Note:** Impressions usage is available in the dashboard for customers with plans purchased on or after November 15, 2023: > > * AXP Enterprise > * AXP Essentials with Native App Experiences add-on > * AXP Essentials Starter with Native App Experiences add-on > > See [Feature packages reference](https://www.airship.com/docs/reference/feature-packages/). 1. Select the account menu icon (user-circle) in the dashboard header, then **Usage and Plan**, then **Usage**. 1. Under **Impressions usage**, see the interval bar chart and trend line representing counts per week for the current project and contract period over the last 30 days.

If you have access to multiple companies, select the company you want to view usage for. For contracts that define a minimum number of billable impressions, that value is displayed as the **Annual** or **Monthly commit**. You can filter the viewable data by: * Contract period * Daily, weekly, or monthly intervals * Date range — The date range is an inclusive look back. For example, if viewing usage ending on December 14th, the counts include usage that occurred on December 14th. Graph data: | Data | Definition | | --- | --- | | **Impressions** | The number of impressions per interval for the selected date range that have been calculated for billing | | **Estimated impressions** | The number of impressions per interval for the selected date range that have been pre-calculated but not yet applied to your bill | | **Running total** | The aggregate number of impressions for the selected contract period that have been calculated for billing | | **Estimated running total** | The aggregate number of impressions for the selected contract period that have been pre-calculated but not yet applied to your bill | ## View Feature Flag and Scene Rollout usage View the counts of [Feature Flags](https://www.airship.com/docs/reference/glossary/#feature_flag) and [Scene Rollouts](https://www.airship.com/docs/reference/glossary/#scene_rollout) that contribute to your billing totals. For additional information, see [Daily and Peak Daily Active Flags](https://www.airship.com/docs/reference/billing/#daily-and-peak-daily-active-flags) in the *Billing* reference. [Company Owners](https://www.airship.com/docs/guides/getting-started/admin/teams-messaging/#access-levels) can view usage: 1. Select the account menu icon (user-circle) in the dashboard header, then **Usage and Plan**, then **Usage**. 1. Under **Feature Flag and Scene Rollout usage**, see the interval bar chart representing counts per week for the current project and contract period over the last 30 days. Hover over a date to see total and individual counts for flags and rollouts.

If you have access to multiple companies, select the company you want to view usage for. For contracts that define a minimum number of billable flags and rollouts, that value is displayed as the **Annual** or **Monthly commit**. You can filter the viewable data by: * Contract period * Daily, weekly, or monthly intervals * Date range — The date range is an inclusive look back. For example, if viewing usage ending on December 14th, the counts include usage that occurred on December 14th. ## Update payment information [Company Owners](https://www.airship.com/docs/guides/getting-started/admin/teams-messaging/#access-levels) can view and update payment information: For enterprise accounts: 1. Select the account menu icon (user-circle) in the dashboard header, then select **Billing**. 1. Follow the onscreen steps to update your payment information. For non-enterprise accounts: 1. Select the account menu icon (user-circle) in the dashboard header, then **Usage and Plan**. 1. On the **Plan & Payment Details** tab, select the edit icon (✏) for **Payment Method**. 1. Follow the onscreen steps to update your payment information. ## View billing and payment history Monthly billing and payment history is available for non-enterprise accounts. For enterprise accounts, contact your account manager or the [Airship Support](https://support.airship.com/). [Company Owners](https://www.airship.com/docs/guides/getting-started/admin/teams-messaging/#access-levels) can view billing and payment history: 1. Select the account menu icon (user-circle) in the dashboard header, then select **Usage and Plan**. 1. Select **Your Payment History** to view your plan name, amount, and payment status per billing period. This link opens in a new tab. 1. Select a billing period's dates to view the invoice. # Manage Messaging teams and access > Share or revoke access to messaging teams, and view the activity log for yourself or team members. ## Team management You add team members by sending an invitation to join a messaging project. Only [Company account](https://www.airship.com/docs/guides/getting-started/admin/company-plan/) Owners and team members with [Administrator permission](#access-levels) can invite or remove other team members, change team member access levels, and grant project access. ## Inviting team members Verify addresses for existing Airship users before sending an invitation. If you enter an email address that does not match an existing Airship user account, they will receive an email with a request to activate a new account. > **Important:** For [Company accounts](https://www.airship.com/docs/guides/getting-started/admin/company-plan/) using single sign-on (SSO), email addresses must meet certain conditions. See the information in [Single sign-on (SSO)](https://www.airship.com/docs/guides/getting-started/admin/security/account-security/#single-sign-on-sso). You can invite users to a project from the Team Access section of the project's settings. There are two ways to get there: 1. Next to your project name, select the dropdown menu (▼), then **Settings**. 1. Under **Project settings**, select **Team Access**. **OR** 1. Select the account menu icon (user-circle) in the dashboard header, then select **Team Management**. 1. Under **Share project**, select the share icon (+) next to a project name. Now you can create an invitation: 1. Enter an email address. 1. Select an [access level](#access-levels). 1. Select **Share project**. After sending an invitation, the Team Access page lists the invited user as pending. If they decline the invitation, the user is removed from the project's member list. Invitations expire 24 hours after they are sent. ## Accepting or declining team invitations If you are invited to a messaging project team but do not yet have an Airship account, you will receive an email asking you to activate a new account. After activating the account and setting up your password and [Multi-Factor Authentication (MFA)](https://www.airship.com/docs/guides/getting-started/admin/security/mfa/): 1. Select the account menu icon (user-circle) in the dashboard header, then select **Team Management**. 1. Select **Accept** in the **Project invitations** list. If you already have an Airship account, you will receive an email asking you to accept access in Team Management in your account. You can either follow the link in the email to go directly to Team Management or follow the above steps. You have 24 hours to accept an invitation after it is sent. If you select **Decline** for an invitation, the invitation is deleted. ## Removing team members To delete a team invitation, [change the user's project access level](#changing-project-access-levels) to Remove Access. ## Managing project access To share access to a project, follow the same steps as [sending a team invitation](#inviting-team-members). To revoke access for a team member, [change their access level](#changing-project-access-levels) to Remove Access. To remove yourself from a project team: 1. Select the account menu icon (user-circle) in the dashboard header, then select **Team Management**. 1. In the **Accepted invitations** list, select **Revoke access** for a project. ### Changing project access levels You can change team member project [access levels](#access-levels) from the Team Access section of a project's settings. There are two ways to get there: 1. Next to your project name, select the dropdown menu (▼), then **Settings**. 1. Under **Project settings**, select **Team Access**. **OR** 1. Select the account menu icon (user-circle) in the dashboard header, then select **Team Management**. 1. Under **Share project**, select the share icon (+) next to a project name. Now you can change access levels: 1. Select **Edit** next to a team member's current access level. 1. Select a new access level. 1. Select **Save**. ## Team activity log View and download the log of team member activity across all projects over the last 90 days. All users can view their own activity. The account Owner or a team member with [Administrator permission](#access-levels) can see the activity of all users. 1. Select the account menu icon (user-circle) in the dashboard header, then select **Team Management**. 1. Select **Activity**. The log provides this information: | Column | Description | | --- | --- | | **Team Member** | The username of the user who performed the action. | | **IP Address** | The IP address of the user who performed the action, if available. | | **Timestamp** | The date, time, and time zone when the action occurred. | | **Action** | The action a user performed. | | **Reference ID** | A unique identifier per logged action. For any reference ID in blue, select it to see its associated [Push ID](https://www.airship.com/docs/reference/glossary/#push-id) and message content. If the Push ID is also blue, select it to open its [message report](https://www.airship.com/docs/guides/reports/message/). | | **Project** | The name of project where the action occurred. Login-related actions display "Not Applicable" since logins are not associated with a project. | | **Company** | The name of company where the action occurred. | | **Notes** | Additional information about the logged action. Not present for all activities. | The default view is sorted by activity date and time, most recent first. Select a column header to sort. You can filter the log by date and time range, project, and activity. To export the log, select **Download CSV**. The file will include the currently displayed record set, up to 3,000 records. ## Access levels Refer to this information when [sending invitations](#inviting-team-members) or [changing project access levels](#changing-project-access-levels). For more about Owner, see [Manage your Airship company account ](https://www.airship.com/docs/guides/getting-started/admin/company-plan/). Permissions per access level: | Permission | Owner | Admin | Full Access | Reports,
Composers,
Segments | Reports &
Composers | Composers
Only | Content
Author | Reports
Only | | --- | --- | --- | --- | --- | --- | --- | --- | --- | | [Create a project](https://www.airship.com/docs/guides/getting-started/setup/#create-a-messaging-project) | ✓ | | | | | | | | | [Delete a project](https://www.airship.com/docs/guides/getting-started/setup/#manage-projects) | ✓ | | | | | | | | | View all user activity in the [Team activity log](#team-activity-log) | ✓ | | | | | | | | | Modify [login security settings](https://www.airship.com/docs/guides/getting-started/admin/security/account-security/) | ✓ | | | | | | | | | Create and modify an [IP Allowlist](https://www.airship.com/docs/guides/getting-started/admin/security/allowlist/) | ✓ | | | | | | | | | View and update [billing](https://www.airship.com/docs/guides/getting-started/admin/usage-payment/#update-payment-information) | ✓ | | | | | | | | | View [usage data](https://www.airship.com/docs/guides/getting-started/admin/usage-payment/) | ✓ | | | | | | | | | [Send Team Access invitations](#inviting-team-members) | ✓ | ✓ | | | | | | | | [Change team member project access level](#changing-project-access-levels) | ✓ | ✓ | | | | | | | | View changes to team member access level in the [Team activity log](#team-activity-log) | ✓ | ✓ | | | | | | | | Create [Preference Centers](https://www.airship.com/docs/reference/glossary/#preference_center) | ✓ | ✓ | | | | | | | | Create and manage [Bearer Tokens or OAuth credentials](https://www.airship.com/docs/guides/getting-started/developers/api-security/) | ✓ | ✓ | | | | | | | | Configure and enable/disable [Ban List](https://www.airship.com/docs/reference/glossary/#ban_list) and Bypass Ban List | ✓ | ✓ | | | | | | | | View [Master Secret](https://www.airship.com/docs/guides/getting-started/developers/app-keys-secrets/) | ✓ | ✓ | | | | | | | | View [Secret](https://www.airship.com/docs/guides/getting-started/developers/app-keys-secrets/) | ✓ | ✓ | ✓ | | | | | | | Set [Brand guidelines and personalities](https://www.airship.com/docs/guides/messaging/features/brand-guidelines/) | ✓ | ✓ | ✓ | | | | | | | Enable/disable [dashboard features](https://www.airship.com/docs/guides/messaging/project/enable-features/) | ✓ | ✓ | ✓ | | | | | | | View and modify [Contacts](https://www.airship.com/docs/guides/audience/contact-management/) | ✓ | ✓ | ✓ | | | | | | | [Edit a project](https://www.airship.com/docs/guides/getting-started/setup/#manage-projects) | ✓ | ✓ | ✓ | | | | | | | Configure and update messaging channels: [App](https://www.airship.com/docs/guides/getting-started/developers/configure-channels/), [Web](https://www.airship.com/docs/developer/sdk-integration/web/getting-started/), [SMS](https://www.airship.com/docs/developer/api-integrations/sms/getting-started/), [Open](https://www.airship.com/docs/developer/api-integrations/open/getting-started/) | ✓ | ✓ | ✓ | | | | | | | View, create, and edit [Holdout Experiments](https://www.airship.com/docs/reference/glossary/#holdout_experiment) | ✓ | ✓ | ✓ | | | | | | | Select random or specific contacts for [previewing personalization](https://www.airship.com/docs/guides/personalization/previewing/) | ✓ | ✓ | ✓ | | | | ✓ | | | View, create, edit, and export [Segments](https://www.airship.com/docs/reference/glossary/#segment) | ✓ | ✓ | ✓ | ✓ | | | | | | View, create, and edit [Feature Flags](https://www.airship.com/docs/reference/glossary/#feature_flag) | ✓ | ✓ | ✓ | ✓ | | | | | | View, create, and edit [Campaigns](https://www.airship.com/docs/reference/glossary/#campaign) | ✓ | ✓ | ✓ | ✓ | ✓ | ✓ | | | | Manage [Preview and Test Groups](https://www.airship.com/docs/reference/glossary/#preview_test_groups) | ✓ | ✓ | ✓ | ✓ | ✓ | ✓ | | | | [Compose messages](https://www.airship.com/docs/guides/getting-started/basics/#composers) | ✓ | ✓ | ✓ | ✓ | ✓ | ✓ | ✓ | | | [Send messages](https://www.airship.com/docs/guides/getting-started/basics/#composers) | ✓ | ✓ | ✓ | ✓ | ✓ | ✓ | | | | Create [Templates](https://www.airship.com/docs/reference/glossary/#template) and [Snippets](https://www.airship.com/docs/reference/glossary/#snippet) | ✓ | ✓ | ✓ | ✓ | ✓ | ✓ | | | | Create [Composer Favorites](https://www.airship.com/docs/reference/glossary/#composer_favorites) | ✓ | ✓ | ✓ | ✓ | ✓ | ✓ | ✓ | | | [Bypass a Ban List](https://www.airship.com/docs/guides/audience/segmentation/ban-lists/#bypassing-your-ban-list) in composers | ✓ | ✓ | ✓ | ✓ | ✓ | ✓ | | | | View [Holdout Experiments](https://www.airship.com/docs/reference/glossary/#holdout_experiment) | ✓ | ✓ | ✓ | ✓ | ✓ | | ✓ | ✓ | | View, print, and export [Reports](https://www.airship.com/docs/guides/reports/engagement/) | ✓ | ✓ | ✓ | ✓ | ✓ | | ✓ | ✓ | {class="access-table"} # Manage Wallet teams and access > Share or revoke access to Wallet teams and projects. ## Team management First, invite users to join your [Company account](https://www.airship.com/docs/guides/getting-started/admin/company-plan/). After they accept the invitation, you can grant them access to individual Wallet projects. Only Company account Owners and team members with [Administrator permission](#managing-administrator-permission) can invite or remove other team members and control project access. ## Inviting team members > **Note:** * Verify addresses for existing Airship users before sending an invitation. If you enter an email address that does not match an existing Airship user account, they will receive an email with a request to activate a new account. > * New team members are automatically assigned [Administrator permission](#managing-administrator-permission). 1. Select the account menu icon (user-circle) in the dashboard header, then select **Team Management**. 1. Select **Invite member**. 1. Enter an email address and select **Invite**. After sending an invitation, the Team Management page lists the invited user under **Outstanding Invitations**. ## Accepting team invitations If you are invited to a Wallet team, Airship may send you two emails: one to activate your account and one to accept the team invitation. After you join a team, an Administrative user can grant you access to Wallet projects. Make sure to activate your Airship account before accepting access to a team. Attempting to accept an invitation before activating your account may prevent you from being able to accept the team invitation without help from Airship Support. If you do not accept the team invitation, you can still follow the link to join the team at any time. Your invitation is valid until an Administrator deletes it. ## Removing team members For outstanding invitations, removing a team member deactivates the invitation link sent to the user and removes the invitation from Team Management. For accepted invitations, removing a team member revokes their access to all projects in your [Company account](https://www.airship.com/docs/guides/getting-started/admin/company-plan/). If you need to revoke access to a single project, see [Managing project access](#managing-project-access). 1. Select the account menu icon (user-circle) in the dashboard header, then select **Team Management**. 1. Select the remove icon (trash) for a team member. ## Managing project access You can grant project access to current team members. Those with outstanding invitations will not be returned in search results. You can remove team members from individual projects. If you need to remove a user from your team entirely, see [Removing team members](#removing-team-members). 1. From a Wallet project, select **Templates** in the project header. 1. Select **Share **. 1. (To grant access) Enter the username or email address of your team member and select from results. 1. (To revoke access) Under **Current Team**, select the remove icon (×) for the team member you want to remove. Team members that cannot be removed are greyed out. 1. Select **Share**. Team members with new access will see the project listed the next time they refresh the dashboard or log in to Airship. Team members removed from a project will no longer see it listed in the dashboard after they refresh or log in Airship. ## Managing Administrator permission Administrators have these additional permissions: * Create new projects * Send team invitations * Add/remove Administrator permissions for other team members * View API credentials and create OAuth tokens You can enable Administrator permission for any team member. Administrators only have access to projects that have been shared with them. To set permission: 1. Select the account menu icon (user-circle) in the dashboard header, then select **Team Management**. 1. In **Accepted Invitations**, enable/disable the **Admin** toggle for a user. ### Secure your Airship account Configure SSO, multi-factor authentication, and IP allowlists to protect your Airship account and control team access. # Manage account security > Manage user sessions and set up single sign-on (SSO). > **Important:** If you ever have any security concerns, immediately [contact Airship Support](https://support.airship.com/). ## Managing user sessions View active web browser sessions for a project's team members and manually end any session. To view sessions, select the account menu icon (user-circle) in the dashboard header, then select **Session Management**. Sessions are listed with this information: | Column | Description | | --- | --- | | **IP address** | The IP address provided by the browser. This may help you verify the network origin of the session. | | **Session start** | The date and time when the session began. | | **Session expiry** | The date and time when the session will expire. Sessions automatically expire two weeks after they start. | Select **Delete session** to manually end a session. **Delete a session if you suspect it has been hijacked or a password has been compromised.** ## Single sign-on (SSO) Single sign-on (SSO) is a method of authentication where you use one set of credentials to access multiple accounts. If you already use SSO, you may add Airship as another service provider to enable members of your team to access your shared Airship projects without requiring dedicated credentials. > **Important:** * SSO is available for paid Airship pricing plans only. Please contact your account manager or Support to enable this feature if it is not already available for your account. > > * You must request your user metadata from your identity provider. It must be a [standard SP (service provider) metadata XML file](https://en.wikipedia.org/wiki/SAML_metadata). You will upload this file in the steps below. > > * Once Airship enables your [Company account](https://www.airship.com/docs/guides/getting-started/admin/company-plan/) for SSO configuration, email addresses for invited users must be: > > * **New to Airship** — If the email address is used for an existing Airship User account, the invitation will fail.

> **OR**

> * **Associated with your Company account's projects only** — If the Airship User account for the email address has access to projects for other Company accounts, the invitation will fail.

> > Email addresses are validated when sharing a project. See [Manage Messaging teams and access](https://www.airship.com/docs/guides/getting-started/admin/teams-messaging/). ### Configure a SAML connection You must configure a new SAML connection for Airship on your identity provider. Include an attribute statement for user email addresses, which Airship uses for authentication. In order for Airship to detect it, the attribute name must be set as `http://schemas.xmlsoap.org/ws/2005/05/identity/claims/emailaddress`, not `email` or `emailaddress` alone. ### Set up SSO in Airship Set up SSO in your Airship project: 1. Select the account menu icon (user-circle) in the dashboard header, then select **Team Management**. If you are in Team Management for Wallet, select the link to go to Team Management for messaging projects, then continue. 1. Select **Single Sign-On**. 1. Under **Identity provider (IDP) metadata**, select **Choose File** and upload your metadata file. 1. Under **Service provider (SP) metadata**, select **Download SP Metadata**. 1. Note the **Entity ID** and **Single sign-on web address** URLs on this screen. You will use them in later steps.

SSO web addresses vary by customer and are determined at the time you upload your metadata. They are generally in this format: * US — `https://go.airship.com/accounts/login/sso//` * EU — `https://go.airship.eu/accounts/login/sso//` ![Single sign-on configuration](https://www.airship.com/docs/images/single-sign-on_hu_f1b13a5ace072907.webp) *Single sign-on configuration* Next, give the SP metadata file to your identity provider, and include the **Entity ID** URL in case they require it. ### Test SSO After your identity provider confirms Airship has been set up as a trusted company, have your users go to your SSO web address and test logging in. If logins fail, [contact Airship Support](https://support.airship.com) or your technical account manager for assistance. ### Go live with SSO Finally, [contact Airship Support](https://support.airship.com) and tell them SSO login is successful for your company and they can complete setup for you. Support will: 1. Set SSO as a requirement for users to access the projects your account 1. Invalidate passwords for all users except the account owners and project administrators 1. Notify you that SSO configuration is complete # Multi-factor authentication (MFA) > Multi-factor authentication provides enhanced login security requiring an Airship user to provide a password and at least one other authentication method. Multi-factor authentication is a user authentication mechanism that enforces the use of a password in combination with a piece of unique information that only you can access, such as a passcode in an SMS sent to a mobile device that you own, or [a time-based one-time password (TOTP)](https://datatracker.ietf.org/doc/html/rfc6238) from your authenticator application. Only if all provided information is correct will the authentication succeed. Airship's MFA provider is Okta. Authentication methods are an authenticator app, text messages (SMS), biometrics, or a security key. The actual list may vary depending on the configuration of your system. For the authenticator app option, while the setup screen specifies Google Authenticator, you can use Bitwarden Authenticator, Last Pass Authenticator, or similar. We advise enabling multiple authentication methods to reduce the likelihood of being locked out of your account if one method should become unavailable. Although it is possible to use the same authentication method more than once — for example, you may set up two or more SMS numbers — we do not suggest this practice. For optimal security, set up multiple distinct authentication methods. To prevent fraud, the SMS method is not supported for all country codes. When configuring SMS, if you do not receive a code at your provided phone number, set up a different MFA method. > **Important:** * All Airship users must configure MFA, except those required to log in via [custom SSO configurations](https://www.airship.com/docs/guides/getting-started/admin/security/account-security/#set-up-single-sign-on-sso). > > * MFA is Airship's replacement two-factor authentication (2FA), which was deprecated August 2023. Users who had 2FA configured will be prompted to migrate to MFA. ## Configuring MFA To start the configuration process, you must follow the activation link sent to your account's email address. * For **new accounts**, we will automatically send an activation link when you create an account. * As of October 23, 2023, users with **existing accounts** who have not yet set up MFA will be prompted and are required to do so upon their next login. Dashboard access is limited until you have completed all steps in the process. After following the activation link, you will: 1. Set your password. For existing accounts, you must change your current password. * For existing accounts and accounts created via [Team Access invitations](https://www.airship.com/docs/guides/getting-started/admin/teams-messaging/), you must also configure an MFA method. * For other new accounts, you will not be prompted to set up MFA until after logging in with your new password. If you want to set up MFA immediately, follow the steps in [Managing authentication methods](#managing-authentication-methods). 1. Log in with your new password. 1. Set up MFA or log in with an existing MFA method. We recommend configuring more than one MFA method so you will be able to recover your account without needing to contact Support. ## Managing authentication methods ![Okta MFA configuration options](https://www.airship.com/docs/images/mfa-okta_hu_366a2d495f5f0d0a.webp) *Okta MFA configuration options* You can add additional authentication methods and remove existing methods, but you must maintain at least one. 1. Select the account menu icon (user-circle) in the dashboard header, then select **Profile**. 1. Under **Login Info**, select the edit icon (✏) for **Multi-factor authentication**. Your Okta account page will open in a new tab. 1. Follow the onscreen steps to make changes to your authentication methods. # Create an IP allowlist > Protect your projects against unauthorized use by restricting access to a set of trusted IP addresses. Define one easy-to-maintain allowlist per company account. Each allowlist can contain an unlimited number of network ranges and/or IP addresses that can access your company's project dashboards and API communication endpoints. ## Prerequisites Before creating your IP Allowlist, plan your approach and gather user data. Doing this preliminary work will significantly reduce support calls related to project access after you build your allowlist. These rules and guidelines make it easier to create and maintain your company's IP Allowlist: 1. Inventory all individuals that must have access to your company's projects, then identify and list their IP addresses. Your list may include company employees, outside contractors, and agency employees. 1. Any user who has access to your company's projects should be allowlisted. For messaging projects, there are two ways to get to a list of project team members: 1\. Next to your project name, select the dropdown menu (▼), then **Settings**.
2\. Under **Project settings**, select **Team Access**. **OR** 1\. Select the account menu icon (user-circle) in the dashboard header, then select **Team Management**.
2\. Under **Share project**, select the share icon (+) next to a project name. Now you can note the email addresses under **Team Member**. Repeat for each of your messaging projects. --- For Wallet projects, select the account menu icon (user-circle) in the dashboard header, then select **Team Management**. If you are in Team Management for Wallet, select the link to go to Team Management for Wallet projects. Now you can note the email addresses under **Accepted invitations**. Repeat for each of your Wallet projects. 1. Add your own IP address to the allowlist first. To make that easy, your IP address is listed at the top of the IP Allowlist screen. 1. If anyone, including you, needs to have access to a project when working remotely (from home, hotel, convention center, coffee shop, etc.), his or her remote IP address must be included on the allowlist in addition to the work IP address. Bear in mind that some internet service providers periodically rotate their customers' IP addresses. If this is a common occurrence, consider recommending that individuals working remotely tunnel in to your company's network via a corporate virtual private network (VPN) that routes all their traffic through the corporate network. ## Creating an allowlist > **Warning:** When you save the first IP address or range in the allowlist, you will block all individuals not originating from that saved IP address or range They will not be able to access any of your company's projects. Consider creating the initial allowlist off-hours to avoid inadvertently blocking a colleague's access to a project. > **Important:** * If you need to access your company's Airship account from more than one > location / IP address, add each of those IP addresses in this initial session. > * If your current IP address is not in the IP range you're attempting to add or > isn't in the saved IP ranges, you will get a validation error. The system will prevent you from locking yourself out in the same session you're setting up. > * Duplicate address entries and overlapping address blocks will not cause error messages. [Company account Owners](https://www.airship.com/docs/guides/getting-started/admin/company-plan/) can manage IP allowlists: 1. Select the account menu icon (user-circle) in the dashboard header, then select **IP Allowlist**. 1. Select **Add IP** and enter your current IP address, which is displayed at the top of the screen. 1. Select **Add IP** and enter an individual IP address or a block of IP addresses using [CIDR](http://en.wikipedia.org/wiki/Classless_Inter-Domain_Routing) notation. 1. Select **Save allowlist**.