# Get started as an Airship developer
Find everything you need to integrate Airship's SDKs and APIs — channel configuration, authentication credentials, identifier lookups, and a Postman collection.
# Intro to Channels
> Channels represent the various devices, users, and addresses that make up your audience. Channels are a concept fundamental to Airship. Understanding the various applications of channels can help you better understand and target your audience.
> **Important:** **Channels** can also refer to *engagement channels*, a medium for engaging with your users, e.g., app, web, SMS, email.
> See [Disambiguation](#disambiguation) below.
## Origin and Purpose
Airship introduced *channels* in 2014 as a new means of addressing
apps via the *channel ID*. Prior to channels, in order to target a
device for a push notification, we used the *push address*, the identifier
provided by the downstream delivery service for the given mobile OS. For
example, to deliver to an iOS device, we used the *device token* provided by
Apple Push Notification service (APNs).
Because a push address can change without notice, we introduced channel IDs to
abstract the notion of an addressable app from the push address. This change
lessened the burden on our customers of having to store push addresses, e.g.,
device tokens. We simply map the channel ID to a device token if it changes.
Channels also became a useful framework for us to develop new services around
the concept of an addressable entity and to move beyond apps into new
engagement mediums such as web browsers, email, and SMS. We subsequently
introduced [Named Users](https://www.airship.com/docs/reference/glossary/#named_user) as a way
to map multiple channels together, and
[Channel Coordination](https://www.airship.com/docs/reference/glossary/#channel_coordination) features, which rely on
both channels and named users to help you optimize your multi-channel
marketing campaigns.
## Disambiguation {#disambiguation}
You will find that throughout our documentation and in the Airship
[Dashboard](https://www.airship.com/docs/reference/glossary/#dashboard)
we use the term *channel* differently, depending on context: engagement vs. development.
### Engagement Channels {#engagement-channels}
At a high level, we use the term *channel* to denote an **engagement
channel** over which you can reach your end users. We support the following
channels, some of which encompass more than one *platform*, e.g.,
_The iOS platform is a supported **app** channel_.
| Engagement channel | Platform |
| --- | --- |
| App | iOS, Android, Fire OS, Windows, Apple News |
| Web | Chrome, Firefox, Edge, Safari, Opera |
| Email | n/a |
| SMS | n/a |
| Open | *Configurable* |
### Development Channels {#development-channels}
In the development context, a channel describes a **deliverable endpoint**,
such as an email address, SMS number, or iPhone app installation.
The defining property of a development channel is the
[*channel ID*](#channel-ids), but development channels are also associated with other information. This information varies depending on the associated
[engagement channels](#engagement-channels),
and also for the platforms within a type of engagement channel. For
example, an email channel has a `sender_name`, and an SMS
channel has a `msisdn`.
Development channels can further be thought of as one of two basic types: *native* and
*open*. This distinction is largely tied to how you interact with the channels — either via an installed SDK for a native platform, or our channels API for
open platforms. See
[Native vs Open Platforms](#native-open) below.
**Example iOS Channel Object**:
```json
{
"channel": {
"channel_id": "01234567-890a-bcde-f012-3456789abc0",
"device_type": "ios",
"installed": true,
"background": true,
"opt_in": true,
"push_address": "FE66489F304DC75B8D6E8200DFF8A456E8DAEACEC428B427E9518741C92C6660",
"created": "2013-08-08T20:41:06",
"last_registration": "2018-05-01T18:00:27",
"named_user_id": "some_id_that_maps_to_your_systems",
"tags": [
"one_fish",
"two_fish"
],
"tag_groups": {
"fish_colors": [
"red",
"blue"
],
"fish_ages": [
"old",
"new"
]
},
"ios": {
"badge": 0,
"quiettime": {
"start": null,
"end": null
},
"tz": "America/Los_Angeles"
}
}
}
```
## Channel IDs {#channel-ids}
[Development channels](#development-channels) are addressable
via the *channel ID*. A channel ID is a unique identifier generated by
Airship for each channel.
In cases where a downstream service (such as APNs for iOS devices) provides the
[push address](#terminology) for ultimate delivery, the channel
ID maps to that delivery address. This mapping ensures consistency of channel
metadata — information about the channel, such as segmentation information —
even if the mapped service changes its own delivery address, e.g., device
token for iOS or registration token for Android.
## Channels API {#channels-api}
Airship’s
[Channels API](https://www.airship.com/docs/developer/rest-api/ua/operations/channels/)
provides a set of endpoints for the management of
[engagement channels](#engagement-channels) and their
platforms.
You can create, look up, list, and manage channel information, as well as
extend Airship by defining new platforms for use with our core platform
services, e.g., segmentation, scheduling, automation.
> **Tip:** If you use an AI coding assistant, you can connect it to Airship with Skills and an MCP server. See [Airship AI Tools](https://www.airship.com/docs/developer/ai-tools/ai-tools/).
## Native vs Open Platforms {#native-open}
App and web platforms are supported by an
[Airship SDK](https://www.airship.com/docs/guides/getting-started/developers/sdk-api/) and as such are considered *native*.
**Native Platforms**:
| Channel | Platform |
|---------|----------|
| App | iOS |
| App | Android |
| App | Fire OS |
| Web | Chrome |
| Web | Safari |
| Web | Firefox |
| Web | Opera |
| Web | Edge |
Email, SMS, and Open channels are supported by our Channels API for channel registration,
and other operations, e.g., adding tags, opt-out, unsubscribe/uninstall, etc.
Open platforms are not supported by an Airship SDK because the delivery mechanism is not a traditional client application like an app or web browser.
**Open Platforms**:
| Channel | Platform | API reference |
| --- | --- | --- |
| [Email](https://www.airship.com/docs/developer/api-integrations/email/) | n/a | [Email Channels API reference](https://www.airship.com/docs/developer/rest-api/ua/operations/email/) |
| [SMS](https://www.airship.com/docs/developer/api-integrations/sms/) | n/a | [SMS Channels API reference](https://www.airship.com/docs/developer/rest-api/ua/operations/sms/) |
| [Open](https://www.airship.com/docs/developer/api-integrations/open/) | *Configurable* | [Open Channels API reference](https://www.airship.com/docs/developer/rest-api/ua/operations/open-channels/) |
### Channel Registration
For **native platforms**, [channel IDs](#channel-ids) are created and persisted during the registration process: When your app runs for the first time (it may run in the background or when a user opens the app for the first time), our SDK creates a [(development) channel](#development-channels) and maps it to that installation. For example, on iOS it will map a device token to that channel. The channel ID then becomes the primary identifier used to address notifications/messages to the device. If iOS ever changes the device token, we can update the device token behind the scenes without changing the channel.
For **open platforms**, channel registration and manipulation are handled via
our [Channels API](#channels-api), giving you maximum
flexibility to create and update, opt-in or -out, look up, or uninstall
channels, and add or remove tags and other metadata.
Delivery addresses on open platforms can be an IP address, webhook URL, phone number, or email address, depending on the channel type.
## Terminology
Channel (Development)
: A *channel* is an instance representing an entity addressable via the Airship service, e.g., an iOS device, email address, SMS number or web browser. The channel instance or [channel object](/docs/developer/rest-api/ua/#schemas-channelobject) contains all relevant information about a channel, including metadata used for targeting, opt-in status, device-specific information, and, importantly, a unique identifier for the channel, the *Channel ID*.
Channel (Engagement)
: A *channel* is a communication medium supported by the Airship service. Supported channels include app, web, email, SMS, and *Open Channels*. Within some channels there may be specific *platforms* with individual characteristics. Example platforms include Chrome for the web channel and Android for the mobile app channel.
Channel ID
: A *Channel ID* is an Airship-specific unique identifier for a channel instance, e.g., a smartphone, web browser, email address.
Platform
: A *platform* is an external OS or other system to which notifications are delivered. Mobile platforms include iOS and Android, web platforms include Chrome and Firefox, etc. Airship-supported platforms may be either *native platforms*, which require an installed SDK, or *open platforms*, which do not.
Native platform
: A *native platform* is a platform for which an installed SDK is required to register and manipulate channels. Examples: iOS, Chrome.
Open platform
: An *open platform* is a platform for which an SDK is not available, and channel registration and manipulation are handled via the Channels API. Examples: Open Channels, Email.
Push address
: The *push address* is the underlying device identifier that maps to a Channel ID for message delivery. The push address is analogous to a phone number and has the information necessary to locate and authenticate an installation of an app or browser. Because a push address can change, Airship maps push addresses to channels, which do not change. An example of a push address is a *device token* in the case of iOS.
# Finding Channel IDs
> {{< glossary_definition "channel_id" >}}
Follow these methods to find the [Channel ID](https://www.airship.com/docs/reference/glossary/#channel_id) in a mobile app or web browser.
## Find a mobile app Channel ID
You can find a device's Channel ID by accessing it programmatically in your app or using the Channel Capture tool.
### Accessing the Channel ID programmatically
You can access the Channel ID directly through the SDK in your app code:
#### iOS Swift
```swift
let channelID = Airship.channel.identifier
```
#### iOS Objective-C
```objc
NSString *channelID = UAirship.channel.identifier;
```
#### Android Kotlin
```kotlin
val channelId = Airship.channel.id
```
#### Android Java
```java
String channelId = Airship.getChannel().getId();
```
#### React Native
```ts
const channelId = await Airship.channel.getChannelId();
```
#### Flutter
```dart
String channelId = await Airship.channel.identifier;
```
#### Cordova
```js
Airship.channel.getChannelId((channelID) => {
console.log("Channel: " + channelID)
})
```
#### Capacitor
```js
const channelID = await Airship.channel.getChannelId()
```
#### .NET MAUI
```csharp
using AirshipDotNet;
string channelId = Airship.Instance.ChannelId;
```
#### Unity
```csharp
string channelId = UAirship.Shared.ChannelId;
```
For more detailed information about accessing channel IDs, see the platform-specific documentation:
* [iOS Audience Management](https://www.airship.com/docs/developer/sdk-integration/apple/audience/channels/)
* [Android Audience Management](https://www.airship.com/docs/developer/sdk-integration/android/audience/channels/)
* [React Native Audience Management](https://www.airship.com/docs/developer/sdk-integration/react-native/audience/channels/)
* [Flutter Audience Management](https://www.airship.com/docs/developer/sdk-integration/flutter/audience/channels/)
* [Cordova Audience Management](https://www.airship.com/docs/developer/sdk-integration/cordova/audience/channels/)
* [Capacitor Audience Management](https://www.airship.com/docs/developer/sdk-integration/capacitor/audience/channels/)
* [.NET Audience Management](https://www.airship.com/docs/developer/sdk-integration/dotnet/audience/channels/)
* [Unity Audience Management](https://www.airship.com/docs/developer/sdk-integration/unity/audience/channels/)
### Using the Channel Capture tool
The Channel Capture tool is a feature built into the SDK that helps users find their Channel ID. It is valuable for troubleshooting individual device issues in production apps since it can expose the Channel ID to the user, who can then send it to Support. Users can also use it to find their Channel ID for a [Preview or Test Group](https://www.airship.com/docs/reference/glossary/#preview_test_groups).
[Channel Capture](https://airship.wistia.com/medias/w5v083w2oj)
If the Channel Capture tool is enabled, it will listen for six app foregrounds within 30 seconds. On the sixth app open, the Channel ID will be copied to the user's clipboard with a leading `ua:`.
Paste your Channel ID from the clipboard to your preferred document. If there is no channel, only `ua:` will be present. The Channel ID will remain on the clipboard for 60 seconds on iOS and until cleared on Android.
The Channel Capture tool is enabled by default and can be disabled through the Airship Config options. For information on how to disable it, see the platform-specific documentation linked above.
#### Android Kotlin
```kotlin
val options = AirshipConfigOptions.newBuilder()
// ...
.setChannelCaptureEnabled(false)
.build()
```
#### Android Java
```java
AirshipConfigOptions options = AirshipConfigOptions.newBuilder()
// ...
.setChannelCaptureEnabled(false)
.build();
```
#### iOS Swift
```swift
config.isChannelCaptureEnabled = false
```
#### iOS Objective-C
```objc
config.isChannelCaptureEnabled = NO;
```
#### React Native
```ts
await Airship.takeoff({
...
isChannelCaptureEnabled: false,
})
```
#### Flutter
```dart
Airship.takeOff(
AirshipConfig(
...
isChannelCaptureEnabled: false
)
);
```
#### Cordova
```js
Airship.takeoff({
...
isChannelCaptureEnabled: false,
})
```
#### Capacitor
```js
await Airship.takeoff({
...
isChannelCaptureEnabled: false,
})
```
#### .NET MAUI
```csharp
// Not supported
```
#### Xamarin
```csharp
// Not supported
```
#### Titanium
```js
// Not supported
```
#### Unity
```csharp
// Not supported
```
### Alternative methods
You can also find a device's Channel ID by logging it to the console. You can view the console with these tools:
* **iOS:** [iPhone Configuration Utility](https://support.apple.com/downloads/iphone_configuration_utility) or [Xcode](https://developer.apple.com/xcode/)
* **Android:** [Android Debug Bridge](https://developer.android.com/tools/adb)
If you didn't write the device identifier to the console, you can use the steps here to help retrieve it:
[Using Charles Proxy to profile an Airship Implementation](https://support.airship.com/hc/en-us/articles/213491123-Using-Charles-Proxy-to-profile-an-Airship-Implementation).
> **Tip:** Even if you're comfortable with using Charles Proxy, you may want to speak with your developer before you attempt to retrieve your Channel ID yourself. Your app may have been designed with a hidden feature that allows you to quickly retrieve your ID, saving you the difficulty of working with Charles Proxy.
## Find a web browser Channel ID
Your web Channel ID is only available if you have already [integrated the Airship SDK](https://www.airship.com/docs/developer/sdk-integration/web/getting-started/) with your website. To access your web Channel ID, you will need to open the Developer console in your browser and paste in a small amount of code. Instructions for Google Chrome and Mozilla Firefox are provided.
1. Open the console via keyboard shortcut or the menu.
**Google Chrome**
* **Keyboard Shortcuts:** In macOS you can go directly to the console
with *Cmd+Opt+J*. In Windows, the shortcut is *Ctrl+Shift+J*.
* **Menu:** Select the more menu icon (⋮), then **More Tools**, then **Developer Tools**, then select the Console tab.
**Mozilla Firefox**
* **Keyboard Shortcuts:** In macOS you can go directly to the console
with *Cmd+Opt+K*. In Windows, the shortcut is *Ctrl+Shift+K*.
* **Menu:** Select the "hamburger" icon, then **More Tools**, then **Web Developer Tools**, and then select the Console tab.
1. Depending on the web SDK version, paste the following code in the console, then hit Enter. If a browser has registered, the resulting line is the Channel ID.
**Version 1**
```javascript
UA.then(sdk => {console.log(sdk.channel.id)})
```

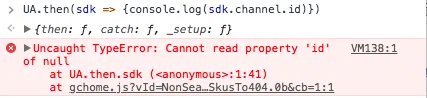
*The Channel ID in a successful console response*
**Version 2 (asynchronous call)**
```javascript
UA.then(sdk=>console.log(sdk.channel.id().then((channel)=>console.log(channel))))
// Or if you are using async/await syntax
(async function getChannel() {
const sdk = await UA;
const channelId = await sdk.channel.id();
console.log(channelId);
})();
```
**Common errors:**
* 
*Response: null*
The SDK will return `null` if the browser is unregistered. Only registered browsers will have a Channel ID. See our documentation on [how to register the current browser with Airship](https://www.airship.com/docs/developer/sdk-integration/web/getting-started/#uasdk).
* 
*Response: UA is not defined*
A `UA is not defined` response can indicate that the SDK snippet is not present within the page. Navigate to a page on your site that does have the SDK snippet and repeat step 2 above.
> **Note:** Ideally, the SDK snippet will be present in every page on your site, as per the [Add JavaScript Snippet section](https://www.airship.com/docs/developer/sdk-integration/web/getting-started/#add-javascript-snippet-to-web-pages) of our Web Getting Started guide. If, for testing or other reasons, you have added the snippet to just one page of your site, you will need to be on that specific page for retrieving your Web Channel ID to be successful.
# Configuring Mobile Channels
> Configure mobile channels and push providers in the Airship dashboard.Configuration information and steps are provided for iOS, Android, and Fire OS.
## iOS channel configuration
To configure an iOS channel, you must configure the Apple Push Notification Service (APNs). To do this, you can either use token or certificate authentication. Use token auth to simplify setup and to avoid having to renew your certificate every year.
### APNs token and certificate authentication
Airship uses token-based authentication for APNs when configured for the iOS channel. When token-based authentication is not configured, Airship uses certificate authentication instead.
The authentication choice depends on what you have configured, not on fallback from token to certificate. If token auth is configured but becomes invalid or stops working, Airship does not automatically use your certificate. As a result, the iOS channel may be disabled until you correct your authentication configuration in the Airship dashboard.
For existing projects:
* Leave your certificate in place while migrating to token-based authentication. If you remove your certificate before token auth is working, you may be unable to send messages until your credentials are valid.
* Once you have confirmed that token auth is working, you may let the certificate expire or revoke it in the Apple Developer Member Center.
### Production versus development projects
When creating your certificate or token, you must choose which environment the application on your device should use. Unlike Android, APNs uses two different environments for push notifications depending on the type of app you are using:
| Environment | Description |
| --- | --- |
| **Sandbox** | The Sandbox environment is intended for applications that are being developed and tested directly off of a computer. |
| **Production** | The Production environment is for applications that are distributed via the App Store or any ad hoc platform like Test Flight. |
When you [create or edit an Airship project](https://www.airship.com/docs/guides/getting-started/setup/#create-a-messaging-project) (and thus its application record on our server), you must select its type, which directly affects which APNS environment it will communicate with:
| Project type | Description | Relationship with APNs environment |
| --- | --- | --- |
| **Test** | Development for sending test messages | A Test project only sends APNs push notifications to the Sandbox environment |
| **Live** | Production for sending messages to users | A Live project only sends APNs push notifications to the Production environment |
Apple treats the production and development servers separately, so a device token for a test project will not work in a production project. Because of this, we suggest creating both Live and Test projects in the Airship dashboard so you can continue to build and develop your application without interrupting your users. Configure the `development` credentials for the test project, and `production` credentials for live project. Then switch between the two credentials using the `inProduction` flag when configuring the Airship SDK.
> **Warning:** * There is no way to change the Test/Live setting after an Airship project has been created. You will need to make a new project to switch environments. When these environments are not aligned, you will see errors in your error console, and typically the Push Address will be removed from the channel.
>
> * Always create a **Live** Airship project first, and
> make sure your application code is pointing to the live project's app
> key. For more tips on what to check before you release your app, see the
> [iOS Production Launch Checklist](https://support.airship.com/hc/en-us/articles/6613974842523-iOS-Production-Launch-Checklist)).
>
> * Test apps use different tokens that, when included in a push to a **Live** app, will fail and in many cases cause all other pushes to fail. While your app's code is pointing to an Airship app key that is set as **Test**, do not:
> 1. Submit to the App Store, or
> 1. Test notifications on an ad hoc build.
### Configure token auth (Recommended)
Apple's token authentication for APNs uses two key types: team-scoped and topic-scoped. Understanding their difference is key for Airship setup:
* **Team-scoped keys: Broad and simple**
* Team-wide access: One key for all your team's apps
* Limited number: Maximum two per environment (Sandbox/Production)
* Simpler setup and easier management
* **Topic-scoped keys: Granular and more secure**
* App-specific access: Key for specific apps/topics only
* Higher number: Up to 200 per environment (Sandbox/Production)
To get started, register a new key:
1. Log in to the [Apple Developer Member Center](https://developer.apple.com/).
1. Go to **Account**, then **Membership details**, then note your **Team ID**.
1. Go to **Program Resources**, then **Certificates, IDs & Profiles**, then **Identifiers**.
1. If you already registered an iOS App ID:
1. Select its name in the list of App IDs.
1. Note the **Bundle ID** for the app.
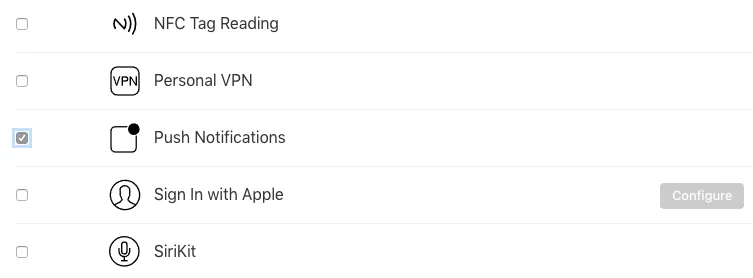
1. Enable **Push Notifications**.
*Enabling push notifications for an iOS app ID*
1. If Push Notifications was already enabled, select **All Identifiers** at the top of the page to go back. Otherwise, select **Save**.
1. Continue to step 6 below.
1. If you have not already registered an iOS App ID, add one now:
1. Select the add icon (+), then select **App IDs**.
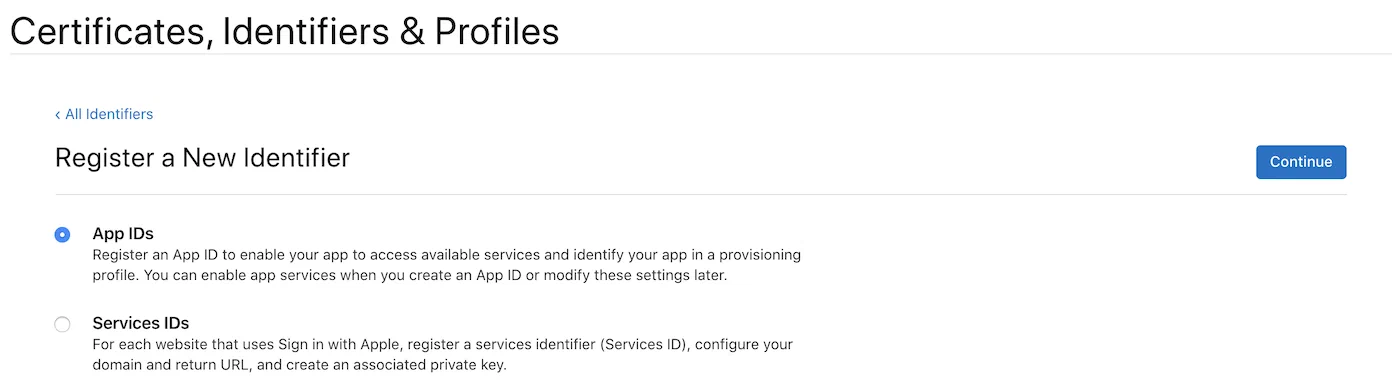
*Adding an iOS app identifier*
1. Select **Continue**.
1. Fill out the **Register an App ID** form and enable **Push Notifications**. Also note the **Bundle ID** you enter.
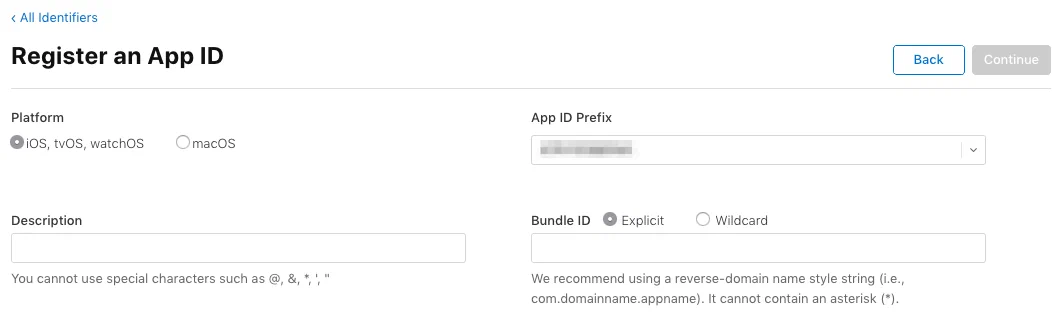
*Registering an app ID*
1. Select **Continue**, then **Register**.
1. In the sidebar, select **Keys**.
1. Select the add icon (+).
1. Enter a unique key name.
1. Enable **Apple Push Notifications service (APNs)**.
1. Select **Configure**.
1. (For team-scoped token auth) Select **Sandbox & Production** for the environment and **Team Scoped (All Topics)** for Key Restriction.
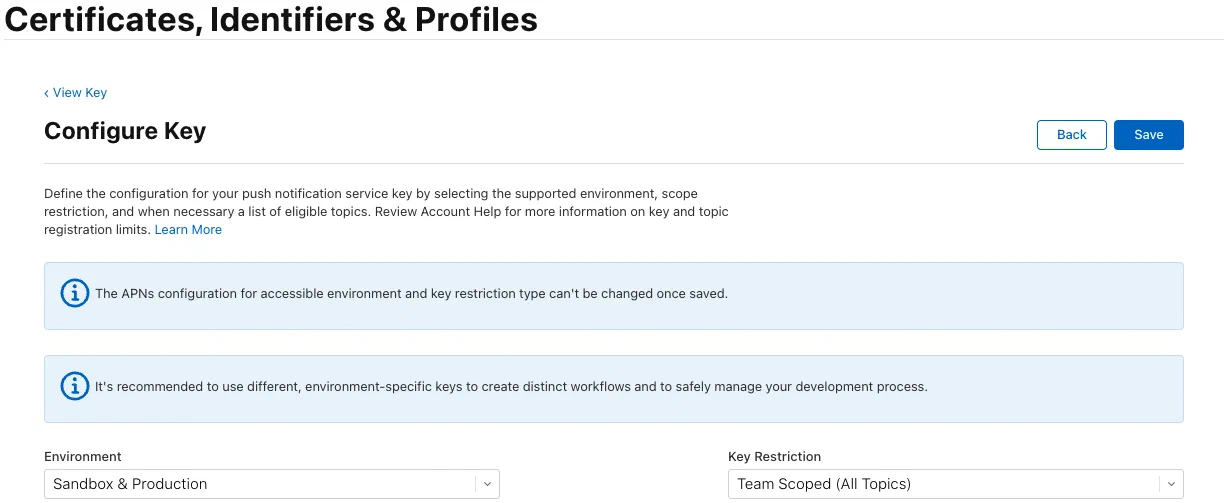
*Configuring a team-scoped key*
1. (For topic-scoped token auth) Select **Sandbox** for development apps or **Production** for production apps in the environment menu and **Topic Specific** for Key Restriction, then:
1. Select the specific apps/topics that this key should be allowed to send notifications to.
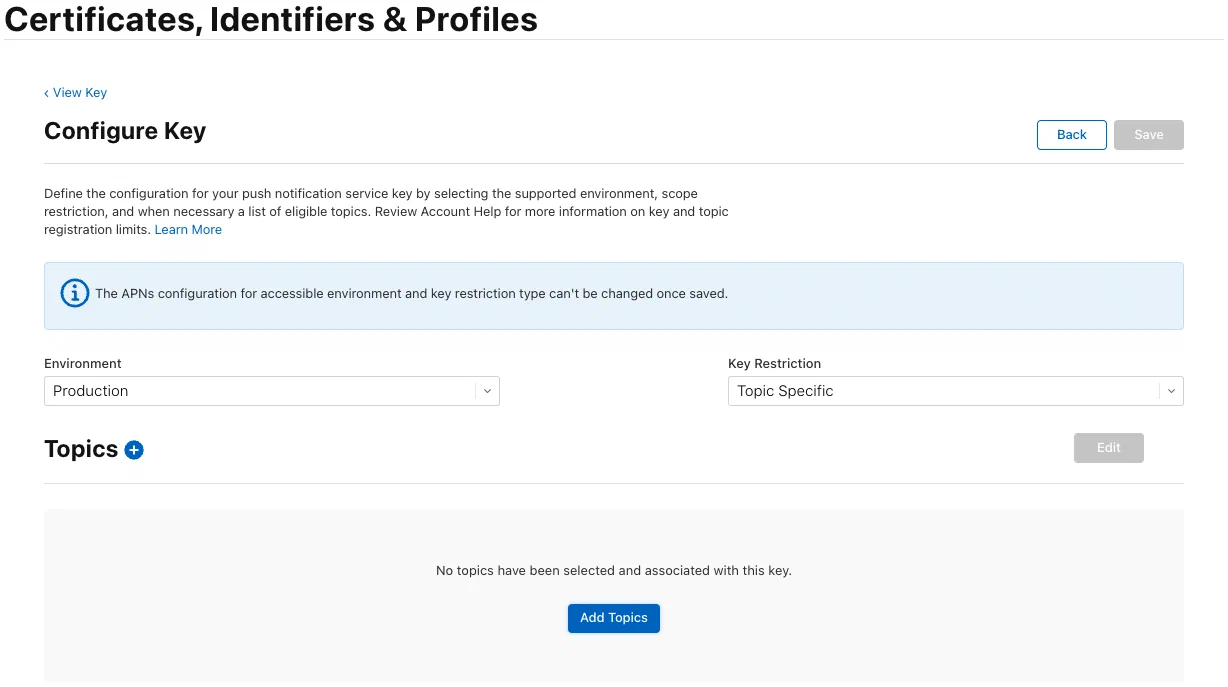
*Configuring a topic-scoped key*
1. Select topics you wish to add to your scope, then **Done**.
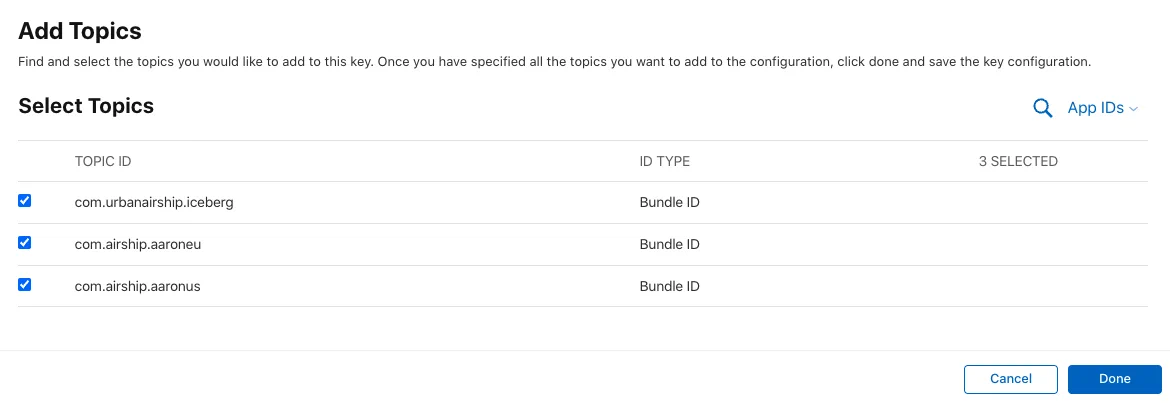
*Selecting topics*
1. Select **Save**, then **Continue**, then **Register**.
1. Note the **Key ID**, then select **Download** to save the key in .p8 format.
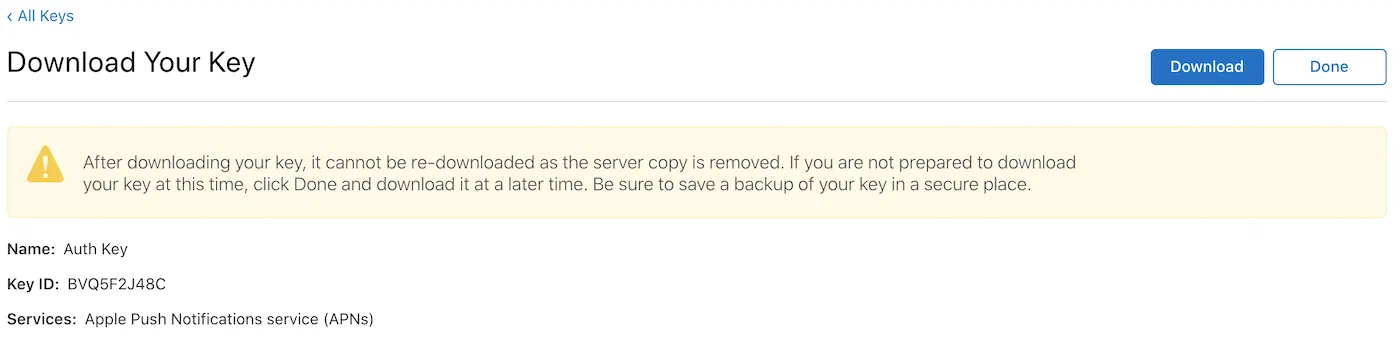
*Getting your key ID and downloading the key*
> **Important:** **For team-scoped keys:** Be sure to save your key in a secure location if you intend to use it across multiple apps or Airship
> projects. Apple only allows **two** team-scoped APNs keys per team, so reaching this limit would require you
> to revoke one of your existing keys before creating a new one, which in turn would require an update for
> any apps previously using the revoked key. Airship will not make your key available for download or
> sharing across projects once it has been uploaded.
>
> **For topic-scoped keys:**
> You may create up to 200 topic-scoped APNs keys per environment. If you want to reuse a key across multiple
> Airship projects or apps, store it securely. Apple will not let you re-download it later, and Airship
> will not make it available for download once uploaded.
Finally, configure your iOS channel in Airship:
1. Next to your project name, select the dropdown menu (▼), then **Settings**.
1. Under **Channels**, select **iOS**.
1. For **Token-based authentication**, select **Edit**.
1. Under **Signing key**, upload your .p8 file.
1. Enter your Team, Bundle, and Key IDs.
1. Select **Save**.
### Configure certificate auth
1. Log in to the
[Apple Developer Member Center](https://developer.apple.com/).
1. Go to **Account**, then **Program Resources**, then **Certificates, IDs & Profiles**, then **Identifiers**.
1. If you already registered an iOS App ID, select its name in the list of App IDs, then go to step 5 below.
1. If you have not already registered an iOS App ID, add one now:
1. Select the add icon (+), then select **App IDs**.

*Adding an iOS app identifier*
1. Select **Continue**.
1. Fill out the **Register an App ID** form and enable **Push Notifications**.

*Registering an app ID*
1. Select **Continue**, then **Register**.
1. Select your app's name in the list of App IDs, then continue to step 5 below.
1. Under **Capabilities**, enable **Push Notifications**, then select **Configure**. The button is labeled **Edit** if it was previously configured.

*Enabling Push Notifications for an App ID*
> **Note:** If the **Configure/Edit** button is not available, you may not be the
> team agent or an admin. The person who originally created the developer
> account is your team agent, and they will have to carry out the remaining
> steps in this section.
1. Select **Create Certificate**:

*Creating a certificate for Push Notifications*
You should now see the **Create a New Certificate** section, where you will generate an Apple Push Notification service SSL (Sandbox & Production) certificate compatible with both the
Production and Development environments:
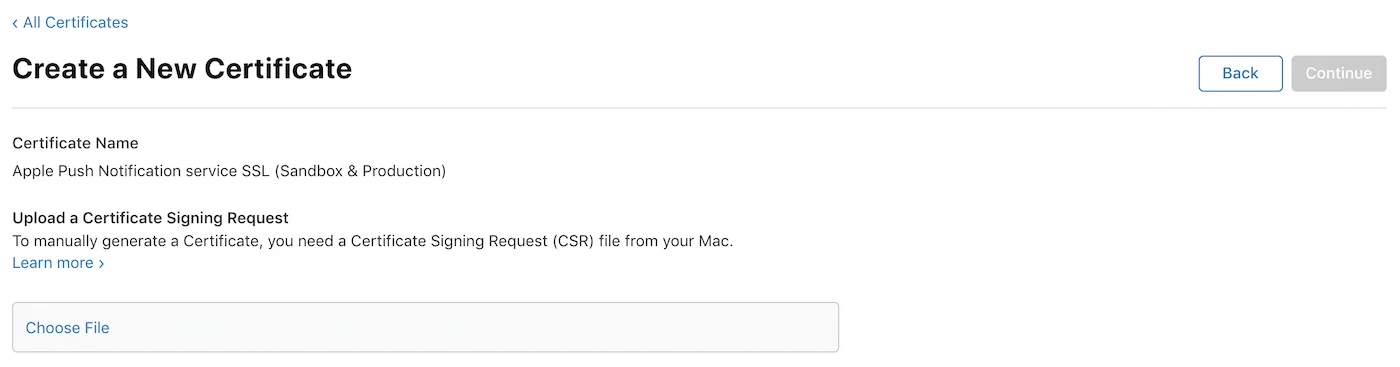
*Creating a new APNs SSL certificate*
1. Follow Apple's instructions to [create a certificate signing request](https://developer.apple.com/help/account/create-certificates/create-a-certificate-signing-request), then upload the file under **Create a New Certificate**.
1. Select **Continue** after uploading your certificate signing request.
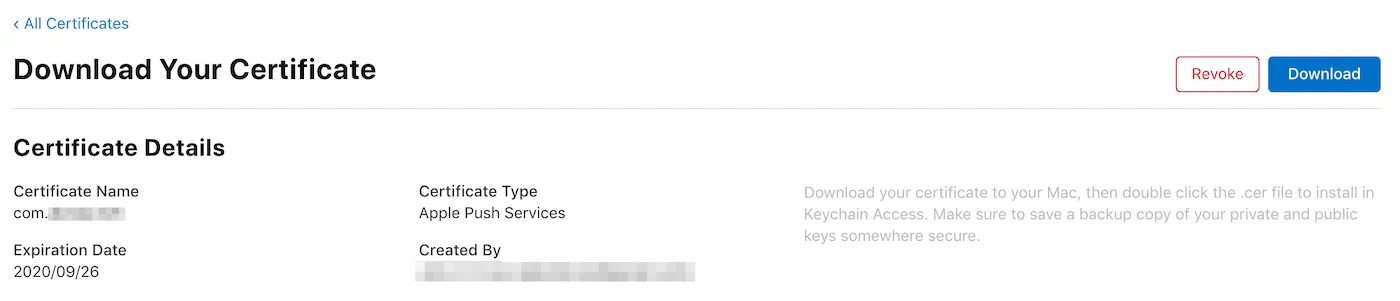
You can now use the newly-created Certificate Signing request to generate
the APNs Push SSL certificate. The next step requires the **Download**
button to be active. You may need to reload the page if it is not yet active.
1. Select **Download** and save the file for use in the next step.
*Downloading your APNs certificate*
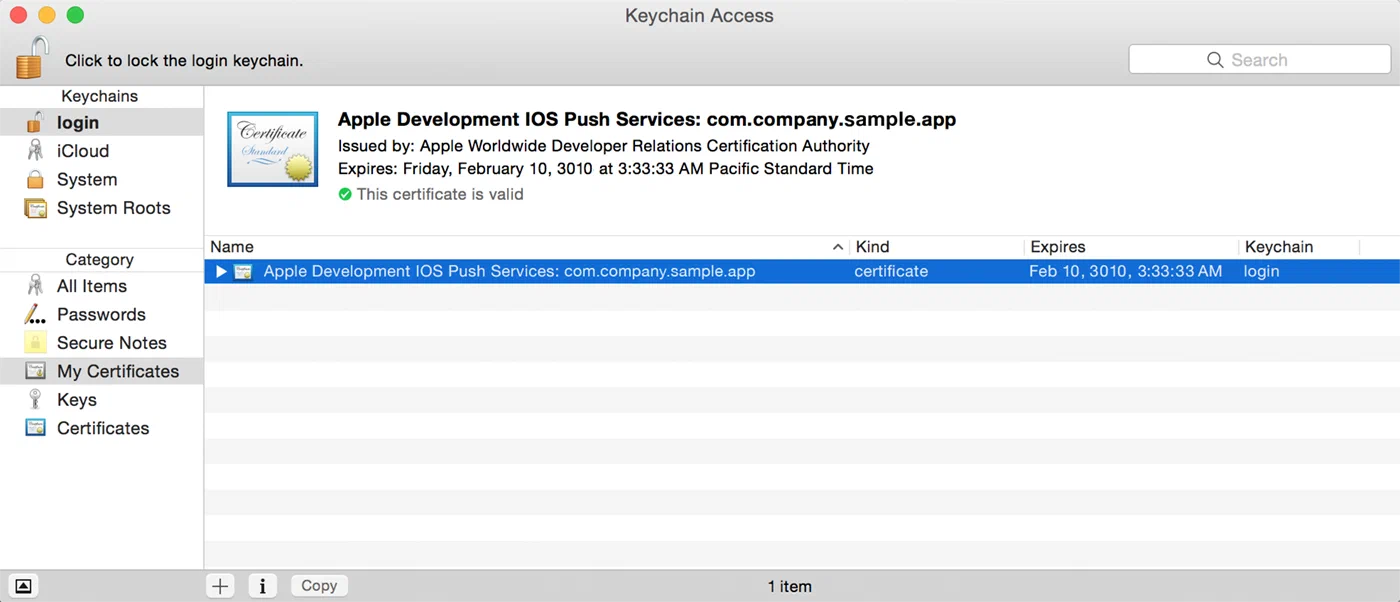
1. Open the certificate you downloaded in the previous step.
It should open in the Keychain Access app and be
listed in My Certificates.
*The certificate in Keychain Access*
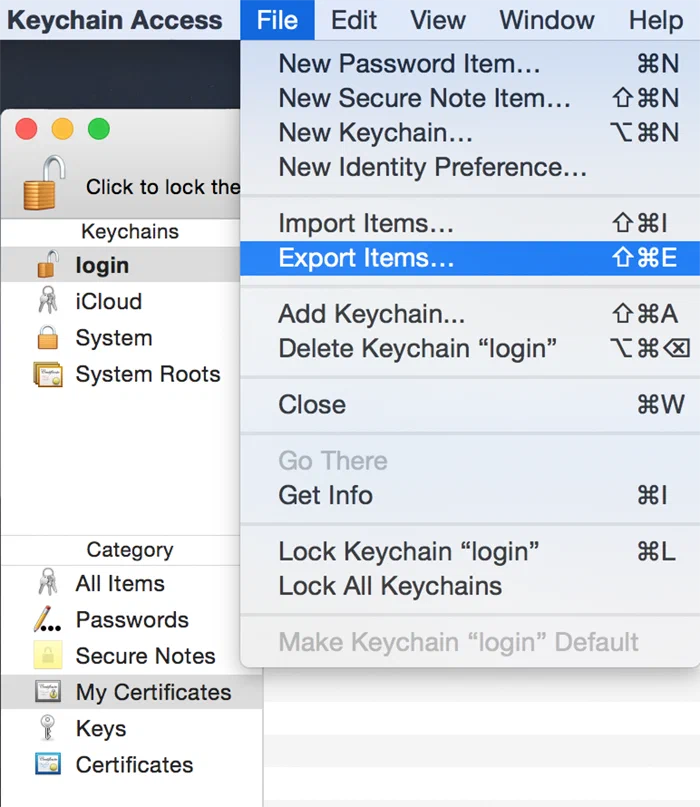
1. Select the certificate in the list, then from the **File** menu, select
**Export Items...**.
*Exporting the certificate as a .p12 file*
> **Note:** Be sure to select
> **My Certificates** under the Category menu on the lower left-hand side.
> If **My Certificates** is not highlighted, you will not be able to export
> the certificate as a .p12 file.
1. Save the file in the Personal Information Exchange (.p12) format.
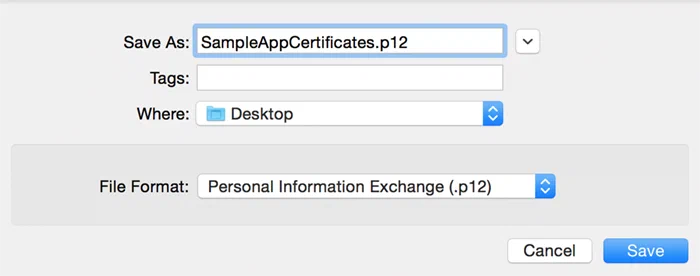
*Saving the certificate in .p12 format*
You will be prompted to create a certificate password. Use this password in the Airship dashboard.
Now you can configure the iOS channel for the project in Airship:
1. Next to your project name, select the dropdown menu (▼), then **Settings**.
1. Under **Channels**, select **iOS**.
1. For **Certificate-based authentication**, select **Edit**.
1. Enter the certificate password and upload the .p12 file.
1. Select **Save**.
## Android channel configuration
To configure Android channels, you must configure either Firebase Cloud Messaging (FCM) and/or Huawei Mobile Services (HMS). If both push providers are configured, the Airship SDK prioritizes FCM as the push provider if the app and the SDK are set up for both.
### FCM rate limit
The Firebase Cloud Messaging API has a default rate limit of 600,000 requests per minute. If your project reaches that limit, Airship will retry after one minute. You may want to request a rate limit increase if you send to large volume audiences when sending time-sensitive messaging such as breaking news.
* To check your current limit:
1. Log in to the [Google Cloud console](https://console.cloud.google.com/).
1. Select your FCM project, then **APIs & Services**, then **Firebase Cloud Messaging API** then **Quotas & System Limits**, or go directly to https://console.cloud.google.com/apis/api/fcm.googleapis.com/quotas.
1. In the table, see the value for **Send requests per minute**.
* To request a rate limit increase, [contact Firebase Support](https://firebase.google.com/support). See [When to reach out to FCM](https://firebase.google.com/docs/cloud-messaging/scale-fcm#when-reach) in Google's *Best practices when sending FCM messages at scale*.
### Configure FCM token auth
Firebase projects use Google's FCM HTTP v1 API, which uses short-lived access tokens that follow the [OAuth2](https://en.wikipedia.org/wiki/OAuth) security model. In the event of tokens becoming public, they can only be used for about an hour before they expire.
> **Important:** In July 2024, Google replaced the Cloud Messaging API with the FCM HTTP v1 API. This change affected sending Android push notifications. We updated our services to use the new API, but your project cannot start using it until authenticated.
>
> If your Airship project has not yet moved to token-based authentication, complete the setup steps that follow this note. You will enable the Firebase Cloud Messaging API (V1) for your Firebase project, generate a private key and download the file, and upload the file in your Airship project settings.
>
> Your Airship project will immediately switch to using the new API to send Android push notifications. You do not need to update your SDK and/or release a new version of my app. This is a server-side change only.
>
> If you have questions, [contact Airship Support](https://support.airship.com/) or your account manager.
First, enable the Firebase Cloud Messaging API (V1) for your Firebase project:
1. Log in to the [Firebase console](https://console.firebase.google.com/).
1. Either create a new project or select an existing project that you want to configure with Airship.
1. In the sidebar, select the settings icon (⚙), then **Project settings**:
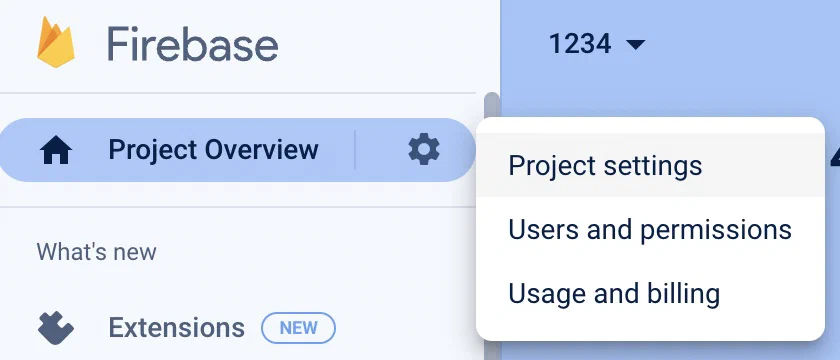
*Selecting Firebase Project settings*
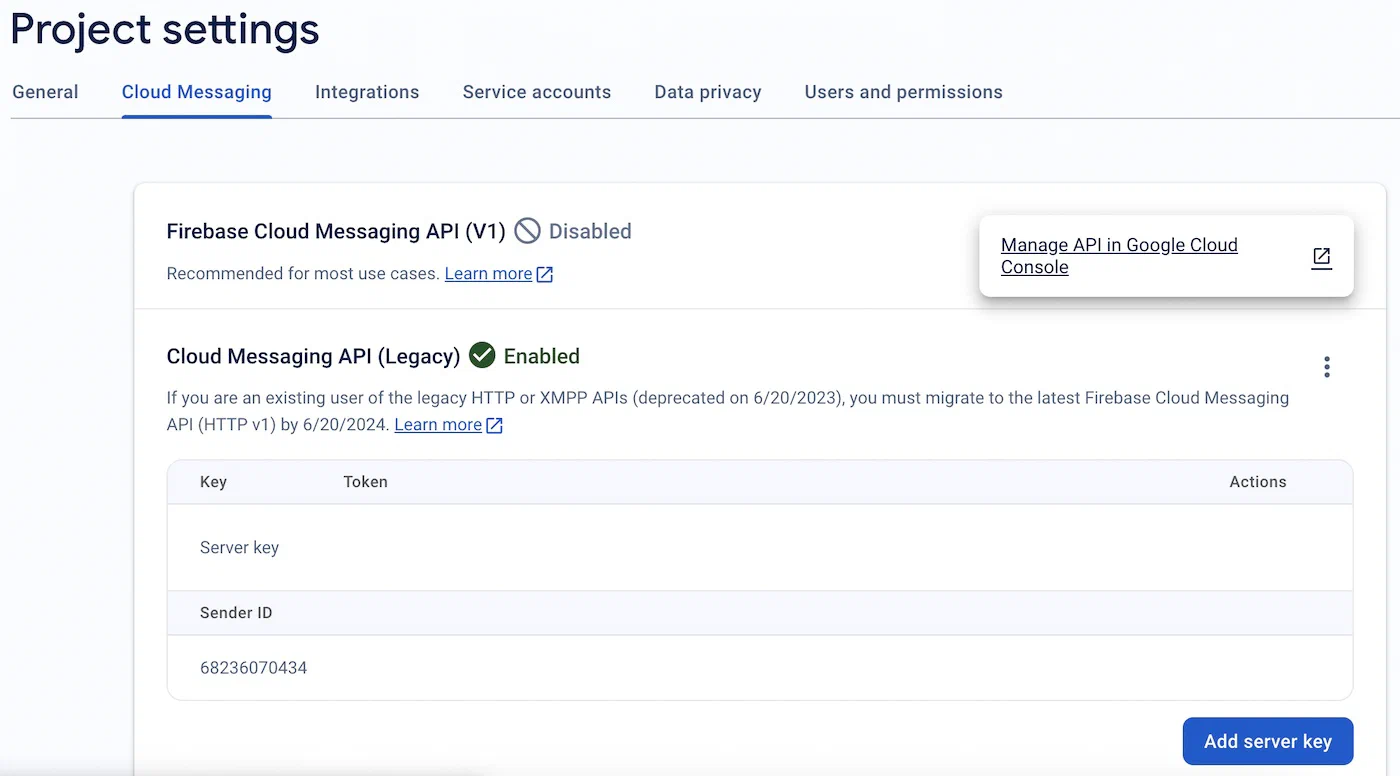
1. Select the **Cloud Messaging** tab.
1. For **Firebase Cloud Messaging API (V1)**, select the more menu icon (⋮), then **Manage API in Google Cloud Console**, which will open in a new browser window or tab:
*Managing the API*
1. Select **Enable**:
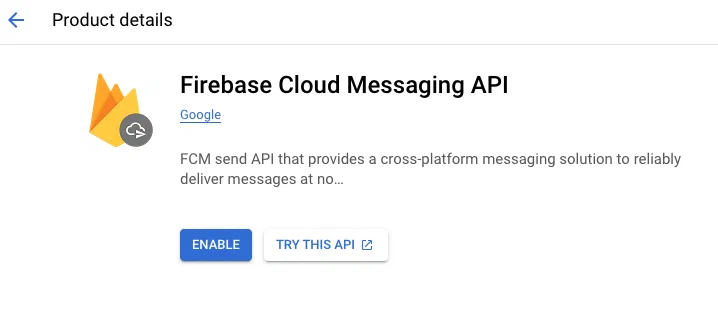
*Enabling the Firebase Cloud Messaging API*
1. Close the Google Cloud Console window or tab.
---
If you are setting up token authentication after previously using server key auth, you must give your Firebase service account the `cloudmessaging.messages.create` permission to send notifications and data messages through the FCM HTTP API and Admin SDK. You can create and assign a custom role for the single permission or you can assign the Firebase Cloud Messaging API Admin role, which includes the permission and other permissions.
For additional information, see Google references:
* [Firebase Cloud Messaging permissions](https://firebase.google.com/docs/projects/iam/permissions/#messaging) in *Firebase IAM permissions*
* [Firebase Cloud Messaging API Admin](https://cloud.google.com/iam/docs/understanding-roles#firebasecloudmessaging.admin)in *IAM basic and predefined roles reference*
* [Custom roles](https://cloud.google.com/iam/docs/roles-overview#custom)in *About IAM access roles: Roles and permissions*
To get your Firebase service account:
1. Go to the [Firebase console](https://console.firebase.google.com/) and select your project.
1. In the sidebar, select the settings icon (⚙), then **Project settings**.
1. Select **Service Accounts**.
1. In the **Firebase Admin SDK** section, see the value under **Firebase service account**. The account has the naming convention `firebase-adminsdk-@.iam.gserviceaccount.com`.
To create and assign a **custom role** for the single permission:
1. Log in to the [Google Cloud console](https://console.cloud.google.com/).
1. Select **IAM & ADMIN**.
1. If you are not viewing the permissions for the correct project, select the correct project from the menu in the header.
1. Create the role:
1. Select **Roles** in the sidebar.
1. Select **(+) CREATE ROLE**.
1. Add a meaningful title, description, and ID, then select a role launch stage.
1. Select **(+) ADD PERMISSIONS**.
1. Enter property name `cloudmessaging.messages.create`, check the box for it in the list, then select **ADD**.
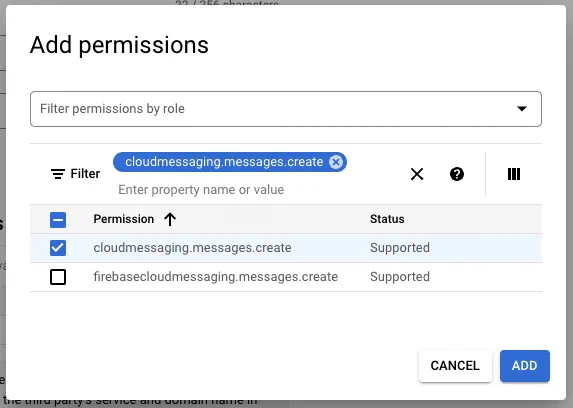
*Adding permission to an IAM role.*
1. Select **CREATE**.
1. Assign the role to your service account:
1. Select **IAM** in the sidebar.
1. Under **View by principals**, select the edit icon (
) next to your Firebase service account.
1. Select **(+) ADD ROLE** or **(+) ADD ANOTHER ROLE**.
1. Select the **Select a role** menu, then select your custom role from the Quick Access list or type its name created and select it from the results.
1. Select **Save**.
To assign the **Firebase Cloud Messaging API Admin role** that includes the permission:
1. Log in to the [Google Cloud console](https://console.cloud.google.com/).
1. Select **IAM & ADMIN**.
1. If you are not viewing the permissions for the correct project, select the correct project from the menu in the header.
1. Under **View by principals**, select the edit icon (
) next to your Firebase service account.
1. If the role "Firebase Cloud Messaging API Admin" is not already listed:
1. Select **(+) ADD ROLE** or **(+) ADD ANOTHER ROLE**.
1. Select the **Select a role** menu, then type "Firebase Cloud Messaging API Admin" and select it from the results.
> **Warning:** Be sure to select **Firebase Cloud Messaging *API* Admin**, not **Firebase Cloud Messaging Admin**.
1. Select **Save**.
---
Next, generate a private key:
1. Return to the [Firebase console](https://console.firebase.google.com/) and select your project.
1. In the sidebar, select the settings icon (⚙), then **Project settings**.
1. Select the **Service accounts** tab.
1. Under **Firebase Admin SDK**, select **Generate new private key**, then **Generate key**. The key will download as .json file with a name like `project--4173162SAMPLE949879-firebase-adminsdk-0ddvl-1d0bc7bacb.json`. Make sure to store this file in a secure location.
---
Now you can configure the Android channel for your project in Airship:
1. Next to your project name, select the dropdown menu (▼), then **Settings**.
1. Under **Channels**, select **Android**.
1. For **Application ID**, select **Edit**, enter your [application ID](https://developer.android.com/build/configure-app-module), then select **Save**.
1. For **Firebase Cloud Messaging (FCM) Token-based authentication**, select **Edit** and upload your Firebase private key file, then select **Save**.
### Configure HMS
First you need to configure your app information in AppGallery Connect, then you can enter your HMS client ID and secret in Airship.
* If you have not yet configured your app, complete the steps in Huawei's [Configuring App Information in AppGallery Connect](https://developer.huawei.com/consumer/en/doc/HMSCore-Guides/android-config-agc-0000001050170137). In the section [Configuring the Signing Certificate Fingerprint](https://developer.huawei.com/consumer/en/doc/HMSCore-Guides/android-config-agc-0000001050170137#section1159841225116), make sure to copy the values for **Client ID** and **Client secret**.
* If you already configured your app information in AppGallery Connect, get your client ID and secret:
1. Log in to [AppGallery Connect](https://developer.huawei.com/consumer/en/console).
1. Select **My projects**, then select the project that contains the app you configured with Airship, then select the Airship app.
1. Under **App information**, copy the values for **Client ID** and **Client secret**.
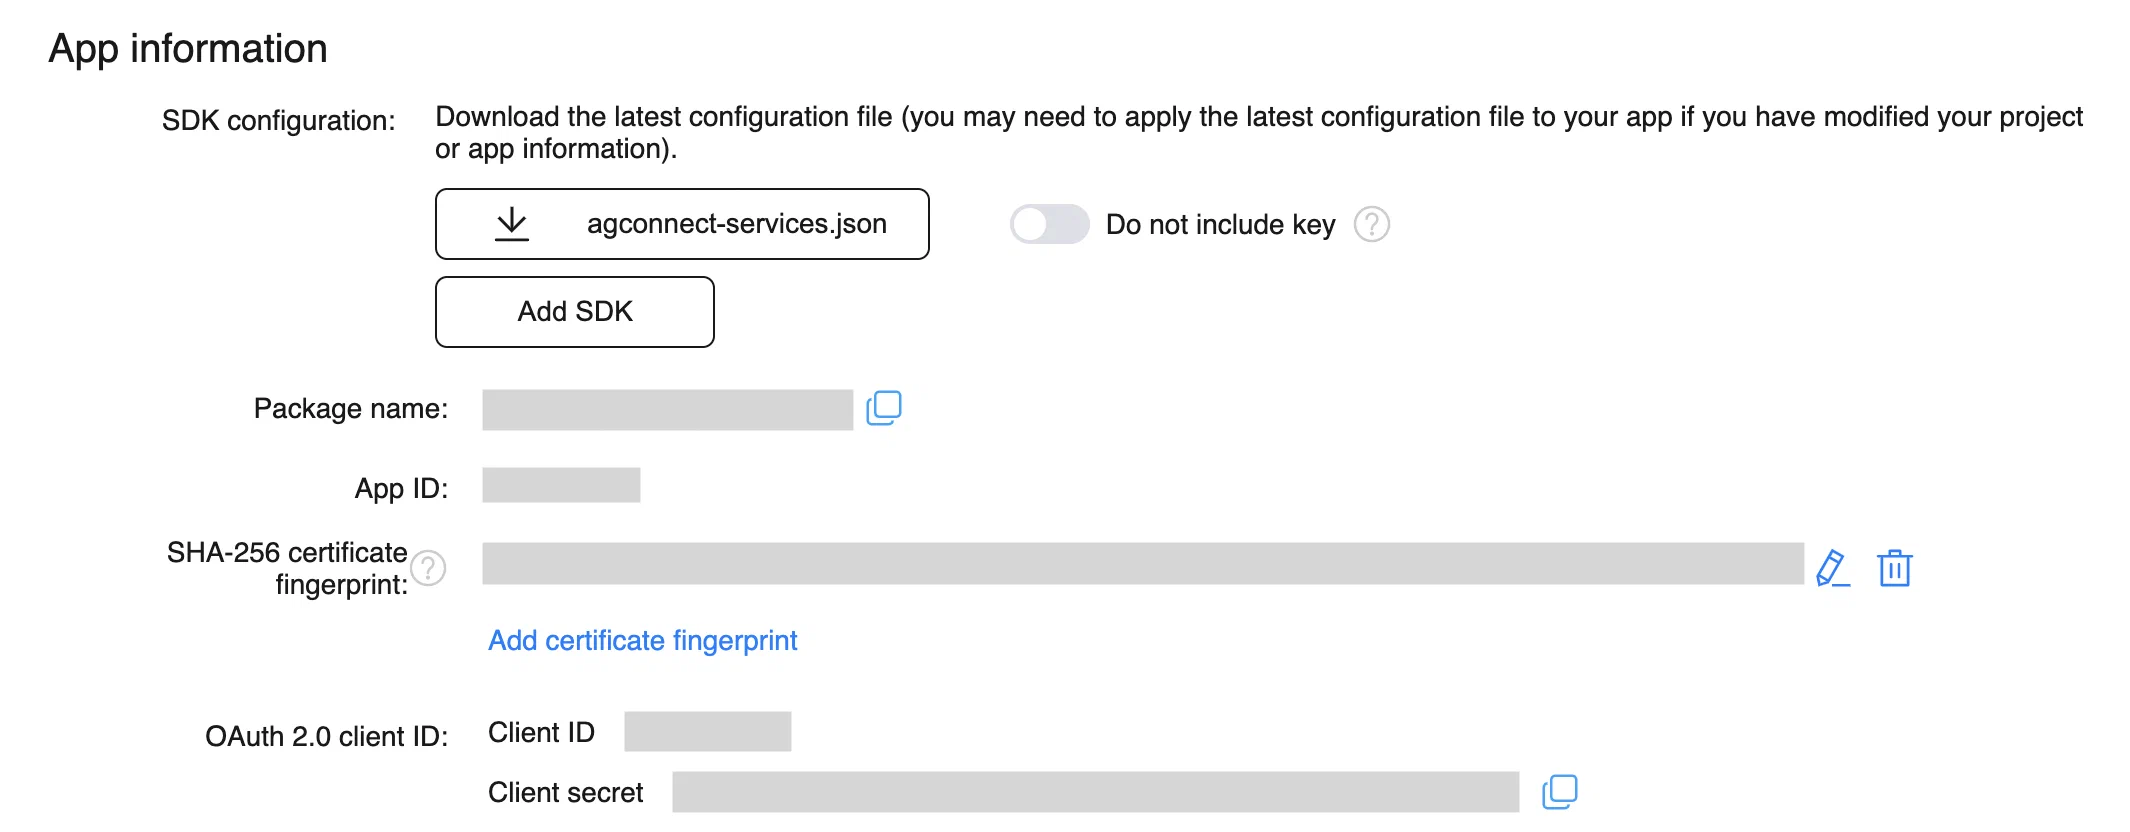
*Retrieving the client ID and secret from AppGallery Connect*
These steps are also provided in [Viewing Basic App Information](https://developer.huawei.com/consumer/en/doc/HMSCore-Guides/android-config-agc-0000001050170137#section125831926193110) in *Configuring App Information in AppGallery Connect*.
Now you can configure the Android channel for the project in Airship:
1. Next to your project name, select the dropdown menu (▼), then **Settings**.
1. Under **Channels**, select **Android**.
1. Under **Huawei Mobile Services (HMS)**, enter your Huawei client ID and client secret in the **Huawei app ID** and **Huawei app secret** fields.
1. Select **Add Android**.
## Fire OS channel configuration
To configure Fire OS channels, you must configure Amazon Device Messaging (ADM).
> **Note:** While you will not need in-depth knowledge of the ADM platform
> in order to use ADM for push notifications, we recommend that you
> review Amazon's [Overview of Amazon Device Messaging](https://developer.amazon.com/docs/adm/overview.html) before continuing.
### Configure Fire OS
First, follow [Amazon's documentation](https://developer.amazon.com/docs/adm/obtain-credentials.html)
to obtain your OAuth Credentials and API Key.
Then you can configure the Fire OS channel for the project in Airship:
1. Next to your project name, select the dropdown menu (▼), then **Settings**.
1. Under **Channels**, select **Fire OS**.
1. Enter your OAuth credentials for the **Client ID** and **Client secret**.
1. Select **Save**.
# The SDKs and APIs
> Airship's SDKs expose messaging and data-gathering functionality on your client devices, and our APIs support messaging mediums that can't use an SDK. Airship has SDKs for iOS, Android/Fire OS, Windows, and Web platforms. The APIs correspond to Airship's engagement (messaging) and real-time event stream products.
## SDK Uses
The SDK registers [channels](https://www.airship.com/docs/reference/glossary/#channel_dev) and interprets
notifications sent from Airship. You must integrate the SDK with your app
or website in order to issue notifications to your mobile and/or web audiences.
Devices that have installed your app and web browsers that have opted-in are
eligible to receive notifications. Refer to your app's
[platform documentation](https://www.airship.com/docs/developer/sdk-integration/) for help integrating and
using the SDK.
## API Uses
Most features are available via the
APIs, however some are available only from the
[Dashboard](https://www.airship.com/docs/reference/glossary/#dashboard).
Dashboard- and API-only exceptions are noted throughout the docs. See
[API vs Dashboard](#api-vs-dashboard)
below for more information.
[Airship API](https://www.airship.com/docs/developer/rest-api/ua/)
: Create and send messages to users, and use advanced messaging features like [Automation](https://www.airship.com/docs/reference/glossary/#automation). This API encompasses the majority of the Airship feature set.
[Data Streaming API](https://www.airship.com/docs/developer/rest-api/connect/)
: Access your app's event stream, helping you gather information about user
interactions with your notifications and app. With [Real-Time Data Streaming](https://www.airship.com/docs/reference/glossary/#rtds), you have access
to the data that will help you maximize the effectiveness of your
communications.
## Channel Registration
Airship's SDK and Airship API are fundamental to the platform, as they are the
mechanisms for registering [channels](https://www.airship.com/docs/reference/glossary/#channel_dev). Channel
registration is a basic requirement for sending notifications; you cannot send
notifications to a channel that is not registered or in the process of becoming
registered.
### SDK vs API
The SDK enables communications with mobile devices and web browsers; it makes
devices and browsers Airship clients. You will bundle the SDK with your
app or website to register and issue notifications to mobile devices and web
browsers.
For an [Open Platform](https://www.airship.com/docs/reference/glossary/#open_platform), you will use our
[Channels API](https://www.airship.com/docs/guides/getting-started/developers/channels-intro/#channels-api)
to register and manage the opt-in/opt-out status of end users.
### Registration Requirements
This table represents the minimum requirements for communicating with the
various channels supported by Airship. A channel must either have
installed the SDK or be registered via the API.
| Channel type | API registration | SDK registration |
| --- | :---: | :---:|
| App | | ✓ |
| Web | | ✓ |
| Email | ✓ | |
| SMS | ✓ | |
| Open Channel | ✓ | ✓ |
## Authentication
All Airship APIs require authentication. Some
endpoints allow multiple authentication schemes. In general, your app should
use Basic App authentication, and server-side implementations should use
Bearer authentication where available. See also:
[App Keys & Secrets: Security](https://www.airship.com/docs/guides/getting-started/developers/app-keys-secrets/).
| Auth type | Value | API | Description |
|-----------|-------|----------|-------------|
| Basic App | App Key and App Secret, Base64 encoded || The typical authentication scheme for apps integrating with Airship. Basic App authentication is limited to low-security API endpoints, ensuring that users can't compromise your data with your app in the wild.|
| Basic Master | App Key and Master Secret, Base64 encoded |- Airship
- Compliance Data Streaming
| Grants access to the complete Airship API and should be reserved for server-to-server communications only. You should not give out your Master Secret or use Basic Master authorization with your app.
| Bearer | Bearer Token | | Bearer authentication uses a token that you can create and revoke. Because you can create and revoke tokens for your team at will, bearer authentication maximizes your control over who can access Airship. |
## API vs Dashboard
It may be helpful to think of Airship APIs as an expansion of the dashboard
feature set. You can do almost anything via the API that you would do using the
dashboard — with notable additions, such as:
* Use the `custom-events` endpoint to associate external data with channels and users.
* Open an event stream with the Data Streaming API to determine the effectiveness of your notifications.
* Use `open-channels` to communicate with channels and platforms that aren't natively supported by Airship.
> **Note:** Some API endpoints may be restricted by your Airship feature bundle.
> [Contact Airship Sales](https://www.airship.com/contact-us/) if you do not have access to an endpoint or
> feature that you want to take advantage of.
> **Tip:** If you use an AI coding assistant, you can connect it to Airship with Skills and an MCP server. See [Airship AI Tools](https://www.airship.com/docs/developer/ai-tools/ai-tools/).
### Airship
The Airship API and dashboard support similar functionality, with some
differences in terminology between the two. The tables below map message types,
composer types, and features to their respective API objects and endpoints.
#### Message Types
| Message type | Dashboard | API object | Requires SDK |
|---------------|:---------:|-----------|:------------:|
| Push Notification | ✓ | `"notification": {}` | ✓ |
| Silent Push Notification | ✓ | `"notification": {}` | ✓ |
| Web Push Notification | ✓ | `"notification": { "web": {}}` | ✓ |
| In-App Message | ✓| `"in_app": {}` 1 | ✓ |
| Message Center | ✓ | `"message": {}` | ✓ |
| Apple News Notification | ✓ | Not supported | |
| Email Notification | ✓ | `"notification": { "email": {}}` | |
| SMS Notification | ✓ | `"notification": { "sms": {}}` | |
1. There is currently no API for in-app automation.
#### Composers and API Equivalents
| Composer | API endpoint|
| --- | --- |
| Message | `/push` |
| A/B Test | `/experiments` |
| Automation | `/pipelines` |
| In-App Automation | Not supported |
| Scene | Not supported |
| Sequence | Not supported |
| Apple News | Not supported |
#### Features
Some features, e.g., tags and named users, can be set via the API (server-side)
or the SDK (device-side) but not via the dashboard.
| Feature | Dashboard | API endpoint |
|---------|:---------:|--------------|
| Email Channel registration | | `/channels/email` |
| SMS Channel registration | | `/channels/sms` |
| Open Channel registration1 | | `/channels/open` |
| Named Users2 | | `/named-users` |
| Tags2 | ✓ | various |
| Segments | ✓ | `/segments` |
| Lists | ✓ | `/static-lists` |
| Custom Events | | `/custom-events` |
| Reports | ✓ | `/reports` |
| Location | ✓ | |
1 Open Channels require a webhook server that will accept a `/push` payload.
2 Named users and tags can be set client-side, via the SDK.
### Real-Time Data Streaming
**Real-Time Data Streaming is an API-only feature.** The Date Streaming API consists of a single endpoint
that opens a real-time event stream for a messaging project. You can authorize
event streams for various apps via the dashboard, but you can only access an event stream via the API.
The event stream reflects user actions, changes in device environment, e.g.,
encountering beacons, and server-side actions, e.g., sending push notifications.
You can use the event stream to gather information about how users use your app
and determine effectiveness of your communications with your users.
When you make a call to the Data Streaming API, you can set the criteria that
determines the events the stream will return. See the
[Data Streaming API Reference](https://www.airship.com/docs/developer/rest-api/connect/) for help with opening and
filtering the event stream.
# Custom Domain Proxy
> Send Airship traffic through your own domain.
Airship traffic is routed using domains including *urbanairship.com*, *aswpapius.com*, and *airsp.co*. Customers viewing these domains in URLs will likely not associate them with your brand. The domains may also be denied by content blockers, resulting in disabled Airship features.
Substituting your own domain instead can provide a consistent brand experience for your users and make it easily identifiable when adding to a trusted domains list in a content blocker. For example, your email [Preference Center](https://www.airship.com/docs/reference/glossary/#preference_center) URL could be *preferences.[yourdomain].com* instead of *pages.airsp.co*.
This is accomplished by setting up a **custom domain proxy**, which relays requests (traffic) from your custom domain to Airship instead of directly to Airship.
## Supported features
Custom domains are supported for the following Airship features:
* [Android](https://www.airship.com/docs/developer/sdk-integration/android/) and [iOS](https://www.airship.com/docs/developer/sdk-integration/apple/) SDKs
* [Web SDK](https://www.airship.com/docs/developer/sdk-integration/web/)
* [Email preference centers](https://www.airship.com/docs/guides/messaging/features/preference-centers/)
* Email [unsubscribe links](https://www.airship.com/docs/guides/messaging/messages/content/email/email-unsubscribe-links/) and [double opt-in links](https://www.airship.com/docs/guides/messaging/messages/content/email/email-double-opt-in-links/)
## Configuration process
Complete these steps to configure a custom domain:
1. **Configure your CDN proxy.** This includes:
* **Creating your custom domain.** We recommend creating a dedicated subdomain, e.g., `analytics.example.com`.
* **Pointing traffic from your custom domain to Airship.** You will specify a *CDN origin* based on the location of your Airship data center.
1. **Request proxy access.** Airship will configure feature support your test projects.
1. **Test** the configured features in your test projects.
1. After a successful test, **request production support**. Airship will configure feature support for your live/production projects.
In this document, configuration steps use an example subdomain: `analytics.example.com`.
> **Note:** You may use a configured CDN to support more than one Airship project. We recommend trying the custom domain on a test project first, and then moving to your live/production project once it has passed testing.
### Requirements
In order to configure a custom domain, you will need access to the following:
* Your domain's DNS configuration
* A CDN proxy, and access to configure it
* A security certificate issued for the proxy domain
You must provide your own CDN, which you will configure with your own TLS certificates, and point to an origin we provide. We have tested the following providers:
* [Amazon CloudFront](https://aws.amazon.com/cloudfront/)
* [Cloudflare](https://www.cloudflare.com/)
> **Note:** For assistance with a CDN product, please contact that product's support team. Airship Support is unable to help you directly for those products.
### CDN origin
The origin you use as a target for your CDN depends on your project's data center:
* North American data center: `ext.airship.com`
* EU data center: `ext.airship.eu`
[Contact Airship Support](https://support.airship.com) if you are unsure which value to use.
## Configuration steps
CDN proxy configuration varies depending on your CDN provider. We provide information for configuring Cloudflare and Amazon CloudFront.
> **Important:** We recommend using a dedicated subdomain for the CDN, as you will be passing *all* traffic from the domain to Airship. We do not support any setup which routes traffic for only some paths.
### Configure your CDN proxy: Amazon CloudFront
Create a new CloudFront distribution with the following settings:
* **Origin:** The correct [origin](#cdn-origin) for your data center: `ext.airship.com` or `ext.airship.eu`.
* **Viewer protocol policy:** `HTTPS only`
* **Allowed HTTP methods:** `GET, HEAD, OPTIONS, PUT, POST, PATCH, DELETE`
* **Cache key and origin requests**
* **Cache policy:** `CachingOptimized`
* **Origin request policy:** `AllViewer`
The remaining settings are your responsibility, but you **must** provide a valid certificate.
### Configure your CDN proxy: Cloudflare
> **Note:** Cloudflare is typically configured for an entire domain (e.g., `example.com`), not just a subdomain. This is the only configuration Airship has tested, and these instructions assume you have already successfully configured Cloudflare for your domain.
Under Cloudflare's DNS management, add a new subdomain record:
* **Type:** `CNAME`
* **Name:** Your chosen subdomain name, e.g., `analytics`
* **Content/Origin:** The correct [origin](#cdn-origin) for your data center: `ext.airship.com` or `ext.airship.eu`
* **Proxy Status:** Proxied
> **Important:** In order for Cloudflare to work with an Airship origin, the SSL/TLS mode **must** be set to `Full (strict)`.
### Request proxy access for test projects
Once your proxy is configured, you can visit the custom domain in a web browser, however you will receive a generic "Error 404" message. This is expected.
Next, [contact Airship Support](https://support.airship.com) with a request for your custom domain to be configured for proxy access. Provide this information:
* The Airship project app keys for **test projects** you wish to configure to use the custom domain. You can get your app key from your project dashboard: Next to your project name, select the dropdown menu (▼), then **Project Details**.
* Your custom domain, e.g. `analytics.example.com`
* The features you wish to enable: Email preference centers and/or the Web SDK.
Airship Support will confirm when they complete configuration. You can then test the proxy in a test (non-live/production) project.
### Test: Email preference center
For an email preference center, edit an existing [preference center URL](https://www.airship.com/docs/guides/messaging/features/preference-centers/#directing-users-to-a-preference-center), replacing the default Airship domain `pages.airsp.co` with your custom domain:
* **Default:** `https://pages.airsp.co/pages//?channel_id=`
* **Custom:** `https://analytics.example.com/pages//?channel_id=`
The preference center should work with no further changes. See also [Testing an Email Preference Center web page](https://www.airship.com/docs/guides/messaging/features/preference-centers/#testing-an-email-preference-center-web-page).
### Test: Email unsubscribe and double opt-in links
> **Important:** The custom domain proxy feature will not affect email link tracking domains. You may not use the same domain for email tracking links and a custom domain proxy.
When sending an email, you may use [Unsubscribe / List unsubscribe](https://www.airship.com/docs/guides/messaging/messages/content/email/email-unsubscribe-links/) or [Double opt-in](https://www.airship.com/docs/guides/messaging/messages/content/email/email-double-opt-in-links/) links to allow end users to update their opt in status. When using these links, Airship provides a default "success" landing page if you do not specify your own.
When using the custom domain proxy feature for these links, they will use your custom domain instead of the Airship default domains.
To test this feature, send an email to yourself that includes an [Unsubscribe link](https://www.airship.com/docs/guides/messaging/messages/content/email/email-unsubscribe-links/), without specifying a redirect URL. After following the link in the email you receive, you should be redirected through your custom domain and arrive at a default landing page on that same domain.
**HTML example**
```html
Unsubscribe
```
**Plain text example**
```plaintext
[[ua-unsubscribe]]
```
### Test: Android and iOS SDKs
> **Important:** You should test the domain configuration on a test project to avoid interruptions to your audience. An invalid configuration will prevent the SDK from communicating with Airship, and this configuration can only be enabled for your full audience.
Enabling a custom domain for Android and iOS SDK traffic can only be done by [contacting Airship Support](https://support.airship.com); you will coordinate with our support staff to determine when the setting should be enabled for your Test and Live projects.
Once a custom domain is enabled for your project, the configuration will automatically be pulled by the SDK once its local cache expires. This will allow you to test SDK communications, however the initial configuration will still be pulled from Airship domains. To fetch this initial configuration from your custom domain you must update your application's configuration with the new "initial configuration URL" setting, which requires the following SDK versions:
* Android: 16.8.0+
* iOS: 16.10.0+
#### Android Kotlin
```kotlin
val config = AirshipConfigOptions.Builder()
...
.setInitialConfigUrl("https://analytics.example.com")
.setUrlAllowList(arrayOf(..., "https://analytics.example.com"))
.build()
```
Apps that load config from a properties file can set the domain using the keys `urlAllowList` and `initialConfigUrl`.
#### Android Java
```java
AirshipConfigOptions config = AirshipConfigOptions.newBuilder()
...
.setInitialConfigUrl("https://analytics.example.com")
.setUrlAllowList(new String[]{..., "https://analytics.example.com"})
.build();
```
Apps that load config from a properties file can set the domain using the keys `urlAllowList` and `initialConfigUrl`.
#### iOS Swift
```swift
let config = Config()
...
config.initialConfigURL = "https://analytics.example.com"
config.urlAllowList = [..., "https://analytics.example.com"]
```
Apps that load config from a plist can set the domain using the keys `urlAllowList` and `initialConfigURL`.
#### iOS Objective-C
```objc
UAConfig *config = [[UAConfig alloc] init];
...
config.initialConfigURL = @"https://analytics.example.com";
config.urlAllowList = @[..., @"https://analytics.example.com"];
```
Apps that load config from a plist can set the domain using the keys `urlAllowList` and `initialConfigURL`.
#### React Native
```ts
import { UrbanAirship } from 'urbanairship-react-native';
Airship.takeOff({
...
urlAllowList: [..., "https://analytics.example.com"],
initialConfigUrl: "https://analytics.example.com"
});
```
Apps that load config from a properties file can set the domain using the keys `urlAllowList` and `initialConfigUrl`.
Apps that load config from a plist can set the domain using the keys `urlAllowList` and `initialConfigURL`.
#### Flutter
```dart
var config = AirshipConfig(
...
initialConfigUrl: "https://analytics.example.com",
urlAllowList: [..., "https://analytics.example.com"]
);
Airship.takeOff(config);
```
Apps that load config from a properties file can set the domain using the keys `urlAllowList` and `initialConfigUrl`.
Apps that load config from a plist can set the domain using the keys `urlAllowList` and `initialConfigURL`.
#### Cordova
```js
Airship.takeOff({
...
urlAllowList: [..., "https://analytics.example.com"],
initialConfigUrl: "https://analytics.example.com"
});
```
### Test: Web SDK
> **Important:** You should test the domain configuration on a staging deployment of your website to avoid interruptions.
The Web SDK's initialization code must be updated to specify the new SDK source URL, as well as the API endpoints. These will have the same value. For example:
**snippet.html (SAMPLE ONLY)**
```html
```
**push-worker.js (SAMPLE ONLY)**
```javascript
importScripts('https://analytics.example.com/notify/v1/ua-sdk.min.js')
uaSetup.worker(self, {
defaultIcon: '',
defaultTitle: 'Example Site',
defaultActionURL: 'https://example.com',
appKey: '',
token: '',
vapidPublicKey: '',
// this configuration key is new, and needed for the custom domain
apiUrl: 'https://analytics.example.com'
})
```
Make the following changes:
* Update the path to `ua-sdk.min.js` to the custom domain, keeping the path the same as before.
* Add a new configuration key `apiUrl`, containing the custom domain and protocol, *without* a trailing slash.
> **Note:** You **must** update the initialization code both in the snippet in your web pages **and** in your push worker, e.g., `push-worker.js`.
Once configured, you should see any SDK traffic being sent from the browser through your custom domain without error.
### Request support for live/production projects
After your configuration has been tested with a successful outcome, once again [contact Airship Support](https://support.airship.com). Reply to your original [proxy access request](#request-proxy-access-for-test-projects) with a request to have the configuration committed to your live/production projects and provide:
* The Airship project app keys for **live projects** you wish to configure to use the custom domain. You can get your app key from your project dashboard: Next to your project name, select the dropdown menu (▼), then **Project Details**.
This final step by Support ensures that any URLs generated by the Airship dashboard will reflect the correct settings for your custom domain.
# Airship API Security
> The Airship messaging API supports HTTP and OAuth authentication. Different security and authorization levels are available for both.
Authentication verifies who is requesting access to the API. Authorization determines what the requester has access to. Use this page to determine what authentication you want to use and the levels of access you want to grant. It also contains setup procedures.
## Supported authentication methods
HTTP authentication supports Basic Auth and Bearer Token. OAuth authentication supports OAuth 2.0.
The basic differences between authentication methods:
| Authentication method | Credentials | Lifetime | API permissions |
| --- | --- | --- | --- |
| **[Basic Auth](#basic-auth)** | [App Key](https://www.airship.com/docs/reference/glossary/#app_key) and [App Secret](https://www.airship.com/docs/reference/glossary/#app_secret) or [Master Secret](https://www.airship.com/docs/reference/glossary/#master_secret) | 🚨 Permanent 🚨 | Master Secret allows access to most APIs, App Secret allows access to only the APIs necessary for providing Airship access to your audience's apps and browsers. |
| **[Bearer Token](#bearer-token)** | A token created in the dashboard | Until revoked | Role-based. Audience Modification grants access to register and modify audiences. All Access grants complete access to all endpoints and features that support Bearer Token authentication. |
| **[OAuth 2.0](#oauth-20)** | A token generated by a `POST` using credentials created in the dashboard | Token=1 hour
Credentials=Until expiration, if set | Scope-based. Specify one or more scopes that define allowed endpoints and operations. |
{class="table-col-1-20 table-col-2-30 table-col-3-20 table-col-4-30"}
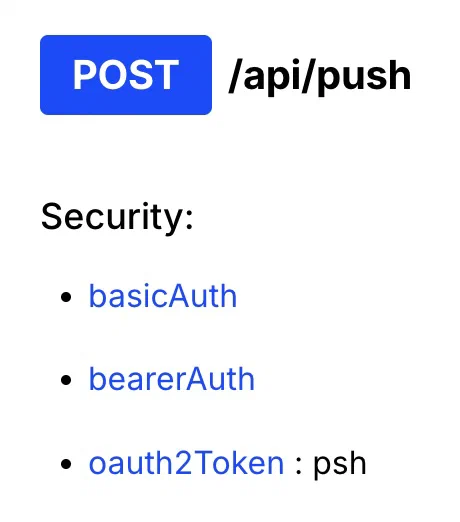
*Supported authentication methods listed for POST /api/push*
For a list of endpoints allowed per authentication method, see the [Airship API Authorization Reference](https://www.airship.com/docs/developer/rest-api/ua/api-auth-reference/).
In addition to the differences noted in the above table, the HTTP and OAuth methods use different base URLs. For detailed information, see each method's section on this page.
In the [Airship API reference](https://www.airship.com/docs/developer/rest-api/ua/) and [Real-Time Data Streaming](https://www.airship.com/docs/reference/glossary/#rtds) [API reference](https://www.airship.com/docs/developer/rest-api/connect/), each endpoint's supported authentication methods, and scopes for OAuth 2.0, are listed under **Security**.
## Basic Auth
Basic Auth is a form of HTTP authentication and authorization. You provide your project's [App Key](https://www.airship.com/docs/reference/glossary/#app_key) and [App Secret](https://www.airship.com/docs/reference/glossary/#app_secret) or [Master Secret](https://www.airship.com/docs/reference/glossary/#master_secret) to generate a Base-64 authorization string. The App Secret grants access to most product features, while the Master Secret grants access to the majority of the Airship API.
While Basic Master grants access to the complete Airship API, you should use this method for server-to-server communications only. You should not give out your Master Secret or use Basic Master authentication with your app. See the [Basic Authentication Map](https://www.airship.com/docs/guides/getting-started/developers/app-keys-secrets/#api-authentication-map) for more information about the features you can access with Basic Auth.
You can access your App Key, Secret, and Master Secret in your project dashboard. Next to your project name, select the dropdown menu (▼), then **Project Details**. Access level [Owner, Administrator, or Full Access](https://www.airship.com/docs/guides/getting-started/admin/teams-messaging/#access-levels) is required to view the Secret. Owner and Administrator can view the Master Secret.
In the API reference, see:
* [Base URLs for HTTP authentication](https://www.airship.com/docs/developer/rest-api/ua/introduction/#servers) in the *Base URLs* section
* [HTTP Authentication: Basic Auth (App) and Basic Auth (Master)](https://www.airship.com/docs/developer/rest-api/ua/introduction/#security) in the *Authentication* section
## Bearer Token
Bearer Token is a form of HTTP authentication and authorization. You provide a token string generated from your Airship project settings. You can set bearer tokens to allow complete access to all endpoints and features that support Bearer Token authentication or only allow registering and modifying audiences. Bearer tokens do not expire. To revoke access, you must delete the token.
In the API reference, see:
* [Base URLs for HTTP authentication](https://www.airship.com/docs/developer/rest-api/ua/introduction/#servers) in the *Base URLs* section
* [HTTP Authentication: Bearer Token](https://www.airship.com/docs/developer/rest-api/ua/introduction/#security) in the *Authentication* section
### Creating bearer tokens
Project [Owners and Administrators](https://www.airship.com/docs/guides/getting-started/admin/teams-messaging/#access-levels) can create bearer tokens.
First, determine which access role you need for your token. See the columns **Bearer — All Access** and **Bearer — Audience Modification** in the [Airship API Authorization Reference](https://www.airship.com/docs/developer/rest-api/ua/api-auth-reference/#authorization-per-authentication-method).
Then create the token in your Airship project:
1. Next to your project name, select the dropdown menu (▼), then **Settings**.
1. Under **Project settings**, select **Tokens**.
1. Select **Create token**.
1. Enter a token name. This is used to recognize your tokens in Airship.
1. Select an access role for the token:
| Role | Description | Typical use |
| --- | --- | --- |
| **Audience Modification** | Grants read and write permission to audience-related APIs | Sending custom events into Airship |
| **All Access** | Grants full access to your Airship project | Inbound message handling webhooks |
1. Select **Create token**.
1. Copy the App Key and token strings, then select **Got it** to close the window. You cannot view the token again after closing.
### Managing bearer tokens
Project [Owners and Administrators](https://www.airship.com/docs/guides/getting-started/admin/teams-messaging/#access-levels) can manage bearer tokens.
Next to your project name, select the dropdown menu (▼), then **Settings**. Then, under **Project settings**, select **Tokens**. The default sort order is by last created, and each row displays the token name, assigned role, and creation date and time.
To immediately revoke a token's access to the Airship API, select **Delete**.
If your request returns an "Invalid bearer token" error, verify your token is active and includes the [access role necessary](https://www.airship.com/docs/developer/rest-api/ua/api-auth-reference/#authorization-per-authentication-method) for the given request.
## OAuth 2.0
[OAuth 2.0](https://oauth.net/2/) is an authorization framework you can use to provide secure, limited access to the Airship API. Instead of providing a single string like with Basic Auth or Bearer Token authentication, you regularly fetch short-lived bearer tokens to use in your API calls.
This method provides better security than Basic Auth and Bearer Token since, in the event of the tokens becoming public, they can only be used for a short time before they expire. Another benefit is control of permissions. Instead of broad access to the API, you select one or more scopes that define which endpoints and operations are authorized for the tokens, and you can edit them at any time.
The general workflow for OAuth 2.0 and Airship:
1. Create client credentials in your Airship project settings and set the [scope of permissions](https://www.airship.com/docs/developer/rest-api/ua/api-auth-reference/#oauth-token-scopes) to authorize for issued tokens.
You can also specify an expiration date and time for the credentials or revoke them later. After expiration or revocation, no tokens will be issued for requests using those credentials, but any tokens already issued will continue to be valid until their own expiration date and time.
1. Request a token in a `POST` using HTTP Basic Auth with your client credentials or, for additional security, using an assertion.
An assertion is a JSON Web Token (JWT) used for authentication. You may want to use an assertion since it does not require regularly transmitting long-lived secrets and provides some defense against replay attacks by requiring a `nonce`. However, it is less convenient, and OAuth clients are unlikely to support this flow.
In your request, you can also restrict a token to specific scopes and/or IP addresses.
1. Use the token for authentication in API calls. Make sure your requests are using the appropriate [domain](https://www.airship.com/docs/developer/rest-api/ua/introduction/#servers).
1. Refresh the token before it expires. The `expires_in` property in the response from the token request tells you the number of seconds from the time the token is generated until it expires.
Keep refreshing until it is no longer needed, or revoke the credentials in the dashboard if you want to disallow further token requests.
In the Airship API reference, see:
* [Base URLs for OAuth authentication](https://www.airship.com/docs/developer/rest-api/ua/introduction/#servers) in *Introduction*
* [HTTP Authentication: Basic Auth (OAuth)](https://www.airship.com/docs/developer/rest-api/ua/introduction/#security) and [OAuth Authentication: OAuth 2.0](https://www.airship.com/docs/developer/rest-api/ua/introduction/#security) in *Introduction*
* [OAuth API endpoints](https://www.airship.com/docs/developer/rest-api/ua/operations/oauth/) in *Operations*
* [Assertion JWT](https://www.airship.com/docs/developer/rest-api/ua/schemas/oauth/#assertionjwt) in *Data Formats*
### Create client credentials
Client credentials are used for communicating with the authorization server that issues OAuth tokens. By default, the credentials are a Client ID, Public Key, and Private Key. You can also generate a Client Secret to use in HTTP Basic Auth token requests. You can edit the credentials' name, expiration, and permissions after saving.
Project [Owners and Administrators](https://www.airship.com/docs/guides/getting-started/admin/teams-messaging/#access-levels) can create client credentials:
1. Next to your project name, select the dropdown menu (▼), then **Settings**.
1. Under **Project settings**, select **OAuth**.
1. Select **Add credentials**.
1. Enter a name and description to help you identify them in your list of all client credentials.
1. Configure options:
| Option | Description | Steps |
| --- | --- | --- |
| **Allow Basic Auth** | Generates a Client Secret for use in HTTP Basic Auth token requests. You cannot change this setting later. | Toggle to enable. |
| **Expiration** | Sets the credentials to expire at a specific date and time. After expiration, no tokens will be issued for requests using the credentials, but any tokens already issued will continue to be valid until their own expiration date and time. | Toggle to enable, then enter a date and time in UTC. |
1. Select **Next**.
1. Toggle to enable the scope of permissions for the issued tokens. For a list of endpoints and related operations allowed for each scope, see [OAuth token scopes](https://www.airship.com/docs/developer/rest-api/ua/api-auth-reference/#oauth-token-scopes) in the *Airship API Authorization Reference*.
1. Select **Save**.
1. Select the copy icon for each credential string or select **Download all** to save them in a zip file.
1. Select **Close**. After closing, only the Client ID and Public Key are accessible in the Airship dashboard.
### Request tokens
See [Request token](https://www.airship.com/docs/developer/rest-api/ua/operations/oauth/#requestoauthtoken) in the *OAuth* section of the API reference.
### Manage client credentials
Project [Owners and Administrators](https://www.airship.com/docs/guides/getting-started/admin/teams-messaging/#access-levels) can manage client credentials.
Next to your project name, select the dropdown menu (▼), then **Settings**. Then, under **Project settings**, select **OAuth**. The default sort order is by last created, and each row displays the name, Client ID, status, description, creation date and time, and expiration date and time. You can search by name, Client ID, and description. You can filter by status: Active, Revoked, or Expired.
Client credentials management options:
| Option | Description | Steps |
| --- | --- | --- |
| **Copy credentials** | You can view and copy the Client ID and Public Key. | Select the copy icon for each credential string, then select **Save**. |
| **Edit credentials** | You can change the name, description, expiration, or permissions. | Select the edit icon (✏), edit, then select **Save**. |
| **Revoke active or expired credentials** | Disables the credentials' ability to request new tokens from the authorization server. Tokens already issued will continue to be valid until their own expiration date and time. You cannot restore revoked credentials. | Select the revoke credentials icon. |
| **Delete revoked credentials** | Removes the credentials from the list of all credentials | Select the delete icon (trash). |
# App Keys & Secrets: Security
> In order for your app to communicate with the Airship API it must use a key and secret combination that authenticates it to your Airship app setup.
These keys are generated automatically when you
create an app in our dashboard, and you manually copy them into your iOS, Android/Fire OS, or Windows
app configuration. Since app bundles are fundamentally considered insecure (they can be decompiled),
this key and secret combination limits the APIs that your device can communicate with. This allows the
device to modify tags and named user for a specific channel, device token, or APID, and nothing more.
Push addresses/tokens are sufficiently random that they can be considered obscure, and the associated data is low risk.
We employ additional security on our servers to monitor for abuse. Tags and named user should be considered
obscure, however they are trusted APIs for devices to access so you should not place sensitive information
in a tag or named user.
We generate one additional piece of data called the Master Secret, which is used to do all
communication with our wider APIs. The Master Secret should never be placed in an app bundle, nor released
to the public. This is the secret you use to authenticate requests to our server for generating pushes, rich
app pages, and more.
## Definitions
App Key
: Airship-generated string identifying the app setup. Used in the application bundle. Only available in the Airship dashboard.
App Secret
: Airship-generated string identifying the app setup secret. Used in the application bundle. Only available in the Airship dashboard.
This can be reset by Airship's Support team, but only for emergency security issues. If you want to change this periodically,
we suggest you use the bearer token instead.
Master Secret
: Airship-generated string used for server-to-server API access. This secret must never be shared or
placed in an application bundle. Only available in the Airship dashboard. This can be reset by Airship's Support team, but only for
emergency security issues. If you want to change this periodically, we suggest you use the bearer token instead.
Partner Secret
: Airship-generated string used for server-to-server API access to create and manage applications for
partner integrations. This should never be shared or placed in an application bundle. Only available
through manual channels.
Bearer Token
: A token you can create and revoke from within Airship to be used for custom event servers, SMS webhook servers, and API consumers.
Because you can create and revoke tokens for your team at will, bearer authentication maximizes your control over who can access Airship.
This should never be shared or placed in an application bundle. Only available in the Airship dashboard.
User ID
: Airship-generated string passed back to devices and stored in the device keychain for authenticating
user-related device API actions when paired with the Password. This is not the same as your Airship
dashboard user ID.
Password
: Airship generated string passed back to devices and stored in the device keychain for authenticating
User related device API actions when paired with the User ID. This is not the same as your Airship dashboard password.
Push Address *or* Token
: A unique proprietary string generated by device vendors (Apple, Google, Windows, Fire OS) for
identifying an addressable push device. This is passed back to the device via vendor specific APIs and
then stored by Airship for addressing push messages and authenticating push related APIs.
Dashboard User ID and Password
: The credentials used to log in to the Airship [Dashboard](https://www.airship.com/docs/reference/glossary/#dashboard).
## API Authentication Map
| API feature | Create | Read | Update | Delete |
| --- | --- | --- | --- | --- |
| Tags | App Key/Secret & Token | Single: App Key/Secret & Token Enumerate: App Key/Secret | App Key/Secret & Token | Single from Device: App Key/Secret & Token All tags, all devices: Master Secret |
| Device Token/APID/PIN Registration | App Key/Secret & Token | Single: App Key/Secret & Token Enumerate: Master Secret | App Key/Secret & Token | App Key/Secret & Token1 |
| Push Message | Master Secret2 | Scheduled Push: Master Secret | Scheduled Push: Master Secret | Scheduled Push: Master Secret |
| Rich Push Message | App Key/Master Secret | User ID/Password | N/A | User ID/Password |
| User | App Key/Master Secret | Single: User ID/Password or Master Secret Enumerate: Master Secret | User ID/Password or Master Secret | User ID/Master Secret1 |
| Partner API | Partner Key/Secret3 | Partner Key/Secret | Partner Key/Secret | Partner Key/Secret |
1. Marks as inactive.
2. Unless push from device feature.
3. Only available to Airship partners.
## Tag & Named User Security
Tags and named users are considered obscure, but not secure in our system. We recommend that you not use
them to store sensitive information. The obscurity varies by platform, as push addresses/tokens are a different
format for each vendor (Apple, Google, Microsoft, Fire OS). Typically these are UUIDs or similar,
but this is not guaranteed and should be considered proprietary in nature. To gain access to
a specific device's tags or the named user it belongs to from an unauthorized source you would need to guess the push
identifier, which is mathematically improbable, or obtain it by other means.
Given that certain tag operations can be completed without the master secret it is possible for a user,
with the app key, secret, and push address, to list tags for an app and subscribe or unsubscribe themselves
to those tags. Please be aware of this as you plan your own usage of the tag API.
# Airship Postman collection
> Use our Postman public workspace to experiment with the Airship API.
The Airship API v3 [Postman](https://www.postman.com/) collection provides sample API requests for our most popular endpoints.
To use the Airship collection, you will fork the collection and an environment to your personal workspace, where you can personalize your payloads and add your project credentials, channels, etc. You can also choose to get updates when there are changes to the main collection.
> **Tip:** If you use an AI coding assistant, you can connect it to Airship with Skills and an MCP server. See [Airship AI Tools](https://www.airship.com/docs/developer/ai-tools/ai-tools/).
## Forking the Airship collection
1. Go to our [Airship Public Workspace](https://www.postman.com/airship-api).
1. Select **Collections** in the sidebar, then select **Airship API v3**.
1. Select the more menu icon (⋯), then select **Create a fork**.
1. Enter a label for your fork, then select location **My Workspace**.
1. (Optional) Check the box for **Watch original collection** to get notified about updates to the original collection.
1. Select **Fork Collection**.
Your forked collection will be created in **My Workspace**.
*Forking the Airship collection*
## Forking the Airship environment
After forking the collection:
1. Select **Environments** in the sidebar, then select **Public Airship Environment**.
1. Select the more menu icon (⋯), then select **Create a fork**.
1. Enter a label for your fork, then select location **My Workspace**.
1. Select **Fork Environment**.
Your forked environment will be created in **My Workspace**. Initial values are shared when you share a collection or environment. Current values are local and not synced or shared.
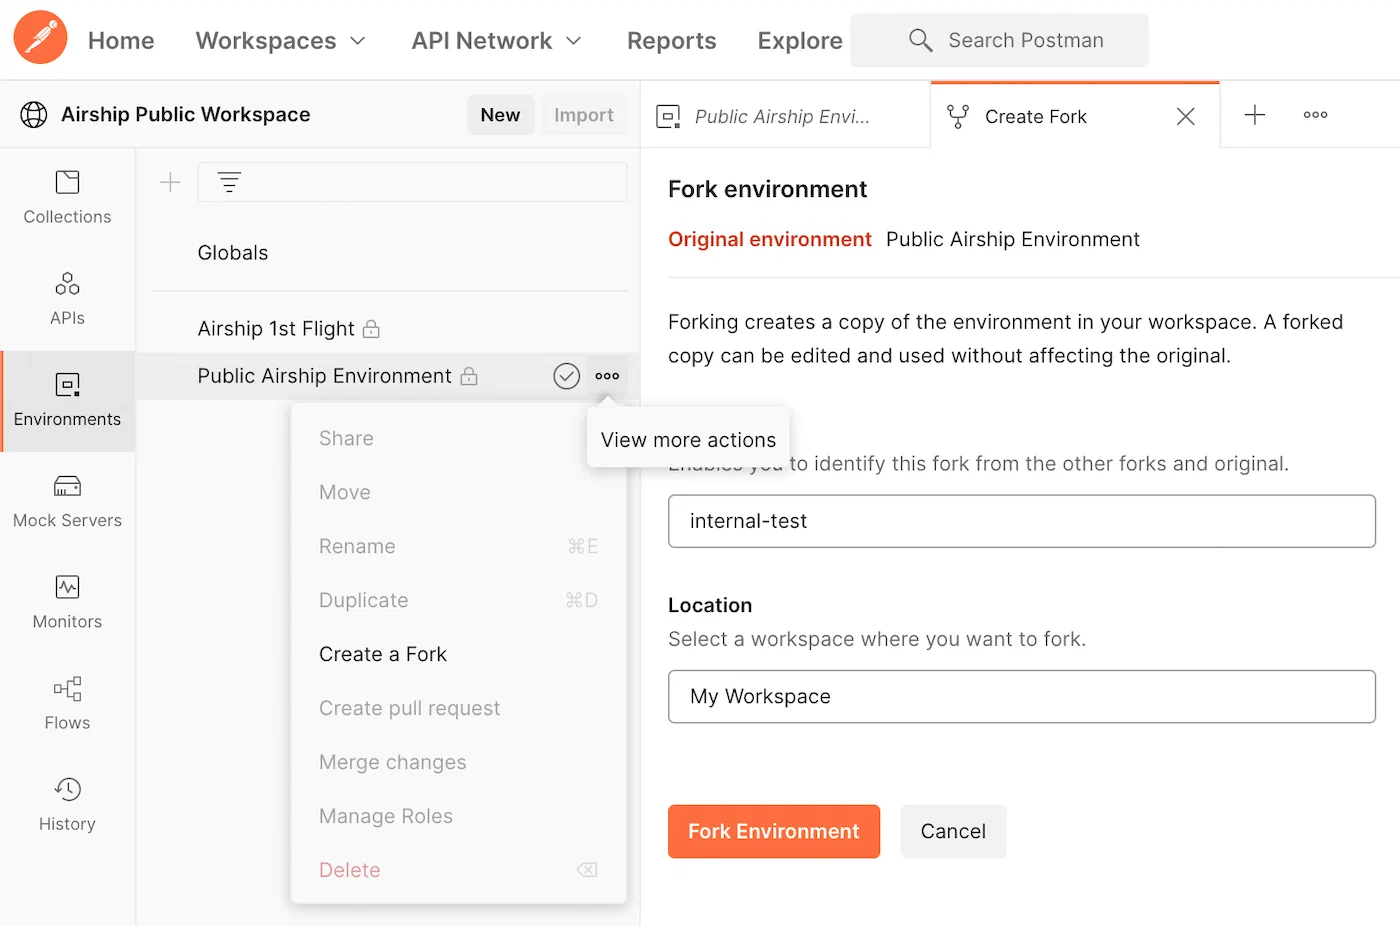
*Forking the Airship environment*
## Setting up your Postman environment
The Airship Public Workspace contains the Airship API v3 collection and Public Airship Environment. Global variables, such as `{{baseUrl}}`, and variables defined in the Public Airship Environment are used for all the pre-built requests in the collection. The endpoints use either a bearer token `{{bearer_token}}` or both app key `{{app_key}}` and master secret `{{master_secret}}` for authorization.
.
Follow the steps below to set up your variables in your Postman environment. All the variables defined in the Public Airship Environment are used in the Airship API v3 requests.
1. Go to **My Workspace**.
1. Select **Environments** in the sidebar, then select **Public Airship Environment**.
1. Select the down arrow icon (▼) at the top right of the screen, then select **Public Airship Environment**.
1. Edit the values in the **CURRENT VALUE** column for variables to be used in the API requests:
| Variable | Value |
| --- | --- |
| app_key and master_secret | Replace the current values with values from your Airship project. In Airship, go to **Settings** and copy them from the sidebar, |
| bearer_token | Replace the current values with values from your Airship project. If you don't already have a bearer token, follow the steps for [Creating bearer tokens](https://www.airship.com/docs/guides/getting-started/developers/api-security/#creating-bearer-tokens) in _Airship API Security_. |
| android_channel and ios_channel | Replace the current values with your Android and iOS channel IDs. See [Finding Channel IDs](https://www.airship.com/docs/guides/getting-started/developers/identifiers/). |
Your current values are local and not synced or shared. You can ignore variables with blank values. They will be populated via scripts.
1. Select **Save**.
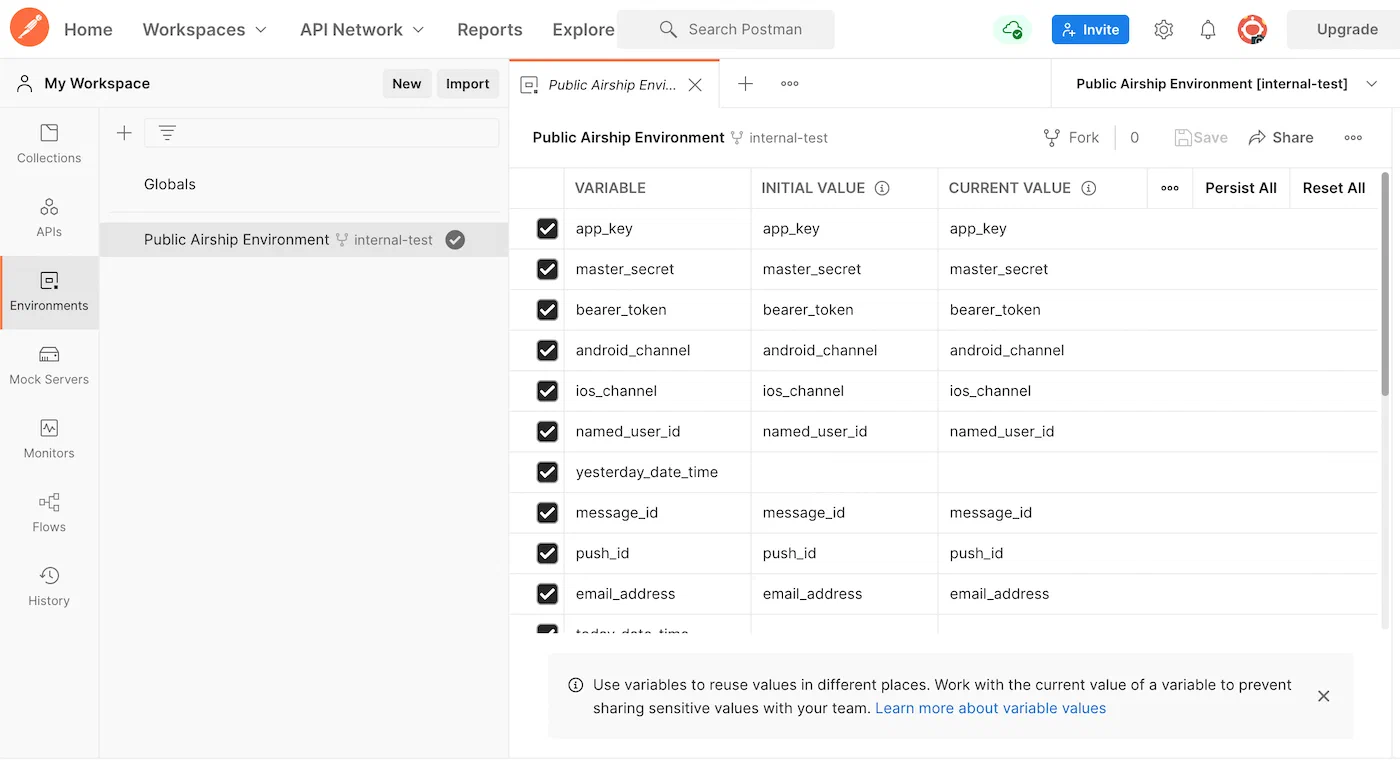
*Setting up your Postman environment*
> **Note:** Before adding tag groups to the environment and using them in requests, make sure they exist in Airship. In your Airship project, go to **Audience**, then **Tags**, then **Tag Groups**.
## Sending a push request
The Airship API v3 collection is organized in folders based on endpoints. Selecting a folder expands all pre-built requests related to that endpoint. Selecting a request opens a new tab in the main window of Postman.
1. Go to **My Workspace**.
1. Select **Collections** in the sidebar, then select the **Airship API v3** collection.
1. Select the down arrow icon (▼) at the top right of the screen, then select **Public Airship Environment**.
1. In **Airship API v3** select the **Push** folder, then open the request **POST Send a Push**.
1. Select the **Body** tab to review the request body.
1. Select **Send**, then verify the response data that is returned below the request section.
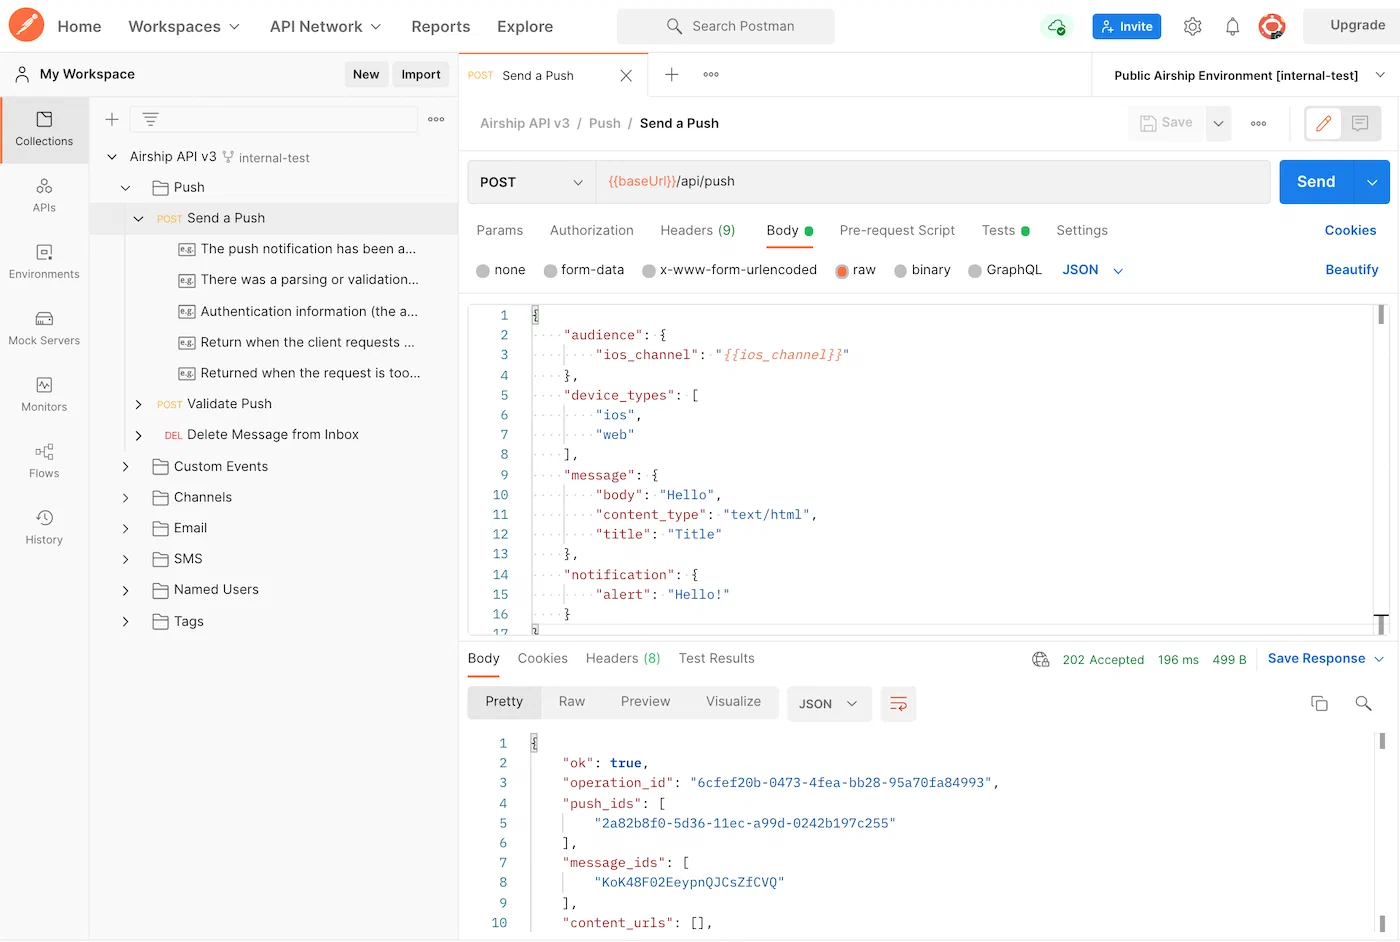
*Sending a push request*