# Secure your Airship account
Configure SSO, multi-factor authentication, and IP allowlists to protect your Airship account and control team access.
# Manage account security
> Manage user sessions and set up single sign-on (SSO).
> **Important:** If you ever have any security concerns, immediately [contact Airship Support](https://support.airship.com/).
## Managing user sessions
View active web browser sessions for a project's team members and manually end any session.
To view sessions, select the account menu icon (user) in the dashboard header, then select **Session Management**. Sessions are listed with this information:
| Column | Description |
| --- | --- |
| **IP address** | The IP address provided by the browser. This may help you verify the network origin of the session. |
| **Session start** | The date and time when the session began. |
| **Session expiry** | The date and time when the session will expire. Sessions automatically expire two weeks after they start. |
Select **Delete session** to manually end a session. **Delete a session if you suspect it has been hijacked or a password has been compromised.**
## Single sign-on (SSO)
Single sign-on (SSO) is a method of authentication where you use one set of credentials to access multiple accounts. If you already use SSO, you may add Airship as another service provider to enable members of your team to access your shared Airship projects without requiring dedicated credentials.
> **Important:** * SSO is available for paid Airship pricing plans only. Please contact your account manager or Support to enable this feature if it is not already available for your account.
>
> * You must request your user metadata from your identity provider. It must be a [standard SP (service provider) metadata XML file](https://en.wikipedia.org/wiki/SAML_metadata). You will upload this file in the steps below.
>
> * Once Airship enables your [Company account](https://www.airship.com/docs/guides/getting-started/admin/company-plan/) for SSO configuration, email addresses for invited users must be:
>
> * **New to Airship** — If the email address is used for an existing Airship User account, the invitation will fail.
> **OR**
> * **Associated with your Company account's projects only** — If the Airship User account for the email address has access to projects for other Company accounts, the invitation will fail.
>
> Email addresses are validated when sharing a project. See [Manage Messaging teams and access](https://www.airship.com/docs/guides/getting-started/admin/teams-messaging/).
### Configure a SAML connection
You must configure a new SAML connection for Airship on your identity provider. Include an attribute statement for user email addresses, which Airship uses for authentication. In order for Airship to detect it, the attribute name must be set as `http://schemas.xmlsoap.org/ws/2005/05/identity/claims/emailaddress`, not `email` or `emailaddress` alone.
### Set up SSO in Airship
Set up SSO in your Airship project:
1. Select the account menu icon (user) in the dashboard header, then select **Team Management**. If you are in Team Management for Wallet, select the link to go to Team Management for messaging projects, then continue.
1. Select **Single Sign-On**.
1. Under **Identity provider (IDP) metadata**, select **Choose File** and upload your metadata file.
1. Under **Service provider (SP) metadata**, select **Download SP Metadata**.
1. Note the **Entity ID** and **Single sign-on web address** URLs on this screen. You will use them in later steps.
SSO web addresses vary by customer and are determined at the time you upload your metadata. They are generally in this format:
* US — `https://go.airship.com/accounts/login/sso//`
* EU — `https://go.airship.eu/accounts/login/sso//`
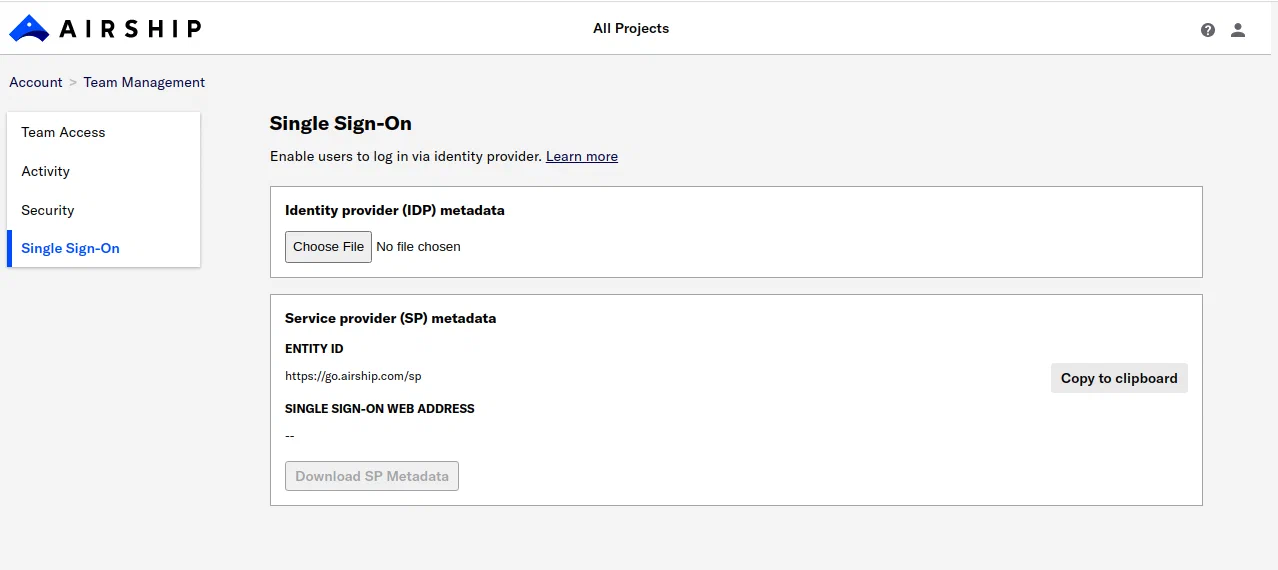
*Single sign-on configuration*
Next, give the SP metadata file to your identity provider, and include the **Entity ID** URL in case they require it.
### Test SSO
After your identity provider confirms Airship has been set up as a trusted company, have your users go to your SSO web address and test logging in. If logins fail, [contact Airship Support](https://support.airship.com) or your technical account manager for assistance.
### Go live with SSO
Finally, [contact Airship Support](https://support.airship.com) and tell them SSO login is successful for your company and they can complete setup for you. Support will:
1. Set SSO as a requirement for users to access the projects your account
1. Invalidate passwords for all users except the account owners and project administrators
1. Notify you that SSO configuration is complete
# Multi-factor authentication (MFA)
> Multi-factor authentication provides enhanced login security requiring an Airship user to provide a password and at least one other authentication method.
Multi-factor authentication is a user authentication mechanism that enforces the use of a password in combination with a piece of unique information that only you can access, such as a passcode in an SMS sent to a mobile device that you own, or [a time-based one-time password (TOTP)](https://datatracker.ietf.org/doc/html/rfc6238) from your authenticator application. Only if all provided information is correct will the authentication succeed.
Airship's MFA provider is Okta. Authentication methods are an authenticator app, text messages (SMS), biometrics, or a security key. The actual list may vary depending on the configuration of your system. For the authenticator app option, while the setup screen specifies Google Authenticator, you can use Bitwarden Authenticator, Last Pass Authenticator, or similar.
We advise enabling multiple authentication methods to reduce the likelihood of being locked out of your account if one method should become unavailable. Although it is possible to use the same authentication method more than once — for example, you may set up two or more SMS numbers — we do not suggest this practice. For optimal security, set up multiple distinct authentication methods.
To prevent fraud, the SMS method is not supported for all country codes. When configuring SMS, if you do not receive a code at your provided phone number, set up a different MFA method.
> **Important:** * All Airship users must configure MFA, except those required to log in via [custom SSO configurations](https://www.airship.com/docs/guides/getting-started/admin/security/account-security/#set-up-single-sign-on-sso).
>
> * MFA is Airship's replacement two-factor authentication (2FA), which was deprecated August 2023. Users who had 2FA configured will be prompted to migrate to MFA.
## Configuring MFA
To start the configuration process, you must follow the activation link sent to your account's email address.
* For **new accounts**, we will automatically send an activation link when you create an account.
* As of October 23, 2023, users with **existing accounts** who have not yet set up MFA will be prompted and are required to do so upon their next login. Dashboard access is limited until you have completed all steps in the process.
After following the activation link, you will:
1. Set your password. For existing accounts, you must change your current password.
* For existing accounts and accounts created via [Team Access invitations](https://www.airship.com/docs/guides/getting-started/admin/teams-messaging/), you must also configure an MFA method.
* For other new accounts, you will not be prompted to set up MFA until after logging in with your new password. If you want to set up MFA immediately, follow the steps in [Managing authentication methods](#managing-authentication-methods).
1. Log in with your new password.
1. Set up MFA or log in with an existing MFA method.
We recommend configuring more than one MFA method so you will be able to recover your account without needing to contact Support.
## Managing authentication methods
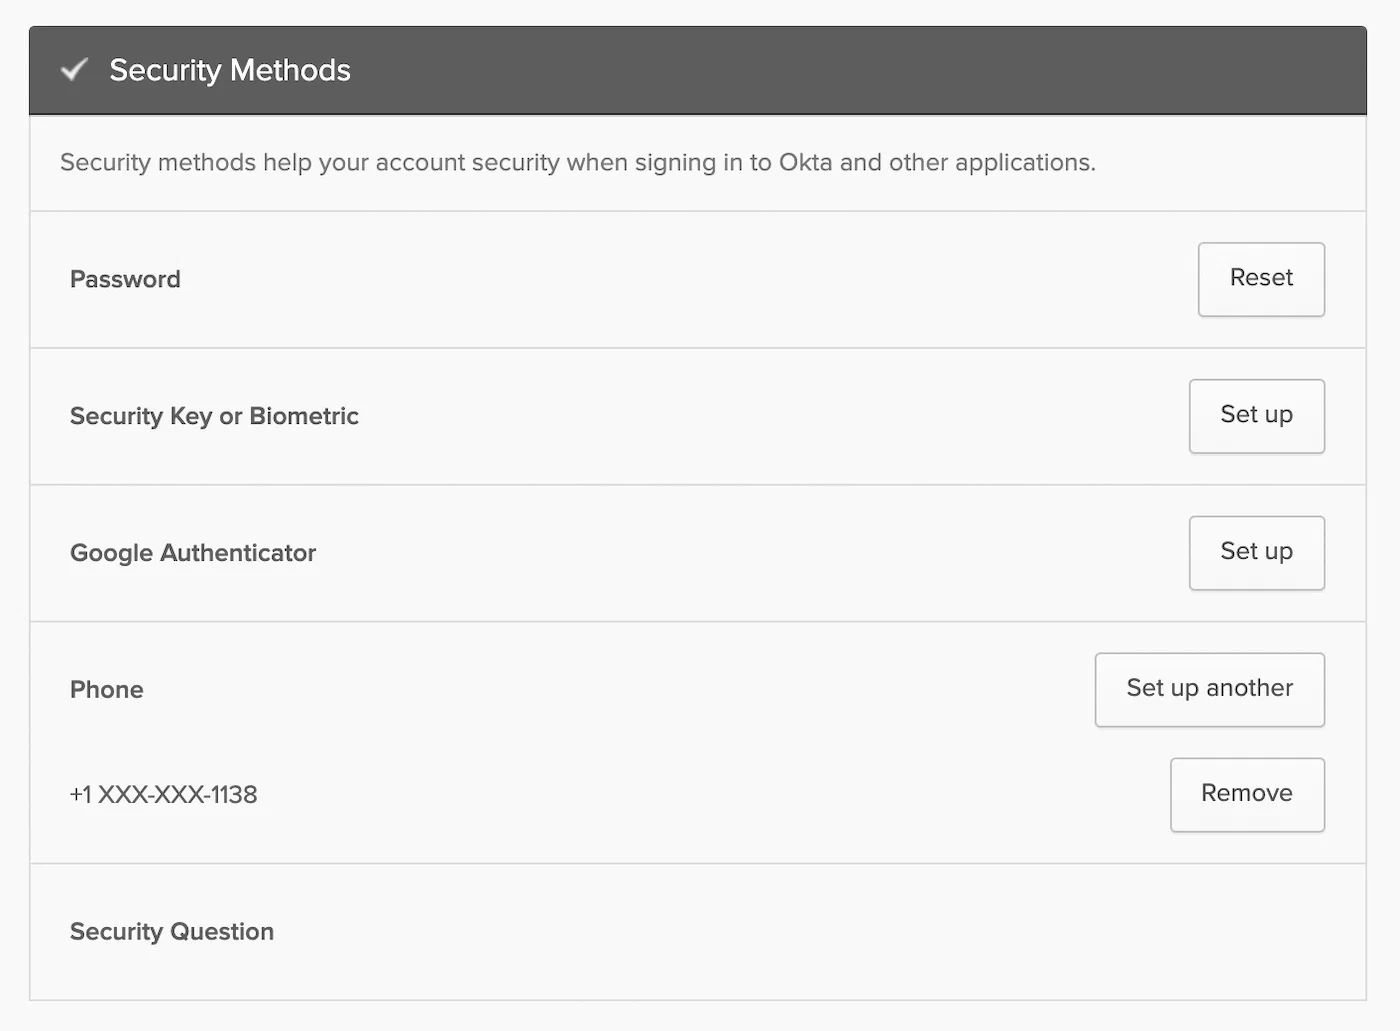
*Okta MFA configuration options*
You can add additional authentication methods and remove existing methods, but you must maintain at least one.
1. Select the account menu icon (user) in the dashboard header, then select **Profile**.
1. Under **Login Info**, select the edit icon (✏) for **Multi-factor authentication**. Your Okta account page will open in a new tab.
1. Follow the onscreen steps to make changes to your authentication methods.
# Create an IP allowlist
> Protect your projects against unauthorized use by restricting access to a set of trusted IP addresses.
Define one easy-to-maintain allowlist per company account. Each allowlist can contain an unlimited number of network ranges and/or IP addresses that can access your company's project dashboards and API communication endpoints.
## Prerequisites
Before creating your IP Allowlist, plan your approach and gather user data. Doing this preliminary work will significantly reduce support calls related to project access after you build your allowlist.
These rules and guidelines make it easier to create and maintain your company's IP Allowlist:
1. Inventory all individuals that must have access to your company's projects,
then identify and list their IP addresses. Your list may include company employees, outside contractors, and agency employees.
1. Any user who has access to your company's projects should be allowlisted.
For messaging projects, there are two ways to get to a list of project team members:
1\. Next to your project name, select the dropdown menu (▼), then **Settings**.
2\. Under **Project settings**, select **Team Access**.
**OR**
1\. Select the account menu icon (user) in the dashboard header, then select **Team Management**.
2\. Under **Share project**, select the share icon (+) next to a project name.
Now you can note the email addresses under **Team Member**. Repeat for each of your messaging projects.
---
For Wallet projects, select the account menu icon (user) in the dashboard header, then select **Team Management**. If you are in Team Management for Wallet, select the link to go to Team Management for Wallet projects. Now you can note the email addresses under **Accepted invitations**. Repeat for each of your Wallet projects.
1. Add your own IP address to the allowlist first. To make that easy, your IP
address is listed at the top of the IP Allowlist screen.
1. If anyone, including you, needs to have access to a project when working remotely
(from home, hotel, convention center, coffee shop, etc.), his or her remote IP address must be included on the allowlist in addition to the work IP address. Bear in mind that some internet service providers periodically rotate their customers' IP addresses. If this is a common occurrence, consider recommending that individuals working remotely tunnel in to your company's network via a corporate virtual private network (VPN) that routes all their traffic through the corporate network.
## Creating an allowlist
> **Warning:** When you save the first IP address or range in the allowlist, you will block all individuals not originating from that saved IP address or range They will not be able to access any of your company's projects. Consider creating the initial allowlist off-hours to avoid inadvertently blocking a colleague's access to a project.
> **Important:** * If you need to access your company's Airship account from more than one
> location / IP address, add each of those IP addresses in this initial session.
> * If your current IP address is not in the IP range you're attempting to add or
> isn't in the saved IP ranges, you will get a validation error. The system will prevent you from locking yourself out in the same session you're setting up.
> * Duplicate address entries and overlapping address blocks will not cause error messages.
[Company account Owners](https://www.airship.com/docs/guides/getting-started/admin/company-plan/) can manage IP allowlists:
1. Select the account menu icon (user) in the dashboard header, then select **IP Allowlist**.
1. Select **Add IP** and enter your current IP address, which is displayed at the top of the screen.
1. Select **Add IP** and enter an individual IP address or a block of IP addresses using [CIDR](http://en.wikipedia.org/wiki/Classless_Inter-Domain_Routing) notation.
1. Select **Save allowlist**.