# Learn about Airship messaging and engagement features
Airship supports push notifications, in-app messages, SMS/MMS/RCS, email, Message Center, and more. Learn what each channel is, when to use it, and what makes it unique.
# Push notifications
> Send push notifications to your App and Web channels.
## About push notifications
Push notifications are banner alerts that can contain many other kinds of data such as images, sounds, badge updates, buttons, and more. App push notifications target mobile devices, while web push notifications target users' web browsers.
Mobile app push notifications help you:
* Alert users when they are not in the app
* Pass extra data to users for marketing/segmentation use
* Keep users engaged with your app
**Use cases:**
* Breaking news
* Score updates
* Transaction confirmation
* Social interactions
* New content available
You can combine mobile app push notification with an [In-App Message](https://www.airship.com/docs/reference/glossary/#in_app_message) and/or [Message Center](https://www.airship.com/docs/reference/glossary/#message_center) message. When combining a push notification and Message Center, Airship sends the Message Center message to both opted-in and opted-out devices.
Reach users on the web without developing an app. Any user with access to a web browser can receive your notifications. If you do have an app, however, you can use web as an additional channel to engage your audience.
Airship supports web push notifications on:
- Desktop: Google Chrome, Mozilla Firefox, Microsoft Edge, Opera, and Safari (v16 and above)
- Android Mobile: Google Chrome, Mozilla Firefox, Opera
- iOS and iPadOS Mobile: Safari (iOS and iPadOS 16.4 and above, as a standalone web app)
### Silent push notifications
A *silent push notification* is a message that wakes a mobile app for processing without appearing on the device or producing sound or vibration. Silent push notifications are useful for performing background tasks such as sending custom keys, updating the app's badge icon, fetching remote content, and enabling new features.
For more information, see [Silent Notifications](https://www.airship.com/docs/developer/sdk-integration/apple/push-notifications/getting-started/#silent-notifications) for iOS and [Silent Notifications](https://www.airship.com/docs/developer/sdk-integration/android/push-notifications/getting-started/#silent-notifications) for Android.
You can send silent push notifications using Sequences and the Message and Automation composers. You cannot combine a silent push notification with any other message type.
> **Note:** When targeting Android devices, Airship sends messages to both opted-in and opted-out devices. Regular notifications are sent to opted-in devices and silent push notifications are sent to opted-out devices. Both silent and alerting sends appear in the message report.
## Appearance and behavior
App and web push notifications are displayed upon receipt and require text content and support adding buttons, a title, and media. Details and differences are described for each in the next sections.
### App push notifications

*A mobile app push notification*
Push notifications are in banner format and can appear on any screen on a device. They are not [Persistent](https://www.airship.com/docs/reference/glossary/#persistent).
Every push notification requires text, and you can also add optional features:
* **Buttons** — You can add one or two buttons.
* **Title** — This is a heading that appears above the notification text in:
* iOS Notification Center
* Apple Watch Looks
* Android and Fire OS Notification Area/Drawer
* **Media** — See [Push notifications](https://www.airship.com/docs/reference/messages/media-guidelines/#push-notifications) in *Media guidelines*.
* **Summary** — This is supplemental text displayed with the notification. The position varies per platform.
### Web push notifications
A web push notification appears as a toast, sliding into the top right or bottom left corner of your audience's web browser (depending on the browser). Depending on the operating system, they may also be delivered to the OS Notification Center. For example, on macOS all web notifications are visible from within the Notification Center, regardless of which browser they come from.
They are displayed upon receipt as long as the browser is open. Safari web notifications are handled by macOS, so they may also be handled by Notification Center preferences.
On a mobile device, web push notifications appear and behave similarly to a mobile push notification.
*A web push notification*
Every web push notification requires text, and you can also add optional features:
* **Buttons** — You can add one or two buttons.
* **Title** — This heading appears above the notification text in:
* iOS Notification Center
* Android and Fire OS Notification Area/Drawer
You define a default title for all of your project's web messages when configuring the web channel for your project, and you can override the title per message.
* **Media** — Add an image that will appear in web messages in Chrome and Opera browsers on Windows and Android platforms.
* **Icon** — This image is included in all web messages. You define a default icon for all of your project's web messages when configuring the web channel for your project, and you can override the icon per message.
## Getting started with push notifications
Follow these steps to start using mobile app push notifications with Airship:
* ⚙ **Configure mobile channels in your project settings** → See [Configuring Mobile Channels](https://www.airship.com/docs/guides/getting-started/developers/configure-channels/) in the Getting Started guide.
* link **Integrate the Mobile SDK with your app** → See [SDK setup](https://www.airship.com/docs/sdk-topics/setup/) for mobile apps in our developer documentation.
Follow these steps to start using web push notifications with Airship:
* ⚙ **Configure the Web channel in your project settings.**
* link **Integrate the Web SDK with your website.**See [Getting Started for the Web SDK](https://www.airship.com/docs/developer/sdk-integration/web/getting-started/) in our developer documentation.
Once your project is set up, you can start creating device-mobile [mobile app push notification content](https://www.airship.com/docs/guides/messaging/messages/content/app/push-notifications/) and browser [Web push notification content](https://www.airship.com/docs/guides/messaging/messages/content/web/).
# Message Center
> {{< glossary_definition "message_center" >}}
## About Message Center
In reporting and other areas of Airship, a Message Center message may be referred to as a **rich page**.
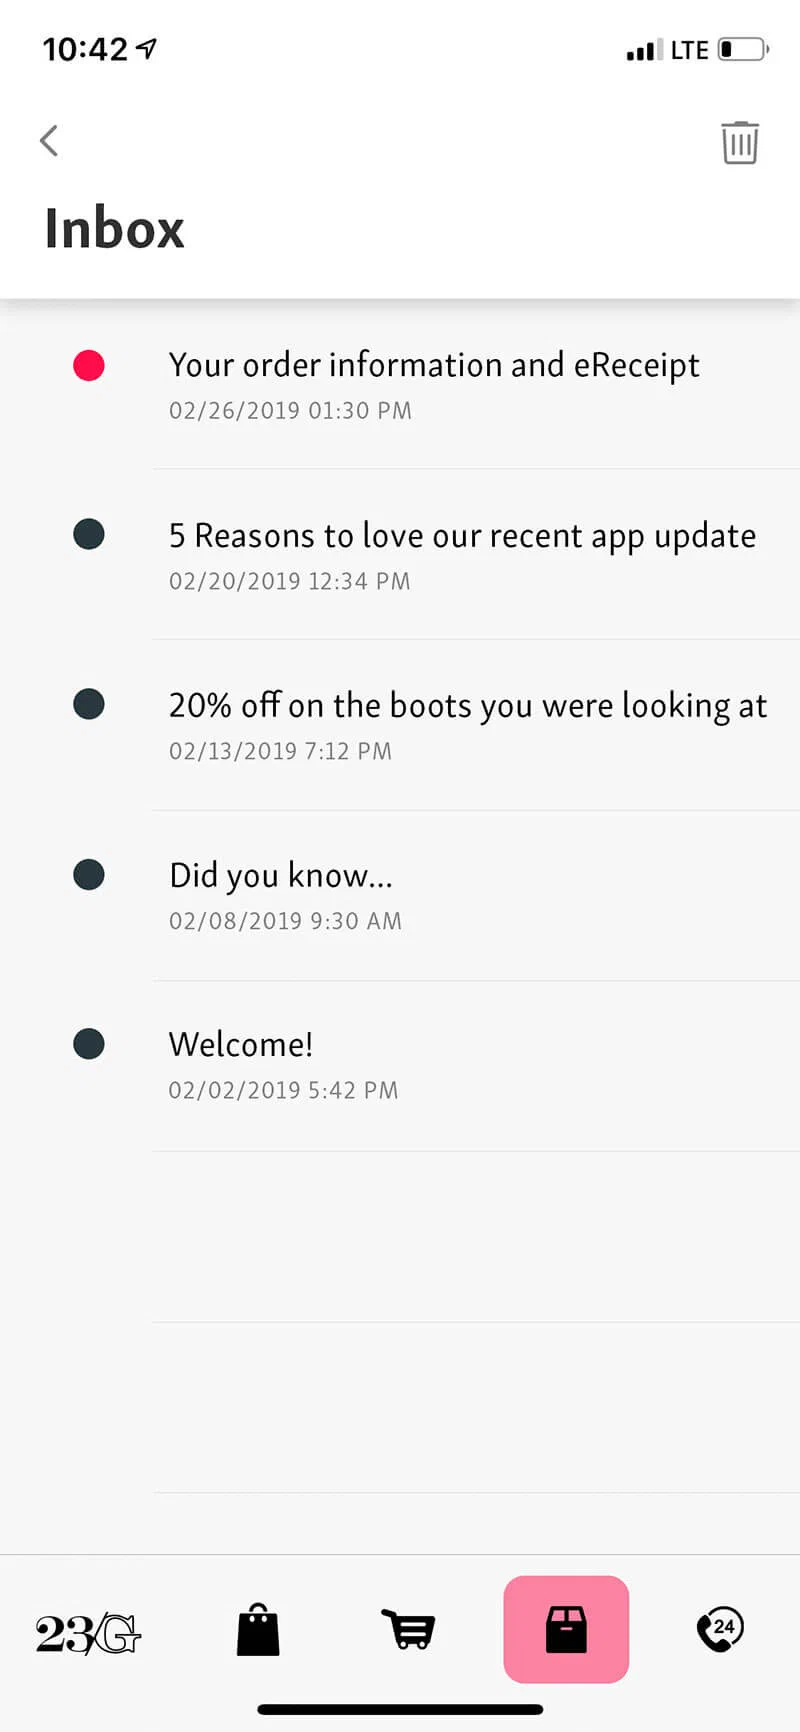
*A Message Center inbox*
* **Reach opted-out users** — Message Center messages are not push notifications, but you can use push notifications to alert users that new rich content is available. Because Message Center messages do not require a user to opt in to push notifications, you can reach your opted-out audience with Message Center.
* **More opportunities to engage** — When users interact with Message Center, e.g., read, delete, tap a button, Airship tracks the interactions and makes them available via our analytics offerings, [Real-Time Data Streaming](https://www.airship.com/docs/reference/glossary/#rtds) and [Performance Analytics](https://www.airship.com/docs/reference/glossary/#pa).
By providing engaging content and facilitating interactions via Message Center, you can also trigger other [Actions](https://www.airship.com/docs/reference/glossary/#action) such as adding a tag, or triggering a follow-up notification.
* **Theming** — Change your Message Center colors, fonts, backgrounds, and icons to match your branding.
* **Airship hosting** — Your message content is hosted by Airship.
* **More benefits**:
* Persistent inbox
* Customized per user, according to how you target individual users
* Tracking of message state per user: Read, unread, deleted, etc.
* Customize UI, or use out-of-the-box
* Data/Reporting
* JavaScript Bridge
You can combine a Message Center message with a [Push Notification](https://www.airship.com/docs/reference/glossary/#push_notification) and/or [In-App Message](https://www.airship.com/docs/reference/glossary/#in_app_message) message.
When combining a push notification and Message Center, Airship sends the Message Center message to both opted-in and opted-out devices.
## Appearance and behavior
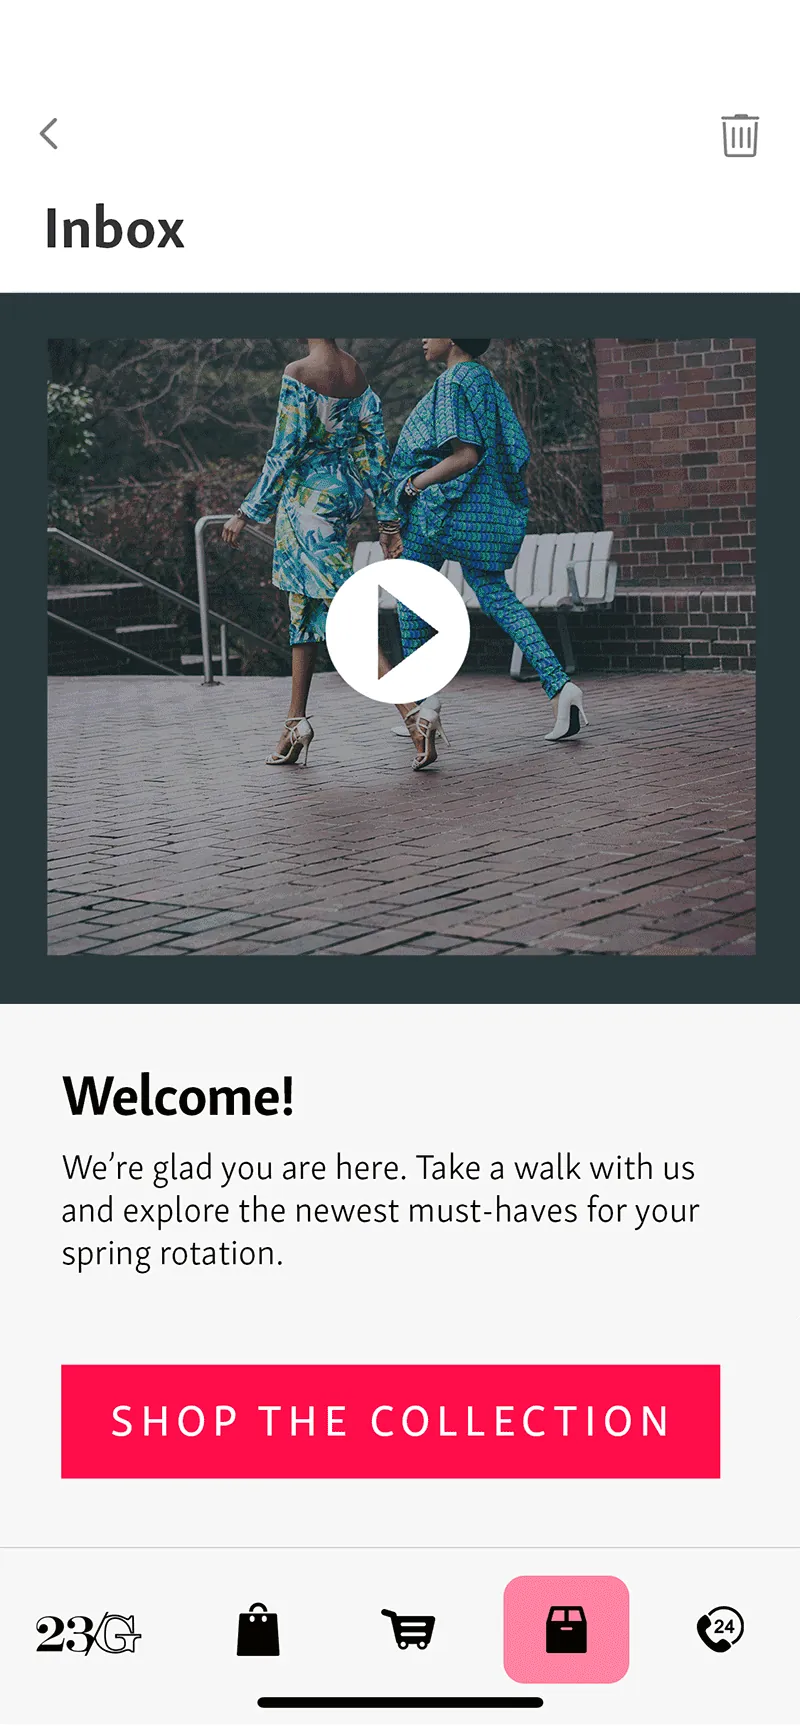
*Message Center messages*
Users access Message Center messages from the Message Center inbox in your app. Messages are **fullscreen**, with navigation back to the inbox at the top of the screen. You can configure a push notification or in-app message to open a Message Center message.
* Inboxes are limited to 250 messages. Exceeding the limit deletes the oldest messages first.
* Messages remain in the inbox until expired or deleted.
* Messages expire after one year or according to individual message expiration setting.
To create the message content, you can either upload your own HTML or design using drag-and-drop. Airship supplies several default layouts. You can also create and save your own layouts for use in new messages.
* **Inbox preview** — The inbox supports a message *preview* of a thumbnail image and one or two lines of text
* **Expiration** and you can specify an expiration date, when the message is removed from the inbox.
* **Custom templates** — Airship can create and add custom message templates for you. Contact your Airship account manager if you are interested in adding custom templates to your project.
Theming your Message Center requires changes to the configuration file in your iOS or Android/Fire OS project. See [Message Center](https://www.airship.com/docs/developer/sdk-integration/apple/message-center/getting-started/) for iOS and [Message Center](https://www.airship.com/docs/developer/sdk-integration/android/message-center/getting-started/) for Android.
## Getting started with Message Center
Follow these steps to start using Message Center with Airship:
* ⚙ **Configure mobile channels in your project settings** → See [Configuring Mobile Channels](https://www.airship.com/docs/guides/getting-started/developers/configure-channels/) in the Getting Started guide.
* link **Integrate the Mobile SDK with your app** → See [SDK setup](https://www.airship.com/docs/sdk-topics/setup/) for mobile apps in our developer documentation.
* paint-roller **Install and theme your Message Center** → See [Message Center](https://www.airship.com/docs/sdk-topics/message-center/) in our developer documentation.
Once your project is set up, you can start creating ↓ [Message Center content](https://www.airship.com/docs/guides/messaging/messages/content/app/message-center/).
# Landing pages
> Direct users to a landing page when they interact with your message.
## About landing pages
A landing page is a page within your app that can include rich content, such as HTML and video, without requiring any additional UI customization to enable the view or to provide an inbox to store the messages.
You can configure a [Push Notification](https://www.airship.com/docs/reference/glossary/#push_notification) or [In-App Message](https://www.airship.com/docs/reference/glossary/#in_app_message) to open a landing page when a user taps the message. In reporting and other areas of Airship, a landing page may be referred to as a *rich page*.
## Appearance and behavior
Landing pages appear as an overlay, with an close icon (×) to close/delete. They open when a user taps a push notification or in-app message. Landing pages are not [Persistent](https://www.airship.com/docs/reference/glossary/#persistent).
*A landing page overlay compared to fullscreen Message Center message*
You can create landing page content using these methods:
* **Self-hosting** — Store content on your own server and provide an HTTPS URL for the content when creating a message. URLs support [personalization](https://www.airship.com/docs/guides/personalization/content/personalize-actions/#web-page-and-landing-page-actions).
* **Upload** — Upload your own HTML.
* **Drag-and-drop** — Design using the drag-and-drop option in the Interactive editor. Airship supplies several default layouts, and you can save the layouts you create.
Also, Airship can create custom landing page templates for you. Contact your Airship account manager if you are interested in adding custom templates to your project.
## Getting started with landing pages
Follow these steps to start using landing pages with Airship:
* ⚙ **Configure mobile channels in your project settings** → See [Configuring Mobile Channels](https://www.airship.com/docs/guides/getting-started/developers/configure-channels/) in the Getting Started guide.
* link **Integrate the Mobile SDK with your app** → See [SDK setup](https://www.airship.com/docs/sdk-topics/setup/) for mobile apps in our developer documentation.
Once your project is set up, you can start creating stack-simple [landing page content](https://www.airship.com/docs/guides/messaging/messages/content/app/landing-pages/).
# Email
> Send messages to registered email addresses.
## About email
You can send email to your registered users. Email features include:
* Registration and unsubscribe capabilities
* Aggregate dashboards for real-time updates
* [Performance Analytics](https://www.airship.com/docs/reference/glossary/#pa) support to view send and deliverability metrics
* [Real-Time Data Streaming](https://www.airship.com/docs/reference/glossary/#rtds) support to send deliverability metrics to a central data lake
### Use cases
* **Multi-channel transactional messaging**
* Urgent transactional message directed to multiple channels, e.g., send notification via both push and email
* **Notification-style email**
* Promotional blast messaging: great for Retail, Sports/Entertainment, and Travel verticals
* Breaking news alerts for the Media industry
* Promotional mobile wallet delivery, such as coupons and loyalty cards
* **Priority channel**
* Allow users to set their preferred delivery channel as email for certain types of messaging, so as not to alert them on multiple channels, e.g., app and web, for the same content
**Industry examples:**
* **Retail** — Send an email for app re-acquisition if a user churns, onboarding, coupon and loyalty pass delivery, and more.
* **Media** — Send highly-segmented news updates.
* **Travel and Hospitality** — Send boarding passes, day of travel updates, and reservation reminders.
## Appearance and behavior
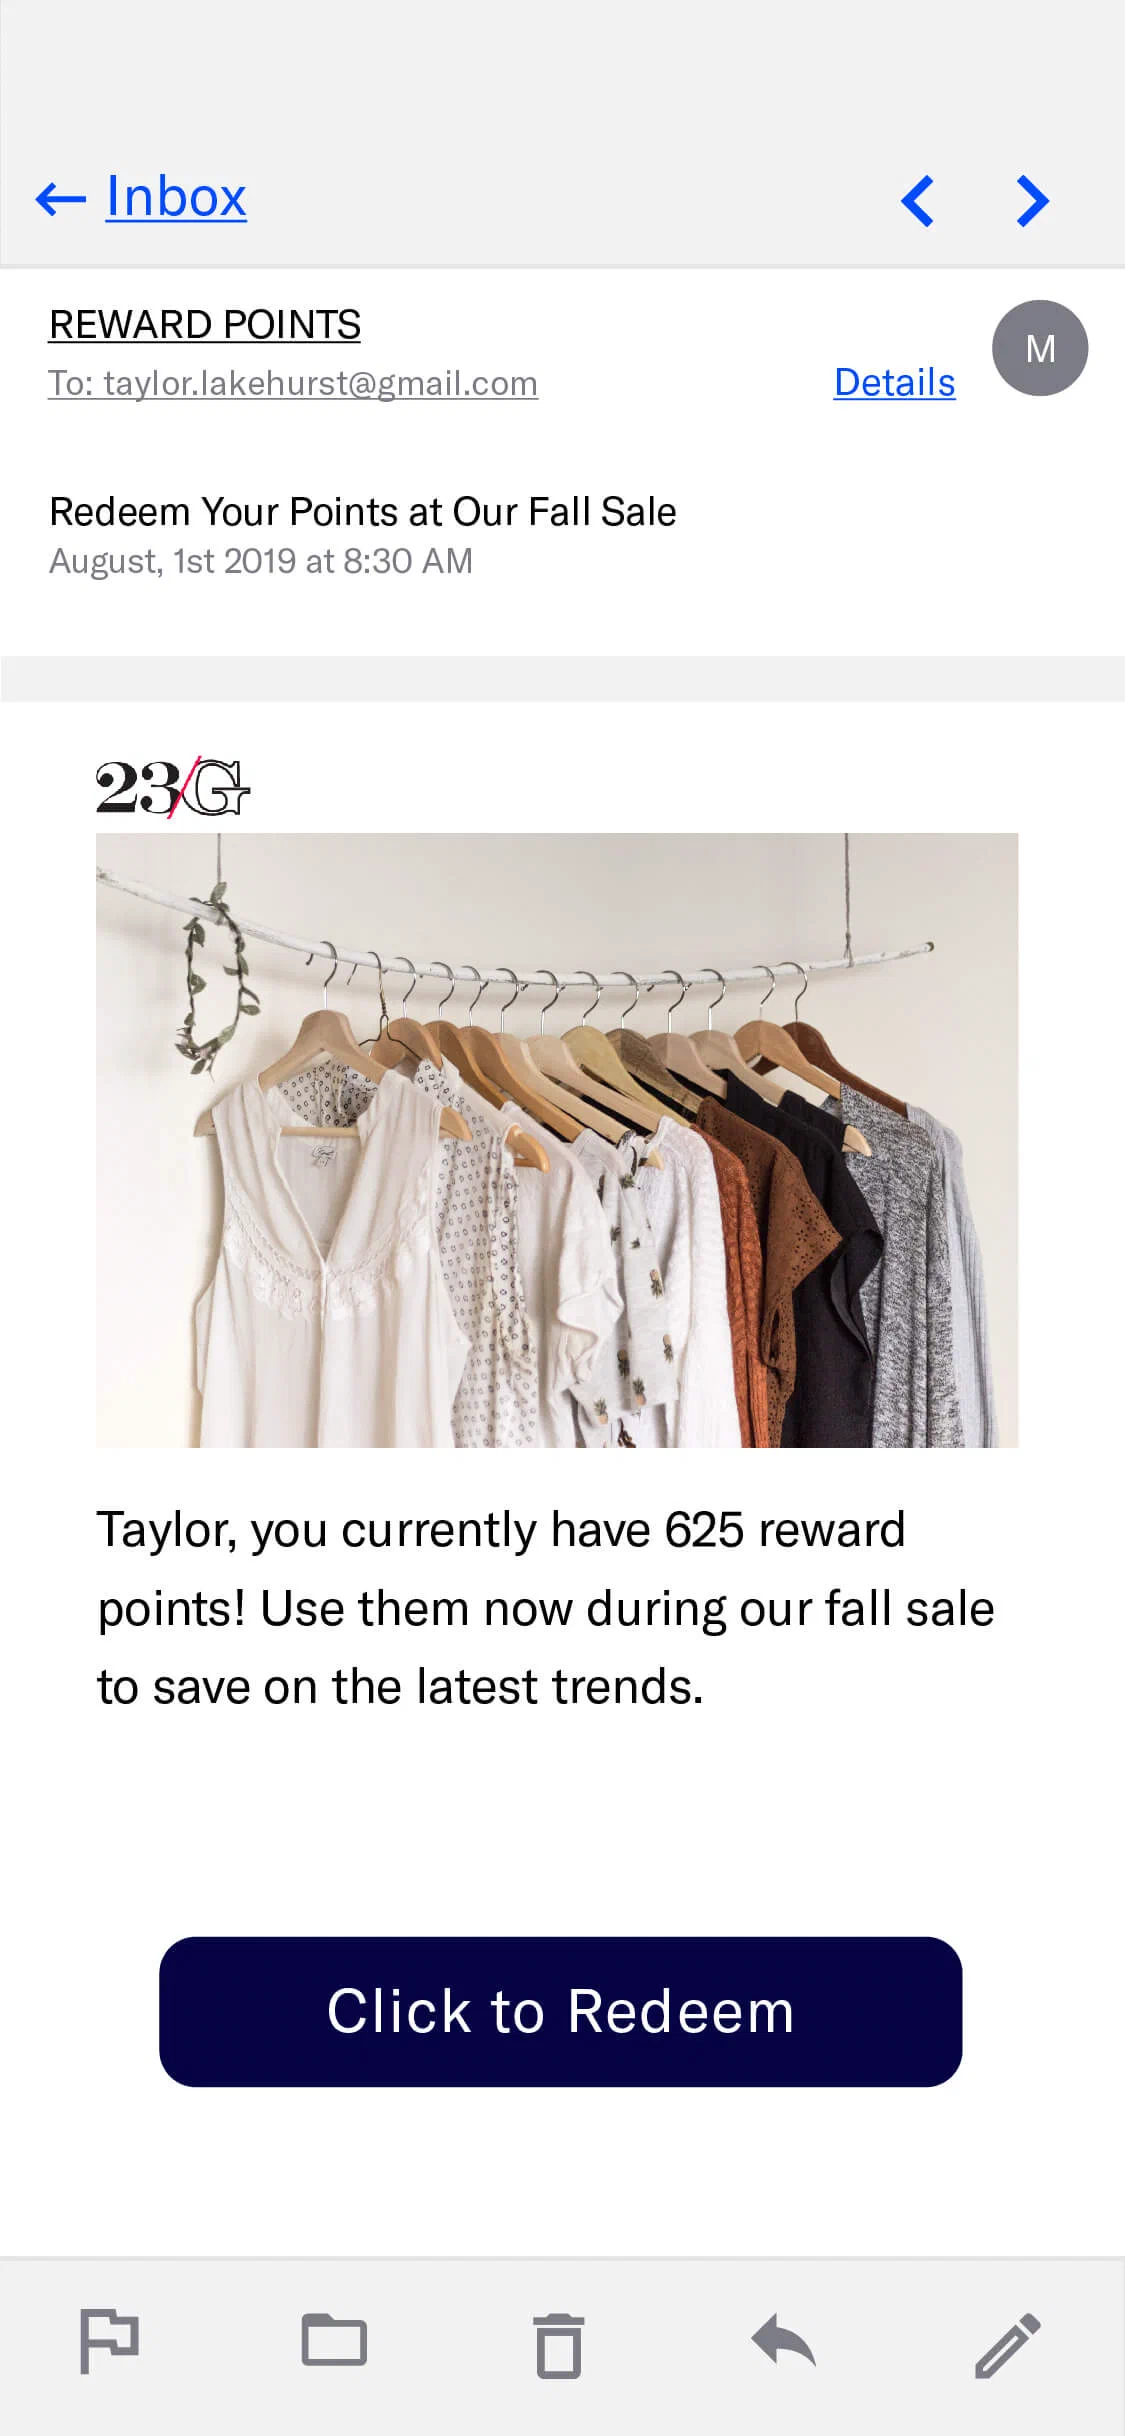
*Email in a mobile device inbox*
Email appears in the recipient's inbox and is displayed upon opening the message. Email is [Persistent](https://www.airship.com/docs/reference/glossary/#persistent), remaining viewable until deleted by the user.
Components of an email:
* **Subject** — [Preheader text](#preheader-text) is optional.
* **Message body** — HTML is optional, plain text is required. Users who cannot receive HTML emails will receive the plain text version. See also: [Media guidelines](https://www.airship.com/docs/reference/messages/media-guidelines/).
An **unsubscribe link** is required within the message body for commercial email. You can also provide unsubscribe links for messages sent to [Subscription Lists](https://www.airship.com/docs/reference/glossary/#subscription_list). See: [Email unsubscribe links](https://www.airship.com/docs/guides/messaging/messages/content/email/email-unsubscribe-links/).
For the HTML body, you can either provide your own HTML or design using drag-and-drop in the [Interactive Editor](https://www.airship.com/docs/guides/messaging/editors/interactive/about/). The drag-and-drop option produces HTML that is compatible with any email client that accepts HTML emails, making sure that your audience sees the best version of your message.
As new versions of Outlook and other clients are released, we make sure your HTML will work with them too. You can choose one of Airship's default layouts to get started or you can design your own. You can also save layouts you design and reuse them for other messages.
### Preheader text
*Preheader text* is a short line of text that displays after or below an email subject line in an inbox. You can also have the text appear in the message body. Preheader text is an easy way to expand on your subject line and improve email open rates. Not all email clients support preheader text. These examples show preheader text following the subject "Undock is Launching":

*Preheader text in browser inbox*
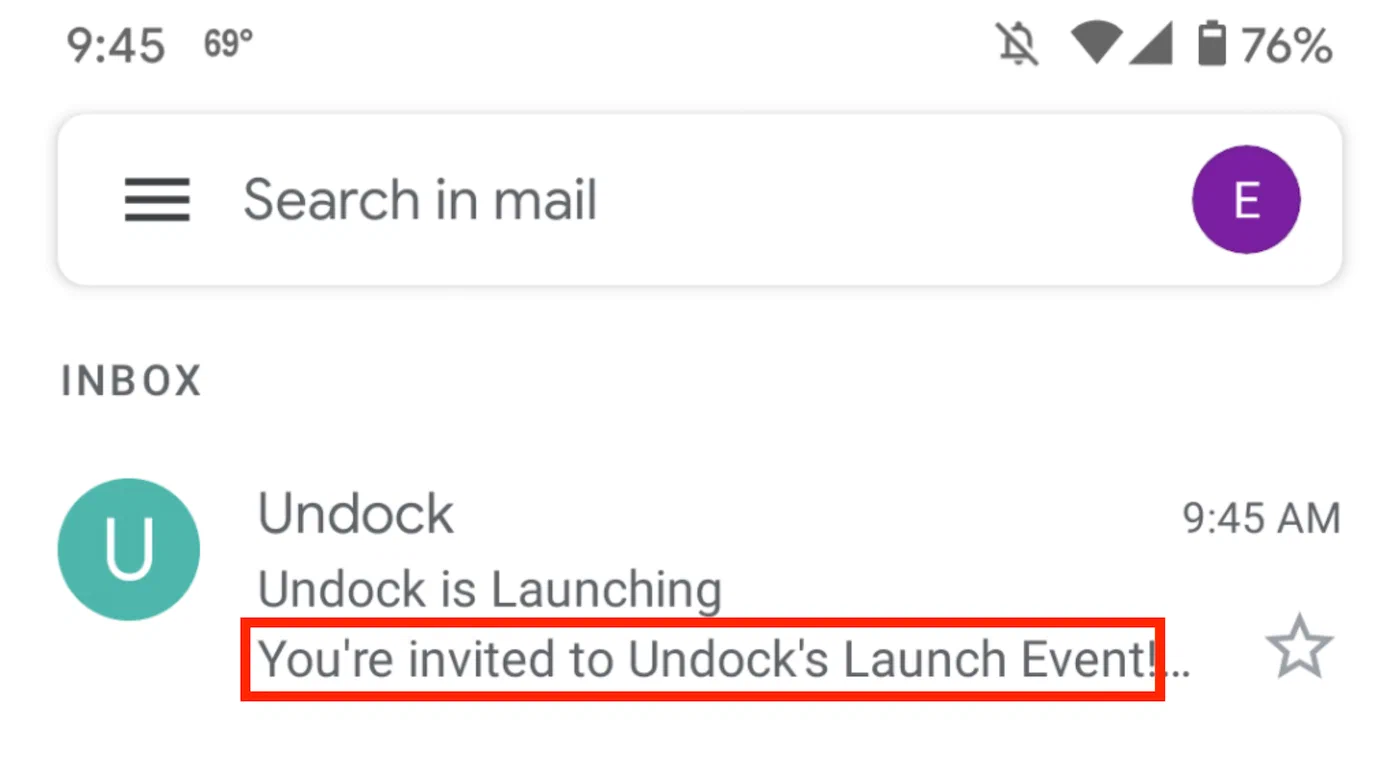
*Preheader text in mobile inbox*
### Disabling click tracking
When creating a message, you can set click tracking behavior in its sender information. When tracking is enabled, you can override the setting and disable tracking for message specific links and actions.
See [Disabling click tracking for specific links
](https://www.airship.com/docs/guides/messaging/messages/content/email/email/#disabling-click-tracking-for-specific-links) in *Email content*.
## Plain text generation
When editing your HTML content in the dashboard, Airship prompts you to automatically generate a plain text version when you save your changes. Your HTML content, including links, is converted and populated into the **Plain text body** field. You can then edit the plain text version as needed. The prompt appears when saving pasted or uploaded HTML and when saving changes to layouts in the Interactive editor.
Having a complete plain text body for your email helps support the following:
- **Better deliverability** — Email providers favor messages with both HTML and plain text versions.
- **Accessibility** — Users with visual impairments benefit from plain text content that is easily consumable by assistive technologies such as screen readers.
- **Fallback support** — Email clients unable to render HTML default to displaying the plain text version.
The auto-generated plain text maintains the structure and links from your HTML content, which you can then review and customize as needed.
## Inbox previews
Before sending your message, you can preview what it will look like in various email clients. After adding the HTML body in a message or template, you can select **Inbox preview** and choose from a list of browser, desktop, and mobile clients. 90+ different client and device combinations are supported.
Inbox previews must be enabled for your account. Contact your Airship account manager if they do not appear for your projects.
See [Inbox previews](https://www.airship.com/docs/guides/messaging/messages/content/email/email/#inbox-previews) in *Email content*.
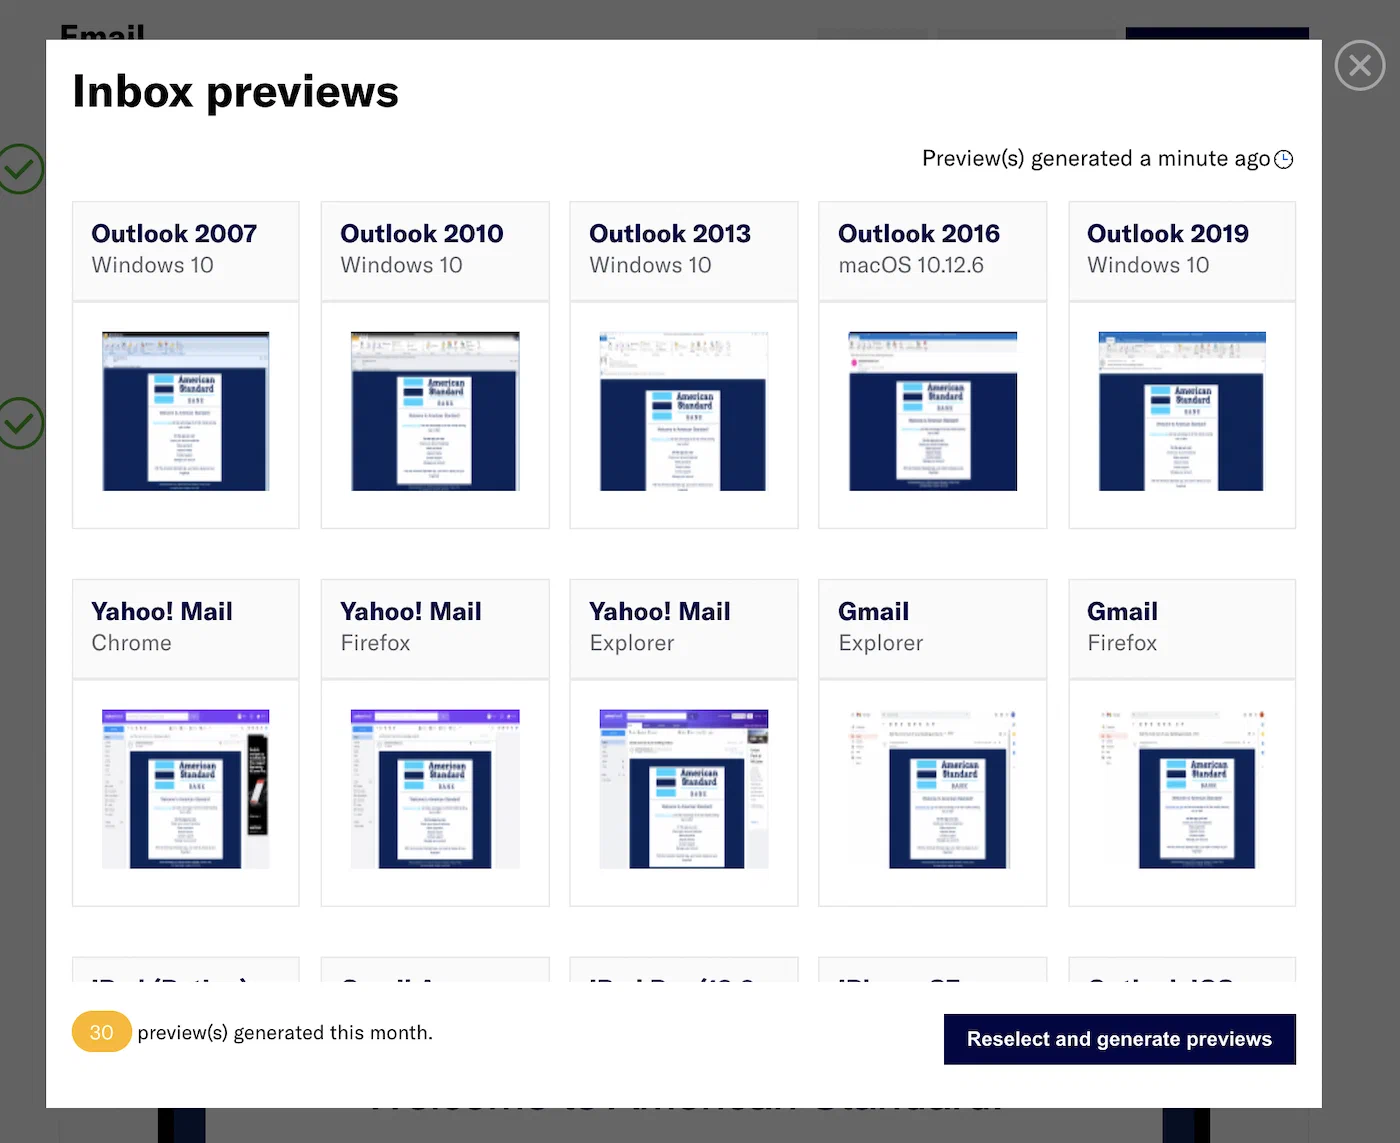
*Email inbox previews*
## Link names
Name your email links to better understand their performance. When users follow links in an email, the URLs and related metrics appear in the Performance section of a message report. Link names also appear in [Real-Time Data Streaming](https://www.airship.com/docs/reference/glossary/#rtds).
Use cases:
* **Differentiation** — In an email containing three links with identical URLs for a login page, you could differentiate them by specifying their location within the message by using link names "Login header," "Login body", and "Login footer".
* **Grouping** — In an email with multiple links in different languages that all go to the same localized home page, you could use link names "English (US)" and "English (Germany)" for URLs `https://www.example.com/en_us/home` and `https://www.example.com/en_de/home`. But if you wanted to see a total count for all links to the homepage, you could use the same "Homepage" link name for all the links instead of naming them for each locale.
* **Segmentation** — Create a [Segment](https://www.airship.com/docs/reference/glossary/#segment) of users who followed links by specifying the link name for the `email_click` event. Link names are easier to work with than dynamic or localized URLs when building Segments for retargeting users.
See [Link names](https://www.airship.com/docs/guides/messaging/messages/content/email/email/#link-names) in *Email content*.
## URL parameters
URL parameters are variables you can automatically append to all link URLs in emails. They function as tags for tracking campaign performance, both on the web and in an app. You can use platforms like Google Analytics to track user behavior after they've followed a link. Add your own custom parameters and/or supply values for [UTM parameters](https://en.wikipedia.org/wiki/UTM_parameters) defined in Airship.
See [URL parameters](https://www.airship.com/docs/guides/messaging/messages/content/email/email/#url-parameters) in *Email content*.
## HTML minification
Reducing message size can help with deliverability and avoiding message truncation by email clients. When using the the drag-and-drop option in the Interactive editor for an email HTML body, you can reduce the overall size of your content by up to 25% by compressing code spacing and removing unused class names and CSS styles. You must request enabling this feature for your projects.
For details, see [Size limit and HTML minification
](https://www.airship.com/docs/guides/messaging/messages/content/email/email/#size-limit-and-html-minification) in *Email content*.
## Blind carbon copies (BCC)
Contact your Airship account manager to enable blind copy (BCC) capabilities for your emails. Because emails can contain personal information about your audience, you must register the addresses that you want to use for blind copies with Airship.
## Unsubscribe events
Airship reflects [unsubscribe events in the Real-Time Data Stream](https://www.airship.com/docs/developer/rest-api/connect/schemas/email-compliance-events/#unsubscribe). When users unsubscribe, Airship also assigns them `commercial_opted_out` or `transactional_opted_out` values based on the type of email they unsubscribed from.
## Preference Centers
A *Preference Center* is a page where users can manage their opt-in statuses for the Subscription Lists in your project. Preference Centers are presented within your app or website or as an Airship-hosted web page.
Design a web page in the Airship dashboard and select a Preference Center to appear on the page. After saving, you can copy the web page link and include it in your email to a [Subscription List](https://www.airship.com/docs/reference/glossary/#subscription_list). No development work is required.
See [About Preference Centers](https://www.airship.com/docs/guides/messaging/features/preference-centers/).
## Getting started with Email
Follow these steps to start using Email with Airship:
* ⚙ **Add the Email channel to your project** → Contact Airship Sales to provision your project for Email.
* link **Register users** → See [Getting Started](https://www.airship.com/docs/developer/api-integrations/email/getting-started/) for Email integration in our developer documentation.
Once your project is set up, you can start creating envelope [Email content](https://www.airship.com/docs/guides/messaging/messages/content/email/email/).
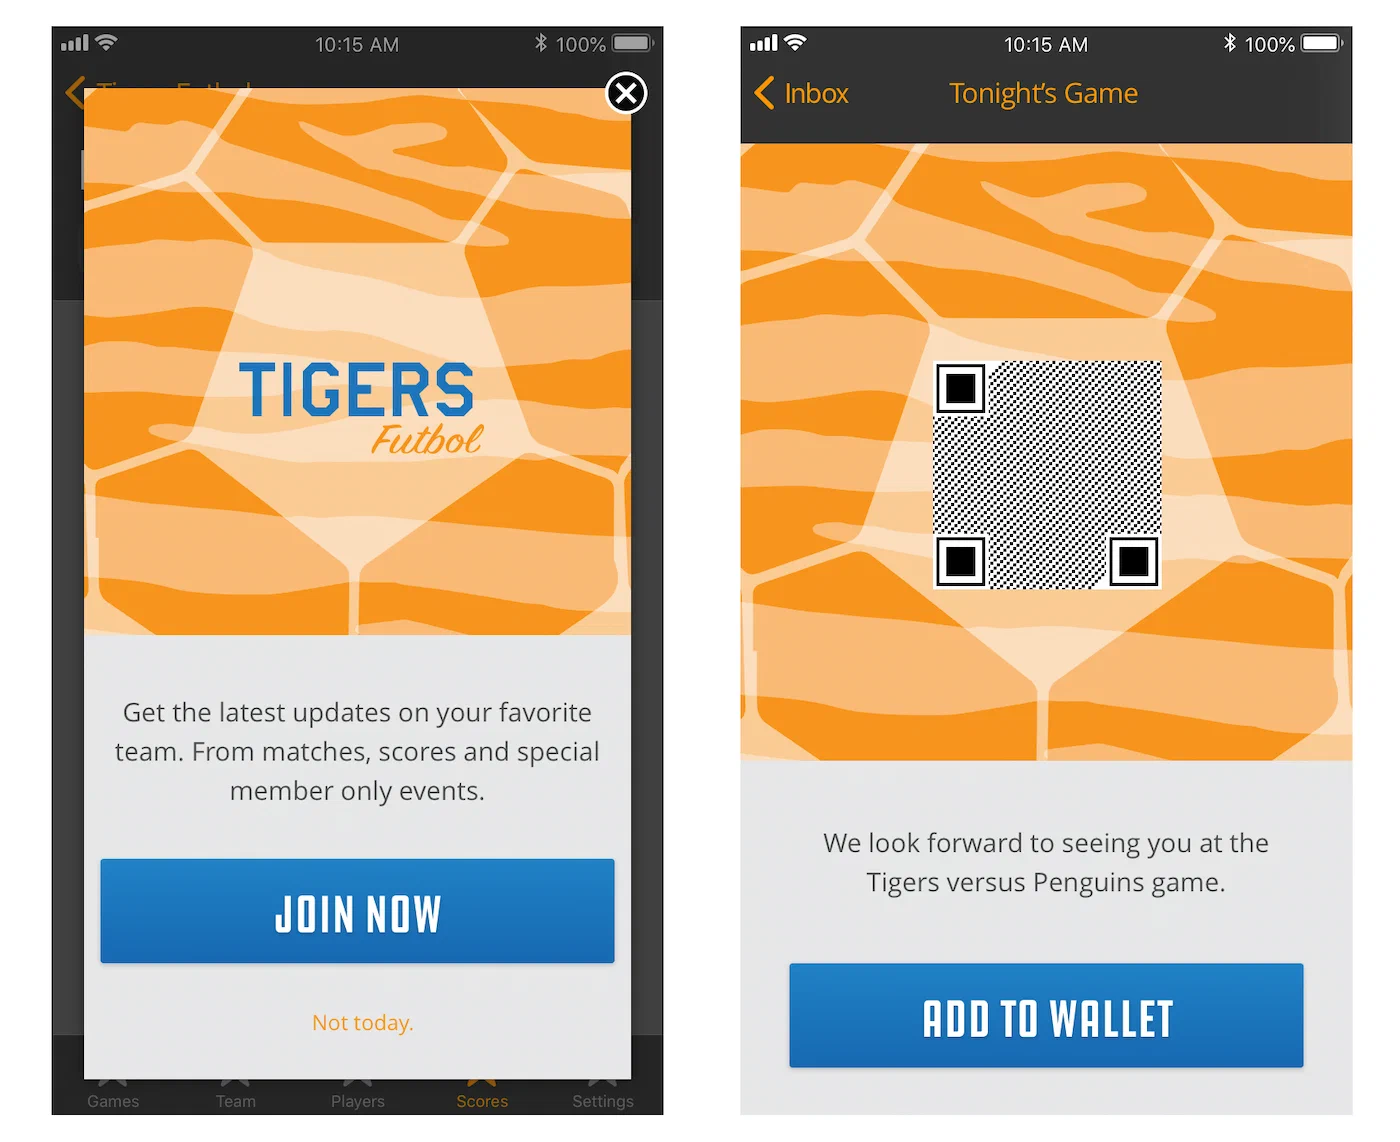
# In-App Automation
> Trigger messages automatically when users meet specific conditions or perform certain actions.
## About In-App Automation
In-app messages appear regardless of a user's opt-in/out status for notifications. In-App Automation refers to messages cached on users' devices and displayed when users meet certain conditions within your app, such as viewing a particular screen or opening the app a certain number of times. While standard in-app messages appear as banners, in-app automation messages have various style and layout options.
In-app automation is designed to be highly contextual and displayed immediately in response to user behaviors, e.g., the user opens the app a specific number of times, views a specific screen, adds an item to their cart, makes a purchase, or views a video. Respond to user behaviors instantly with customizable messages, giving you precise control of the user experience. Benefits include:
* **Real-time display** — In-app automation uses our on-device automation framework, which means they can respond to a series of events in real time (e.g., multiple game level changes, a sequence of screens, additions to a shopping cart) without round-trips to a server.
* **Dashboard management** — Control all aspects of the message, including branding, using the Airship dashboard.
You cannot combine in-app automation with other channels or message types, however you can trigger a [Sequence](https://www.airship.com/docs/reference/glossary/#sequence) when a specific in-app automation displays for a user.
## Use cases
- Welcome messages — Communicate the value of your app and highlight key features.
- Push and location opt-in prompts — Explain the value of your notifications to drive opt-in rates.
- Feature education — Drive adoption of critical/new features that promote retention.
- Onboarding messages — A series of messages educate users about the app over time.
- App reviews — Prompt users to rate your app after positive experiences.
- Registration/login — Drive registrations and logins to your loyalty program or account.
- Profile enhancement — Promote the benefits of a completed profile, and provide a link to the relevant page in your app. Encourage your users to take a second to personalize their experience, and increase engagement and retention.
- App updates — Send your users an in-app message highlighting your app’s newest features, or encourage users on older versions to update the app. If you just added a new page or have some new content, make sure to include a Deep Link so that they can find it quickly.
- Ongoing promotions — If you have a promotion that users can take advantage of at any time — such as a discount for inviting a friend or for taking a survey — an in-app message serves as a convenient reminder.
These use cases are also true for standard in-app messages, however, using in-app automation, you can trigger your message to display based on specific scenarios. For example:
* Display a "Welcome" message **when users first open your app**.
* Display a "Tip" message **when a new feature is added to your app**.
* Ask a user to rate your app **after they have opened it for the 6th time**.
These experiences are typically hard-coded by app developers and cannot be updated without custom development and app store updates. With in-app automation, you create and update these in the Airship dashboard, without custom development.
## Appearance and behavior

*Banner with media and buttons*
Multiple message [styles](#styles) (banner, modal, fullscreen, and custom HTML) are supported, as well as various [layouts](#layouts) for each style.
You will configure the message content based on the requirements for your selected style and layout:
* **Text** — Add text to header, body, and footer fields.
* **Media** — See [In-App Automation](https://www.airship.com/docs/reference/messages/media-guidelines/#in-app-automation) in Media guidelines.
* **Buttons** — Different styles support a different number of buttons, and you must associate an action for each. If more than one button is added, you may choose a button layout: *Separate*, *Joined*, or *Stacked*.
In-App Automation use intelligent caching to balance performance with real-time capabilities. Our SDK downloads and refreshes the entire message list upon next app open. Up to 50 messages can be pre-loaded onto the device at a time. SDK versions prior to iOS SDK 16.6 and Android SDK 16.4 use background push to perform these actions.
In-app automation is not [Persistent](https://www.airship.com/docs/reference/glossary/#persistent), and display **duration** varies by message style:
* Modal and fullscreen messages appear on screen until the user interacts with them, either by clicking one of the main buttons or dismissing the message.
* Banner messages disappear automatically after 15 seconds but will disappear sooner if the user clicks any button or dismisses the message.
### Styles
There are four styles:
[Banner](#style-banner),
[Modal](#style-modal),
[Fullscreen](#style-fullscreen), and [Custom HTML](#custom-html).
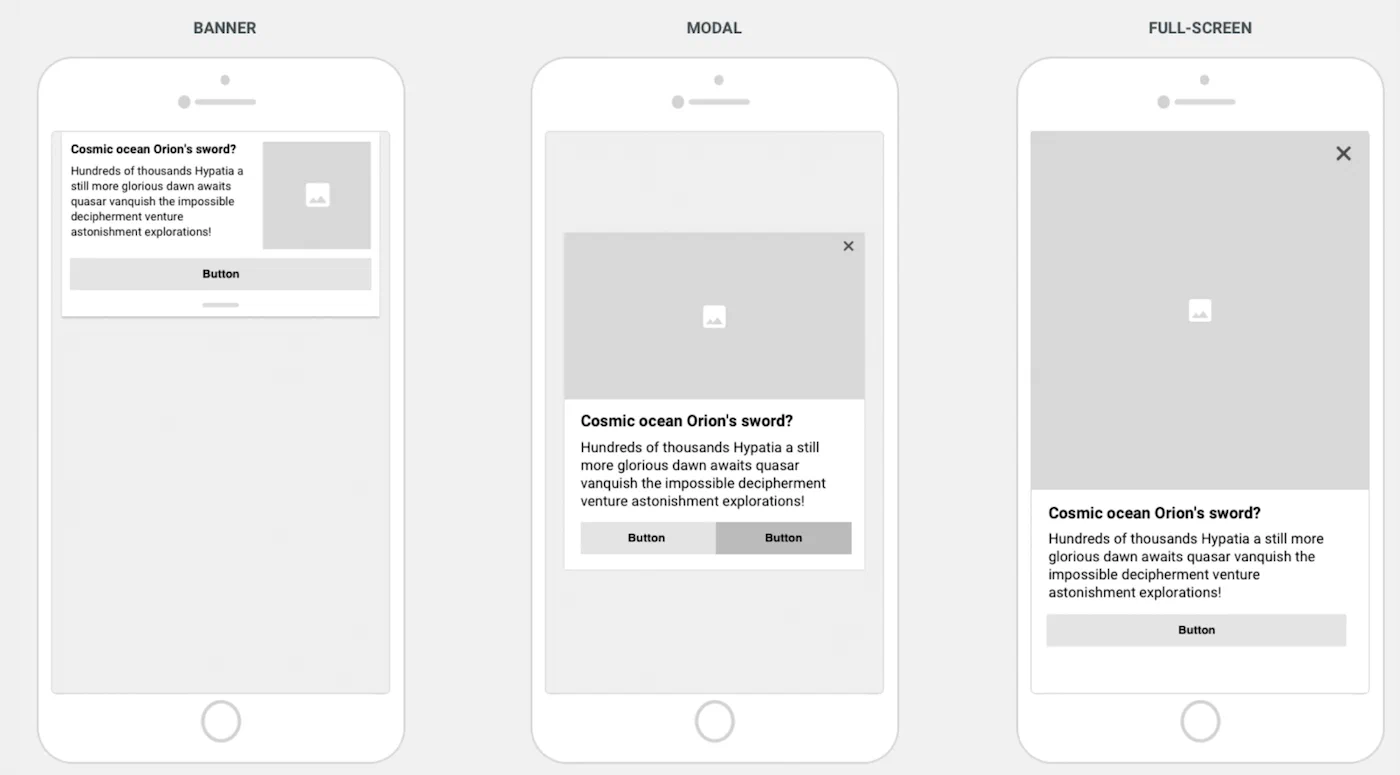
*In-App Automation styles*
#### Banner {#style-banner}
Banner messages appear at the top or bottom of your screen, sliding up from the bottom of the screen, or down from the top. They are designed to be less obtrusive to users than modal or fullscreen messages, by taking only a portion
of the screen and not fully interrupting the user from their current task. Example uses include informational messages, news alerts, or promotions that do not deserve a full user interruption.
Banner message elements:
* **Header** — An optional headline for the message. Bolded by default to stand out from the message text.
* **Image** — A small thumbnail image that appears on the right or left side of the message.
* **Text** — The main text of the message.
* **Buttons** — Display up to two buttons, allowing a user to respond to the message.
* **Dismiss** — Ability to dismiss the message by swiping it back in the direction it came from.
#### Modal {#style-modal}
A modal message takes over the user’s screen, compelling the user to interact with it. Modals are typically used to prompt users to reply to a question or make a quick decision. The message window is smaller than the full width of the screen, superimposed on the app with a translucent background, assuring the user that the interruption is temporary.
Modal message elements:
* **Header** — An optional headline for the message. Bolded by default to stand out from the message text.
* **Image** — A large image embedded in the message.
* **Text** — The main text of the message.
* **Buttons** — Display up to two buttons, allowing a user to respond to the message.
* **Dismiss** — Ability to dismiss the message by clicking the X button.
> **Tip:** You can make a modal message display as fullscreen on small screen devices. Use this setting if you want your message to take over the entire screen on a phone but display as a modal on a tablet. See *Display fullscreen on small screen devices* in the [default design settings](https://www.airship.com/docs/guides/messaging/in-app-experiences/configuration/defaults/#setting-in-app-automation-defaults).
#### Fullscreen {#style-fullscreen}
Fullscreen messages are similar to [modal](#style-modal) messages but take over the entire screen, providing more real estate for your message.
Fullscreen message elements:
* **Header** — An optional headline for the message. Bolded by default to stand out from the message text.
* **Image** — A large image embedded in the message.
* **Video** — Can be displayed instead of an image.
* **Text** — The main text of the message.
* **Buttons** — Display up to five buttons, allowing a user to respond to your message.
* **Dismiss** — Ability to dismiss the message by clicking the X button.
* **Footer** — A text link to content, e.g., Terms & Conditions, relevant to the message.
#### Custom HTML {#custom-html}
Custom HTML messages have the same appearance as [modal](#style-modal) messages and also have the
same message elements. The appearance of custom HTML messages is determined by your provided code.
General guidelines:
* Set your layout, content text, media, buttons, and any actions you want to trigger.
* Since much of the message's content and behavior are defined in your HTML, the settings and options available in the composer are reduced to only those applicable to the custom HTML message style.
* Any images, CSS, and applicable scripts referenced in your HTML should be made available via a CDN or publicly available repository. You cannot upload additional files using the composer.
> **Tip:** You can make a custom HTML message display as fullscreen on small screen devices. Use this setting if you want your message to take over the entire screen on a phone but display as a modal on a tablet. See *Display fullscreen on small screen devices* in [In-App Experience Defaults](https://www.airship.com/docs/guides/messaging/in-app-experiences/configuration/defaults/#setting-in-app-automation-defaults).
### Layouts
Available layouts per style:
* **Banner** — Left or right image orientation, or a text-only banner.
* **Modal** — Media at the top, middle, or bottom of the message, or text-only.
* **Fullscreen** — Media at the top, middle, or bottom of the message, or text-only option
### Optional features
In addition to configuring when the message will display and its appearance and content, you can set optional features:
* **Priority** — Because multiple messages can become eligible for display at the same time, you can assign a priority value to each one. If no priority is assigned, by default, the most recently updated message will appear first. Priority is shared across in-app automation and [Scenes](https://www.airship.com/docs/reference/glossary/#scene).
* **Repeat** — To prevent over-messaging, our SDK waits 30 seconds after one message is closed before displaying the next eligible message. This delay value can be updated through native code. You may also control the number of times an individual message is displayed and the minimum waiting period before it is eligible for redisplay. Redisplaying your message is useful because users can dismiss or ignore messages.
* **Start and end dates** — Set the dates and times during which your message can be displayed. Specifying a window of time is useful for messages that are time-bound or tied to scheduled events.
* **Missed behavior** — Override the project-level setting for how the message is handled when audience conditions are not fully met.
* **Ignore** [Message Limits](https://www.airship.com/docs/reference/glossary/#message_limits) — Override the project-level limit for a single message.
* **Campaign categories** — Group messages of a similar type or messaging strategy for aggregate reporting.
## Default settings
You can set appearance and behavior defaults for in-app automation, including [Color Sets](https://www.airship.com/docs/reference/glossary/#color_set) and custom fonts. You can override the defaults in the Design step of the In-App Automation composer. See: [In-App Experience Defaults](https://www.airship.com/docs/guides/messaging/in-app-experiences/configuration/defaults/).
## Getting started with In-App Automation
Follow these steps to start using In-App Automation with Airship:
* ⚙ **Configure mobile channels in your project settings** → See [Configuring Mobile Channels](https://www.airship.com/docs/guides/getting-started/developers/configure-channels/) in the Getting Started guide.
* link **Integrate the Mobile SDK with your app** → See [SDK setup](https://www.airship.com/docs/sdk-topics/setup/) for mobile apps in our developer documentation.
Once your project is set up, you can start creating megaphone-simple [In-App Automations](https://www.airship.com/docs/guides/messaging/in-app-experiences/in-app-automation/create/). Make sure to also set a default for Missed Behavior. See [Setting behavioral defaults](https://www.airship.com/docs/guides/messaging/project/enable-features/#setting-behavioral-defaults) in *Enable dashboard features and set behavioral defaults*.
# In-App Messages
> Send banner-style in-app messages to your App channel, including users who haven't opted in to push.
## About in-app messages
You can send in-app messages to your entire app audience, not just users who have opted in to push notifications. Use in-app messages to:
* Engage with users as they browse your app
* Reach users opted out of push notifications or may not have seen your push notification
* Reach users who saw your notification but opened the app without interacting with it
**Use cases:**
- Welcome messages — Communicate the value of your app and highlight key features.
- Push and location opt-in prompts — Explain the value of your notifications to drive opt-in rates.
- Feature education — Drive adoption of critical/new features that promote retention.
- Onboarding messages — A series of messages educate users about the app over time.
- App reviews — Prompt users to rate your app after positive experiences.
- Registration/login — Drive registrations and logins to your loyalty program or account.
- Profile enhancement — Promote the benefits of a completed profile, and provide a link to the relevant page in your app. Encourage your users to take a second to personalize their experience, and increase engagement and retention.
- App updates — Send your users an in-app message highlighting your app’s newest features, or encourage users on older versions to update the app. If you just added a new page or have some new content, make sure to include a Deep Link so that they can find it quickly.
- Ongoing promotions — If you have a promotion that users can take advantage of at any time — such as a discount for inviting a friend or for taking a survey — an in-app message serves as a convenient reminder.
You can combine an in-app message with a [Push Notification](https://www.airship.com/docs/reference/glossary/#push_notification) and/or [Message Center](https://www.airship.com/docs/reference/glossary/#message_center) message.
**Combined messaging example:**
Many media companies send breaking news push notifications with a deep link to the story within their app; when a user taps the notification, they’re taken directly to the story. For users that don’t tap notifications directly and instead open the app later, that news story may be difficult to find. An in-app message that appears the next time a user opens the app provides a second opportunity to link them directly to the story, and a much more streamlined experience.
## Appearance and behavior
In-app messages are in banner format. Every in-app message requires text, and you can also add one or two buttons.
* **Animation** — In-app messages animate into the user's screen. Depending on your project's design defaults or [API request specifications](https://www.airship.com/docs/developer/rest-api/ua/schemas/push/#inappobject), the message will animate in from either the top or bottom of the user's screen.
* **Colors** — Notification colors can be specified in your project's design defaults or the [API](https://www.airship.com/docs/developer/rest-api/ua/schemas/push/#inappobject).
* **Dismissal** — Notification dismissal on iOS and Android is accomplished with a *drawer pull*.
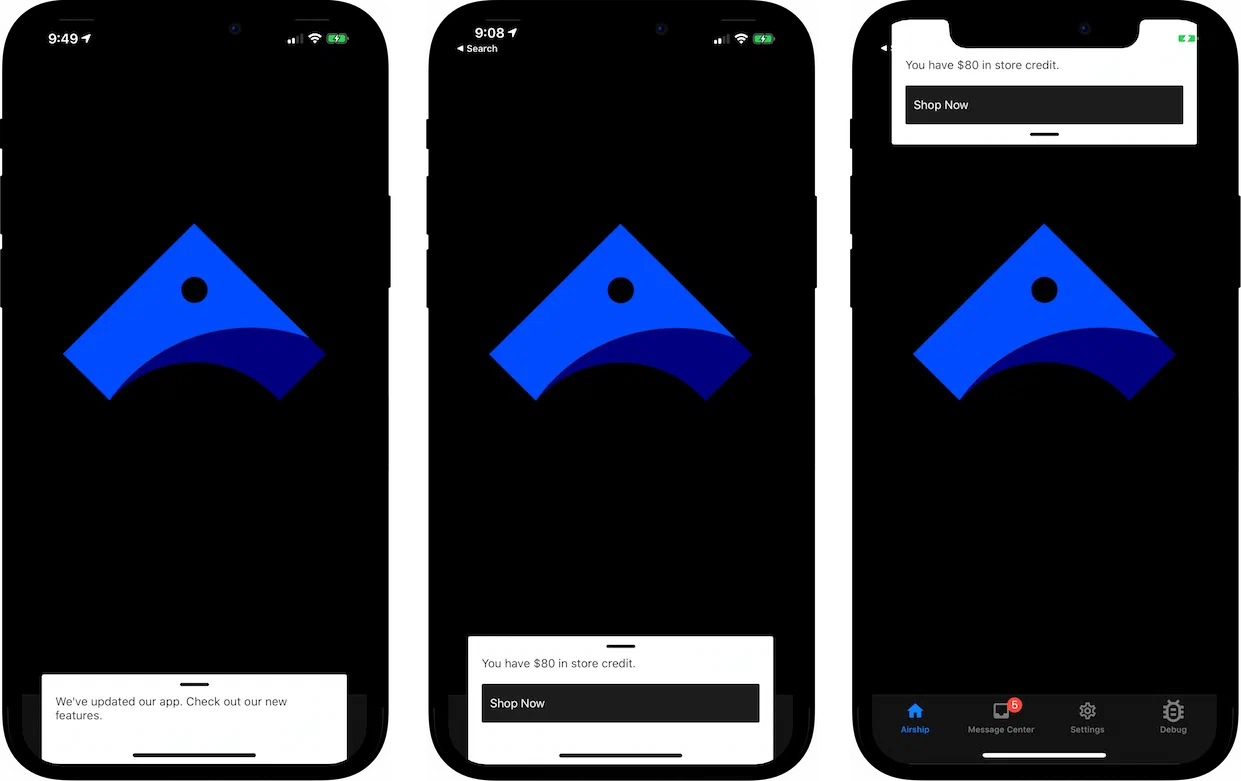
*In-app messages*
By default, an in-app message will display while a user is browsing your app. If a user is not browsing your app while you send an in-app message, the message will be displayed the next time they open the app.
Users will see an in-app message as long as:
* The message is not expired.
* They have not tapped a push notification that was sent in combination with the in-app message.
They behave largely like push notifications, and they can be dismissed as you would dismiss a push notification. However, there are a few key differences regarding display behavior:
* **Duration** — In-app messages are not [Persistent](https://www.airship.com/docs/reference/glossary/#persistent). By default, an in-app message will only appear on a user's screen for 15 seconds before disappearing. You can change this value in the design defaults for the in-app messages in your project. When sending in-app messages via the API, you can override this value with the `duration` key.
* **Sending Multiple Messages** — An app will only store a single in-app message at a time. If a valid message is waiting to be displayed in a user's app and a you send another in-app message, the new message takes the place of the prior one. Moreover, there is no way to specify an in-app message's priority. The latest message will always replace the previous one.
## Getting started with in-app messages
Follow these steps to start using in-app messages with Airship:
* ⚙ **Configure mobile channels in your project settings** → See [Configuring Mobile Channels](https://www.airship.com/docs/guides/getting-started/developers/configure-channels/) in the Getting Started guide.
* link **Integrate the Mobile SDK with your app** → See [SDK setup](https://www.airship.com/docs/sdk-topics/setup/) for mobile apps in our developer documentation.
Once your project is set up, you can start creating megaphone-simple [In-app message content](https://www.airship.com/docs/guides/messaging/messages/content/app/in-app-messages/).
# SMS/MMS/RCS
> SMS, MMS, and RCS messages reach customers directly on their phones, even without an app, for immediate engagement and time-sensitive communications.
## About SMS
You send SMS messages to an MSISDN (phone number) over the [SMMP protocol](https://en.wikipedia.org/wiki/Short_Message_Peer-to-Peer) to devices that have opted in for a specific [Sender ID](https://www.airship.com/docs/reference/glossary/#sender_id). SMS messages help you reach a wide audience quickly, without an app or development work.
SMS messages are text-based. MMS (multi-media messaging service) is an extension of SMS, and MMS messages are image-based. MMS messages can include fallback text, ensuring that users who can't view the original MMS message still receive a message that makes sense. Generally speaking, "SMS" is inclusive of MMS. Benefits include:
* **Immediacy** — Send time-sensitive notifications.
* **Reach** — Contact customers who don’t have your app, or re-engage customers who are inactive on other channels or at-risk.
* **Personalization** — Send transactional messages triggered by a backend system, e.g., order confirmation and shipment tracking updates.
* **[Mobile wallet](https://www.airship.com/docs/guides/wallet/getting-started/wallet/) integration** — Deliver personalized passes, tickets, coupons, and more.
* **Integrated platform** — Centralize all your engagement channels; manage personalization, scheduling, and deployment for all message types; and measure SMS alongside all your other channels, all in the Airship platform.
* **No app required** — If you do have an app, however, SMS notifications are an additional channel
that you can use to engage your audience. You can decide which channel (app, SMS, etc.) is more important for different types of messaging, adjust your messaging for different channels, set priority per channel, and much
more. See [Channel Coordination](https://www.airship.com/docs/reference/glossary/#channel_coordination) for details about priority channel and other cross-channel engagement strategies.
You can create SMS keywords in the dashboard. See [SMS keywords](https://www.airship.com/docs/guides/messaging/features/sms-keywords/).
### Use cases
**Sports Events**
* **Before the event** — Last-minute ticket offers, seat upgrades, parking coupons
* **During the event** — Coupons, promotions of venue facilities, promotion of sponsor experiences to increase partner activations
* **Mobile wallet pass delivery** — Coupons, tickets
**Retail**
* **Campaigns** — Location-aware promotions, promotions to drive in-store traffic, lifecycle marketing
* **Transactional** — Offer confirmations, order status updates
* **Mobile wallet pass delivery** — Loyalty card updates, coupons
**Airlines**
* **Day-of-travel** — Flight reminders, promotions, loyalty benefits
* **Mobile wallet pass delivery** — Boarding passes, loyalty card updates, coupons
**Media**
* **Campaigns** — Re-engage inactive or at-risk readers
* **News** — Preferred new categories
## Appearance and behavior
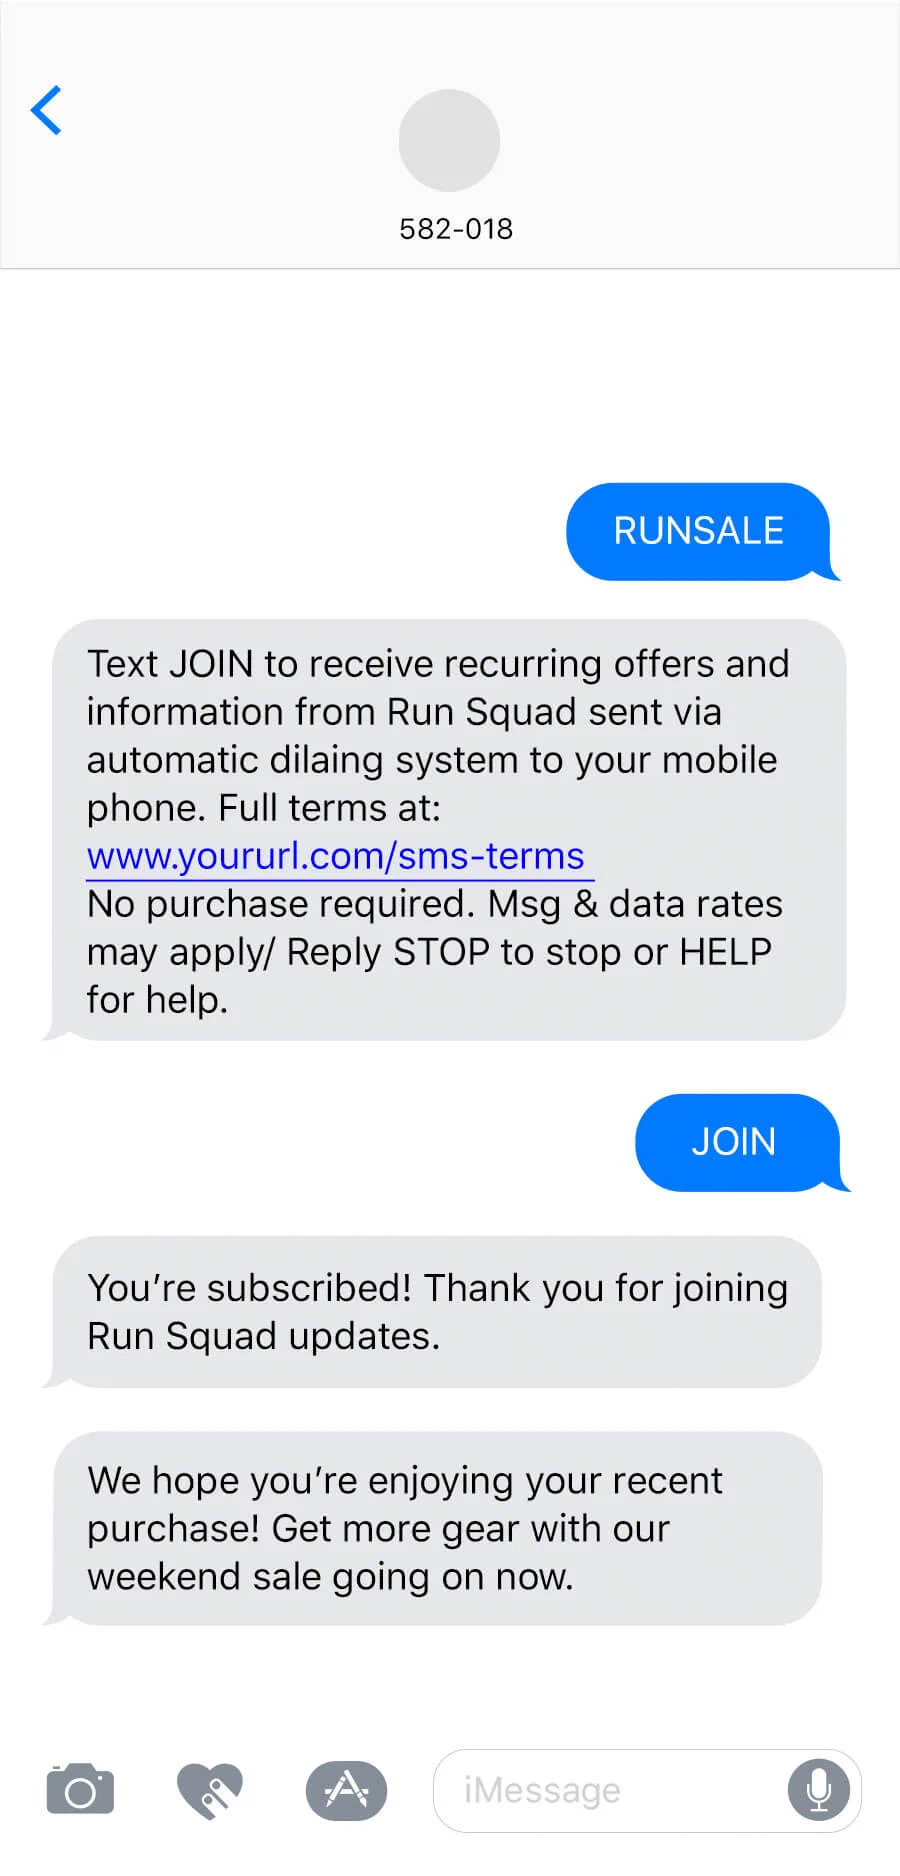
*SMS*
SMS and MMS messages appear in the recipient device's native SMS client. They are [Persistent](https://www.airship.com/docs/reference/glossary/#persistent), remaining viewable until deleted by the user.
**SMS** messages require text, with a limit of 160 characters:
* An SMS message over 160 characters appears to the user as successive messages.
* If emojis and/or multibit characters are included, the message will be split into an additional message after 70 characters.
We will ensure the delivery of split messages, and most modern phones will concatenate the messages for the recipient, displaying them as a single message as opposed to delivering message 1 of 2 and message 2 of 2 separately. The number of actual SMS message sends will be billed even though the receiving device may display a fewer number of messages.
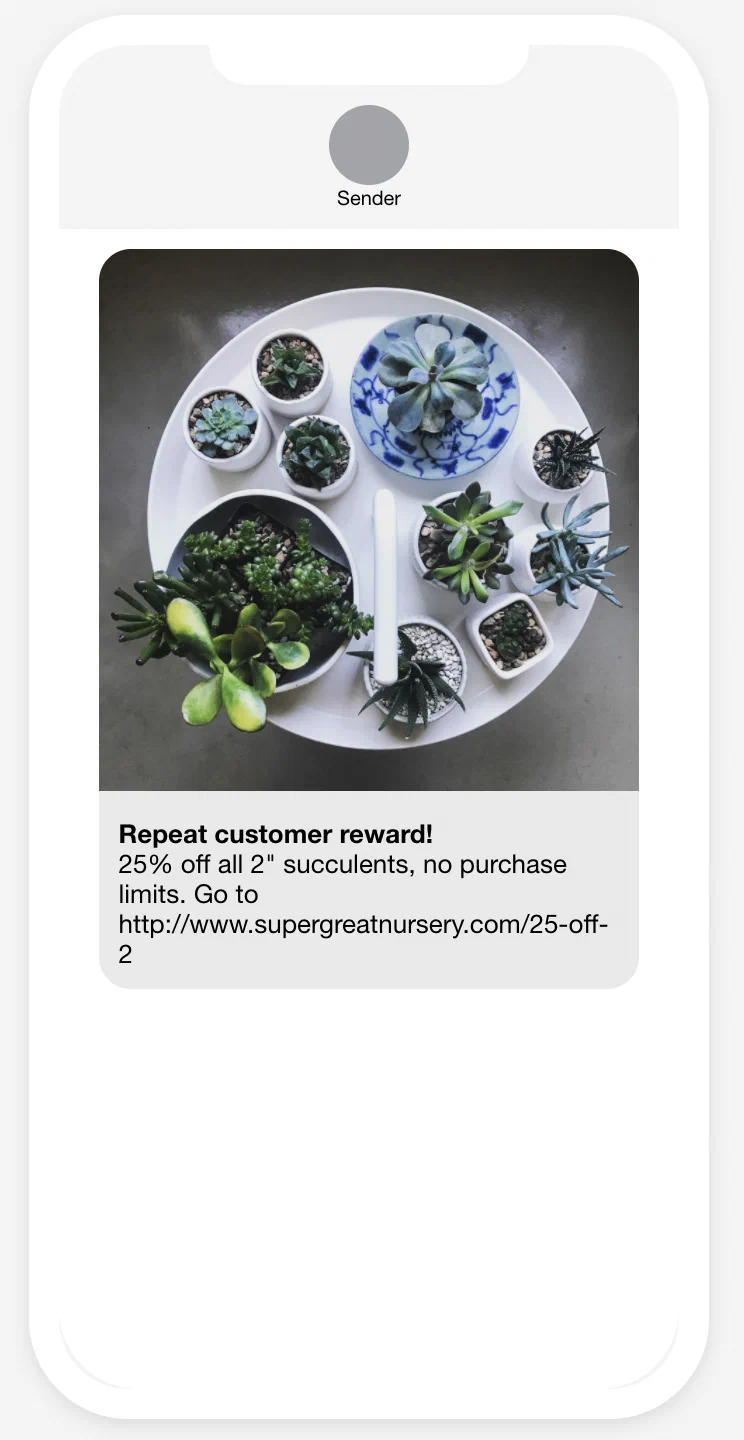
*MMS with subject and text*
**MMS** messages require an image or [vCard](https://en.wikipedia.org/wiki/VCard). See [Media guidelines](https://www.airship.com/docs/reference/messages/media-guidelines/).
Content options for MMS:
* **Subject** — A heading that appears in bold. Subject might not appear if you are sending from a toll-free number. 80 character maximum.
* **Text message** — Text that accompanies the image. 5,000 character maximum.
* **SMS fallback text** — Users who cannot receive your MMS message will receive an SMS message with this text along with the image URL. 160 character maximum.
Link shortening and tag actions are supported for both text options in MMS.
> **Important:** While MMS messages can include a subject and text, there is no guarantee as to the order in which text and the media in the message appear to the user. Media and text are sent separately.
### RCS branded sender
Use an RCS branded sender to enable richer, branded delivery with read events where available. Your message automatically falls back to SMS/MMS when RCS is not supported. See [RCS branded senders](https://www.airship.com/docs/developer/api-integrations/sms/rcs/) for more information.
## Link shortening
*Link shortening* converts HTTP/HTTPS URLs in your SMS messages to unique, shortened URLs for your recipients. The shortened URLs reduce the total number of characters that links consume and produce click tracking metrics, helping you determine how effective your SMS messages are in driving traffic to your links.
### Tag actions
You can add or remove tags from users who engage with Airship-shortened links in your SMS messages. Shortened links with tag actions are the same length as URLs without. You can also use tag change events to kick off automation rules or sequences, making it easier to integrate SMS messaging campaigns into your larger messaging strategy.
Tag actions add query parameters to your URL, but users will still see the shortened URL in your SMS messages.
### Custom domains for short links
Take advantage of your highly-recognizable brand and increase conversions while saving characters in SMS messages using Airship-shortened links with a custom domain. See [Custom domains for short links](https://www.airship.com/docs/developer/api-integrations/sms/custom-short-link/) in our developer documentation.
## Getting started with SMS
Follow these steps to start using SMS with Airship:
* ⚙ **Add the SMS channel to your project** → Contact Airship Sales to provision your project for SMS messages.
* link **Register users and set up keywords** → See [Getting Started](https://www.airship.com/docs/developer/api-integrations/sms/getting-started/) for SMS integration in our developer documentation.
Once your project is set up, you can start creating chat-text [SMS/MMS/RCS content](https://www.airship.com/docs/guides/messaging/messages/content/sms/).
# Open channels
> Open channels extend Airship messaging to devices and apps that aren't natively supported.
## About Open channels
An open channel is essentially any internet-connected medium that can accept and interpret a JSON payload.
The simplest use case for a notification is the one we are all familiar with: displaying
the text of an alert. But there are many other uses for a notification payload, which,
depending on the target interface or OS, may be handled in different ways. For example,
our SDKs for iOS and Android support the interactive features of those operating systems
through our API. Our API also supports an extra field, which lets you to pass any
key/value pair to handle how you see fit, e.g., update a config file or trigger a different
process.
An open channel can be any non-native
platform or interface where you’d like to reach users, or for that matter any client
capable of receiving a payload over the Internet. The end message doesn’t need to be
human-readable alert text as you might see on an iPhone. Alerts are usually intended
for people, but in the case of a machine, you could tell it to update its firmware,
increment a counter in a database, or perform some other action. Use cases include:
- Automated Slack Message using Slack incoming webhooks
- Chatbot notifications
- Firmware updates for IOT devices
- Integrate with third-party messaging APIs, e.g., Twitter
While open channels require some development work on your end, integrating your open channel with Airship extends most of the features of our platform to additional channels, providing you with an additional way to communicate with your audience.
## Appearance and behavior
Open channels are not backed by an Airship SDK, so the developer must determine how to parse and display the notification payloads in the available interface.
Every push notification requires text, and you can also add optional features:
* **Title** — A heading that appears above the notification text where applicable.
* **Media** — See: [Media guidelines](https://www.airship.com/docs/reference/messages/media-guidelines/).
* **Summary** — Supplemental text displayed with the primary notification.
## Getting started with Open channels
Follow these steps to start using Open channels with Airship:
* ⚙ **Configure a webhook for your project** that accepts open delivery payloads, translates them, and routes notifications to your app or open channel device.
* link **Register users** using the Open channels API.
For both, see [Getting Started](https://www.airship.com/docs/developer/api-integrations/open/getting-started/) for Open channels integration in our developer documentation.
Once your project is set up, you can start creating share-network [Open channels content](https://www.airship.com/docs/guides/messaging/messages/content/open/).
# iOS Live Activities and Android Live Updates
> Display real-time, dynamically updated content that refreshes in place instead of sending multiple notifications. Available for iOS and Android devices. {{< badge "axp" >}}
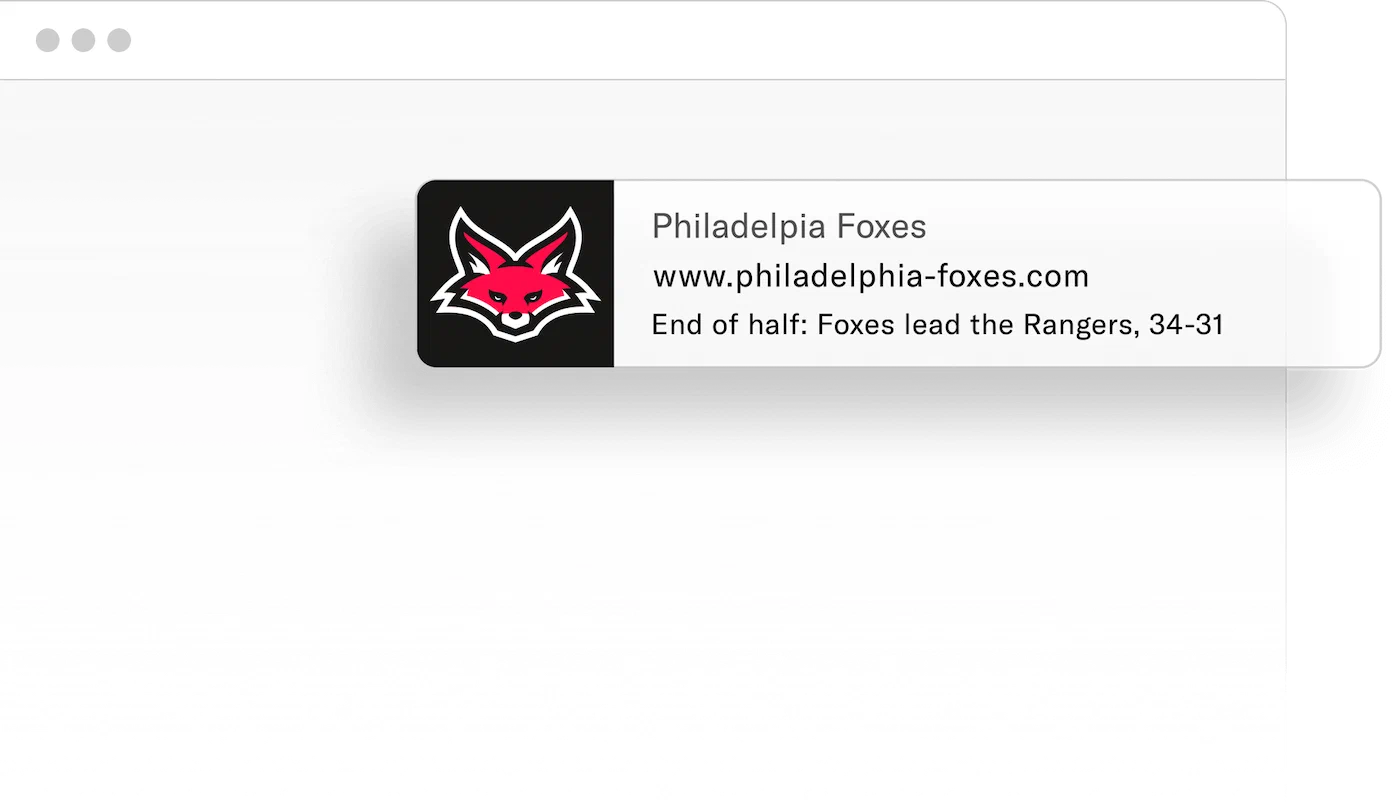
iOS Live Activities and Android Live Updates can make it easier to keep information updated in real time instead of receiving multiple notifications from the same app for things like a game's latest score, food delivery status, or rideshare arrivals.
## iOS Live Activities
A *Live Activity* displays current data from your app on the iPhone Lock Screen and in the Dynamic Island.
Key features:
* **Duration** — Live Activities can be displayed and updated for up to eight hours, until they expire. After expiration, an activity can continue to be displayed for up to four hours before it is automatically dismissed.
* **Multiple activities and apps** — They can be started by an app, and a device can show multiple activities from different apps, the maximum number of which may depend on a range of factors.
* **Updates** — Make changes to your content through API push notifications and/or background tasks in the app. For more timely updates, Airship recommends using push notifications or push notifications in addition to background tasks.
Along with the iOS SDK, Airship supports Live Activities for multiple **frameworks**: React Native, Capacitor, and Flutter.
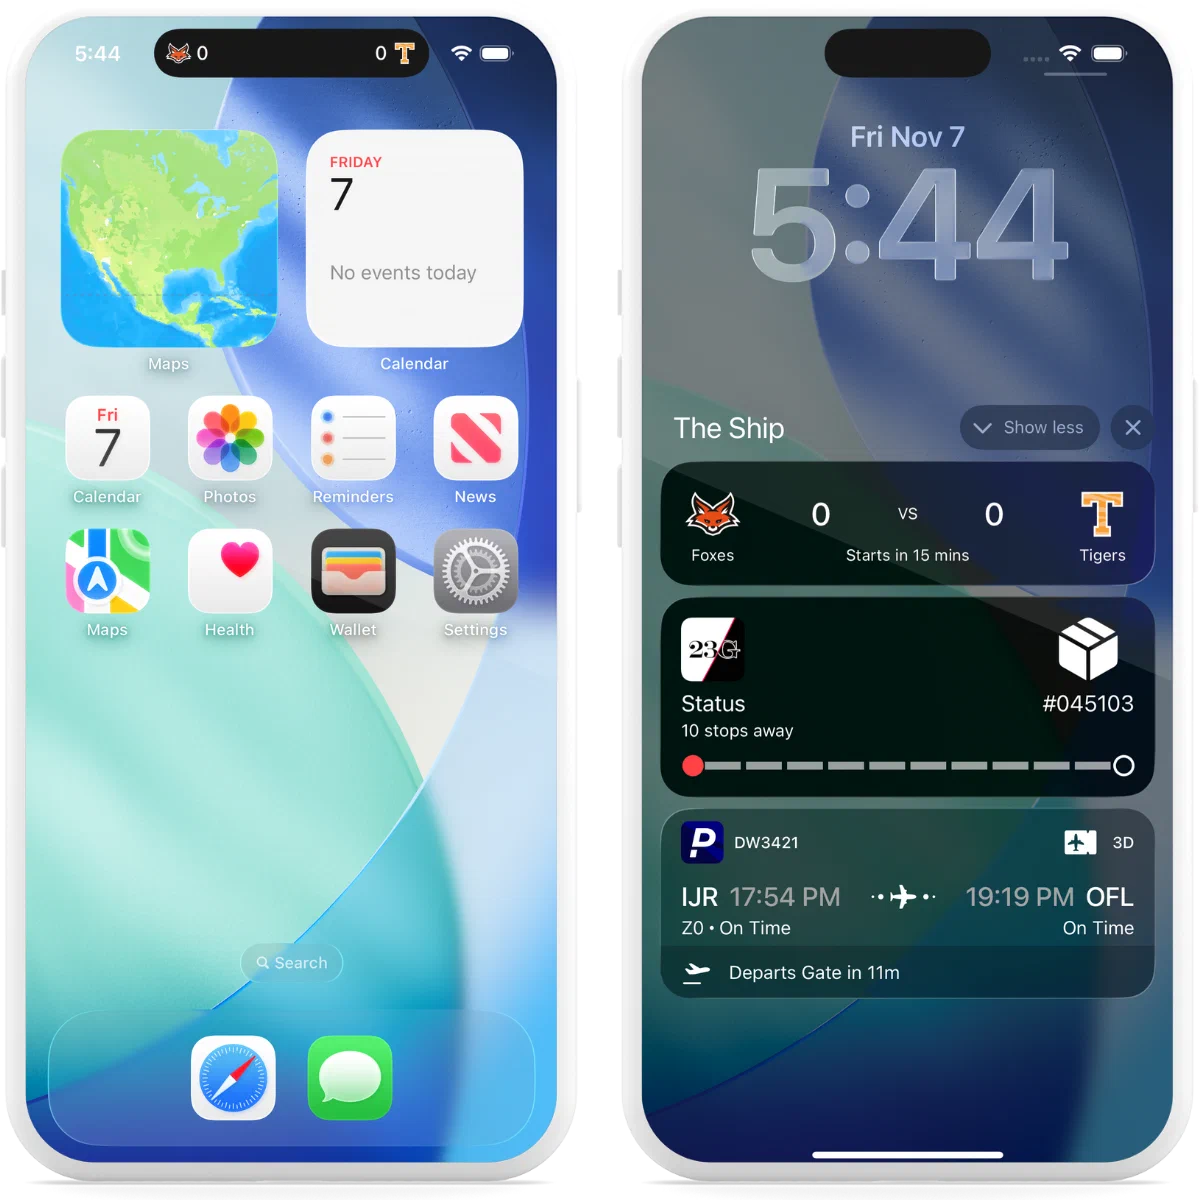
*iOS Live Activities in the Dynamic Island and Lock Screen*
## Android Live Updates
*A Live Update in a sports game notification*
Live Updates provide functionality similar to [iOS Live Activities](#ios-live-activities), making it easy to display dynamically updated content on Android. They do not have time limits.
The Live Update is the *container* of the information, which can be *displayed* on a device in these formats:
* [Push Notification](https://www.airship.com/docs/reference/glossary/#push_notification) — API only. Format is determined by custom layout.
* **Home screen widget**
* **Custom app view** — The content from a Live Update can be presented using custom code.
Live Updates can be started, updated, and ended using API push notifications or the SDK. The notification, widget, or custom app view refreshes with the information contained in the latest Live Update received by the device.
Along with the Android SDK, Airship supports Live Updates for multiple **frameworks**: React Native, Capacitor, and Flutter.
## Getting started with Live Activities and Live Updates
Follow these steps to start using real-time updates with Airship:
* ⚙ **Configure mobile channels in your project settings** → See [Configuring Mobile Channels](https://www.airship.com/docs/guides/getting-started/developers/configure-channels/) in the Getting Started guide.
* link **Integrate the Mobile SDK with your app** → See [SDK setup](https://www.airship.com/docs/sdk-topics/setup/) for mobile apps in our developer documentation.
Once your project is set up, start using:
* ⟳ [Live Activities](https://www.airship.com/docs/guides/messaging/features/ios-live-activities/) using the push API. For SDK methods, see the [Live Activities](https://www.airship.com/docs/sdk-topics/live-activities/) developer documentation.
* ⟳ [Live Updates](https://www.airship.com/docs/guides/messaging/features/android-live-updates/) using the push API. For SDK methods, see the [Live Updates](https://www.airship.com/docs/sdk-topics/live-updates/) developer documentation.
## Scenes
Scenes are native in-app experiences that provide immediate, contextual responses to user behaviors across mobile and web.
# Scenes
> A Scene is a mobile app or web experience of one or more screens displayed with fully native UI components in real time, providing immediate, contextual responses to user behaviors. {{< badge "axp" >}}
## Why use Scenes?
Use Scenes to build and update rich user interfaces remotely across mobile apps and the web without waiting for engineering release cycles. By utilizing a **Server-Driven UI (SDUI)** approach, Scenes ensure optimal performance on every device by rendering as native components on mobile and optimized HTML on the web. You can deploy interface updates in real-time using declarative data, ensuring your experiences remain agile while strictly adhering to app store policies regarding remote code execution.
*Web Scenes using a modal view style*
### Native rendering and performance
Scenes utilize the native components for each platform to ensure maximum performance. On mobile apps, Scenes render as fully native UI components that leverage **SwiftUI** on iOS and provide seamless **Jetpack Compose** support on Android. On the web, they render as optimized HTML elements. This architecture ensures:
* **High performance** — Mobile Scenes allow for smooth, native gestures and animations. Web Scenes use modern, lightweight web technology to ensure fast load times and responsive interactions across devices.
* **Design consistency** — Scenes use your centralized brand guidelines to maintain visual unity across channels. Typography, colors, and themes are applied consistently across iOS, Android, and Web, eliminating common platform discrepancies. Scenes also respect user device settings, seamlessly adapting to Light and Dark mode preferences.
* **Deep platform integration** — Scenes respect the "rules" of the device. This means handling Safe Areas and notches on mobile, while managing window resizing and responsive behavior on the web.
* **Accessibility** — Leveraging native components ensures support for core accessibility features like screen readers (VoiceOver/TalkBack), dynamic text sizing, and high contrast modes. Scenes are engineered to align with Web Content Accessibility Guidelines (WCAG) and map to correct platform standards, minimizing the configuration required to support users relying on assistive technologies.
The [accessibility agent](https://www.airship.com/docs/guides/messaging/editors/native/about/#accessibility-audit) uses agentic and generative AI to automatically audit your content and identify potential accessibility issues such as insufficient color contrast, missing alternative text, and text size that falls below recommend minimums. Issues can be fixed with a single click.
### Full visual editor
Create and update screens using the [Native Experience Editor](https://www.airship.com/docs/reference/glossary/#ne_editor) in the Airship dashboard. No engineering resources required.
* **No-code design** — Build custom, reusable layouts from scratch or generate them via AI. You control the layout, styling, and interactions without rigid restrictions.
* **AI-assisted creation** — Generate and edit content instantly using AI to speed up your workflow.
* **Reusable layouts** — Save Scene designs to quickly replicate layouts and maintain brand consistency across different campaigns.
* **Reduced overhead** — Eliminate the need to build and maintain custom UI components for every new message type.
### Extensibility with Custom Views
Bridge the gap between no-code flexibility and **advanced custom capabilities**. You can embed native mobile app views or custom web components registered via the Airship SDK directly into a Scene. This allows you to include:
* **Authentication** — Embed login, sign-up, or biometric prompts directly within an onboarding flow.
* **Commerce** — Embed shopping carts or checkout flows directly within the message.
* **Existing UI components** — Reuse complex interfaces you've already built, such as video players, product cards, or AR experiences.
* **Interactive maps** — Embed store locators or delivery tracking.
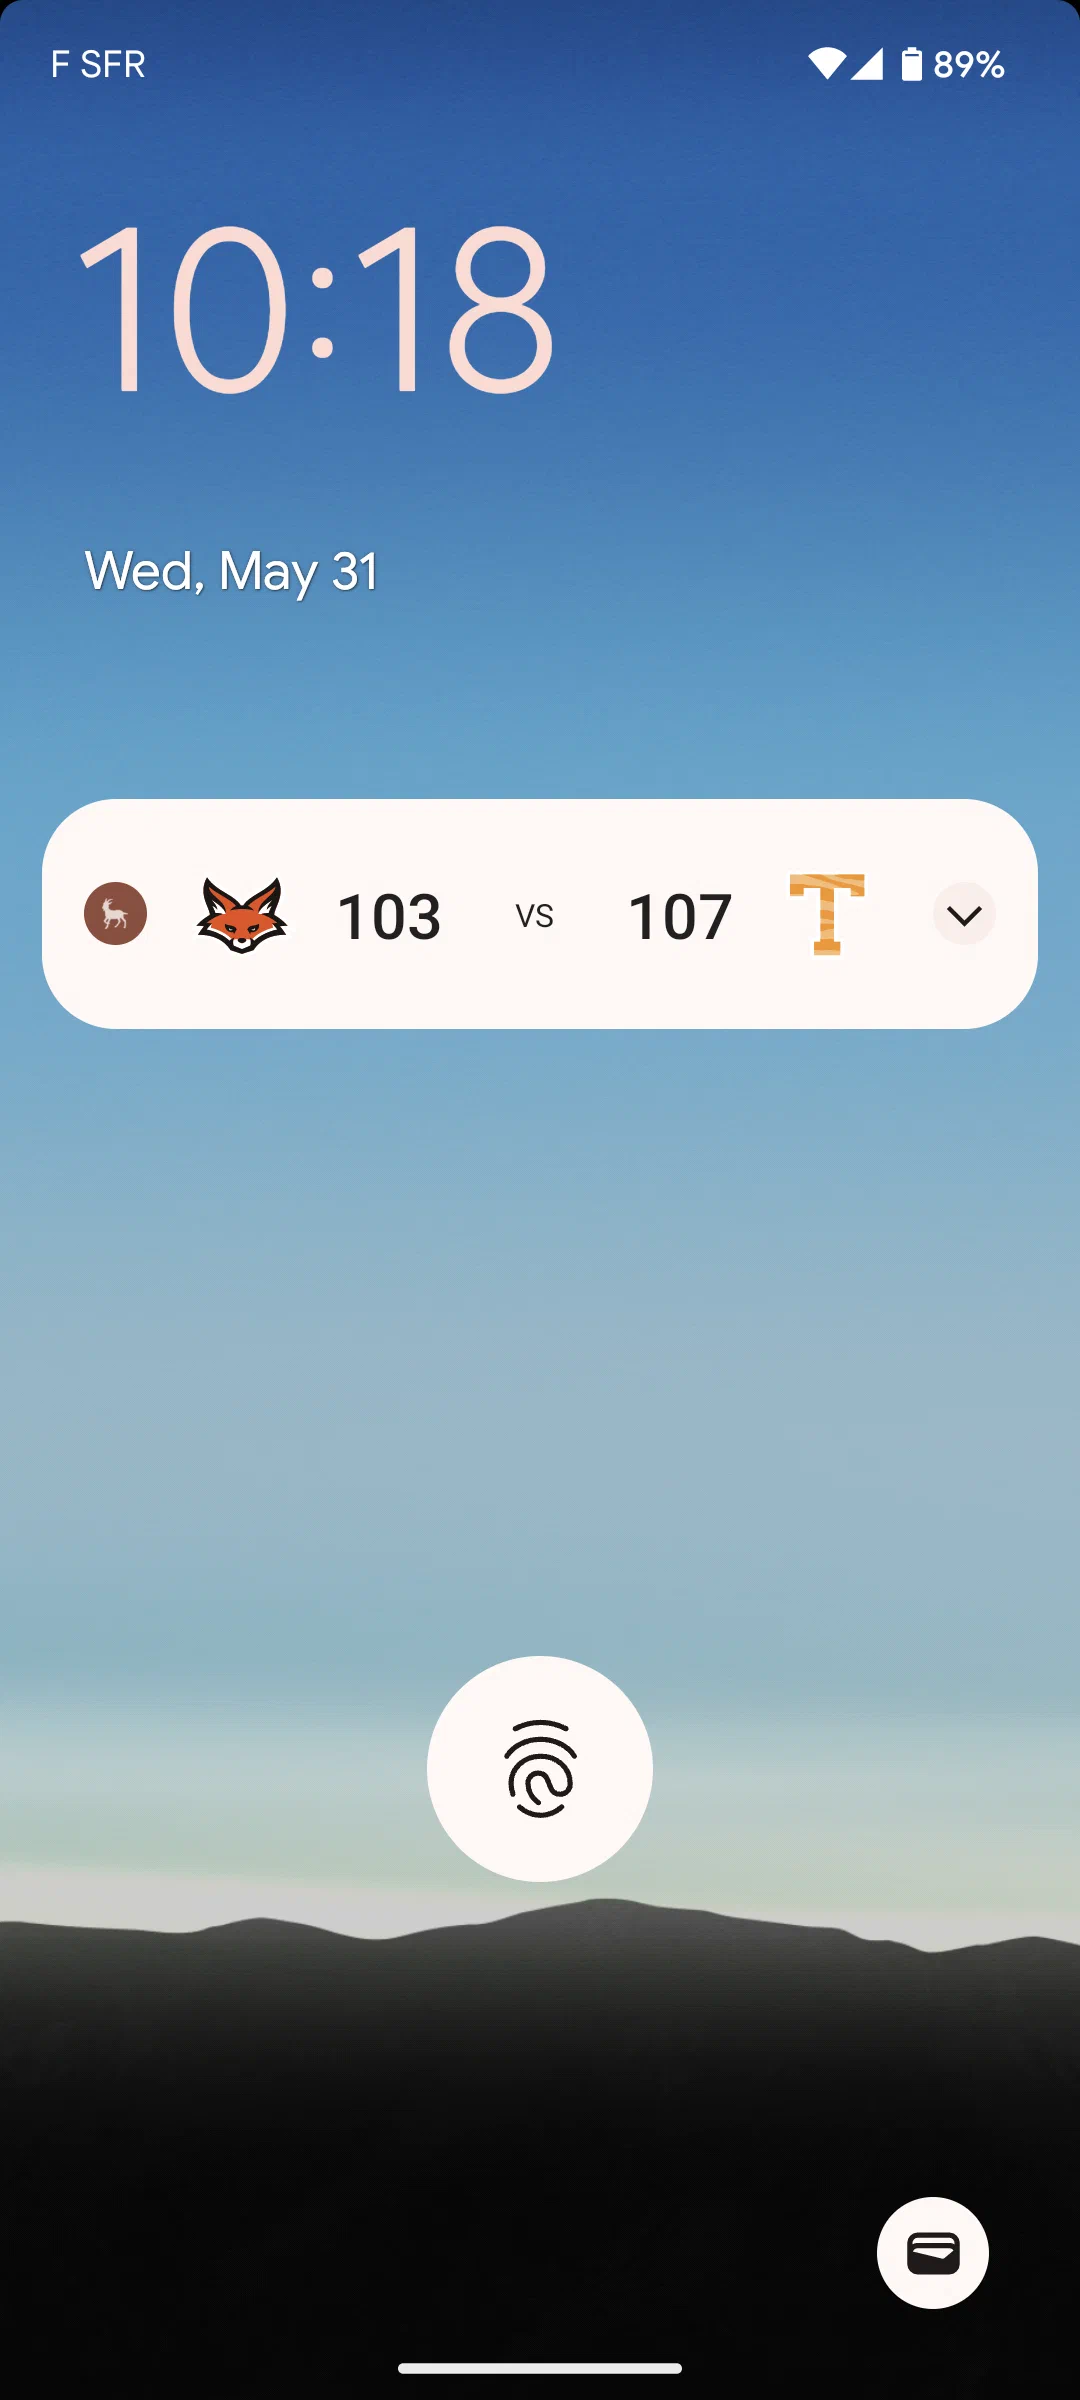
* **Live data** — Display real-time stock quotes, flight status, or sports scores.
See [Custom Views](https://www.airship.com/docs/guides/features/messaging/scenes/custom-views/) for more details.
### Hybrid real-time and offline capability
Scenes use an intelligent caching strategy to balance performance with personalization.
* **Fast performance** — Scenes are cached on the device for instant display, with automatic updates when triggered to ensure users see the latest content.
* **Offline support** — Simple text-only Scenes can display even when the device is offline, ensuring your messages reach users regardless of connectivity.
* **Real-time personalization** — Scenes with personalization and advanced audience targeting are processed right before display, so users always see content tailored to their current context and behavior.
* **Smooth experience** — Images load before the Scene appears, ensuring a polished, complete experience without loading delays.
### Real-time triggering
Scenes respond instantly to user actions and behaviors, enabling you to deliver contextual experiences at the perfect moment.
* **Custom Events** — Trigger Scenes based on any user action you track—purchases, cart additions, video views, button clicks, or any custom interaction. Create connected, multi-step experiences that respond to user behavior in real time.
* **Screen views** — Display Scenes when users navigate to specific screens in your app or website. Guide users through onboarding flows, highlight features on relevant pages, or provide contextual help exactly where they need it.
* **App opens and sessions** — Welcome users on their first visit, celebrate milestones after multiple sessions, or re-engage users who haven't opened your app recently.
* **App updates** — Introduce new features or highlight changes when users update to a new version of your app.
* **Web URL targeting** — For web experiences, trigger Scenes based on specific URLs, query parameters, or navigation patterns. Perfect for campaign landing pages, checkout flows, or personalized content based on referral sources.
* **[Feature Flag](https://www.airship.com/docs/reference/glossary/#feature_flag) interactions** — Trigger Scenes based on feature flag interactions, enabling you to create experiences tied to feature rollouts or A/B tests.
You can combine multiple triggers and set display conditions to create sophisticated, context-aware experiences that adapt to each user's behavior and context. See [In-App Experience Triggers](https://www.airship.com/docs/guides/messaging/in-app-experiences/configuration/triggers/) for complete configuration details.
### Interactive capabilities
Scenes support rich interactive features that enable two-way communication and dynamic user experiences:
* **Surveys and feedback collection** — Create surveys with various question types (open, single/multiple choice) and NPS elements. Present them at the optimal moment based on user behavior to collect responses in real time.
* **Channel registration** — Collect contact info directly within Scenes. Users can register for email or SMS channels without leaving your app, enabling seamless channel growth and re-engagement opportunities.
* **Branching logic** — Create dynamic, personalized experiences that adapt based on user responses or conditions. Branching allows you to show different screens or paths based on user selections, enabling sophisticated, context-aware messaging flows.
* **Story mode** — Create engaging, auto-advancing experiences similar to social media stories. Perfect for visual narratives or product showcases, users can tap to navigate or let the story play automatically with customizable timing.
### Flexible display formats
Scenes adapt to your content and use case with multiple display formats and presentation styles, each optimized for different scenarios:
* **Embedded Content** — Inject dynamic Scene content directly into your app or website's existing screens (e.g., a banner within a feed) rather than overlaying them. This allows you to add dynamic, remotely configurable content to specific locations—perfect for promotional banners, featured content sections, or contextual help that appears exactly where users need it.
* **Fullscreen** — Immersive experiences perfect for onboarding flows, multi-step tutorials, or important announcements.
* **Modal** — Standard overlays for quick announcements, surveys, or calls-to-action.
You can create custom view styles beyond the default modal and fullscreen options, giving you complete control over size, position, and appearance. This flexibility ensures your Scenes match your brand and user experience goals, whether you need a subtle nudge or a bold statement.
### Responsive design across devices
Optimize your Scenes for different screen sizes and orientations using conditional design overrides that automatically adjust your content based on device characteristics:
* **Device-specific optimization** — Ensure Scenes display appropriately across smartphones, tablets, and different screen sizes. A fullscreen Scene on a phone can automatically display as a smaller modal on a large tablet for a better viewing experience.
* **Orientation adaptation** — Configure different display settings for portrait and landscape orientations, ensuring your content looks great regardless of how users hold their device.
* **Automatic adjustments** — Set conditional overrides that apply based on device size and orientation, so you don't need to create separate Scenes for different devices.
* **Preview tools** — Use orientation and device size preview tools while creating Scenes to see how your content will appear across different scenarios before deployment.
See [Conditional design overrides](https://www.airship.com/docs/guides/features/messaging/scenes/conditional-design-overrides/) for more details.
## Use cases
Scenes can be used for a variety of custom experiences that you define. The following examples demonstrate how Scenes can support different stages of the user experience.
*Retail app onboarding Scene*
### Onboarding and engagement
Use Scenes to guide new users and encourage key actions:
* **Welcome messages** — Communicate the value of your app and highlight key features.
* **Push opt-in prompts** — Explain the value of your notifications to drive opt-in rates.
* **Registration/login** — Drive registrations and logins to your loyalty program or account.
### Promotional messaging
Use Scenes to deliver targeted promotional content and drive conversions:
* **Sales and discounts** — Highlight special offers, flash sales, or limited-time discounts with rich visuals and clear calls-to-action.
* **Product launches** — Announce new products or features with engaging multi-screen experiences that showcase key benefits and drive early adoption.
* **Loyalty program benefits** — Promote exclusive rewards, points multipliers, or member-only offers to encourage engagement and retention.
* **Seasonal campaigns** — Create timely promotional experiences for holidays, events, or seasonal shopping periods with contextually relevant content.
* **Cross-sell and upsell** — Display complementary products or premium features based on user behavior or purchase history.
* **Event promotions** — Drive attendance or participation for webinars, in-store events, or special occasions with interactive promotional content.
### Feedback and surveys
Collect user feedback at strategic moments:
* **App reviews** — Prompt users to rate your app after positive experiences.
* **NPS (Net Promoter Score)** — Display an NPS survey to gauge how likely your users are to recommend your app.
* **Customer service rating** — Display a customer service satisfaction survey after they end a support chat.
* **Purchase confirmation** — Display a survey after they complete a purchase to get feedback on your checkout process.
* **General feedback** — Display a survey in response to a button click.
* **Account closure** — Display a survey at the end of an account closing asking why they closed their account.
### Web URL targeting
Web Scenes support URL-based targeting that enables precise control over when and where your content appears on your website. You can create contextually relevant experiences without requiring web development resources.
**Common use cases:**
* **Page-specific messaging** — Show different content on product pages, checkout flows, or landing pages.
* **Campaign targeting** — Display content based on UTM parameters or referrer sources.
* **Workflow guidance** — Guide users through complex workflows with contextual messaging.
**Example scenarios:**
* Welcome new visitors arriving at your homepage.
* Show product promotions on specific category pages.
* Display checkout assistance when users reach cart pages.
* Target users from email campaigns with personalized follow-up content.
See [Web URL](https://www.airship.com/docs/guides/messaging/in-app-experiences/configuration/triggers/#web-url) in *In-App Experience Triggers* for configuration details.
## Appearance and behavior
Scenes appear regardless of a user's opt-in/out status for notifications and remain on screen until the user interacts with them, either by swiping or tapping through all screens or dismissing the Scene. They persist across app and web sessions until dismissed.
For Scenes with multiple screens, dots appear at the bottom, indicating the number of screens. You can set colors for their active and inactive states, hide them, and disable the swipe requirement to require interacting with buttons and prevent swiping between screens.
Scenes can be customized for device Light and Dark modes by creating [Color Sets](https://www.airship.com/docs/reference/glossary/#color_set) and assigning them when configuring color fields for various design settings, like background, text, or the dismiss button.
### View styles
All projects contain two preset view styles, Modal and Fullscreen, and you can create custom versions for each.
* A **modal** view is smaller than the full width of the screen, superimposed on the app with the background color of your choosing, indicating that the interruption is temporary. It takes over the user's screen, compelling the user to interact with it.
* **Fullscreen** Scenes have the same design as modal but use the entire screen. You can set fullscreen Scenes to extend to the full height and width of a device or display only within the area of your app's interface that is not covered by physical or UI elements, such as a status bar or notch.
You can also present the content of a Scene on any app screen as defined by an app developer. This format is called [Embedded Content](https://www.airship.com/docs/guides/features/messaging/scenes/embedded-content/).
### Screens and design
Scenes can have up to 20 screens. You can design content manually or use [AI generation](https://www.airship.com/docs/guides/messaging/editors/native/ai-content/).
Each screen can contain these elements:
* **Text**
* **Text Input** — A field for entering user input for collection
* **List** — A bulleted list where the bullet is an image you provide
* **Media** — An image or video
* **Button** — A single button
* **Button group** — One to five buttons
* **NPS** — A survey based on the [net promoter score](https://en.wikipedia.org/wiki/Net_promoter_score) metric, which measures how likely it is that your users would recommend your brand or product to a friend or colleague
* **Question** — Open, single choice, or multiple choice
* **Email** — A field for entering an email address for collection or registration as a channel
* **SMS** — A field for entering a phone number for collection or registration as a channel
* [**Custom View**](https://www.airship.com/docs/guides/features/messaging/scenes/custom-views/) — A native app view embedded within a screen
* **Container**
Alternatively, you can create Scenes using custom HTML for complete design control, with all Scene logic handled by your HTML and JavaScript. See [Provide custom HTML](https://www.airship.com/docs/guides/messaging/in-app-experiences/scenes/create/#provide-custom-html) in *Create a Scene*.
## Getting started with Scenes
Follow these steps to start using mobile app Scenes with Airship:
* ⚙ **Configure mobile channels in your project settings** → See [Configuring Mobile Channels](https://www.airship.com/docs/guides/getting-started/developers/configure-channels/) in the Getting Started guide.
* link **Integrate the Mobile SDK with your app** → See [SDK setup](https://www.airship.com/docs/sdk-topics/setup/) for mobile apps in our developer documentation.
Follow these steps to start using web Scenes with Airship:
* ⚙ **Configure the Web channel in your project settings.**
* link **Integrate the Web SDK with your website.**See [Getting Started for the Web SDK](https://www.airship.com/docs/developer/sdk-integration/web/getting-started/) in our developer documentation.
Once your project is set up, you can start creating slideshow [Scenes](https://www.airship.com/docs/guides/messaging/in-app-experiences/scenes/create/). To set default values for all new Scenes, see [In-App Experience Defaults](https://www.airship.com/docs/guides/messaging/in-app-experiences/configuration/defaults/).
# Embedded Content
> Embed Scene content inline within your app or web screens to create seamless, contextual experiences. {{< badge_sdk_min ios="18.7+" android="18.1.4+" >}} {{< badge "axp" >}}
## About Embedded Content

*Embedded Content*
Embedded Content is an alternative Scene format that can be displayed on any app or web screen in a view defined by a developer. It can also be presented in Story format.
* **Seamless inline experiences** — Present Scene content within your app or website screens, naturally fitting into your existing flow.
* **Integrated display** — Unlike modal or fullscreen Scenes that appear as overlays, Embedded Content appears directly within your existing views, making it ideal for promotional banners, contextual messaging, and personalized content cards.
Use Embedded Content to:
* **Display contextual messages** — Show relevant content inline with your existing UI, such as promotional banners on a home screen or product recommendations within a shopping flow.
* **Personalize content** — Use audience targeting and Scene capabilities to show different content to different users in the same view location.
* **Test and iterate** — Update content remotely without requiring app updates, allowing you to test different messages and layouts quickly.
Consider using modal or fullscreen Scenes instead when you need to:
* Capture immediate attention with an overlay
* Display important announcements or critical actions
* Show content that requires full user focus
### How Embedded Content works
There are three primary components that work together to display Embedded Content. Components 1 and 2 can be created in any order, as long as their IDs match:
1. **A "view" in your app or website where Scene content will display** — An app developer creates an embedded view component, such as `AirshipEmbeddedView` for iOS, that controls the dimensions of the content and its location. A web developer creates an HTML container where Scene content will be rendered. For both, they also determine what content can be displayed in the view by setting a value for the view's `embeddedId` that matches the ID of an Embedded Content view style.
1. **A view style in your project settings** — A marketer creates an Embedded Content view style and assigns an ID for reference in the app or web view's `embeddedId`.
1. **A Scene using an Embedded Content view style** — This is the source of the content that will be displayed in the view.
Once the Scene is triggered for display and matches the specified audience conditions, its content is available to users when visiting an app screen or web page that contains the view.
The view is populated with the content from all active Scenes with the matching ID, sorted based on priority. When an embedded view loads content, the highest priority Scene that is queued for display will be shown. The same content will be shown across app and web sessions until it is dismissed by the user or is no longer available. The view will then show the next Scene with the highest priority from the display queue.
Airship first prepares the content when the triggering event occurs and then refreshes it upon every app open or web session start. This ensures that users always experience the most up-to-date message. So, after updating active Embedded Content, users will see the latest version the next time they visit an app screen or web page containing the view.
## Getting started with Embedded Content
Follow these steps to start using Embedded Content with Airship:
* link **Create a "view" in your app or website where Scene content will display** → See the [Embedded Content](https://www.airship.com/docs/sdk-topics/embedded-content/) developer documentation for mobile app and web.
* link **Create an Embedded Content view style with an ID matching the app or web view's `embeddedId`** → See [Set Embedded Content view styles](https://www.airship.com/docs/guides/messaging/in-app-experiences/configuration/defaults/#set-embedded-content-view-styles) in *In-App Experience Defaults*.
With the above in place, you can create a slideshow [Scene](https://www.airship.com/docs/guides/messaging/in-app-experiences/scenes/create/). In the Content step, select your Embedded Content view style when [setting the Scene's root appearance](https://www.airship.com/docs/guides/messaging/editors/native/root/).
# Custom Views for Scenes
> {{< glossary_definition "custom_view" >}} {{< badge_sdk_min ios="19.2+" android="19.4+" >}}
## About Custom Views
Bridge the gap between no-code flexibility and **advanced custom capabilities**. You can embed native mobile app views or custom web components registered via the Airship SDK directly into a Scene. This allows you to include:
* **Authentication** — Embed login, sign-up, or biometric prompts directly within an onboarding flow.
* **Commerce** — Embed shopping carts or checkout flows directly within the message.
* **Existing UI components** — Reuse complex interfaces you've already built, such as video players, product cards, or AR experiences.
* **Interactive maps** — Embed store locators or delivery tracking.
* **Live data** — Display real-time stock quotes, flight status, or sports scores.
You can add key-value pairs for the view so your app can serve a more specific or granular view. For example, a map view can reference a specific place, or a score widget can reference specific teams. Values can be personalized using [Handlebars](https://www.airship.com/docs/reference/glossary/#handlebars).
### Use cases
Custom Views enable these use cases:
* **Native maps** — Direct users to their local store or embed a store locator component in a Scene.
* **Shopping cart** — Embed a user's shopping cart contents in a Scene advertising a promotion or coupon.
* **Ads** — Embed ad views from your native ad SDK to serve that content in a Scene.
* **Retail** — Embed product wishlists and shopping carts, and complete checkout flows directly within a Scene.
* **Travel** — Display real-time flight status information and gate changes or allow users to book travel.
* **Sports** — Show live scores, game statistics, or personalized highlights.
* **Finance** — Display a user's transaction history, investment portfolio, or real-time stock quotes.
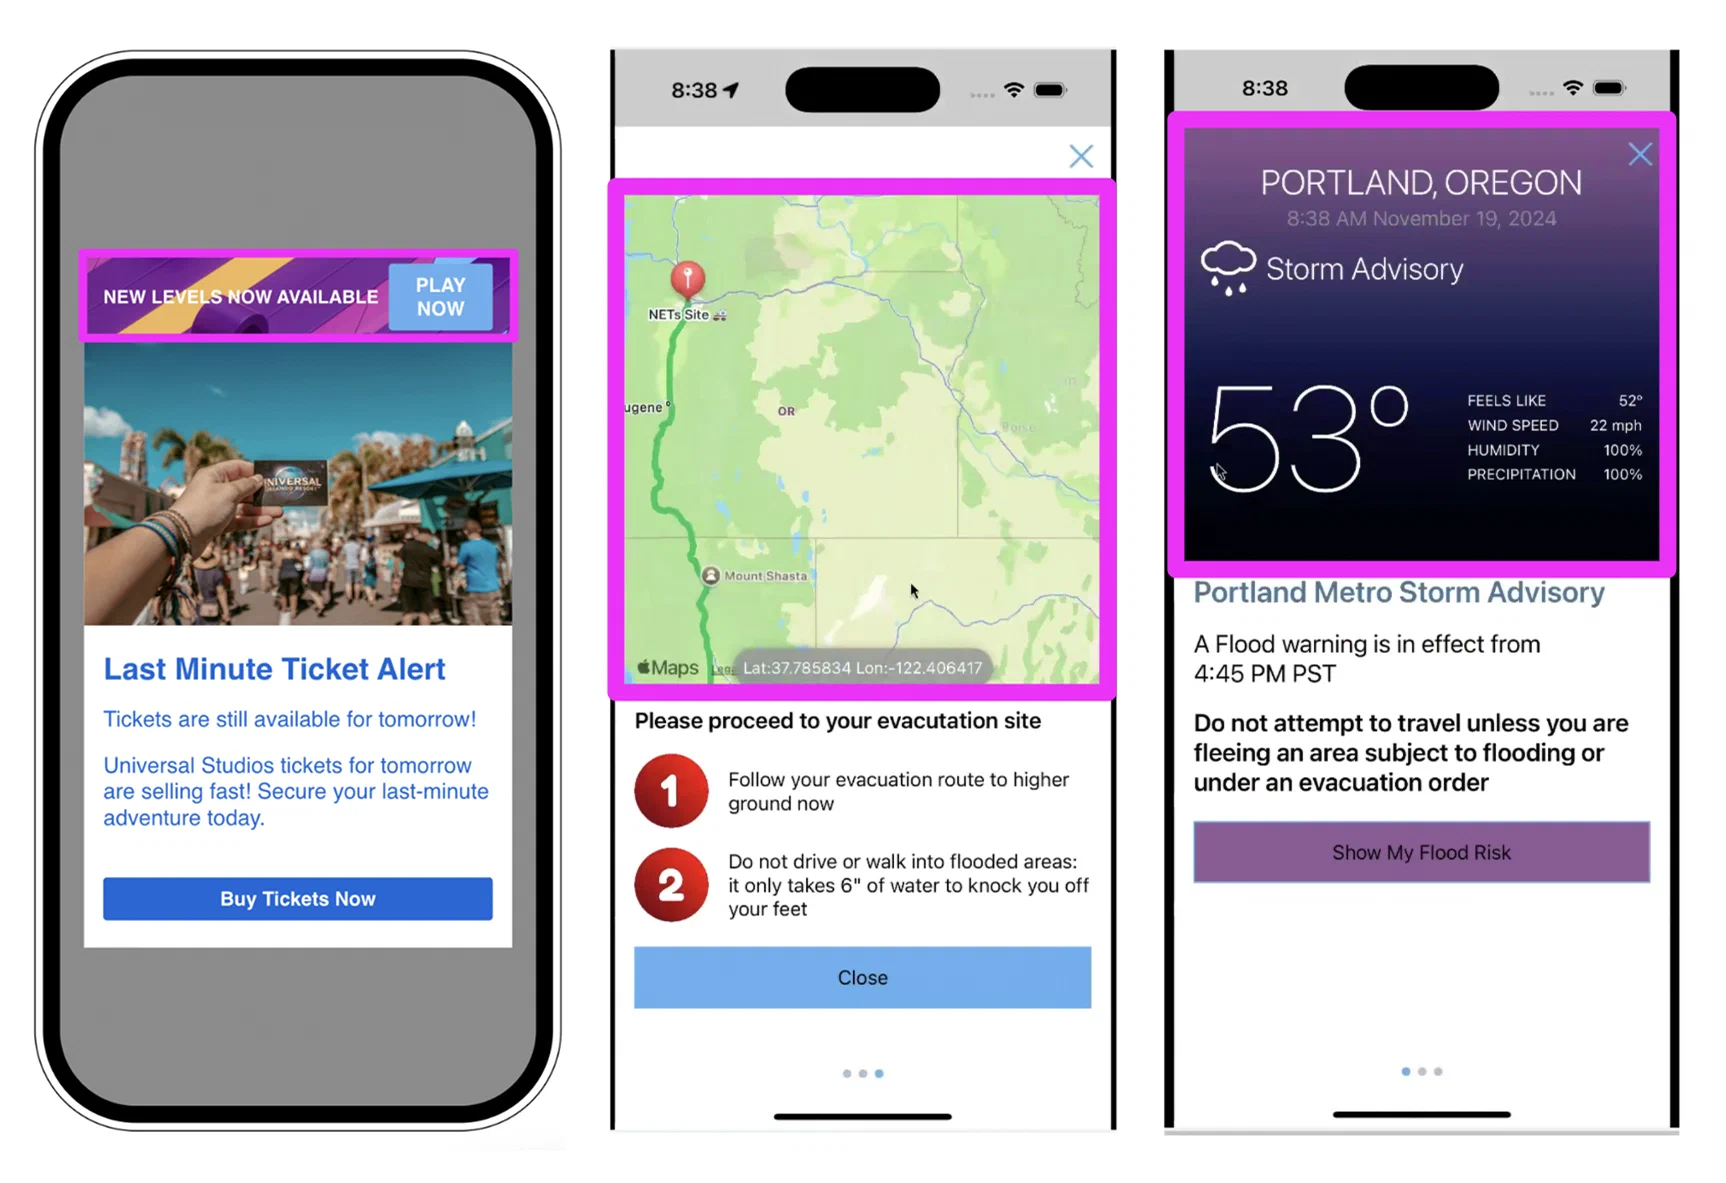
*Custom Views in Scenes*
## Getting started with Custom Views
Follow these steps to start using Custom Views for Scenes:
* link **Register the native view in your mobile application using the Airship SDK.** → See the [Mobile Custom Views](https://www.airship.com/docs/sdk-topics/custom-views/) developer documentation.
* link **Register the native view in your web application using the Airship SDK.** → See [Web Custom Views](https://www.airship.com/docs/developer/sdk-integration/web/in-app-experiences/#custom-views) in our developer documentation.
Once a Custom View is registered with the Airship SDK, you can add it to a Scene. When configuring a screen, add the + [Custom View content element](https://www.airship.com/docs/guides/messaging/editors/native/elements/#custom-view) and enter the view name as defined by your developer.
# Surveys and Stories
> Configure a Scene as a survey to collect user feedback. Enable Story mode for auto-advancing experiences.
## Surveys
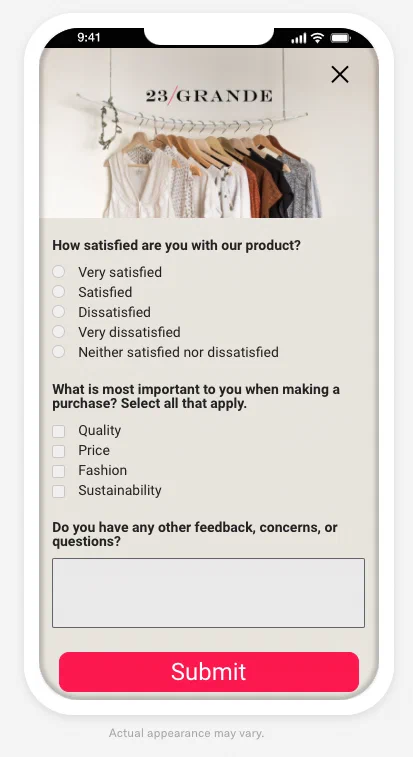
*Fullscreen user feedback survey*
Respond to user behaviors instantly by presenting a survey at the best time, giving you precise control of the user experience.
You can add [questions](https://www.airship.com/docs/guides/messaging/editors/native/elements/#question) and/or the [Net Promoter Score (NPS) element](https://www.airship.com/docs/guides/messaging/editors/native/elements/#nps) to create a survey.
An NPS survey is based on the [net promoter score](https://en.wikipedia.org/wiki/Net_promoter_score) metric, which measures how likely it is that your users would recommend your brand or product to a friend or colleague. This can be used to measure their overall sentiment about your brand or product (known as relational NPS) or about a specific experience or transaction such as booking a flight (known as transactional NPS). The survey format is a question with answer scale 0-10.
You can also create a confirmation screen that appears when a user submits their answers.
Instead of starting from scratch, you can select the NPS or User Feedback default content layout. After selection, you can customize the questions and design.
### NPS segmentation
For NPS surveys, Airship automatically generates [Attributes](https://www.airship.com/docs/reference/glossary/#attributes) based on the following data:
* **NPS Score** is the score submitted by the user: 0-10.
* **NPS Category** is one of three categories based on the NPS Score. Ratings 9 and 10 have category Promoter, 7 and 8 are Passive, and 6 or lower are Detractor.
## Story mode
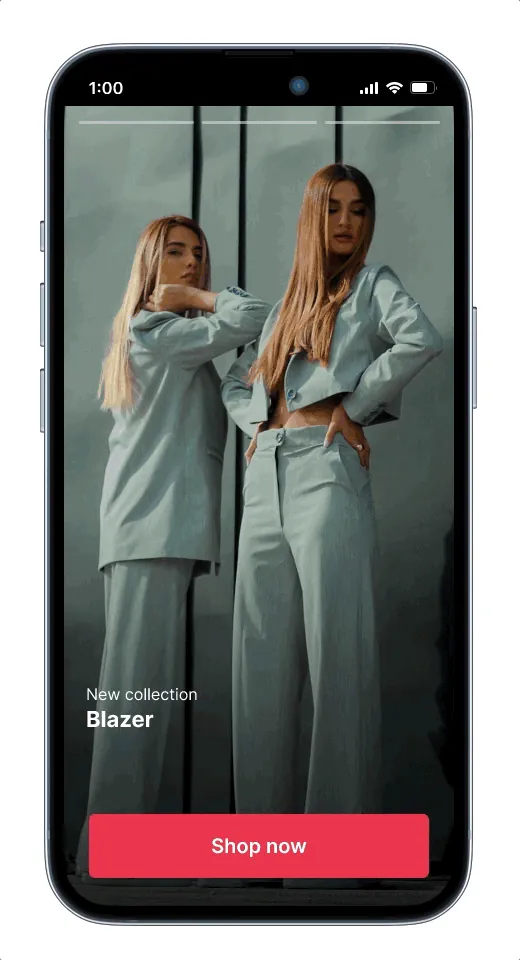
*A Scene presented in Story format*
The default behavior of a Scene requires the user to swipe between screens. Story mode enables automatic transitions to the next screen without requiring swiping.
When configuring Story mode, you set how long each screen is displayed (1-60 seconds) and determine what happens after the story ends: Loop, display the last screen, or dismiss the Scene.
When viewing a story, a progress bar indicates the number of screens and their remaining duration. Users can navigate between screens, pause playback, and close the Scene using tap, swipe, and hold gestures:
* Tap the right side of a Scene to go to the next screen and tap the left side to go to the previous screen
* Tap and hold anywhere on the Scene to pause
* Tap the play/pause button to pause or resume automatic transitions and background video playback
* Tap outside of a non-fullscreen Scene to close
* Swipe down within the Scene or tap the Dismiss button (×) to close
Story mode does not support:
* Scrolling — Make sure to design screens for small device dimensions to eliminate the appearance of a non-functional scroll bar.
* [Questions](https://www.airship.com/docs/guides/messaging/editors/native/elements/#question) or [NPS](https://www.airship.com/docs/guides/messaging/editors/native/elements/#nps)
* [Branching](https://www.airship.com/docs/reference/glossary/#branching)
* Background video play controls — Since the screen-level control is not available in Story mode, use the [Play control setting for the root appearance](https://www.airship.com/docs/guides/messaging/editors/native/root/) instead.
Set Story mode in the Content step of a Scene. See [Scene behaviors](https://www.airship.com/docs/guides/messaging/editors/native/behaviors/).
# Scene Branching
> {{< glossary_definition "branching" >}} {{< badge_sdk_min ios="19.6+" android="19.9+" >}}
Use branching in Scenes to create personalized and dynamic experiences tailored to user behavior.
## About branching
Branching expands a Scene's capabilities by ensuring users only see and interact with content according to the rules you create to guide them to specific screens. Design paths between screens using a visual map and conditional logic to create an adaptive experience that is aligned with your desired goals and outcomes.
Branching is essentially a decision tree, and its logic uses conditional *if/then/else* statements. You define rules where *if* a user performs one or more actions, *then* which screen to go to based on the action, and an *else* alternative if none of those actions were taken. You can add multiple *if* conditions for each rule and multiple rules per statement.
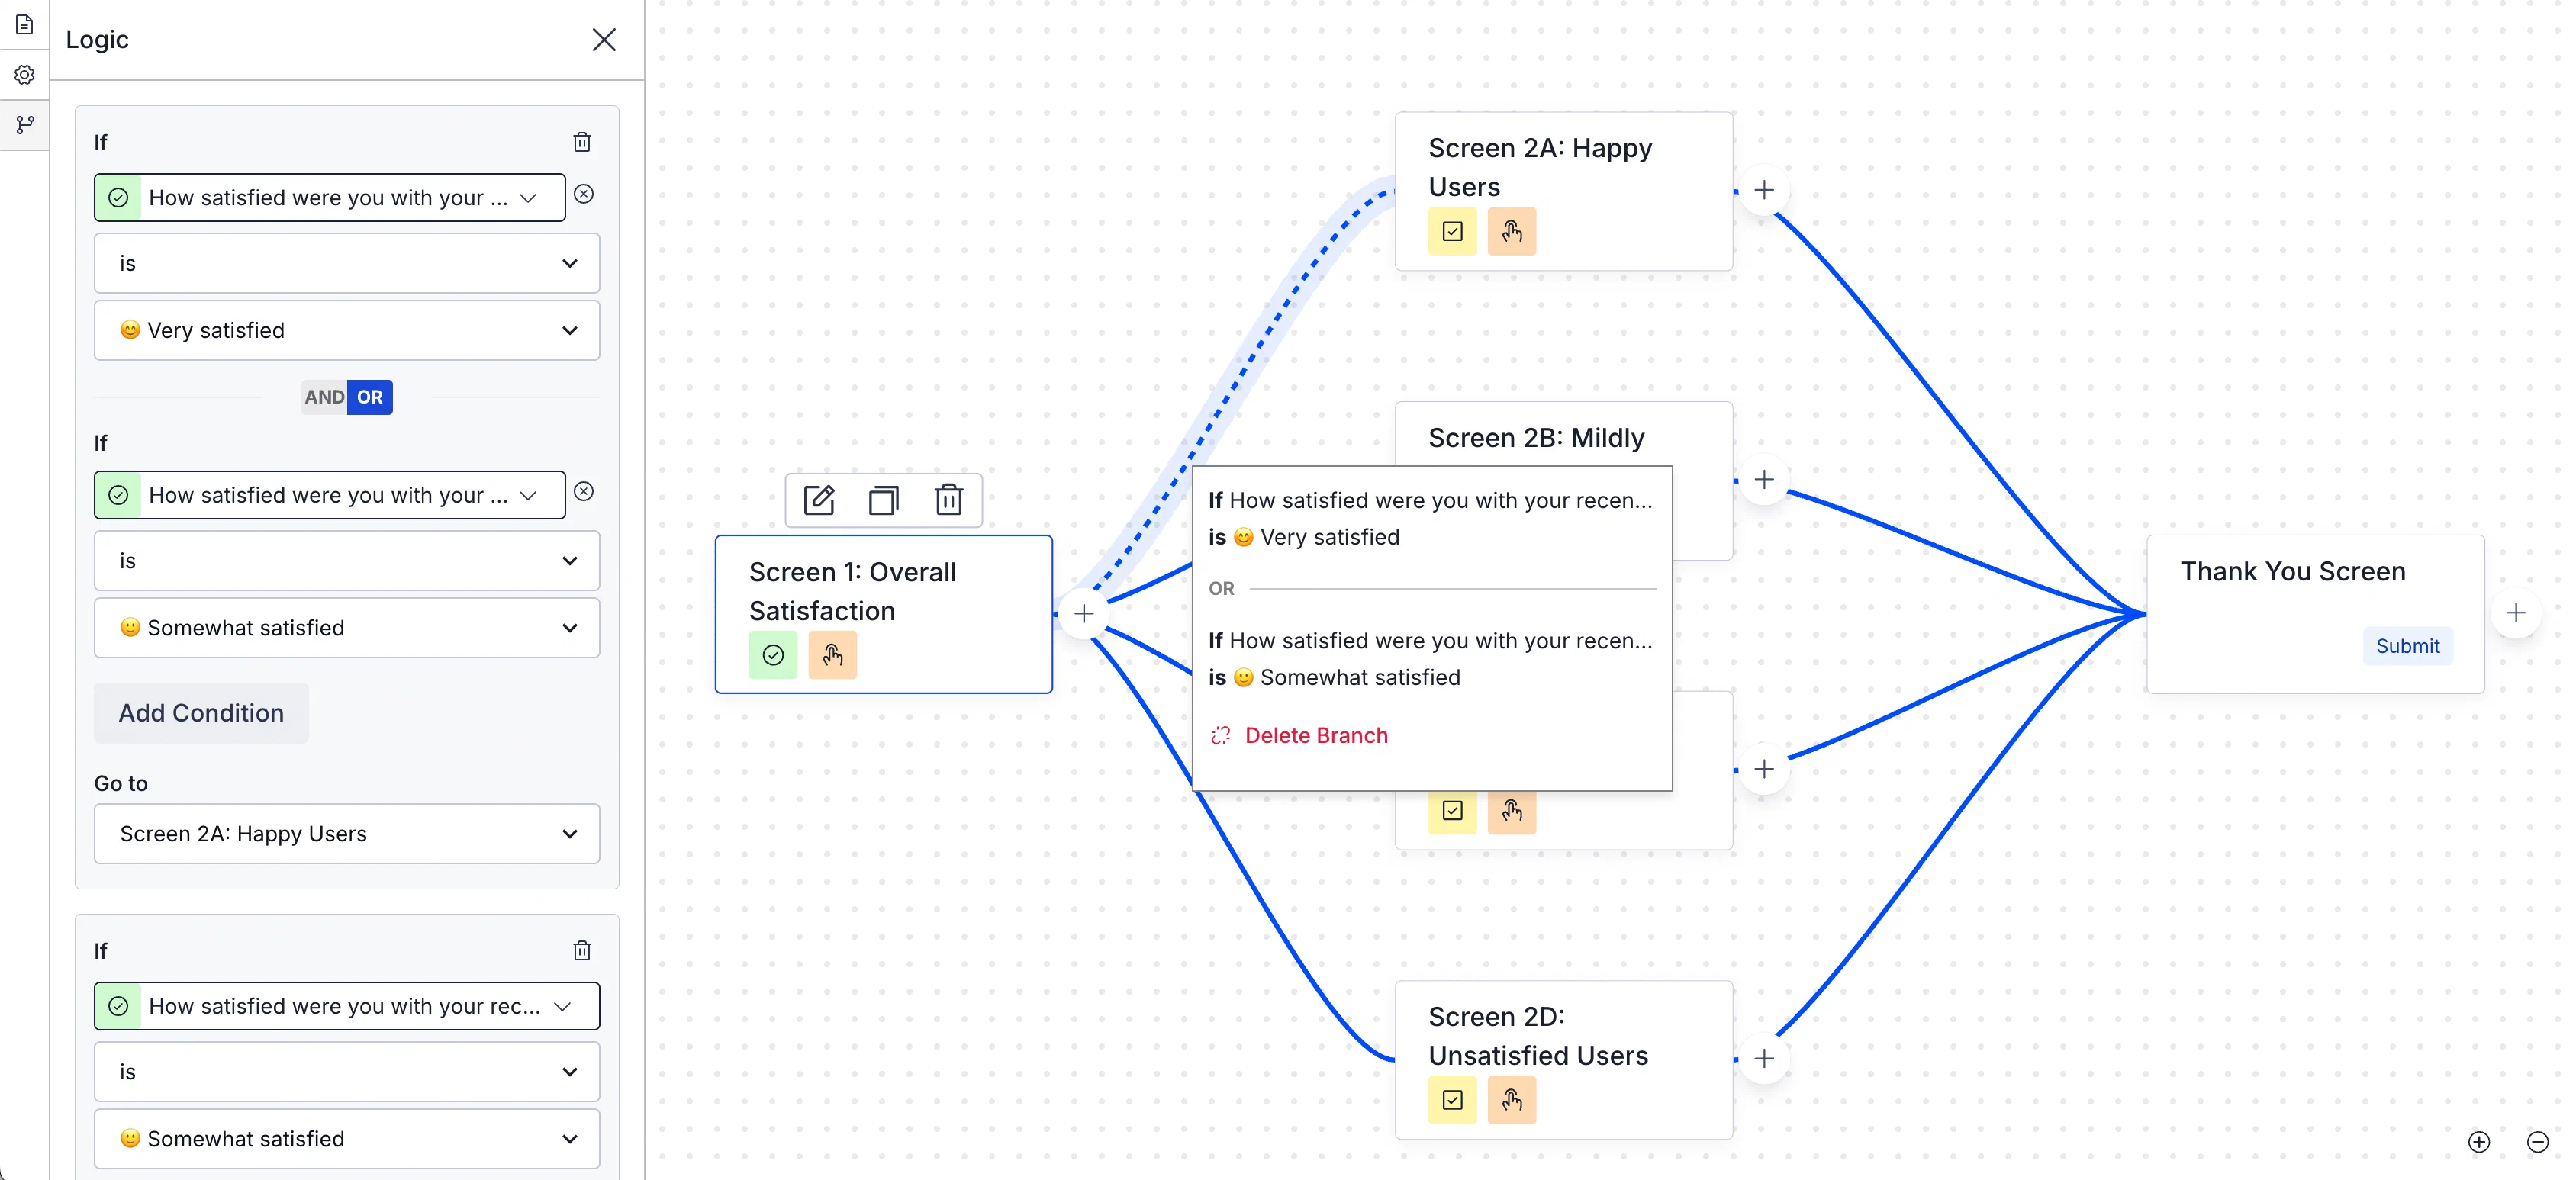
*Configuring Scene branching*
Implementing branching in your Scenes offers several benefits:
* **More interactive experiences** — Create adaptive flows that change based on user interactions to make your in-app content more customized and engaging.
* **Reduced drop-offs** — Present specific content to streamline the user experience and decrease abandonment rates.
* **Improved data collection** — Ask follow-up questions in surveys for more accurate, in-depth data and increased submission rates.
* **Better ROI on campaigns** — Drive more targeted interactions for more effective campaigns.
You can set up branching for the maximum 20 screens in a Scene. Branching is not available for [Stories](https://www.airship.com/docs/guides/features/messaging/scenes/surveys-stories/#story-mode) or when using [Custom HTML](https://www.airship.com/docs/guides/messaging/in-app-experiences/scenes/create/#provide-custom-html).
### Use cases
Example use cases for various industries:
* **Understand what's driving your NPS** — Uncover deeper customer insights on customer loyalty and identify key areas of improvement. Prioritize product, content, or experience enhancements based on real feedback.
* **Increase loyalty with a customer-centric loyalty program** — Drive adoption, loyalty, and referrals by offering unique incentives and offers based on what your customers want.
* **Prevent and convert abandoned carts** — Reduce cart abandonment and increase conversions with targeted interventions.
* **Fix FAQs before they lead to support tickets** — Reduce costs and encourage self-service by enhancing FAQ pages. Measure their effectiveness through real user insights.
* **Understand and improve in-store experiences** — Find out how your restaurant customers rate their experience and which branches shine the most.
* **Increase conversions by optimizing your booking process** — Gather customer feedback on preferences, the booking process, and the ease of finding information and payment options.
* **Refine your subscription model to drive growth** — Uncover customer and prospect satisfaction with your subscription model and its perceived value to guide pricing strategy and retention efforts.
* **Increase social media engagement with a data-driven strategy** — Grow your number of followers by directing interested users to your social media page. Measure which proposition resonates best to tailor your social media content strategy.
* **Provide personalized learning paths** — Adapt a learning experience to the user's level of understanding, ensuring they grasp the material before moving on.
### Testing and reports
You can test your branching logic as you build, and you can send the Scene to a [Test Group](https://www.airship.com/docs/reference/glossary/#preview_test_groups) to test on actual devices. Message reports for Scenes includes a flow chart that displays a visual representation of the user progression between screens and metrics associated with each screen and branch.

*Branching represented in a Scene message report*
## Getting started with Scene branching
See the [Scene branching](https://www.airship.com/docs/guides/messaging/editors/native/branching/) messaging guide to learn how to configure branching and for an example implementation.
# Conditional design overrides
> Optimize your Scenes across devices with conditional design overrides that automatically adjust your content based on screen size and orientation.
Sometimes a Scene that looks great on a phone screen in portrait orientation doesn't deliver the same impact on a tablet in landscape. Using conditional overrides, you can be sure your Scenes display as fullscreen on smartphones and modal on tablets, along with the orientation that best represents your content.
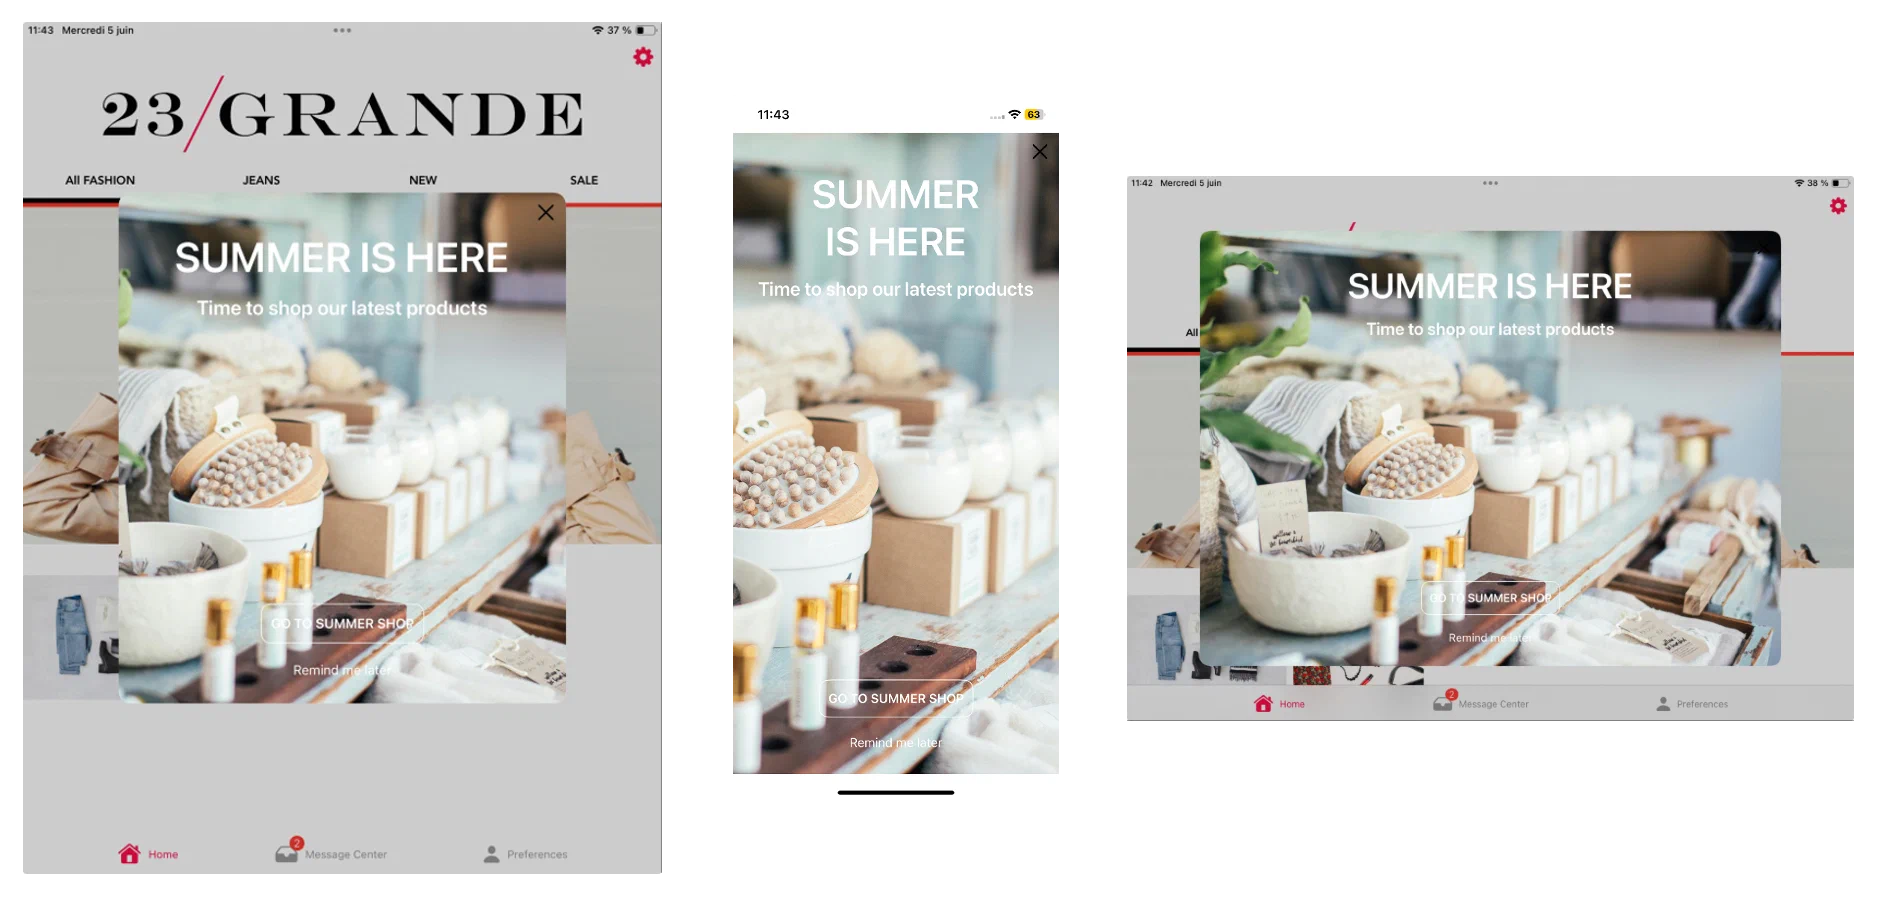
*Set conditional overrides to control how your Scenes are rendered on different devices and in different orientations*
Using a fullscreen view style as an example, without overrides the Scene is displayed as fullscreen on all devices in any orientation. On a large device, such as a 12.9" iPad Pro, this can be overwhelming. For a better experience, you could add overrides for these display scenarios:
* Large device in landscape orientation: Set height and width to 80%.
* Large device in portrait orientation: Set height to 60% and width to 70%.
These overrides ensure that when viewed on large devices, the Scene is reduced to a comfortable viewing size. It displays as fullscreen on all other devices.
You can add overrides for modal and fullscreen view styles in your project settings or when setting the root appearance for a Scene. See:
* [Set fullscreen and modal view styles](https://www.airship.com/docs/guides/messaging/in-app-experiences/configuration/defaults/#set-fullscreen-and-modal-view-styles) in *In-App Experience Defaults*
* [Root appearance](https://www.airship.com/docs/guides/messaging/editors/native/root/)
While creating a Scene, you can use the orientation and device/screen size [preview tools](https://www.airship.com/docs/guides/messaging/editors/native/about/#preview-tools) to see how your content will appear when a device is rotated and when viewed on specific devices and screen sizes.
# Scene rollouts
> {{< glossary_definition "scene_rollout" >}} {{< badge "addon" >}}
## About rollouts
Gradually roll out your Scenes so you can effectively manage feedback volume, server constraints, or other concerns. For example, retailers can put this to work when announcing a new loyalty program or sales offer. Start with a limited audience, then increase it as your customer service team adapts to the changed workflow or as you add staff to handle the increased workload.
When configuring your audience, you can limit by percentage. For example, with a limit of 10%:
* When targeting all users, 10% of your total number of users are included in the audience.
* When [targeting by conditions](https://www.airship.com/docs/guides/messaging/in-app-experiences/scenes/create/#audience), 10% of the users who meet the set conditions are included in the audience.
Audience members are randomly selected. You can change the percentage at any time.
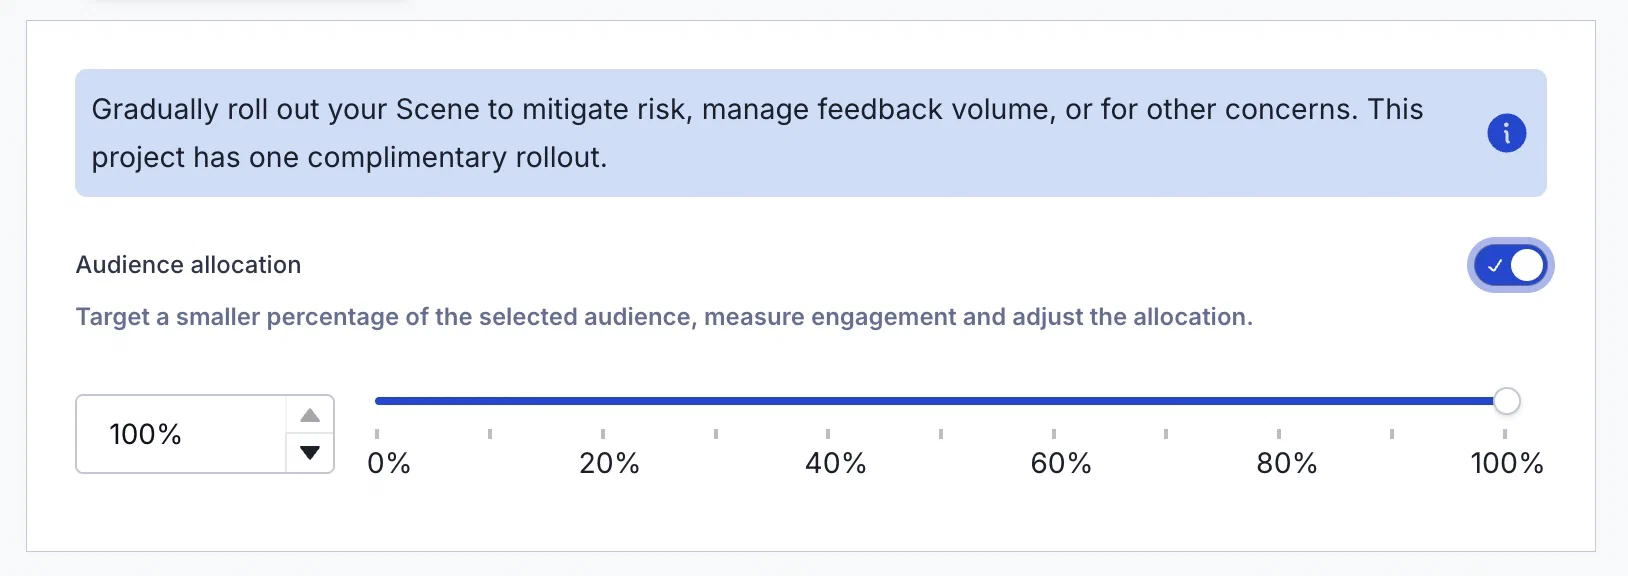
*Configuring a rollout for a Scene*
### Reports
The day's percentage appears in the Scene's message report. If the setting was changed that day, it appears as a percentage range. See [Engagement Over Time](https://www.airship.com/docs/guides/messaging/in-app-experiences/scenes/create/scene-reports/#performance) in the Performance section of *Scene Reports*.
Usage data is available in the dashboard. See [View Feature Flag and Scene Rollout usage](https://www.airship.com/docs/guides/getting-started/admin/usage-payment/#view-feature-flag-and-scene-rollout-usage).
## Getting started with rollouts
Rollouts for Scenes require the Feature Flags add-on for your Airship plan. However, all [AXP](https://www.airship.com/docs/reference/feature-packages/) plans include one complimentary rollout to try the feature.
You can sliders-horizontal [set up a rollout](https://www.airship.com/docs/guides/messaging/in-app-experiences/scenes/create/#rollout) in the Audience step of a Scene.