**Segmentation data is evaluated at send time.** If you schedule a message that targets a Segment and then edit that Segment, the scheduled message automatically uses the updated Segment criteria. "Scheduled" includes recurring messages. | Select the more menu icon (⋮) for a Segment, then **Edit**, edit as you would a [new Segment](#create-a-segment), then select **Save & exit**. | | **Duplicate**1 | Make a copy of a Segment. Not available for Audience Pulse Segments. | Select the more menu icon (⋮), then **Duplicate**, and then complete the same steps as when [creating a Segment](#create-a-segment). | | **Delete** | Remove a Segment from your project. **Deleting a Segment that is in use may impact messaging.** | Select the more menu icon (⋮), then **Delete**. | {class="table-col-1-20 table-col-2-40"} 1. Some complex Segments created using the API cannot be edited or duplicated in the dashboard. Use the Update Segment API. > **Note:** For projects using the [channel-level segmentation system](https://www.airship.com/docs/guides/audience/segmentation/about/#channel-level-segmentation), use the following reference to manage your Segments: > > | Action | Description | Steps | > | --- | --- | --- | > | **Generate audience count** | Calculate and display the number of [Channel IDs](https://www.airship.com/docs/reference/glossary/#channel_id) in a Segment. | Select **Generate** for a Segment. See [Generate audience count](#generate-audience-count) above. | > | **View details** | Show a Segment's description and targeted audience, as well as the number of Channel IDs and opted-in users per [engagement channel](https://www.airship.com/docs/reference/glossary/#channel_engage) after generating the audience count. | Select the expand icon ( > ) to view details for a Segment and collapse icon ( > ) to close. | > | **Edit**1 | You can edit any part of a Segment. Not available for Audience Pulse Segments that update weekly.
**Segmentation data is evaluated at send time.** If you schedule a message that targets a Segment and then edit that Segment, the scheduled message automatically uses the updated Segment criteria. "Scheduled" includes recurring messages. | Select the edit icon (
> ) for a Segment, edit as you would a [new Segment](#create-a-segment), then select **Save and exit**. |
> | **Duplicate**1 | Make a copy of a Segment. Not available for Audience Pulse Segments. | Select the duplicate icon (
> ), enter a name and description, edit as you would a [new Segment](#create-a-segment), then select **Save and exit**. |
> | **Delete** | Remove a Segment from your project. **Deleting a Segment that is in use may impact messaging.** | Select the delete icon (trash) for a Segment. |
> {class="table-col-1-20 table-col-2-40"}
> 1. Some complex Segments created using the API cannot be edited or duplicated in the dashboard.
> Use the Update Segment API.
# Targeting Specific Users
> Set conditions for message and experience audiences.
You can target specific users based on user data. A channel must meet your conditions to remain in the audience.
## Set conditions
Configure conditions in the Audience step of a message or experiment:
* **Feature Flag configurations and A/B test audiences** — Configure conditions after selecting the **Target Specific Users** audience option.
* **In-App Automations and Scenes** — Configure conditions under **Channel conditions**.
> **Note:** For projects using the [channel-level segmentation system](https://www.airship.com/docs/guides/audience/segmentation/about/#channel-level-segmentation), configure In-App Automation and Scene conditions after selecting the **Target Specific Users** audience option.
Configuration steps for each condition are described on this page.
Use multiple conditions to build a more complex audience. Multiple conditions in a single message are handled as a boolean AND, meaning a user must meet ALL of the conditions to see a message.
Make sure to also specify how messages are handled when audience conditions are not fully met. You can do so at the project level and per message. See [Missed behavior](https://www.airship.com/docs/guides/messaging/project/enable-features/#setting-behavioral-defaults) in *Setting behavioral defaults* and [Override default missed behavior action](https://www.airship.com/docs/guides/messaging/in-app-experiences/configuration/optional-features/#missed-behavior) in *Optional features*.
### App Version
Target users based on the version of your app they have installed.
For each platform:
1. Select one of:
* any version
* is equal to
* is greater than or equal to
* is less than or equal to
* is between — *This option includes boundary values. For example, entering versions 4.3 - 5.1 includes 4.3 and 5.1.*
1. Enter the version number or numbers. For Android apps, enter the versionCode. If you don't know this value, you can find it in your Google Play dashboard.
> **Tip:** Use the App Version target to contact users on older versions of your app and
> encourage them to upgrade to the latest version.
### Device Property
Filter the audience eligible to see your message by targeting users who have or do not have a specific [Device Property](https://www.airship.com/docs/reference/glossary/#device_properties). See the [Device Property Tags reference](https://www.airship.com/docs/reference/data-collection/device-properties/#device-property-tags).
> **Note:** If a device property is available in a different condition (e.g., Locale), it is not available in the Device Property condition.
1. Select *is* or *is not* from the dropdown menu, then enter a term in the search field and select from the results. A device property tag's type is listed below the tag name.
To filter results, select the down arrow icon (▼) below the search box, then select a type of device property. You can select a filter after entering a search term.
1. (Optional) Select the add icon (+) to add another device property. If using an *is not* selector, you cannot add another device property in the same condition. For each additional tag, select *and* or *or* from the dropdown menu.
* **and** = all criteria must be met (boolean AND)
* **or** = any criteria must be met (boolean OR)
### Locale
Target users based on their device's [Locale](https://www.airship.com/docs/reference/glossary/#locale).
Select language and country. Country is optional. Select **Add additional locale** for more locales.
**Examples:**
* To display a message in French to users that have a country code of France, select both French and France.
* To display a message in French to all users that have their language set to French, regardless of country setting, select French and do not select a country.
### Location Opt-in Status
Target users based on their opt-in status to Location. Select **Opted in** or **Opted out of location**.
### New Users
Select **New Users** to ensure your message is seen only by users who have
freshly installed your app.
New Users are detected on the first app startup, and a user becomes eligible to
receive all messages targeting a New User at that time. The actual message has
the potential to be displayed in the future, however, depending on the other
display rules (e.g., triggers) selected.
Users will not see New Users-targeted messages that are published after the
first time the app was run. However, they will see edits to message content.
> **Note:** Users who remove and reinstall the app become re-eligible for messages targeting New Users. App version updates are not installs.
> **Tip:** New Users is useful for targeting users with a "Welcome" message, which the
> user will see the first time they open your app. Our SDK will download and
> display messages to a new user if they’re set to be triggered on the next
> [app open](https://www.airship.com/docs/guides/messaging/in-app-experiences/configuration/triggers/#app-open).
>
> You can also use the New User target to orchestrate a series of onboarding
> messages by triggering a different message to display on the second, third,
> and fourth app open, for example.
### Platforms {#platforms}
Filter the eligible audience for your message to those on a specific platform.
Check the box for *iOS*, *Android*, and/or *Fire OS*.
> **Tip:** Create platform-specific content and functionality in your messages.
### Predicted to Churn {#predictive-churn}
Target users based on their likelihood to abandon your app.
[Predictive Churn](https://www.airship.com/docs/guides/features/intelligence-ai/predictive/predictive-churn/)
analyzes your audience for users that exhibit behaviors indicating they are
likely to become inactive, and tags the users as High, Medium, or Low Risk.
Select a risk group.
### Push Opt-in Status {#opt-in-push}
Target users based on their opt-in status to Push. Select **Opted-in** or **Opted-out of push notifications**.
> **Tip:** Some example uses include:
>
> * Present new users who are opted out of push with a message giving them
> reasons to opt in during onboarding.
> * Retarget long-time users who never opted in to push with messages giving
> them reasons to opt in.
> * Market features specifically to users who are opted in to push.
### Segments
Filter your audience based on whether they meet a set of conditions you define. To configure the condition, follow the same process as building a [Segment](https://www.airship.com/docs/reference/glossary/#segment).
> **Note:** For In-App Automations and Scenes, the **Segments** condition is only available for projects using the [channel-level segmentation system](https://www.airship.com/docs/guides/audience/segmentation/about/#channel-level-segmentation).
>
> If your project uses Contact-level segmentation, add a Segment under **Audience selection** instead: select **Target by conditions**, and then add your Segment.
### Tags {#target-tags}
Filter the audience eligible to see your message by targeting users who have or
do not have a specific tag or tag group. For [device property tags](https://www.airship.com/docs/reference/glossary/#device_properties) use the [Device Property](#device-property) condition instead.
> **Note:** [Server-side](https://www.airship.com/docs/guides/audience/segmentation/about/#client-server) tags cannot be targeted directly. You must first [create a Segment](https://www.airship.com/docs/guides/audience/segmentation/segments/) that includes this data, then select that Segment when configuring your audience. See the [Segments condition](#segments) above.
1. Select **is** or **is not**, and then enter a term in the
search field.
To filter results, select the down arrow icon (▼) next to the search field, then
select **Tags** or a specific tag group. You can select a filter before or
after entering a search term.
1. From the search results box, do one of:
* Click to **select a tag** from the listed results. A tag's tag group, if
any, is listed below the tag name.
* **Select a tag group** from the dropdown menu.
* Click the button to **create a new tag**.
1. (Optional) Select the add icon (+) to add another tag. If using an *is not* selector, you cannot add another tag in the same condition. For each additional tag, select **and** or **or**.
* **and** = all criteria must be met (boolean AND)
* **or** = any criteria must be met (boolean OR)
> **Tip:** **Example use case:** Educate specific users about your app's Store Finder
> feature.
>
> 1. Create an In-App Message about the Store Finder feature, and target users
> who do not have the tag `store_finder`.
>
> 1. Associate the tag `store_finder` with a message
> [action](https://www.airship.com/docs/guides/messaging/in-app-experiences/configuration/button-actions/#set-tag) or when the message is displayed.
> This ensures that users who have seen the message will not see it again.
# Bulk sending
> Send messages to lists of users by providing audience identifiers at send time, either directly in the request or by first creating a bulk audience ID.
Bulk sending eliminates the need to add users to your project ahead of time. For example, you can send messages to a list of users generated from [Performance Analytics](https://www.airship.com/docs/reference/glossary/#pa) or other reporting platforms without having to re-create your audience criteria.
To address existing channels by [Channel ID](https://www.airship.com/docs/reference/glossary/#channel_id), use the [Upload and Send](#upload-and-send) method. To send to email addresses, phone numbers, or Open channel addresses, use [Create and Send](#create-and-send), and any unregistered addresses will be registered as new channels at send time.
## Upload and Send
Upload and Send targets existing channels by [Channel ID](https://www.airship.com/docs/reference/glossary/#channel_id) across app, web, email, SMS, and Open channels.
To use this method, first prepare a CSV file of Channel IDs (see [CSV formatting](#csv-formatting) for requirements), and then:
* **Dashboard:** In the [Message composer](https://www.airship.com/docs/guides/messaging/messages/create/), select **Upload users** in the Audience step, and upload your CSV in the Review step.
* **API:** Upload your CSV to the [Create bulk send audience endpoint](https://www.airship.com/docs/developer/rest-api/ua/operations/bulk-sending/#bulkuploadcreateandsendplatform) to obtain a `bulk_id`, and then send your message using the [Send message with bulk ID](https://www.airship.com/docs/developer/rest-api/ua/operations/bulk-sending/#bulksendpush) or [Schedule message with bulk ID](https://www.airship.com/docs/developer/rest-api/ua/operations/bulk-sending/#schedulebulksendpush) endpoint.
## Create and Send
*Create and Send* is a way to target recipients of a single channel type by providing a list of user identifiers when creating a message. You can send to email addresses, phone numbers, or Open channel addresses. Unknown identifiers are registered as new channels.
You can provide your identifiers as CSV in the dashboard or API, and the API also supports an array method:
| Use | ID format | Steps |
| --- | --- | --- |
| **Dashboard** | CSV | In the [Message composer](https://www.airship.com/docs/guides/messaging/messages/create/), select **Upload users** in the Audience step, and upload your CSV in the Review step. |
| **API** | CSV | First, upload identifiers in CSV format to the [Create bulk send audience](https://www.airship.com/docs/developer/rest-api/ua/operations/bulk-sending/#bulkuploadcreateandsendplatform) endpoint to obtain a `bulk_id`. Then, send your message using the [Create and Send a message](https://www.airship.com/docs/developer/rest-api/ua/operations/bulk-sending/#createandsend) or [Schedule a Create and Send message](https://www.airship.com/docs/developer/rest-api/ua/operations/bulk-sending/#schedulecreateandsendoperations) endpoint. New channels are created at send time, not when requesting the ID. |
| **API** | Array | Include audience identifiers in the `create_and_send` array within the `audience` object when calling the [Create and Send a message](https://www.airship.com/docs/developer/rest-api/ua/operations/bulk-sending/#createandsend) or [Schedule a Create and Send message](https://www.airship.com/docs/developer/rest-api/ua/operations/bulk-sending/#schedulecreateandsendoperations) endpoint. |
The Create and Send endpoints also support sending to app and web Channel IDs using a `bulk_id`, but it works identically to [Upload and Send](#upload-and-send).
## Usage guidelines
Bulk send methods have the following limitations:
* Channels must all be of the same type.
* Each `bulk_id` can only be used once. After sending, the bulk audience data is deleted.
* [CSV columns](#csv-formatting) not prefixed with `ua_` are used for message personalization only and are not saved as channel attributes.
* Bulk sends support only a single device type per request. Setting multiple `device_types` returns a 400 response.
* [Optimal Send Time](https://www.airship.com/docs/reference/glossary/#optimal_send_time) is not supported.
## CSV formatting
CSV files must be smaller than 150 MB, with a maximum of three million rows. The header row is case-sensitive and must contain the required `ua_`-prefixed channel fields as column headers, with values in corresponding fields. Airship ignores rows that are empty or contain malformed channel information.
### Using Channel IDs
Use Channel IDs for [Upload and Send](#upload-and-send).
* The first column header must be `ua_channel_id`. Entries in the first column contain the target Channel ID.
* Your audience must all belong to the same device type. For App channels, this means one of iOS, Android, or Fire OS channels at a time. For example, if you want to send a message to both iOS and Android channels, you must curate separate lists of iOS and Android users and send two separate messages.
### Using email, SMS, or Open channel identifiers
Use email addresses, phone numbers, or Open channel identifiers for [Create and Send](#create-and-send).
* The first column header varies per channel. Entries in the first column contain the target identifier.
* For existing channels, you must provide an `opted_in` date-time value that is newer than an `opted_out` value on the channel.
> **Important:** Setting a newer `opted_in` date-time value within the CSV data does not update the `opted_in` value on the channel. It only overrides the `opted_out` value to send the current message. You must update the `opted_in` value using the appropriate channel API to opt it back in to your messaging audience.
* Opt-in/out dates must be formatted as ISO 8601 strings. See [Date-Time Format](https://www.airship.com/docs/developer/rest-api/ua/introduction/#date-time-format) in the API reference.
Required fields and formatting per channel type:
**SMS**
* First column header: `ua_msisdn`
* First column values: A [MSISDN](https://www.airship.com/docs/reference/glossary/#msisdn)
* Additional headers:
* `ua_sender`
* `ua_opted_in` — The date-time when the user subscribed to messages.
**Email**
* First column header: `ua_address`
* First column values: An email address
* Additional headers:
* `ua_commercial_opted_in` or `ua_commercial_opted_out` — The date-time when the user subscribed to or unsubscribed from messages. An opt-in or -out date is required for commercial emails. You can also provide dates for `ua_transactional_opted_in` or `ua_transactional_opted_out`, but they are optional. Opt-in/out dates are mutually exclusive. Providing a date for both opted in and opted out in the same row is considered invalid.
* `ua_open_tracking_opted_in` or `ua_open_tracking_opted_out` — The date-time when the user opted in to or out of tracking. By default, new channels are opted in to both open and click tracking. A channel can be opted out of tracking by setting an opted out date. The channel can be opted back in to tracking by setting an opted in date that is newer than the opted out date. Providing a date for both opted in and opted out in the same row is considered invalid.
* `ua_click_tracking_opted_in` or `ua_click_tracking_opted_out` — Same rules as open tracking above.
* `ua_email_suppression_state` — With value `BOUNCE`, `SPAM_COMPLAINT`, `COMMERCIAL_SPAM_COMPLAINT`, or `IMPORTED`. See [Suppression types](https://www.airship.com/docs/developer/api-integrations/email/bounce-handling/#suppression-types) in *Email Bounce Handling and Suppression*.
* `timezone` — Format time zones according to the IANA time zone database. For example, `America/Los_Angeles`.
**Open**
* First column header: `ua_address`
* First column values: A unique address that your Open channel uses
**CSV example for a Create and Send email**
```text
ua_address,ua_commercial_opted_in,name,city,state
someone@example.com,2022-04-01T18:45:30,Joe Someone,Portland,OR
else@example.com,2022-04-21T16:13:01,Sir Else,Seattle,WA
```
## Personalization
All bulk send methods support [personalization](https://www.airship.com/docs/guides/personalization/about/). Your CSV can contain additional columns for personalizing messages using [Handlebars](https://www.airship.com/docs/reference/glossary/#handlebars). All values in CSV uploads, including numbers, are represented as strings and cannot be used with [math helpers](https://www.airship.com/docs/guides/personalization/handlebars/math-helpers/).
When sending to a `bulk_id`, include `"personalization": true` in the `options` object of your send request. Personalization is enabled automatically for the array method and dashboard sends.
See [Personalize your Create and Send messages](https://www.airship.com/docs/guides/personalization/sources/create-and-send/).
# Audience Pulse
> {{< glossary_definition "audience_pulse" >}}
Turn user activity data into actionable insights with tier-based reports and AI-powered recommendations.
## About Audience Pulse
Audience Pulse applies the Recency, Frequency, Monetary (RFM) method and assigns users to tiers based on the following:
* How recently they performed an event
* How frequently they performed an event
* The amount of time or money they spent related to an event
Events are analyzed across all channels for a user. Each event is evaluated on the channel where it occurred. Activity from all connected channels together provides a holistic view of user engagement.
Two reports display the tier data:
* The [Distribution report](#distribution) shows the relative size of each tier at a single point in time, so you can see how your audience is spread across tiers and gauge overall user activity.
* The [Transitions report](#transitions) shows how users move between tiers from one week to the next, so you can see how well you are retaining users and how effective your campaigns are.
Both reports also list the user count, audience percentage, and median monetary value for each tier.
At first, each report looks back over the analysis window from the current date and again from one week prior. For example, with a 30-day window, you see the past 30 days through today and the past 30 days through a point seven days ago. Analysis regenerates weekly, so reports stay up to date and you gain more weeks for tracking tier transitions.
A project supports up to three models at a time. In each model, choose the events and properties used for Recency, Frequency, and Monetary analysis, such as purchases, cart adds, or time with editorial content. When reports are ready, save tier or transition selections as [Segments](https://www.airship.com/docs/reference/glossary/#segment) and use them for more targeted campaigns.
### Events to analyze
You can use a different event for Recency, Frequency, and Monetary to tailor analysis to your business goals and how users interact with your channels. Select any [Custom Event](https://www.airship.com/docs/reference/glossary/#custom_event) in your project or a Default Event.
For Monetary, you must also select an event property so analysis can use a numeric value, not only an event count. With that property, you can track metrics such as purchase amount, content consumption duration, or any other relevant numerical data.
All channels are supported, but Default Events are limited to the following:
* App: `app_open` or `message_center_read`
* Web: `web_click` or `web_session`
* Email: `email_click`, `email_open`, `email_unsubscribe`, or `email_bounce`
* SMS: `short_link_click`
See [Events](https://www.airship.com/docs/guides/audience/events/about/) and the [Events Reference](https://www.airship.com/docs/reference/data-collection/events/).
### Analysis window
Each model uses an analysis window you choose to fit your user lifecycle. Only users with at least one event occurrence during that window are included in the analysis.
### Segments
After analysis completes for a model, create [Segments](https://www.airship.com/docs/reference/glossary/#segment) from selections in its Distribution or Transitions reports. Use those Segments to reach users by current tier or by how tier membership shifts between analysis runs.
Segments update weekly when analysis regeneration is complete, and segmentation data is evaluated at send time. If you schedule a message that targets an Audience Pulse Segment, the scheduled message automatically uses the latest Segment criteria. "Scheduled" includes recurring messages.
You have the option to save a Segment with its current values only instead of letting it update weekly.
Use cases:
* **Personalization** — Different tiers can represent users at different stages of using your app or different levels of interest in your product. Use Segments based on tiers to tailor messaging to each group. For example, reward your top tiers and incentivize the lower ones.
* **Engagement** — Transitions between tiers are opportunities to provide specific content based on engagement level. Create Segments based on transitions to reach users when tier membership changes, including the direction of movement and the tiers involved. For example, create a re-engagement campaign for users moving down tiers to help retain them, or send a message suggesting users share your app or write a review when they transition into the top tier.
### Analysis, tiers, and tagging
For each Recency, Frequency, and Monetary category, users are divided into groups: top, middle, and bottom thirds. The groups are in relation to all the other users in the category. Here are a few examples to illustrate:
* A user who visited the app the most recently will fall into the top third of the Recency category, because they are in the top 33% of recent visitors. A user who opened the app the furthest back in time in the analysis window will be in the bottom third.
* Users who opened the app more times than the bottom two thirds of the audience will fall into the top third of the Frequency category. Users who opened the app fewer times than the top two thirds of the audience will land in the bottom third.
* A user who spent the most time in the app will fall into the top third of the Monetary category. A user who spent the least time in the app will land in the bottom third.
Each third has a value: 3 for top, 2 for middle, and 1 for bottom. Each user is represented by a combination of these distributed values. For example:
* A user at the top third for Recency, middle for Frequency, and top for Monetary is represented as 323.
* A user at the top third for Recency, bottom for Frequency, and middle for Monetary is represented as 312.
Users are assigned a tier based on their distribution.
Tier descriptions and distributions:
| Tier | Description | Distributions |
| --- | --- | --- |
| **Champions** | Users who performed the analyzed event most recently, most often, and spent the most on it | 333 |
| **Loyal Customers** | Users who performed the analyzed event recently, often, and spent a great amount on it | 332, 233 |
| **Potential Loyalists** | Recent users who spent a good amount on the event | 223, 323, 322, 232 |
| **Recent Customers** | Users who visited most recently but haven't yet moved into the Potential Loyalists tier and could easily go down in ranking | 311, 313, 312, 331, 321 |
| **Promising** | Users with average Recency scores and potential to increase Frequency or Monetary scores | 222, 221, 212, 213, 231 |
| **Need Attention** | Users who haven't performed the analyzed event in a while or have low Frequency and Monetary scores and whose Recency is fading | 123, 113, 211 |
| **At Risk** | Users with above average Frequency but who haven't performed the analyzed event for a long time, so are strong candidates to re-engage | 122, 132, 131 |
| **Can't Lose Them** | Users who have spent a great amount and performed the analyzed event often but not recently | 133 |
| **Hibernating** | Users whose last visit was a while ago, have infrequent visits, and have not spent much | 111, 112, 121 |
When assigned a tier, [Tags](https://www.airship.com/docs/reference/glossary/#tag) describing the tier and analysis window date are assigned to users. Tags are added at the [Contact level](https://www.airship.com/docs/guides/audience/your-audience/#data-storage).
### Running multiple models
You can run up to three models at a time in a project. Each model has its own event configuration, analysis window, Distribution and Transitions reports, and Segments.
Multiple models give you parallel analyses that stay independent:
* **Compare settings** — Try different events or analysis windows without losing existing data, and keep the model that works best for your goals.
* **Different segments, different goals** — Different parts of your audience may drive different outcomes. Run separate models and create Segments from each. For example, run one model for purchase value, one for app engagement, and one for content consumption.
* **Multiple business goals** — Evaluate several goals at once, such as revenue, engagement, and retention, each with its own model.
* **Understand tier value** — See the median monetary value of users in each tier. The value is shown in the Distribution and Transitions reports and feeds [AI recommendations](#ai-recommendations).
## Add models and generate tiers
Add a new model and start analysis:
1. Go to **Audience**, then **Audience Pulse**.
1. Select **Add model**, or **Generate Audience Pulse** if you have no models yet.
1. Enter a name for the model so you can distinguish it from others.
1. Select events to measure for recency, frequency, and monetary value. They are set to `app_open` by default.
1. For the **Monetary** event, select an event property for the time or monetary amount the user spent on the event, such as the property named **Time in app**. The menu includes all properties with numeric or `ANY` values.
1. For **Analysis window**, select a time period that matches your user lifecycle.
1. Select **Start**. Analysis and tier generation will begin.
The processing time for generating the tiers can vary depending on the size of your audience and the analysis window. You can leave the page during this process.
## Manage models
Go to **Audience**, then **Audience Pulse** to view and manage your models. The list includes the model name, events, analysis window, status, and date range.
To change the name, select the more menu icon (⋯) for a model, then **Edit**. Enter a new name, then select **Update**.
To delete a model from your project, select the more menu icon (⋯) for a model, then **Remove**. Removal does not affect your remaining models.
## Access reports and create Segments
To access the Distribution and Transitions reports, go to **Audience**, then **Audience Pulse**, and select a model name.
If analysis has not yet completed, **In progress** appears in the date range column. After selecting the model name, the only available action is **Stop**, which will stop analysis and remove the model from your project.
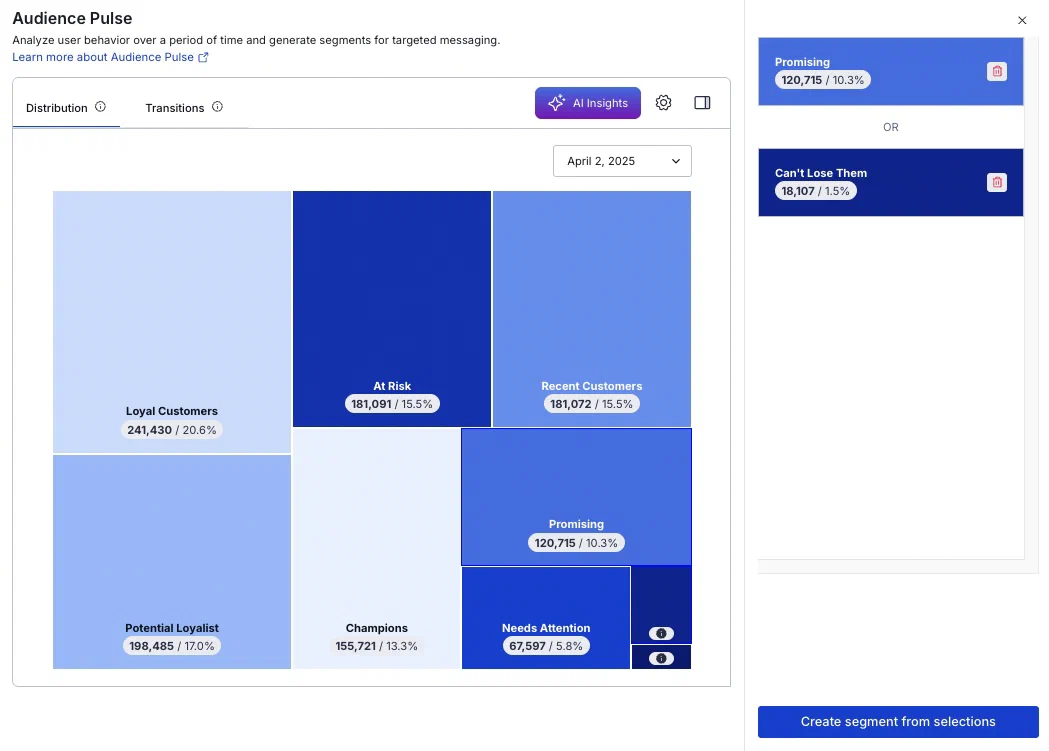
### Distribution
The Distribution report shows the relative size of each tier, plus user count and audience percentage. Hover over a tier to see its description, median monetary value, and monetary event property.
*Audience Pulse Distribution report*
To create a Segment from tiers:
1. Select one or more tiers, and they will appear in a list in the sidebar. To remove a tier from the list, select the remove icon (trash) or select it again in the report. Multiple tiers are handled as a boolean OR. Select the sidebar icon (◨) to collapse or expand the sidebar.
1. Select **Create segment from selections**.
1. Enter a Segment name.
1. (Optional) Enter a description.
1. (Optional) Disable **Update weekly** to save the Segment with the current values only. **You cannot change this behavior later.** See [Segments](#segments).
1. Select **Save Segment**.
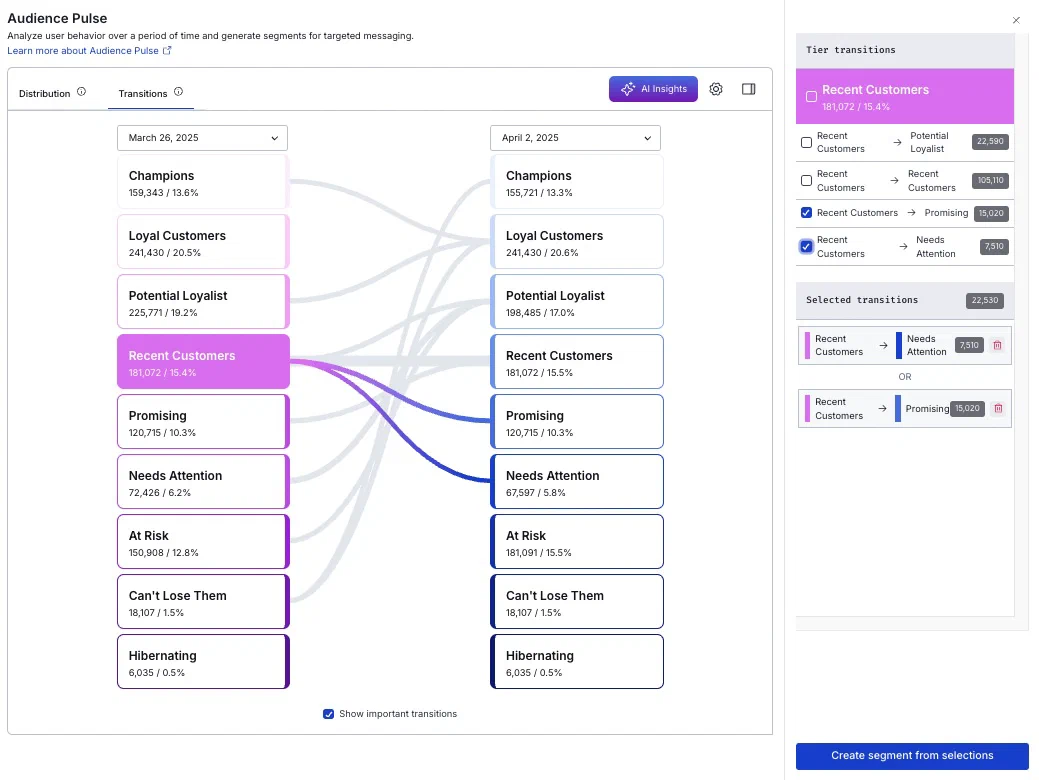
### Transitions
The Transitions report shows the tiers in columns for two selected weeks, and each tier's user count and audience percentage. Connecting lines indicate the movement of users between tiers from one week to the next. Hover over a tier to see its description, median monetary value, and monetary event property.
High volume transitions are highlighted. These are the top 30% of transitions by number of users who moved between tiers. Uncheck **Show important transitions** to remove highlighting.
*Audience Pulse Transitions report*
Select new dates to update the displayed transitions. Select a tier in either column, and all transitions into and out of that tier will be listed in the sidebar, with the number of users in each transition group.
To create a Segment from users who transitioned between tiers for your selected dates:
1. Select tiers to add them to the sidebar list.
1. Select the tier name in the sidebar to include all transition groups or select individual groups. Repeat for additional tiers. Multiple transitions are handled as a boolean OR. Select the sidebar icon (◨) to collapse or expand the sidebar.
1. Select **Create segment from selections**.
1. Enter a Segment name.
1. (Optional) Enter a description.
1. (Optional) Disable **Update weekly** to save the Segment with the current values only. **You cannot change this behavior later.** See [Segments](#segments).
1. Select **Save Segment**.
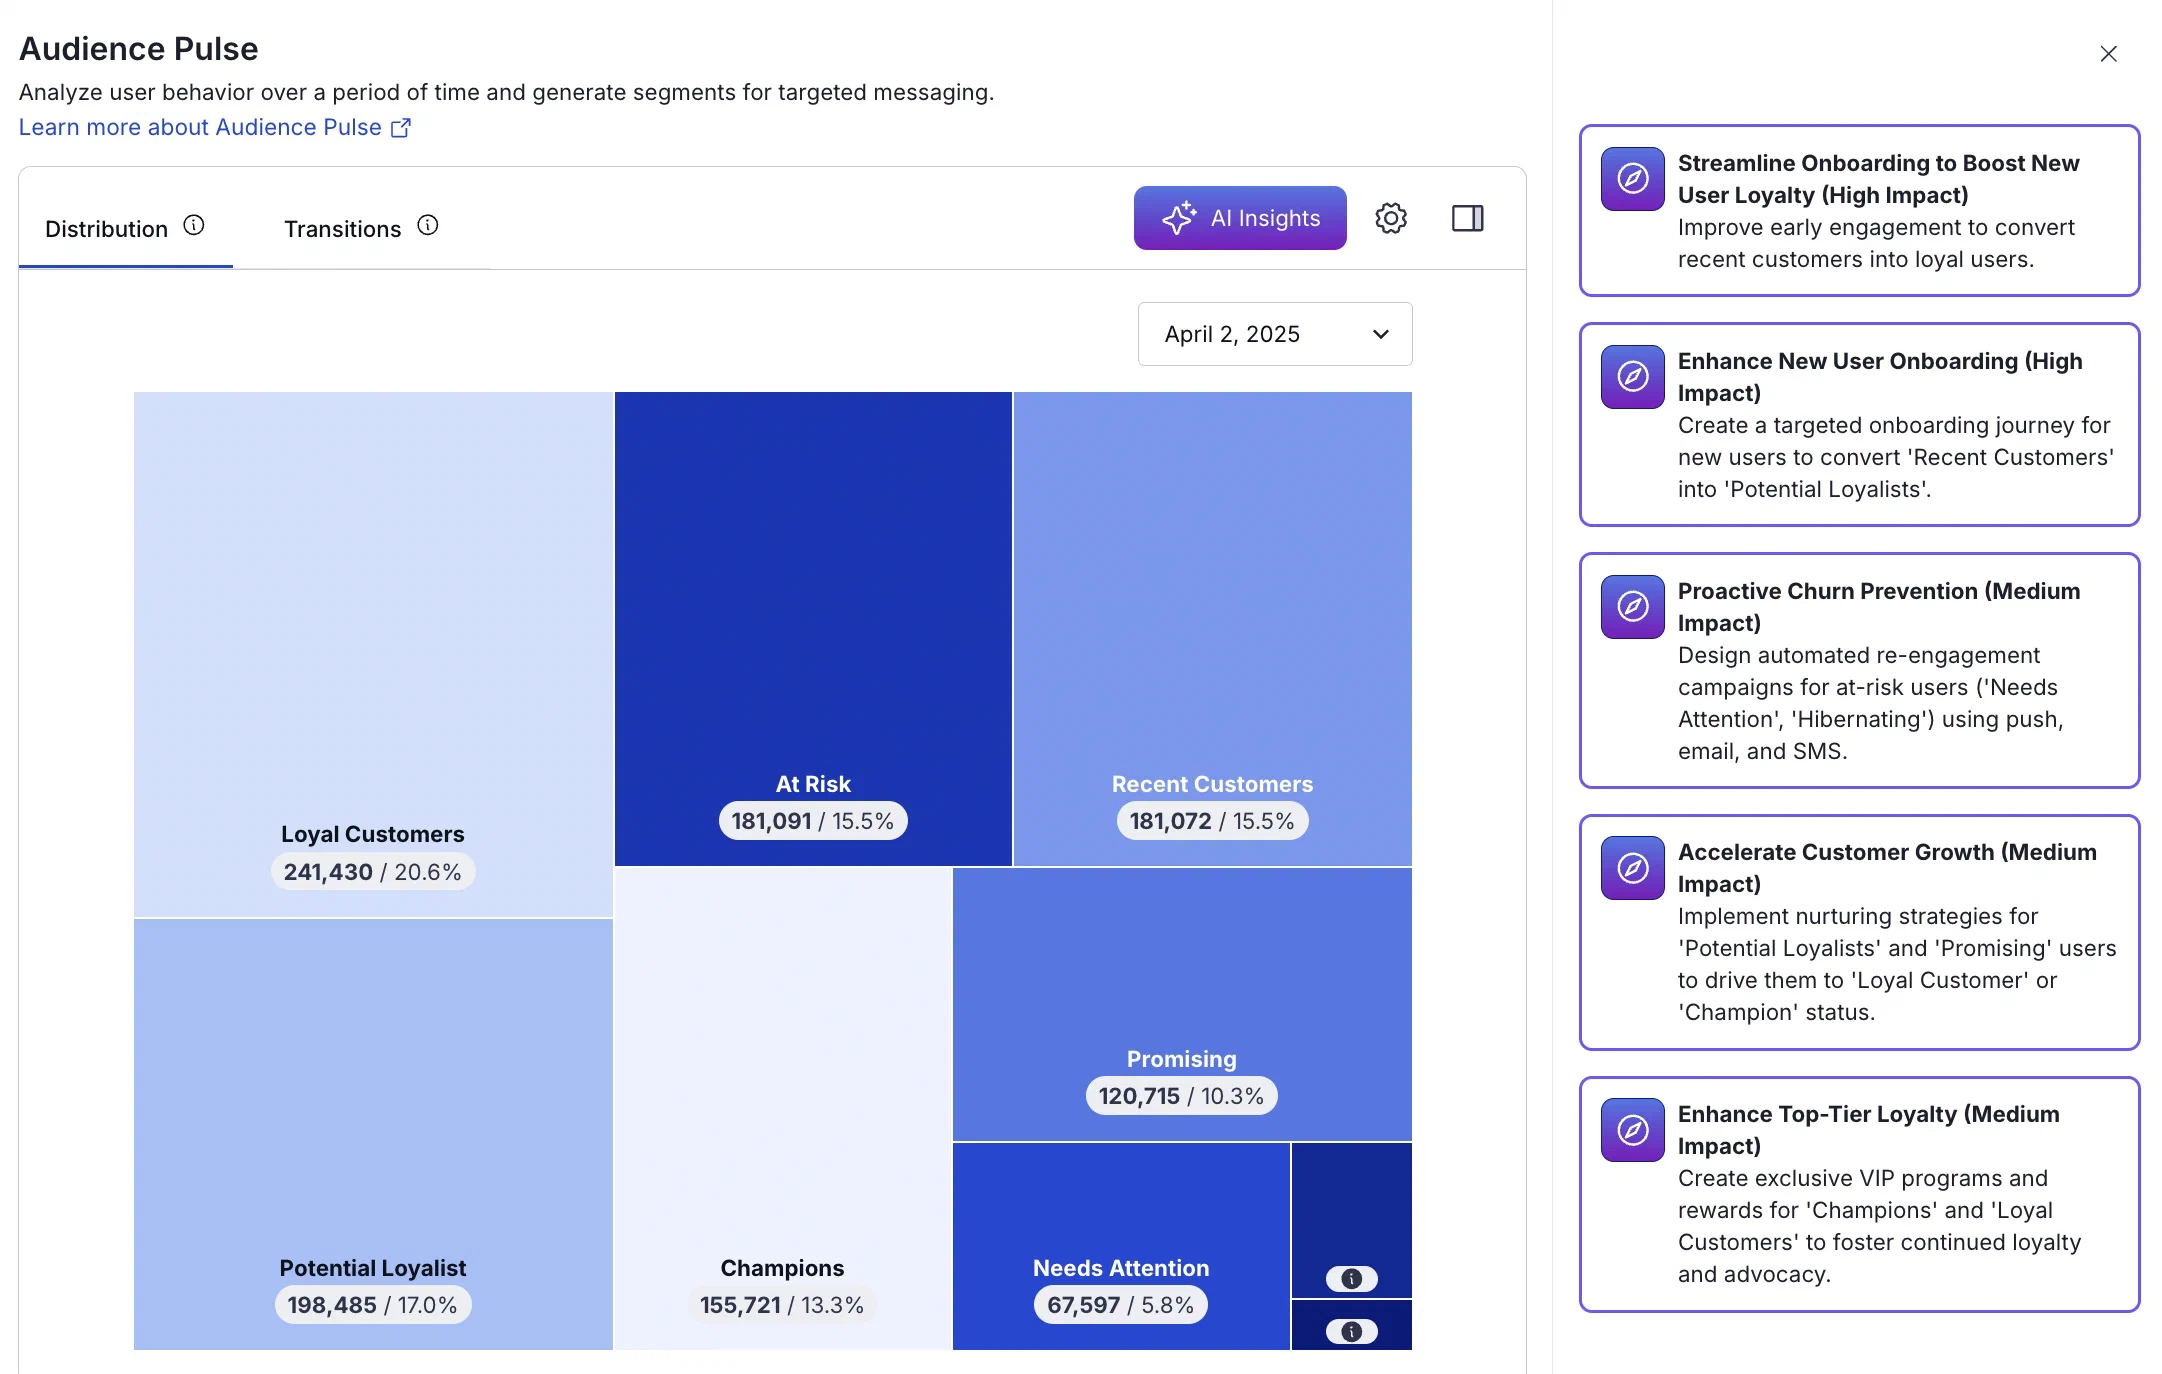
### AI recommendations
[AXP](https://www.airship.com/docs/reference/feature-packages/) [Agentic & Generative AI](https://www.airship.com/docs/guides/features/intelligence-ai/ai/)
For [AXP Enterprise plans](https://www.airship.com/docs/reference/feature-packages/), apply AI analysis for deeper insights into audience activities and get actionable recommendations to build more effective, targeted campaigns. Recommendations use tier median monetary value from your models to surface insights.
To access your recommendations in Audience Pulse, select **✨ AI Insights**. A drawer will expand and display summary cards for five recommendations. Select a card to see the details:
* **Why this matters** describes the discovered trend and the importance of addressing it.
* **Recommendations** provides the recommended course of action and implementation instructions. Recommendations can include messages, experiences, [Journeys](https://www.airship.com/docs/reference/glossary/#journey), and experiments.
If there is an error in processing, you can select **Generate new recommendations**.
*Audience Pulse with AI recommendations*
For even more relevant recommendations, add your brand's homepage URL for analysis. Homepage text provides context to ensure insights are a better fit for your brand. The industry setting for your project is also taken into account.
To edit your industry and URL, select the dropdown menu (▼) next to your project name, then **Project details**. The current values are processed each time AI recommendations are run.
> **Note:** **Opting In to AI Functions**
>
> If you opted out of AI usage, you must sign an updated contract to enable this feature. Contact your account manager for assistance.
>
> **Compliance Considerations in Using AI Functions**
>
> The Service incorporates AI functions, including Generative AI and Agentic AI.
>
> Generative AI generates content such as Notification copy, images, and Journeys based on your prompts.
>
> Agentic AI autonomously optimizes, personalizes, or executes cross-channel customer engagement actions, or analyzes audience and performance data, subject to the parameters and controls you set in the Service. These systems operate under human-defined parameters and do not initiate customer-facing actions without human interaction or pre-configured parameters. You are responsible for reviewing Generated Outputs for accuracy, appropriateness, and to ensure they do not violate third-party intellectual property or other rights. Airship does not publish Generated Outputs to end users without approval from the Customer.
>
> In addition to the applicable terms of your agreement with Airship (e.g., Use of Service, Customer Responsibilities sections), you must comply with the [Airship Acceptable Use Policy](https://www.airship.com/legal/acceptable-use/), which provides additional details about appropriate conduct when using the Service.
>
> The Service includes safety features to block harmful content, such as content that violates our Acceptable Use Policy. You may not attempt to bypass these protective measures or use content that violates your agreement with Airship.
>
> About the AI models:
>
> Airship utilizes Google Gemini and Imagen to generate copy and images for AI Scene screens. The content is created solely with Google's out-of-the-box models, and no customization or fine-tuning with Customer Data is applied. See [Responsible AI](https://cloud.google.com/responsible-ai?hl=en) in Google's *Google Cloud* documentation.
## Manage saved Segments
Go to **Audience**, then **Segments** to view and manage your saved Segments. See [Manage Segments](https://www.airship.com/docs/guides/audience/segmentation/segments/#manage-segments).
# Ban Lists
> {{< glossary_definition "ban_list" >}} {{< badge "axp" >}}
> **Important:** You are responsible for maintaining any Ban List, including accuracy and timing of its updates. Please verify with your legal and compliance teams:
>
> * that any Ban List provided to the Airship Service is compliant with local regulations regarding which End Users should be added to a Ban List;
> * scenarios when communications are appropriate to audience members on a Ban List;
> * timing of required updates to the Ban List under applicable industry and local regulatory standards.
>
> Airship does not monitor and is not otherwise responsible for the Ban List content and modifications that have to be made to the Ban List.
## About Ban Lists
A Ban List has these components:
* **Your record of banned users** — These may be users compiled from "Do not contact me" responses or any other reason to omit them from messaging.
You decide the record's format and storage location outside of Airship. Each user must be associated with a [Channel ID](https://www.airship.com/docs/reference/glossary/#channel_id) or [Named User](https://www.airship.com/docs/reference/glossary/#named_user). We recommend Named User since it maps to all Channel IDs associated with a user. Named User must already be implemented for your project.
* **An external [webhook](https://en.wikipedia.org/wiki/Webhook)** — This is an HTTP callback Airship uses to access your record of banned users. You configure the callback and provide Airship with a request URL formatted for querying your data.
The webhook must provide a specific response when a match is found. You can format the request URL to use Channel ID, Named User, or both. You can also format it to pass variables. You set a default value for the variable when setting up the URL and can [override the values](#overriding-variable-default-values) for individual messages.
* **A Ban List configuration in your Airship project** — You will enter your request URL and confirm Airship is authorized to use it for its intended purpose.
Once the above items are in place, this is the Ban List workflow:
1. Airship makes an API call to your webhook for every Channel ID in a message audience. For In-App Automations and Scenes, the Ban List is checked immediately before display. For all other messages, it is checked at send time.
1. Your webhook checks your record of banned users for matches for each Channel ID. If a match is found, the webhook sends a response telling Airship to drop the matched user.
1. Airship drops the send for each match.
Only necessary data to prevent users from receiving messages is captured during time of send and is not stored beyond what is necessary for that purpose. Airship does not access or store administrative configurations related to your Ban List.
You can set up one Ban List per project.
Support for [In-App Automation](https://www.airship.com/docs/reference/glossary/#iaa) and [Scenes](https://www.airship.com/docs/reference/glossary/#scene) requires: [iOS SDK 18.4+](/docs/docs/developer/sdk-integration/apple/ios-changelog/#18.4.0) (Android SDK 18+)
> **Warning:** Ban Lists do not work with email addresses or [MSISDNs](https://www.airship.com/docs/reference/glossary/#msisdn) in [Create and Send](https://www.airship.com/docs/reference/glossary/#create_and_send) CSVs since Ban Lists must match against existing user data.
### Throttling
Using an external Ban List can mean a lot of API calls in a short period of time. When configuring your Ban List in Airship, you can set a frequency rate for your requests. The minimum rate is 100 requests per second.
### Bypassing
You can bypass your Ban List when sending business-critical or otherwise required messages, such as privacy policy update notifications. Bypass is supported for both the API and dashboard.
### Reporting
A `SEND_ABORTED` event occurs when a recipient is dropped from our system before delivery is attempted, with `reason` value `FEED_BANNED_RESPONSE`.
`SEND_ABORTED` is not reported for dropped In-App Automations or Scenes. Instead, the app SDK sends an `IN_APP_MESSAGE` event with resolution `IN_APP_MESSAGE_EXCLUSION` when a recipient is dropped.
See the events and examples in the *Real-Time Data Streaming API* reference:
* [Send Aborted](https://www.airship.com/docs/developer/rest-api/connect/schemas/events/#send-aborted)
* [In-App Message Exclusion](https://www.airship.com/docs/developer/rest-api/connect/schemas/events/#in-app-message-exclusion)
Each dropped recipient counts toward the Not Sent count in a [message report](https://www.airship.com/docs/guides/reports/message/).
### Webhook requirements
When you send a message, Airship will make an API call to your webhook with a URL parameter containing a Named User ID and/or Channel ID. Your server must return a header indicating Airship should drop a matched user from the send.
Set up your webhook to return an `X-UA-Segmentation-Action` header to specify an action to be taken by Airship. The only value supported is `drop`, to drop the recipient from the send. This header is valid only for 200- and 400-level status codes and is ignored if provided for 300- or 500-level status codes. It is also ignored if the value is not recognized or the header is missing. Any response with a 200-level status code that does not contain a `drop` value in the header will allow sending to the recipient.
## Formatting your request URL
Your request URL is used to retrieve the user data. You will enter it in the dashboard when configuring your Ban List. It comprises your domain, protocol, path, and any variables you want to include.
Guidelines:
* The URL **must contain** a parameter for the identifiers in your Ban List, one of:
* `?channel_id={{$channel.id}}`
* `?named_user={{ua_named_user_id}}`
* `?named_user={{ua_named_user_id}}&channel_id={{$channel.id}}`
* Use double square brackets (`[[var]]`) for send time, or *message-level*, variables.
This example request URL has a send time variable `category` and the parameter for Named User: `https://api.example.com/ban-list/[[category]]?named_user={{ua_named_user_id}}`.
## Configuring your Ban List
[Owners and Administrators](https://www.airship.com/docs/guides/getting-started/messaging/teams-and-access/#access-levels) can configure a project's Ban List.
In the Airship dashboard:
1. Next to your project name, select the dropdown menu (▼), then **Settings**.
1. Under **Project settings**, select **Dashboard Settings**.
1. Select **Configure** for Ban List.
1. Configure the list settings:
| Setting | Description | Steps |
| --- | --- | --- |
| **Request URL** | The URL to retrieve the user data from. See [Formatting your request URL](#formatting-your-request-url). | Enter the request URL. |
| **Default value for \
* **Email segments**
* *Email Sent* — The entire email audience.
* *Email Opened* — Any email address with at least one open event associated with it for the message.
* *Email Clicked* — Any email address with at least one click event associated with it for the message, excluding clicks on the unsubscribe link. Only HTTP and HTTPS links are tracked.
* *Email Opened, No Click* — Any email address with at least one open event associated with it for the message, but zero click events.
* *Email Sent, not opened or clicked* — Any email address that has no open or click events associated with it for the message.
---
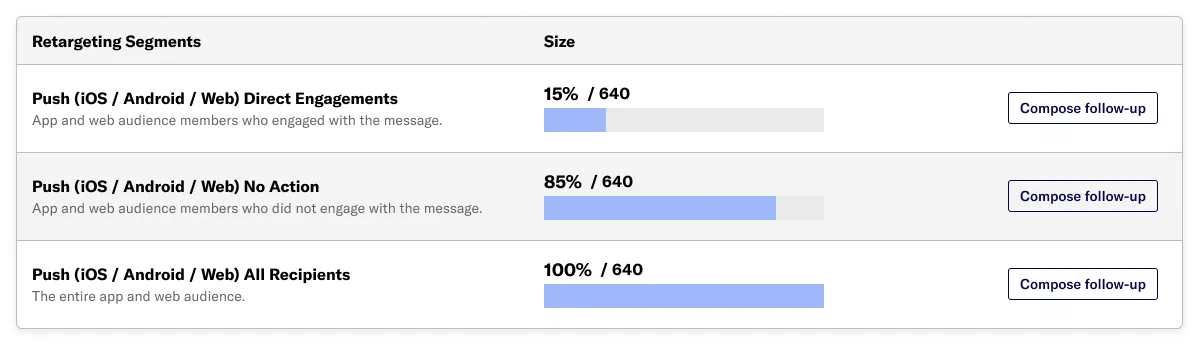
You can send a follow-up message to any of your retargeting segments.
* The original message is considered the *parent*, and the follow-up message is the *child*.
* The selected channels for the follow-up message must be the same as the parent, and the message type for the app channel must be push notification only; app channel message types cannot be combined.
* Your follow-up message is a copy of the parent message, with the following differences in the *Audience* step:
* *Target Specific Users* is selected and set to your selected retargeting segment. You can add additional criteria to narrow down the retargeted audience.
* If the parent message included multiple app platforms, you can disable app platforms, but you cannot select additional ones.
> **Note:** **Multi-channel messages**
>
> If the parent message targets multiple channels, you will be presented with an option to set up follow-up messages for *each channel* individually. Child messages are specific to the channel they are tied to, and never target multiple channels as a parent message can.
>
> For example, if a parent message targets the email *AND* app channels, the retargeting messages that you create will only be activated on the email *OR* app channel given a qualifiying interaction with the email or push notification, respectively.
---
You can generate retargeting segments for up to 5 parent messages per day. There's no limit to the number of follow-up messages you can send from those parents.
The [message report](https://www.airship.com/docs/guides/reports/message/) for a parent message shows that retargeting is enabled, along with the complete audience criteria and the audience size (recipient count and percentage of total audience) for each segment. The child message report specifies the segment retargeted from the parent message, and links to its parent message. You can follow the link from the child to the parent to see your original audience criteria.
## Enable Retargeting {#enable}
To make the audience of a message eligible for retargeting, enable *Generate retargeting segments* in the *Audience* step of the Message composer. This option is only available when your channels are limited to app platforms, web, and email.

*Enabling retargeting segments*
> **Tip:** You can keep *Generate retargeting segments* enabled for your child message too. This can help you narrow down a key audience segment in a series of messages.
## View Segment Metrics and Send a Follow-up Message {#follow-up}
To take advantage of audience retargeting, you must have already sent a parent message with *Generate retargeting segments* enabled. You can then view the segment metrics and select one as the audience for a follow-up to the parent message, or a subset of that audience. The message type for app platforms is limited to push notification only; you cannot add additional message types.
1. Go to **Messages**, then **Messages Overview**.
1. Select the report icon (
) for the message containing the audience you want to retarget.
1. Under *Retargeting Segments*, click **Compose follow-up** for the audience you want to target. This opens a copy of the message in the Message composer, with *Target Specific Users* set to your selected audience segment.
*Composing a follow-up from retargeting segments in a message report*
1. (Optional) Add additional audience criteria to narrow down the audience if necessary.
1. Continue composing your message as normal.
> **Note:** When you send or schedule a message to a retargeting segment, Airship does not calculate your audience until send time. Make sure you leave enough time for users to see and interact with the parent message before you send a follow-up message.
# SFTP upload for CSV files
> You can upload audience lists, attributes, named user association lists, and Coupons data directly to Airship using SFTP.
Many CRM platforms export data as CSV files. You can take advantage of Airship's SFTP interface to upload that data to:
* **Add users to your project in a reusable** [Audience List](https://www.airship.com/docs/reference/glossary/#audience_list) — The list is labeled "[Uploaded List](https://www.airship.com/docs/reference/glossary/#uploaded_list)" in the dashboard and can be selected as your messaging audience or included in a [Segment](https://www.airship.com/docs/reference/glossary/#segment).
* **Set or remove user** [Attributes](https://www.airship.com/docs/reference/glossary/#attributes) — Attributes can be associated with [Channels](https://www.airship.com/docs/reference/glossary/#channel_dev), [Named Users](https://www.airship.com/docs/reference/glossary/#named_user), [MSISDNs](https://www.airship.com/docs/reference/glossary/#msisdn), or email addresses, but you cannot mix identifiers. For MSISDNs and email addresses, Airship will generate new channels for identifiers we don't recognize.
* **Associate** [Channels](https://www.airship.com/docs/reference/glossary/#channel_dev) **with** [Named Users](https://www.airship.com/docs/reference/glossary/#named_user) — Upon upload, Airship registers channels that are new to your project and creates the named user ID if it does not already exist.
* **Add more codes for a [Coupons](https://www.airship.com/docs/reference/glossary/#coupons) campaign** — You can also overwrite existing campaign settings using the values in the CSV file.
All uploaded files are encrypted in transit and at rest.
You will need:
1. An FTP/SFTP client — Many CRM platforms support SFTP directly, or you can use a client like FileZilla.
1. SSH keys — Airship's implementation of SFTP uses public key authentication.
1. A properly formatted CSV file
> **Important:** You must add Custom and Predefined Attributes to your project before setting them on users. Otherwise, setting those Attributes will result in an error. See [Adding Attributes to your project](https://www.airship.com/docs/guides/audience/attributes/adding/).
>
> JSON Attributes can only be set using the API.
> **Tip:** You can also upload audience lists, attributes, named user association lists, and Coupons data in the dashboard. See:
>
> * [Uploaded Lists](https://www.airship.com/docs/guides/audience/segmentation/audience-lists/uploaded/)
> * [Setting Attributes Using a CSV File](https://www.airship.com/docs/guides/audience/attributes/setting/#csv-file)
> * [Associating Named Users Using a CSV File](https://www.airship.com/docs/guides/audience/named-users/#csv-file)
> * [Coupons: Editing campaigns and adding more codes](https://www.airship.com/docs/guides/personalization/sources/coupons/#editing-campaigns-and-adding-more-codes)
## Format your CSV
Prepare your CSV according to the formatting reference for the data you want to upload:
* [Attributes CSV format](https://www.airship.com/docs/reference/messages/csv-formatting/#attributes)
* [Named user association CSV format](https://www.airship.com/docs/reference/messages/csv-formatting/#named-user-association)
* [Uploaded audience list CSV format](https://www.airship.com/docs/guides/audience/segmentation/audience-lists/uploaded/#formatting-your-list)
* [Coupons CSV format](https://www.airship.com/docs/guides/personalization/sources/coupons/#formatting-your-csv)
## Generate keys
Airship's SFTP implementation uses SSH key pairs for authentication. You will create a pair of keys: a private key for your client and a public key for Airship. The `ssh-keygen` command is included with macOS, Linux, and Windows 10 and later.
1. Open your terminal. On Windows, use PowerShell or Command Prompt.
1. At the command line, enter `ssh-keygen -t rsa`. You can set other options, but the key type must be set to RSA (`-t rsa`).
1. Enter the directory and file name (without extension) for your new keys, e.g., `/Users/your_username/Documents/rsa_keys/ For status “Processed with errors”, select the download icon (
) to download a CSV file of the identifiers that failed processing and their error reasons.
As with [Uploaded Lists](https://www.airship.com/docs/reference/glossary/#uploaded_list), the Devices count includes both users who are opted-in *and* opted-out of push. For example, if you send a push to a list of 1,000 devices where 600 of the devices are opt-in, only 600 devices will receive that push, whereas an in-app message would go to all 1,000 devices. This distinction between a list's Devices count (total devices) and opt-in devices is important to know when viewing a push-to-list's Total Sends metric — Total Sends will correspond to opt-in devices rather than the Devices count.
You can also retrieve Lifecycle list information using the [`/lists`](https://www.airship.com/docs/developer/rest-api/ua/operations/static-lists/) API endpoint.
### Use cases
You can use Lifecycle lists to target users with personalized messages based on their behaviors:
* Specify a Lifecycle list when using the targeting specific users in a message or experiment audience.
* Include a Lifecycle list in a [Segment](https://www.airship.com/docs/reference/glossary/#segment).
* Download Lifecycle lists and add the users to your CRM or other backend system.
Use cases per list:
* **First App Open:** Target users that have been acquired recently.
* Engage with newly-acquired users, sending specific messages that help them understand the benefits of your app.
* Guide users to specific areas of your app experience that they might not know about.
* Welcome customers and deliver an incentive to open the app again.
* **Opened App:** Target users according to active-user status.
* If your app is focused on daily or weekly users, e.g., a gaming app, use the *Last Whole Day* or *Last 7 Days* Opened App list to target your most active users.
* For lifestyle or retail apps, the *Last 30 Days* list can be used to message users that have engaged, pushing them to a conversion point in the app such as making a purchase.
* **Uninstalls:** Target users (via non-push channels) who have uninstalled your app.
* Use this list to export devices that have uninstalled your app. Consider messaging them via a different channel regarding the value and utility of mobile notifications.
* Augment your data warehouse with this information to investigate why they uninstalled your app.
* **Sent Notifications:** Filter out users who have already received a message.
* Create a [Segment](https://www.airship.com/docs/reference/glossary/#segment). to filter out users that recently received a message to limit overreach.
* Export this list into your email tool to filter our users you have already messaged.
* Export this list into your CRM to investigate how users actions outside of the app are influenced by your messaging.
* **Dormant:** Target previously active customers who have not engaged with the app recently.
* Send special offers to previously active users, incentivizing re-engagement with your app.
* Send messages that describe the value and benefit of your app to users who have become dormant. Encourage re-engagement by describing new app versions and features.
* Export the dormant list into your CRM and follow up with customers using a different communication method.
## Enabling Lifecycle lists
Go to *Audience » Lists » Lifecycle*, and click **Turn On**. The lists are available 24 hours after you enable them; the delay is necessary in order to populate the minimum data required for the shortest time interval, *Last Whole Day*.
## Using Lifecycle Lists
* **Message and experiment audiences** — Include a Lifecycle list when using the **Target by conditions** or **Target Specific Users** option in a message, Feature Flag Configuration, or A/B test audience. To send to a Lifecycle list using the API, include `"static_list": "name_of_list"` in the audience object. See [Audience Selection](https://www.airship.com/docs/developer/rest-api/ua/schemas/audience-selection/) in the API reference.
> **Note:** If a Lifecycle list is processing, you will not be able to send to the list until processing has finished.
* **Segments** — Include a Lifecycle list in a [Segment](https://www.airship.com/docs/reference/glossary/#segment).
* **Add to a backend system** — Download a CSV of your Lifecycle list data for use in another system. Click the arrow icon at the end of a list's row, and save the file. Lifecycle lists can only be downloaded by a [project Owner or Administrator](https://www.airship.com/docs/guides/getting-started/messaging/teams-and-access/#access-levels).
Each row of the CSV has two columns: device type and channel ID; add the users' channel IDs to your CRM or other backend system. How you use this data depends on your backend integration:
1. **You maintain a mapping of channel IDs to customer IDs (such as named users) in your system.** If this is the case, you have all the information you need! Feed the channel IDs into your backend system for further analysis.
1. **You don't have a mapping, but you do have named users integrated with your app.** In order for the downloaded list data to be usable, you need to get the named user associated with each channel:
1. Use the [named users listing](https://www.airship.com/docs/developer/rest-api/ua/operations/named-users/#getnameduser)
endpoint to get a paginated list of named users and their associated channels.
1. Iterate through the list of named users and their channels, mapping the
channels contained in your downloaded list to the appropriate named user. How you accomplish this step is up to you. You may want to write a simple script that compares the named user list generated in step 1 with the downloaded list.
1. Now that each channel on the downloaded list has an associated named
user, you may add the channels to your backend system.
# Uploaded lists
> Create audience lists using your own data.
Audience Lists are messaging recipient groups based on either your own data or automatically-generated app user lifecycle information. You can use audience lists to target specific users. This document explains Uploaded audience lists.
## About Uploaded lists
Uploaded Lists are reusable audience lists that you create. They are static and updatable. In the API, they are referred to as Static Lists.
After you create an Uploaded list, you can:
* Select the list when defining your audience for a message.
* Include the list in a [Segment](https://www.airship.com/docs/reference/glossary/#segment).
Because lists are static, they can become outdated very quickly. We encourage active curation of lists, updating them with current data as frequently as possible.
### Retention and deletion
Airship automatically deletes a list and all its versions after 90 days of inactivity. Timestamps used to calculate the 90-day period:
* Creation date
* New version uploaded
* Message sent (pushed) to the list
The creation date is the initial day one of the 90-day period. Each instance of uploading a new version or sending to the list resets the timestamp to day one.
The retention period for an Uploaded list is the same whether uploaded in the Airship dashboard, [using SFTP](https://www.airship.com/docs/guides/audience/segmentation/sftp-upload/), or using the [`/lists`](https://www.airship.com/docs/developer/rest-api/ua/operations/static-lists/) API endpoint.
After deletion, the list is removed from the upload history, is no longer visible in the Airship dashboard or through API calls, and is no longer available for audience segmentation.
## Formatting your list
Uploaded lists must be in CSV format. CSV files can contain up to 10 million
[Named Users](https://www.airship.com/docs/reference/glossary/#named_user)
or channel IDs, and be up to 1.5 GB. Each row in the CSV must be
an `identifier_type,UUID` pair.
The `identifier_type` is one of: `named_user`, `ios_channel`, `android_channel`, `amazon_channel`, `sms_channel`, `email_channel`, `open_channel`, or `web_channel`.
The `identifier` is the associated `named_user_id` or `channel_id`.
```text
named_user,customer-42
named_user,room-27
ios_channel,5i4c91s5-9tg2-k5zc-m592150z5634
web_channel,d132f5b7-abcf-4920-aeb3-9132ddac3d5a
android_channel,52b2b587-0152-4134-a8a0-38ae6933c88a
email_channel,ab1a81e3-5af3-4c04-a7ae-d676960e6684
open_channel,6bcf3e63-a38a-44d8-8b0d-2fb5941e74ab
sms_channel,ab1a81e3-aaf3-ac04-a7ae-a676960e6684
```
> **Tip:** Follow the steps in [Export Audience Lists](https://www.airship.com/docs/guides/reports/analytics/tasks-queries/export/#export-audience-list) to download a CSV of device identifiers in [Performance Analytics](https://www.airship.com/docs/reference/glossary/#pa).
## Uploading your list
You can create up to 100 Uploaded lists per project, either in the dashboard, [using SFTP](https://www.airship.com/docs/guides/audience/segmentation/sftp-upload/), or using the [`/lists`](https://www.airship.com/docs/developer/rest-api/ua/operations/static-lists/) API endpoint.
In the dashboard:
1. Go to *Audience » Lists » Uploaded* and click **Create List**.
1. Enter a name. **The name cannot be changed after you save the list.**
1. Enter a description that explains what kind of identifiers are contained within your CSV file.
1. Click **Choose file** and select your file. After selection, you will see the button label change to **Uploaded list**. If you need to choose a different file before saving the list, click *clear* and start again.
1. Click **Save**.
You will return to the Uploaded tab, where your new list's status will likely be *Processing*. Once the status is *Ready*, you can send to your new list. Processing time is generally quick but varies depending on the size of your list and server load. Small lists can process within seconds, while large lists may take 5 or 10 minutes. We recommend uploading lists at least a few hours before you need to send to them. This will give you plenty of time to address any potential errors.
> **Warning:** When a new list is uploaded, an empty list is created first while the
> list identifiers are processed. Please be sure the new list completes
> processing and displays a Device count before sending to it. It is
> possible to upload a new list and then immediately send to it, resulting
> in zero (0) sends because it hasn't completed processing.
> **Tip:** You can create an empty list by completing the steps to upload your list but without
> uploading a CSV file. This list can be used via both the UI and API, but it
> will, of course, send to 0 devices. This may be useful if you want to send a
> scheduled message to a list but you haven't yet finished collecting the data
> necessary to construct the CSV file.
>
> Create an empty list, then compose the scheduled message, selecting the
> empty list as the audience. Once your CSV file is ready, edit the list and upload the CSV file. The
> message will be sent to your intended recipients as long as the upload has
> completed processing and the list Status is *Ready* before the scheduled send
> time.
### Troubleshooting upload failure {#troubleshooting}
Upload may timeout due to a poor internet connection. If so, the file upload must be attempted again. To ensure that the entirety of a given list is successfully processed, we do not support partial uploads.
If your Uploaded list shows status *Failed*, review these typical causes:
Invalid UUID
: One or more of the given UUIDs are invalid. See [this page](https://en.wikipedia.org/wiki/Universally_unique_identifier) for more information on properly formatted UUIDs.
Invalid identifier type
: You included an identifier type that is not recognized by the uploader. The valid identifier types are `named_user`, `ios_channel`, `android_channel`, `amazon_channel`, `web_channel`, `open_channel`, `sms_channel`, and `email_channel`.
Too many identifiers
: The list uploader supports up to 10 million `identifier_type,UUID` pairs. Exceeding this limit will result in an error.
Too many lists
: You can have up to 100 Uploaded lists. Attempting to create more than 100 Uploaded lists will result in an error.
Wrong number of columns
: CSV files must be two columns, containing `identifier_type,UUID` pairs. Uploading a CSV file with more or fewer than two columns will result in an error.
Invalid name/description
: Names and descriptions can have lengths of up to 64 and 10,000 characters, respectively. Exceeding either limit will result in an error.
### List data
Go to *Audience » Lists » Uploaded*. Each row displays:
* List name
* Processing status — *Ready* indicates that your list may be used as a message
audience, *Processing* indicates that our servers have not yet completed the upload, *Failed* indicates upload failure.
* Devices count — The number of [Channel IDs](https://www.airship.com/docs/reference/glossary/#channel_id)
associated with the list. This count simply reflects the number of *valid* channel identifiers associated with a given list. Uninstalled channels may still be reflected in the channel count, meaning that sending to a list may result in a send count
lower than the channel count.
* Users count — The number of named users associated with a given list. May include named user identifiers with no associated channels in Airship.
* Created and Last Modified dates
When interpreting the Devices count, keep in mind:
1. The Devices count includes both users who are opted-in *and* opted-out
of push. For example, if you send a push to a list of 1,000 devices where 600 of the devices are opt-in, only 600 devices will receive that push, whereas an in-app message would go to all 1,000 devices. This distinction between a list's Devices count (total devices) and opt-in devices is important to know when viewing a push-to-list's Total Sends metric — Total Sends will correspond to opt-in devices rather than the
Devices count.
1. In order to improve processing time, Airship does not validate
that channels are active and addressable when they are processed by our system. We only validate that channels have the right format. This means that any channels that have either been uninstalled or are incorrect but in proper format will still be reflected in the total channel count when the list is done processing, and sending to the list will result in a lower send count than was on the list of channels.
> **Warning:** Attribute information may contain a combination of values from both the last *Uploaded list* and the last *successfully processed list*. For example, if the processing step fails after you edit an existing list, the **Status** indicator will read *Failed*, but **Devices** and **Last Modified** will display information from the last *successfully processed list*.
## Using Uploaded Lists
Specify an Uploaded list in these locations:
* **Segments** — Include an Uploaded list in a [Segment](https://www.airship.com/docs/reference/glossary/#segment).
* **Message and experiment audiences** — Include an Uploaded list when using the **Target by conditions** or **Target Specific Users** option in a message, Feature Flag Configuration, or A/B test audience. To send to a list using the API, include `"static_list": "name_of_list"` in the audience object. See [Audience Selection](https://www.airship.com/docs/developer/rest-api/ua/schemas/audience-selection/) in the API reference.
> **Note:** * If an Uploaded list is processing, you will not be able to send to the list until processing has finished.
> * If you edited an Uploaded list and it is still processing, you can still send to the list, but the recipients will be from the pre-edited version.
## Managing Uploaded Lists
You can edit an Uploaded list's description and CSV file.
> **Note:** * You cannot append new values to an existing list by uploading only the new values. To extend a list with additional `identifier_type,UUID` pairs, you must update the original CSV file with those values, then edit the list, uploading the new CSV file that contains both the original pairs and the additions.
>
> * If you replace a CSV file or upload a CSV for a list that was created without one, be advised that:
> * The CSV file will be processed in the same manner as a new list.
> * The previously uploaded list is available during processing.
> * All existing scheduled messages will use the most recent processed list. "Scheduled" includes recurring messages.
1. Go to *Audience » Lists » Uploaded*.
1. Find the list you want to edit, and select the edit icon (
).
1. Change the description and/or upload a new CSV file as instructed in [Uploading your list](#uploading-your-list).
1. Click **Save**.
---
To delete a list:
1. Go to *Audience » Lists » Uploaded*.
1. Select the delete icon (trash) for a list.
After deletion, the list is removed from the upload history, is no longer visible in the Airship dashboard or through API calls, and is no longer available for audience segmentation.
# Subscription lists
> Create audience lists for specific topics.
> **Important:** Please consult your legal counsel before implementing a particular subscription list approach or to help define the subscription purpose in order to address your specific use case or regulatory requirements in your jurisdiction.
Audience Lists are messaging recipient groups based on either your own data or automatically-generated app user lifecycle information. You can use audience lists to target specific users.
## About subscription lists
A *Subscription list* is an audience list of users who are opted in to messaging about a specific topic. Users can manage their opt-in status per list using a Preference Center. Subscription lists can help with retaining customers, since recipients can opt in and out of content per list rather than opting out of all messaging.
After you create a subscription list, you can:
* Select the list when defining your audience for a message
* Opt a user in to or out of a subscription when the user taps a button in a push notification, in-app message, or web push notification
* Trigger an [Automation](https://www.airship.com/docs/reference/glossary/#automation) or [Sequence](https://www.airship.com/docs/reference/glossary/#sequence) when a user opts in to or out of a subscription, or use their opt-in status as a [Condition](https://www.airship.com/docs/reference/glossary/#conditions_event_option)
* Include the list in a [Segment](https://www.airship.com/docs/reference/glossary/#segment)
* Include the list in a [Preference Center](https://www.airship.com/docs/reference/glossary/#preference_center)
* Opt users in to or out of a subscription list when they respond with an [SMS Keyword](https://www.airship.com/docs/reference/glossary/#sms_keyword)
---
A subscription list is for either commercial or transactional purposes, which you specify when creating the list and can edit at any time.
* **Commercial** — Advertises or promotes a commercial product or service, including content on a website operated for a commercial purpose.
* **Transactional** — Facilitates an already agreed-upon transaction, or updates a customer about an ongoing transaction. Verify with your legal team to comply with regulations.
When you send to the list, you should only include content related to its purpose.
When sending an **email** to a subscription list, you must include an unsubscribe link for opting out of all email messaging, and you can also include an unsubscribe link for that list only. See: [Email unsubscribe links](https://www.airship.com/docs/guides/messaging/messages/content/email/email-unsubscribe-links/).
---
You create subscription lists in the dashboard, and you can add users using these methods:
* **Automatically** — Enable [Auto opt-in](#auto-opt-in).
* **Manually** — [Use the API to add or remove users](#populating-a-list-using-the-api).
* **User choice** — Include the list in a [Preference Center](https://www.airship.com/docs/reference/glossary/#preference_center).
> **Note:** Airship does not preserve the opt-in/out dates or the source of when or where a user opts into or out of a subscription. Airship does not have access to dates for opt-in/out events unless [Real-Time Data Streaming (RTDS)](https://www.airship.com/docs/reference/glossary/#rtds) is set up. See: [RTDS API: Subscription List Event](https://www.airship.com/docs/developer/rest-api/connect/schemas/events/#subscription-list).
### Auto opt-in
[AXP](https://www.airship.com/docs/reference/feature-packages/)
When creating a subscription list, you can automatically opt in users to that list by enabling *Auto opt-in*. Both existing and new audience members will be opted in to the list.
Auto opt-in cannot be disabled after saving your list. Lists enabled for auto opt-in are not available for use with the *Subscription* trigger for Sequences and Automation.
Changing the list type between commercial and transactional does not change the auto opt-in setting.
### Reporting
In [Performance Analytics](https://www.airship.com/docs/reference/glossary/#pa), you can view a list's eligible subscriber count over time. This count is of unique users subscribed to the list and opted in to notifications at any time during the time frame defined for the report.
Go to *Audience » Lists » Subscription* and select the report icon (
) for a list. The default view is the last 30 days of data. Use the date filter to select a new time frame.
Reporting is not available for lists enabled for [Auto opt-in](#auto-opt-in).
## Creating a list
You can create up to 20 subscription lists per project.
1. Go to *Audience » Lists » Subscription* and click **Create subscription list**.
1. Enter a name and description for the list. Both appear in your project's [Preference Centers](https://www.airship.com/docs/reference/glossary/#preference_center). Description is optional.
* The list ID is automatically generated based on the name and is truncated at 32 characters.
* A list ID will not generate for a list name that contains only numbers and/or special characters.
* If the name starts with a number and/or special characters, the generated ID omits the leading numbers and/or special characters.
* Uppercase letters in the name are converted to lowercase in the ID.
* Special characters in the name are converted to underscores in the ID and only appear if followed by numbers or letters.
1. (Optional) Edit the list ID. Letters, numbers, and underscores only, and must start with a letter and end with a letter or number. 32 characters maximum. **You cannot change the list ID later.**
1. Click **Next**.
1. Enable the channels you want to include in the list.
1. Select a subscription type: Commercial or Transactional. Commercial is selected by default.
1. (Optional) Check the *Auto opt-in* checkbox to enable [auto opt-in](#auto-opt-in). **You cannot change this setting after you save the list.**
1. Click **Save**.
## Populating a list using the API
Subscription lists are set at the user level to support multi-channel preferences. Use the [Named User Scoped Batch Operations endpoint](https://www.airship.com/docs/developer/rest-api/ua/operations/named-users/#performnameduserscopedbatchoperations) to add or remove users to/from your subscription list.
> **Note:** If you are using a single-channel [Preference Center](https://www.airship.com/docs/reference/glossary/#preference_center) created before October 10, 2022, that has not been [migrated to user-level](https://www.airship.com/docs/guides/messaging/features/preference-centers/#migrating-to-a-user-level-preference-center), use the [`/api/channels/subscription_lists` endpoint](https://www.airship.com/docs/developer/rest-api/ua/operations/channels/#modifychannelsubscriptions) to add or remove individual channels to/from your subscription list.
## Using subscription lists
* **Message and experiment audiences** — Include a subscription list when using the **Target by conditions** or **Target Specific Users** option in a message, Feature Flag Configuration, or A/B test audience. To send to a subscription list using the API, use the [`subscription_list` atomic selector](https://www.airship.com/docs/developer/rest-api/ua/schemas/audience-selection/).
* **Buttons** [AXP](https://www.airship.com/docs/reference/feature-packages/) — Opt a user in to or out of a subscription list when the user taps a button in your message. See [Add buttons to message content](https://www.airship.com/docs/guides/messaging/messages/buttons/#add-buttons-to-message-content) in *Buttons*.
* **Automation and sequence trigger and condition** — Trigger an [Automation](https://www.airship.com/docs/reference/glossary/#automation) or [Sequence](https://www.airship.com/docs/reference/glossary/#sequence) when a user opts in to or out of a subscription, or use their opt-in status as a [Condition](https://www.airship.com/docs/reference/glossary/#conditions_event_option). See:
* [Subscription](https://www.airship.com/docs/guides/messaging/messages/sequences/triggers/#subscription) in *Automation and Sequence Triggers*
* [Conditions](https://www.airship.com/docs/guides/messaging/messages/sequences/create-automation/#conditions) in the Setup section of *Create an Automation*
* [Conditions](https://www.airship.com/docs/guides/messaging/messages/sequences/create/add-messages/#conditions) in *Add Messages to a Sequence*
* **Segments** — Include a subscription list in a [Segment](https://www.airship.com/docs/reference/glossary/#segment). For the API, see the [`/api/segments` endpoint](https://www.airship.com/docs/developer/rest-api/ua/operations/segments/).
* **Preference centers** — Add subscription lists to [Preference Centers](https://www.airship.com/docs/reference/glossary/#preference_center).
* **SMS keywords** — Set up [keywords](https://www.airship.com/docs/guides/messaging/features/sms-keywords/) your audience can use to opt in to or out of your subscription lists. Once added to your project, you can include the keywords in your SMS messages.
## Managing subscription lists
Go to *Audience » Lists » Subscription*. The default sort order is by last modified. Each row displays:
* List name and ID
* Type — *Commercial* or *Transactional*, and *Auto opt-in*, if enabled
* Channels
* Description
* Date and time last modified (browser local time)
* Audience count — The number of [Channel IDs](https://www.airship.com/docs/reference/glossary/#channel_id) in the list and the time it was last calculated (browser local time). Select the regenerate icon (⟳) to generate an updated count.
Lists for all channels appear by default. Click *All channels ▼* and select a channel to filter for only lists enabled for that channel. You can search for lists by name, ID, or description.
Select the report icon (
) to view a list's reporting data. Select the edit icon (
) to edit a list's name, type, description, or enabled channels. Select the archive icon (
) to archive.