# Adding events to your project
Add custom and predefined events to your project for targeting, automation, and Goals.
You must add custom and predefined events to your project before you can use them for audience targeting, automation triggers, or [Goals](https://www.airship.com/docs/reference/glossary/#goals). You can [track events](https://www.airship.com/docs/guides/audience/events/tracking/) without adding them first, but they are not available for segmentation until added. You can add up to 1,000 custom and predefined events per project.
No setup is required for default events. The Airship SDKs and system record them automatically, so you can go straight to [targeting your audience](https://www.airship.com/docs/guides/audience/events/targeting/).
## Before you add events
Decide which predefined and custom events matter for your project, how you will name them, and which properties or values to include. For example, you might track account registrations for onboarding, add-to-cart and purchase events for commerce, or create a custom event to use for your project [Goals](https://www.airship.com/docs/reference/glossary/#goals).
### Event names
As you enter an event name when adding it to your project, Airship searches for matching predefined events. If a suggested name fits what you want to track, select that predefined event. Otherwise, create a custom event.
Predefined events have names supplied by Airship, for example `registered_account`, `added_to_cart`, and `purchased`. For the full list, see [Predefined events](https://www.airship.com/docs/reference/data-collection/events/#predefined-events) in the *Events Reference*.
For custom events, name the event for the action that occurred and follow these guidelines:
* Use a verb-first convention, for example `used_feature` or `viewed_screen`.
* Use consistent, lowercase names. Airship lowercases incoming event names for consistency in reports. Event names can contain up to 255 characters.
* Do not include personally identifiable information in event names.
* Use dashes to separate levels of granularity, and underscores for multi-word parts of a name, for example `completed_tutorial`, `completed_tutorial-onboarding`, and `completed_tutorial-onboarding-payments`. Start with a broader name when you can.
Custom event name examples:
| Description | Example event name |
| --- | --- |
| User uses a feature | `used_feature` |
| User views a screen | `viewed_screen` |
| User saves content | `saved_content` |
| User completes a tutorial | `completed_tutorial` |
| User books an appointment | `booked_appointment` |
### Event properties and values
Event properties are key/value pairs that add more information to an event, such as a product SKU on a purchase or a category on a viewed video. Specify properties when you need more detail instead of creating many unique events.
You can define up to 100 properties for each predefined or custom event. Predefined events include default properties you can edit, remove, or extend. Properties can contain objects and arrays of objects. Use dot notation to access nested properties: `parent_property.child_property`.
Each event can also have a single numeric value, such as a purchase price or a completion score. Event values must be between -231 and [231 - 1]. Values that contain `$` or `,` characters are ignored. Use decimals only.
## Add an event to your project
Add a custom or predefined event:
1. Next to your project name, select the dropdown menu (), then **Settings**.
1. Under **Project settings**, select **Events**.
1. Select **Create event**.
1. 
*Creating a new event*
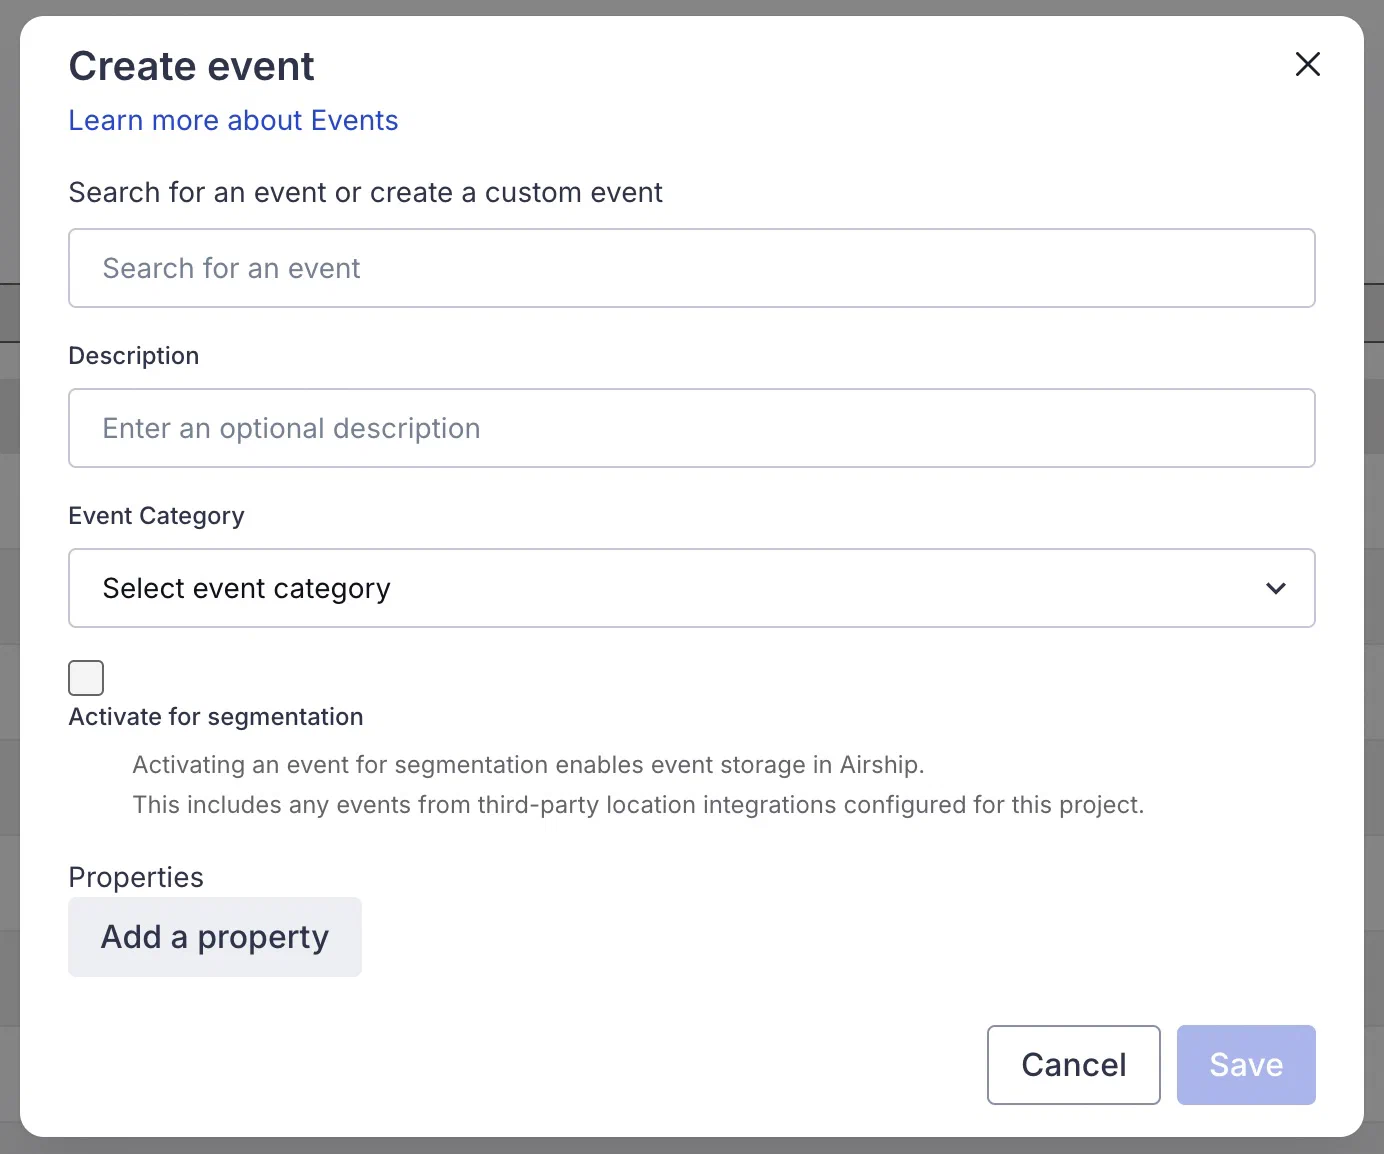
Enter a name for your event or search for and select a predefined event. Predefined events appear in search results with a **Predefined event** flag. If the name is not in the list, select **Create custom "[search term]" event**.
1. (Optional) Enter a description for the event.
1. Select an event category or select **Create category** and enter a category name.
> **Note:** When Airship adds a new default category with the same name as a custom category, the default category replaces the custom one, and the custom category is removed from your project. For example, a custom Shipped category is replaced if Airship later adds a default Shipped category.
1. (Optional) Check the box to **Activate for segmentation**.
1. (Optional) Add event properties. Predefined events are already populated with properties, which you can edit or remove. You can also add more properties.
Select **Add property**, then enter a property name and select its type: String, Number, Boolean, Date, Array, or Any. The type determines which operators are available for event segmentation. Select **Any** if the value for the property is unknown or if it could be multiple types.
> **Note:** Properties of type Any cannot be used for segmentation. They do not appear in the dashboard when building segments or targeting with segmentation data, and they cannot be referenced using the API.
>
> Properties of type Array have these restrictions by default. You can make the contents of an array accessible for segmentation by defining their nested properties. See [Defining nested array properties](#defining-nested-array-properties) below.
1. Select **Save**.
In the events list, you can search by name. After creating an event, you can edit any part of its configuration. If you change an event's name, only the new name is available for segmentation.
Deleted events are deactivated for segmentation and are no longer available to select in the dashboard. Deleting an event does not affect existing automated messages that use it. Deleted event properties are no longer available for segmentation or for selection when configuring triggers that use properties. The event itself remains available as a trigger.
### Defining nested array properties
When adding an Array type property for an event, you can make the contents of the array accessible for segmentation by defining its nested properties using JSONPath expressions.
After adding the array property, add sub-properties using the syntax `$.arrayproperty[*].subproperty`. The asterisk (`*`) acts as a wildcard, indicating that the path should match the sub-property for any item within the array property. This makes it possible to segment your audience based on the characteristics of individual items within an array without needing to refer to their specific locations.
For example, consider a `Products` array where each product object has a name and price:
```json
{
"Products": [
{
"name": "Laptop",
"price": 1200
},
{
"name": "Mouse",
"price": 25
}
]
}
```
To enable segmentation on the name and price of individual products within the `Products` array, define the following properties for the event in your project:
* `Products` of type Array, to acknowledge the array itself
* `$.Products[*].name` of type String, for segmentation using the name of any product in the array
* `$.Products[*].price` of type Number, for segmentation using the price of any product in the array
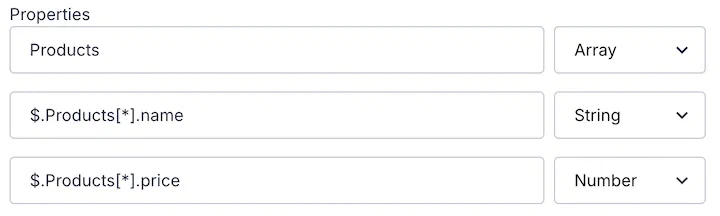
*Specifying properties within an array property*