# Push Notifications
Configure and implement push notifications for iOS and Android platforms.
# Push Notifications
> How to configure your application to receive and respond to notifications.
Before setting up push notifications in your app, you need to configure push services in the Airship dashboard. See [iOS Channel Configuration](https://www.airship.com/docs/guides/getting-started/developers/configure-channels/#ios-channel-configuration) for APNs setup and [Android Channel Configuration](https://www.airship.com/docs/guides/getting-started/developers/configure-channels/#android-channel-configuration) for FCM setup.
## Platform Setup
Before you can send and receive push notifications, you need to configure your app for the platform(s) you're targeting.
### iOS
#### Standard React Native
#### Enable Push Notifications Capability
1. Open your project in Xcode.
2. Click on your project in the Project Navigator.
3. Select your main app target and then click the **Signing & Capabilities** tab.
4. If you do not see Push Notifications enabled, click **+ Capability** and add **Push Notifications**.
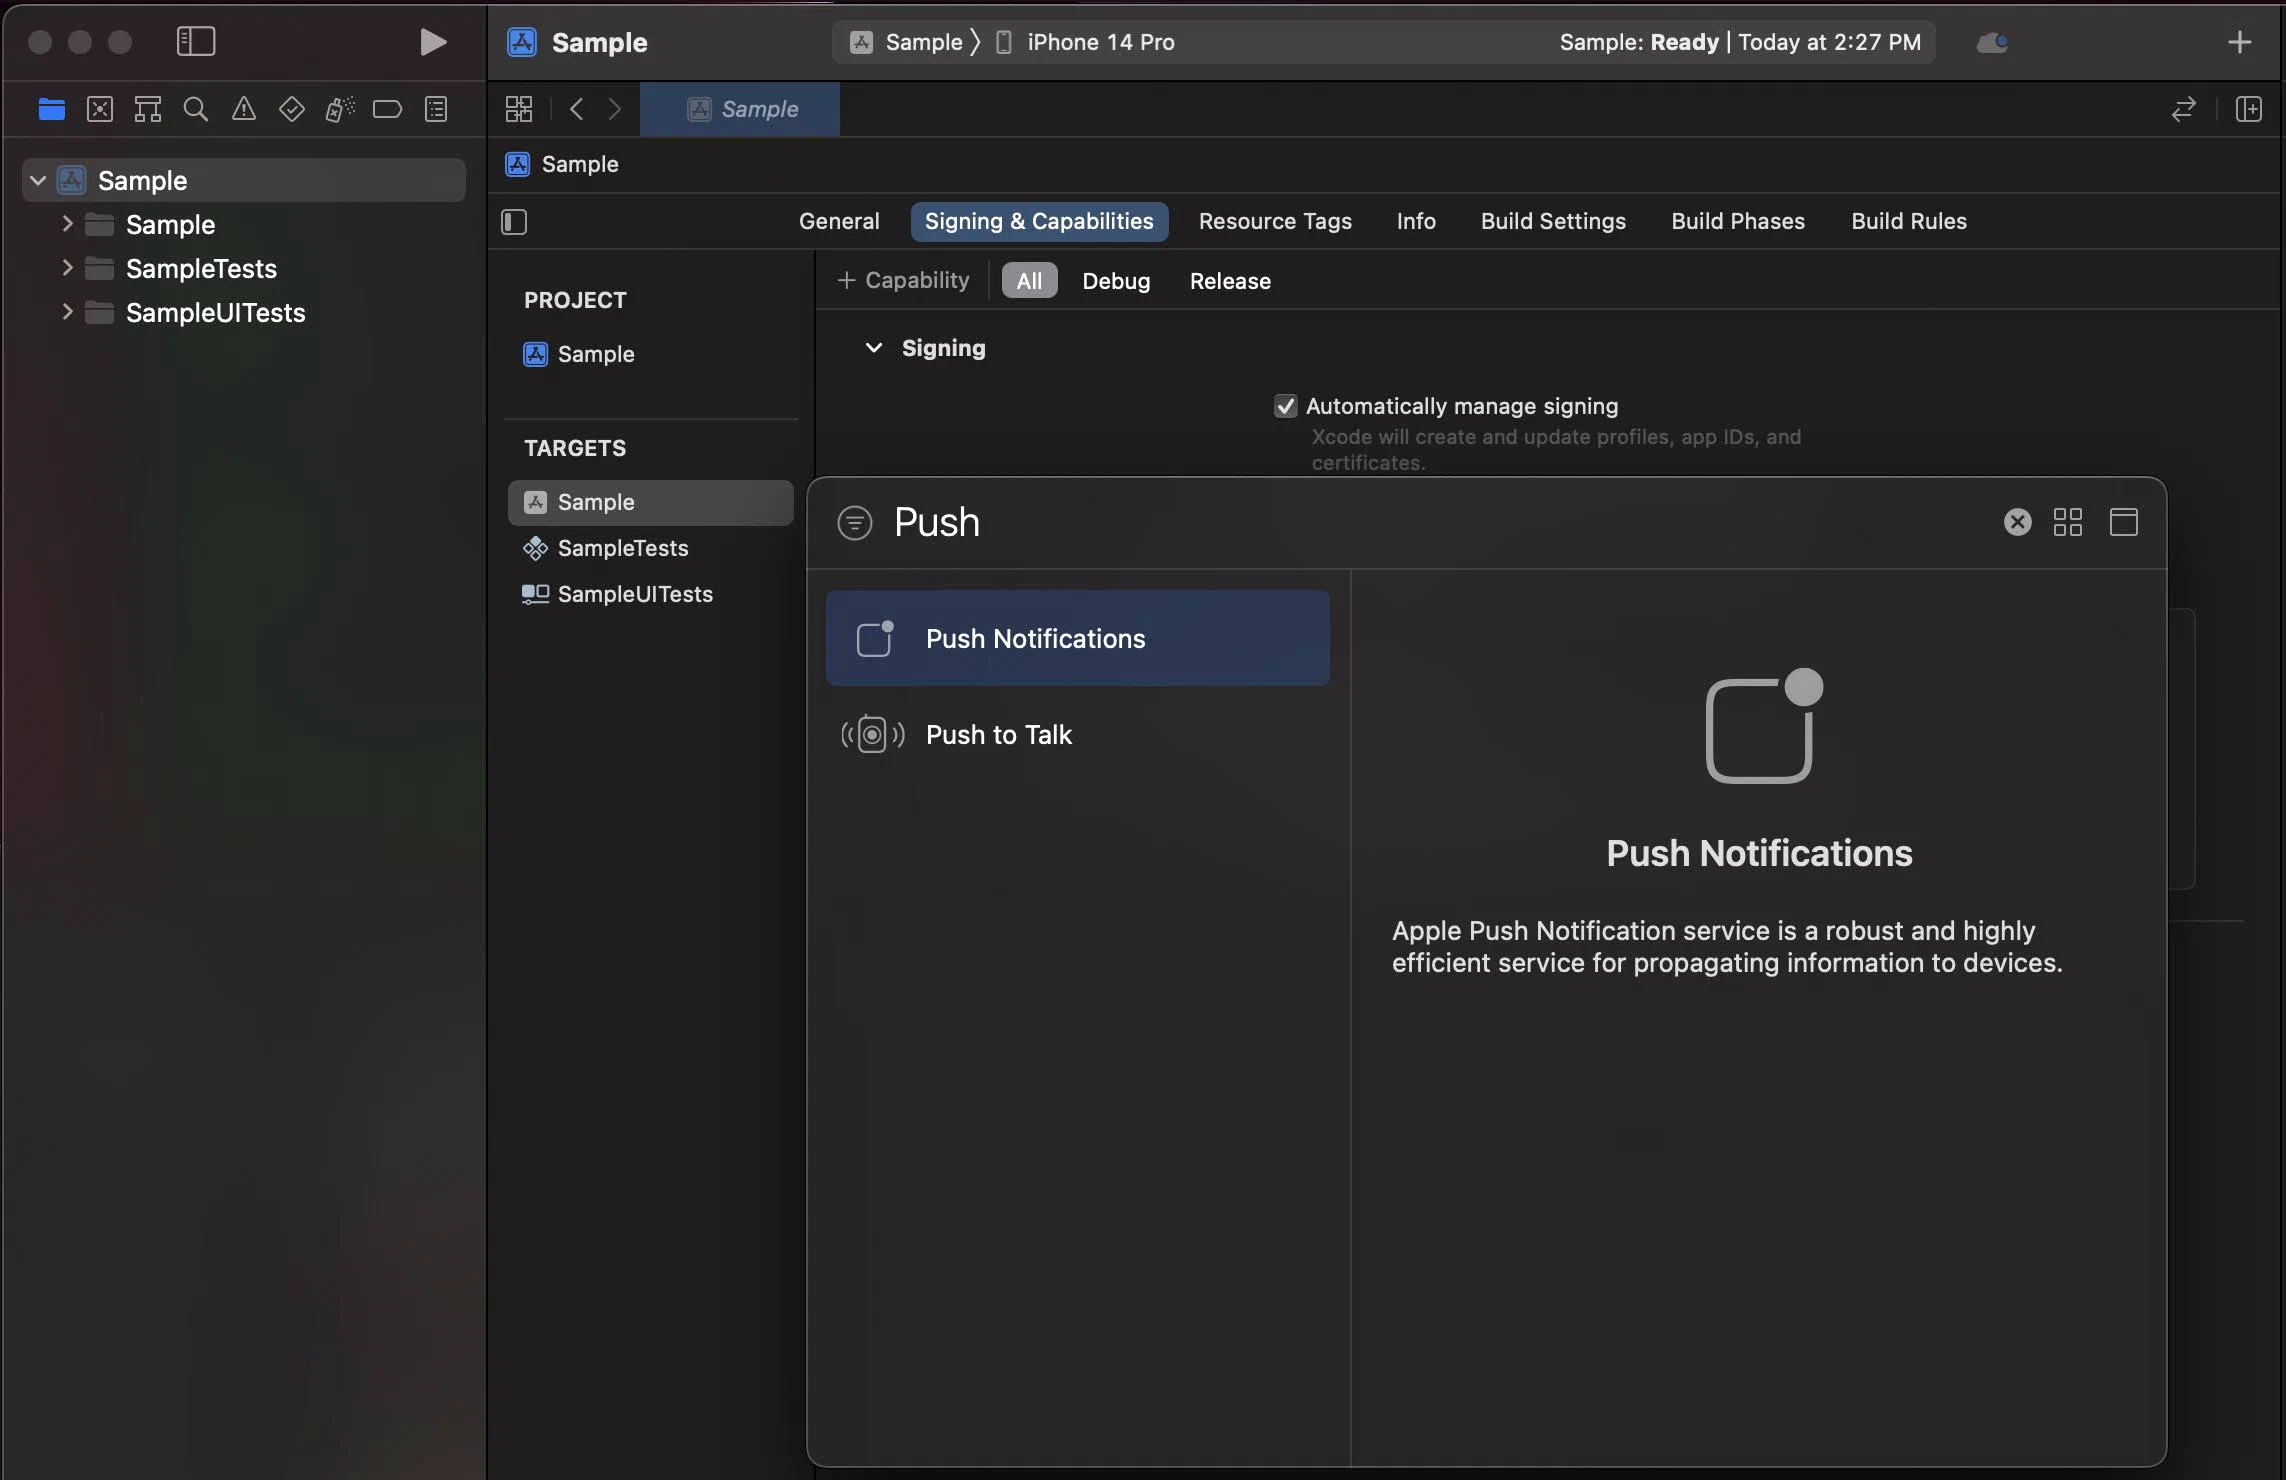
*Adding the Push Notifications capability in Xcode*
#### Enable Background Modes
1. Select your main app target and then click the **Signing & Capabilities** tab.
2. Click **+ Capability** and add **Background Modes**.
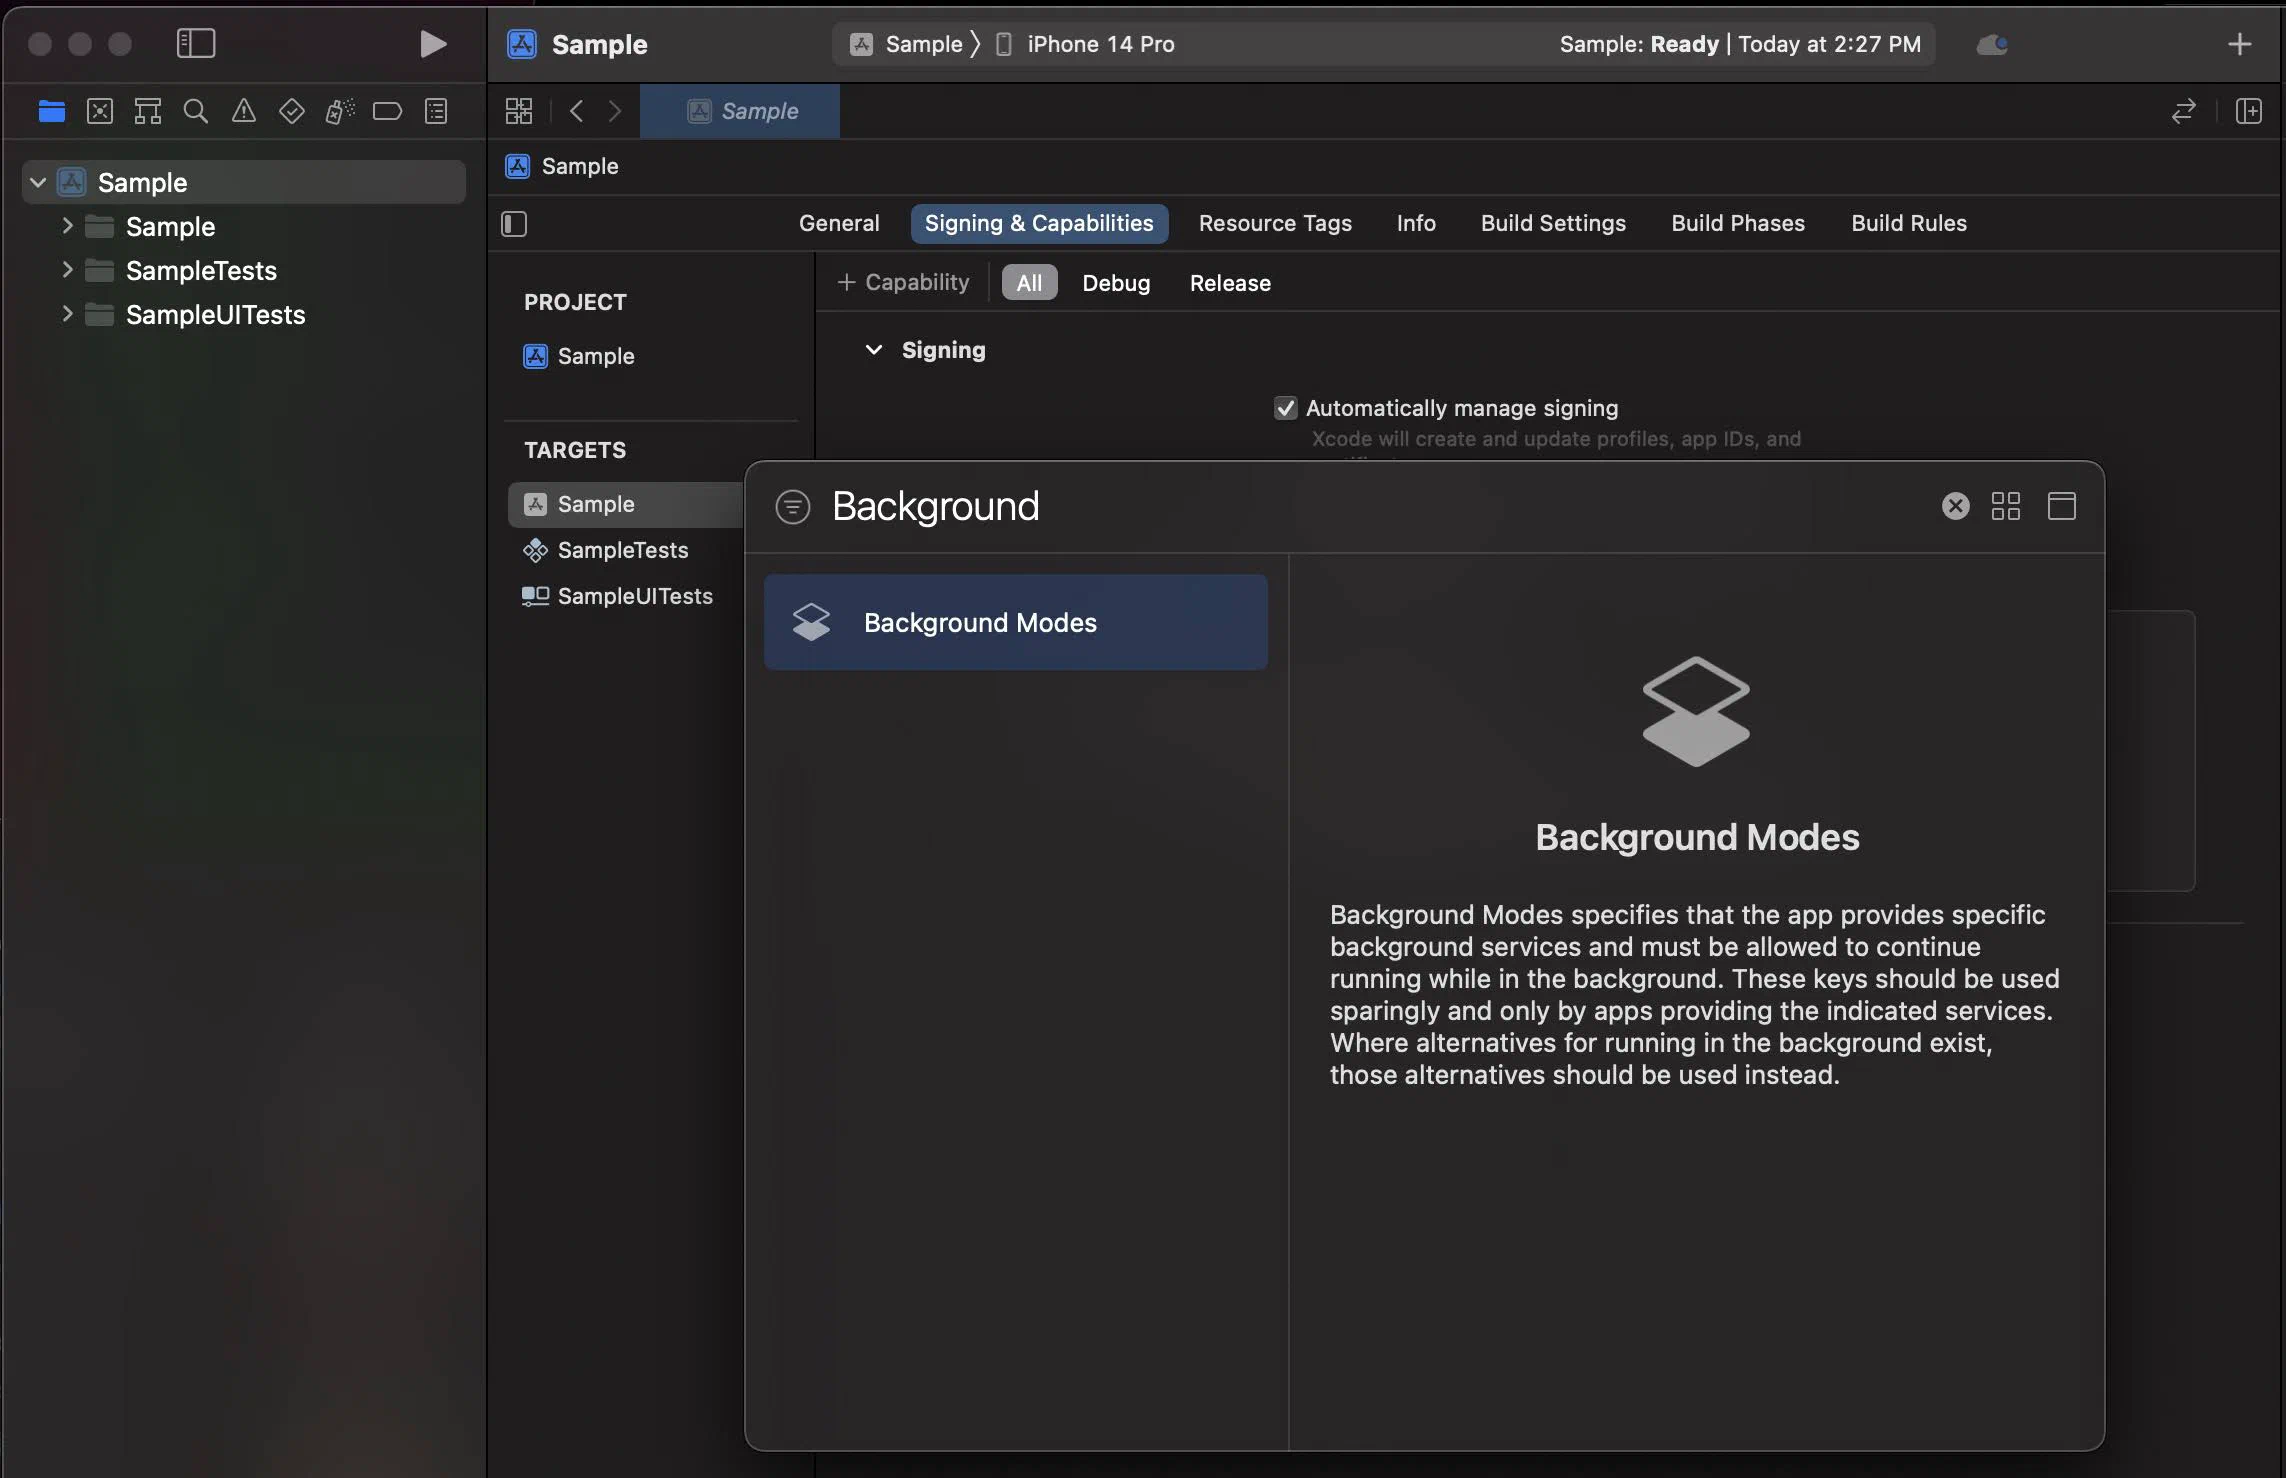
*Adding the Background Modes capability in Xcode*
3. In the **Background Modes** section, select the **Remote notifications** checkbox.
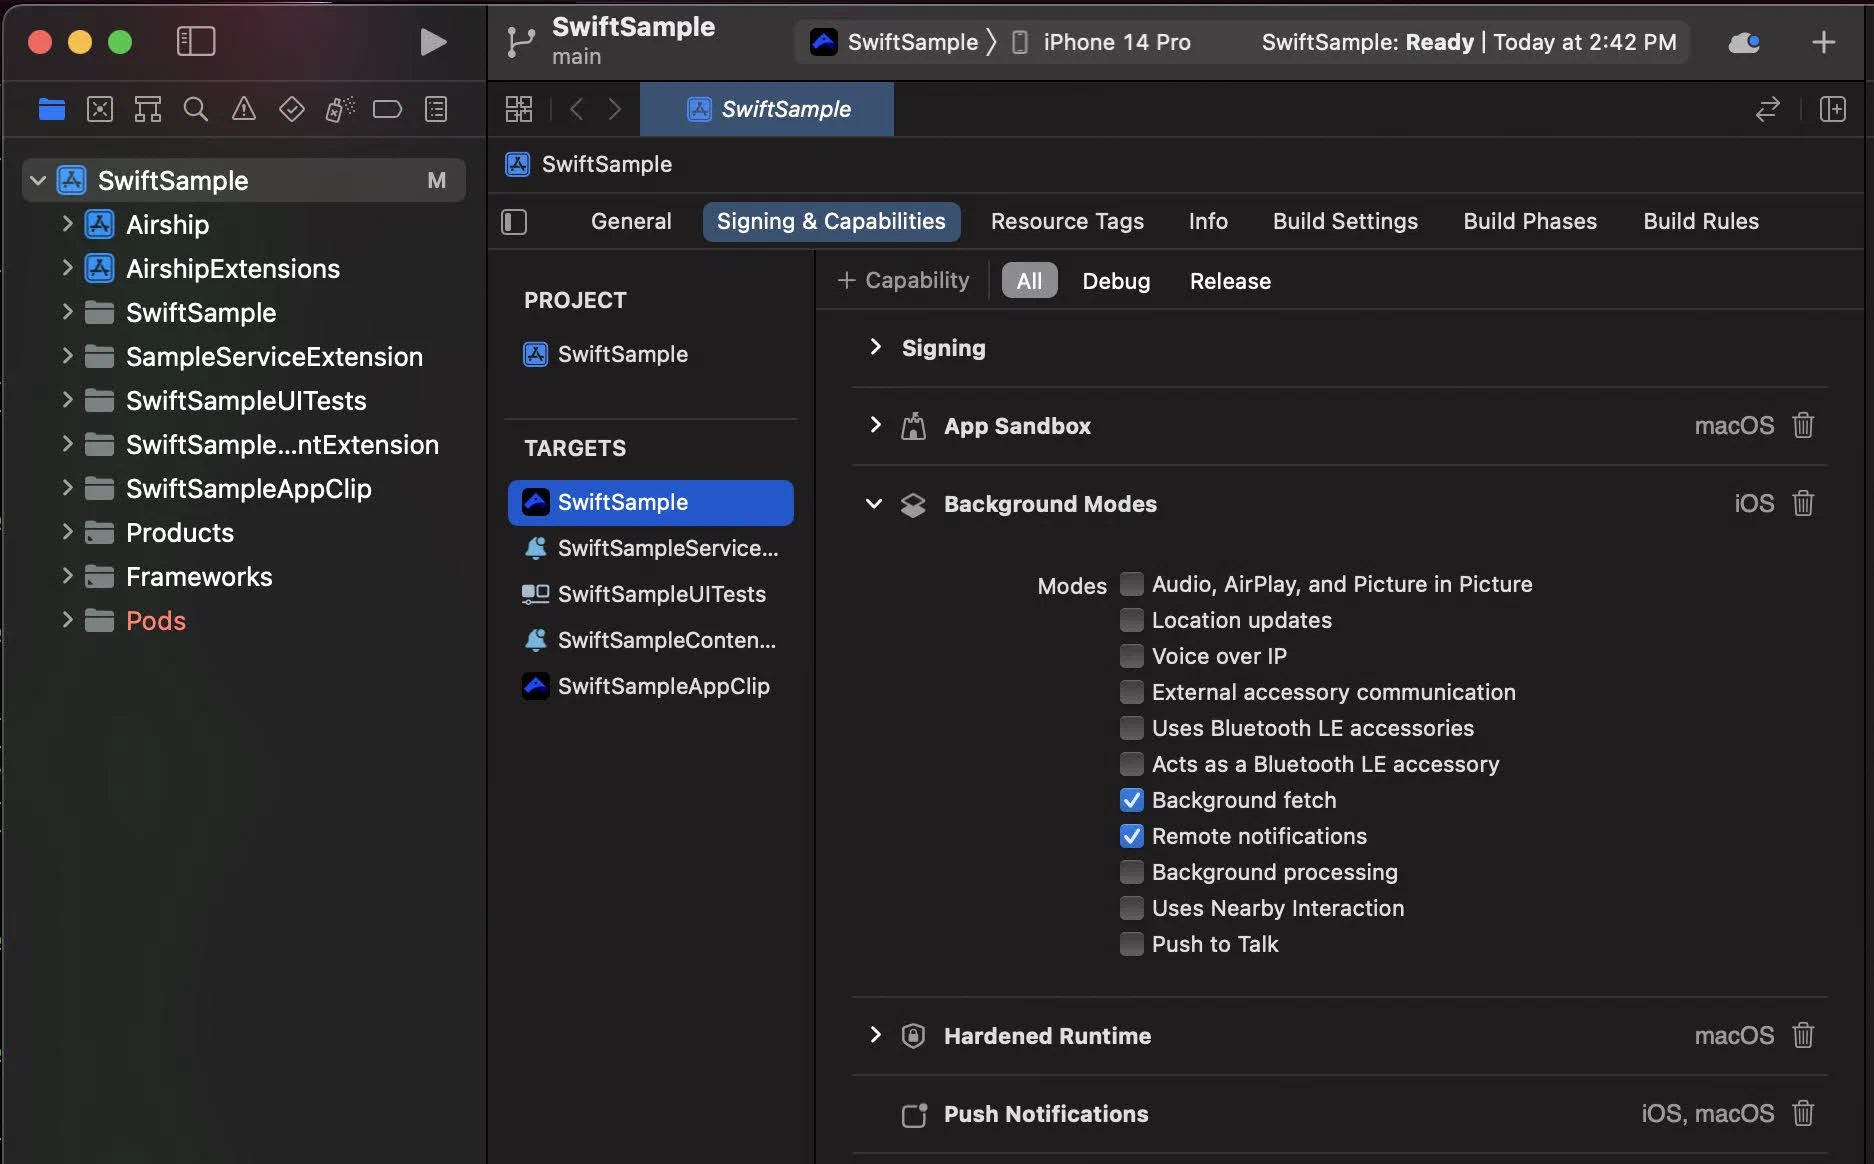
*Enabling Remote notifications in Background Modes*
#### Notification Service Extension
To take advantage of notification attachments, such as images,
animated gifs, and video, you will need to create a notification service extension .
Follow the steps in the [iOS Notification Service Extension Guide](https://www.airship.com/docs/developer/sdk-integration/apple/push-notifications/notification-service-extension/).
#### Expo
The Airship Expo plugin automatically configures iOS capabilities (Push Notifications and Background Modes) and the Notification Service Extension. No manual Xcode configuration is required.
### Android
Configure Firebase Cloud Messaging (FCM) to enable push notifications on Android.
#### FCM Setup
#### Standard React Native
1. Download the Android Firebase configuration file `google-services.json` from the application's Firebase console into the root directory at `android/app/google-services.json`.
If your react-native application does not have an associated app in the Firebase console, follow the [FCM setup instructions](https://www.airship.com/docs/developer/sdk-integration/android/installation/getting-started/#fcm-setup) to set one up.
#### Expo
Expo automatically handles the `google-services.json` file through its build process. See the [Expo documentation](https://docs.expo.dev/push-notifications/fcm-credentials/) for details on configuring FCM credentials.
#### HMS Setup
1. Follow [Huawei's documentation](https://developer.huawei.com/consumer/en/doc/development/HMSCore-Guides/android-integrating-sdk-0000001050040084) to set up the HMS SDK.
> **Note:** Airship requires HMS Core Push SDK 6.3.0.304 or newer.
2. Add `airshipHmsEnabled=true` to the app's gradle.properties.
#### Notification Configuration
Configure the notification icon and accent color in your `takeOff` config:
```ts
Airship.takeOff({
default: {
appKey: "YOUR_APP_KEY",
appSecret: "YOUR_APP_SECRET"
},
site: "us",
android: {
notificationConfig: {
icon: "ic_notification",
accentColor: "#00ff00"
}
}
});
```
See the [React Native Setup guide](https://www.airship.com/docs/developer/sdk-integration/react-native/installation/getting-started/) for complete `takeOff` configuration options.
## Enable User Notifications
The Airship SDK distinguishes between *user notifications* (visible to users) and *silent push notifications* (background data delivery). User notifications require explicit permission from the user.
By default, user notifications are disabled. Enable them when you want to show visible notifications to users.
### Basic Enablement
The simplest way to enable user notifications is with `setUserNotificationsEnabled()`:
```typescript
await Airship.push.setUserNotificationsEnabled(true);
```
This will prompt the user for permission if not already granted. However, it does not provide feedback on whether the user accepted or denied the permission.
> **Note:** For apps that target Android 13 (API 33) and above, enabling user notifications will display a runtime permission prompt.
>
> To increase the likelihood that the user will accept, you should avoid prompting the user for permission immediately on app startup, and instead wait for a more appropriate time to prompt for notification permission.
### Async Enablement with Fallback
For more control over the permission flow, use `enableUserNotifications()` which returns the permission result and supports a fallback option:
```typescript
// Enable with system settings fallback
const granted = await Airship.push.enableUserNotifications({
fallback: PromptPermissionFallback.SystemSettings
});
if (granted) {
console.log('Notifications enabled');
} else {
console.log('Notifications denied');
}
```
The `SystemSettings` fallback option will prompt the user to open system settings if permission is denied on iOS or denied silently on Android. This gives users a second chance to enable notifications if they initially declined.
### Checking Notification Status
To check if user notifications are currently enabled:
```typescript
const enabled = await Airship.push.isUserNotificationsEnabled();
```
For more detailed status information, use `getNotificationStatus()`:
```typescript
const status = await Airship.push.getNotificationStatus();
console.log('Are notifications allowed:', status.areNotificationsAllowed);
console.log('Is opted in:', status.isOptedIn);
```
To monitor notification status changes in real-time:
```typescript
Airship.addListener(EventType.PushNotificationStatusChangedStatus, (event) => {
console.log('Notification status changed:', event.status);
console.log('Is opted in:', event.status.isOptedIn);
});
```
### Getting the Registration Token
To get the platform-specific push token (APNs token on iOS, FCM token on Android):
```typescript
const token = await Airship.push.getRegistrationToken();
```
For more advanced event handling and token updates, see [Handling Notification Events](https://www.airship.com/docs/developer/sdk-integration/react-native/push-notifications/handling-notification-events/).
If push notifications aren't working as expected, see [Troubleshooting Push Notifications](https://www.airship.com/docs/developer/sdk-integration/react-native/troubleshooting/push-notifications/) to check notification status and fix common issues.
# Notification Events
> Listen for push notification events, handle user responses, and manage active notifications.
The Airship SDK provides event listeners for when a push is received or a notification is interacted with. Apps can use these events for custom push processing.
## Notification Events
The SDK provides several event listeners for handling push notifications at different stages.
### Push Received
Listen for when a push notification is received:
```typescript
Airship.addListener(EventType.PushReceived, (event) => {
console.log('Push received:', event.pushPayload);
// Handle push received event
});
```
This event fires when a push notification arrives, regardless of whether the app is in the foreground or background.
### Notification Response
Listen for when a user interacts with a notification:
```typescript
Airship.addListener(EventType.NotificationResponse, (response) => {
console.log('Notification tapped:', response);
console.log('Action ID:', response.actionId);
// Handle the notification response
if (response.actionId === 'custom_action') {
// Handle custom action
}
});
```
This event fires when a user taps on a notification or a notification action button.
### Registration Token Updates
Listen for when the push registration token is generated or updated:
```typescript
Airship.addListener(EventType.PushTokenReceived, (event) => {
console.log('Push token:', event.pushToken);
// Send token to your backend if needed
});
```
You can also retrieve the current token at any time:
```typescript
const token = await Airship.push.getRegistrationToken();
```
### Notification Status Changes
Monitor changes to notification permission status:
```typescript
Airship.addListener(EventType.PushNotificationStatusChangedStatus, (event) => {
console.log('Notification status changed:', event.status);
console.log('Is opted in:', event.status.isOptedIn);
});
```
## Managing Active Notifications
You can retrieve and clear notifications that are currently displayed in the notification center.
### Get Active Notifications
Retrieve the list of currently displayed notifications:
```typescript
const notifications = await Airship.push.getActiveNotifications();
console.log('Active notifications:', notifications);
```
> **Note:** On Android, this list only includes notifications sent through Airship.
### Clear Notifications
Clear all notifications for the app:
```typescript
Airship.push.clearNotifications();
```
Clear a specific notification by identifier:
```typescript
Airship.push.clearNotification(identifier);
```
> **Note:** On Android, you can use this method to clear notifications outside of Airship. The identifier is in the format `:`.
## Silent Notifications
Silent notifications are push messages that do not present a notification to the user. These are typically used to briefly wake the app from a background state to perform processing tasks or fetch remote content.
> **Important:** We recommend that you thoroughly test your implementation to confirm that silent notifications do not generate any device notifications.
### Platform Configuration
**iOS**: Set the `content_available` property to `true` in the [iOS override object](https://www.airship.com/docs/developer/rest-api/ua/schemas/platform-overrides/#iosoverrideobject).
**Android**: All push messages are delivered in the background. By default, Airship will treat messages without an `alert` as silent.
> **Note:** Silent pushes do not have guaranteed delivery. Factors affecting delivery include battery life, WiFi connectivity, and the number of silent pushes sent within a recent time period. These metrics are determined solely by iOS/Android and APNs/FCM.
>
> Silent push is best used for supplementing regular app behavior rather than providing critical functionality. For example, an app could use a silent push to pre-fetch new data ahead of time to reduce load times when the app is later launched by the user.
### Handling Silent Notifications
Silent notifications will trigger the `PushReceived` event but will not display a notification to the user:
```typescript
Airship.addListener(EventType.PushReceived, (event) => {
if (!event.pushPayload.alert) {
console.log('Silent push received');
// Perform background work
}
});
```
# Customize Notifications
> Configure notification options, foreground presentation, badges, and custom categories.
## iOS Notification Options
By default, the Airship SDK will request `Alert`, `Badge`, and `Sound` notification options for remote notifications. This can be configured by setting notification options before enabling user notifications.
```typescript
await Airship.push.iOS.setNotificationOptions([
iOS.NotificationOption.Alert,
iOS.NotificationOption.Badge,
iOS.NotificationOption.Sound,
]);
```
### Provisional Authorization
Apps can request provisional authorization along with the usual notification options. When requesting provisional authorization apps do not need to prompt the user for permission initially, and notifications will be delivered in a non-interruptive manner to the Notification Center until the user explicitly chooses to keep delivering messages either prominently or quietly.
```typescript
await Airship.push.iOS.setNotificationOptions([
iOS.NotificationOption.Alert,
iOS.NotificationOption.Badge,
iOS.NotificationOption.Sound,
iOS.NotificationOption.Provisional,
]);
```
### Foreground Presentation Options
When a push is received in the foreground on iOS, how the notification is displayed to the user is controlled by foreground presentation options. By default, the SDK will not set any options so the notification will be silenced.
#### Global Foreground Presentation Options
Set default foreground presentation options for all notifications:
```typescript
await Airship.push.iOS.setForegroundPresentationOptions([
iOS.ForegroundPresentationOption.List,
iOS.ForegroundPresentationOption.Badge,
iOS.ForegroundPresentationOption.Sound,
]);
```
#### Per-Notification Foreground Presentation Options
For more control, you can override presentation options on a per-notification basis using a callback:
```typescript
Airship.push.iOS.setForegroundPresentationOptionsCallback(async (pushPayload) => {
// Check the push payload and return custom options
if (pushPayload.extras?.highPriority) {
// Show high priority notifications with all options
return [
iOS.ForegroundPresentationOption.List,
iOS.ForegroundPresentationOption.Banner,
iOS.ForegroundPresentationOption.Sound,
iOS.ForegroundPresentationOption.Badge
];
}
// Return null to use the default options
return null;
});
```
The callback receives the full push payload and should return quickly to avoid delaying notification delivery. Returning `null` uses the default options set with `setForegroundPresentationOptions()`.
### Badges
The badge on iOS presents a counter on top of the application icon. You can control this directly through Airship.
```typescript
// Set badge number
await Airship.push.iOS.setBadgeNumber(20);
// Reset badge
await Airship.push.iOS.setBadgeNumber(0);
// Enable auto-badge
await Airship.push.iOS.setAutobadgeEnabled(true);
```
> **Important:** When using auto-badge, only modify the badge value through Airship methods to ensure the value stays in sync.
### Quiet Time
Quiet time allows you to suppress notifications during specific hours. Notifications are still received but won't be displayed to the user during the quiet time window.
> **Note:** Quiet time is only supported on iOS.
## Android Notification Configuration
You can configure Android-specific notification behaviors and settings.
### Foreground Display Control
By default, push notifications received while the app is in the foreground on Android are displayed to the user. You can control this behavior on a per-notification basis using a predicate:
```typescript
Airship.push.android.setForegroundDisplayPredicate(async (pushPayload) => {
// Check the push payload and return true to display, false to suppress
if (pushPayload.extras?.silent) {
return false; // Don't display notifications marked as silent
}
// Display all other notifications
return true;
});
```
The predicate receives the full push payload and should return quickly to avoid delaying notification delivery. Return `true` to display the notification or `false` to suppress it.
## Adding Custom Notification Categories
The Airship module supports adding custom notification categories on iOS,
and custom notification action button groups on Android, by way of a specially
named plist and XML file, respectively. Once these files are added to your
iOS and Android projects, the module will load this file at runtime and
automatically register your custom categories with the Airship API.
### iOS Setup
Add a new plist file to your app's Xcode project, named `UACustomNotificationCategories.plist`,
and make sure to add the file to your application's target.
The structure of the plist file follows the format used by the core Airship SDK for its default
categories. As a starting point, see the example below. Note that key and string values
prefixed with **"ua_"** are reserved by the Airship SDK.
**UACustomNotificationCategories.plist**
```xml
yes_no_background
authenticationRequired
foreground
identifier
yes
title
Yes
title_resource
notification_button_yes
authenticationRequired
foreground
identifier
no
title
No
title_resource
notification_button_no
yes_no_foreground
foreground
identifier
yes
title
Yes
title_resource
notification_button_yes
authenticationRequired
foreground
identifier
no
title
No
title_resource
notification_button_no
```
### Android Setup
First, add a new xml file to your app's `main/res/xml` directory, named `ua_custom_notification_buttons.xml`.
As with the iOS example above, the structure of this XML file follows the format used by the
core Airship SDK for its default categories. And as before, entities and resource names
with the **"ua_"** prefix are reserved by the Airship SDK. A similar example is given below.
The icon and label resources shown are only examples; to create custom categories of your
own, you should either use built-in Android resources or supply resources defined by your app.
**ua_custom_notification_buttons.xml**
```xml
```
## Adding Custom Notification Channels (Android)
The Airship module also supports adding custom notification channels on Android,
by supplying a specially named XML file.
First, add a new xml file to your app's `main/res/xml` directory, named `ua_custom_notification_channels.xml`.
The structure of this XML file follows the format used by the
core Airship SDK for its default notification channels. A simple
example is shown below. Note that entities and resource names with the **"ua_"** prefix are
reserved by the Airship SDK. To create custom notification channels of your
own, you should either use built-in Android resources or supply resources defined by your app.
**ua_custom_notification_channels.xml**
```xml
```